Inventory Reports section.
Item Site Reports section.
To view Item Sites by Planner Code, select the "Item Sites by Planner Code" option. The following screen will appear:
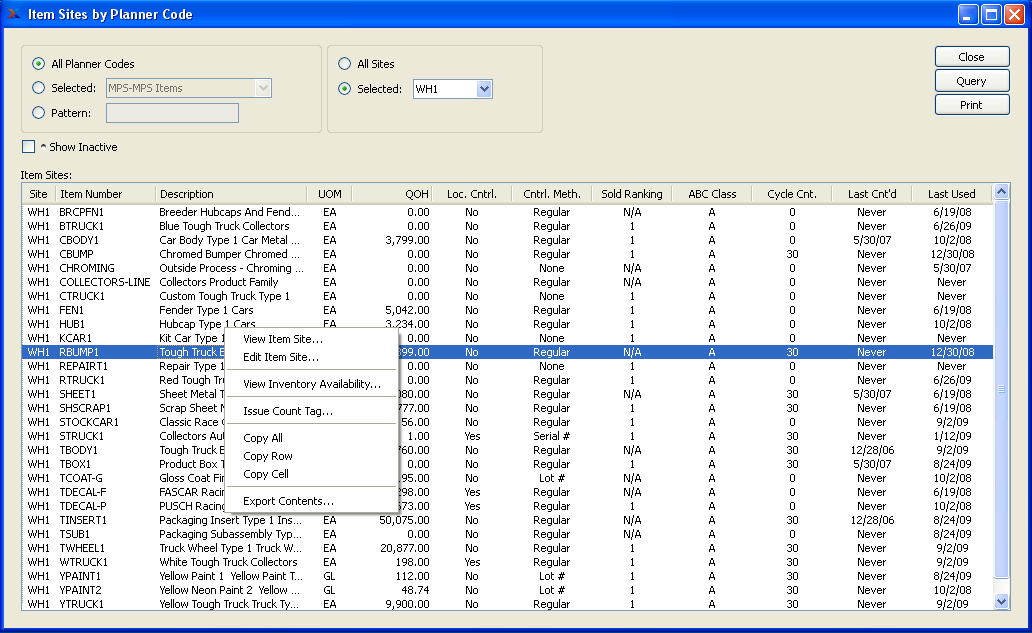
When displaying Item Sites by Planner Code, you are presented with the following options:
- All Planner Codes
Select to display Item Sites for all Planner Codes.
- Selected
Specify Planner Code whose Item Sites you want to display.
- Pattern
Enter a Planner Code pattern to select a range of Planner Codes. Refine your search using Regular Expressions.
- All Sites
Select to display Item Sites by Planner Code for all Sites.
- Selected
Specify Site whose Item Sites by Planner Code you want to display.
- Show Inactive
Select to display active as well as inactive Item Sites.
- Item Sites
Display lists Item Sites by Planner Code, using the specified parameters.
To the far right of the screen, the following buttons are available:
- CLOSE
Closes the screen, returning you to the application desktop.
- QUERY
Select to generate the display, using the specified parameters.
Runs the report associated with this screen.
To view Item Sites by Cost Category, select the "Item Sites by Cost Category" option. The following screen will appear:
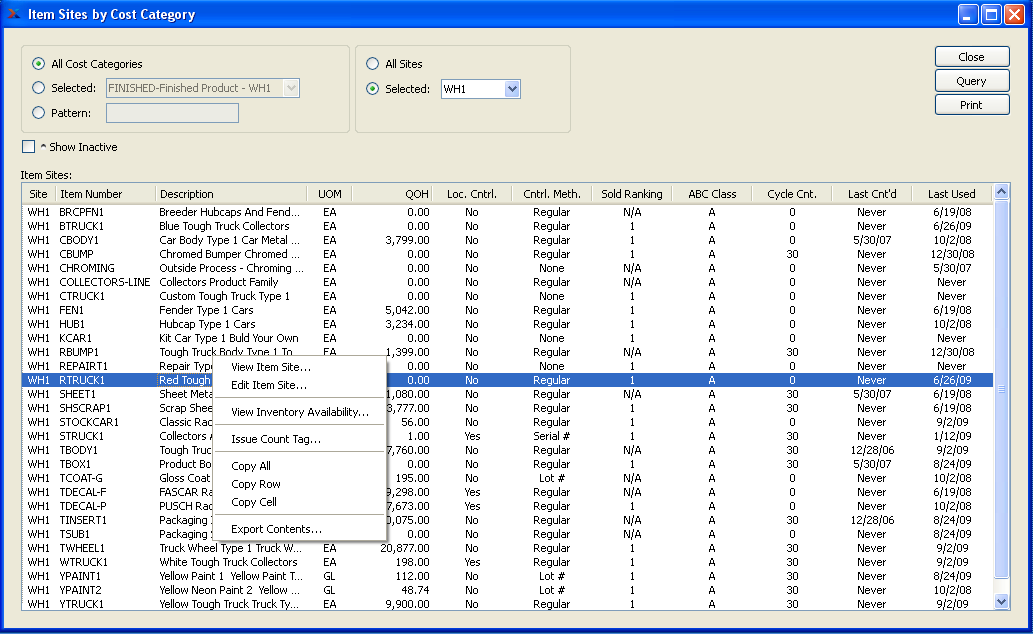
When displaying Item Sites by Cost Category, you are presented with the following options:
- All Cost Categories
Select to display Item Sites for all Cost Categories.
- Selected
Specify Cost Category whose Item Sites you want to display.
- Pattern
Enter a Cost Category pattern to select a range of Cost Categories. Refine your search using Regular Expressions.
- All Sites
Select to display Item Sites by Cost Category for all Sites.
- Selected
Specify Site whose Item Sites by Cost Category you want to display.
- Show Inactive
Select to display active as well as inactive Item Sites.
- Item Sites
Display lists Item Sites by Cost Category, using the specified parameters.
To the far right of the screen, the following buttons are available:
- CLOSE
Closes the screen, returning you to the application desktop.
- QUERY
Select to generate the display, using the specified parameters.
Runs the report associated with this screen.
To view Item Sites by Class Code, select the "Item Sites by Class Code" option. The following screen will appear:
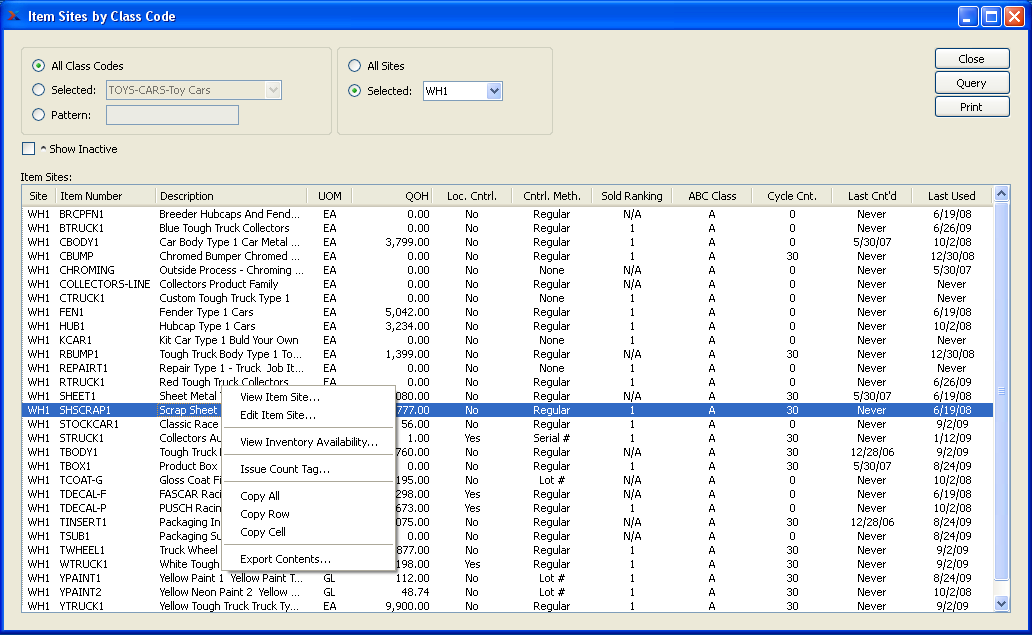
When displaying Item Sites by Class Code, you are presented with the following options:
- All Class Codes
Select to display Item Sites for all Class Codes.
- Selected
Specify Class Code whose Item Sites you want to display.
- Pattern
Enter a Class Code pattern to select a range of Class Codes. Refine your search using Regular Expressions.
- All Sites
Select to display Item Sites by Class Code for all Sites.
- Selected
Specify Site whose Item Sites by Class Code you want to display.
- Show Inactive
Select to display active as well as inactive Item Sites.
- Item Sites
Display lists Item Sites by Class Code, using the specified parameters.
To the far right of the screen, the following buttons are available:
- CLOSE
Closes the screen, returning you to the application desktop.
- QUERY
Select to generate the display, using the specified parameters.
Runs the report associated with this screen.
To view Item Sites by Item, select the "Item Sites by Item" option. The following screen will appear:
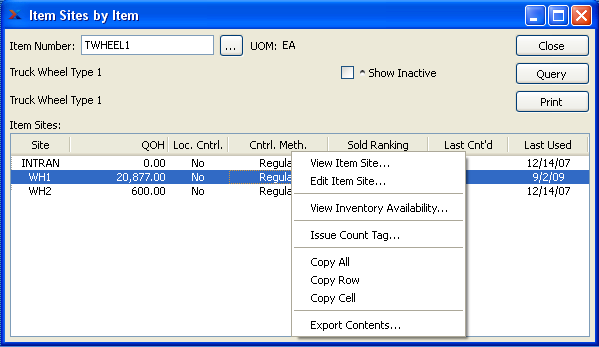
When displaying Item Sites by Item, you are presented with the following options:
- Item Number
Enter the Item Number of the Item whose Item Site(s) you want to display. The browse button located to the right of the field leads to a searchable list of make and buy items.
- UOM
Inventory Unit of Measure.
- Show Inactive
Select to display active as well as inactive Item Sites.
- Item Sites
Display lists Item Sites for the specified Item.
To the far right of the screen, the following buttons are available:
- CLOSE
Closes the screen, returning you to the application desktop.
- QUERY
Select to generate the display, using the specified parameters.
Runs the report associated with this screen.
To view valid Locations by Item, select the "Valid Locations by Item" option. The following screen will appear:
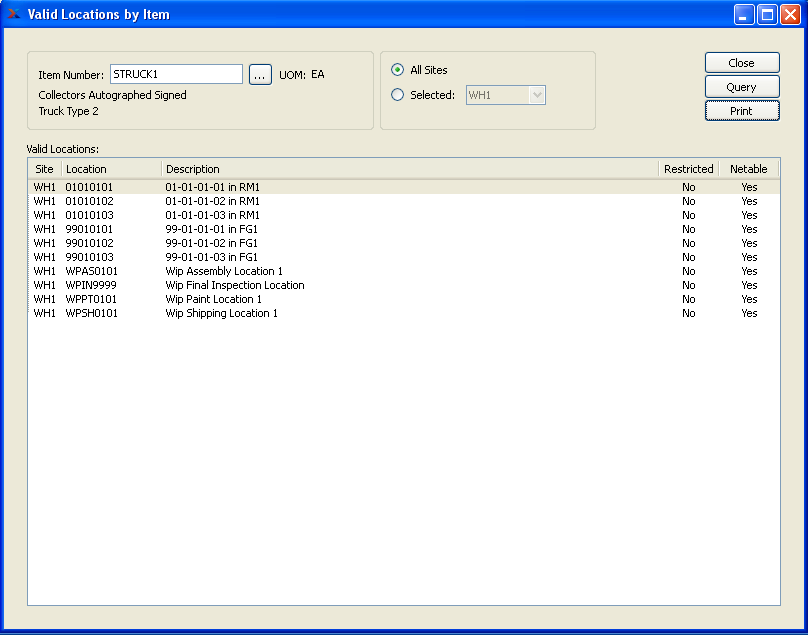
When displaying valid Locations by Item, you are presented with the following options:
- Item Number
Enter the Item Number of the Item whose valid Location(s) you want to display. The browse button located to the right of the field leads to a searchable list of make and buy items.
- UOM
Inventory Unit of Measure.
- All Sites
Select to display Locations for all Sites.
- Selected
Specify Site whose Locations you want to display.
- Valid Location
Display lists valid Locations by Item, using the specified parameters.
To the far right of the screen, the following buttons are available:
- CLOSE
Closes the screen, returning you to the application desktop.
- QUERY
Select to generate the display, using the specified parameters.
Runs the report associated with this screen.
Quantities on Hand Reports section.
To view Quantities on Hand by Class Code, select the "Quantities on Hand by Class Code" option. The following screen will appear:
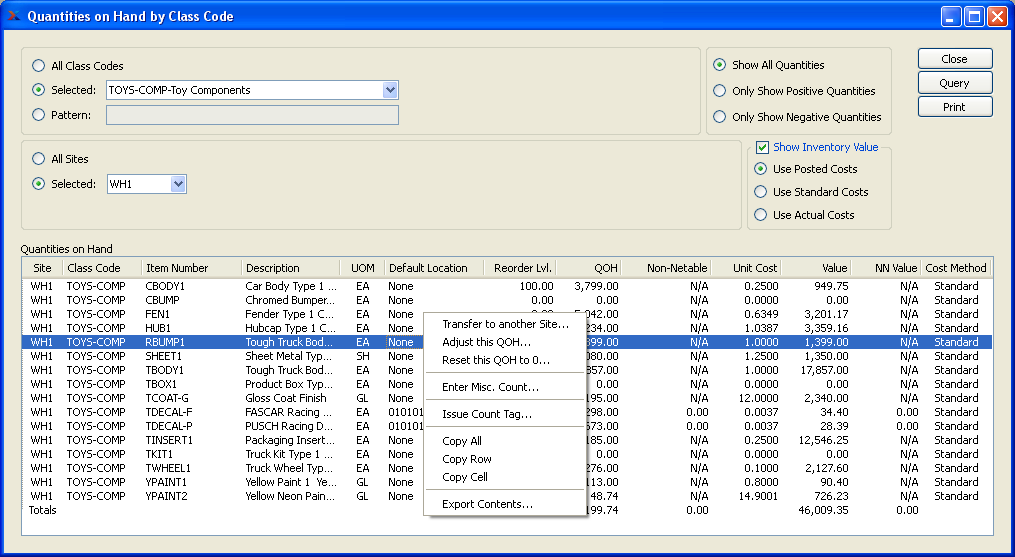
When displaying Quantities on Hand by Class Code, you are presented with the following options:
- All Class Codes
Select to display Quantities on Hand for all Class Codes.
- Selected
Specify Class Code whose Quantities on Hand you want to display.
- Pattern
Enter a Class Code pattern to select a range of Class Codes. Refine your search using Regular Expressions.
- All Sites
Select to display Quantities on Hand by Class Code for all Sites.
- Selected
Specify Site whose Quantities on Hand by Class Code you want to display.
- Show All Quantities
Select to show all Quantities on Hand in the display.
- Only Show Positive QOHs
Select to show only Inventory with a positive Quantity on Hand in the display.
- Only Show Negative QOHs
Select to show only Inventory with a negative Quantity on Hand in the display.
- Show Inventory Value
Select to include the Inventory value of Quantities on Hand by Class Code in the display. Once selected, specify one of the following costing options:
- Use Posted Costs
Select to show Inventory value based on the costing method defined for the Item Site. Item Sites may use the following costing methods, depending on the Item Type: Standard, Average, Job (i.e., Job Items), and None (i.e., Reference Items and any Items having a control method = None).
- Use Standard Costs
Select to show Inventory value based on Standard Costs.
- Use Actual Costs
Select to show Inventory value based on Actual Costs.
- Quantities on Hand
Display lists Quantities on Hand by Class Code, using the specified parameters. If the "Show Inventory Value" box is selected, the display will also show unit Cost, value, and non-netable value. Totals for each column will be calculated at the bottom of the display. If a Quantity on Hand value displays in the color orange, this means the actual or projected Quantity on Hand is at or below the Reorder Level. If the color is red, the current or projected Quantity on Hand is below 0.
To the far right of the screen, the following buttons are available:
- CLOSE
Closes the screen, returning you to the application desktop.
- QUERY
Select to generate the display, using the specified parameters.
Runs the report associated with this screen.
To view Quantities on Hand by Item Group, select the "Quantities on Hand by Item Group" option. The following screen will appear:
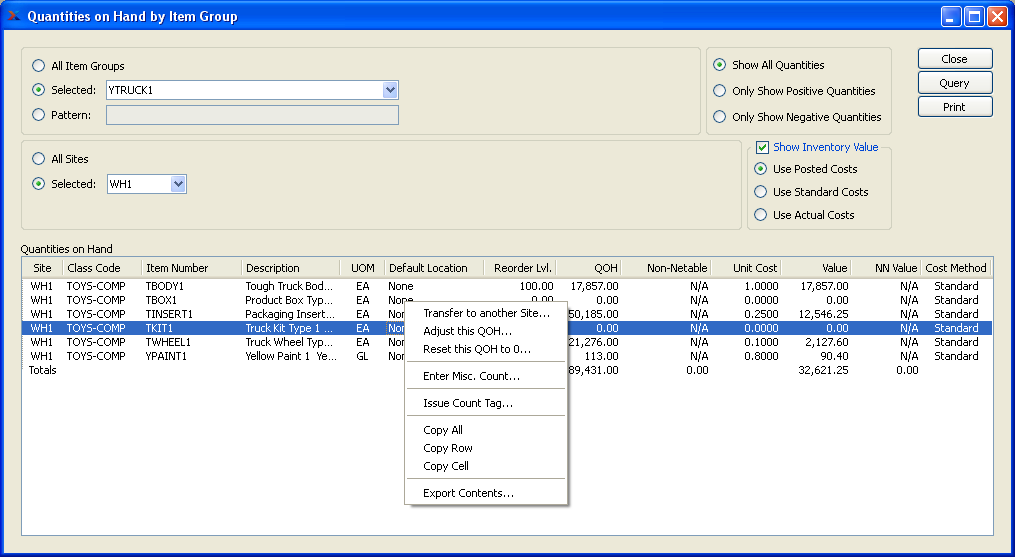
When displaying Quantities on Hand by Item Group, you are presented with the following options:
- All Item Groups
Select to display Quantities on Hand for all Item Groups.
- Selected
Specify Item Group whose Quantities on Hand you want to display.
- Pattern
Enter an Item Group pattern to select a range of Item Groups. Refine your search using Regular Expressions.
- All Sites
Select to display Quantities on Hand by Item Group for all Sites.
- Selected
Specify Site whose Quantities on Hand by Item Group you want to display.
- Show All Quantities
Select to show all Quantities on Hand in the display.
- Only Show Positive QOHs
Select to show only Inventory with a positive Quantity on Hand in the display.
- Only Show Negative QOHs
Select to show only Inventory with a negative Quantity on Hand in the display.
- Show Inventory Value
Select to include the Inventory value of Quantities on Hand by Item Group in the display. Specify whether to display Inventory value using Standard Costs or Actual Costs.
- Use Posted Costs
Select to show Inventory value based on the costing method defined for the Item Site. Item Sites may use the following costing methods, depending on the Item Type: Standard, Average, Job (i.e., Job Items), and None (i.e., Reference Items and any Items having a control method = None).
- Use Standard Costs
Select to show Inventory value based on Standard Costs.
- Use Actual Costs
Select to show Inventory value based on Actual Costs.
- Quantities on Hand
Display lists Quantities on Hand by Item Group, using the specified parameters. If the "Show Inventory Value" box is selected, the display will also show unit Cost, value, and non-netable value. Totals for each column will be calculated at the bottom of the display. If a Quantity on Hand value displays in the color orange, this means the actual or projected Quantity on Hand is at or below the Reorder Level. If the color is red, the current or projected Quantity on Hand is below 0.
To the far right of the screen, the following buttons are available:
- CLOSE
Closes the screen, returning you to the application desktop.
- QUERY
Select to generate the display, using the specified parameters.
Runs the report associated with this screen.
To view Quantities on Hand by Location, select the "Quantities on Hand by Location" option. The following screen will appear:
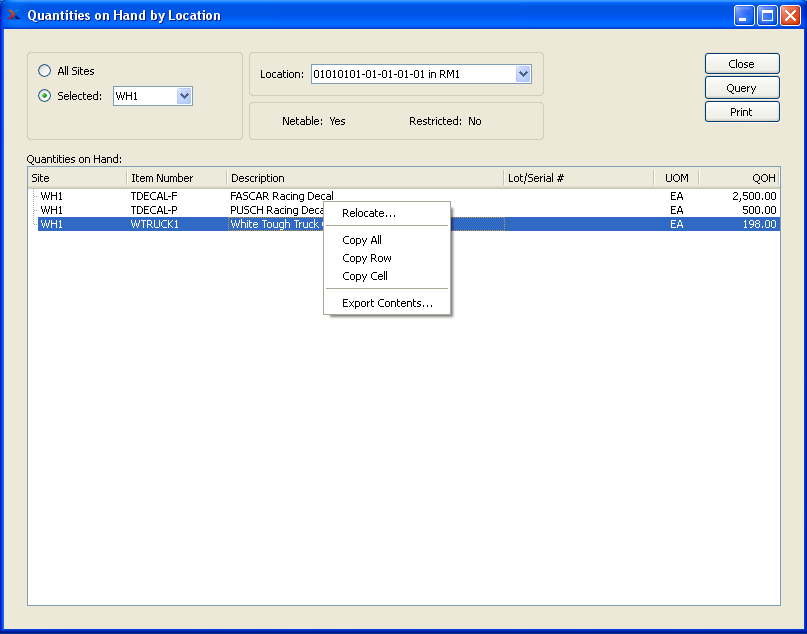
When displaying Quantities on Hand by Location, you are presented with the following options:
- All Sites
Select to display Quantities on Hand for all Sites.
- Selected
Specify Site whose Quantities on Hand by Location you want to display.
- Location
Specify Location whose Quantity on Hand you want to display. Displays Quantity on Hand for selected Location.
- Netable
Indicates whether Location is Netable or not.
- Restricted
Indicates whether Location is Restricted or not.
- Quantities on Hand
Display lists Quantities on Hand by Location, using the specified parameters. If S/O Reservations by Location has been enabled, then reservation quantities will be displayed by Sales Order.
To the far right of the screen, the following buttons are available:
- CLOSE
Closes the screen, returning you to the application desktop.
- QUERY
Select to generate the display, using the specified parameters.
Runs the report associated with this screen.
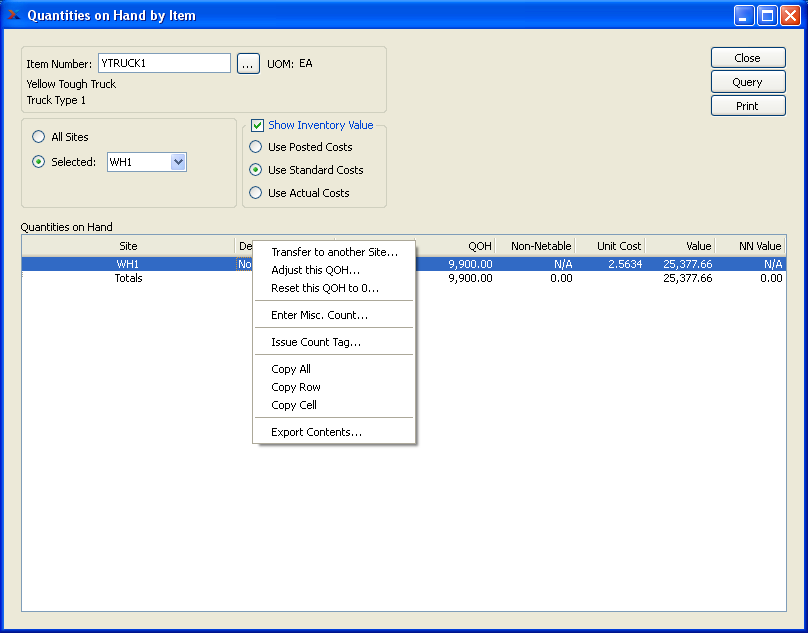
To view Quantities on Hand by Item, select the "Quantities on Hand by Item" option. The following screen will appear:
When displaying Quantities on Hand by Item, you are presented with the following options:
- Item Number
Enter the Item Number of the Item whose Quantity on Hand you want to display. The browse button located to the right of the field leads to a searchable list of make and buy items.
- UOM
Inventory Unit of Measure.
- All Sites
Select to display Quantities on Hand by Item for all Sites.
- Selected
Specify Site whose Quantities on Hand by Item you want to display.
- Show Inventory Value
Select to include the Inventory value of Quantities on Hand by Item in the display. Specify whether to display Inventory value using Standard Costs or Actual Costs.
- Use Posted Costs
Select to show Inventory value based on the costing method defined for the Item Site. Item Sites may use the following costing methods, depending on the Item Type: Standard, Average, Job (i.e., Job Items), and None (i.e., Reference Items and any Items having a control method = None).
- Use Standard Costs
Select to show Inventory value based on Standard Costs.
- Use Actual Costs
Select to show Inventory value based on Actual Costs.
- Quantities on Hand
Display lists Quantities on Hand by Item, using the specified parameters. If the "Show Inventory Value" box is selected, the display will also show unit Cost, value, and non-netable value. Totals for each column will be calculated at the bottom of the display. If a Quantity on Hand value displays in the color orange, this means the actual or projected Quantity on Hand is at or below the Reorder Level. If the color is red, the current or projected Quantity on Hand is below 0.
To the far right of the screen, the following buttons are available:
- CLOSE
Closes the screen, returning you to the application desktop.
- QUERY
Select to generate the display, using the specified parameters.
Runs the report associated with this screen.
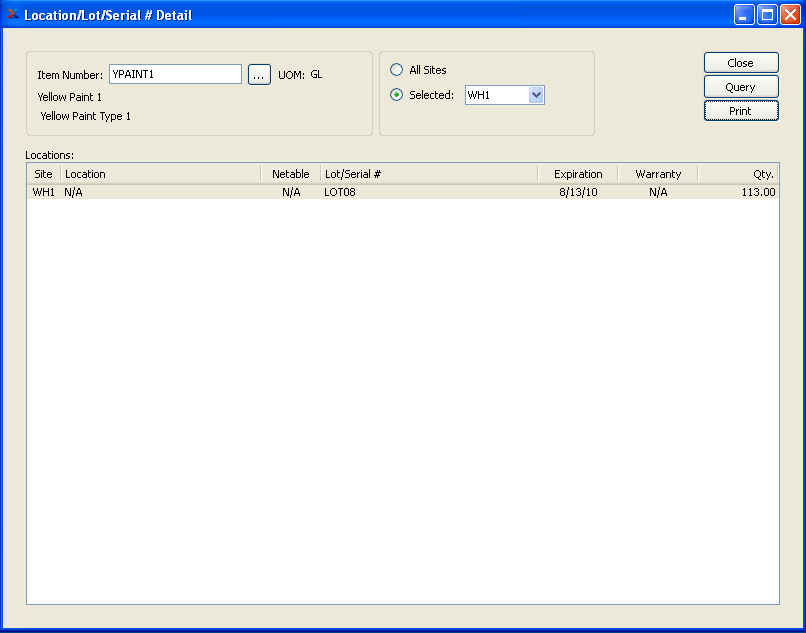
To locate detailed Location and Lot/Serial Number information, select the "Location/Lot/Serial # Detail" option. The following screen will appear:
When displaying detailed Location and Lot/Serial Number information, you are presented with the following options:
- Item Number
Enter the Item Number of the Item whose detailed Location/Lot/Serial Number information you want to display.
- UOM
Inventory Unit of Measure.
- All Sites
Select to display detailed Location/Lot/Serial Number information for all Sites.
- Selected
Specify Site whose detailed Location/Lot/Serial Number information you want to display.
- Locations
Display lists Location/Lot/Serial Number detail, using the specified parameters.
To the far right of the screen, the following buttons are available:
- CLOSE
Closes the screen, returning you to the application desktop.
- QUERY
Select to generate the display, using the specified parameters.
Runs the report associated with this screen.
Item Sites marked as perishable may have Quantity on Hand that expires on a specified date. Typically, these are Lot/Serial Number controlled Item Sites. If such Inventory has expired, you may view Inventory details using this display. To view expired Inventory, select the "Expired Inventory" option. The following screen will appear:
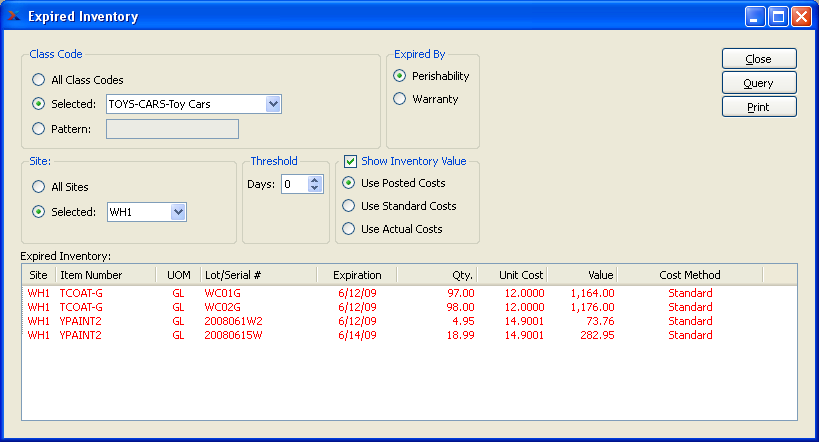
Note
Expired Inventory will be displayed in red type, to alert users to the expired status of the Item. This typographical feature appears in other Inventory displays, as well.
When displaying expired Inventory, you are presented with the following options:
- Class Code
Specify one of the following Class Code options:
- All Class Codes
Select to display expired Inventory for all Class Codes.
- Selected
Specify Class Code whose expired Inventory you want to display.
- Pattern
Enter a Class Code pattern to select a range of Class Codes. Refine your search using Regular Expressions.
- Site
Specify one of the following Site options:
- All Sites
Select to display expired Inventory for all Sites.
- Selected
Specify Site whose expired Inventory you want to display.
- Threshold
Select a number of days using the arrow buttons, or manually enter a value between 999 and -999. Specify which expired Items to include in the display using the threshold parameter. Threshold days are measured from the current day. To view all currently expired Inventory, set the parameter to "0". To display Inventory due to expire in the future, enter a positive value. Enter a negative value to display Inventory that expired prior to the current day.
- Expired By
Specify one of the following expiration types to include in the display:
- Perishability
Select if you want to include Inventory which expired because its perishable date passed.
- Warranty
Select if you want to include Inventory which expired because its warranty date passed.
- Show Inventory Value
Select to include the Inventory value of expired Inventory in the display. Then specify one of the following costing options:
- Use Posted Costs
Select to show Inventory value based on the costing method defined for the Item Site. Item Sites may use the following costing methods, depending on the Item Type: Standard, Average, Job (i.e., Job Items), and None (i.e., Reference Items and any Items having a control method = None).
- Use Standard Costs
Select to show Inventory value based on Standard Costs.
- Use Actual Costs
Select to show Inventory value based on Actual Costs.
- Expired Inventory
Display lists expired Inventory, using the specified parameters. If the "Show Inventory Value" box is selected, the display will also show unit Cost and value.
To the far right of the screen, the following buttons are available:
- CLOSE
Closes the screen, returning you to the application desktop.
- QUERY
Select to generate the display, using the specified parameters.
Runs the report associated with this screen.
Slow moving Inventory is Inventory that has not been used since the specified cutoff date. Inventory is considered to have been used whenever it is issued, received, returned, counted, etc. To view slow moving Inventory, select the "Slow Moving Inventory" option. The following screen will appear:
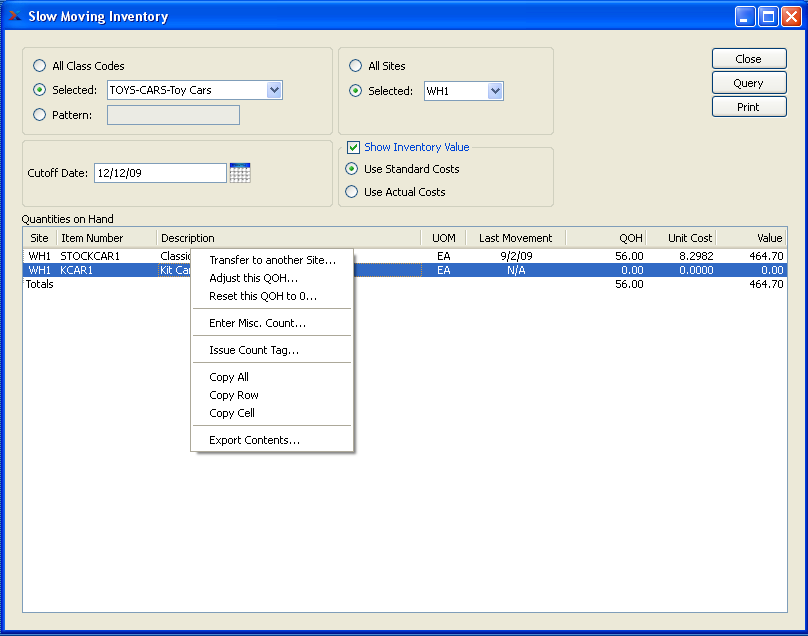
Tip
The Cutoff date is a required field. If you don"t enter a Cutoff date, no data will be displayed.
When displaying slow moving Inventory, you are presented with the following options:
- All Class Codes
Select to display slow moving Inventory for all Class Codes.
- Selected
Specify Class Code whose slow moving Inventory you want to display.
- Pattern
Enter a Class Code pattern to select a range of Class Codes. Refine your search using Regular Expressions.
- Cutoff Date
Any Inventory that has not been moved since this date will be displayed. This is a required field.
- All Sites
Select to display slow moving Inventory for all Sites.
- Selected
Specify Site whose slow moving Inventory you want to display.
- Show Inventory Value
Select to include the Inventory value of slow moving Inventory in the display. Specify whether to display Inventory value using Standard Costs or Actual Costs.
- Use Standard Costs
Select to show Inventory value based on Standard Costs.
- Use Actual Costs
Select to show Inventory value based on Actual Costs.
- Quantities on Hand
Display lists Quantities on Hand for slow moving Inventory, using the specified parameters.
To the far right of the screen, the following buttons are available:
- CLOSE
Closes the screen, returning you to the application desktop.
- QUERY
Select to generate the display, using the specified parameters. Cutoff date must be entered for calculation to proceed. Results will be displayed in the "Quantities on Hand" list.
Runs the report associated with this screen.
Inventory Availability Reports section.
To view Inventory Availability by Planner Code, select the "Inventory Availability by Planner Code" option. The following screen will appear:
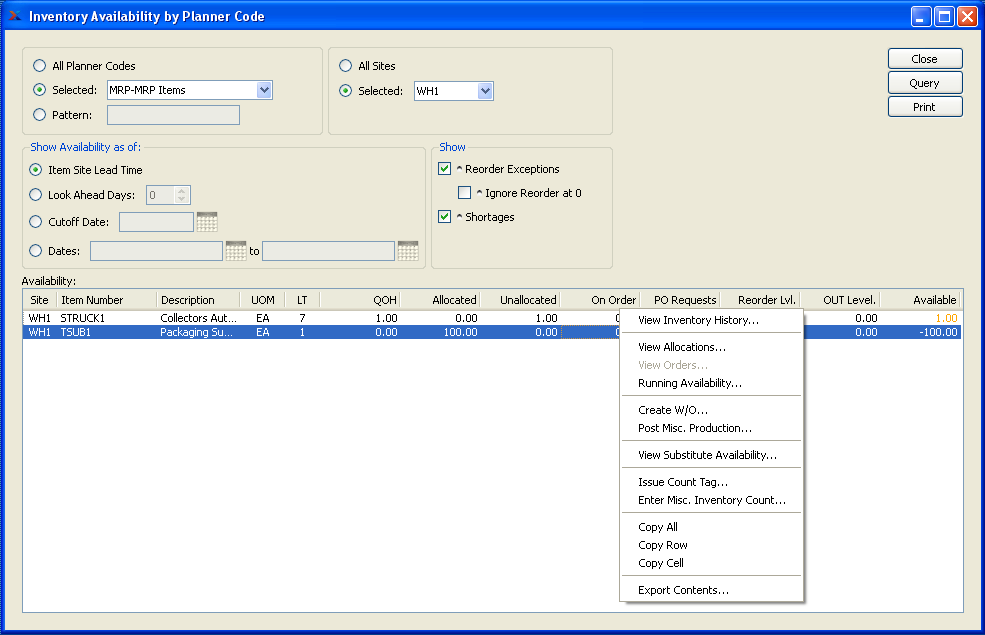
When displaying Inventory Availability by Planner Code, you are presented with the following options:
- All Planner Codes
Select to display Inventory Availability for all Planner Codes.
- Selected
Specify Planner Code whose Inventory Availability you want to display.
- Pattern
Enter a Planner Code pattern to select a range of Planner Codes. Refine your search using Regular Expressions.
- Show Availability as of
Show Availability using one of the following criteria:
- Item Site Lead Time
Select to show projected Availability based on the Lead Time specified in the Item Site master.
- Look Ahead Days
Select a number using the arrow buttons, or manually enter a value up to a maximum of 1000. Future Availability for the specified Item will be displayed based on the value entered here.
- Cutoff Date
Display will show projected Inventory Availability as of date entered up to a maximum of 1000 days.
- Dates
Display will show projected Inventory Availability for the date range entered.
- All Sites
Select to display Inventory Availability for all Sites.
- Selected
Specify Site whose Inventory Availability you want to display.
- Show Reorder Exceptions
Select to show Reorder Exceptions in display.
- Ignore Reorder at 0
Select to ignore reorder at 0 in display.
- Show Shortages
Select to only show Inventory shortages in display. Shortages are always shown in the report, if they exist. However, using this option simply separates shortages out so you can see only them. A shortage exists if Availability is less than zero, as in
QOH - Allocated + Ordered < 0
- Availability
Display lists Inventory Availability by Planner Code, using the specified parameters. If Planned Availability displays in the color orange, this means the actual or projected Quantity on Hand is at or below the Reorder Level. If the color is red, the current or projected Quantity on Hand is below 0.
Note
When quantity appears in the "On Order" column, this refers to quantity that is on order through either a Work Order or Purchase Order. In the case of Purchase Orders, the quantity will always be represented in the Inventory Unit of Measure (UOM)—regardless of the Vendor UOM used on the Purchase Order.
To the far right of the screen, the following buttons are available:
- CLOSE
Closes the screen, returning you to the application desktop.
- QUERY
Select to generate the display, using the specified parameters.
Runs the report associated with this screen.
To view Inventory Availability by Class Code, select the "Inventory Availability by Class Code" option. The following screen will appear:
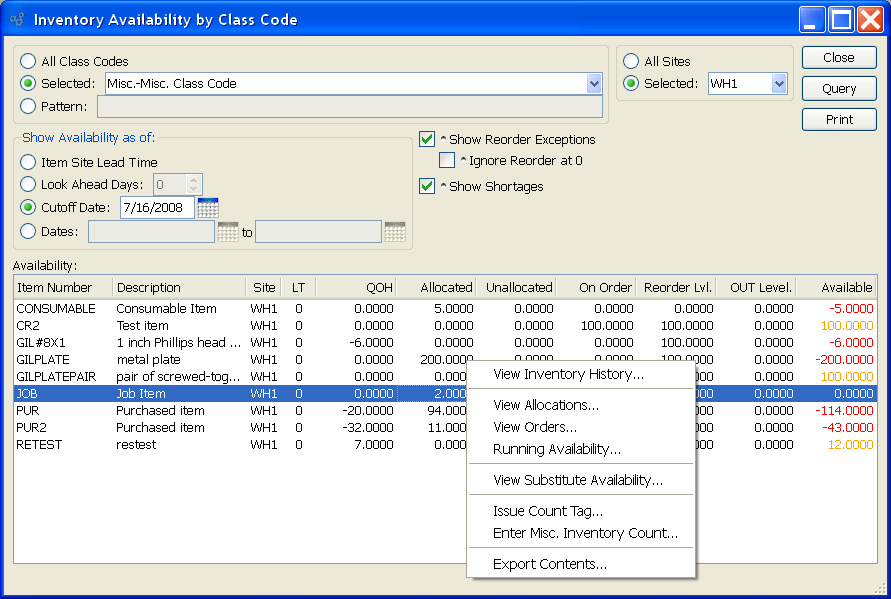
When displaying Inventory Availability by Class Code, you are presented with the following options:
- All Class Codes
Select to display Inventory Availability for all Class Codes.
- Selected
Specify Class Code whose Inventory Availability you want to display.
- Pattern
Enter a Class Code pattern to select a range of Class Codes. Refine your search using Regular Expressions.
- Show Availability as of
Show Availability using one of the following criteria:
- Item Site Lead Time
Select to show projected Availability based on the Lead Time specified in the Item Site master.
- Look Ahead Days
Select a number using the arrow buttons, or manually enter a value up to a maximum of 1000. Future Availability for the specified Item will be displayed based on the value entered here.
- Cutoff Date
Display will show projected Inventory Availability as of date entered up to a maximum of 1000 days.
- Dates
Display will show projected Inventory Availability for the date range entered.
- Show Reorder Exceptions
Select to show Reorder Exceptions in display.
- Ignore Reorder at 0
Select to ignore reorder at 0 in display.
- Show Shortages
Select to only show Inventory shortages in display. Shortages are always shown in the report, if they exist. However, using this option simply separates shortages out so you can see only them. A shortage exists if Availability is less than zero, as in
QOH - Allocated + Ordered < 0
- All Sites
Select to display Inventory Availability for all Sites.
- Selected
Specify Site whose Inventory Availability you want to display.
- Availability
Display lists Inventory Availability by Code, using the specified parameters. If Planned Availability displays in the color orange, this means the actual or projected Quantity on Hand is at or below the Reorder Level. If the color is red, the current or projected Quantity on Hand is below 0.
Note
When quantity appears in the "On Order" column, this refers to quantity that is on order through either a Work Order or Purchase Order. In the case of Purchase Orders, the quantity will always be represented in the Inventory Unit of Measure (UOM)—regardless of the Vendor UOM used on the Purchase Order.
To the far right of the screen, the following buttons are available:
- CLOSE
Closes the screen, returning you to the application desktop.
- QUERY
Select to generate the display, using the specified parameters.
Runs the report associated with this screen.
To view Inventory Availability by source Vendor, select the "Inventory Availability by Source Vendor" option. The following screen will appear:
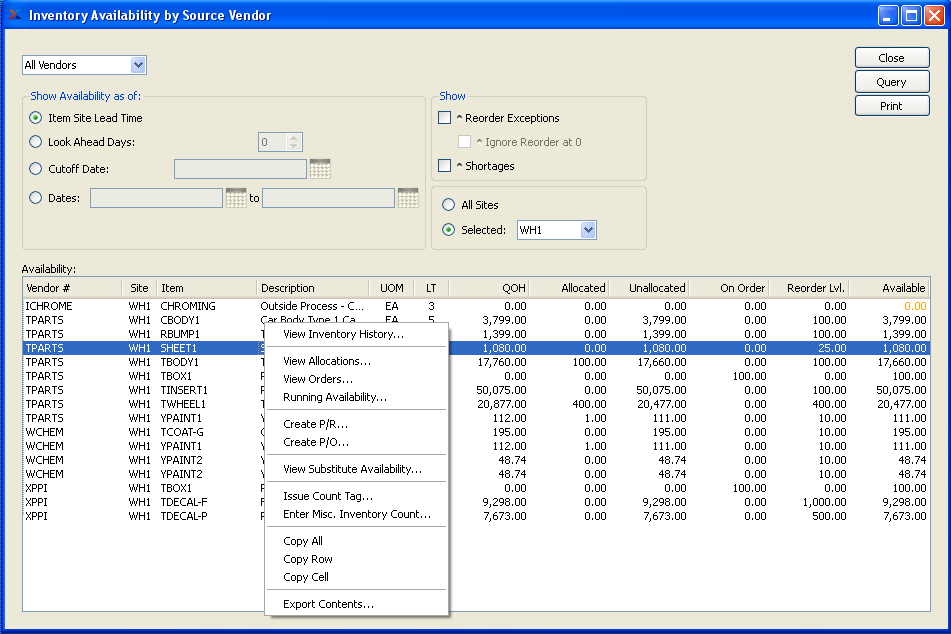
When displaying Inventory Availability by source Vendor, you are presented with the following options:
- All Vendors
Select to display Inventory Availability for all Vendors.
- Selected Vendor
Enter the Vendor Number of the Vendor whose Inventory Availability you want to display.
- Selected Vendor Type
Specify Vendor Type whose Inventory Availability you want to display.
- Vendor Type Pattern
Enter a Vendor Type pattern to select a range of Vendor Types. Refine your search using Regular Expressions.
- Show Availability as of
Show Availability using one of the following criteria:
- Item Site Lead Time
Select to show projected Availability based on the Lead Time specified in the Item Site master.
- Look Ahead Days
Select a number using the arrow buttons, or manually enter a value up to a maximum of 1000. Future Availability for the specified Item will be displayed based on the value entered here.
- Cutoff Date
Display will show projected Inventory Availability as of date entered up to a maximum of 1000 days.
- Dates
Display will show projected Inventory Availability for the date range entered.
- Show Reorder Exceptions
Select to show Reorder Exceptions in display.
- Ignore Reorder at 0
Select to ignore reorder at 0 in display.
- Show Shortages
Select to only show Inventory shortages in display. Shortages are always shown in the report, if they exist. However, using this option simply separates shortages out so you can see only them. A shortage exists if Availability is less than zero, as in
QOH - Allocated + Ordered < 0
- All Sites
Select to display Inventory Availability by source Vendor for all Sites.
- Selected
Specify Site whose Inventory Availability by source Vendor you want to display.
- Availability
Display lists Inventory Availability by source Vendor, using the specified parameters.
If Planned Availability displays in the color orange, this means the actual or projected Quantity on Hand is at or below the Reorder Level. If the color is red, the current or projected Quantity on Hand is below 0.
Note
When quantity appears in the "On Order" column, this refers to quantity that is on order through either a Work Order or Purchase Order. In the case of Purchase Orders, the quantity will always be represented in the Inventory Unit of Measure (UOM)—regardless of the Vendor UOM used on the Purchase Order.
To the far right of the screen, the following buttons are available:
- CLOSE
Closes the screen, returning you to the application desktop.
- QUERY
Select to generate the display, using the specified parameters.
Runs the report associated with this screen.
To view Inventory Availability by Item Group, select the "Inventory Availability by Item Group" option. The following screen will appear:
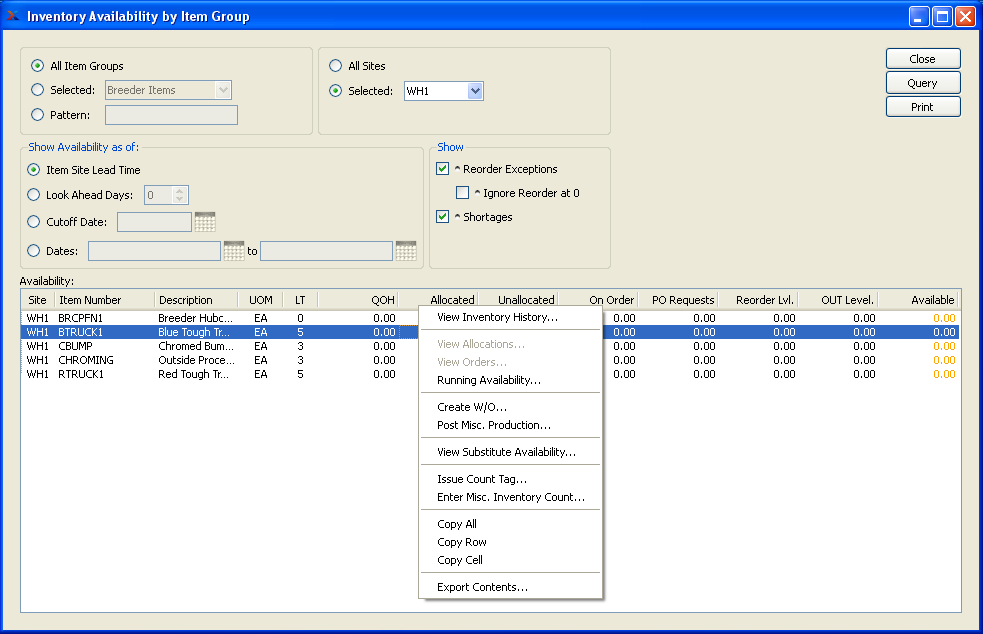
When displaying Inventory Availability by Item Group, you are presented with the following options:
- All Item Groups
Select to display Inventory Availability for all Item Groups.
- Selected
Specify Item Group whose Inventory Availability you want to display.
- Item Group Pattern
Enter an Item Group pattern to select a range of Item Groups. Refine your search using Regular Expressions.
- Show Availability as of
Show Availability using one of the following criteria:
- Item Site Lead Time
Select to show projected Availability based on the Lead Time specified in the Item Site master.
- Look Ahead Days
Select a number using the arrow buttons, or manually enter a value up to a maximum of 1000. Future Availability for the specified Item will be displayed based on the value entered here.
- Cutoff Date
Display will show projected Inventory Availability as of date entered up to a maximum of 1000 days.
- Dates
Display will show projected Inventory Availability for the date range entered.
- All Sites
Select to display Inventory Availability for all Sites.
- Selected
Specify Site whose Inventory Availability you want to display.
- Show Reorder Exceptions
Select to show Reorder Exceptions in display.
- Ignore Reorder at 0
Select to ignore reorder at 0 in display.
- Show Shortages
Select to only show Inventory shortages in display. Shortages are always shown in the report, if they exist. However, using this option simply separates shortages out so you can see only them. A shortage exists if Availability is less than zero, as in
QOH - Allocated + Ordered < 0
- Availability
Display lists Inventory Availability by Item Group, using the specified parameters. If Planned Availability displays in the color orange, this means the actual or projected Quantity on Hand is at or below the Reorder Level. If the color is red, the current or projected Quantity on Hand is below 0.
Note
When quantity appears in the "On Order" column, this refers to quantity that is on order through either a Work Order or Purchase Order. In the case of Purchase Orders, the quantity will always be represented in the Inventory Unit of Measure (UOM)—regardless of the Vendor UOM used on the Purchase Order.
To the far right of the screen, the following buttons are available:
- CLOSE
Closes the screen, returning you to the application desktop.
- QUERY
Select to generate the display, using the specified parameters.
Runs the report associated with this screen.
To view Inventory Availability by Item, select the "Inventory Availability by Item" option. The following screen will appear:
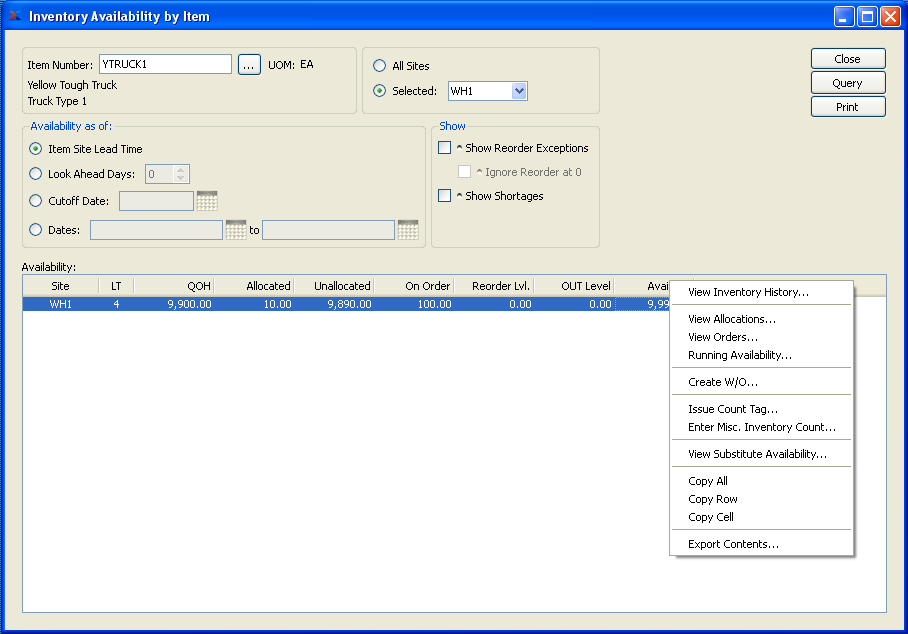
When displaying Inventory Availability by Item, you are presented with the following options:
- Item Number
Enter the Item Number of the Item whose Inventory Availability you want to display. The browse button located to the right of the field leads to a searchable list of make and buy items.
- UOM
Inventory Unit of Measure.
- Show Availability as of
Show Availability using one of the following criteria:
- Item Site Lead Time
Select to show projected Availability based on the Lead Time specified in the Item Site master.
- Look Ahead Days
Select a number using the arrow buttons, or manually enter a value up to a maximum of 1000. Future Availability for the specified Item will be displayed based on the value entered here.
- Cutoff Date
Display will show projected Inventory Availability as of date entered up to a maximum of 1000 days.
- Dates
Display will show projected Inventory Availability for the date range entered.
- All Sites
Select to display Inventory Availability for all Sites.
- Selected
Specify Site whose Inventory Availability you want to display.
- Show Reorder Exceptions
Select to show Reorder Exceptions in display. Reorder Exceptions are an indication that an Item Site's projected Availability will drop below the Reorder Level for the Item Site.
- Ignore Reorder at 0
Select to ignore Reorder Exceptions in cases where both the Item Site Reorder Level and Planned Availability are equal to zero ("0"). If selected, Item Sites matching these criteria will not be displayed.
- Show Shortages
Select to only show Inventory shortages in display. Shortages are always shown in the report, if they exist. However, using this option simply separates shortages out so you can see only them. A shortage exists if Availability is less than zero, as in
QOH - Allocated + Ordered < 0
- Availability
Display lists Inventory Availability by Item, using the specified parameters. If Planned Availability displays in the color orange, this means the actual or projected Quantity on Hand is at or below the Reorder Level. If the color is red, the current or projected Quantity on Hand is below 0.
Note
When quantity appears in the "On Order" column, this refers to quantity that is on order through either a Work Order or Purchase Order. In the case of Purchase Orders, the quantity will always be represented in the Inventory Unit of Measure (UOM)—regardless of the Vendor UOM used on the Purchase Order.
To the far right of the screen, the following buttons are available:
- CLOSE
Closes the screen, returning you to the application desktop.
- QUERY
Select to generate the display, using the specified parameters.
Runs the report associated with this screen.
To view substitute Availability by Root Item, select the "Substitute Availability by Root Item" option. The following screen will appear:
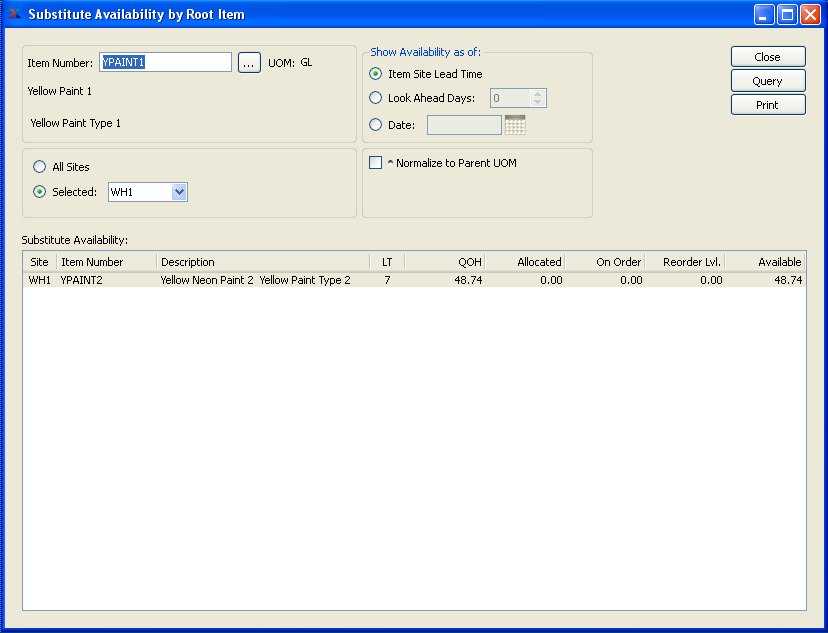
When displaying substitute Availability by Root Item, you are presented with the following options:
- Item Number
Enter the Item Number of the Item whose substitute Availability you want to display. The browse button located to the right of the field leads to a searchable list of make and buy items.
- UOM
Inventory Unit of Measure.
- All Sites
Select to display substitute Availability for all Sites.
- Selected
Specify Site whose substitute Availability you want to display.
- Show Availability as of
Show Availability using one of the following criteria:
- Item Site Lead Time
Select to show projected Availability based on the Lead Time specified in the Item Site master.
- Look Ahead Days
Select a number using the arrow buttons, or manually enter a value up to a maximum of 1000. Future Availability for the specified Item will be displayed based on the value entered here.
- Date
Display will show projected Inventory Availability as of date entered up to a maximum of 1000 days.
- Normalize to Parent UOM
Select to adjust the Quantity on Hand of substitute Items so these quantities meet requirements for substitution. The adjusted Quantity on Hand is determined by the Item substitution ratio.
- Substitute Availability
Display lists substitute Availability by Item, using the specified parameters. If "Normalize to Parent UOM" option is selected, the substitute Item's Quantity on Hand is adjusted to reflect the substitution ratio. If Planned Availability displays in the color orange, this means the actual or projected Quantity on Hand is at or below the Reorder Level. If the color is red, the current or projected Quantity on Hand is below 0.
Note
When quantity appears in the "On Order" column, this refers to quantity that is on order through either a Work Order or Purchase Order. In the case of Purchase Orders, the quantity will always be represented in the Inventory Unit of Measure (UOM)—regardless of the Vendor UOM used on the Purchase Order.
To the far right of the screen, the following buttons are available:
- CLOSE
Closes the screen, returning you to the application desktop.
- QUERY
Select to generate the display, using the specified parameters.
Runs the report associated with this screen.
Inventory Buffer Status Reports section.
The Inventory buffer status displays provide information on your current stock buffer levels. Stock buffers apply to make-to-stock Items. Keep in mind that buffer status information will only be displayed on days when the Constraint Management system is run. If you find your displays show no information, this probably means Constraint Management has not been run.
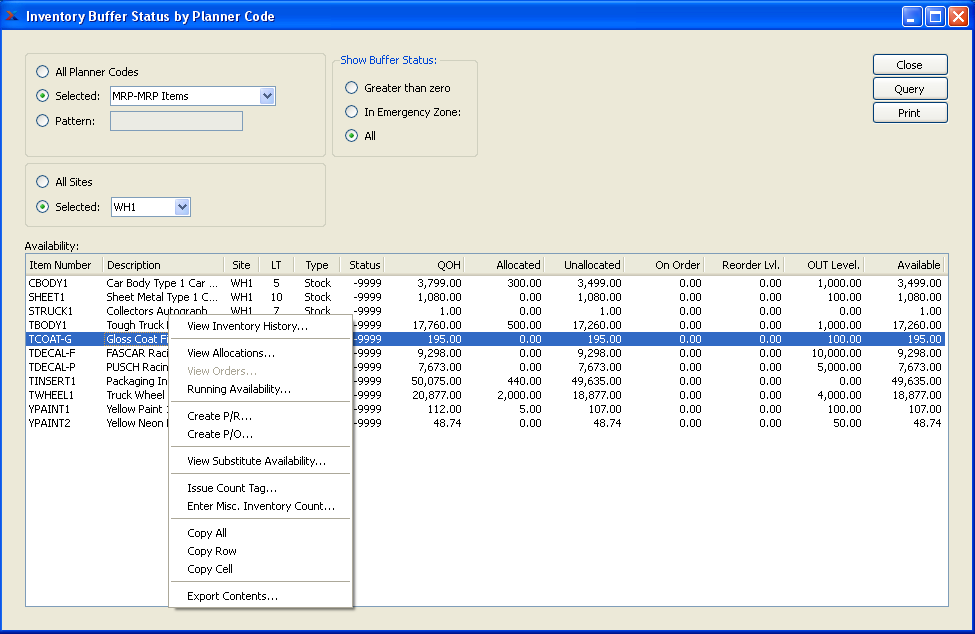
To view Inventory buffer status by Planner Code, select the "Inventory Buffer Status by Planner Code" option. The following screen will appear:
Note
When the buffer status for an Item hits 66 or higher, the status number will become red. By highlighting Items which are "red hot," the system is informing you which Items should be acted on immediately. The best remedy for red hot Item Sites is to expedite any associated Work Orders or Purchase Orders.
When displaying Inventory buffer statuses by Planner Code, you are presented with the following options:
- All Planner Codes
Select to display Inventory buffer statuses for all Planner Codes.
- Selected
Specify Planner Code whose Inventory buffer statuses you want to display.
- Pattern
Enter a Class Code pattern to select a range of Planner Codes. Refine your search using Regular Expressions.
- All Sites
Select to display Inventory buffer statuses for all Sites.
- Selected
Specify Site whose Inventory buffer statuses you want to display.
- Show Buffer Status
Show buffer statuses using one of the following criteria:
- Greater than zero
Select to display only those Item Sites having a buffer status greater than zero.
- In Emergency Zone
Select to display only those Item Sites whose buffer status is in the "emergency zone." The emergency zone is defined as a buffer status of 66 or greater.
- All
Select to display buffer statuses for all Item Sites.
Note
By default, the display will sort Item Sites by buffer status in descending order. In other words, Item Sites with the highest buffer status will appear at the top of the list; Item Sites with the lowest buffer status will appear at the bottom.
- Availability
Display lists Inventory buffer status by Planner Code, using the specified parameters. If Planned Availability displays in the color orange, this means the actual or projected Quantity on Hand is at or below the Reorder Level. If the color is red, the current or projected Quantity on Hand is below 0.
Note
When quantity appears in the "On Order" column, this refers to quantity that is on order through either a Work Order or Purchase Order. In the case of Purchase Orders, the quantity will always be represented in the Inventory Unit of Measure (UOM)—regardless of the Vendor UOM used on the Purchase Order.
To the far right of the screen, the following buttons are available:
- CLOSE
Closes the screen, returning you to the application desktop.
- QUERY
Select to generate the display, using the specified parameters.
Runs the report associated with this screen.
The Inventory buffer status displays provide information on your current stock buffer levels. Stock buffers apply to make-to-stock Items. Keep in mind that buffer status information will only be displayed on days when the Constraint Management system is run. If you find your displays show no information, this probably means Constraint Management has not been run.
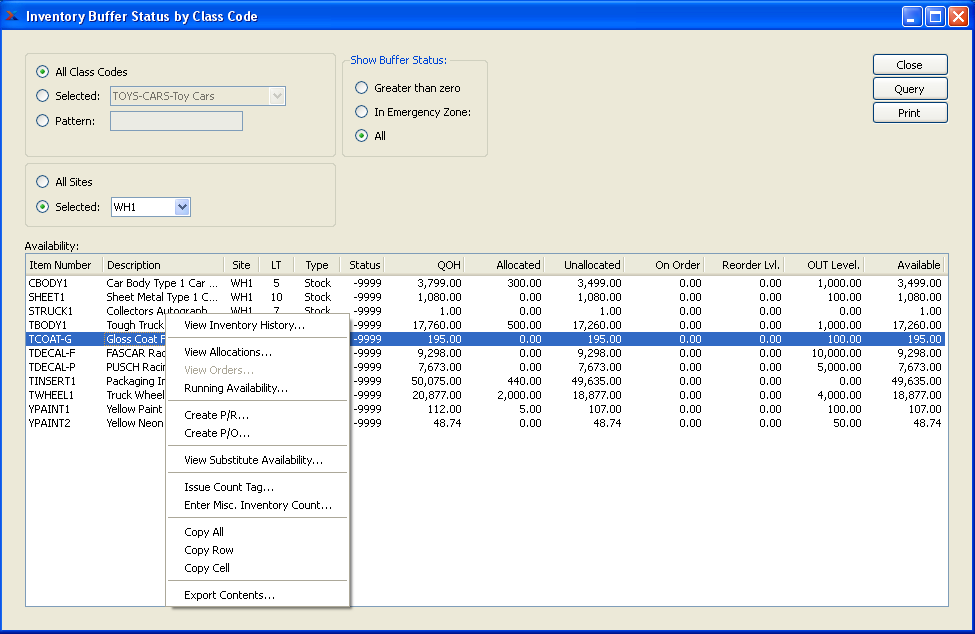
To view Inventory buffer status by Class Code, select the "Inventory Buffer Status by Class Code" option. The following screen will appear:
Note
When the buffer status for an Item hits 66 or higher, the status number will become red. By highlighting Items which are "red hot," the system is informing you which Items should be acted on immediately. The best remedy for red hot Item Sites is to expedite any associated Work Orders or Purchase Orders.
When displaying Inventory buffer statuses by Class Code, you are presented with the following options:
- All Class Codes
Select to display Inventory buffer statuses for all Class Codes.
- Selected
Specify Class Code whose Inventory buffer statuses you want to display.
- Pattern
Enter a Class Code pattern to select a range of Class Codes. Refine your search using Regular Expressions.
- All Sites
Select to display Inventory buffer statuses for all Sites.
- Selected
Specify Site whose Inventory buffer statuses you want to display.
- Show Buffer Status
Show buffer statuses using one of the following criteria:
- Greater than zero
Select to display only those Item Sites having a buffer status greater than zero.
- In Emergency Zone
Select to display only those Item Sites whose buffer status is in the "emergency zone." The emergency zone is defined as a buffer status of 66 or greater.
- All
Select to display buffer statuses for all Item Sites.
Note
By default, the display will sort Item Sites by buffer status in descending order. In other words, Item Sites with the highest buffer status will appear at the top of the list; Item Sites with the lowest buffer status will appear at the bottom.
- Availability
Display lists Inventory buffer statuses by Class Code, using the specified parameters. If Planned Availability displays in the color orange, this means the actual or projected Quantity on Hand is at or below the Reorder Level. If the color is red, the current or projected Quantity on Hand is below 0.
Note
When quantity appears in the "On Order" column, this refers to quantity that is on order through either a Work Order or Purchase Order. In the case of Purchase Orders, the quantity will always be represented in the Inventory Unit of Measure (UOM)—regardless of the Vendor UOM used on the Purchase Order.
To the far right of the screen, the following buttons are available:
- CLOSE
Closes the screen, returning you to the application desktop.
- QUERY
Select to generate the display, using the specified parameters.
Runs the report associated with this screen.
The Inventory buffer status displays provide information on your current stock buffer levels. Stock buffers apply to make-to-stock Items. Keep in mind that buffer status information will only be displayed on days when the Constraint Management system is run. If you find your displays show no information, this probably means Constraint Management has not been run.
To view Inventory buffer status by Item Group, select the "Inventory Buffer Status by Item Group" option. The following screen will appear:
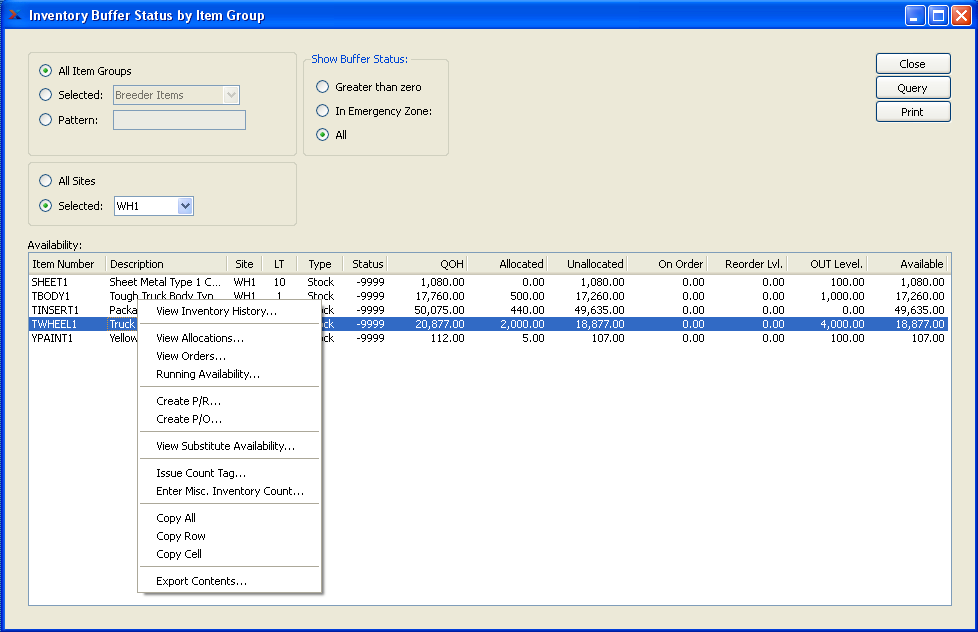
Note
When the buffer status for an Item hits 66 or higher, the status number will become red. By highlighting Items which are "red hot," the system is informing you which Items should be acted on immediately. The best remedy for red hot Item Sites is to expedite any associated Work Orders or Purchase Orders.
When displaying Inventory buffer statuses by Item Group, you are presented with the following options:
- All Item Groups
Select to display Inventory buffer statuses for all Item Groups.
- Selected
Specify Item Group whose Inventory buffer statuses you want to display.
- Item Group Pattern
Enter an Item Group pattern to select a range of Item Groups. Refine your search using Regular Expressions.
- All Sites
Select to display Inventory buffer statuses for all Sites.
- Selected
Specify Site whose Inventory buffer statuses you want to display.
- Show Buffer Status
Show buffer statuses using one of the following criteria:
- Greater than zero
Select to display only those Item Sites having a buffer status greater than zero.
- In Emergency Zone
Select to display only those Item Sites whose buffer status is in the "emergency zone." The emergency zone is defined as a buffer status of 66 or greater.
- All
Select to display buffer statuses for all Item Sites.
Note
By default, the display will sort Item Sites by buffer status in descending order. In other words, Item Sites with the highest buffer status will appear at the top of the list; Item Sites with the lowest buffer status will appear at the bottom.
- Availability
Display lists Inventory buffer statuses by Item Group, using the specified parameters. If Planned Availability displays in the color orange, this means the actual or projected Quantity on Hand is at or below the Reorder Level. If the color is red, the current or projected Quantity on Hand is below 0.
Note
When quantity appears in the "On Order" column, this refers to quantity that is on order through either a Work Order or Purchase Order. In the case of Purchase Orders, the quantity will always be represented in the Inventory Unit of Measure (UOM)—regardless of the Vendor UOM used on the Purchase Order.
To the far right of the screen, the following buttons are available:
- CLOSE
Closes the screen, returning you to the application desktop.
- QUERY
Select to generate the display, using the specified parameters.
Runs the report associated with this screen.
Inventory history Reports section.
To view Inventory history by Class Code, select the "Inventory History by Class Code" option. The following screen will appear:
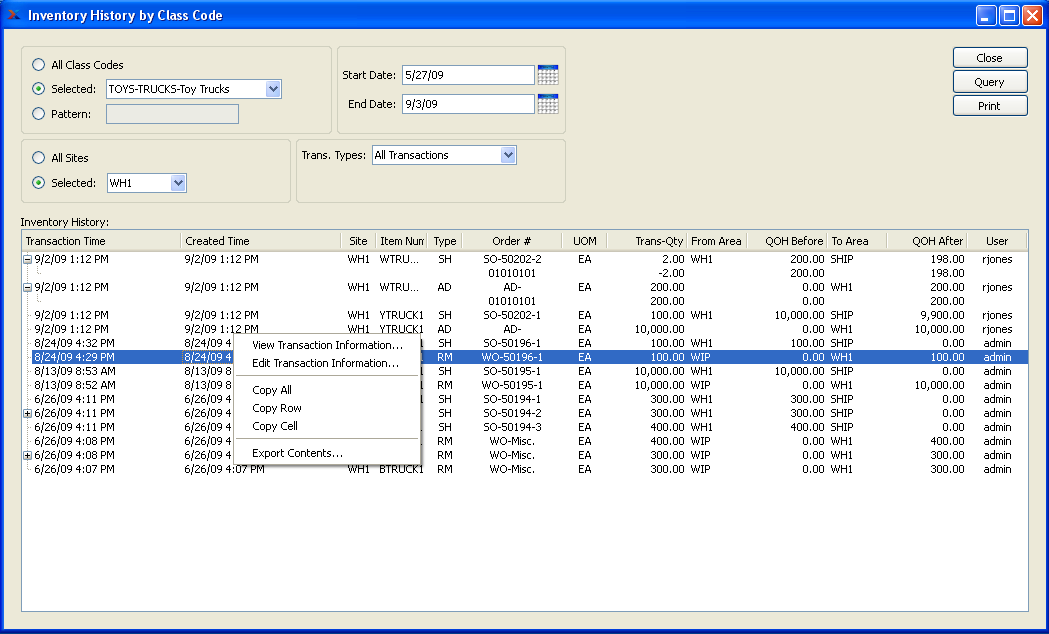
Tip
If a line displays in orange, this means the Item Site in question is frozen. Accurate Quantity on Hand information will not be shown until the Item Site is thawed.
When displaying Inventory history by Class Code, you are presented with the following options:
- All Class Codes
Select to display Inventory history for all Class Codes.
- Selected
Specify Class Code whose Inventory history you want to display.
- Pattern
Enter a Class Code pattern to select a range of Class Codes. Refine your search using Regular Expressions.
- All Sites
Select to display Inventory history by Class Code for all Sites.
- Selected
Specify Site whose Inventory history by Class Code you want to display.
- Start Date
This is a required field. Inventory transactions conducted on and after this date will be displayed. Start date and end date must be entered for calculation to proceed.
- End Date
This is a required field. Inventory transactions conducted on and before this date will be displayed. Start date and end date must be entered for calculation to proceed.
- Trans. Types
Select one of the available transaction types:
- All Transactions
Displays all Inventory transactions.
- Receipts
Displays receipts into Inventory from Manufacturing, purchases, or miscellaneous receipts.
- Issues
Displays issues from Inventory to Manufacturing.
- Shipments
Displays shipments to customers.
- Adjustments and Counts
Displays Inventory adjustments and counts.
- Transfers
Displays Inter-Site Transfers and Location and Lot/Serial Number reassignments.
- Scraps
Displays Scrap removed from Inventory.
Note
The system prefixes Order Numbers with letters indicating the Order type. For example, Work Orders are prefixed with "WO", Purchase Orders with "PO", and Sales Orders with "SO". These letters are for display purposes only and are not considered part of the Order Number.
To the far right of the screen, the following buttons are available:
- CLOSE
Closes the screen, returning you to the application desktop.
- QUERY
Select to generate the display, using the specified parameters. Start date and end date must be entered for calculation to proceed. Results will be displayed in the "Inventory History" list.
Runs the report associated with this screen.
When editing transaction information, you may choose to exclude a transaction from Inventory analysis. Not including a transaction in this manner means the following Inventory analyses will ignore the transaction: Item Usage Statistics displays, Update Reorder Levels, and Update Order Up To Levels.
To view Inventory history by Class Code, select the "Inventory History by Class Code" option. The following screen will appear:
Tip
If a line displays in orange, this means the Item Site in question is frozen. Accurate Quantity on Hand information will not be shown until the Item Site is thawed.
When displaying Inventory history by Class Code, you are presented with the following options:
- All Class Codes
Select to display Inventory history for all Class Codes.
- Selected
Specify Class Code whose Inventory history you want to display.
- Pattern
Enter a Class Code pattern to select a range of Class Codes. Refine your search using Regular Expressions.
- All Sites
Select to display Inventory history by Class Code for all Sites.
- Selected
Specify Site whose Inventory history by Class Code you want to display.
- Start Date
This is a required field. Inventory transactions conducted on and after this date will be displayed. Start date and end date must be entered for calculation to proceed.
- End Date
This is a required field. Inventory transactions conducted on and before this date will be displayed. Start date and end date must be entered for calculation to proceed.
- Trans. Types
Select one of the available transaction types:
- All Transactions
Displays all Inventory transactions.
- Receipts
Displays receipts into Inventory from Manufacturing, purchases, or miscellaneous receipts.
- Issues
Displays issues from Inventory to Manufacturing.
- Shipments
Displays shipments to customers.
- Adjustments and Counts
Displays Inventory adjustments and counts.
- Transfers
Displays Inter-Site Transfers and Location and Lot/Serial Number reassignments.
- Scraps
Displays Scrap removed from Inventory.
Note
The system prefixes Order Numbers with letters indicating the Order type. For example, Work Orders are prefixed with "WO", Purchase Orders with "PO", and Sales Orders with "SO". These letters are for display purposes only and are not considered part of the Order Number.
To the far right of the screen, the following buttons are available:
- CLOSE
Closes the screen, returning you to the application desktop.
- QUERY
Select to generate the display, using the specified parameters. Start date and end date must be entered for calculation to proceed. Results will be displayed in the "Inventory History" list.
Runs the report associated with this screen.
When editing transaction information, you may choose to exclude a transaction from Inventory analysis. Not including a transaction in this manner means the following Inventory analyses will ignore the transaction: Item Usage Statistics displays, Update Reorder Levels, and Update Order Up To Levels.
The Inventory History by Order Number display provides transaction details in support of all Order types: Sales Orders, Purchase Orders, and Work Orders. To view Inventory history by Order Number, select the "Inventory History by Order Number" option. The following screen will appear:
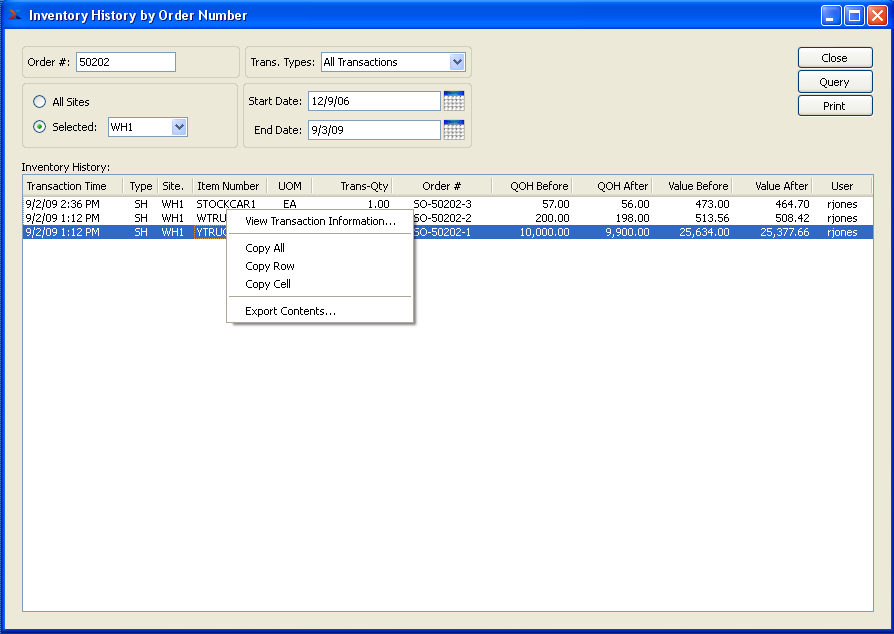
Tip
If a line displays in orange, this means the Item Site in question is frozen. Accurate Quantity on Hand information will not be shown until the Item Site is thawed.
When displaying Inventory history by Order Number, you are presented with the following options:
- Order #
Enter an Order Number or Regular Expression. The display will show Inventory history for the specified Order Number(s). Purchase Order Numbers, Sales Order Numbers, and Work Order Numbers are supported.
Tip
The "Order #" field supports pattern matching with Regular Expressions.
- All Sites
Select to display Inventory history by Order Number for all Sites.
- Selected
Specify Site whose Inventory history by Order Number you want to display.
- Trans. Types
Select one of the available transaction types:
- All Transactions
Displays all Inventory transactions.
- Receipts
Displays receipts into Inventory from Manufacturing, purchases, or miscellaneous receipts.
- Issues
Displays issues from Inventory to Manufacturing.
- Shipments
Displays shipments to customers.
- Adjustments and Counts
Displays Inventory adjustments and counts.
- Transfers
Displays Inter-Site Transfers and Location and Lot/Serial Number reassignments.
- Scraps
Displays Scrap removed from Inventory.
- Start Date
This is a required field. Inventory transactions conducted on and after this date will be displayed.
- End Date
This is a required field. Inventory transactions conducted on and before this date will be displayed.
- Inventory History
Display lists Inventory history by Order Number, using the specified parameters.
To the far right of the screen, the following buttons are available:
- CLOSE
Closes the screen, returning you to the application desktop.
- QUERY
Select to generate the display, using the specified parameters.
Runs the report associated with this screen.
To view Inventory history by Item Group, select the "Inventory History by Item Group" option. The following screen will appear:

Tip
If a line displays in orange, this means the Item Site in question is frozen. Accurate Quantity on Hand information will not be shown until the Item Site is thawed.
When displaying Inventory history by Item Group, you are presented with the following options:
- All Item Groups
Select to display Inventory history for all Item Groups.
- Selected
Specify Item Group whose Inventory history you want to display.
- Pattern
Enter an Item Group pattern to select a range of Item Groups. Refine your search using Regular Expressions.
- All Sites
Select to display Inventory history by Item Group for all Sites.
- Selected
Specify Site whose Inventory history by Item Group you want to display.
- Start Date
This is a required field. Inventory transactions conducted on and after this date will be displayed.
- End Date
This is a required field. Inventory transactions conducted on and before this date will be displayed.
- Trans. Types
Select one of the available transaction types:
- All Transactions
Displays all Inventory transactions.
- Receipts
Displays receipts into Inventory from Manufacturing, purchases, or miscellaneous receipts.
- Issues
Displays issues from Inventory to Manufacturing.
- Shipments
Displays shipments to customers.
- Adjustments and Counts
Displays Inventory adjustments and counts.
- Transfers
Displays Inter-Site Transfers and Location and Lot/Serial Number reassignments.
- Scraps
Displays Scrap removed from Inventory.
Note
The system prefixes Order Numbers with letters indicating the Order type. For example, Work Orders are prefixed with "WO", Purchase Orders with "PO", and Sales Orders with "SO". These letters are for display purposes only and are not considered part of the Order Number.
- Inventory History
Display lists Inventory history by Item Group, using the specified parameters. This display is a nested list, with a plus ("+") sign located to the far left of the display next to each transaction that may be expanded to lower levels. By clicking your mouse on a plus sign, you reveal lower levels of information related to the Order.
To the far right of the screen, the following buttons are available:
- CLOSE
Closes the screen, returning you to the application desktop.
- QUERY
Select to generate the display, using the specified parameters. Start date and end date must be entered for calculation to proceed. Results will be displayed in the "Inventory History" list.
Runs the report associated with this screen.
Note
When editing transaction information, you may choose to exclude a transaction from Inventory analysis. Not including a transaction in this manner means the following Inventory analyses will ignore the transaction: Item Usage Statistics displays, Update Reorder Levels, and Update Order Up To Levels.
To view Inventory history by Item, select the "Inventory History by Item" option. The following screen will appear:

Tip
If a line displays in orange, this means the Item Site in question is frozen. Accurate Quantity on Hand information will not be shown until the Item Site is thawed.
When displaying Inventory history by Item, you are presented with the following options:
- Item Number
Enter the Item Number of the Item whose Inventory history you want to display. The browse button located to the right of the field leads to a searchable list of make and buy items.
- UOM
Inventory Unit of Measure.
- All Sites
Select to display Inventory history by Item for all Sites.
- Selected
Specify Site whose Inventory history by Item you want to display.
- Start Date
This is a required field. Inventory transactions conducted on and after this date will be displayed.
- End Date
This is a required field. Inventory transactions conducted on and before this date will be displayed.
- Trans. Types
Select one of the available transaction types:
- All Transactions
Displays all Inventory transactions.
- Receipts
Displays receipts into Inventory from Manufacturing, purchases, or miscellaneous receipts.
- Issues
Displays issues from Inventory to Manufacturing.
- Shipments
Displays shipments to customers.
- Adjustments and Counts
Displays Inventory adjustments and counts.
- Transfers
Displays Inter-Site Transfers and Location and Lot/Serial Number reassignments.
- Scraps
Displays Scrap removed from Inventory.
Note
The system prefixes Order Numbers with letters indicating the Order type. For example, Work Orders are prefixed with "WO", Purchase Orders with "PO", and Sales Orders with "SO". These letters are for display purposes only and are not considered part of the Order Number.
- Inventory History
Display lists Inventory history by Item, using the specified parameters. This display is a nested list, with a plus ("+") sign located to the far left of the display next to each transaction that may be expanded to lower levels. By clicking your mouse on a plus sign, you reveal lower levels of information related to the Order.
To the far right of the screen, the following buttons are available:
- CLOSE
Closes the screen, returning you to the application desktop.
- QUERY
Select to generate the display, using the specified parameters. Start date and end date must be entered for calculation to proceed. Results will be displayed in the "Inventory History" list.
Runs the report associated with this screen.
Note
When editing transaction information, you may choose to exclude a transaction from Inventory analysis. Not including a transaction in this manner means the following Inventory analyses will ignore the transaction: Item Usage Statistics displays, Update Reorder Levels, and Update Order Up To Levels.
Detailed Inventory history Reports section.
To view detailed Inventory history by Location, select the "Detailed Inventory History by Location" option. The following screen will appear:
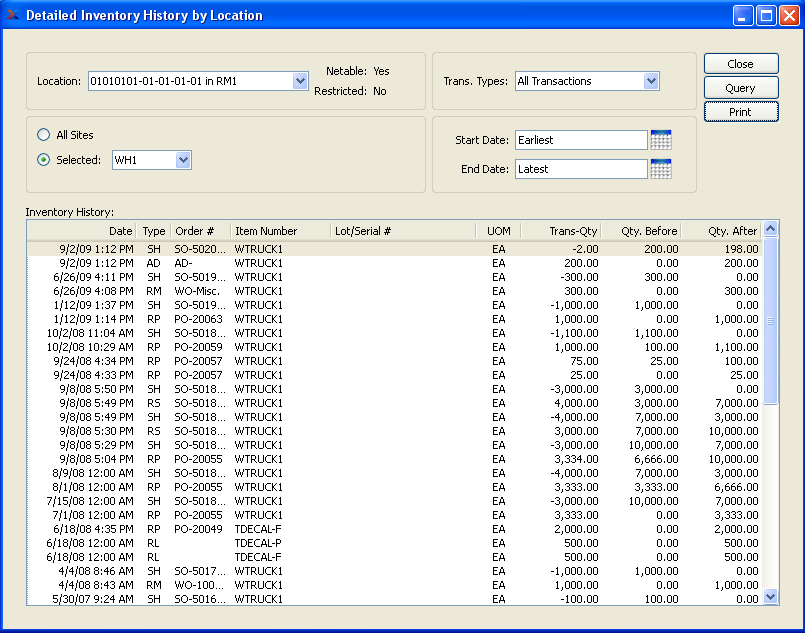
Note
The display will only list Inventory history for Multiple Location Control Items. Items without Multiple Location Control turned on will not be listed in the display. Multiple Location Control is set in the Item Site record.
When displaying detailed Inventory history by Location, you are presented with the following options:
- Location
Specify the Location whose detailed Inventory History you want to display. Displays detailed Inventory history for selected Location.
- Netable
Indicates whether the Location is Netable or not.
- Restricted
Indicates whether the Location is Restricted or not.
- All Sites
Select to display detailed Inventory history by Location for all Sites.
- Selected
Specify Site whose detailed Inventory history by Location you want to display.
- Trans. Types
Select one of the available transaction types:
- All Transactions
Displays all Inventory transactions.
- Receipts
Displays receipts into Inventory from Manufacturing, purchases, or miscellaneous receipts.
- Issues
Displays issues from Inventory to Manufacturing.
- Shipments
Displays shipments to customers.
- Adjustments and Counts
Displays Inventory adjustments and counts.
- Transfers
Displays Inter-Site Transfers and Location and Lot/Serial Number reassignments.
- Scraps
Displays Scrap removed from Inventory.
Note
The system prefixes Order Numbers with letters indicating the Order type. For example, Work Orders are prefixed with "WO", Purchase Orders with "PO", and Sales Orders with "SO". These letters are for display purposes only and are not considered part of the Order Number.
- Start Date
Inventory transactions conducted on and after this date will be displayed. Start date and end date must be entered for calculation to proceed.
- End Date
Inventory transactions conducted on and before this date will be displayed. Start date and end date must be entered for calculation to proceed.
- Inventory History
Display lists detailed Inventory history by Location, using the specified parameters.
To the far right of the screen, the following buttons are available:
- CLOSE
Closes the screen, returning you to the application desktop.
- QUERY
Select to generate the display, using the specified parameters. Start date and end date must be entered for calculation to proceed. Results will be displayed in the "Inventory History" list.
Runs the report associated with this screen.
Some users need to be able to track warranty periods of Items from the purchase of raw materials to the sale of finished goods. Such traceability is possible by leveraging the Lot/Serial capability in xTuple ERP. Using Lot/Serial trace, users have access to backwards and forwards tracking through multiple levels of production—including the where used and warranty status of Items.
For example, if a defective internal medical device came back because of a defective spring, a user should be able to determine what Lot of springs went into the device—even if the spring was issued to a subassembly two levels down. Likewise, once the spring Lot is determined, the user should be able to search forward and determine all goods where that Lot of springs was used and shipped so all Customers may be notified of the defect. If the spring was under warranty and is still eligible, the backward search should indicate so.
To view detailed Inventory history by Lot/Serial Number, select the "Detailed Inventory History by Lot/Serial #" option. The following screen will appear:
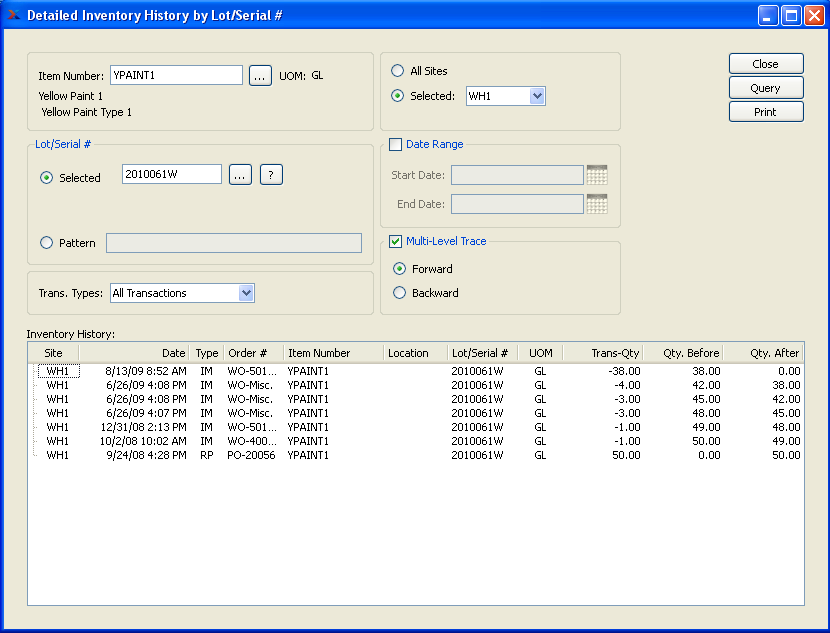
When displaying detailed Inventory history by Lot/Serial Number, you are presented with the following options:
- Item Number
Enter the Item Number of the Item whose detailed Inventory history by Lot/Serial Number you want to display.
- UOM
Inventory Unit of Measure.
- Lot/Serial #
Specify one of the following Lot/Serial Number selection criteria:
- Selected
Enter the Lot/Serial Number of the Inventory whose detailed Inventory history you want to display.
- Pattern
Enter a Lot/Serial Number pattern to select a range of Product CategorieLot/Serial Numbers.
- Trans. Types
Select one of the following transaction types from the drop-down menu.
- All Transactions
Displays all Inventory transactions.
- Receipts
Displays receipts into Inventory from Manufacturing, purchases, or miscellaneous receipts.
- Issues
Displays issues from Inventory to Manufacturing.
- Shipments
Displays shipments to customers.
- Adjustments and Counts
Displays Inventory adjustments and counts.
- Transfers
Displays Inter-Site Transfers and Location and Lot/Serial Number reassignments.
- Scraps
Displays Scrap transfer from Inventory.
- All Sites
Select to display detailed Inventory history by Lot/Serial Number for all Sites.
- Selected
Specify Site whose detailed Inventory history by Lot/Serial Number you want to display.
- Date Range
Select if you want to use specific date range parameters. If not selected, the query will search for all time.
- Start Date
Inventory transactions conducted on and after this date will be displayed. Start date and end date must be entered for calculation to proceed.
- End Date
Inventory transactions conducted on and before this date will be displayed. Start date and end date must be entered for calculation to proceed.
- Multi-Level Trace
Select if you want the query to include one of the following trace options:
- Forward
Select to view transaction activity of Lot/Serial goods through multiple levels showing where they were used. For example, we can see where a purchased Item was used in a Work Order and subsequently shipped against a Sales Order.
- Backward
Select to view transaction activity of Lot/Serial goods though multiple levels showing what serialized Items went into them. For example, we can look at a finished goods shipped to a Customer and determine what purchased Items went into the good.
- Inventory History
Display lists detailed Inventory history by Lot/Serial Number, using the specified parameters.
Note
The system prefixes Order Numbers with letters indicating the Order type. For example, Work Orders are prefixed with "WO", Purchase Orders with "PO", and Sales Orders with "SO". These letters are for display purposes only and are not considered part of the Order Number.
To the far right of the screen, the following buttons are available:
- CLOSE
Closes the screen, returning you to the application desktop.
- QUERY
Select to generate the display, using the specified parameters. Start date and end date must be entered for calculation to proceed. Results will be displayed in the "Inventory History" list.
Runs the report associated with this screen.
Usage statistics Reports section.
To view Item usage statistics by Site, select the "Item Usage Statistics by Site" option. The following screen will appear:
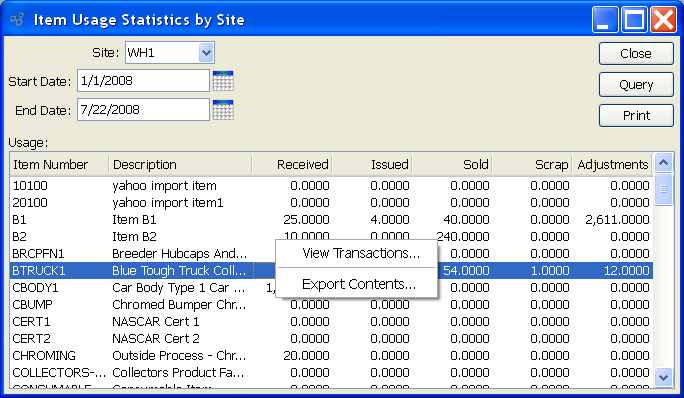
When displaying Item usage statistics by Site, you are presented with the following options:
- Site
Specify Site whose Item usage statistics you want to display.
- Start Date
Item usage recorded on and after this date will be displayed. Start date and end date must be entered for calculation to proceed.
- End Date
Item usage recorded on and before this date will be displayed. Start date and end date must be entered for calculation to proceed.
- Usage
Display lists Item usage statistics by Site, using the specified parameters.
To the far right of the screen, the following buttons are available:
- CLOSE
Closes the screen, returning you to the application desktop.
- QUERY
Select to generate the display, using the specified parameters. Start date and end date must be entered for calculation to proceed. Results will be displayed in the "Usage" list.
Runs the report associated with this screen.
Note
The right-click menu is context-sensitive, meaning transaction details will vary depending on which column you select to view transactions from.
To view Item usage statistics by Class Code, select the "Item Usage Statistics by Class Code" option. The following screen will appear:
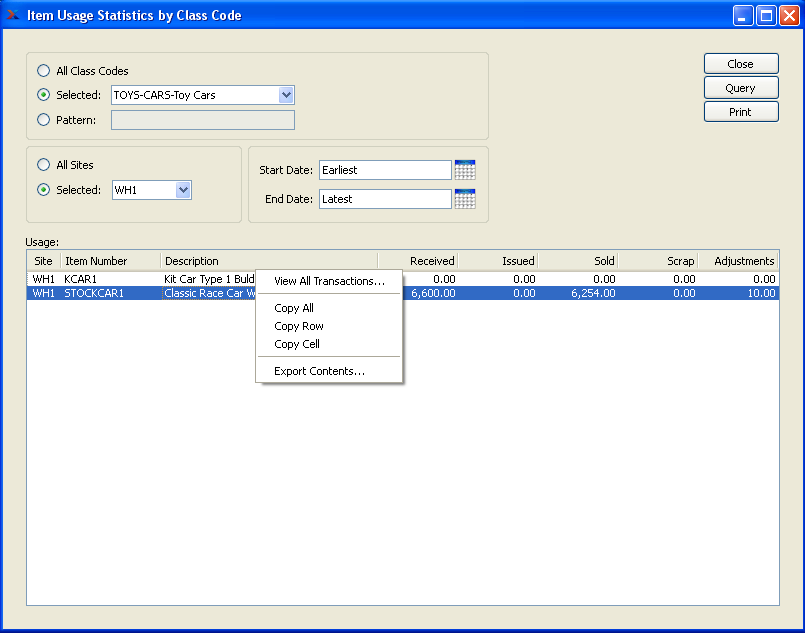
When displaying Item usage statistics by Class Code, you are presented with the following options:
- All Class Codes
Select to display Item usage statistics for all Class Codes.
- Selected
Specify Class Code whose Item usage statistics you want to display.
- Pattern
Enter a Class Code pattern to select a range of Class Codes. Refine your search using Regular Expressions.
- All Sites
Select to display Item usage statistics by Class Code for all Sites.
- Selected
Specify Site whose Item usage statistics by Class Code you want to display.
- Start Date
Item usage recorded on and after this date will be displayed. Start date and end date must be entered for calculation to proceed.
- End Date
Item usage recorded on and before this date will be displayed. Start date and end date must be entered for calculation to proceed.
- Usage
Display lists Item usage statistics by Class Code, using the specified parameters.
To the far right of the screen, the following buttons are available:
- CLOSE
Closes the screen, returning you to the application desktop.
- QUERY
Select to generate the display, using the specified parameters. Start date and end date must be entered for calculation to proceed. Results will be displayed in the "Usage" list.
Runs the report associated with this screen.
Note
To view details on Issue, Sold, Scrap, or Adjustment transactions, simply right-click in the corresponding columns.
To view Item usage statistics by Item Group, select the "Item Usage Statistics by Item Group" option. The following screen will appear:

When displaying Item usage statistics by Item Group, you are presented with the following options:
- All Item Groups
Select to display Item usage statistics for all Item Groups.
- Selected
Specify Item Group whose Item usage statistics you want to display.
- Pattern
Enter an Item Group pattern to select a range of Item Groups. Refine your search using Regular Expressions.
- All Sites
Select to display Item usage statistics by Item Group for all Sites.
- Selected
Specify Site whose Item usage statistics by Item Group you want to display.
- Start Date
Item usage recorded on and after this date will be displayed. Start date and end date must be entered for calculation to proceed.
- End Date
Item usage recorded on and before this date will be displayed. Start date and end date must be entered for calculation to proceed.
- Usage
Display lists Item usage statistics by Item Group, using the specified parameters.
To the far right of the screen, the following buttons are available:
- CLOSE
Closes the screen, returning you to the application desktop.
- QUERY
Select to generate the display, using the specified parameters. Start date and end date must be entered for calculation to proceed. Results will be displayed in the "Usage" list.
Runs the report associated with this screen.
Note
To view details on Issue, Sold, Scrap, or Adjustment transactions, simply right-click in the corresponding columns.
To view Item usage statistics by Item, select the "Item Usage Statistics by Item" option. The following screen will appear:
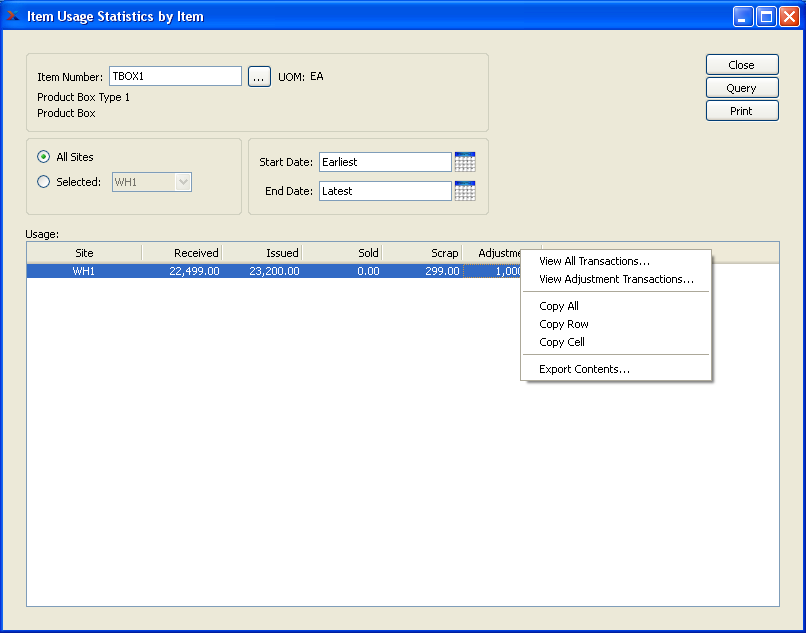
When displaying Item usage statistics by Item, you are presented with the following options:
- Item Number
Enter the Item Number of the Item whose usage statistics you want to display. The browse button located to the right of the field leads to a searchable list of make and buy items.
- UOM
Inventory Unit of Measure.
- All Sites
Select to display Item usage Statistics for all Sites.
- Selected
Specify Site whose Item usage statistics you want to display.
- Start Date
Inventory transactions conducted on and after this date will be displayed. Start date and end date must be entered for calculation to proceed.
- End Date
Inventory transactions conducted on and before this date will be displayed. Start date and end date must be entered for calculation to proceed.
- Usage
Display lists Item usage statistics by Item, using the specified parameters.
To the far right of the screen, the following buttons are available:
- CLOSE
Closes the screen, returning you to the application desktop.
- QUERY
Select to generate the display, using the specified parameters. Start date and end date must be entered for calculation to proceed. Results will be displayed in the "Usage" list.
Runs the report associated with this screen.
Note
To view details on Issue, Sold, Scrap, or Adjustment transactions, simply right-click in the corresponding columns.
To view time-phased Item usage statistics by Item, select the "Time-Phased Item Usage Statistics by Item" option. The following screen will appear:
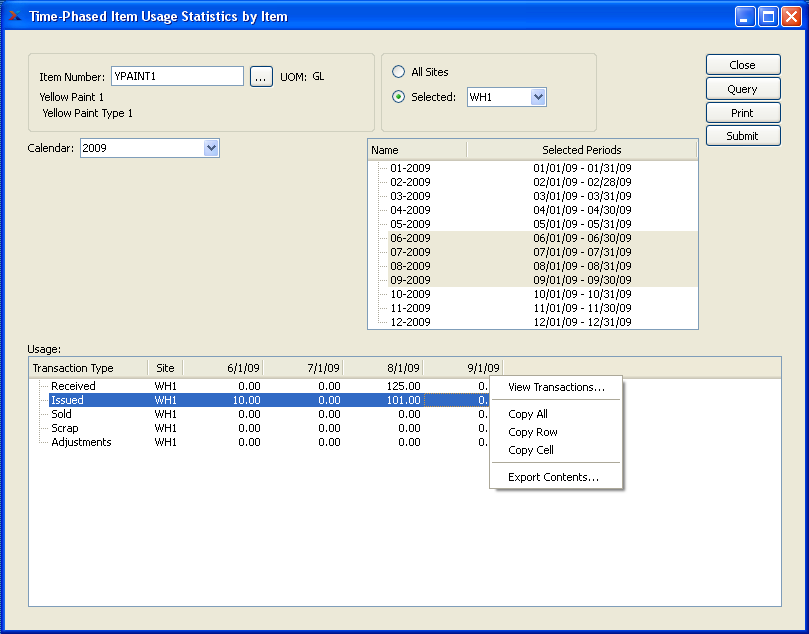
When displaying time-phased Item usage statistics by Item, you are presented with the following options:
- Item Number
Enter the Item Number of the Item whose usage statistics you want to display.
- UOM
Inventory Unit of Measure.
- All Sites
Select to display time-phased Item usage statistics for all Sites.
- Selected
Specify Site whose time-phased Item usage statistics you want to display.
- Calendar
Select the Calendar you want to use for the report. Associated Calendar periods will be displayed.
- Name/Selected Periods
Select as many periods as you want to display. Selected periods correspond to Calendar specified in the "Calendar" field. Select individual periods or groups of periods together. To select an individual period, highlight the period using your mouse button. The period is now selected. To select a sequence of periods, highlight the first in the sequence using your mouse button. Then, holding down the SHIFT key on your keyboard, highlight the last period in the sequence. The entire sequence is now selected. To select periods that are out of sequence (e.g., January, April, July, October), highlight the first period in the group. Then, holding down the CTRL key on your keyboard, highlight the next period you want to select. Continue highlighting periods with the CTRL key depressed until all desired periods are selected. The entire group is now selected.
- Usage
Display lists time-phased Item usage statistics by Item, using the specified parameters. The transaction types include the following: received, issued, sold, Scrap percentage, and adjustments. If multiple Sites are involved, statistics for each will be displayed.
To the far right of the screen, the following buttons are available:
- CLOSE
Closes the screen, returning you to the application desktop.
- QUERY
Select to generate the display, using the specified parameters. Start dates and end dates must be entered for calculation to proceed. Results will be displayed in the "Usage" display.
Runs the report associated with this screen.
- SUBMIT
Select to submit report to the Batch Manager.