Site section.
Sites typically describe physical production and storage facilities. Work Centers, Item Sites, and Site Locations belong to Sites. To access the master list of Sites, select the "Sites" option. The following screen will appear:
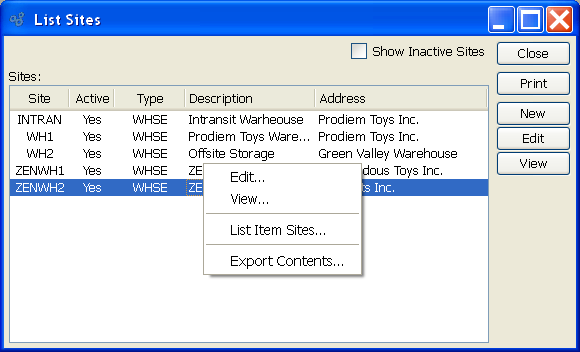
The "Sites" screen displays information on all existing Sites, including Site code, Site description, and Site address. To include inactive Sites in the display, select the "Show Inactive Sites" option.
To the far right of the screen, the following buttons are available:
- CLOSE
Closes the screen, returning you to the application desktop.
Runs the report associated with this screen.
- NEW
Opens screen for creating a new Site.
- EDIT
Enables you to edit highlighted Sites. The edit screen is the same as that for creating a new Site—except that when editing, the fields will contain Site information. Double-clicking on a Site will also bring you to the editing screen.
- VIEW
Highlight a Site and then select this button to reach a read-only view of the "Edit" screen.
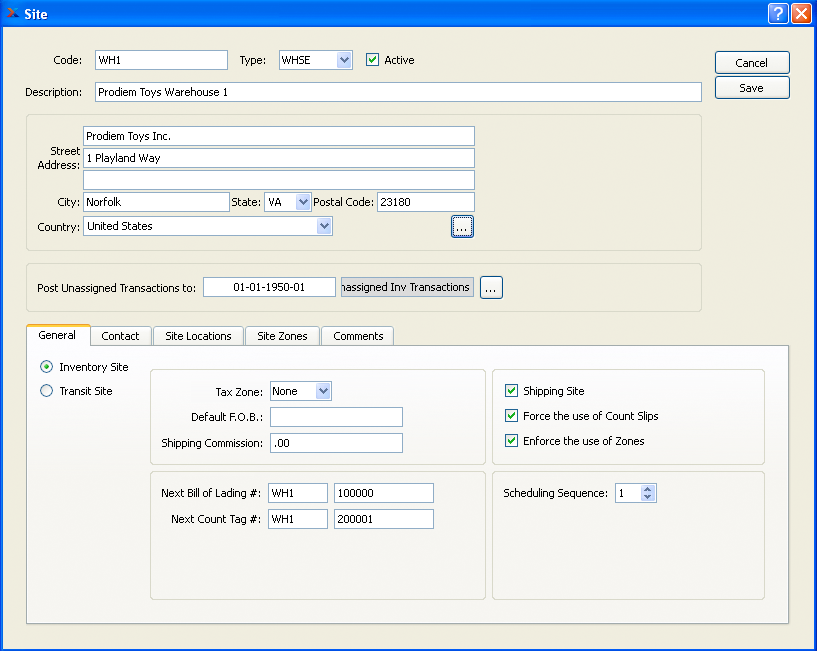
To create a new Site, select the NEW button. The following screen will appear:
Tip
Site Codes are abbreviations used to quickly and easily identify Sites. Keep these Codes short and meaningful so Employees will have an easy time identifying them.
When creating a new Site, you are presented with the following options:
- Code
The Site code is used to identify a given Site.
- Type
Specify the Site Type from the list of user-defined values. Sites may be defined in any number of ways―as warehouses, stores, etc. To learn more about Site Types, see Section 11.1, “Site Types”.
- Active
Select to specify the Site is active. Not selecting means the Site will be considered inactive. To re-activate a Site, simply select this option.
- Description
Enter a brief description of the Site.
Note
If a new Address is manually entered here, that Address will be added automatically to the master list of Addresses.
- Address
Manually enter Address information in the fields below—or use the browse button to select pre-existing Address information. The Site Address is used on shipping and receiving paperwork. If a new Address is manually entered here, that Address will be added automatically to the master list of Addresses. For additional documentation related to creating Addresses, see Section 8.1, “ New Address”.
- Contact
Manually enter Contact information in the fields below—or use the browse button to select pre-existing Contact information. If a new Contact is manually entered here, that Contact will be added automatically to the master list of Contacts. For additional documentation related to creating Contacts, see Section 7.1, “ New Contact”.
- Post Unassigned Transactions to
Specify a General Ledger Account to post unassigned transactions to. This account is used as a general bucket for General Ledger transactions which the system, for one reason or another, may not know how to handle. A transaction is considered unassigned if the affected Item Site does not have a Cost Category assigned to it for the transaction type in question. By specifying an Account to post unassigned transactions to, you can remove most of the ambiguous error messages that may result from inadequately assigned Item Site Cost Categories. For example, if an Inventory Asset Account is not defined, Inventory transactions may proceed—but the Asset portion of the transactions will be posted to the unassigned transaction Account.
- Inventory Site
Select if the Site is to be used for Inventory storage. The following options are available for Inventory Sites:
- Next Bill of Lading #
There are two parts to this field. These two parts include a "prefix" that will appear at the beginning of all system-generated bill of lading numbers for this Site and a starting number sequence (e.g., 10000, 20000, etc.). Use the first field window to prefix the bill of lading number with user-defined information (e.g., Site code). Prefixing bill of lading numbers may be helpful in tracking Items that were shipped to customers from a specific Site Location. Use the second part of this two-part field window to enter an unlimited number of whole numbers.
- Next Count Tag#
There are two parts to this field. These two parts include a "prefix" that will appear at the beginning of all system-generated Count Tag Numbers for this Site and a starting number sequence (e.g., 10000, 20000, etc.). Use the first field window to prefix the Count Tag Number with user-defined information (e.g., Site code). Use the second part of this two-part field window to enter an unlimited number of whole numbers.
- Shipping Site
Select if the Site is used for Shipping. Not selecting means materials are not shipped from the Site.
- Force the use of Count Slips
Select to enforce the use of Count Slips. Not selecting means Count Slips will not be required when counting Inventory in this Site.
- Enforce the use of Zones
Select to enforce the use of Zones within the Site. A Site Zone is a defined section or area within a Site. For example, separate Site Zones might be designated to define areas where Orders are selected, Picked, and Packed. If selected, Zones may be specified when defining Site Locations. If not selected, Site Locations may not include Zones.
- Shipping Commission
Enter a commission percentage to be charged whenever Inventory is shipped from the Site. This is an optional feature to be used specifically for contract Sites, which charge a commission based on shipping volume. If the Site does not charge a commission, then this field may be ignored, leaving the default value of "0.00".
- Tax Zone
Specify the Tax Zone associated with the Site.
- Default F.O.B
Enter default free on board (FOB) Terms for the Site. The default F.O.B. Terms will be entered on the Sales Order header for any Orders where the Site is specified as the Shipping Site.
- Scheduling Sequence
Select or enter the Scheduling Sequence. This sequence number determines the order in which Sites are processed when MRP or MPS is run against all Sites.
Transit Sites are special Sites used by Transfer Orders. When Transfer Order Inventory is shipped from the Source Site, it is moved to a Transit Site. Inventory stays in the Transit Site until it is received at the Destination Site. If the Site is to be used as a Transit Site, select the "Transit Site" option. The following changes to the main screen will appear:
Tip
Be sure to define a default Transit Site on your Inventory Configuration screen. This will make it easier to generate Transfer Orders, as Transit Sites are required for Transfer Orders.
When defining a Site as a Transit Site, you are presented with the following options:
- Default Ship Via
Specify a default Ship Via to be used by the Transit Site. The selected Ship Via will be used by default on the Transfer Order header whenever the specified Transit Site is used.
- Default Shipping Form
Specify a default Shipping Form to be used by the Transit Site. The selected Shipping Form will be used by default on the Transfer Order header whenever the specified Transit Site is used.
Note
The Shipping Form will be used when printing Packing Lists for the Transfer Order.
- Default Cost Category
Specify a default Cost Category to be used by the Transit Site. Associating a Cost Category with a Transit Site makes it possible for the system to create Item Sites for Transit Sites automatically when Transfer Order Inventory is shipped. This greatly simplifies the use of Transit Sites, as Item Sites do not need to be created manually beforehand. The accounting for in-transit goods is handled by the default Cost Category associated with the Transit Site.
Tip
Consider creating a separate Cost Category for Transit Sites. In this way you can use unique Accounts to reflect the movement of Inventory which is in-transit.
- Shipping Comments
Enter shipping Comments you want to associate with the Transit Site. Shipping Comments entered here will be used on any Transfer Order which uses specified Transit Site. This is a scrolling text field with word-wrapping for entering shipping Comments.
To the far right of the screen, the following buttons are available:
- CANCEL
Closes the screen without creating a Site, returning you to the previous screen.
- SAVE
Creates the Site and adds it to the master list of Sites.
To define ARBL (Aisle, Rack, Bin, Location) naming conventions for your Site Locations, select the "Site Locations" tab. The following screen will appear:
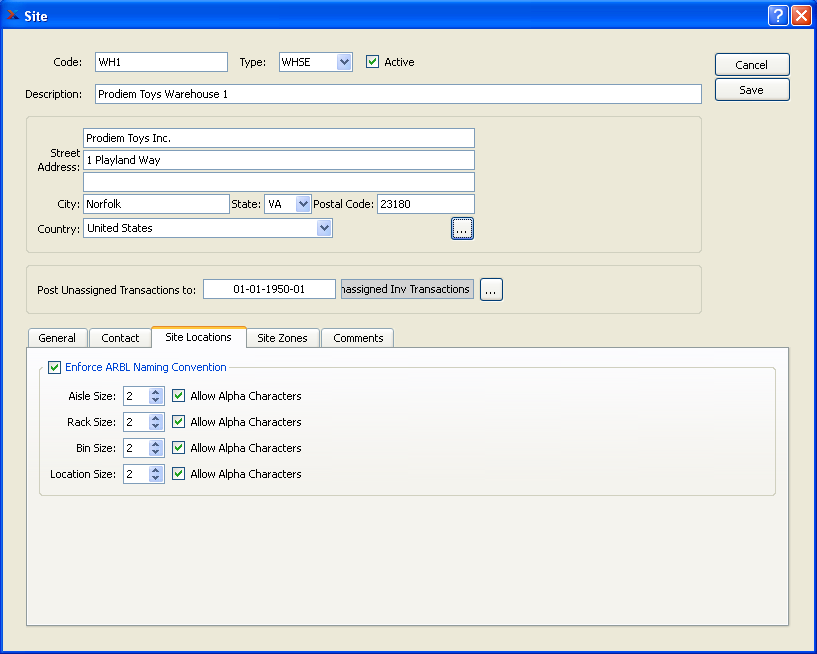
When defining ARBL naming conventions for your Site Locations, you are presented with the following options:
- Enforce ARBL Naming Convention
Select to enforce the aisle, rack, bin, Location (ARBL) naming convention when defining Site Locations. Specify values for the following ARBL parameters:
- Aisle Size
Specify the maximum number of characters allowed in an aisle name by using the arrow buttons or manually entering a value up to a maximum of 99. Also specify whether alpha characters are allowed in aisle names.
- Rack Size
Specify the maximum number of characters allowed in a rack name by using the arrow buttons or manually entering a value up to a maximum of 99. Also specify whether alpha characters are allowed in rack names.
- Bin Size
Specify the maximum number of characters allowed in a bin name by using the arrow buttons or manually entering a value up to a maximum of 99. Also specify whether alpha characters are allowed in bin names.
- Location Size
Specify the maximum number of characters allowed in a Location name by using the arrow buttons or manually entering a value up to a maximum of 99. Also specify whether alpha characters are allowed in Location names.
Site Zones are defined sections or areas within a Site. For example, separate Site Zones might be designated to define areas where Orders are selected, Picked, and Packed. To define or maintain Site Zones, select the "Site Zones" tab. The following screen will appear:
When defining or maintaining Site Zones, you are presented with the following options:
To the far right of the screen, the following buttons are available:
- NEW
Opens screen for creating a new Site Zone.
- EDIT
Enables you to edit highlighted Site Zones. The edit screen is the same as that for creating a new Site Zone—except that when editing, the fields will contain Site Zone information. Double-clicking on a Site Zone also bring you to the editing screen.
- DELETE
Highlight a Site Zone and then select this button to remove the Zone from the list.
To create a new Site Zone, select the NEW button. The following screen will appear:
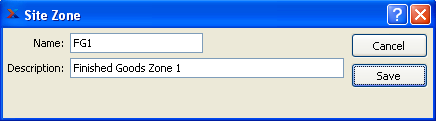
When creating a new Site Zone, you are presented with the following options:
- Name
Enter a unique name for the Site Zone.
- Description
Enter a brief description of the Site Zone.
To the far right of the screen, the following buttons are available:
- CANCEL
Closes the screen without adding a new Site Zone to the list of Site Zones.
- SAVE
Creates the Site Zone and adds it to the list of Site Zones.
To associate Comments with a Site, select the "Comments" tab. The following screen will appear:
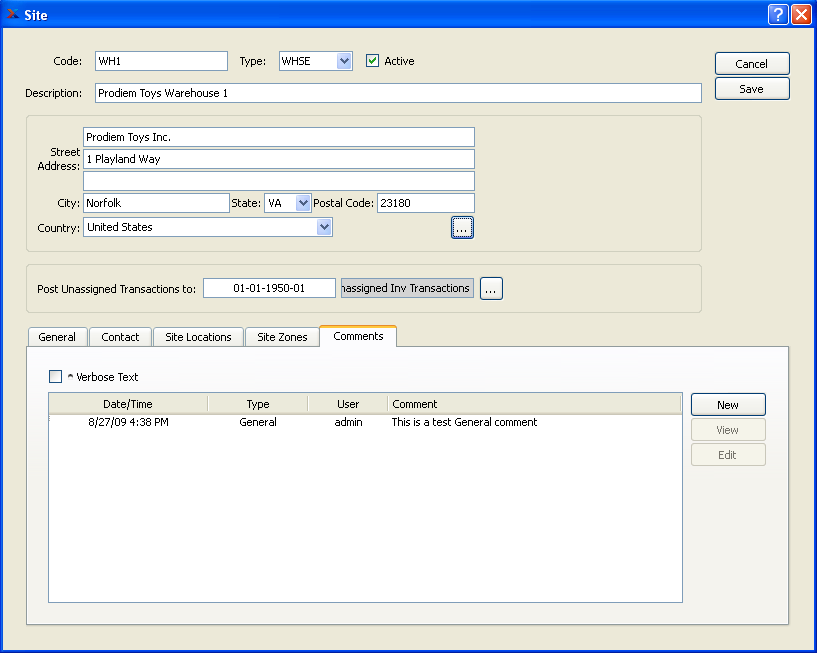
When adding or reviewing Comments, you are presented with the following options:
- Verbose Text
Select to display all Comments in the list in an expanded view which includes the entire text of each Comment. To edit a Comment, simply select the "Edit" link next to the Comment. That link will not be shown for Changelog Comments, which can't be edited. If the "Verbose Text" option is not selected, the Comment list will display only header level information for each Comment.
- Comments
Display lists Comments related to the record.
To the far right of the screen, the following buttons are available:
- NEW
Opens screen for creating a new Comment.
- VIEW
Highlight a Comment and then select this button to reach a read-only view of the "Edit" screen.
- EDIT
Enables you to edit highlighted Comments—as long as the Comments are not "ChangeLog" Comments. ChangeLog Comments are system-generated and may not be edited. The edit screen is the same as that for creating a new Comment—except that when editing, the fields will contain Comment information. Double-clicking on a Comment will also bring you to the editing screen.
To enter a new Comment, select the NEW button. The following screen will appear:
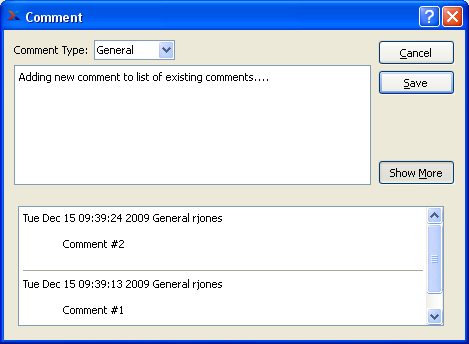
- Comment Type
Select a Comment Type from the drop-down list to classify the Comment. This is a required step. Comment Types may be system-defined (i.e., "ChangeLog" and "General") or user-defined, as described in Section 13.13, “Comment Types”. Once you have specified a Comment Type, begin typing your Comment in the main text area. The text area features word-wrapping and scroll-bar support for longer Comments.
To the far right of the screen, the following buttons are available:
- CANCEL
Closes the screen without creating the Comment, returning you to the previous screen.
- SAVE
Creates the Comment and adds it to the list of Comments.
- SHOW MORE
Select to show the complete list (i.e., "thread") of Comments associated with the record. To hide the list, simply select the SHOW MORE button again. The Comment thread will show the most recent Comment first.
Site Locations—also known as Locations—are the specific, unique material sites where Inventory is located inside a Site. If the ARBL naming convention is being enforced within a Site, Locations may be identified by aisle, rack, bin, and Location number. Locations may also exist within Site Zones, if Zones are defined for the specified Site. In most cases, related Items will be stored near to each other to simplify picking and Inventory counting. To access a master list of Site Locations, select the "Site Locations" option. The following screen will appear:
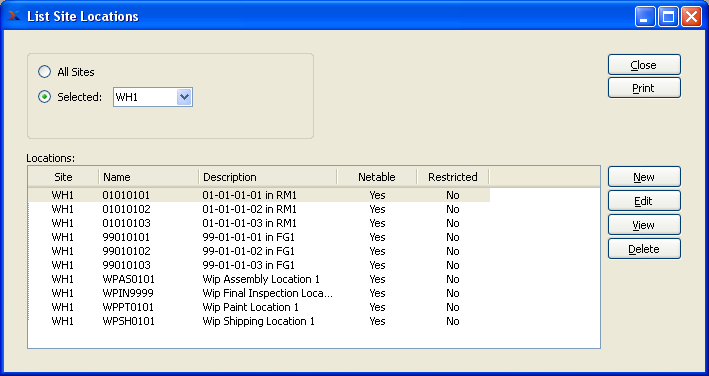
The "Site Locations" screen displays information on all existing Site Locations, including Site code, Location name, Location description, and whether the Location is netable or restricted. When displaying available Site Locations, you are presented with the following options:
- All Sites
Select to display Site Locations for all Sites.
- Selected
Specify Site whose Locations you want to display.
To the far right of the screen, the following buttons are available:
- CLOSE
Closes the screen, returning you to the application desktop.
Runs the report associated with this screen.
- NEW
Opens screen for creating a new Site Location.
- EDIT
Enables you to edit highlighted Site Locations. The edit screen is the same as that for creating a new Site Location—except that when editing, the fields will contain Site Location information. Double-clicking on a Site Location also bring you to the editing screen.
- VIEW
Highlight a Site Location and then select this button to reach a read-only view of the "Edit" screen.
- DELETE
Highlight a Site Location and then select this button to remove the Location from the list.
To create a new Site Location, select the NEW button. The following screen will appear:
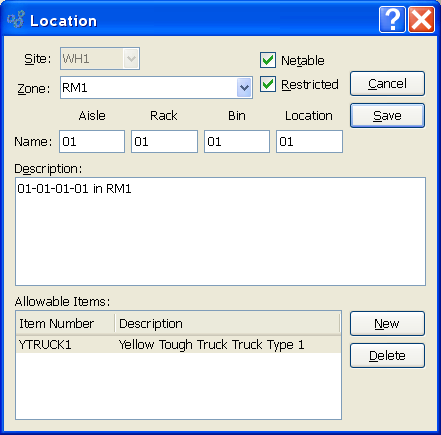
When creating a new Site Location, you are presented with the following options:
- Site
Specify Site for the Site Location.
- Zone
Specify the Site Zone you want to associate with the Location, if any. Zone selection will be activated only if Site Zones have been defined for the specified Site.
- Netable
Select if you want Items in the Location to be included in Quantity on Hand and Availability calculations. Not selecting means Items in the Location are non-netable. Items stored in a non-netable Location are not included in Quantity on Hand or Availability totals.
Note
When an Item is received into a non-netable Location, the Inventory transaction history will reflect a two-step process. First, the Quantity on Hand for the Item will be increased in the quantity received. Second, a non-netable (NN) correction will occur. This correction returns the Quantity on Hand to the pre-receipt levels—indicating a receipt into a non-netable Location. Again, quantity stored in a non-netable Location is considered separately. Changes in non-netable quantity do not affect bottom-line Quantity on Hand levels.
- Restricted
Select if only a restricted set of Items may be placed in this Location. Not selecting means any Item that exists in the same Site as this Location may be placed into it.
- Name
Enter a name to identify the Location. The name of the Location will vary, depending on whether the specified Site enforces the aisle, rack, bin, Location (ARBL) naming convention. If the convention is enforced, then the name for the Location may also include aisle, rack, or bin information. If ARBL is not enforced, then the Location name will consist of only one field.
Note
The parameters for the ARBL naming convention are set within a Site master. These parameters include the maximum length allowed for names and whether alpha characters or numeric only may be used.
To the far right of the screen, the following buttons are available:
- CANCEL
Closes the screen without creating the Site Location, returning you to the previous screen.
- SAVE
Creates the Site Location and adds it to the master list of Site Locations.
- NEW
Select to pick an Item from the master list of Items and designate it as allowed within the restricted Location.
- DELETE
Highlight an Item and then select this button to remove the Item from the list of allowable items.