Manufacturing managers frequently look for tools and methods to help them identify actions requiring immediate attention. In this way, they can help ensure production output matches Customer demand. This is where the Constraint Management system comes in. Constraint Management is used to evaluate Items, Work Orders, Purchase Orders, and Work Centers-and then prioritize each, identifying which should be worked on and/or addressed first.
The Constraint Management system reports on the following three types of buffers:
Stock buffer: An accumulation of Items stored in Inventory that act as a hedge against demand where the required service time is shorter than a time buffer for that Item would allow. The buffer size is determined by the Reorder Level at the Item Site.
Time buffer: The lead time, measured in working days, of a supply order for an Item that is not stocked.
Capacity buffer: The relative load of a resource (i.e., Work Center) compared to the desired lead time of Items coming out of that resource.
Update Buffer Status section.
When you run buffer status by Planner Code, you are running the Constraint Management system. This utility, when it is run, scans through your data and then updates the buffer status for Items in the specified Planner Code(s) using the most current information.
Because buffer status information is time-sensitive, you must run the system frequently (i.e., daily) to keep your statuses up-to-date. In fact, the various buffer status displays will not even show status information if Constraint Management has not been run on the day when you"re trying to view buffer status information. This built-in requirement prevents you from using information that is not current.
Note
The critical buffer status in the Constraint Management system is 66%. In other words, any time you consume 66% of a buffer, then it\qs time to act immediately to resolve the situation. The 66% value is a percentage that is widely used in academic research and practical real-world implementations of the Theory of Constraints—a theory pioneered by Eliyahu Goldratt.
After the buffer status utility has been run, you may view the Constraint Management displays which pertain to the affected Items—and then decide whether to take immediate action based on the newly-updated status values.
To run buffer status by Planner Code, select the "Run Buffer Status by Planner Code" option. The following screen will appear:
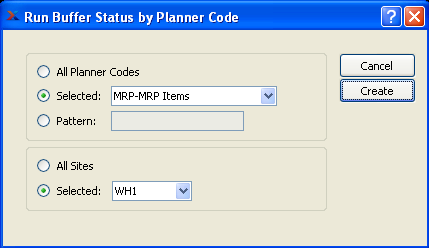
When running buffer status by Planner Code, you are presented with the following options:
- All Planner Codes
Select to update the buffer status for Item Sites in all Planner Codes.
- Selected
Specify Planner Code whose Item Site buffer statuses you want to update.
- Pattern
Enter a Planner Code pattern to select a range of Planner Codes. Refine your search using Regular Expressions.
- All Sites
Select to update buffer statuses by Planner Code in all Sites.
- Selected
Specify Site where buffer status updates should occur.
To the far right of the screen, the following buttons are available:
- CANCEL
Closes the screen without updating buffer statuses by Planner Code, returning you to the application desktop.
- CREATE
Runs the buffer status update by Planner Code, using the specified parameters.
- SUBMIT
Select to submit the buffer status update to the Batch Manager.
When you run buffer status by Item, you are running the Constraint Management system. This utility, when it is run, scans through your data and then updates the buffer status for the specified Item using the most current information. Because buffer status information is time-sensitive, you must run the system frequently (i.e., daily) to keep your statuses up-to-date. In fact, the various buffer status displays will not even show status information if Constraint Management has not been run on the day when you"re trying to view buffer status information. This built-in requirement prevents you from using information that is not current.
Note
The critical buffer status in the Constraint Management system is 66%. In other words, any time you consume 66% of a buffer, then it\qs time to act immediately to resolve the situation. The 66% value is a percentage that is widely used in academic research and practical real-world implementations of the Theory of Constraints—a theory pioneered by Eliyahu Goldratt.
After the buffer status utility has been run, you may view the Constraint Management displays which pertain to the Item—and then decide whether to take immediate action based on the newly-updated status value.
To run buffer status by Item, select the "Run Buffer Status by Item" option. The following screen will appear:
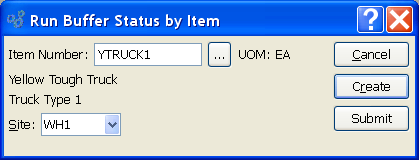
When running buffer status by Item, you are presented with the following options:
- Item Number
Enter the Item Number of the Item whose buffer status you want to update.
- UOM
Inventory Unit of Measure.
- Site
Specify Site where buffer status update should occur.
To the far right of the screen, the following buttons are available:
- CANCEL
Closes the screen without updating buffer status by Item, returning you to the application desktop.
- CREATE
Runs the buffer status update by Item, using the specified parameters.
- SUBMIT
Select to submit the buffer status update to the Batch Manager.
Inventory Buffer Status section.
The Inventory buffer status displays provide information on your current stock buffer levels. Stock buffers apply to make-to-stock Items. Keep in mind that buffer status information will only be displayed on days when the Constraint Management system is run. If you find your displays show no information, this probably means Constraint Management has not been run.
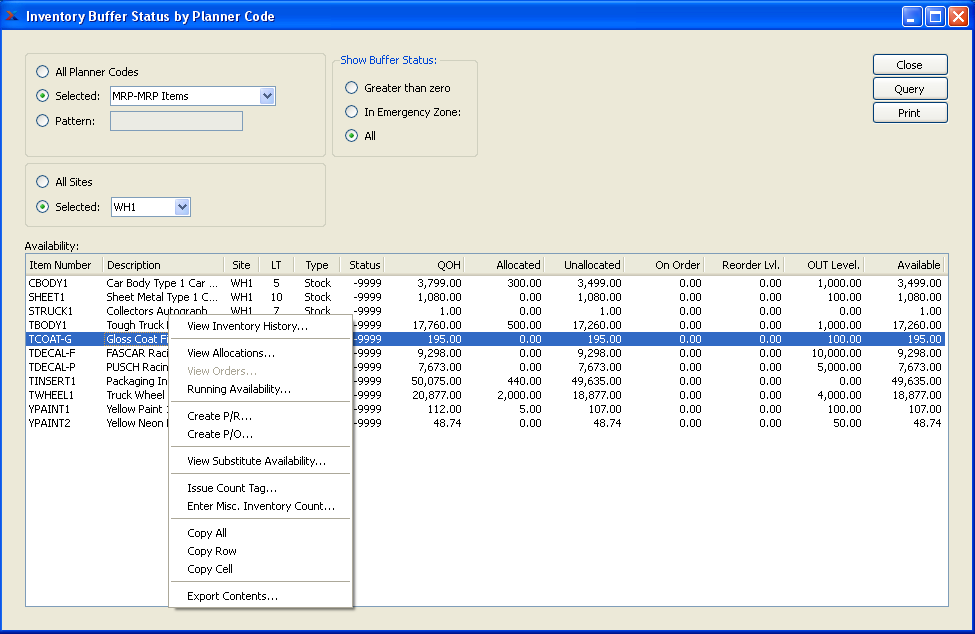
To view Inventory buffer status by Planner Code, select the "Inventory Buffer Status by Planner Code" option. The following screen will appear:
Note
When the buffer status for an Item hits 66 or higher, the status number will become red. By highlighting Items which are "red hot," the system is informing you which Items should be acted on immediately. The best remedy for red hot Item Sites is to expedite any associated Work Orders or Purchase Orders.
When displaying Inventory buffer statuses by Planner Code, you are presented with the following options:
- All Planner Codes
Select to display Inventory buffer statuses for all Planner Codes.
- Selected
Specify Planner Code whose Inventory buffer statuses you want to display.
- Pattern
Enter a Class Code pattern to select a range of Planner Codes. Refine your search using Regular Expressions.
- All Sites
Select to display Inventory buffer statuses for all Sites.
- Selected
Specify Site whose Inventory buffer statuses you want to display.
- Show Buffer Status
Show buffer statuses using one of the following criteria:
- Greater than zero
Select to display only those Item Sites having a buffer status greater than zero.
- In Emergency Zone
Select to display only those Item Sites whose buffer status is in the "emergency zone." The emergency zone is defined as a buffer status of 66 or greater.
- All
Select to display buffer statuses for all Item Sites.
Note
By default, the display will sort Item Sites by buffer status in descending order. In other words, Item Sites with the highest buffer status will appear at the top of the list; Item Sites with the lowest buffer status will appear at the bottom.
- Availability
Display lists Inventory buffer status by Planner Code, using the specified parameters. If Planned Availability displays in the color orange, this means the actual or projected Quantity on Hand is at or below the Reorder Level. If the color is red, the current or projected Quantity on Hand is below 0.
Note
When quantity appears in the "On Order" column, this refers to quantity that is on order through either a Work Order or Purchase Order. In the case of Purchase Orders, the quantity will always be represented in the Inventory Unit of Measure (UOM)—regardless of the Vendor UOM used on the Purchase Order.
To the far right of the screen, the following buttons are available:
- CLOSE
Closes the screen, returning you to the application desktop.
- QUERY
Select to generate the display, using the specified parameters.
Runs the report associated with this screen.
The Inventory buffer status displays provide information on your current stock buffer levels. Stock buffers apply to make-to-stock Items. Keep in mind that buffer status information will only be displayed on days when the Constraint Management system is run. If you find your displays show no information, this probably means Constraint Management has not been run.
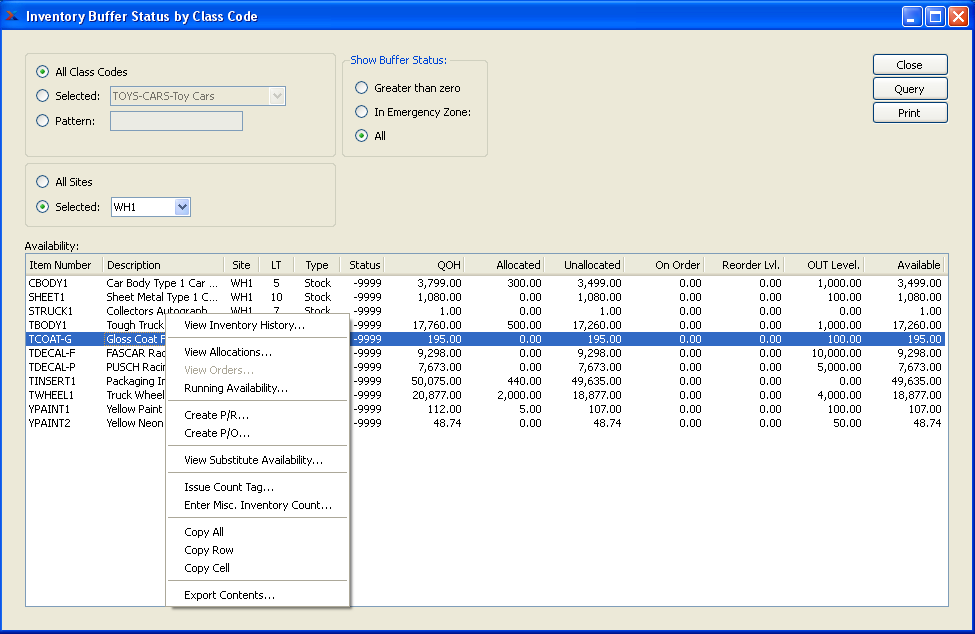
To view Inventory buffer status by Class Code, select the "Inventory Buffer Status by Class Code" option. The following screen will appear:
Note
When the buffer status for an Item hits 66 or higher, the status number will become red. By highlighting Items which are "red hot," the system is informing you which Items should be acted on immediately. The best remedy for red hot Item Sites is to expedite any associated Work Orders or Purchase Orders.
When displaying Inventory buffer statuses by Class Code, you are presented with the following options:
- All Class Codes
Select to display Inventory buffer statuses for all Class Codes.
- Selected
Specify Class Code whose Inventory buffer statuses you want to display.
- Pattern
Enter a Class Code pattern to select a range of Class Codes. Refine your search using Regular Expressions.
- All Sites
Select to display Inventory buffer statuses for all Sites.
- Selected
Specify Site whose Inventory buffer statuses you want to display.
- Show Buffer Status
Show buffer statuses using one of the following criteria:
- Greater than zero
Select to display only those Item Sites having a buffer status greater than zero.
- In Emergency Zone
Select to display only those Item Sites whose buffer status is in the "emergency zone." The emergency zone is defined as a buffer status of 66 or greater.
- All
Select to display buffer statuses for all Item Sites.
Note
By default, the display will sort Item Sites by buffer status in descending order. In other words, Item Sites with the highest buffer status will appear at the top of the list; Item Sites with the lowest buffer status will appear at the bottom.
- Availability
Display lists Inventory buffer statuses by Class Code, using the specified parameters. If Planned Availability displays in the color orange, this means the actual or projected Quantity on Hand is at or below the Reorder Level. If the color is red, the current or projected Quantity on Hand is below 0.
Note
When quantity appears in the "On Order" column, this refers to quantity that is on order through either a Work Order or Purchase Order. In the case of Purchase Orders, the quantity will always be represented in the Inventory Unit of Measure (UOM)—regardless of the Vendor UOM used on the Purchase Order.
To the far right of the screen, the following buttons are available:
- CLOSE
Closes the screen, returning you to the application desktop.
- QUERY
Select to generate the display, using the specified parameters.
Runs the report associated with this screen.
The Inventory buffer status displays provide information on your current stock buffer levels. Stock buffers apply to make-to-stock Items. Keep in mind that buffer status information will only be displayed on days when the Constraint Management system is run. If you find your displays show no information, this probably means Constraint Management has not been run.
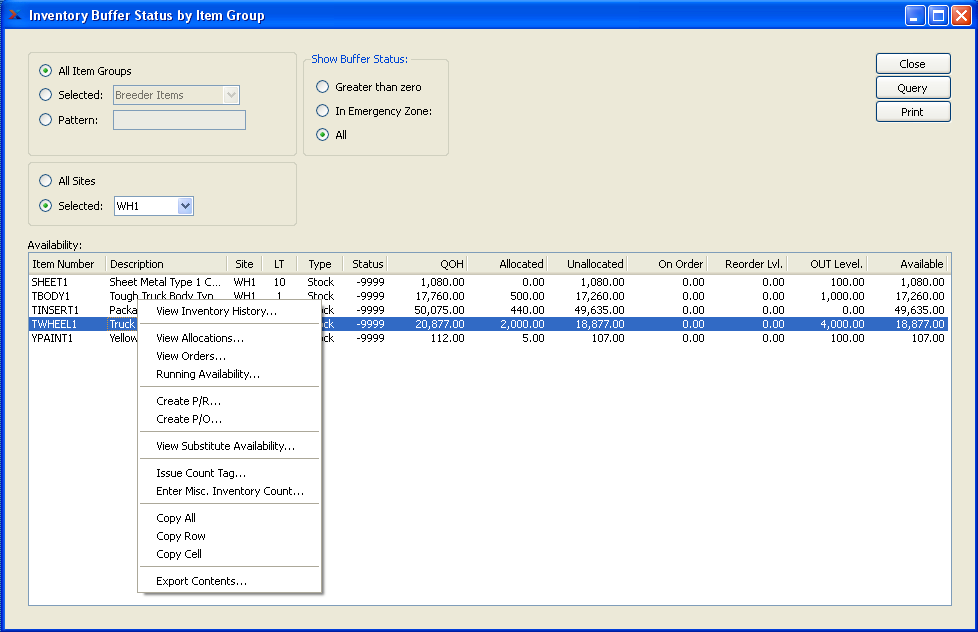
To view Inventory buffer status by Item Group, select the "Inventory Buffer Status by Item Group" option. The following screen will appear:
Note
When the buffer status for an Item hits 66 or higher, the status number will become red. By highlighting Items which are "red hot," the system is informing you which Items should be acted on immediately. The best remedy for red hot Item Sites is to expedite any associated Work Orders or Purchase Orders.
When displaying Inventory buffer statuses by Item Group, you are presented with the following options:
- All Item Groups
Select to display Inventory buffer statuses for all Item Groups.
- Selected
Specify Item Group whose Inventory buffer statuses you want to display.
- Item Group Pattern
Enter an Item Group pattern to select a range of Item Groups. Refine your search using Regular Expressions.
- All Sites
Select to display Inventory buffer statuses for all Sites.
- Selected
Specify Site whose Inventory buffer statuses you want to display.
- Show Buffer Status
Show buffer statuses using one of the following criteria:
- Greater than zero
Select to display only those Item Sites having a buffer status greater than zero.
- In Emergency Zone
Select to display only those Item Sites whose buffer status is in the "emergency zone." The emergency zone is defined as a buffer status of 66 or greater.
- All
Select to display buffer statuses for all Item Sites.
Note
By default, the display will sort Item Sites by buffer status in descending order. In other words, Item Sites with the highest buffer status will appear at the top of the list; Item Sites with the lowest buffer status will appear at the bottom.
- Availability
Display lists Inventory buffer statuses by Item Group, using the specified parameters. If Planned Availability displays in the color orange, this means the actual or projected Quantity on Hand is at or below the Reorder Level. If the color is red, the current or projected Quantity on Hand is below 0.
Note
When quantity appears in the "On Order" column, this refers to quantity that is on order through either a Work Order or Purchase Order. In the case of Purchase Orders, the quantity will always be represented in the Inventory Unit of Measure (UOM)—regardless of the Vendor UOM used on the Purchase Order.
To the far right of the screen, the following buttons are available:
- CLOSE
Closes the screen, returning you to the application desktop.
- QUERY
Select to generate the display, using the specified parameters.
Runs the report associated with this screen.
The Purchase Order buffer status displays provide information on your current stock and time buffer levels for those Items having current Purchase Orders. Stock buffers apply to make-to-stock Items; whereas time buffers apply to Items which are make-to-order. Keep in mind that buffer status information will only be displayed on days when the Constraint Management system is run. If you find your displays show no information, this probably means Constraint Management has not been run.
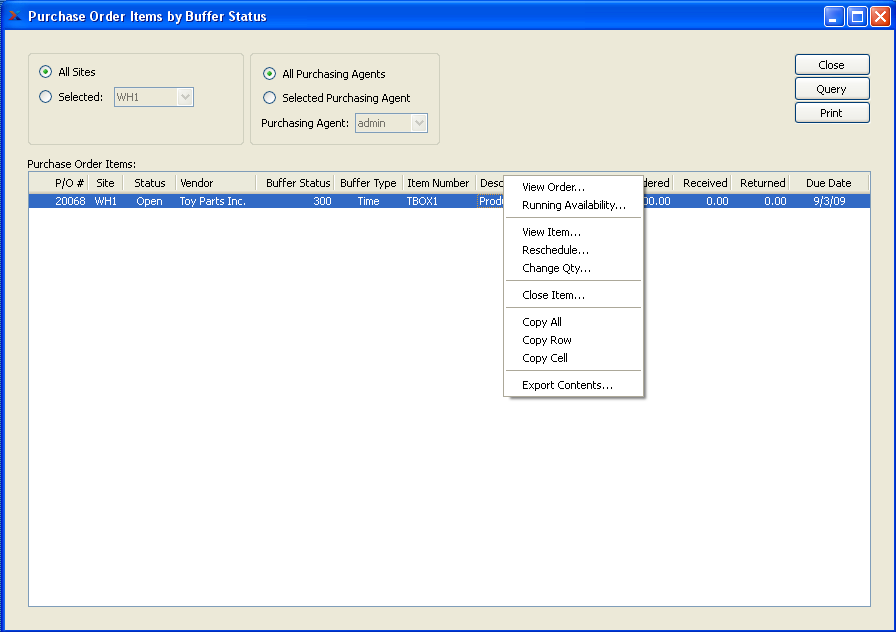
To view Purchase Order Item buffer statuses, select the "P/O Items by Buffer Status" option. The following screen will appear:
Note
When the buffer status for an Item hits 66 or higher, the status number will become red. By highlighting Items which are "red hot," the system is informing you which Items should be acted on immediately. The best remedy for red hot Item Sites is to expedite any associated Work Orders or Purchase Orders.
When displaying Purchase Order Item buffer statuses, you are presented with the following options:
- All Sites
Select to display Purchase Order Item buffer statuses for all Sites.
- Selected
Specify Site whose Purchase Order Item buffer statuses you want to display.
- All Purchasing Agents
Select to display Purchase Order Item buffer statuses for all Purchasing Agents.
- Selected
Specify Purchasing Agent whose Purchase Order Item buffer statuses you want to display. Users may be designated as Purchasing Agents at the system level.
Note
By default, the display will sort Purchase Order Items by buffer status in descending order. In other words, Purchase Order Items with the highest buffer status will appear at the top of the list; Purchase Order Items with the lowest buffer status will appear at the bottom.
- P/O Items
Display lists buffer statuses for open Purchase Order Items, using the specified parameters.
To the far right and at the bottom of the screen, the following buttons are available:
- CLOSE
Closes the screen, returning you to the application desktop.
- QUERY
Select to generate the display, using the specified parameters.
Runs the report associated with this screen.
Work Order Buffer Status section.
The Work Order buffer status displays provide information on your current stock and time buffer levels for those Items having current Work Orders. Stock buffers apply to make-to-stock Items; whereas time buffers apply to Items which are make-to-order. Keep in mind that buffer status information will only be displayed on days when the Constraint Management system is run. If you find your displays show no information, this probably means Constraint Management has not been run.
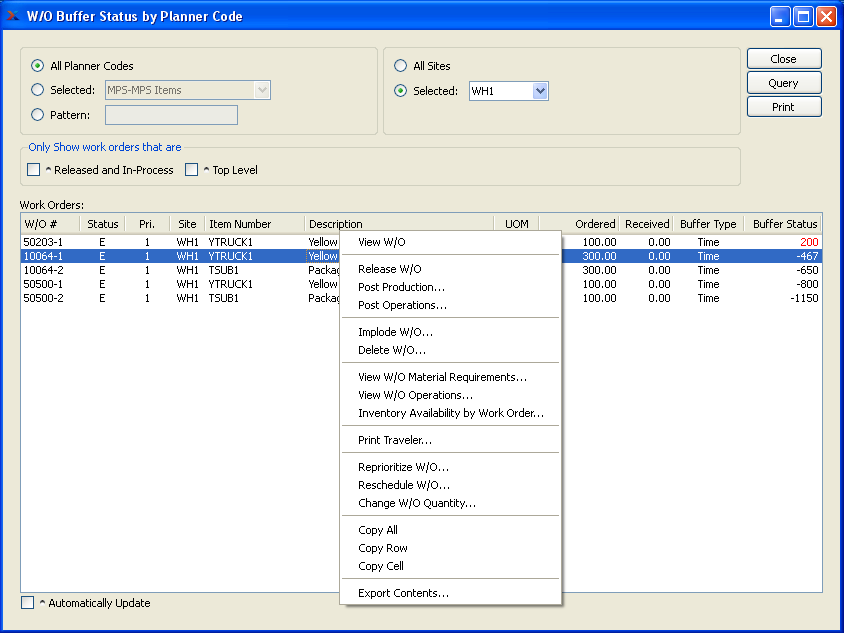
To view Work Order buffer status by Planner Code, select the "Work Order Buffer Status by Planner Code" option. The following screen will appear:
Note
When the buffer status for an Item hits 66 or higher, the status number will become red. By highlighting Items which are "red hot," the system is informing you which Items should be acted on immediately. The best remedy for red hot Item Sites is to expedite any associated Work Orders or Purchase Orders.
When displaying Work Order buffer status by Planner Code, you are presented with the following options:
- All Planner Codes
Select to display Work Order buffer statuses for all Planner Codes.
- Selected
Specify Planner Code whose Work Order buffer statuses you want to display.
- Planner Code Pattern
Enter a Planner Code pattern to select a range of Item Groups. Refine your search using Regular Expressions.
- All Sites
Select to display Work Order buffer statuses for all Sites.
- Selected
Specify Site whose Work Order buffer statuses you want to display.
Note
By default, the display will sort Work Orders by buffer status in descending order. In other words, Work Orders with the highest buffer status will appear at the top of the list; Work Orders with the lowest buffer status will appear at the bottom.
- Only Show Released and In-Process W/O"s
Select to display only released and in-process Work Order schedules. Selecting this option means only Work Orders whose Status is released ("R") or in-process ("I") will be displayed.
- Only Show Top Level Work Orders
Select to display only top level Work Orders. Top level Work Orders are Work Orders that have not been created to meet the component demands of a parent Work Order.
- Work Orders
Display lists Work Order buffer statuses by Planner Code, using the specified parameters.
- Automatically Update
Select to automatically update the display every five minutes.
To the far right and at the bottom of the screen, the following buttons are available:
- CLOSE
Closes the screen, returning you to the application desktop.
- QUERY
Select to generate the display, using the specified parameters.
Runs the report associated with this screen.
The Work Order buffer status displays provide information on your current stock and time buffer levels for those Items having current Work Orders. Stock buffers apply to make-to-stock Items; whereas time buffers apply to Items which are make-to-order. Keep in mind that buffer status information will only be displayed on days when the Constraint Management system is run. If you find your displays show no information, this probably means Constraint Management has not been run.
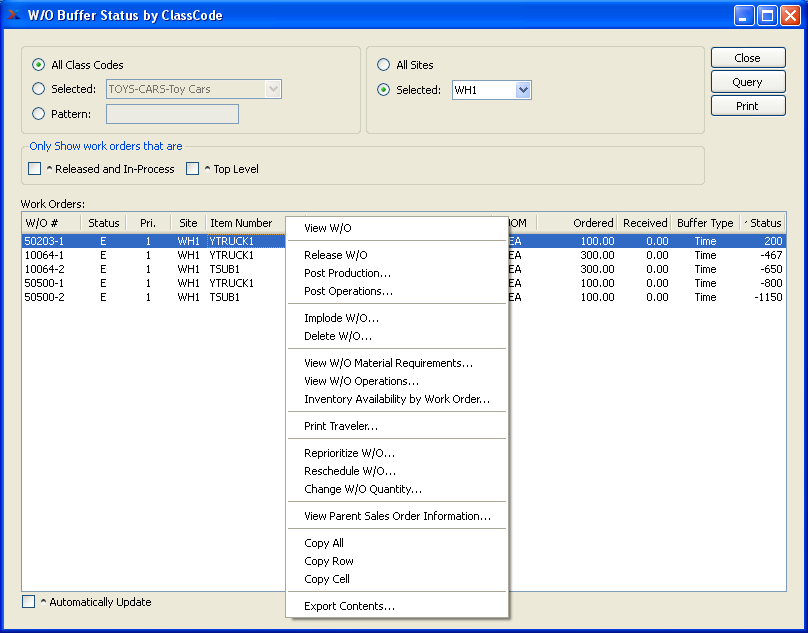
To view Work Order buffer status by Class Code, select the "Work Order Buffer Status by Class Code" option. The following screen will appear:
Note
When the buffer status for an Item hits 66 or higher, the status number will become red. By highlighting Items which are "red hot," the system is informing you which Items should be acted on immediately. The best remedy for red hot Item Sites is to expedite any associated Work Orders or Purchase Orders.
When displaying Work Order buffer status by Class Code, you are presented with the following options:
- All Class Codes
Select to display Work Order buffer statuses for all Class Codes.
- Selected
Specify Class Code whose Work Order buffer statuses you want to display.
- Class Code Pattern
Enter a Class Code pattern to select a range of Item Groups. Refine your search using Regular Expressions.
- All Sites
Select to display Work Order buffer statuses for all Sites.
- Selected
Specify Site whose Work Order buffer statuses you want to display.
Note
By default, the display will sort Work Orders by buffer status in descending order. In other words, Work Orders with the highest buffer status will appear at the top of the list; Work Orders with the lowest buffer status will appear at the bottom.
- Only Show Released and In-Process W/O"s
Select to display only released and in-process Work Order schedules. Selecting this option means only Work Orders whose Status is released ("R") or in-process ("I") will be displayed.
- Only Show Top Level Work Orders
Select to display only top level Work Orders. Top level Work Orders are Work Orders that have not been created to meet the component demands of a parent Work Order.
- Work Orders
Display lists Work Order buffer statuses by Class Code, using the specified parameters.
- Automatically Update
Select to automatically update the display every five minutes.
To the far right and at the bottom of the screen, the following buttons are available:
- CLOSE
Closes the screen, returning you to the application desktop.
- QUERY
Select to generate the display, using the specified parameters.
Runs the report associated with this screen.
The Work Order buffer status displays provide information on your current stock and time buffer levels for those Items having current Work Orders. Stock buffers apply to make-to-stock Items; whereas time buffers apply to Items which are make-to-order. Keep in mind that buffer status information will only be displayed on days when the Constraint Management system is run. If you find your displays show no information, this probably means Constraint Management has not been run.
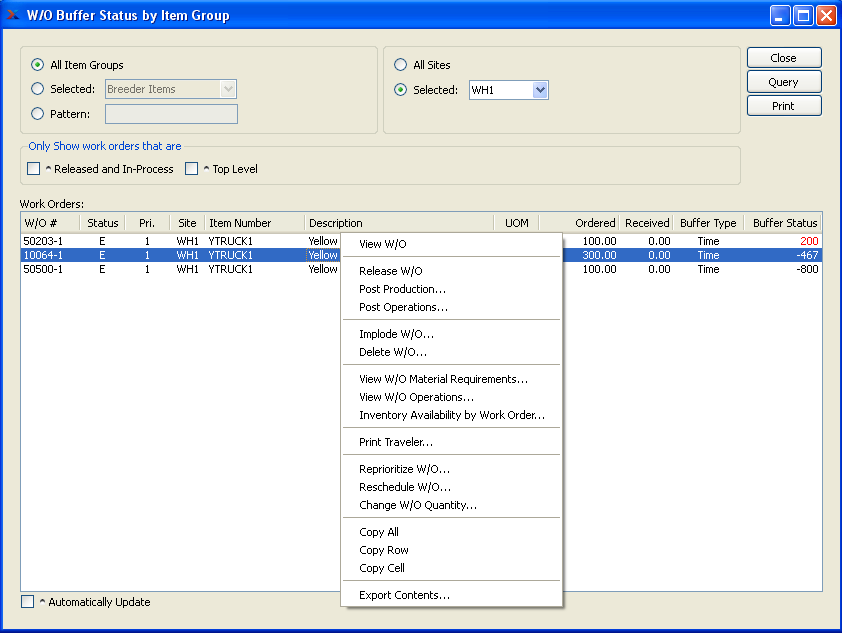
To view Work Order buffer status by Item Group, select the "Work Order Buffer Status by Item Group" option. The following screen will appear:
Note
When the buffer status for an Item hits 66 or higher, the status number will become red. By highlighting Items which are "red hot," the system is informing you which Items should be acted on immediately. The best remedy for red hot Item Sites is to expedite any associated Work Orders or Purchase Orders.
When displaying Work Order buffer status by Item Group, you are presented with the following options:
- All Item Groups
Select to display Work Order buffer statuses for all Item Groups.
- Selected
Specify Item Group whose Work Order buffer statuses you want to display.
- Item Group Pattern
Enter an Item Group pattern to select a range of Item Groups. Refine your search using Regular Expressions.
- All Sites
Select to display Work Order buffer statuses for all Sites.
- Selected
Specify Site whose Work Order buffer statuses you want to display.
Note
By default, the display will sort Work Orders by buffer status in descending order. In other words, Work Orders with the highest buffer status will appear at the top of the list; Work Orders with the lowest buffer status will appear at the bottom.
- Only Show Released and In-Process W/O"s
Select to display only released and in-process Work Order schedules. Selecting this option means only Work Orders whose Status is released ("R") or in-process ("I") will be displayed.
- Only Show Top Level Work Orders
Select to display only top level Work Orders. Top level Work Orders are Work Orders that have not been created to meet the component demands of a parent Work Order.
- Work Orders
Display lists Work Order buffer statuses by Item Group, using the specified parameters.
- Automatically Update
Select to automatically update the display every five minutes.
To the far right and at the bottom of the screen, the following buttons are available:
- CLOSE
Closes the screen, returning you to the application desktop.
- QUERY
Select to generate the display, using the specified parameters.
Runs the report associated with this screen.
The capacity buffer status display provides information on your current capacity buffer levels. Capacity buffers apply to Work Centers. The capacity buffer screen enables us to view the current load in relation to a definable number of days of capacity. Keep in mind that buffer status information will only be displayed on days when the Constraint Management system is run. If you find your displays show no information, this probably means Constraint Management has not been run.
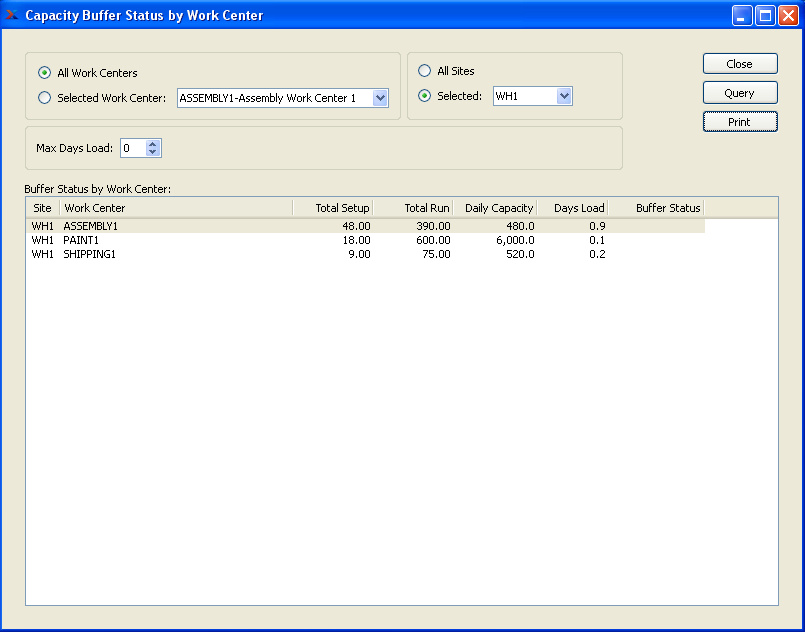
To view capacity buffer status by Work Center, select the "Capacity Buffer Status by Work Center" option. The following screen will appear:
Note
When the buffer status for a Work Center hits 66 or higher, the status number will become red. By highlighting lines which are "red hot," the system is informing you which should be acted on immediately. The best remedy for red hot Item Sites is to expedite any associated Work Orders or Purchase Orders.
When displaying capacity buffer statuses by Work Center, you are presented with the following options:
- All Work Centers
Select to display capacity buffer statuses for all Work Centers.
- Selected
Specify Work Center whose Inventory buffer status you want to display.
- All Sites
Select to display capacity buffer statuses for all Sites.
- Selected
Specify Site whose capacity buffer statuses you want to display.
- Max Days Load
Specify the maximum number of days worth of Work Center load you want to view, using the arrows to the right of the field. This is required information. You must enter a value greater than 0 to generate buffer status information. The system uses the following equation to determine the capacity buffer status for a Work Center:
(Total Setup + Total Run) / (Max Days Load x Daily Capacity) = Buffer (%)
Note
By default, the display will sort Work Centers by buffer status in descending order. In other words, Work Centers with the highest buffer status will appear at the top of the list; Work Centers with the lowest buffer status will appear at the bottom.
- Buffer Status by Work Center
Display lists capacity buffer status by Work Center, using the specified parameters.
To the far right of the screen, the following buttons are available:
- CLOSE
Closes the screen, returning you to the application desktop.
- QUERY
Select to generate the display, using the specified parameters.
Runs the report associated with this screen.
The Work Order buffer status displays provide information on your current stock and time buffer levels for those Items having current Work Orders. Stock buffers apply to make-to-stock Items; whereas time buffers apply to Items which are make-to-order. Keep in mind that buffer status information will only be displayed on days when the Constraint Management system is run. If you find your displays show no information, this probably means Constraint Management has not been run.
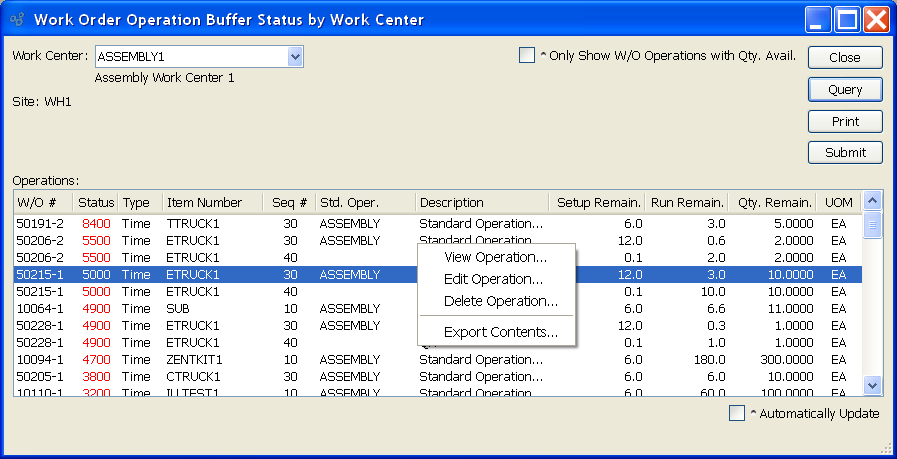
To view Work Order Operation buffer statuses by Work Center, select the "W/O Buffer Status by Work Center" option. The following screen will appear:
Note
When the buffer status for an Item hits 66 or higher, the status number will become red. By highlighting Items which are "red hot," the system is informing you which Items should be acted on immediately. The best remedy for red hot Item Sites is to expedite any associated Work Orders or Purchase Orders.
When displaying Work Order Operation buffer statuses by Work Center, you are presented with the following options:
- Work Center
Specify Work Center whose Work Order Operation buffer statuses you want to display.
- Site
Displays Site code for Site where Work Center is located.
Note
By default, the display will sort Work Orders by buffer status in descending order. In other words, Work Orders with the highest buffer status will appear at the top of the list; Work Orders with the lowest buffer status will appear at the bottom.
- Only Show W/O Operations with Qty. Available
Select to only show Work Order Operations with quantity available in the display.
- Operations
Display lists Work Order Operation buffer statuses by Work Center, using the specified parameters.
- Automatically Update
Select to automatically update the display every five minutes.
To the far right and at the bottom of the screen, the following buttons are available:
- CLOSE
Closes the screen, returning you to the application desktop.
- QUERY
Select to generate the display, using the specified parameters.
Runs the report associated with this screen.
- SUBMIT
Select to submit report to the Batch Manager.