Capacity Planning section.
To view time-phased Capacity by Work Center, select the "Time-Phased Capacity by Work Center" option. The following screen will appear:
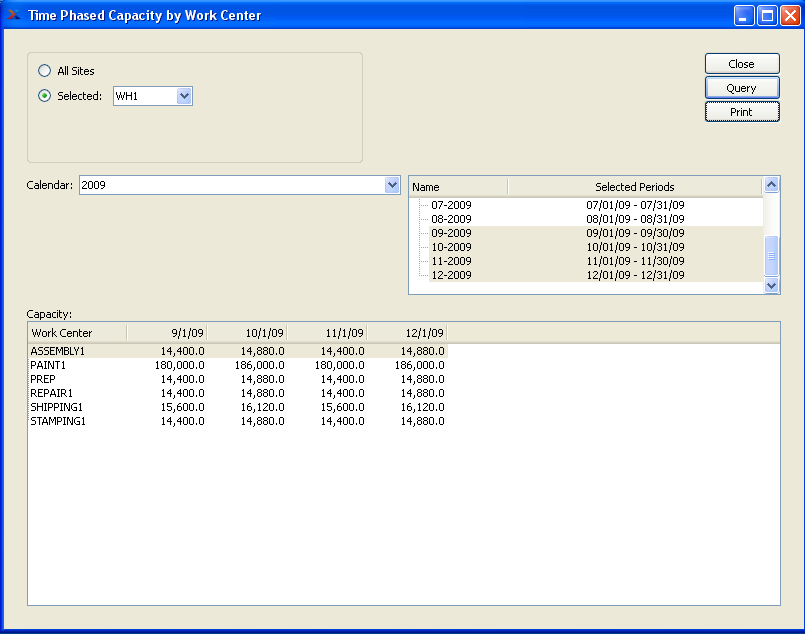
When displaying time-phased Capacity by Work Center, you are presented with the following options:
- All Sites
Select to display time-phased Capacity by Work Center for all Sites.
- Selected
Specify Site whose time-phased Capacity by Work Center you want to display.
- Calendar
Select the Calendar you want to use for the report. Associated Calendar periods will be displayed.
- Name/Selected Periods
Select as many periods as you want to display. Selected periods correspond to Calendar specified in the "Calendar" field. Select individual periods or groups of periods together. To select an individual period, highlight the period using your mouse button. The period is now selected. To select a sequence of periods, highlight the first in the sequence using your mouse button. Then, holding down the SHIFT key on your keyboard, highlight the last period in the sequence. The entire sequence is now selected. To select periods that are out of sequence (e.g., January, April, July, October), highlight the first period in the group. Then, holding down the CTRL key on your keyboard, highlight the next period you want to select. Continue highlighting periods with the CTRL key depressed until all desired periods are selected. The entire group is now selected.
- Capacity
Display lists time-phased Capacity by Work Center, using the specified parameters.
To the far right of the screen, the following buttons are available:
- CLOSE
Closes the screen, returning you to the application desktop.
- QUERY
Select to generate the display, using the specified parameters. Start date and end date must be entered for calculation to proceed. Results will be displayed in the "Capacity" display.
Runs the report associated with this screen.
To view time-phased load by Work Center, select the "Time-Phased Load by Work Center" option. The following screen will appear:
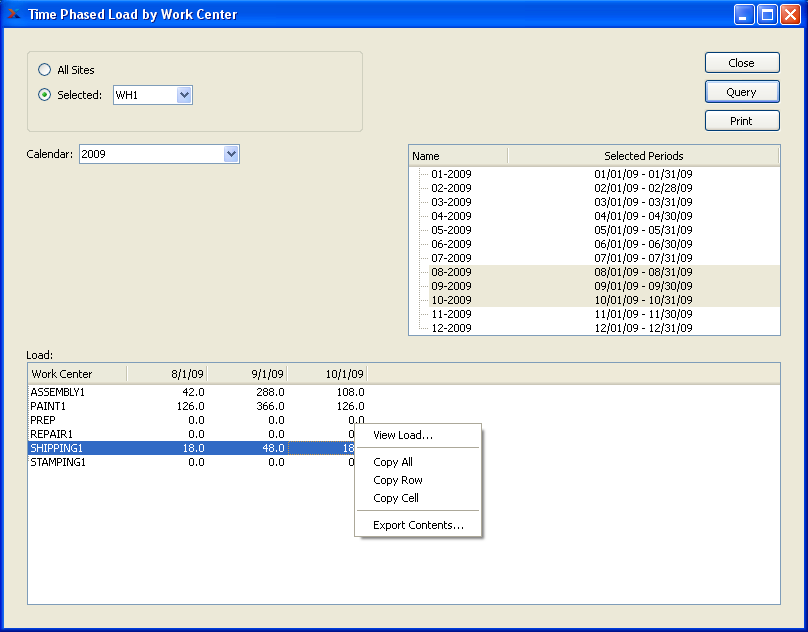
When displaying time-phased load by Work Center, you are presented with the following options:
- All Sites
Select to display time-phased load by Work Center for all Sites.
- Selected
Specify Site whose time-phased load by Work Center you want to display.
- Calendar
Select the Calendar you want to use for the report. Associated Calendar periods will be displayed.
- Name/Selected Periods
Select as many periods as you want to display. Selected periods correspond to Calendar specified in the "Calendar" field. Select individual periods or groups of periods together. To select an individual period, highlight the period using your mouse button. The period is now selected. To select a sequence of periods, highlight the first in the sequence using your mouse button. Then, holding down the SHIFT key on your keyboard, highlight the last period in the sequence. The entire sequence is now selected. To select periods that are out of sequence (e.g., January, April, July, October), highlight the first period in the group. Then, holding down the CTRL key on your keyboard, highlight the next period you want to select. Continue highlighting periods with the CTRL key depressed until all desired periods are selected. The entire group is now selected.
- Load
Display lists time-phased load by Work Center, using the specified parameters.
To the far right of the screen, the following buttons are available:
- CLOSE
Closes the screen, returning you to the application desktop.
- QUERY
Select to generate the display, using the specified parameters. Start date and end date must be entered for calculation to proceed. Results will be displayed in the "Load" display.
Runs the report associated with this screen.
To view time-phased available Capacity by Work Center, select the "Time-Phased Available Capacity by Work Center" option. The following screen will appear:
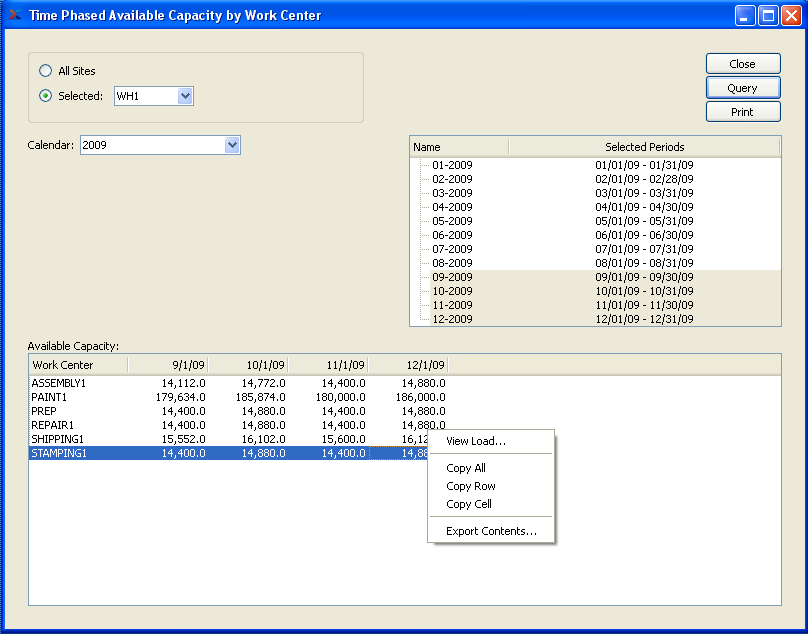
When displaying time-phased available Capacity by Work Center, you are presented with the following options:
- All Sites
Select to display time-phased available Capacity by Work Center for all Sites.
- Selected
Specify Site whose time-phased available Capacity by Work Center you want to display.
- Calendar
Select the Calendar you want to use for the report. Associated Calendar periods will be displayed.
- Name/Selected Periods
Select as many periods as you want to display. Selected periods correspond to Calendar specified in the "Calendar" field. Select individual periods or groups of periods together. To select an individual period, highlight the period using your mouse button. The period is now selected. To select a sequence of periods, highlight the first in the sequence using your mouse button. Then, holding down the SHIFT key on your keyboard, highlight the last period in the sequence. The entire sequence is now selected. To select periods that are out of sequence (e.g., January, April, July, October), highlight the first period in the group. Then, holding down the CTRL key on your keyboard, highlight the next period you want to select. Continue highlighting periods with the CTRL key depressed until all desired periods are selected. The entire group is now selected.
- Available Capacity
Display lists time-phased available Capacity by Work Center, using the specified parameters.
To the far right of the screen, the following buttons are available:
- CLOSE
Closes the screen, returning you to the application desktop.
- QUERY
Select to generate the display, using the specified parameters. Start date and end date must be entered for calculation to proceed. Results will be displayed in the "Available Capacity" display.
Runs the report associated with this screen.
Time-Phased Production section.
To view time-phased production by Planner Code, select the "Time-Phased Production by Planner Code" option. The following screen will appear:
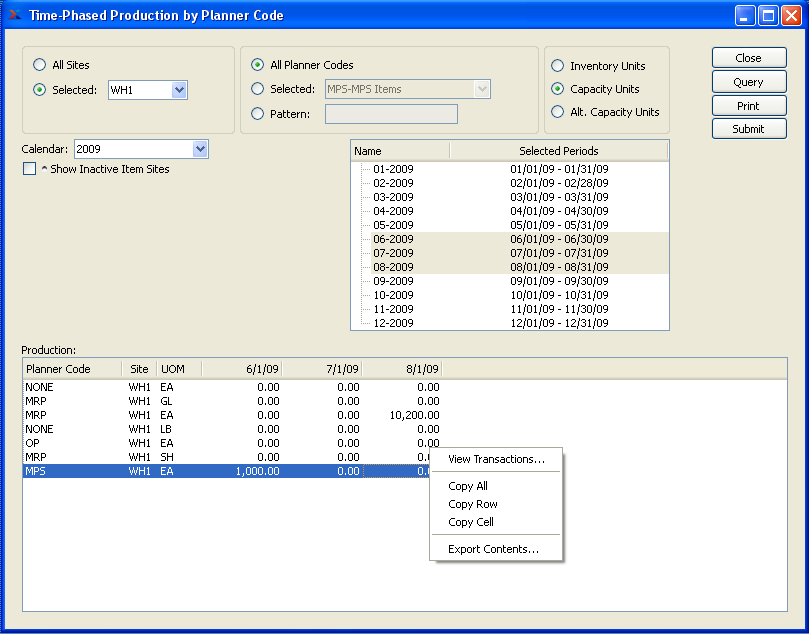
When displaying time-phased production by Planner Code, you are presented with the following options:
- All Sites
Select to display time-phased production by Planner Code for all Sites.
- Selected
Specify Site whose time-phased production by Planner Code you want to display.
- All Planner Codes
Select to display time-phased production for all Planner Codes.
- Selected
Specify Planner Code whose time-phased production you want to display.
- Pattern
Enter a Planner Code pattern to select a range of Planner Codes. Refine your search using Regular Expressions.
- Inventory Units
Select to display Inventory Units of Measure.
- Capacity Units
Select to display Capacity Units of Measure.
- Alt. Capacity Units
Capacity Units: Select to display Alternate Capacity Units of Measure.
- Calendar
Select the Calendar you want to use for the report. Associated Calendar periods will be displayed.
- Name/Selected Periods
Select as many periods as you want to display. Selected periods correspond to Calendar specified in the "Calendar" field. Select individual periods or groups of periods together. To select an individual period, highlight the period using your mouse button. The period is now selected. To select a sequence of periods, highlight the first in the sequence using your mouse button. Then, holding down the SHIFT key on your keyboard, highlight the last period in the sequence. The entire sequence is now selected. To select periods that are out of sequence (e.g., January, April, July, October), highlight the first period in the group. Then, holding down the CTRL key on your keyboard, highlight the next period you want to select. Continue highlighting periods with the CTRL key depressed until all desired periods are selected. The entire group is now selected.
- Show Inactive Item Sites
Select to include inactive Item Sites in the display.
- Production
Display lists time-phased production by Planner Code, using the specified parameters.
To the far right of the screen, the following buttons are available:
- CLOSE
Closes the screen, returning you to the application desktop.
- QUERY
Select to generate the display, using the specified parameters. Start date and end date must be entered for calculation to proceed. Results will be displayed in the "Production" display.
Runs the report associated with this screen.
- SUBMIT
Select to submit report to the Batch Manager.
To view time-phased production by Item, select the "Time-Phased Production by Item" option. The following screen will appear:
When displaying time-phased production by Item, you are presented with the following options:
- All Sites
Select to display time-phased production by Item for all Sites.
- Selected
Specify Site whose time-phased production by Item you want to display.
- All Planner Codes
Select to display time-phased production by Item for all Planner Codes.
- Selected
Specify Planner Code whose time-phased production by Item you want to display.
- Pattern
Enter a Planner Code pattern to select a range of Planner Codes. Refine your search using Regular Expressions.
- Calendar
Select the Calendar you want to use for the report. Associated Calendar periods will be displayed.
- Name/Selected Periods
Select as many periods as you want to display. Selected periods correspond to Calendar specified in the "Calendar" field. Select individual periods or groups of periods together. To select an individual period, highlight the period using your mouse button. The period is now selected. To select a sequence of periods, highlight the first in the sequence using your mouse button. Then, holding down the SHIFT key on your keyboard, highlight the last period in the sequence. The entire sequence is now selected. To select periods that are out of sequence (e.g., January, April, July, October), highlight the first period in the group. Then, holding down the CTRL key on your keyboard, highlight the next period you want to select. Continue highlighting periods with the CTRL key depressed until all desired periods are selected. The entire group is now selected.
- Production
Display lists time-phased production by Item, using the specified parameters.
To the far right of the screen, the following buttons are available:
- CLOSE
Closes the screen, returning you to the application desktop.
- QUERY
Select to generate the display, using the specified parameters. Start date and end date must be entered for calculation to proceed. Results will be displayed in the "Production" display.
Runs the report associated with this screen.
- SUBMIT
Select to submit report to the Batch Manager.
To view time-phased demand by Planner Code, select the "Time-Phased Demand by Planner Code" option. The following screen will appear:
When displaying time-phased demand by Planner Code, you are presented with the following options:
- All Sites
Select to display time-phased demand by Planner Code for all Sites.
- Selected
Specify Site whose time-phased demand by Planner Code you want to display.
- All Planner Codes
Select to display time-phased demand for all Planner Codes.
- Selected
Specify Planner Code whose time-phased demand you want to display.
- Pattern
Enter a Planner Code pattern to select a range of Planner Codes. Refine your search using Regular Expressions.
- Inventory Units
Select to display Inventory Units of Measure.
- Capacity Units
Select to display Capacity Units of Measure.
- Alt. Capacity Units
Capacity Units: Select to display Alternate Capacity Units of Measure.
- Calendar
Select the Calendar you want to use for the report. Associated Calendar periods will be displayed.
- Name/Selected Periods
Select as many periods as you want to display. Selected periods correspond to Calendar specified in the "Calendar" field. Select individual periods or groups of periods together. To select an individual period, highlight the period using your mouse button. The period is now selected. To select a sequence of periods, highlight the first in the sequence using your mouse button. Then, holding down the SHIFT key on your keyboard, highlight the last period in the sequence. The entire sequence is now selected. To select periods that are out of sequence (e.g., January, April, July, October), highlight the first period in the group. Then, holding down the CTRL key on your keyboard, highlight the next period you want to select. Continue highlighting periods with the CTRL key depressed until all desired periods are selected. The entire group is now selected.
- Demand
Display lists time-phased demand by Planner Code, using the specified parameters.
To the far right of the screen, the following buttons are available:
- CLOSE
Closes the screen, returning you to the application desktop.
- QUERY
Select to generate the display, using the specified parameters. Start date and end date must be entered for calculation to proceed. Results will be displayed in the "Demand" display.
Runs the report associated with this screen.
- SUBMIT
Select to submit report to the Batch Manager.
The capacity buffer status display provides information on your current capacity buffer levels. Capacity buffers apply to Work Centers. The capacity buffer screen enables us to view the current load in relation to a definable number of days of capacity. Keep in mind that buffer status information will only be displayed on days when the Constraint Management system is run. If you find your displays show no information, this probably means Constraint Management has not been run.
To view capacity buffer status by Work Center, select the "Capacity Buffer Status by Work Center" option. The following screen will appear:
Note
When the buffer status for a Work Center hits 66 or higher, the status number will become red. By highlighting lines which are "red hot," the system is informing you which should be acted on immediately. The best remedy for red hot Item Sites is to expedite any associated Work Orders or Purchase Orders.
When displaying capacity buffer statuses by Work Center, you are presented with the following options:
- All Work Centers
Select to display capacity buffer statuses for all Work Centers.
- Selected
Specify Work Center whose Inventory buffer status you want to display.
- All Sites
Select to display capacity buffer statuses for all Sites.
- Selected
Specify Site whose capacity buffer statuses you want to display.
- Max Days Load
Specify the maximum number of days worth of Work Center load you want to view, using the arrows to the right of the field. This is required information. You must enter a value greater than 0 to generate buffer status information. The system uses the following equation to determine the capacity buffer status for a Work Center:
(Total Setup + Total Run) / (Max Days Load x Daily Capacity) = Buffer (%)
Note
By default, the display will sort Work Centers by buffer status in descending order. In other words, Work Centers with the highest buffer status will appear at the top of the list; Work Centers with the lowest buffer status will appear at the bottom.
- Buffer Status by Work Center
Display lists capacity buffer status by Work Center, using the specified parameters.
To the far right of the screen, the following buttons are available:
- CLOSE
Closes the screen, returning you to the application desktop.
- QUERY
Select to generate the display, using the specified parameters.
Runs the report associated with this screen.