Schedule Master Information section.
Planner Codes are used to identify Items that fall under the jurisdiction of planners—that is, employees responsible for planning, scheduling, or procurement. To access the master list of Planner Codes, select the "Planner Codes" option. The following screen will appear:
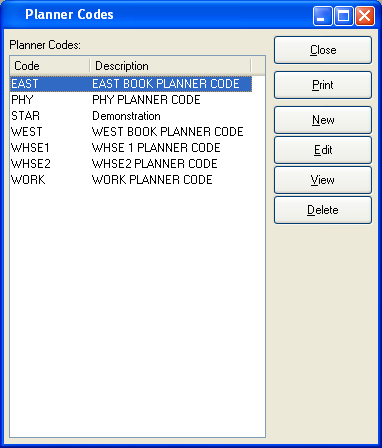
Planner Codes Master List
The "Planner Codes" screen displays information on all existing Planner Codes, including Planner Code and Planner Code description.
To the far right of the screen, the following buttons are available:
- CLOSE
Closes the screen, returning you to the application desktop.
Runs the report associated with this screen.
- NEW
Opens screen for creating a new Planner Code.
- EDIT
Enables you to edit highlighted Planner Codes. The edit screen is the same as that for creating a new Planner Code—except that when editing, the fields will contain Planner Code information. Double-clicking on a Planner Code will also bring you to the editing screen.
- VIEW
Highlight a Planner Code and then select this button to reach a read-only view of the "Edit" screen.
- DELETE
Highlight a Planner Code and then select this button to remove it from the list.
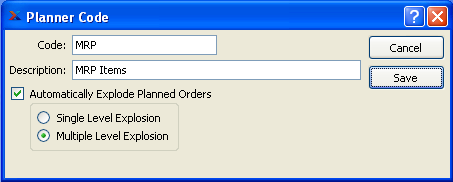
To create a new Planner Code, select the NEW button. The following screen will appear:
Tip
Create your Planner Codes using a logical, hierarchical structure. This will make it easier to retrieve Planner Code information in the future.
When creating a new Planner Code, you are presented with the following options:
- Code
Enter a code to identify the Planner Code.
- Description
Enter a brief description of the Planner Code.
Note
If you want requirements to be created for Planned Work Orders, the option "Automatically Explode Planned Orders" must be selected. If not selected, Planned Work Orders will not be exploded. This means that Planned Orders for lower level material requirements will not be generated when MRP is run.
- Automatically Explode Planned Orders
Select one of the following if you want Planned Work Orders to be exploded automatically:
- Single Level Explosion
This option specifies that when Planned Work Orders are exploded, requirements should be created for the parent Planned Work Order only.
- Multiple Level Explosion
This option specifies that requirements should be created for both parent and child Planned Work Orders.
Note
If you"re running MRP by Planner Code, the explosion level setting may not make a difference—depending on how your Planner Codes are assigned. For example, if all your Items fall within the same Planner Code, Planned Orders will be generated for all levels of requirements—regardless of whether single or multiple level explosion is set. The same does not hold true when running MRP by Item.
To the far right of the screen, the following buttons are available:
- CANCEL
Closes the screen without creating a Planner Code, returning you to the previous screen.
- SAVE
Creates the Planner Code and adds it to the master list of Planner Codes.
Site weeks are used to define the days of the week when a Site is open for business. For example, a production Site may operate from Monday-Friday; whereas, the hours for a Shipping Site may also include the weekend.
Note
The Constraint Management system considers work week settings when calculating time buffers for Item Sites.
To define the work week for a Site(s), select the "Site Week" option. The following screen will appear:
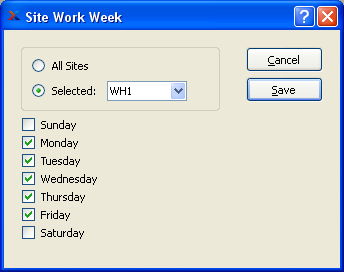
When defining the work week for a Site, you are presented with the following options:
- All Sites
Select to create a blanket schedule for all Sites. Specify which days the Sites are open for business. Settings made using this option will be inherited by all Sites.
Tip
After creating a blanket schedule for all Sites, you may then switch to the selected mode and modify the schedules for individual Sites.
- Selected
Select the Site whose work week you want to define. Specify which days the Site is open for business. Settings made using this option are specific to the selected Site.
To the far right of the screen, the following buttons are available:
- CANCEL
Closes the screen without creating work weeks for your Sites, returning you to the previous screen.
- SAVE
Creates the settings for any Site weeks you have defined.
Site calendar exceptions allow you to define variations from the standard work week for a Site(s). For example, you can indicate whether a Site will be closed for a company holiday—or whether extra shifts are being added to extend the standard week.
Note
The Constraint Management system will consider calendar exceptions when determining the time buffer status for an Item Site.
To access the master list of calendar exceptions, select the "Site Calendar Exceptions" option. The following screen will appear:
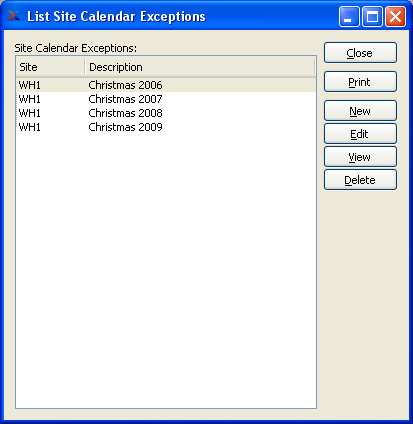
The "Site Calendar Exceptions" screen displays information on all existing Site calendar exceptions, including affected Site(s) and a description of the exception.
To the far right of the screen, the following buttons are available:
- CLOSE
Closes the screen, returning you to the application desktop.
Runs the report associated with this screen.
- NEW
Opens screen for creating a new Site calendar exception.
- EDIT
Enables you to edit Site calendar exceptions. The edit screen is the same as that for creating a new Site calendar exception—except that when editing, the fields will contain Site calendar exception information. Double-clicking on a Site calendar exception will also bring you to the editing screen.
- VIEW
Highlight a Site calendar exception and then select this button to reach a read-only view of the "Edit" screen.
- DELETE
Highlight a Site calendar exception and then select this button to remove it from the list.
Work Centers are collections of machines or labor that perform a specific task when building a manufactured Item. Work Centers are used by Bills of Operations to determine the amount of available and required manufacturing Capacity to produce the manufactured Item. Work Centers also determine the Cost, in direct labor, overhead, and, optionally, machine overhead, of such production. A single Site may contain multiple Work Centers. To access the master list of Work Centers, select the "Work Centers" option. The following screen will appear.
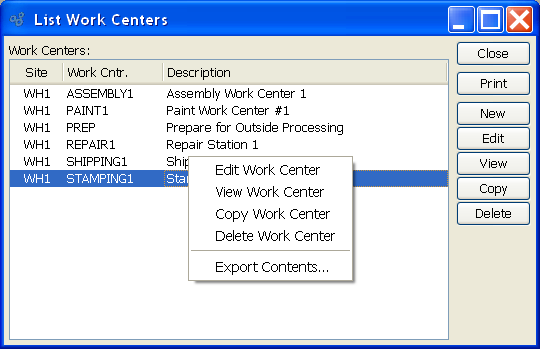
The "Work Centers" screen displays information on all existing Work Centers, including Site Location, Work Center name, number of machines, and Work Center description.
Tip
At least one Site must be entered into the system before a Work Center may be added.
To the far right of the list, the following buttons are available:
- CLOSE
Closes the screen, returning you to the application desktop.
Runs the report associated with this screen.
- NEW
Opens screen for creating a new Work Center.
- EDIT
Enables you to edit highlighted Work Centers. The edit screen is the same as that for creating a new Work Center—except that when editing, the fields will contain Work Center information. Double-clicking on Work Center will also bring you to the editing screen.
- VIEW
Highlight a Work Center and then select this button to reach a read-only view of the "Edit" screen.
- COPY
Highlight a Work Center and then select this button to reach a screen for copying the Work Center master.
- DELETE
Highlight a Work Center and then select this button to remove the Work Center from the list.
To create a new Work Center, select the NEW button. The following screen will appear:
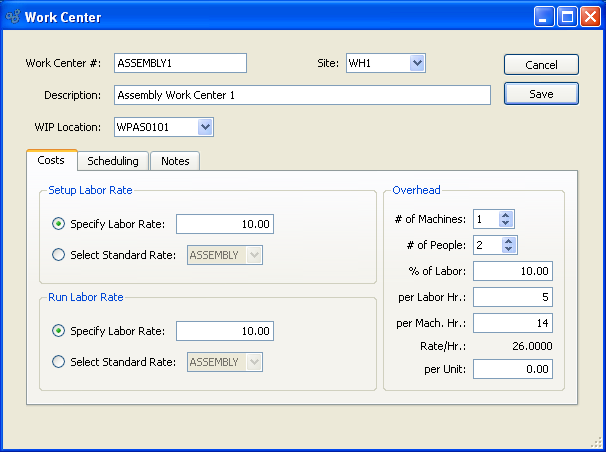
When creating a new Work Center, you are presented with the following options:
- Work Center #
Enter a unique code to identify the Work Center.
- Site
Specify the Site where the Work Center is located.
- Description
Enter a description to further identify the Work Center.
- WIP Location
Select a location that designates where the work center resides.
- Setup Labor Rate
Specify a setup labor rate from the following options:
- Specify Labor Rate
Amount entered represents dollars per man hour that it Costs to set up the Operation that will be performed at the Work Center. You have the choice of entering a specific setup labor rate in this field, or selecting a pre-defined Standard Labor Rate from the list in the succeeding field.
- Select Standard Rate
Select a pre-defined labor rate to be applied to the setup activity assigned to the Work Center. If you determine that none of the Standard Labor Rates apply to the setup activity involved with the Work Center, then you can manually specify a rate in the preceding field.
Tip
To calculate hourly labor rates for a Work Center, multiply the number of people by the labor rate—either the run rate or the setup rate. To calculate all Work Center charges, add overhead Costs to the sum of the labor rates.
- Run Labor Rate
Specify a run labor rate from the following options:
- Specify Labor Rate
Amount entered represents dollars per man hour that it Costs to complete the activity assigned to the Work Center. You have the choice of entering a specific run labor rate in this field, or selecting a pre-defined Standard Labor Rate from the list in the succeeding field.
- Select Standard Rate
Select a pre-defined labor rate to be applied for the activity assigned to the Work Center.
Note
For the purposes of Work Order reporting, Work Centers are set up only once. As a result, the setup labor rate is charged only once per Work Order. The run labor rate, on the other hand, is charged per Item produced. These rates may be adjusted after Work Order explosion using the Maintain Work Order Operations screen.
- Overhead
Specify overhead rates from the following options:
- # of Machines
Select a number using the arrow buttons, or manually enter a value up to a maximum of 99.
- # of People
Select a number using the arrow buttons, or manually enter a value up to a maximum of 1,000. Value entered indicates the multiplier that will be used for man hour calculations.
- Overhead % of Labor
Amount entered represents overhead for this Work Center as a percentage of the hourly run labor rate. The hourly run labor rate is equal to the number of people multiplied by the run labor rate.
- Overhead per Labor Hr.
Amount entered represents overhead for this Work Center as the number of dollars per man hour.
- Overhead per Mach. Hr.
Hr.: Amount entered represents overhead for this Work Center as the number of dollars per machine hour.
- Overhead Rate/Hr.
Displays automatic calculation of the Work Center's overhead Costs, expressed in dollars per hour. Calculation is based on the following formula, using data entered into the Work Center screen:
(overhead % of labor * run labor rate) +
(overhead per labor Hr. * # of People) +
(overhead per mach. hr. * # of machines) = overhead rate/Hr.
- Overhead per Unit
Amount entered represents overhead for this Work Center as the number of dollars per unit produced.
To the far right of the screen, the following buttons are available:
- CANCEL
Closes the screen without creating the Work Center, returning you to the previous screen.
- SAVE
Creates the Work Center and adds it to the master list of Work Centers.
When the scheduling tab is selected, the screen will appear as follows:
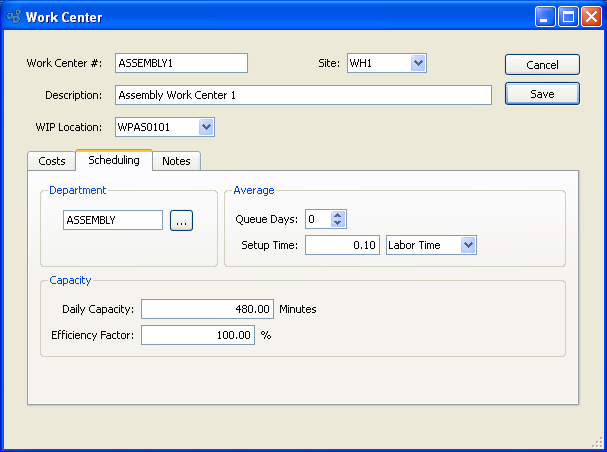
- Department
Specify a Department to be associated with the Work Center. This is an optional setting.
- Average
Specify average times to complete work with the following options:
- Queue Days
Queue Days: Select a number using the arrow buttons, or manually enter a value up to a maximum of 999. Amount entered represents the average number of days between the day a job arrives at the Work Center and the day work begins on the job.
- Setup Time
Setup Time: Amount entered represents the average amount of time required to set up the Work Center in preparation for starting the job. This option also enables you to specify whether setup time relates to labor time or machine time.
- Capacity
Specify capacity available with the following options:
- Daily Capacity
The amount entered indicates the number of minutes worth of production the Work Center is available to perform in one day.
- Efficiency Factor
Amount entered will be multiplied by the daily Capacity to determine the standard Capacity for the Work Center. The standard Capacity value will be used when determining the actual Capacity for this Work Center. The efficiency factor for a Work Center should be developed based on time studies.
When the notes tab is selected, the screen will appear as follows:
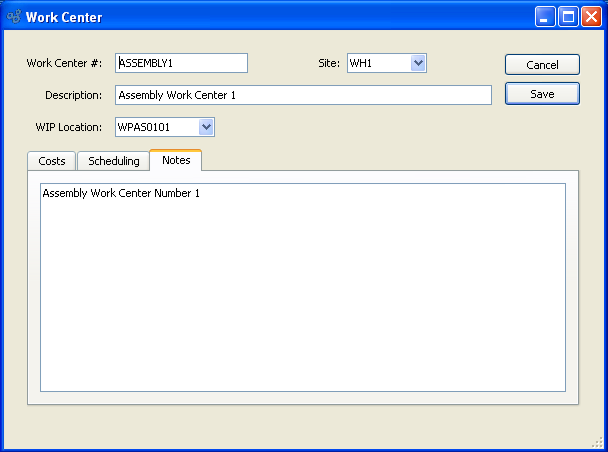
- Notes
This is a scrolling text field with word-wrapping for entering Comments related to the Work Center.