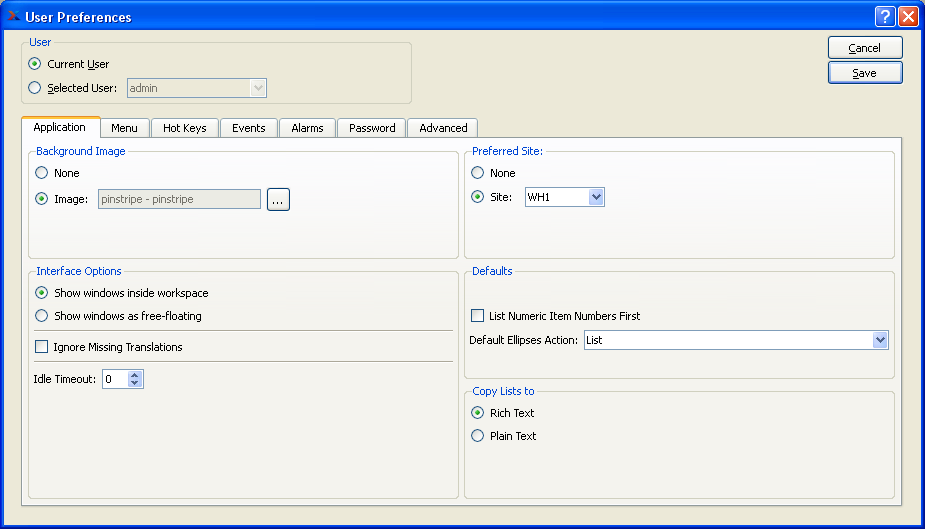
The Preferences section enables users to customize the look and feel of their main application window. Users can also specify various application defaults. While users have the ability to modify their own preferences, only those users granted the "MaintainUsers" privilege can change another user's preferences. To access the Preferences area, select the "Preferences" option. The following screen will appear:
When establishing user preferences, you are presented with the following options:
- Current User
Select to edit user preferences for the current user. This is the only option available to users who do not have the "MaintainUsers" privilege.
- Selected User
Select an individual user to view and/or edit preferences for that user. This option is only available to system administrators and others who have been granted the "MaintainUsers" privilege. Only users who have been granted this privilege can edit the preferences of other users. The usernames of all users who are registered on the current Database will appear in the list.
- Background Image
Select one of the following background image options:
- None
Select if you do not want to add digital wall paper on the main application work space.
- Image
Specify an Image definition to create digital wall paper on the main application work space.
- Interface Options
Select one of the following window behaviors:
- Show windows inside workspace
Select to make non-modal screens open within the main desktop window.
- Show windows as free-floating
For new xTuple installations, this is the default selection. With this option turned on, all screens will be free-floating and not constrained by the main desktop.
- Ignore Missing Translations
Select to bypass the warning message which may be presented at log in to indicate that a translation file is missing. The warning may be irrelevant in some cases. This User Preference option will be useful in situations where the default language is acceptable, even though the country designation on the user's Locale might indicate otherwise. For example, in the United Kingdom (UK), the language may be English and the country United Kingdom—allowing for date and time localizations specific to the UK. However, because the default English language translation is acceptable, there's no need for an alternate translation file just for the UK (e.g.,
xTuple.en_uk.qm).- Idle Timeout
Value entered dictates the number of minutes before the client automatically shuts down. To turn the idle timeout feature off, simply set the value = 0.
- Preferred Site
Select one of the following default Site preferences:
- None
Select if the user does not have a preferred Site.
- Site
Specify the preferred Site. Sites designated as preferred will appear at the top of Site list by default—eliminating the need to search the menu for the desired Site code. The user may access other Sites in these lists in the normal way. Assigning a preferred Site is simply a time-saving feature and does not affect user access to Site data.
- Defaults
Specify preferences for the following defaults:
- List Numeric Item Numbers First
Select to list numeric Item Numbers before alphabetic Item Numbers in displays featuring Item Numbers.
- Default Ellipses Action
Specify whether you want to launch a List view or a Search view after selecting a browse button to look up information. The List view corresponds to the standard CTRL+L keyboard shortcut functionality; whereas the Search view corresponds to CTRL+S functionality.
- Copy Lists to
Specify how you want text (e.g., displayed lists) to be copied to your computer's clipboard:
- Rich Text
Select to preserve font, coloring, and other formatting information for pasting into office applications like Open Office Calc or Excel.
- Plain Text
Select to copy only the most basic text information for pasting into simple text editors.
To the far right of the screen, the following buttons are available:
- CANCEL
Closes the screen without making any changes to the user's preferences, returning you to the application desktop.
- SAVE
Saves the user Preference settings, returning you to the application desktop.
The system allows you to show only those menus which you want to see. To define your menu preference, select the "Menu" tab. The following screen will appear:
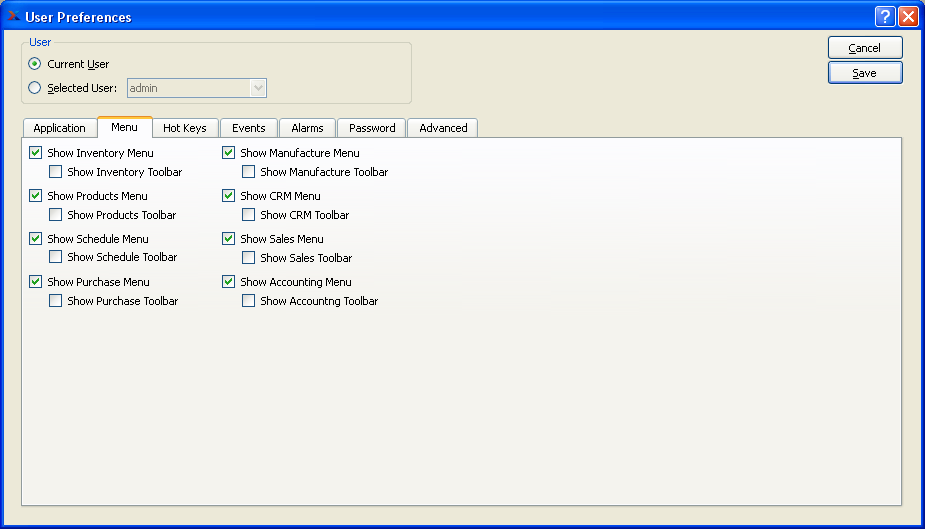
When specifying a preferred menu style, you are presented with the following options:
Note
For a complete list of all the toolbar buttons available for each module, see Section 2.7.6, “Toolbar Buttons”.
- Show Inventory Menu
Select to display the Inventory module menu on the user's main application window.
- Show Inventory Toolbar
Select to display the Inventory module toolbar buttons on the user's main application window.
- Show Products Menu
Select to display the Products module menu on the user's main application window.
- Show Products Toolbar
Select to display the Products module toolbar buttons on the user's main application window.
- Show Schedule Menu
Select to display the Schedule module menu on the user's main application window.
- Show Schedule Toolbar
Select to display the Schedule module toolbar buttons on the user's main application window.
- Show Purchase Menu
Select to display the Purchase module menu on the user's main application window.
- Show Purchase Toolbar
Select to display the Purchase module toolbar buttons on the user's main application window.
- Show Manufacture Menu
Select to display the Manufacture module menu on the user's main application window.
- Show Manufacture Toolbar
Select to display the Manufacture module toolbar buttons on the user's main application window.
- Show CRM Menu
Select to display the CRM module menu on the user's main application window.
- Show CRM Toolbar
Select to display the CRM module toolbar buttons on the user's main application window.
- Show Sales Menu
Select to display the Sales module menu on the user's main application window.
- Show Sales Toolbar
Select to display the Sales module toolbar buttons on the user's main application window.
- Show Accounting Menu
Select to display the Accounting module menu on the user's main application window.
- Show Accounting Toolbar
Select to display the Accounting module toolbar buttons on the user's main application window.
Each user has the option of setting up custom keyboard shortcuts, otherwise knows as Hot Keys. These Hot Keys make it possible to launch individual screens using the keyboard. To set up user-defined Hot Keys, select the "Hot Keys" tab. The following screen will appear:
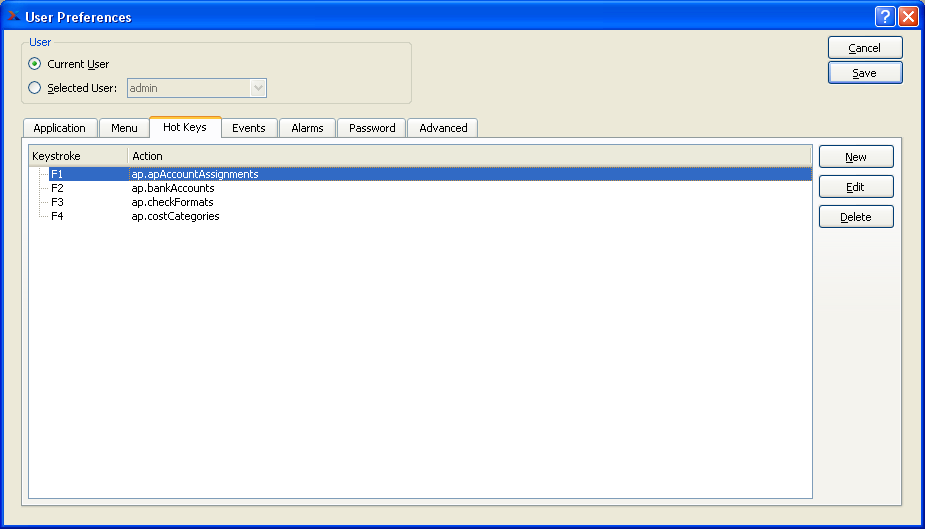
The "Hot Keys" screen displays information on all existing Hot Keys, including keyboard keystroke and related action.
To the far right of the screen, the following buttons are available:
- NEW
Opens screen for creating a new Hot Key.
- EDIT
Enables you to edit highlighted Hot Key definitions. The edit screen is the same as that for creating a new Hot Key definition—except that when editing, the fields will contain Hot Key information. Double-clicking on a Hot Key definition will also bring you to the editing screen.
- DELETE
Highlight a Hot Key definition and then select this button to remove the Hot Key from the list.
To define or modify a user's Event notification preferences, select the "Events" tab. The following screen will appear:
Note
For a complete list of user-defined Events see Section 1, “ Inventory Transaction Types”.
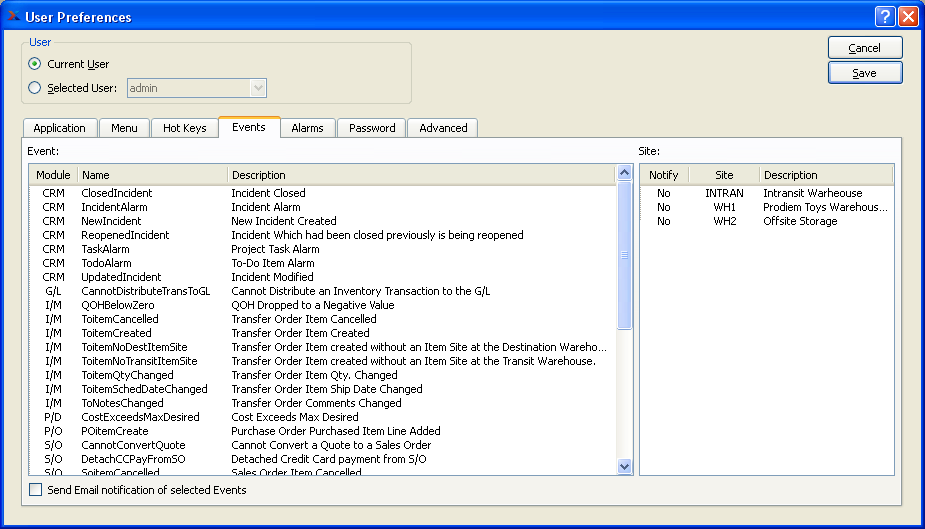
When defining or modifying a user's Event notification preferences, you are presented with the following options:
- Event
Displays the complete list of system-defined Events. Highlight an Event and then double-click a Site in the adjacent Site column to set the user's Event notification preference for that Site. Selecting "Yes" means the user will be notified if the specified event occurs in the specified Site. Selecting "No" means the user will not be notified about the Event if it occurs in that Site. To globally affect the settings for all Sites, double-click on an Event. Double-clicking on an Event causes the Site settings to toggle back-and-forth between "Yes" and "No."
Note
When an Event occurs, the Event notification button will appear in the lower left-hand corner of the application desktop. This alerts the user that one of the Events they subscribe to has occurred. Open the Event Manager to view and respond to the Event.
- Sites
Displays the complete list of Sites. Highlight an Event in the adjacent Event column and then double-click a Site to set the user's Event notification preference for that Site. Selecting "Yes" means the user will be notified if the specified event occurs in the specified Site. Selecting "No" means the user will not be notified about the Event if it occurs in that Site. To globally affect the settings for all Sites, double-click on an Event. Double-clicking on an Event causes the Site settings to toggle back-and-forth between "Yes" and "No."
Alarms offer a method for alerting users when Tasks or To-Dos are due or near due. The preferences may be changed at the local level, but to define a user's global Alarm preferences, select the "Alarms" tab. The following screen will appear:
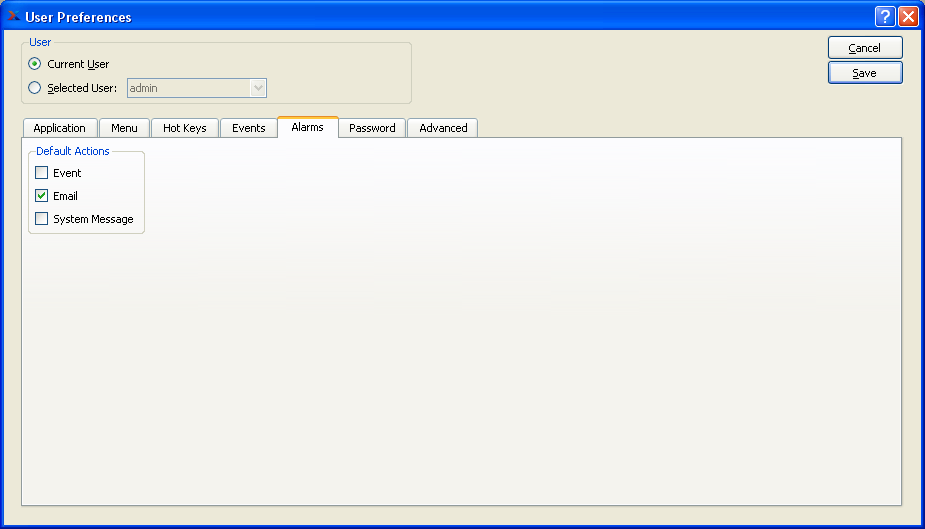
When defining or modifying a user's global Alarm notification preferences, you are presented with the following options:
- Event
Select Event if you would like an alarm to alert you when an event occurs.
Select Email if you would like an alarm to alert you when a system Email has been sent to you.
- System Message
Select System Message if you would like an alarm to alert you when a System Message has occurred.
System administrators typically set the initial password for their users. But then users often like to set their password to something different. If you are a user and want to change your password, select the "Password" tab. The following screen will appear:
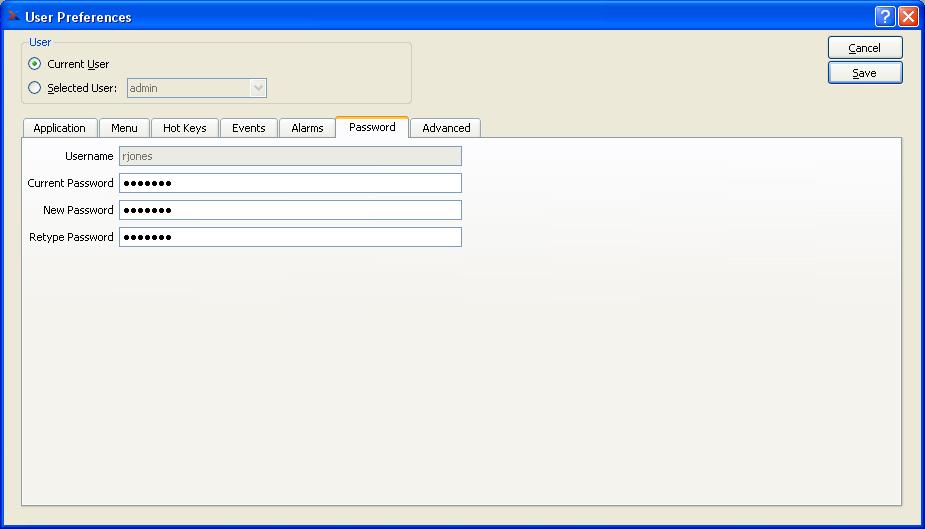
When changing your password, you are presented with the following options:
- Username
Displays your username.
- Current Password
Enter your current password.
- New Password
Enter your new password.
- Retype Password
Retype your new password to verify it. The next time you log in you can use your new password.
To specify advanced user preferences, select the "Advanced" tab. The following screen will appear:
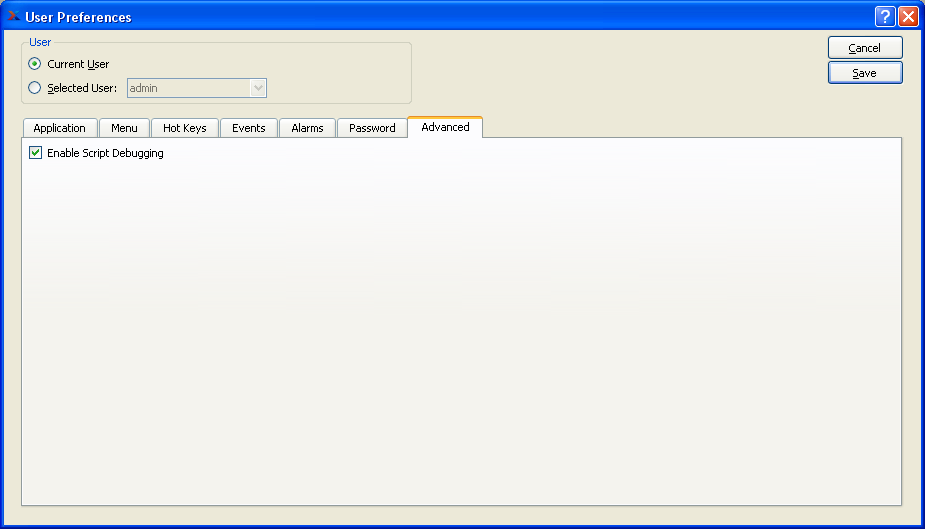
When specifying advanced user preferences, you are presented with the following options:
- Enable Script Debugging
Select to enable automatic script debugging using the Qt Script debugger. If selected, any custom script that contains the "debugger" command will launch the Qt Script debugger at that point. If you are trying to develop your own custom scripts and want to use the Qt Script debugger, xTuple recommends starting your script with this command.
To create a new Hot Key, select the NEW button. The following screen will appear:
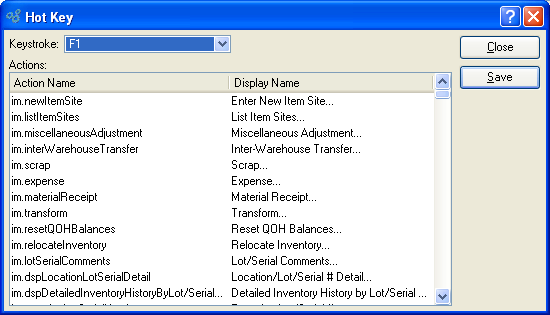
When creating a new Hot Key, you are presented with the following options:
- Keystroke
Select a keyboard keystroke from the list of available keystrokes. The list will include all keystrokes which may linked to a specific action. Only one action at a time may be assigned to a single keystroke. For multiple actions, multiple keystrokes must be used.
- Actions
Display lists actions you may associate with keystrokes.
To the far right of the screen, the following buttons are available:
- CLOSE
Closes the screen without creating a Hot Key, returning you to the application desktop.
- SAVE
Creates the Hot Key and adds it to the list of Hot Keys.