The Maintain Groups section enables system administrators to create common groups of user privileges. Then, when new users are added, the users can be assigned to the user group they should belong to. Having user groups simplifies the process of adding new users into the system. The following screen will appear when you select the "Maintain Groups" option:
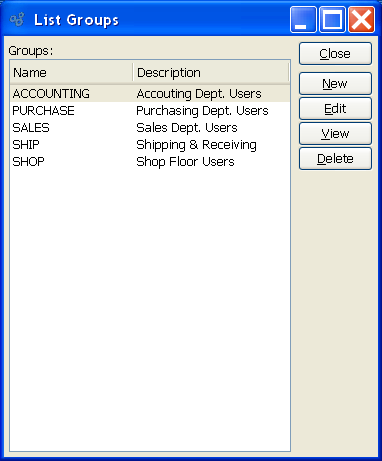
The "Maintain Groups" screen displays information on all existing user groups, including group name and description.
- CLOSE
Closes the screen, returning you to the application desktop.
- NEW
Opens screen for creating a new user group.
- EDIT
Enables you to edit highlighted user groups. The edit screen is the same as that for creating a new user group—except that when editing, the fields will contain user group information. Double-clicking on a user group will also bring you to the editing screen.
- VIEW
Highlight a user group and then select this button to reach a read-only view of the "Edit" screen.
- DELETE
Highlight a user group and then select this button to remove the user group from the list.
To create a new user group, select the NEW button. The following screen will appear:
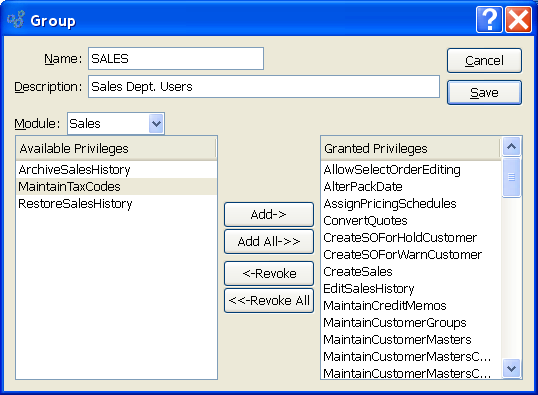
When creating a new user group, you are presented with the following options:
- Module
Select an individual module to assign privileges for that module. Assign privileges to the user group on a module-by-module basis. Select one module, assign the appropriate privileges, and then repeat for each subsequent module users in the group will need access to. All application modules are included in the list.
- Available Privileges
Select appropriate privileges from list of available privileges. The privileges listed in this column represent the full range of privileges available for the specified module. The list of available privileges will change as different modules are specified. To grant privileges to a user group, highlight an available privilege and then click the ADD button. The highlighted privilege will be added to the user group's list of granted privileges. Double-clicking on a privilege will also move it to the granted privileges column. You can grant all privileges for a specified module by clicking on the ADD ALL button.
- Granted Privileges
Displays granted privileges for the specified user group. To remove a user group's granted privileges for a specified module, highlight a granted privilege and then click the REVOKE button. The highlighted privilege will be removed from the user group's list of granted privileges. Double-clicking on a privilege will also remove it from the granted privileges column. You can remove all granted privileges for a specified module by clicking on the REVOKE ALL button.
The following buttons are located between the Available Privileges and Granted Privileges columns:
- ADD->
Highlight a specific privilege in the available privileges column, then select this button to transfer the privilege to the granted privileges column. Double-clicking on an available privilege will also transfer it to the granted privileges column.
- ADD ALL->>
Select this button to automatically transfer all available privileges to the granted privileges column.
- <-REVOKE
Highlight a specific privilege in the granted privileges column, then select this button to remove the privilege from the granted privileges column. Double-clicking on a granted privilege will also remove it from the granted privileges column.
- <<-REVOKE ALL
Select this button to automatically remove all granted privileges from the granted privileges column.
To the far right of the screen, the following buttons are available:
- SAVE
Saves the specified user group's information and adds it to the list of registered users.
- CLOSE
Closes the screen without saving any changes, returning you to the previous screen.