| Prev | Part II. Guided Tour and Tutorial Chapter 5. ProActive Example Applications |
 |
Next |
Distribution is often used for CPU-intensive applications, where parallelism is a key for performance. The parallelization of programs can be facilitated with ProActive, thanks to asynchronous method calls (see Section 10.7, “Asynchronous calls and futures”), as well as group communications (see Chapter 11, Typed Group Communication).
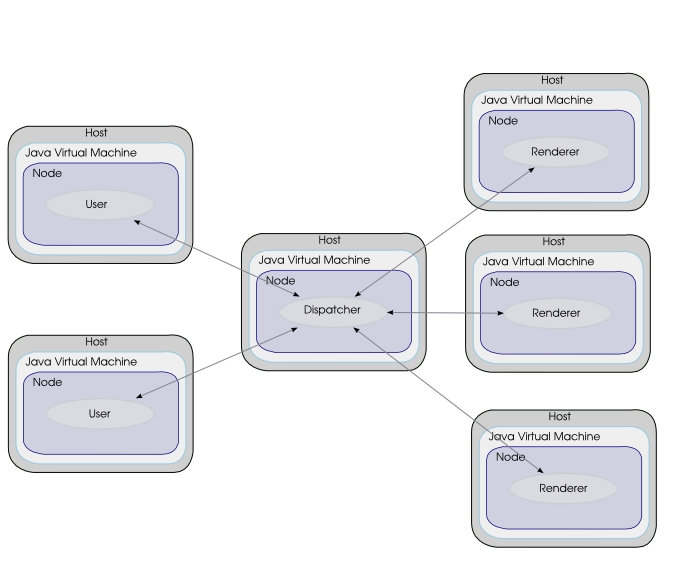
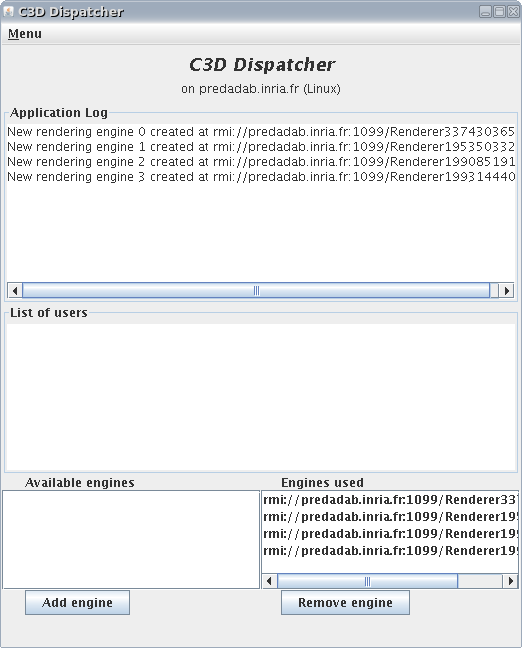
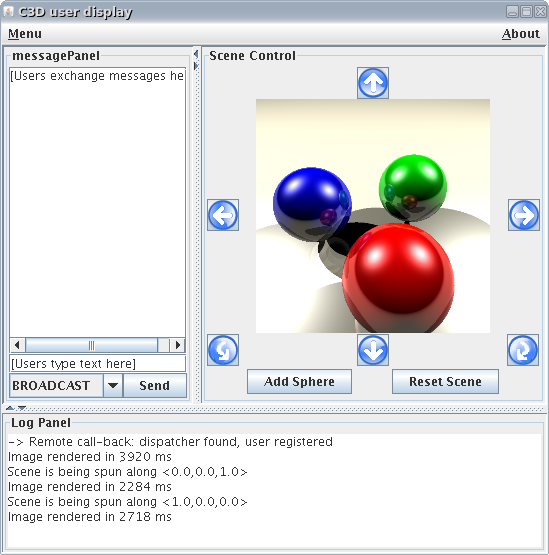
To illustrate how parallelization can be used for computationally intensive tasks we have built the C3D application. C3D is a Java benchmark application that measures the performance of a 3D raytracer renderer distributed over several Java virtual machines using Java RMI. It showcases some of the benefits of ProActive, notably the ease of distributed programming, and the speedup through distributed parallel calculation. This benchmark gives indication of the performance of the serialization process and Java RMI itself. The benchmark is an automated version of C3D, which is both a collaborative application and a distributed raytracer: users can interact through messaging and voting facilities in order to choose a scene that is renderer using a set of distributed rendering engines working in parallel. Near-linear speedup is achieved with up to half a dozen rendering engines running in parallel that communicate using Java RMI and controlled by a central dispatcher.
The C3D application uses three scripts that can be found under examples/c3d:
c3d_one_user.sh or c3d_one_user.bat
launches the C3D Dispatcher with four rendering engines and one user.
c3d_no_user.sh or c3d_no_user.bat
launches the C3D Dispatcher with four rendering engines and no user
c3d_add_user.sh or
c3d_add_user.bat adds another users
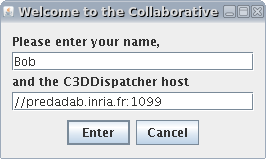
To use the application first start the dispatcher using either
c3d_one_user.sh/bat or c3d_no_user.sh/bat
and then add users with c3d_add_user.sh/bat
ProActive provides an advanced synchronization mechanism that allows an easy and safe implementation of complex synchronization policies.
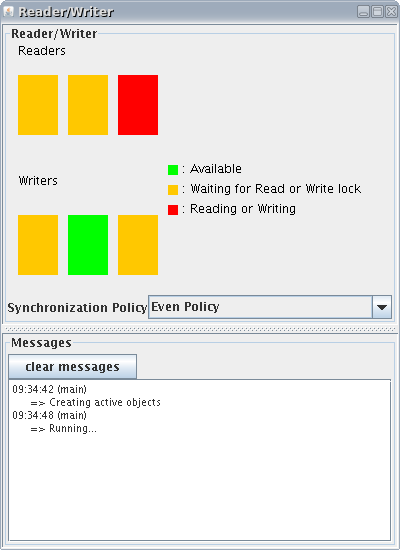
The readers/writers application showcases the synchronization capabilities of ProActive. In order to allow concurrency while ensuring the consistency of the readings, accesses to the data have to be synchronized upon a specified policy.
The implementation with ProActive uses 3 active objects: Reader, Writer, and the controller class (ReaderWriter).
To start the application use examples/readers.
ProActive starts a node (i.e. a JVM) on the current machine, and creates 3 Writers, 3 Readers, a ReaderWrite (the controller of the application), and a ReaderDisplay, all of which are active objects.
The examples has three synchronization modes "Priority to Writers", "Priority to Readers", and "Even Policy". The application is able to assign different priority to readers or writers without blocking on reading or writing.
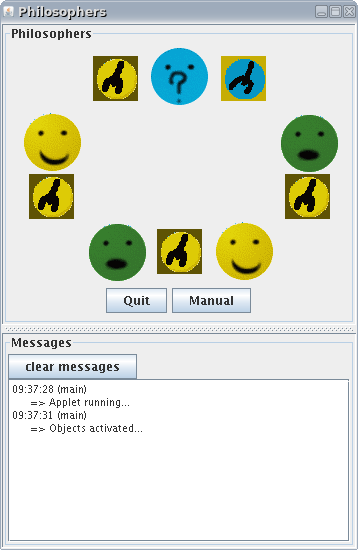
The 'dining philosophers' problem is a classic exercise in concurrent programming with the goal of avoiding deadlocks. In the problem there are five philosophers sitting around a dinner table and sharing five forks. The philosophers alternate between eating and thinking. When eating, a philosopher must use the two forks adjacent to him. As there are not enough forks for all the philosophers to eat at the same time, the possibility of deadlock arises.
We have provided an illustration of the solution using ProActive, where all the philosophers are active objects, as well as the table (controller) and the dinner frame (user interface).
To start the application use examples/philosophers/philosophers.sh
or examples\philosophers\philosophers.bat depending on your operating
system.
ProActive creates a new node and instantiates the active objects of the application: DinnerLayout, Table, and Philosopher
The pictures represent the state of the philosophers. They can be:
 philosophizing
 hungry, wants the
fork!
hungry, wants the
fork!
 eating
The forks can have two states:
 taken
taken
 free
free
You can either run the application in autopilot mode running it by itself without encountering a deadlock or in manual mode where you click on the philosophers' heads to switch their modes. You can starve one of the philosophers. (i.e. the others alternate eating and thinking while one never eats!)
ProActive allows the transparent migration of active objects between virtual machines. The migration happens while the application containing the active objects is running and without interruptions in the application.
The penguin migration example shows how a set of mobile agentscan move around from machine to machine while still communicating with their base and with each other. It also features the ability to move a swing window between screens while moving an agent from one JVM to the other.
Use the examples/penguin/penguin.sh
script to start the penguin controller. The controller allows you to add
a new agent (penguin), and control its itinerary.
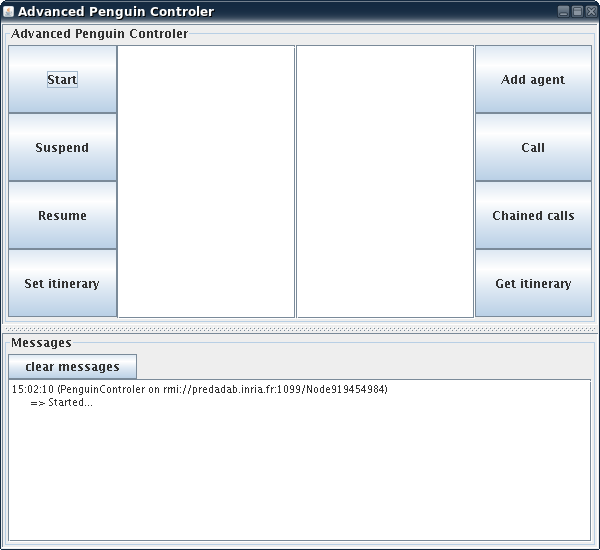
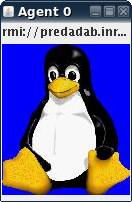
The active object is moving between the machines (specified in the deployment descriptor) , and that the penguin window disappears and reappears on the screen associated with the new JVM.
ProActive has support for groups and migration. To show this we have programmed a simple chat application using the groups framework. The clients in the application can communicate to each other in a decentralized manner and can migrate from computer to computer.
To start a chat client run chat.sh
or chat.bat from the examples/chat/folder.
The syntax is chat.sh|bat user_name host_to_connect_to user_to_connect_to .
When you start the first client the last argument can have any value. However if you want to connect to another chat you have to supply a valid user name and host. The communication is not dependent on any particular user. The first user that created the chat can leave and the other users can still communicate.
Start the first user by running chat.sh|bat toto localhost no_user .
The following window appears.
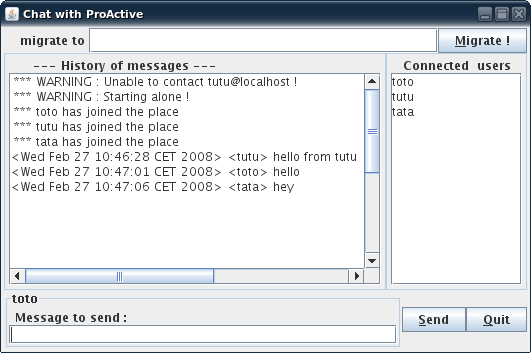
To connect the user tutu run chat.sh|bat tutu localhost toto .
You can further connect other users in the same manner. Run chat.sh|bat tata localhost tutu .
You can connect to any user in the chat and you will have access to all the users.
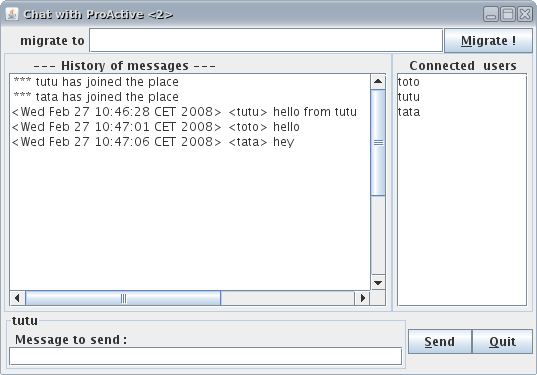
The chat application can be migrated to another computer.
All we have to do to fully migrate one chat is start a node on the
remote computer using
startNode.sh or startNode.bat from
the scripts folder. We have to use a parameter in the form of
rmi://hostname/node_name to start the node.
After starting the node we can migrate the chat application
by putting the URL //hostname/node_name in the
migrate to textbox and clicking on the Migrate button.
The application will be recreated on the remote computer with its state
intact and ready to communicate to the other users.
The MPI PI program approximates pi by computing :
pi = integral from 0 to 1 of 4/( 1+x*x ) dx
Which is approximated by :
sum from k=1 to N of 4 / ( ( 1 +( k-1/2 ) **2 )
The only input data required is N, the number of iterations.
The communication pattern is done in 2 steps by first having the process 0 broadcast N and wait for the result from each other process. After the results are recieved the process sums the values.
In this chapter we are going to see a simple example of an MPI written program ported to ProActive.
First let's introduce what we are going to compute.
This simple program approximates pi by computing :
pi = integral from 0 to 1 of 4/( 1+x*x ) dx
Which is approximated by :
sum from k=1 to N of 4 / ( ( 1 +( k-1/2 ) **2 )
The only input data required is N, the number of iterations.
Involved files :
ProActive/doc-src/mpi_files/int_pi2.c : the original MPI implementation
ProActive/src/Examples/org/objectweb/proactive/examples/integralpi/Launcher.java : the main class
ProActive/src/Examples/org/objectweb/proactive/examples/integralpi/Worker.java : the class implementing the SPMD code
Some basic primitives are used, notice that MPI provides a rank to each process and the group size ( the number of involved processes ).
  // All instances call startup routine to get their instance number (mynum)
  MPI_Init(&argc, &argv);
  MPI_Comm_rank(MPI_COMM_WORLD, &mynum);
  MPI_Comm_size(MPI_COMM_WORLD, &nprocs);

  // Get a value for N
  solicit (&N, &nprocs, mynum);
First we need to create the group of workers (MPI processes represented by active objects). Notice that the creation of active objects is done in Launcher.java.
The group of active objects is created using specified parameters and the nodes specified in the deployment descriptor.
  // Group creation
  Worker workers = (Worker) PASPMD.newSPMDGroup(
         Worker.class.getName(), params, provideNodes(args[0]));

  // Once the group is created and the value for N is entered we can start the workers job
  // Workers starts their job and return a group of Futures
  DoubleWrapper results = workers.start( numOfIterations );
As with MPI, the ProActive's SPMD layer provides some initialization primitives. In Worker.java you can identify this initialization. Note that one-to-one communications will be done thanks to an array view on the created group.
  // Worker initialization
  rank = PASPMD.getMyRank();
  groupSize = PASPMD.getMySPMDGroupSize();

  // Get all workers references
  workersArray = (Worker[]) PAGroup.getGroup(PASPMD.getSPMDGroup()).toArray(new Worker[0]);
The communication pattern is very simple, it's done in 2 steps. First the process 0 Broadcasts N then waits for the result from each other process and sums the received values.
The MPI implementation involves 3 communication primitives :
MPI_Send ( Sends data to one process )
MPI_Recv ( Receives data from a sending process )
MPI_Bcast ( Broadcast a data to all processes )
Please note that MPI_Bcast, MPI_Send and MPI_Recv primitives are blocking.
  // Get a value of N from stdin for the next run and Broadcast it
  MPI_Bcast(pN, 1, MPI_INT, source, MPI_COMM_WORLD);

  // LOCAL COMPUTATION LOOP
  // ...

  if ( mynum == 0 ) { // Check if i'm the leader process
     for (i=1; i<nprocs; i++) {
        source = i;
        info = MPI_Recv(&x, 1, MPI_FLOAT, source, type, MPI_COMM_WORLD, &status); // waits
 the value from source process
        sum=sum+x; // sum up the receive value
     }
  } else {
     info = MPI_Send(&sum, 1, MPI_FLOAT, dest, type, MPI_COMM_WORLD); // if i'm not the process
 0 i send my sum
  }
The ProActive implementation is quite similar to MPI one. The fact is that all communications in ProActive are asynchronous ( non-blocking ) by default, therefore we need to specify explicitly to block until a specific request.
  // The leader collects partial results.
  // Others just send their computed data to the rank 0.

  if ( rank==0 ) { // Check if i'm the leader worker
     for ( i=1; i<groupSize; i++ ) {
         body.serve(body.getRequestQueue().blockingRemoveOldest("updateX")); // block until an
 updateX call
         sum += x;
     }
  } else {
     workersArray[0].updateX(sum);
  }
The leader blocks his request queue until another worker will do a distant call on the leader's updateX method which is :
  public void updateX(double value){
     this.x = value;
  }
In examples/integralPi run integralpi.sh or .bat, you can specify the number of workers from the command line. Feel free to edit scripts to specify another deployment descriptor.
bash-3.00$ ./integralpi.sh

--- IntegralPi --------------------------------------------------
The number of workers is 4
 --> This ClassFileServer is reading resources from classpath 2011
Created a new registry on port 1099
ProActive Security Policy (proactive.runtime.security) not set. Runtime Security disabled
************* Reading deployment descriptor: file:./../../descriptors/Matrix.xml ********************
created VirtualNode name=matrixNode
**** Starting jvm on amda.inria.fr
**** Starting jvm on amda.inria.fr
**** Starting jvm on amda.inria.fr
ProActive Security Policy (proactive.runtime.security) not set. Runtime Security disabled
 --> This ClassFileServer is reading resources from classpath 2012
ProActive Security Policy (proactive.runtime.security) not set. Runtime Security disabled
ProActive Security Policy (proactive.runtime.security) not set. Runtime Security disabled
 --> This ClassFileServer is reading resources from classpath 2013
 --> This ClassFileServer is reading resources from classpath 2014
**** Starting jvm on amda.inria.fr
Detected an existing RMI Registry on port 1099
Detected an existing RMI Registry on port 1099
Detected an existing RMI Registry on port 1099
ProActive Security Policy (proactive.runtime.security) not set. Runtime Security disabled
 --> This ClassFileServer is reading resources from classpath 2015
//amda.inria.fr/matrixNode2048238867 successfully bound in registry at //amda.inria.fr/matrixNode2048238867
**** Mapping VirtualNode matrixNode with Node: //amda.inria.fr/matrixNode2048238867 done
//amda.inria.fr/matrixNode690267632 successfully bound in registry at //amda.inria.fr/matrixNode690267632
**** Mapping VirtualNode matrixNode with Node: //amda.inria.fr/matrixNode690267632 done
//amda.inria.fr/matrixNode1157915128 successfully bound in registry at //amda.inria.fr/matrixNode1157915128
**** Mapping VirtualNode matrixNode with Node: //amda.inria.fr/matrixNode1157915128 done
Detected an existing RMI Registry on port 1099
//amda.inria.fr/matrixNode-814241328 successfully bound in registry at //amda.inria.fr/matrixNode-814241328
**** Mapping VirtualNode matrixNode with Node: //amda.inria.fr/matrixNode-814241328 done
4 nodes found
Generating class : pa.stub.org.objectweb.proactive.examples.integralpi.Stub_Worker

Enter the number of iterations (0 to exit) : 100000
Generating class : pa.stub.org.objectweb.proactive.examples.integralpi.Stub_Worker
Generating class : pa.stub.org.objectweb.proactive.examples.integralpi.Stub_Worker
Generating class : pa.stub.org.objectweb.proactive.examples.integralpi.Stub_Worker
Generating class : pa.stub.org.objectweb.proactive.examples.integralpi.Stub_Worker

         Worker 2 Calculated x = 0.7853956634245252 in 43 ms


         Worker 3 Calculated x = 0.7853906633745299 in 30 ms


         Worker 1 Calculated x = 0.7854006634245316 in 99 ms


         Worker 0 Calculated x = 3.141592653598117 in 12 ms


Calculated PI is 3.141592653598117 error is 8.324008149429574E-12
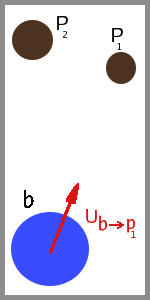
Enter the number of iterations (0 to exit) : n-body is a classic problem consisting of calculating the position of bodies in space. The position depends only on the gravitational forces that apply to them. In short, one considers several bodies (sometimes called particles) in space, where the only force is due to gravity. When only two bodies are at hand, this is expressed as
|
|
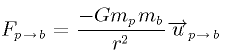 F p->b is the force that p applies on b, G is the gravitational constant, m p m b describe the mass of the bodies, r is the distance between p and b, andu is a unit vector in the direction going from p to b. When we consider all the forces that apply to one given body, we have to sum up the contribution of all the other bodies:
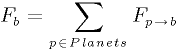
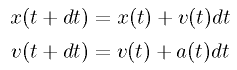
This should be read as: the total force on the body b is the sum of all the forces applied to b, generated by all the other bodies in the system. This is the force that has to be computed for every body in the system. With this force, using the usual physics formulae, (Newton's second Law)

one may now compute the movement of a particle for a given time step (a the acceleration, v the velocity, x the position, t the time):
|
With the script located in the folder
ProActive/script/[unix|windows]
do:
nbody.[bat|sh] [-nodisplay | -displayft | -3d | -3dft] totalNbBodies maxIter
No parameter starting in default mode (2D).
-nodisplay starting in console mode.
-displayft starting with fault-tolerance configuration.
-3d starting GUI in 3D, must have Java3d (≥ 1.4) installed and also must have ProActive compiled with it installed.
-3dft same as above with fault-tolerance configuration.
totalNbBodies is the total number of bodies, default is 4 bodies.
maxIter is the maximun number of iterations, default is 10,000 iterations.
Right after starting the application, users have to choose one algorithm for computing. The choice is between:
Simplest version, one-to-one communication and master.
Group communication and master.
Group communication, odd-even-synchronization.
Group communication, oospmd synchronization.
Barnes-Hut.
Mouse controls with the 3D GUI:
Left click: rotating.
Right click: moving the scene.
Scroll whell: zoom in/out
This way to construct the nbody simulation is based on a very different algorithm. This is inserted to show how one can express this algorithm in ProActive, but breaks off from the previous track, having such a different approach to solving the problem. Here's how it works:
To avoid broadcasting to every active object the new position of every particle, a tree implementation can simplify the problem by agglomerating sets of particles as a single particle, with a mass equal to the sum of masses of the all the particles:. This is the core of the Barnes-Hut algorithm. This method allows us to have a complexity brought down to O(N log N).
In our parallel implementation, we have defined an
Active Object
called
Domain
, which represents a volume in space, and which contains
Planets
. It is either subdivided into smaller
Domains
, or is a leaf of the total tree, and then only contains
Planets
. A Planet is still an Object with mass, velocity and
position, but is no longer on a one-to-one connection
with a
Domain
. We have cut down communications to the biggest
Domains
possible : when a
Planet
is distant enough, its interactions are not computed,
but it is grouped with its local neighbours to a bigger
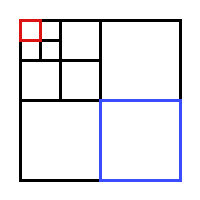
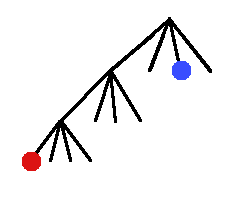
particle. Here is an example of the
Domains
which would be known by the
Domain
drawn in red:
|
|
|
The Domain in the lower left hand-corner, drawn in blue, is also divided into sub-Domains, but this needs not be known by the Domain in red: it assumes all the particles in the blue Domain are only one big one, centered at the center of mass of all the particles within the blue.
In this version, the
Domains
communicate with a reduced set of other
Domains
, spanning on volumes of different sizes.
Synchronization is achieved by sending explicitely
iteration numbers, and returning when needed older
positions. You may notice that some
Domains
seem desynchronized with other ones, having several
iterations inbetween. That is no problem because if they
then need to be synchronized and send each other
information, a mechanism saving the older positions
permits to send them when needed.
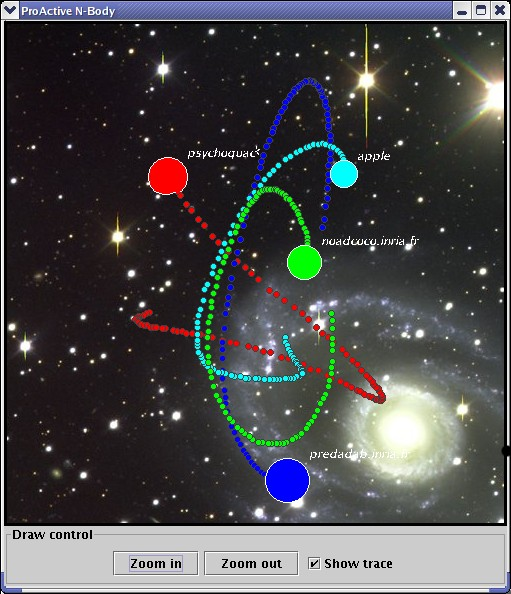
This is a snapshot of the ProActive n-body example running on 3 hosts with 8 bodies:
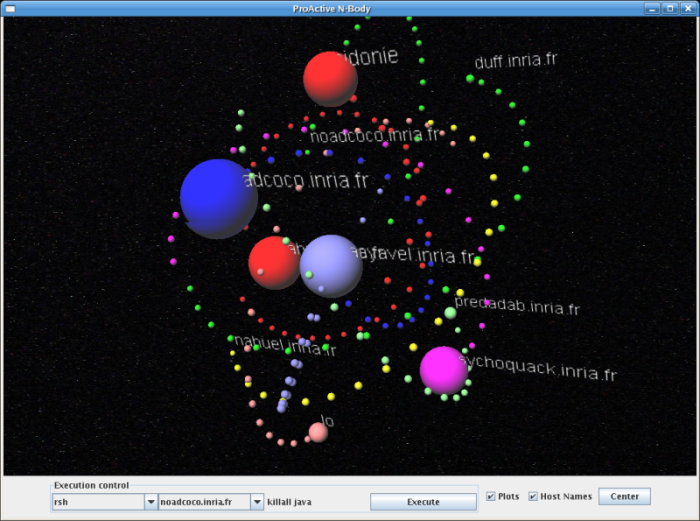
n-body screenshot, with the application GUI and Java3D installed:
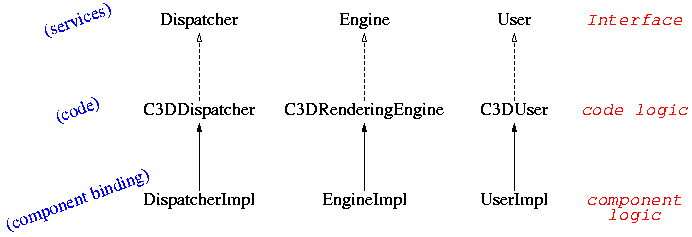
The standard C3D example has been taken as a basis, and component wrappers have been created. This is an example of an application that is refactored to fit the components dogma. This way, one can see what is needed to transform an application into component-oriented code.
Add wrappers around the original object classes (C3D*) and instead of linking the classes together by setting fields through the initial methods, do that in the binding methods. In other words, we have to spot exactly where C3DRenderingEngine, C3DUser and C3DDispatcher are used by a class other than itself, and turn these references into component bindings. Of course, we also have to expose the interfaces that we are going to use, hence the Dispatcher, Engine and User interface that have to be implemented.
First of all, have a look at the doc on C3D to remember how this application is written, in Section 5.1, “C3D: A distributed 3D renderer” . Most important is the class diagram, showing C3DUser, C3DDispatcher and C3DRederingEngine. We decided that the only objects worth wrapping in components were those three. The rest is too small to be worth the hassle.
What we need to do is to extract the interfaces of the
Objects, ie find which methods are going to be called on
the components. This means find out what methods are
called from outside the Active Object. You can do that
by searching in the classes where the calls are made on
active objects. For this,
you have to know in detail which classes are going
to be turned into component
. If you have a code base which closely follows Object
Oriented Programming rules, the interfaces are already
there. Indeed, when a class is written, it should always
go with one or more interfaces, which present to the
world what the class abilities are. In C3D (Active
Object version), these interfaces already exist: they
are called
User
,
Engine
and
Dispatcher
.
![[Note]](images/note.png) |
Note |
|---|---|
|
Tricky part: whatever way you look at components, you'll have to modify the initial code if these interfaces were not created at first go. You have to replace all the class references by their interface, when you use them in other files. For example, if we had not already used interfaces in the C3D Object code, we would have had to replace all occurrences of C3DDispatcher by occurrences of Dispatcher. |
Why do we have to do that, replacing classes by interfaces? That's due to the way components work. When the components are going to be bound, you're not binding the classes themselves (ie the container which performs operations), but [proxies to] the interfaces presenting the behaviour available. And these proxies implement the interfaces, and do not extend the classes. What is highlighted here is that components enforce good code design by separating behaviours.
You now have to create a class that englobes the
previous Active Objects, and which is a component
representing the same functionality. How do you do that?
Pretty simple. All you need to do is extend the Active
Object class, and add to it the non-functional
interfaces which go with the component. You have the
binding interfaces to create, which basically say how to
put together two Components, tell who is already
attached, and how to separate them. These are the
lookupFc
,
listFc
,
bindFc
and
unbindFc
methods.
This has been done in the
*Impl
files. Let's consider, for example, the UserImpl class
(it is shown below).What you have here are those
component methods. Be even more careful with this
bindFc
method. In fact, it really binds the protected
Dispatcher
variable
c3ddispatcher
. This way, the
C3DUser
code can now use this variable as if it was addressing
the real Active Object. Just to be precise, we have to
point out that you're going through proxies before
reaching the Component, then the Active Object. This is
hidden by the ProActive layer, all you should know is
you're addressing a
Dispatcher
, and you're fine! The
findDispatcher
method has been overridden because component lookup
doesn't work like standard Active Object lookup.
Suppose you are only dealing with packaged software.
That means you may not modify the source code of some
part of your application, for instance because it is
kindly given to you by some other company, which wants
to keep parts of its codebase secret. Let's say that the
deployment descriptor you're using does not reference
the proper
VirtualNodes
. How can you still deploy your application in this
case? Well, you have to
rename
those Nodes into the names that are fitting to your
application. You should do that after the definition of
the interfaces that are defined inside the component.
Here's an example of how to do that, renaming the
externally provided name 'UserVirtualNode' to the name
internally used by UserImpl 'User':
In the main ADL file (
userAndComposite.fractal
)
  <component ... />

    <!-- mapping the node names in the descriptor file to others referenced in the component's
 adl files. -->
    <exportedVirtualNodes>
      <exportedVirtualNode name="UserVirtualNode">
        <composedFrom>
           <composingVirtualNode component="user" name="User"/>
        </composedFrom>
      </exportedVirtualNode>
    </exportedVirtualNodes>

    <!-- Creating one user component -->
In the User ADL file (
UserImpl.fractal
)
<content class="org.objectweb.proactive.examples.components.c3d.UserImpl"/>

    <!-- Recalling a renamed Virtual Node -->
    <exportedVirtualNodes>
      <exportedVirtualNode name="User">
        <composedFrom>
          <composingVirtualNode component="this" name="User"/>
        </composedFrom>
      </exportedVirtualNode>
    </exportedVirtualNodes>

    <controller desc="primitive"/>
Example 5.1. How to rename Virtual Nodes in ADL files
If you add this code into the adl, you are saying that
the
VirtualNode
called
UserVirtualNode
(found in the deployment descriptor file the application
is using) should be recognized by the application as if
it was called
User
.
|
Note |
|---|---|
|
Above has been described the way to rename a
|
When running the User Component alone, you are prompted for an address on which to lookup a Dispatcher Component. Then the two components are bound through a lookup mechanism. This is very simple to use. Here's the code to do that:
The component Registration
Fractive.register(Fractive.getComponentRepresentativeOnThis(),
      UrlBuilder.buildUrlFromProperties("localhost", "Dispatcher"));
The Component lookup
ProActiveComponentRepresentative a = Fractive.lookup(
      UrlBuilder.buildUrl(this.hostName, "Dispatcher", protocol, this.portNumber));
      this.c3dDispatcher = (Dispatcher) a.getFcInterface("user2dispatcher");
For the registeration, you only need a reference on the component you want to register, and build a url containing the name of the host, containing an alias for the Component.
The
Fractive.lookup
method uses a Url to find the host which holds the
component. This Url contains the machine name of the
host, communication protocl and portNumber, but also the
lookup name under which the desired Component has been
registered under , here "Dispatcher". The last operation
consists only in retreiving the correct interface to
which to connect to. If the interface is not known at
compile-time, it can be discovered at run-time with the
getFcInterfaces()
method, which lists all the interfaces available.
There is only one access point for this example in the scripts directory:
examples/c3d$ ./c3d_component.sh
--- Fractal C3D example ---------------------------------------------
Parameters : descriptor_file [fractal_ADL_file]
        The first file describes your deployment of computing nodes.
                You may want to try ../../../descriptors/components/C3D_all.xml
        The second file describes your components layout.
                Default is org.objectweb.proactive.examples.components.c3d.adl.userAndComposite
---------------------------------------------------------
There are two ways to start the components C3D. If you only want to start the Composite (Dispatcher + Renderer):
examples/c3d$ ./c3d_component.sh \
../../../descriptors/components/C3D_all.xml \
org.objectweb.proactive.examples.components.c3d.adl.compositeOfDispRend
If you want to start only a User, you will be asked for the address of a Dispatcher to which to connect to:
examples/c3d$ ./c3d_component.sh \
../../../descriptors/components/C3D_all.xml \
org.objectweb.proactive.examples.components.c3d.adl.UserImpl
These are a few of the examples present in the ProActive distribution. To see a full list of the examples go to the application web page.
© 1997-2008 INRIA Sophia Antipolis All Rights Reserved