6.6. Channels
If you click the Channels tab on the top navigation bar, the Channels category and links appear. The pages in the Channels category enable you to view and manage the channels and packages associated with your systems. In addition, you can obtain ISO images here.
6.6.1. Software Channels
The Software Channels page is the first to appear in the Channels category. A software channel is a list of Red Hat Enterprise Linux packages grouped by use. Channels are used to choose packages to be installed on a system.
There are two types of software channels: base channels and child channels. A base channel consists of a list of packages based on a specific architecture and Red Hat Enterprise Linux release. For example, all the packages in Red Hat Enterprise Linux 2.1 for the x86 architecture is a base channel. The list of packages in Red Hat Enterprise Linux 2.1 for the Itanium architecture is a different base channel. A child channel is a channel associated with a base channel but contains extra packages. For example, an organization can create a child channel associated with Red Hat Enterprise Linux 2.1 for the x86 architecture that contains extra packages needed only for the organization, such as a custom engineering application.
A system must be subscribed to one base channel only. This base channel is assigned automatically during registration based upon the Red Hat Enterprise Linux release and system architecture selected. In the case of public free channels, the action will succeed. In the case of paid base channels, this action will fail if an associated entitlement doesn't exist.
A system can be subscribed to multiple child channels of its base channel. Only packages included in a system's subscribed channels can be installed or updated on that system. Some customers, such as those using RHN Satellite and Proxy, have channel management authority. This authority, granted by RHN as a separate role to certain customers, gives them the ability to create and manage their own custom channels.
Channels can be further broken down by their relevance to your systems. Two such lists emerge: Relevant and All.
6.6.1.1. Relevant Channels
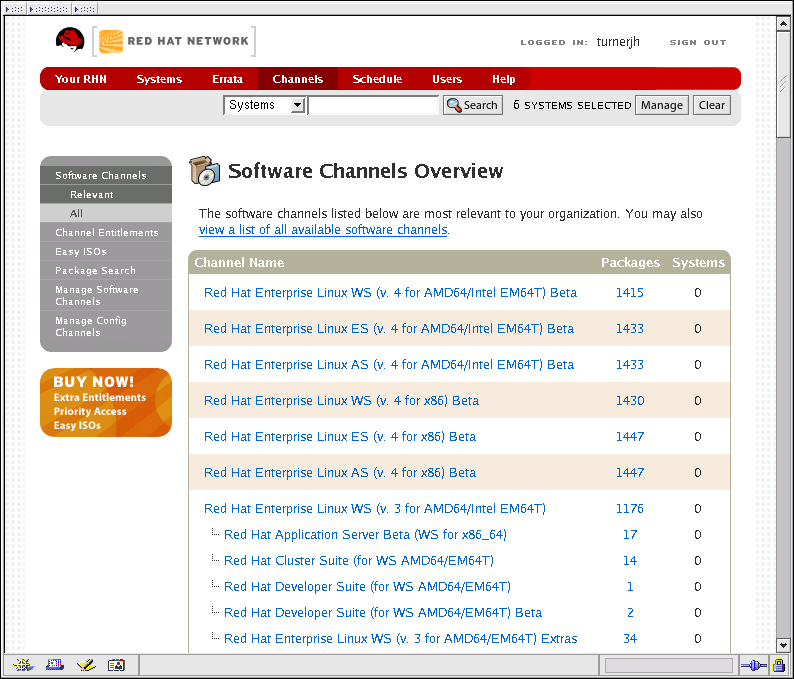
As shown in Figure 6-6, the Relevant Channels page is shown by default when you click Software Channels in the left navigation bar. It displays a list of channels now associated with your systems. Links within this list go to different tabs of the Software Channel Details page. Clicking on a channel name takes you to the Details tab. Clicking on the packages number takes you to the Packages tab. And clicking on the systems number takes you to the Subscribed Systems tab. Refer to Section 6.6.1.3 Software Channel Details for details.
6.6.1.2. All Channels
The All Channels page can be retrieved by clicking All below Software Channels in the left navigation bar. It works identically to the Relevant button with one exception; It displays all software channels offered by Red Hat Network, regardless of whether you have systems associated with them.
6.6.1.3. Software Channel Details
If you click on the name of a channel, the Software Channel Details page will appear. This page is broken down into the following tabs:
6.6.1.3.1. Software Channel Details ⇒ Details
General information about the channel and the parent channel, if it is a child channel. This is the first tab you see when you click on a channel. It displays essential information about the channel, such as summary, description, and architecture.
![]() — In addition, a Globally Subscribable
checkbox can be seen by Organization Administrators and Channel Administrators. This
signifies the default behavior of every channel allowing any user to
subscribe systems to it. Unchecking this box and clicking
Update causes the appearance of
a Subscribers tab, which may then be used to
grant certain users subscription permissions to the channel.
— In addition, a Globally Subscribable
checkbox can be seen by Organization Administrators and Channel Administrators. This
signifies the default behavior of every channel allowing any user to
subscribe systems to it. Unchecking this box and clicking
Update causes the appearance of
a Subscribers tab, which may then be used to
grant certain users subscription permissions to the channel.
![]() — Only customers with custom base
channels may change their systems' base
channel assignment. They may do this through the website in two ways:
— Only customers with custom base
channels may change their systems' base
channel assignment. They may do this through the website in two ways:
The customer has its own base channel and it is assigning the system to that new base channel.
The customer has its own base channel and, having assigned a system to this base channel, it subsequently reverts the system to its original distribution-based base channel.
6.6.1.3.2. Software Channel Details ⇒ Subscribers — 
List of users who have subscription permissions to the channel. This tab appears on two conditions: First, the logged in user must be an Organization Administrator or a Channel Administrator. Second, the Globally Subscribable checkbox on the Details tab must be unchecked, thereby making the channel subscribable by user. On this tab, select the checkboxes of the users to be allowed to subscribe systems to this channel and click Update. Note that Organization Administrators and Channel Administrators automatically have subscription access to all channels.
6.6.1.3.3. Software Channel Details ⇒ Errata
List of Errata affecting the channel. The list displays advisory types, names, summaries, and the dates issued. Clicking on an advisory name takes you to its Errata Details page. Refer to Section 6.5.2.2 Errata Details for more information.
6.6.1.3.4. Software Channel Details ⇒ Packages
List of packages in the channel. To download packages as a .tar file, select them and click the Download Packages button at the bottom-left corner of the page. Clicking on a package name takes you to the Package Details page. This page displays a set of tabs with information about the package, including which architectures it runs on, the package size, build date, package dependencies, the change log, list of files in the package, newer versions, and which systems have the package installed. From here, you can download the packages as RPMs or SRPMs. Refer to Section 6.6.5.3 Package Details for more information.
If you are looking for a specific package or a subset of packages, you can use the package filter on the top of the list. Entering a substring to search for will search all the packages in the list for the substring at the beginning, in the middle, or at the end of the package name. For example, typing ks in the filter might return all the ksconfig, krb5-workstation, and links. The filter is case-insensitive.
6.6.1.3.5. Software Channel Details ⇒ Subscribed Systems
List of entitled systems subscribed to the channel. The list displays system names, base channels, and their levels of entitlement. Clicking on a system name takes you to its System Details page. Refer to Section 6.4.2.6 System Details for more information.
![]() — If it is a child
channel, you will also have the option within this tab of
unsubscribing systems from the channel. Use the checkboxes to select
the systems, then click the Unsubscribe button
on the bottom right-hand corner.
— If it is a child
channel, you will also have the option within this tab of
unsubscribing systems from the channel. Use the checkboxes to select
the systems, then click the Unsubscribe button
on the bottom right-hand corner.
6.6.1.3.6. Software Channel Details ⇒ Target Systems
List of entitled systems that are eligible to be subscribed to the channel. This tab appears only for child channels. Use the checkboxes to select the systems, then click the Subscribe button on the bottom right-hand corner. You will receive a success message or be notified of any errors. This can also be accomplished through the Channels tab of the System Details page. Refer to Section 6.4.2.6 System Details for more information.
6.6.1.3.7. Software Channel Details ⇒ Downloads
ISO images associated with the channel. This tab appears only for base channels. Links on the Easy ISOs pages bring you to this tab for the related channel. Red Hat recommends using curl or wget for ISO downloads. Click the help on using curl or wget link for precise instructions.
6.6.1.3.8. Software Channel Details ⇒ License
Text of the channel's End User License Agreement. This tab is associated only with channels of third-party providers. It appears when you attempt a subscription to such a channel through the Target Systems tab. To complete the subscription, read the agreement, click the Accept button, and then click the Confirm button. To decline the subscription, click the Cancel button.
6.6.2. Channel Entitlements
The Channel Entitlements page displays the list of channels for which you have paid. Click the number of systems subscribed to see a list of systems tied to the corresponding channel.
6.6.3. Easy ISOs
The Easy ISOs pages provide direct access to the ISO images available to you. These images, comprising full installations of various Red Hat operating system distributions, are actually located within the Downloads tab of the Channel Details page. This feature is available only to paid RHN subscribers.
To download an ISO image, Red Hat recommends copying its URL and using either curl or wget. Click the help on using curl or wget link for precise instructions. To obtain the URL, right-click on the disc link and select to open the link in a new window or tab. You may then cancel the download, copy the lengthy URL from the location bar, and paste it into the curl or wget command.
Once downloaded, either burn the images to CD-Rs or CD-RWs or copy them to the machine for direct installation. Refer to http://www.redhat.com/download/howto_download.html for additional download instructions and steps to burn images to discs. Refer to the operating system's respective installation guide for instructions on installing from CD-ROM or hard drive, available at http://www.redhat.com/docs/.
ISOs can be further broken down by their relevance to your systems. Two such lists emerge: Relevant and All.
6.6.3.1. Relevant ISOs
The Relevant ISOs page is shown by default when you click Easy ISOs in the left navigation bar. It displays a list of ISOs by channel now associated with your systems. Links within this list go to the Downloads tab of the Channel Details page. Refer to Section 6.6.3 Easy ISOs for instructions on use.
6.6.3.2. All ISOs
The All ISOs page can be retrieved by clicking All below Easy ISOs in the left navigation bar. It works identically to the Relevant button with one exception; It displays all ISOs available to you through Red Hat Network, regardless of whether you have systems associated with the related channels. Refer to Section 6.6.3 Easy ISOs for instructions on use.
6.6.4. Package Search
The Package Search page allows you to search through packages using various criteria. You may search by name or name and summary, within relevant or all channels, or within specific architectures. Type your keyword, select the criterion to search by, and click the Search button. The results appear at the bottom of the page.
6.6.5. Software Packages
A software package is the smallest essential ingredient of any Red Hat Enterprise Linux system. Packages, commonly known as RPMs because of their oversight by RPM Package Manager, are the pieces of software that, when installed, enable your system to operate. Packages are grouped by channels to help you more easily determine which are applicable to your systems.
These packages can be retrieved in one of two ways: by direct install or through download.
6.6.5.1. Software Package Install
Only software packages included in a system's subscribed channels can be installed or updated on that system.
 | Important |
|---|---|
If you use scheduled package installation, the packages will be installed via the RHN Daemon. You must have the RHN Daemon enabled on your systems. Refer to Chapter 3 Red Hat Network Daemon for more details. |
To apply Errata Updates, refer to Section 6.5.2.1 Apply Errata Updates. To upgrade and install packages through the Systems category, use the Packages tab of the System Details page. Refer to Section 6.4.2.6 System Details for instructions.
![]() — Within the
Channels category, you may install an
individual package on multiple entitled systems by following these steps:
— Within the
Channels category, you may install an
individual package on multiple entitled systems by following these steps:
Select Channels => Software Channels from the top and left navigation bars.
Click on the name of the channel that contains the package to be installed.
On the Software Channel Details page, click on the Packages tab.
Click on the name of the package you want to install.
On the Package Details page, click on the Target Systems tab.
Select the entitled systems you want to install the package on.
Click on the Install Packages button.
Confirm the action.
The action is added to the Pending Actions list under the Schedule tab in the top navigation bar.
6.6.5.2. Package Download
If you do not want to schedule a package installation, you can download the packages immediately. If you download the packages, you must install them manually.
To download packages through the Systems category, refer to Section 6.4.2.6 System Details.
To download individual RPMs and SRPMs through the Channels category, follow these steps:
Select Channels => Software Channels from the top and left navigation bars.
Click on the name of the channel that contains the package to be downloaded.
On the Software Channel Details page, click on the Packages tab.
Click on the name of the package that you want to download.
On the Package Details page, click the Download RPM or Download SRPM link on the bottom right-hand corner.
Confirm the action.
The next step is to install the packages manually. Refer to Section 2.3.5.2 Manual Package Installation for details.
6.6.5.3. Package Details
If you click on the name of any package in the website, the Package Details page will appear. This page contains the following tabs:
6.6.5.3.1. Package Details ⇒ Details
Details about the package, including subtabs for overview, dependencies, change log, and file list:
6.6.5.3.1.1. Package Details ⇒ Details ⇒ Overview
A summary of the package, including the package description, size, and version. (This information is similar to issuing the command rpm -qi packagename but with more detail.) Click the links in the bottom right-hand corner of the page to download the RPM and/or SRPM files for the package.
6.6.5.3.1.2. Package Details ⇒ Details ⇒ Dependencies
A list of all other packages that must also be installed on the system for this one to function properly. It also lists packages that it obsoletes or has conflicts with.
6.6.5.3.1.3. Package Details ⇒ Details ⇒ Change Log
The events of this package's history listed in reverse chronological order. (This information is similar to issuing the command rpm -q --changelog packagename.)
6.6.5.3.1.4. Package Details ⇒ Details ⇒ File List
A list of the files that comprise this package, including their MD5 Sums and sizes. (This information is similar to issuing the command rpm -ql packagename.)
6.6.5.3.2. Package Details ⇒ Newer Versions
List of newer versions of the packages released via Errata Alerts.
6.6.5.3.3. Package Details ⇒ Installed Systems
List of systems with this package installed.
6.6.5.3.4. Package Details ⇒ Target Systems —
List of systems on which the package can be installed. Go here to install packages on entitled systems. Refer to Section 6.6.5.1 Software Package Install for instructions.
6.6.6. Manage Config Channels — 
Provides the means to create and oversee channels containing configuration files. Like software channels, configuration channels store files to be installed on systems. Unlike software packages, various versions of configuration files may prove useful to a system at any given time. Further, RHN allows you to include variables, or macros, that may make your configuration files templates that can be deployed across your organization, with the relevant values populated upon individual system installation.
6.6.6.1. Preparing Systems for Config Management
For a system to have its configuration managed through RHN, it must have the appropriate tools and config-enable file installed. These tools may already be installed on your system, especially if you kickstarted the system with configuration management functionality. If not, they can be found within the RHN Provisioning child channel for your distribution. Download and install the latest rhncfg* packages.
Next, you must place a config-enable file on the system to have config actions scheduled. This file is required to allow configuration management on the system while preventing inadvertent and potentially dangerous changes. To create this file, issue the following commands as root. First, create the necessary directory:
mkdir -p /etc/sysconfig/rhn/allowed-actions/configfiles |
Then, you should decide exactly what actions should be allowed by system administrators. The following modes are available:
deploy — Install configuration files from the central repository on the system. Without this set, the configuration management interface provides no real value for this system.
verify — Identify any differences between configuration files on the system and those associated with it in the central repository.
diff — Display differences between configuration files on the system and those associated with it in the central repository.
upload — Send any files from the system to the central repository. This is similar to granting root privileges on the machine.
mtime_upload — Send files modified since a certain date and time from the system to the central repository.
all — Enable all of these modes for configuration management on the system.
To set individual modes, issue this command (repeatedly, as root), appending the mode name to the end:
touch /etc/sysconfig/rhn/allowed-actions/configfiles/mode |
To grant full configuration management access, issue this command:
touch /etc/sysconfig/rhn/allowed-actions/configfiles/all |
Your system should now be ready for config management through RHN. Command line options also exist for many of these functions. Refer to Appendix A Command Line Config Management Tools for instructions.
6.6.6.2. Manage Config Channels ⇒ Config Channels —
There are two types of configuration channels: global channels and system-specific channels. A global channel contains configuration files developed across your organization. These may well be applicable to multiple systems. A system-specific channel consists of local override configuration files tied to particular systems. These files take precedent over all other configurations.
6.6.6.2.1. Manage Config Channels ⇒ Config Channels ⇒ Global; —
Shown by default when you click Manage Config
Channels in the left navigation bar, the Global
Config Channels displays a list of configuration channels managed by
your organization. Links within this list go to different tabs of the
Configuration Channel Details page. Clicking on a channel
name takes you to the Details tab. Clicking on the
files number takes you to the Files tab. And clicking on the
systems number takes you to the Systems
tab. Refer to Section 6.6.6.5 Configuration Channel Details — ![]() for instructions.
for instructions.
6.6.6.2.2. Manage Config Channels ⇒ Config Channels ⇒ System; —
The System Config Channels page can be retrieved by
selecting it from the pulldown menu on the main Manage Config
Channels page. It displays system-specific configuration
channels and works similarly to the Global Config
Channels page in that clicking the name of a system takes you
to the List subtab of the Configuration
Channel Details page. Refer to Section 6.6.6.5 Configuration Channel Details — ![]() for instructions.
for instructions.
6.6.6.3. Manage Config Channels ⇒ Manage Files —
The Manage Files page lists the configuration files
managed by your organization. Clicking the number in the Config
Channels column takes you to a list of channels containing the file. From
there you can access tabs of the Configuration Channel
Details page. Clicking the number in the Latest Revision column
takes you to the Configuration File Details
page. Refer to Section 6.6.6.6 Configuration File Details — ![]() for instructions.
for instructions.
6.6.6.4. Manage Config Channels ⇒ Quota —
The Quota page displays the amount of disk space
alloted and used for storing configuration files. A summary of available
and used space can be found at the top, while individual file use is
listed within the table. Click the filename to go to the
Configuration File Details page. Refer to Section 6.6.6.6 Configuration File Details — ![]() for instructions. Click the config channel name
to access the Configuration Channel Details
page. Refer to Section 6.6.6.5 Configuration Channel Details —
for instructions. Click the config channel name
to access the Configuration Channel Details
page. Refer to Section 6.6.6.5 Configuration Channel Details — ![]() for instructions.
for instructions.
6.6.6.5. Configuration Channel Details —
If you click on the name of a channel in a list, the Configuration Channel Details page will appear. This page contains the following tabs:
6.6.6.5.1. Configuration Channel Details ⇒ Details —
General information about the channel. This is the first tab you see when you click on a channel. It displays basic information about the channel, including name and description, and provides the means to alter this information. To make changes, enter new values in the text fields and click the Edit Config Channel button.
6.6.6.5.2. Configuration Channel Details ⇒ Files —
Configuration files associated with this channel. Use the subtabs to view, upload, and create files.
6.6.6.5.2.1. Configuration Channel Details ⇒ Files ⇒ List —
Displays the files
associated with the configuration channel. If a file exists, click
its name to go to the Configuration File Details
page. Refer to Section 6.6.6.6 Configuration File Details — ![]() for instructions. To
replicate the file within a config channel, select its checkbox,
click the Copy to Config Channel
button, and select the destination channel. To remove a file,
select it and click Delete Selected Files.
for instructions. To
replicate the file within a config channel, select its checkbox,
click the Copy to Config Channel
button, and select the destination channel. To remove a file,
select it and click Delete Selected Files.
6.6.6.5.2.2. Configuration Channel Details ⇒ Files ⇒ Upload —
Enables you to import files from your system into RHN's central configuration manager. To do this, populate all fields, browse for the file, and click the Upload File button. Note that files larger than 16 KB cannot be edited through the RHN website. The file path is the location to which the file will be deployed. The user, group, and mode fields allow you to set the file's ownership and permissions.
6.6.6.5.2.3. Configuration Channel Details ⇒ Files ⇒ Create —
Allows you to create a configuration file from scratch within the interface. The fields here work similarly to those on the Upload subtab: Path is the location to which the file will be deployed. The user, group, and mode fields allow you to set the file's ownership and permissions. Include the actual file in the contents field. When finished, click the Create Config File button.
6.6.6.5.3. Configuration Channel Details ⇒ Systems —
Identifies the systems subscribed to this configuration channel. Clicking a system name takes you to the System Details page.
6.6.6.5.4. Configuration Channel Details ⇒ Target Systems —
Displays all of the systems that have Provisioning entitlements but are not yet subscribed to this config channel. To associate systems with the config channel, select their checkboxes and click the button matching the rank to be assigned. Subscribe with Highest Rank will override all other config channels, except local configs. Subscribe with Lowest Rank will rank this config channel below all others. When done, the selected systems will appear in the Systems tab.
6.6.6.6. Configuration File Details —
If you click on the name or number of a file in a list, the Configuration File Details page will appear. You may remove the file at anytime by clicking delete file in the upper-right corner of the page. This page contains the following tabs:
6.6.6.6.1. Configuration File Details ⇒ Details —
General information about the file. This is the first tab you see when you click on a file. It displays basic information about the file, including path, associated channel, revision, and date. It also provides links to download, view and edit the file, as well as identify whether it is binary. Note that files larger than 16 KB cannot be edited through the RHN website. In addition, you can define macros (variables) here that will have different values interpolated when installed on various systems. Refer to Section 6.6.6.7 Including Macros in your Configuration Files for a full description of this feature.
6.6.6.6.2. Configuration File Details ⇒ Revisions —
A list of revisions stored by RHN. You can examine revisions in the list or use the Browse and Upload File buttons to upload a more recent revision.
6.6.6.6.3. Configuration File Details ⇒ Diff —
A list of configuration files available for comparison. Click the name of the channel containing the file, then the name of the file itself. A list of differences will appear.
6.6.6.6.4. Configuration File Details ⇒ Copy —
A list of configuration channels that may receive a copy of the file. To copy the file to a channel, select the channel's checkbox, and click the Copy File button.
Copy to Config Channel — Displays the global config channels for your organization. To copy the latest revision of this file to channels, select the appropriate checkboxes, and click the Copy File button.
Copy to System — Displays the system-specific config channels for your organization. To copy the latest revision of this file to channels, select the appropriate checkboxes, and click the Copy File button.
6.6.6.7. Including Macros in your Configuration Files
Being able to store and share identical configurations is useful, but what if you have many variations of the same configuration file? What do you do if you have configuration files that differ only in system-specific details, such as hostname and MAC address?
In traditional file management, you would be required to upload and distribute each file separately, even if the distinction is nominal and the number of variations is in the hundreds or thousands. RHN addresses this by allowing the inclusion of macros, or variables, within the configuration files it manages for Provisioning-entitled systems. In addition to variables for custom system information, the following standard macros are supported:
rhn.system.sid
rhn.system.profile_name
rhn.system.description
rhn.system.hostname
rhn.system.ip_address
rhn.system.custom_info(key_name)
rhn.system.net_interface.ip_address(eth_device)
rhn.system.net_interface.netmask(eth_device)
rhn.system.net_interface.broadcast(eth_device)
rhn.system.net_interface.hardware_address(eth_device)
rhn.system.net_interface.driver_module(eth_device)
To use this powerful feature, either upload or create a configuration file through the Configuration Channel Details page. Then, open its Configuration File Details page and include the supported macros of your choosing. Ensure the delimiters used to offset your variables match those set in the Macro Start Delimiter and Macro End Delimiter fields and do not conflict with other characters in the file. The delimiters must be two characters and cannot contain the percent (%) symbol.
As an example, you may have a file applicable to all of your servers that differs only in IP address and hostname. Rather than manage a separate configuration file for each server, you may create a single file, say server.conf, with the IP address and hostname macros included, like so:
hostname={@ rhn.system.hostname @}
ip_address={@ rhn.system.net_interface.ip_address(eth0) @} |
Upon delivery of the file to individual systems, whether through a scheduled action in the RHN website or at the command line with the Red Hat Network Configuration Client (rhncfg-client), the variables will be substituted with the actual hostname and IP address of the system, as recorded in RHN's System Profile, such as:
hostname=test.example.domain.com ip_address=177.18.54.7 |
To capture custom system information, insert the key label into the custom information macro (rhn.system.custom_info). For instance, if you developed a key labeled "asset" you can add it to the custom information macro in a configuration file to have the value substituted on any system containing it. The macro would look like this:
asset={@ rhn.system.custom_info(asset) @} |
Upon deployment of the file to a system containing a value for that key, the macro gets translated, such as:
asset=Example#456 |
To include a default value, for instance if one is required to prevent errors, you can append it to the custom information macro, like so:
asset={@ rhn.system.custom_info(asset) = 'Asset #' @} |
This default will be overridden by the actual value on any system
containing it. For instructions on developing custom system information
keys, refer to Section 6.4.9 Custom System Info — ![]() .
.
Using the Red Hat Network Configuration Manager (rhncfg-manager) will not translate or alter files, as that tool is system agnostic. Binary files cannot be interpolated.