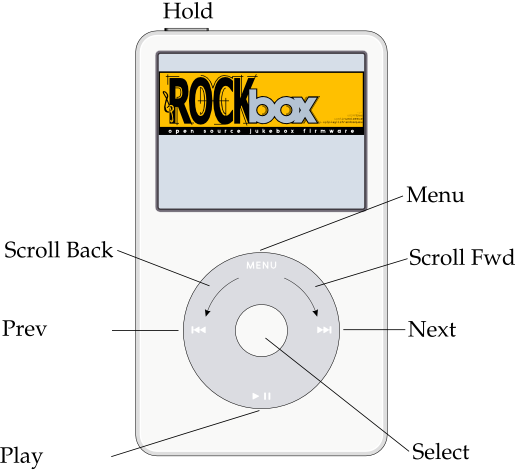
Throughout this manual, the buttons on the player are labelled according to the picture above. Whenever a button name is prefixed by “Long”, a long press of approximately one second should be performed on that button. The buttons are described in detail in the following paragraph.
Additional information for blind users is available on the Rockbox website at BlindFAQ.
The main controls on the player are a slightly indented scroll wheel with a flat round button in the center. Hold the player with these controls facing you.
The top of the player will have the following, from left to right: Hold switch, headphone jack.
The dock connector that is used to connect your player to your computer is on the bottom panel of the player.
The button in the middle of the wheel is called Select. You can operate the wheel by pressing the top, bottom, left or right sections, or by sliding your finger around it. The top is Menu, the bottom is Play, the left is Prev, and the right is Next. When the manual says to Scroll Forward, it means to slide your finger clockwise around the wheel. Scroll Backward means to slide your finger counterclockwise. Note that the wheel is sensitive, so you will need to move slowly at first and get a feel for how it works.
Note that when the Hold switch is pushed toward the center of the player, hold is on, and none of the other controls do anything. Be sure Hold is off before trying to use your player.
To turn on and off your Rockbox enabled player use the following keys:
|
On shutdown, Rockbox automatically saves its settings.
If you have problems with your settings, such as accidentally having set the colours to black on black, they can be reset at boot time. See the Reset Settings in section 11.3.3 for details.
In the unlikely event of a software failure, hardware poweroff or reset can be performed by holding down Menu+ Select until the player shuts off or reboots.
Rockbox has a dual-boot feature. To boot into the original firmware, shut down the device as described above. Turn on the Hold switch immediately after turning the player on. The Apple logo will display for a few seconds as Rockbox loads the original firmware.
You can also load the original firmware by shutting down the device, then clicking the Hold switch on and connecting the iPod to your computer.
Regardless of which method you use to boot to the original firmware, you can return to Rockbox by pressing and holding Menu and Select simultaneously until the player hard resets.
With the player connected to the computer as an MSC/UMS device (like a USB Drive), music files can be put on the player via any standard file transfer method that you would use to copy files between drives (e.g. Drag ’n’ Drop). The default directory structure that is assumed by some parts of Rockbox (album art searching, WPS missing-tag fallback) is: /ArtistName/AlbumName/*.ext. See section A.2 for a list of supported audio formats.
After you have first started the player you’ll be presented by the Main Menu. From this menu you can reach every function of Rockbox, for more information (see section 5.1). To browse the files on you player select Files (see section 4.1), and to browse in a view that is based on the meta-data1 of your audio files, select Database (see section 4.2).
When browsing files and moving through menus you usually get a list view presented. The navigation in these lists are usually the same and should be pretty intuitive. In the tree view use Scroll Forward and Scroll Backward to move around the selection. Use Select or Next to select an item. When browsing the file system selecting an audio file plays it. The view switches to the “While playing screen”, usually abbreviated as “WPS” (see section 4.3. The dynamic playlist gets replaced with the contents of the current directory. This way you can easily treat directories as playlists. The created dynamic playlist can be extended or modified while playing. This is also known as “on-the-fly playlist”. To go back to the File Browser stop the playback with the Long Play button or return to the file browser while keeping playback running using Select. In list views you can go back one step with Prev.
Rockbox is playlist oriented. This means that every time you play an audio file, a so-called “dynamic playlist” is generated, unless you play a saved playlist. You can modify the dynamic playlist while playing and also save it to a file. If you do not want to use playlists you can simply play your files directory based. Playlists are covered in detail in section 4.4.
From the menu you can customise Rockbox. Rockbox itself is very customisable. Also there are some special menus for quick access to frequently used functions.
Some views, especially the file browser and the WPS have a context menu. From the file browser this can be accessed with Long Select. The contents of the context menu vary, depending on the situation it gets called. The context menu itself presents you with some operations you can perform with the currently highlighted file. In the file browser this is the file (or directory) that is highlighted by the cursor. From the WPS this is the currently playing file. Also there are some actions that do not apply to the current file but refer to the screen from which the context menu gets called. One example is the playback menu, which can be called using the context menu from within the WPS.
Rockbox’ User Interface can be customised using “Themes”. Themes usually only affect the visual appearance, but an advanced user can create a theme that also changes various other settings like file view, LCD settings and all other settings that can be modified using .cfg files. This topic is discussed in more detail in section 11.3. The Rockbox distribution comes with some themes that should look nice on your player.
Note: Some of the themes shipped with Rockbox need additional fonts from the fonts package, so make sure you installed them. Also, if you downloaded additional themes from the Internet make sure you have the needed fonts installed as otherwise the theme may get displayed garbled.
The player can be powered over USB without connecting to your computer by holding Menu while plugging in. This allows you to continue using the player normally.