7. General Settings
7.1. Playback
The Playback sub menu allows you to configure settings related to audio playback.
-
Shuffle
- Turning shuffle on will cause Rockbox to randomly re-order the playlist.
Thus, to shuffle all of the audio files on the player, you first need to create a
playlist containing all of them. For more information on creating playlists refer to
section 4.4.
Options: Yes/No.
-
Repeat
- Configures settings related to repeating of directories or playlists.
Options: Off / All / One / Shuffle / A-B:
-
Off
- The current playlist will not repeat when it is finished.
Note: If you have the Auto-Change Directory option set to Yes,
Rockbox will move on to the next directory on your hard drive. If the
Auto-Change Directory option is set to No, playback will stop when
the current directory or playlist is finished.
-
All
- The current playlist will repeat when it is finished.
-
One
- Repeat one track over and over.
-
Shuffle
- When the current playlist has finished playing, it will be shuffled and
then repeated.
-
A-B
- Repeats between two user defined points within a track, typically used by
musicians when attempting to learn a piece of music. This option is more
complicated to use than the others as the player must first be placed into
A-B repeat mode and then the start and end points defined.
To set the Start Point (A) press Select. The following press of Select will set
the End Point (B), and a third successive Select will reset the markers.
-
Play Selected First
- This setting controls what happens when you select a file for playback
while shuffle mode is on. If the Play Selected First setting is Yes, the file you
selected will be played first. If this setting is No, a random file in the directory will be
played first.
-
Fast-Forward/Rewind
- These settings control the speed and acceleration during fast forward
and rewind. The setting FF/RW Min Step controls the initial speed and FF/RW
Accel controls the acceleration.
-
Anti-Skip Buffer
- This setting allows you to control how much music is stored in the player’s
memory whilst playing a song, acting as a buffer against shock or playback problems.
The player transfers the selected amount of the forthcoming song into its memory at
high speed whilst you are playing the song. It keeps a “rolling” buffer, which keeps
feeding more of the forthcoming song into memory as it goes along. If the player is
knocked, shaken or jogged heavily while Rockbox is trying to read the hard drive,
Rockbox might not be able to read the drive. Rockbox will retry over and over again
until it succeeds, but may eventually reach the end of the memory buffer. When that
happens, Rockbox must stop playing and wait for more data from the disk, which
causes your music to skip. The anti-skip setting tells Rockbox how much extra
buffer memory to spare to handle this situation. This setting therefore allows
you to reduce the chances of there being a gap or pause during playback of
songs.
The anti-skip buffer can be set to various values between 5 seconds and 10
minutes.
Note: Having a large anti-skip buffer tends to use more power, and may reduce your
battery life. It is recommended to always use the lowest possible setting that allows
correct and continuous playback.
-
Fade on Stop/Pause
- Enables and disables a fade effect when you pause or stop
playing a song. If the Fade on Stop/Pause option is set to Yes, your music will
fade out when you stop or pause playback, and fade in when you resume
playback.
-
Party Mode
- Enables unstoppable music playback. When new songs are selected, they are
queued at the end of the current dynamic playlist instead of being played immediately.
Pausing and stopping playback is disabled as well as skipping songs and launching
plugins.
-
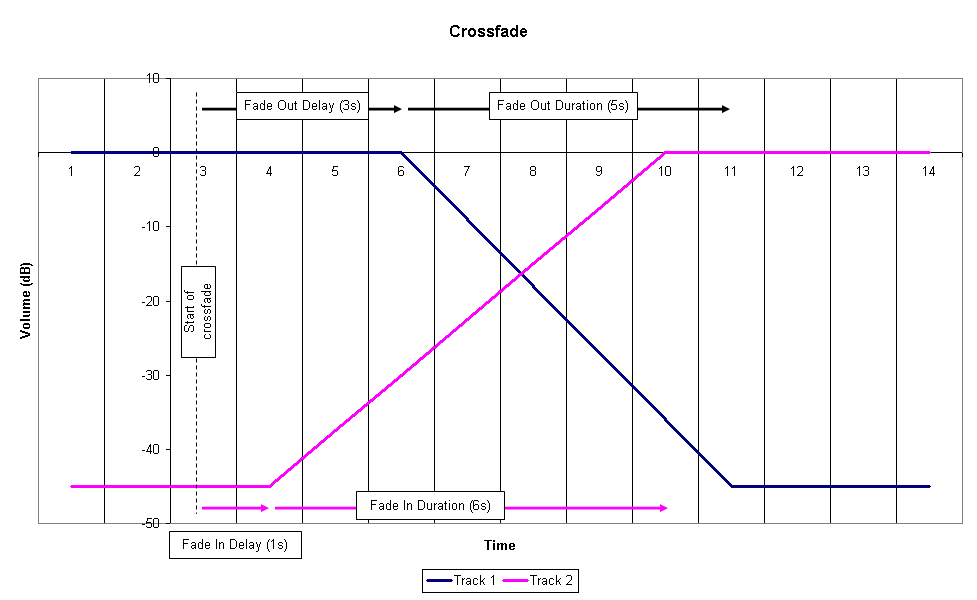
Crossfade
- This setting enables a cross-fader. At the end of a song, the song will fade out as
the next song fades in, creating a smooth transition between songs. The crossfade setting
is particularly effective when the player is set on shuffle.
Options for crossfade settings are:
-
Enable Crossfade
- If set to Off, crossfade is disabled. If set to Always, songs
will always crossfade into one another. If set to Shuffle, crossfade is enabled
when the shuffle feature is set to Yes, but disabled otherwise. If set to track
skip only, tracks will only crossfade when you manually change tracks.
-
Fade In Delay
- The “fade in delay” is the length of time between when the
crossfade process begins and when the new track begins to fade in.
-
Fade In Duration
- The length of time, in seconds, that it takes your music to fade
in once the Fade In Delay has ended.
-
Fade Out Delay
- The “fade out delay” is the length of time between when the
crossfade process begins and when the old track begins to fade out.
-
Fade Out Duration
- The length of time, in seconds, that it takes your music to
fade out once the Fade Out Delay has ended.
-
Fade Out Mode
- If set to Crossfade, one song will fade out and the next song
will simultaneously fade in. If set to Mix, the ending song will continue to
play as normal until its end, while the starting song will fade in from under
it. Mix mode is not used for manual track skips, even if it is selected here.
Note: The rules above apply except in the instance where Fade Out Delay plus
Fade Out Duration is less then Fade In Delay (which would create a gap
in the audio). In this case, the Fade In Delay is reduced to eliminate the
gap.
The graphic below illustrates how the different settings work in practice.
-
Replaygain
- This allows you to control the replaygain function. The purpose of
replaygain is to adjust the volume of the music played so that all songs (or albums,
depending on your settings) have the same apparent volume. This prevents
sudden changes in volume when changing between songs recorded at different
volume levels. For replaygain to work, the songs must have been processed
by a program that adds replaygain information to the ID3 tags (or Vorbis
tags).
Note: APEv2 tags are not currently supported.
Options for replaygain are:
-
Enable Replaygain
- This turns on/off the replaygain function.
-
Prevent Clipping
- Avoid clipping of a song’s waveform. If a song would
clip during playback, the volume is lowered for that song. Replaygain
information is needed for this to work.
-
Replaygain Type
- Choose the type of replaygain to apply:
-
Album Gain
- Maintain a constant volume level between albums, but keep
any intentional volume variations between songs in an album. (If album
gain value is not available, uses track gain information).
-
Track Gain
- Maintain a constant volume level between tracks. If track gain
value is not available, no replaygain is applied.
-
Track Gain If Shuffling
- Maintains a constant volume between tracks if
Shuffle is set to Yes. Reverts to album mode if Shuffle is set to No.
-
Pre-amp
- This allows you to adjust the volume when replaygain is applied. Replaygain
often lowers the volume, sometimes quite much, so here you can compensate
for that. Please note that a (large) positive pre-amp setting can cause
clipping, unless prevent clipping is enabled. The pre-amp can be set
to any decibel (dB) value between -12dB and +12dB, in increments of
0.1dB.
-
Beep Volume
- Controls the volume of the beep that is heard when skipping forward or
backward between tracks. The beep is disabled when set to Off.
-
Auto-Change Directory
- Control what Rockbox does when it reaches the end of a directory. If
Auto-Change Directory is set to Yes, Rockbox will continue to the next
directory. If Auto-Change Directory is set to No, playback will stop at the
end of the current playlist. Using the Random feature requires you to first
generate a folder list via the Random Folder Advance Configuration plugin (see
section 10.4.10).
Note: You must have the Repeat option set to No for Auto-Change Directory to
function properly.
Note: This feature only works when songs have been played from the file browser.
Using it with the database may cause unexpected behavior.
-
Pause on Headphone Unplug
- Enables and disables automatic pausing of playback when
the headphones are disconnected from the player’s headphone socket.
-
Pause on Headphone Unplug
- Options for automatic pause:
-
Off.
- Disables automatic pause.
-
Pause.
- Pauses the player when the headphones are removed.
-
Pause and Resume.
- Pauses when the headphones are removed, and
resumes playback when they are reconnected.
-
Duration to Rewind
- Number of seconds (between 0 and 15) to rewind playback when
the headphones are removed.
-
Disable Auto-Resume If Phones Not Present
- This option will disable the automatic
resumption of playback at startup if the headphones are not connected to the
player.
Note: This requires Resume on Startup to be enabled.
-
Last.fm Log
- Enables logging of your played tracks for submittal to http://www.last.fm. This
service was formely known as Audioscrobbler. When you enable this option, you’ll have
to reboot to start the logging. The log-file is called .scrobbler.log,and is to be found
in the root directory of your player.
Note: See LastFMLog for a further description, and for tools you can use to submit your
Last.fm log.
-
Cuesheet Support
- Enables reading of cuesheet files for played tracks. If a cuesheet is found
for a track, track markers are displayed on the progressbar and it is possible to skip
between the tracks within the cuesheet. Also the information found in the cuesheet file
will replace the information from the ID3 tags. When you enable this option, you’ll have
to reboot for it to come into effect.
-
Skip Length
- Designed to speed up navigation and prevent unintentional track skipping
when listening to long audio tracks, Skip Length changes the behavior of the Prev and
Next buttons so that they skip by a given number of minutes instead of skipping to a
new track.
Note: To skip tracks with this setting set to a time interval, press Short Prev + Long Next
to go forward and Short Next + Long Prev to go back.
7.2. Playlist
The Playlist sub menu allows you to configure settings related to playlists.
-
Recursively Insert Directories.
- If set to On, then when a directory is inserted or
queued into a dynamic playlist, all subdirectories will also be inserted. If set to
Ask, Rockbox will prompt the user about whether to include sub-directories.
-
Warn When Erasing Dynamic Playlist.
- If set to Yes, Rockbox will provide a warning
if the user attempts to take an action that will cause Rockbox to erase the current
dynamic playlist.
7.3. File View
The File View menu deals with options relating to how the File Browser displays
files.
-
Sort Case Sensitive:
- If this option is set to Yes, all files that start with upper case
letters will be listed first, followed by all files that begin with lower case letters. If
this option is set to NO, then case will be ignored when sorting files.
-
Sort Directories:
- This option controls how Rockbox sorts directories. The default is to
sort them alphabetically. By date sorts them with the oldest directory first. By
newest date sorts them with the newest directory first.
-
Sort Files:
- This option controls how Rockbox sorts files. All of the options for Sort
Directories are available in this option. In addition, there is a By type option
which sorts files alphabetically by their type (such as .mp3) then alphabetically
within each type.
-
Show Files:
- This option controls which files are displayed in the File Browser.
-
All:
- The File Browser displays all files and directories. Extensions are shown.
No files or directories are hidden.
-
Supported:
- The File Browser displays all directories and files supported by
Rockbox (see section A.1). Files and directories starting with . (dot) or with
the hidden flag set are hidden.
-
Music:
- The File Browser displays only directories, playlists and the supported
audio file formats. Extensions are stripped. Files and directories starting with
. or with the “hidden” flag set are hidden.
-
Playlists:
- The File Browser displays only directories and playlists, for
simplified navigation.
-
Show Filename Extensions:
- This option controls how file extensions are shown in the File
Browser.
-
Off:
- The file extensions are never shown.
-
On:
- The file extensions are always shown.
-
Only unknown types:
- Only the extensions of unknown filetypes are shown.
-
Only when viewing all types:
- Only show file extensions when Show Files is
set to All.
-
Follow Playlist:
- This option determines what directory the File Browser displays first. If
Follow Playlist is set to Yes, when you enter the File Browser from the WPS, you
will find yourself in the same directory as the currently playing file. If Follow
Playlist is set to No, when you enter the File Browser from the WPS, you
will find yourself in the directory you were in when you last left the File
Browser.
-
Show Path:
- If this setting is set to Full Path the full path to the current directory will be
displayed on the first line in the File Browser. If set to Current Directory Only
only the name of the current directory will be displayed.
This has a similar effect on the Database browser. If set to Current Directory Only
or Full Path, then the title of each menu will be displayed on the first line in the
Database Browser.
7.4. Database
This sub menu allows you to configure the database. See section 4.2 for more information
about using the database.
7.5. Display
-
LCD Settings:
- This sub menu contains settings that relate to the display of the
player.
-
Backlight:
- The amount of time the backlight shines after a key press. If set to
Off, the backlight will not light when a button is pressed. If set to On, the
backlight will never shut off. If set to a time (1 to 90 seconds), the backlight
will stay lit for that amount of time after a button press.
-
Backlight (While Plugged In):
- This setting is equivalent to the Backlight
setting except it applies when the player is plugged into the charger.
-
Backlight on Hold:
- This setting controls the behavior of the backlight when the
Hold switch is toggled. If set to Normal the backlight will behave as usual.
If set to Off the backlight will be turned off immediately when the Hold
switch is engaged and if set to On the backlight will be turned on and stay
on while the Hold switch is engaged.
-
Caption Backlight:
- This option turns on the backlight a number of seconds
before the start of a new track, and keeps it on for the same number of
seconds after the beginning so that the display can be read to see song
information. The amount of time is determined by the value of the backlight
timeout setting, but is no less than 5 seconds.
-
Backlight Fade In:
- The amount of time that the backlight will take to fade from
off to on after a button is pressed. If set to Off the backlight will turn on
immediately, with no fade in. Can also be set to 500ms, 1s or 2s.
-
Backlight Fade Out:
- Like Backlight fade in, this controls the amount of time that
the backlight will take to fade from on to off after a button is pressed. If set
to Off the backlight will turn off immediately, with no fade out. Other valid
values: 500ms, 1s, 2s, 3s, 4s, 5s or 10s.
-
First Keypress Enables Backlight Only:
- With this option enabled the first
keypress while the backlight is turned off will only turn the backlight on
without having any other effect. When disabled the first keypress will also
perform its appropriate action.
-
Brightness:
- Changes the brightness of your LCD display.
-
Scrolling
- This feature controls how text will scroll in Rockbox. You can configure the
following parameters:
-
Scroll Speed:
- Sets how many times per second the automatic horizontal
scrolling text will move a step.
-
Scroll Start Delay:
- Controls how many milliseconds Rockbox should wait
before a new text begins automatically scrolling.
-
Scroll Step Size:
- Defines the number of pixels the text should move for each
step, as used by the Scroll Speed setting.
-
Bidirectional Scroll Limit:
- Rockbox has two different automatic horizontal
scrolling methods: 1) always scrolling the text to the left until the line has
ended and then beginning again at the start, and 2) moving to the left until
you can read the end of the line and then scrolling right until you see the
beginning again. Rockbox chooses which method it should use depending of
how much it has to scroll to the left. This setting lets you tell Rockbox where
that limit is, expressed in percentage of the line length.
-
Screen Scrolls Out of View:
- Screens can be manually scrolled horizontally by
pressing . Setting this option to Yes will keep the list entries at their fixed
positions and allow them to be scrolled out of view, whereas No will only
scroll those entries which surpass the right margin.
-
Screen Scroll Step Size:
- Defines the number of pixels the horizontal manual
screen scroll should move for each step.
-
Paged Scrolling:
- When set to Yes scrolling vertically on pages that surpass the
screen size will page up/down instead of simply changing lines. This can be
useful on slow displays.
-
Status/Scrollbar:
- Settings related to on screen status display and the scrollbar.
-
Scroll Bar:
- Enables or disables the scroll bar at the left.
-
Status Bar:
- Enables or disables the status bar at the upper side.
-
Volume Display:
- Controls whether the volume is displayed as a graphic or a
numeric value on the Status Bar. If you select a numeric display, volume is
displayed in decibels. See section 6.1 for more on the volume setting.
-
Battery Display:
- Controls whether the battery charge status is displayed as a
graphic or numerical percentage value on the Status Bar.
-
Peak Meter:
- The peak meter can be configured with a number of parameters.
-
Peak Release:
- This determines how fast the bar shrinks when the music
becomes softer. Lower values make the peak meter look smoother. Expressed
in scale units per 10ms.
-
Peak Hold Time:
- Specifies the time after which the peak indicator will reset. For
example, if you set this value to 5s, the peak indicator displays the loudest
volume value that occurred within the last 5 seconds. Larger values are
useful if you want to find the peak level of a song, which might be of interest
when copying music from the player via the analogue output to some other
recording device.
-
Clip Hold Time:
- The number of seconds that the clipping indicator will be visible
after clipping is detected.
-
Clip Counter:
- Show the number of times the clip indicator went active during
recording in front of the peak meters.
-
Scale:
- Select whether the peak meter displays linear or logarithmic values. The
human ear perceives loudness on a logarithmic scale. If the Scale setting is
set to Logarithmic (dB) scale, the volume values are scaled logarithmically.
The volume meters of digital audio devices usually are scaled this way. On
the other hand, if you are interested in the power level that is applied to
your headphones you should choose Linear display. This setting cannot be
displayed in units like volts or watts because such units depend on your
headphones.
-
Minimum and maximum range:
- These two options define the full value range
that the peak meter displays. Recommended values for the Logarithmic
(dB) setting are -40 dB for minimum and 0 dB for maximum. Recommended
values for Linear display are 0 and 100%. Note that -40 dB is approximately
1% in linear value, but if you change the minimum setting in linear mode
slightly and then change to the dB scale, there will be a large change. You
can use these values for ‘zooming’ into the peak meter.
-
Default Codepage:
- A codepage describes the way extended characters that are not available
within the ASCII character set are encoded. ID3v1 tags do not have a codepage
encoding contained so Rockbox needs to know what encoding has been used when
generating these tags. This should be “ISO-8859-1” but to support languages outside
Western Europe most applications use the setting of your operating system instead. If
your operating system uses a different codepage and you are getting garbled extended
characters you should adjust this settings. In most cases sticking to “ISO-8859-1” would
be sufficient.
7.6. System
7.6.1. Start Screen
Set the screen that Rockbox will start in. Selecting Resume Playback will resume playback
where it was when the player was shut off if there is a playlist to resume and will then end up
in the WPS. Selecting Previous Screen will make Rockbox start in the screen it was when
the player was shut off.
7.6.2. Battery
Options relating to the battery in the player.
-
Battery Capacity:
- This setting can be used to tell Rockbox what capacity (in mAh) the
battery being used has. The default is unknown, which is the capacity value for
the standard battery shipped with the player. Rockbox uses this value to estimate
remaining battery life for the info screen and WPS. Changing this setting has no
effect whatsoever on actual battery life. This setting only affects the accuracy of
the battery life estimation as shown on screen. This value is fairly meaningless
in the Ipod family at present, and work is on-going into finding a better way to
determine battery life.
-
Charge During USB Connection:
- This option lets you control whether the player
should charge during the USB connection and hence draw the full 500mA.
Turning it Off is recommended if the dap is connected through an unpowered
USB hub or a laptop port.
7.6.3. Disk
Options relating to the hard disk.
-
Disk Spindown:
- Rockbox has a timer that makes it spin down the hard disk after it is
idle for a certain amount of time. This setting controls the amount of time between
the last user activity and the time that the disk spins down. This idle time is only
affected by user activity, like navigating through the File Browser. When the
hard disk spins up to fill the audio buffer, it automatically spins down afterwards.
-
Directory Cache:
- Rockbox has the ability to cache the contents of your drive in RAM.
The Directory Cache takes a small amount of memory away from Rockbox
that would otherwise be used to buffer music, but it speeds up navigation in the
file browser by eliminating the slight pause between the time a navigation button
is pressed and the time Rockbox responds. Turning this setting on activates the
directory cache, and turning it off deactivates the directory cache.
Note: The first time you enable the directory cache, Rockbox will request a reboot
of the player and upon restarting take a few minutes to scan the drive. After this,
the directory cache will work in the background.
7.6.4. Time and Date
Time related menu options.
-
Set Time/Date:
- Set current time and date.
-
Time Format:
- Choose 12 or 24 hour clock.
7.6.5. Idle Poweroff
Rockbox can be configured to turn off power after the unit has been idle for a defined
number of minutes. The player is idle when playback is stopped or paused. It is
not idle while the USB or charger is connected , or while recording. Settings are
either Off or 1 to 10 minutes in 1 minute steps. Then 15,30,45 and 60 minutes are
available.
7.6.6. Wake-Up Alarm
This option turns the player off and then starts it up again at the specified time. Use Scroll
Forward and Scroll Backward to adjust the minutes setting, Prev and Next to adjust the
hours. Select confirms the alarm and shuts the player down, and Menu cancels setting an
alarm. If the player is turned on again before the alarm occurs, the alarm will be cancelled.
Using this option disables the Sleep Timer.
7.6.7. Alarm Wake up Screen
This option controls what the player does when it is woken up by the alarm.
7.6.8. Limits
This sub menu relates to limits in the Rockbox operating system.
-
Max Entries in File Browser:
- This setting controls the limit on the number of files
that you can put in any particular directory in the file browser. You can configure
the size to be between 50 and 10,000 files in steps of 50. The default is 400. Higher
values will shorten the music buffer, so you should increase this setting only if
you have directories with a large number of files.
-
Max Playlist Size:
- This setting controls the maximum size of a playlist. The playlist
size can be between 1,000 and 32,000 files, in steps of 1,000 (default is 10,000).
Higher values will shorten the music buffer, so you should increase this setting
only if you have very large playlists.
7.6.9. Car Adapter Mode
This option turns On and Off the car ignition auto stop function.
-
Car Adapter Mode:
- When using the player in a car, Car Adapter Mode
automatically stops playback on the player when power (i.e. from cigarette lighter
power adapter) to the external DC in jack is turned off. If the Car Adapter
Mode is set to On, Rockbox will pause playback when the external power off
condition is detected. Rockbox will then shutdown the player after the length of
time set in the Idle Poweroff setting (see above). If power to the DC in jack is
turned back on before the Idle Poweroff function has shut the player off, playback
will be resumed 5 seconds after the power is applied. This delay is to allow for
the time while the car engine is being started.
Once the player is shut off either manually, or automatically with the Idle Poweroff
function, it must be powered up manually to resume playback.
7.7. Bookmarking
Bookmarks allow you to save your current position within a track so that you can return to it
at a later time. Bookmarks are saved on a per directory basis (for dynamic playlists) or for
individual (saved) playlists. They are stored next to the directory/playlist they reference. You
can store multiple bookmarks for the same track.
-
Bookmark on Stop.
- This option controls whether Rockbox writes a bookmark to the disk
when playback is stopped. Setting this to No turns automatic bookmarking completely
off. In contrast Yes turns automatic bookmarking on while Ask asks on stopping the
track if a bookmark should be created. With the above options Yes and Ask if there is
an existing .bmark file the current position information will be added to the front of the
existing list, up to the maximum number of allowed bookmarks per file (currently 10). If
no .bmark file exists, one will be created with the new bookmark information.
Finally, if the Maintain a list of Recently Used Bookmarks option is
enabled, the bookmarking information will be added to recent bookmarks
list.
-
Yes – Recent Only.
- Turns on automatic bookmarking – One bookmark only
-
Ask – Recent Only.
- Asks if a bookmark should be created when stopping track
– One bookmark only
With the two Recent Only options, nothing is written to the .bmark file. If
the Maintain a list of Recently Used Bookmarks option is enabled,
the bookmarking information will however be added to recent bookmarks
list.
Note: The Resume function remembers your position in the most recently accessed
track regardless of how the Bookmark on Stop option is set.
-
Load Last Bookmark.
-
When the Load Last Bookmark option is set to Yes, Rockbox automatically returns
to the position of the last bookmark within a file when that file is played.
When the Load Last Bookmark option is set to Ask, Rockbox will give
the user the option of starting from the beginning of the track of or from the
bookmark.
When the Load Last Bookmark option is set to No, playback always starts from the
beginning of the track, and the user must play the bookmark or use the Load
Bookmark function in the Main Menu, while the file is playing, to resume at the
bookmarked location.
-
Maintain a list of Recently Used Bookmarks.
-
This list of Most Recent Bookmarks (MRB’s) may be accessed through the Recent
Bookmarks option of the Bookmarks sub menu of the Main Menu. When
set to Yes each new bookmark will be added to the MRB list. Setting this
to No disables the addition of bookmarks to the MRB list. Unique Only
behaves like the Yes setting but in addition all older entries for the current
(dynamic) playlist will be removed from the MRB whenever a new entry is
added.
-
Bookmark Actions context menu.
-
When viewing any bookmark list, pressing the standard context menu key (Long Select)
will bring up the Bookmark Actions context menu.
Resume will commence playback of the currently-selected bookmark entry.
Delete will remove just the currently-selected bookmark entry from the list.
7.8. Language
This setting controls the language of the Rockbox user interface. Selecting a language will
activate it. The language files must be in the /.rockbox/langs/ directory. See
section 11.1.3 for further details about languages.
7.9. Voice
-
Voice Menus.
- This option controls the voicing of menus/settings as they are selected by the
cursor. In order for this to work, a voice file must be present in the /.rockbox/langs/
directory on the player. Voice files are large and are not shipped with Rockbox by
default. The voice file is the name of the language for which it is made, followed by the
extension .voice. So for English, the file name would be english.voice. This
option is on by default, but will do nothing unless the appropriate voice file is
installed in the correct place on the player. The Voice Menus have several
limitations:
- Setting the Sound Option Channels to Karaoke may disable voice
menus.
- Plugins and the wake up alarm do not support voice features.
-
Voice Directories.
- This option controls voicing of directory names. A voice file must be
present for this to work. Several options are available.
-
Spell.
- Speak the directory name by spelling it out letter by letter. Support is
provided only for the most common letters, numbers and punctuation.
-
Numbers.
- Each directory is assigned a number based upon its position in the file
list. They are then announced as “Directory 1”, “Directory 2” etc.
-
Off.
- No attempt will be made to speak directory names.
You can use pre-generated .talk clips to have directory names spoken properly, but you
must enable this explicitly (see below).
-
Use Directory .talk Clips.
- This option turns on the use of .talk clips for directories.
-
On.
- Use special pre-recorded MP3 files (_dirname.talk) in each directory.
These must be generated in advance, and are typically produced
synthetically using a text-to-speech engine on a PC.
-
Off.
- No checking is made for directory .talk clips; they are not used even if
present. This can reduce disk activity.
Use of a .talk clip takes precedence over other directory name voicing. Otherwise (e.g. if
a .talk clip is not available), voicing uses the method set under Voice Directories
above.
-
Voice Filenames.
- This option controls voicing of filenames. Again, a voice file must be
present for this to work. The options provided are Spell, Numbers, and Off which
function the same as for Voice Directories. You can use pre-generated .talk clips
to have filenames spoken properly, but you must enable this explicitly (see
below).
-
Use File .talk Clips.
- This option turns on the use of .talk clips for files.
-
On.
- Use special pre-recorded MP3 files for each file. This functions the same as
for directories except that the .talk clip file must have the same name as the
described file with an extra .talk extension (e.g. Punkadiddle.mp3 would
require a file called Punkadiddle.mp3.talk).
-
Off.
- No checking is made for file .talk clips; they are not used even if present.
This can reduce disk activity.
Use of a .talk clip takes precedence over other filename voicing. Otherwise (e.g. if a .talk
clip is not available), voicing uses the method set under Voice Filenames
above.
-
Say File Type.
- This option turns on voicing of file types when Voice Filenames is set to
Spell or Numbers. When Voice Directories is set to Spell, “Directory” will be
voiced after each spelled out directory.
-
Announce Battery Level.
- When this option is enabled the battery level is announced when
it falls under 50%, 30% and 15%.
See VoiceHowto for more details on configuring speech support in Rockbox.