|
|
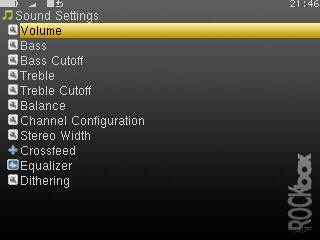
The sound settings menu offers a selection of sound settings you may change to customise your listening experience.
This setting adjusts the volume of your music. Like most professional audio gear and many consumer audio products, Rockbox uses a decibel scale where 0 dB is a reference that indicates the maximum volume that the player can produce without possible distortion (clipping). All values lower than this reference will be negative and yield a progressively softer volume. Values higher than 0 dB are available and can be used to raise the volume more than would otherwise be possible. These volume levels will ordinarily lead to distorted sound, but might work nicely for music that has an otherwise low volume level. The volume can be adjusted from a minimum of -57 dB to a maximum of +6 dB.
This setting emphasises or suppresses the lower (bass) frequencies in the sound. A value of 0 dB means that bass sounds are unaltered (flat response). The minimum setting is -12 dB and the maximum is 12 dB.
This setting controls the frequency below which the bass adjustment applies. The setting has a range from 1 to 4, where a bigger number affects a bigger range of bass frequencies. The actual cutoff frequency used for each setting value will vary with sample rate.
This setting emphasises or suppresses the higher (treble) frequencies in the sound. A value of 0 dB means that treble sounds are unaltered (flat response). The minimum setting is -12 dB and the maximum is 12 dB.
This setting controls the frequency above which the treble adjustment applies. The setting has a range from 1 to 4, where a bigger number affects a smaller range of treble frequencies. The actual cutoff frequency used for each setting value will vary with sample rate.
This setting controls the balance between the left and right channels. The default, 0, means that the left and right outputs are equal in volume. Negative numbers increase the volume of the left channel relative to the right, positive numbers increase the volume of the right channel relative to the left.
A stereo audio signal consists of two channels, left and right. The Channels setting determines if these channels are to be combined in any way, and if so, in what manner they will be combined. Available options are:
|
|
Stereo width allows you to manually specify the effect that is applied when the Channels setting is set to “custom”. All values below 100% will progressively mix the contents of one channel into the other. This has the effect of gradually centering the stereo image, until you have monophonic sound at 0%. Values above 100% will progressively remove components in one channel that is also present in the other. This has the effect of widening the stereo field. A value of 100% will leave the stereo field unaltered.
Crossfeed attempts to make the experience of listening to music on headphones more similar to listening to music with stereo speakers. When you listen to music through speakers, each ear will hear sound originating from both speakers. However, the sound from the left speaker reaches your right ear slightly later than it does your left ear, and vice versa.
The human ear and brain together are very good at interpreting the time differences between direct sounds and reflected sounds and using that information to identify the direction that the sound is coming from. On the other hand, when listening to headphones, each ear hears only the stereo channel corresponding to it. The left ear hears only the left channel and the right ear hears only the right channel. The result is that sound from headphones does not provide the same spatial cues to your ear and brain as speakers, and might for that reason sound unnatural to some listeners.
The crossfeed function uses an algorithm to feed a delayed and filtered portion of the signal from the right channel into the left channel and vice versa in order to simulate the spatial cues that the ear and brain receive when listening to a set of loudspeakers placed in front of the listener. The result is a more natural stereo image that can be especially appreciated in older rock and jazz records, where one instrument is often hard-panned to just one of the speakers. Many people will find such records tiring to listen to using earphones and no crossfeed effect.
Crossfeed has the following settings:
Most users will find the default settings to yield satisfactory results, but for the more adventurous user the settings can be fine-tuned to provide a virtual speaker placement suited to ones preference.
Beware that the crossfeed function is capable of making the audio distort if you choose settings which result in a too high output level.
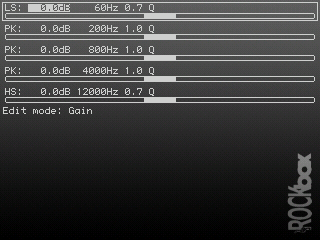
Rockbox features a parametric equalizer (EQ). As the name suggests, a parametric EQ lets you control several different parameters for each band of the EQ. In some ways the EQ is similar to the Bass and Treble settings described earlier, but the EQ allows you to control the sound much more carefully.
Rockbox’s parametric EQ is composed of five different bands:
As a general guide, EQ band 0 should be used for low frequencies, EQ bands 1 through 3 should be used for mids, and EQ band 4 should be used for highs.
|
If your music distorts when using the EQ, trying changing this setting to a negative value.
This setting controls the dithering and noise shaping functionality of Rockbox.
Most of Rockbox’ audio file decoders work at a higher bit depth than the 16 bits used for output on the player’s audio connectors. The simplest way to convert from one bit depth to another is simply discarding all the surplus bits. This is the default behaviour, and adds distortion to the signal that will vary in character along with the desired sound.
Dithering adds low-level noise to the signal prior to throwing away the surplus bits, which gives the resulting signal a uniform noise floor which is independent of the signal. Most people find this noise preferable to the time-varying noise heard when not performing dithering.
After dithering, noise shaping is performed. This basically just pushes the dithering noise to the parts of the frequency spectrum humans cannot hear so easily. In Rockbox’ case, some of the noise is pushed up to above 10 kHz.
This setting will be put to its best use when listening to dynamic music with frequently occuring quiet parts, classical music being a typical example. It is worth noting that the effects of dithering and noise shaping are very subtle, and not easily noticable.
Rockbox uses highpass triangular distribution noise as the dithering noise source, and a third order noise shaper.