sbt Reference Manual
sbt is a build tool for Scala, Java, and more. It requires Java 1.6 or later.
Install
See Installing sbt for the setup instructions.
Getting Started
To get started, please read the Getting Started Guide. You will save yourself a lot of time if you have the right understanding of the big picture up-front. All documentation may be found via the table of contents included at the end of every page.
Use Stack Overflow for questions. Use the sbt-dev mailing list for discussing sbt development. Use @scala_sbt for questions and discussions.
Features of sbt
- Little or no configuration required for simple projects
- Scala-based build definition that can use the full flexibility of Scala code
- Accurate incremental recompilation using information extracted from the compiler
- Continuous compilation and testing with triggered execution
- Packages and publishes jars
- Generates documentation with scaladoc
- Supports mixed Scala/Java projects
- Supports testing with ScalaCheck, specs, and ScalaTest. JUnit is supported by a plugin.
- Starts the Scala REPL with project classes and dependencies on the classpath
- Modularization supported with sub-projects
- External project support (list a git repository as a dependency!)
- Parallel task execution, including parallel test execution
- Library management support: inline declarations, external Ivy or Maven configuration files, or manual management
Also
This documentation can be forked on GitHub. Feel free to make corrections and add documentation.
Documentation for 0.7.x has been archived here. This documentation applies to sbt 0.13.11.
See also the API Documentation, SXR Documentation, and the index of names and types.
Getting Started with sbt
sbt uses a small number of concepts to support flexible and powerful build definitions. There are not that many concepts, but sbt is not exactly like other build systems and there are details you will stumble on if you haven’t read the documentation.
The Getting Started Guide covers the concepts you need to know to create and maintain an sbt build definition.
It is highly recommended to read the Getting Started Guide!
If you are in a huge hurry, the most important conceptual background can be found in .sbt build definition, scopes, and more kinds of setting. But we don’t promise that it’s a good idea to skip the other pages in the guide.
It’s best to read in order, as later pages in the Getting Started Guide build on concepts introduced earlier.
Thanks for trying out sbt and have fun!
Installing sbt
To create an sbt project, you’ll need to take these steps:
- Install sbt and create a script to launch it.
Setup a simple hello world project
- Create a project directory with source files in it.
- Create your build definition.
- Move on to running to learn how to run sbt.
- Then move on to .sbt build definition to learn more about build definitions.
Ultimately, the installation of sbt boils down to a launcher JAR and a shell script, but depending on your platform, we provide several ways to make the process less tedious. Head over to the installation steps for Mac, Windows, Linux, Typesafe Activator, or manual installation.
Tips and Notes
If you have any trouble running sbt, see Setup Notes on terminal encodings, HTTP proxies, and JVM options.
Installing sbt on Mac
Installing from a third-party package
Note: Third-party packages may not provide the latest version. Please make sure to report any issues with these packages to the relevant maintainers.
Macports
$ port install sbt
Homebrew
$ brew install sbt
Installing from a universal package
Download ZIP or TGZ package, and expand it.
Typesafe Activator
See the Typesafe Activator instructions.
Installing manually
See instruction to install manually.
Installing sbt on Windows
Windows installer
Download msi installer and install it.
Installing from a universal package
Download ZIP or TGZ package and expand it.
Typesafe Activator
See the Typesafe Activator instructions.
Installing manually
See instruction to install manually.
Installing sbt on Linux
Installing from a universal package
Download ZIP or TGZ package and expand it.
Ubuntu and other Debian-based distributions
DEB package is officially supported by sbt.
Ubuntu and other Debian-based distributions use the DEB format, but usually you don’t install your software from a local DEB file. Instead they come with package managers both for the command line (e.g. apt-get, aptitude) or with a graphical user interface (e.g. Synaptic).
Run the following from the terminal to install sbt (You’ll need superuser privileges to do so, hence the sudo).
echo "deb https://dl.bintray.com/sbt/debian /" | sudo tee -a /etc/apt/sources.list.d/sbt.list
sudo apt-key adv --keyserver hkp://keyserver.ubuntu.com:80 --recv 642AC823
sudo apt-get update
sudo apt-get install sbt
Package managers will check a number of configured repositories for packages to offer for installation. sbt binaries are published to Bintray, and conveniently Bintray provides an APT repository. You just have to add the repository to the places your package manager will check.
Once sbt is installed, you’ll be able to manage the package in aptitude or Synaptic after you updated their package cache. You should also be able to see the added repository at the bottom of the list in System Settings -> Software & Updates -> Other Software:

Red Hat Enterprise Linux and other RPM-based distributions
RPM package is officially supported by sbt.
Red Hat Enterprise Linux and other RPM-based distributions use the RPM format.
Run the following from the terminal to install sbt (You’ll need superuser privileges to do so, hence the sudo).
curl https://bintray.com/sbt/rpm/rpm | sudo tee /etc/yum.repos.d/bintray-sbt-rpm.repo
sudo yum install sbt
sbt binaries are published to Bintray, and conveniently Bintray provides an RPM repository. You just have to add the repository to the places your package manager will check.
Note: Please report any issues with these to the sbt-launcher-package project.
Gentoo
In the official tree there is no ebuild for sbt. But there are ebuilds to merge sbt from binaries. To merge sbt from this ebuilds you can do:
mkdir -p /usr/local/portage && cd /usr/local/portage
git clone git://github.com/whiter4bbit/overlays.git
echo "PORTDIR_OVERLAY=$PORTDIR_OVERLAY /usr/local/portage/overlays" >> /etc/make.conf
emerge sbt-bin
Note: Please report any issues with the ebuild here.
Typesafe Activator
See the Typesafe Activator instructions.
Installing manually
See instructions to install manually.
Installing sbt manually
Manual installation requires downloading sbt-launch.jar and creating a script to start it.
Unix
Put sbt-launch.jar in ~/bin.
Create a script to run the jar, by creating ~/bin/sbt with these
contents:
#!/bin/bash
SBT_OPTS="-Xms512M -Xmx1536M -Xss1M -XX:+CMSClassUnloadingEnabled -XX:MaxPermSize=256M"
java $SBT_OPTS -jar `dirname $0`/sbt-launch.jar "$@"
Make the script executable:
$ chmod u+x ~/bin/sbt
Windows
Manual installation for Windows varies by terminal type and whether
Cygwin is used. In all cases, put the batch file or script on the path
so that you can launch sbt in any directory by typing sbt at the command
prompt. Also, adjust JVM settings according to your machine if
necessary.
Non-Cygwin
For non-Cygwin users using the standard Windows terminal, create a batch file sbt.bat:
set SCRIPT_DIR=%~dp0
java -Xms512M -Xmx1536M -Xss1M -XX:+CMSClassUnloadingEnabled -XX:MaxPermSize=256M -jar "%SCRIPT_DIR%sbt-launch.jar" %*
and put the downloaded sbt-launch.jar in the same directory as the batch file.
Cygwin with the standard Windows termnial
If using Cygwin with the standard Windows terminal, create a bash
script ~/bin/sbt:
SBT_OPTS="-Xms512M -Xmx1536M -Xss1M -XX:+CMSClassUnloadingEnabled -XX:MaxPermSize=256M"
java $SBT_OPTS -jar sbt-launch.jar "$@"
Replace sbt-launch.jar with the path to your downloaded sbt-launch.jar and remember to use cygpath if necessary. Make the script executable:
$ chmod u+x ~/bin/sbt
Cygwin with an Ansi terminal
Cygwin with an Ansi terminal (supports Ansi escape sequences and is configurable via stty), create a bash script
~/bin/sbt:
SBT_OPTS="-Xms512M -Xmx1536M -Xss1M -XX:+CMSClassUnloadingEnabled -XX:MaxPermSize=256M"
stty -icanon min 1 -echo > /dev/null 2>&1
java -Djline.terminal=jline.UnixTerminal -Dsbt.cygwin=true $SBT_OPTS -jar sbt-launch.jar "$@"
stty icanon echo > /dev/null 2>&1
Replace sbt-launch.jar with the path to your downloaded sbt-launch.jar and remember to use cygpath if necessary. Then, make the script executable:
$ chmod u+x ~/bin/sbt
In order for backspace to work correctly in the scala console, you need to make sure your backspace key is sending the erase character as configured by stty. For the default cygwin terminal (mintty) you can find a setting under Options -> Keys “Backspace sends ^H” which will need to be checked if your erase key is the cygwin default of ^H.
Note: Other configurations are currently unsupported. Please submit a pull request implementing or describing that support.
Installing Typesafe Activator (including sbt)
Typesafe Activator is a custom version of sbt which adds two extra
commands, activator ui and activator new. The activator
command is a superset of sbt, in short.
You can obtain Activator from typesafe.com.
If you see a command line such as sbt ~test in the
documentation, you will also be able to type activator ~test.
Any Activator project can be opened in sbt and vice versa because
Activator is “sbt powered.”
The Activator download includes an activator script and an
activator-launch.jar, which are equivalent to the sbt script and
launch jar described under
manual installation. Here are the
differences between Activator and a
manual installation of sbt:
- typing
activatorwith no arguments will attempt to guess whether to enteractivator shelloractivator uimode; typeactivator shellto force the command line prompt. activator newallows you to create projects from a large catalog of template projects, for example theplay-scalatemplate is a skeleton Play Framework Scala app.activator uilaunches a quick start UI that can be used to work through tutorials from the template catalog (many templates in the catalog have accompanying tutorials).
Activator offers two downloads; the small “minimal” download contains only the wrapper script and launch jar, while the large “full” download contains a preloaded Ivy cache with jars for Scala, Akka, and the Play Framework.
Hello, World
This page assumes you’ve installed sbt.
Create a project directory with source code
A valid sbt project can be a directory containing a single source file.
Try creating a directory hello with a file hw.scala, containing the
following:
object Hi {
  def main(args: Array[String]) = println("Hi!")
}
Now from inside the hello directory, start sbt and type run at the sbt
interactive console. On Linux or OS X the commands might look like this:
$ mkdir hello
$ cd hello
$ echo 'object Hi { def main(args: Array[String]) = println("Hi!") }' > hw.scala
$ sbt
...
> run
...
Hi!
In this case, sbt works purely by convention. sbt will find the following automatically:
- Sources in the base directory
- Sources in
src/main/scalaorsrc/main/java - Tests in
src/test/scalaorsrc/test/java - Data files in
src/main/resourcesorsrc/test/resources - jars in
lib
By default, sbt will build projects with the same version of Scala used to run sbt itself.
You can run the project with sbt run or enter the Scala
REPL with sbt console. sbt console
sets up your project’s classpath so you can try out live Scala examples
based on your project’s code.
Build definition
Most projects will need some manual setup. Basic build settings go in a
file called build.sbt, located in the project’s base directory.
For example, if your project is in the directory hello, in
hello/build.sbt you might write:
lazy val root = (project in file(".")).
  settings(
    name := "hello",
    version := "1.0",
    scalaVersion := "2.11.7"
  )
In .sbt build definition you’ll learn more about how to write
a build.sbt file.
If you plan to package your project in a jar, you will want to set at
least the name and version in a build.sbt.
Setting the sbt version
You can force a particular version of sbt by creating a file
hello/project/build.properties. In this file, write:
sbt.version=0.13.11
to force the use of sbt 0.13.11. sbt is 99% source compatible from
release to release. Still, setting the sbt version in
project/build.properties avoids any potential confusion.
Directory structure
This page assumes you’ve installed sbt and seen the Hello, World example.
Base directory
In sbt’s terminology, the “base directory” is the directory containing
the project. So if you created a project hello containing
hello/build.sbt and hello/hw.scala as in the Hello, World
example, hello is your base directory.
Source code
Source code can be placed in the project’s base directory as with
hello/hw.scala. However, most people don’t do this for real projects;
too much clutter.
sbt uses the same directory structure as Maven for source files by default (all paths are relative to the base directory):
src/
  main/
    resources/
       <files to include in main jar here>
    scala/
       <main Scala sources>
    java/
       <main Java sources>
  test/
    resources
       <files to include in test jar here>
    scala/
       <test Scala sources>
    java/
       <test Java sources>
Other directories in src/ will be ignored. Additionally, all hidden
directories will be ignored.
sbt build definition files
You’ve already seen build.sbt in the project’s base directory. Other sbt
files appear in a project subdirectory.
project can contain .scala files, which are combined with .sbt files to
form the complete build definition. See organizing the build for more.
build.sbt
project/
  Build.scala
You may see .sbt files inside project/ but they are not equivalent to
.sbt files in the project’s base directory. Explaining this will
come later, since you’ll need some background information first.
Build products
Generated files (compiled classes, packaged jars, managed files, caches,
and documentation) will be written to the target directory by default.
Configuring version control
Your .gitignore (or equivalent for other version control systems) should
contain:
target/
Note that this deliberately has a trailing / (to match only directories)
and it deliberately has no leading / (to match project/target/ in
addition to plain target/).
Running
This page describes how to use sbt once you have set up your project. It assumes you’ve installed sbt and created a Hello, World or other project.
Interactive mode
Run sbt in your project directory with no arguments:
$ sbt
Running sbt with no command line arguments starts it in interactive mode. Interactive mode has a command prompt (with tab completion and history!).
For example, you could type compile at the sbt prompt:
> compile
To compile again, press up arrow and then enter.
To run your program, type run.
To leave interactive mode, type exit or use Ctrl+D (Unix) or Ctrl+Z
(Windows).
Batch mode
You can also run sbt in batch mode, specifying a space-separated list of sbt commands as arguments. For sbt commands that take arguments, pass the command and arguments as one argument to sbt by enclosing them in quotes. For example,
$ sbt clean compile "testOnly TestA TestB"
In this example, testOnly has arguments, TestA and TestB. The commands
will be run in sequence (clean, compile, then testOnly).
Continuous build and test
To speed up your edit-compile-test cycle, you can ask sbt to automatically recompile or run tests whenever you save a source file.
Make a command run when one or more source files change by prefixing the
command with ~. For example, in interactive mode try:
> ~ compile
Press enter to stop watching for changes.
You can use the ~ prefix with either interactive mode or batch mode.
See Triggered Execution for more details.
Common commands
Here are some of the most common sbt commands. For a more complete list, see Command Line Reference.
| clean | Deletes all generated files (in the target directory). |
| compile | Compiles the main sources (in src/main/scala and src/main/java directories). |
| test | Compiles and runs all tests. |
| console | Starts the Scala interpreter with a classpath including the compiled sources and all dependencies. To return to sbt, type :quit, Ctrl+D (Unix), or Ctrl+Z (Windows). |
| Runs the main class for the project in the same virtual machine as sbt. | |
| package | Creates a jar file containing the files in src/main/resources and the classes compiled from src/main/scala and src/main/java. |
| help <command> | Displays detailed help for the specified command. If no command is provided, displays brief descriptions of all commands. |
| reload | Reloads the build definition (build.sbt, project/*.scala, project/*.sbt files). Needed if you change the build definition. |
Tab completion
Interactive mode has tab completion, including at an empty prompt. A special sbt convention is that pressing tab once may show only a subset of most likely completions, while pressing it more times shows more verbose choices.
History Commands
Interactive mode remembers history, even if you exit sbt and restart it. The simplest way to access history is with the up arrow key. The following commands are also supported:
| ! | Show history command help. |
| !! | Execute the previous command again. |
| !: | Show all previous commands. |
| !:n | Show the last n commands. |
| !n | Execute the command with index n, as shown by the !: command. |
| !-n | Execute the nth command before this one. |
| !string | Execute the most recent command starting with 'string.' |
| !?string | Execute the most recent command containing 'string.' |
.sbt build definition
This page describes sbt build definitions, including some “theory” and
the syntax of build.sbt. It assumes you know how to use sbt
and have read the previous pages in the Getting Started Guide.
Three Flavors of Build Definition
There are three flavors of build definition:
- Multi-project
.sbtbuild definition - Bare
.sbtbuild definition .scalabuild definition
This page discusses the newest multi-project .sbt build definition, which combines the strength
of the two older flavors, and is suitable for all cases.
You might come across the other older flavors when dealing with builds in the wild.
See bare .sbt build definition and .scala build definition (later in Getting Started) for more
on other flavors.
In addition, a build definition can contain files ending in .scala, located in the
project/ subdirectory of the base directory to define commonly used functions and values.
What is a Build Definition?
After examining a set of directories and processing build definition files, sbt
ends up with Project definitions.
In build.sbt you might create a Project definition of
the project located in the current directory like this:
lazy val root = (project in file("."))
Each project is associated with an immutable map (set of key-value pairs) describing the project.
For example, one key is name and it maps to a string value, the name of
your project.
Build definition files do not affect sbt’s map directly.
Instead, the build definition creates a huge list of objects with type
Setting[T] where T is the type of the value in the map. A Setting
describes a transformation to the map, such as adding a new key-value
pair or appending to an existing value. (In the spirit of functional
programming with immutable data structures and values, a transformation
returns a new map — it does not update the old map in-place.)
Here is how you associate the Setting[String] for the name of
the project located in the current directory:
lazy val root = (project in file(".")).
  settings(
    name := "hello"
  )
This Setting[String] transforms the map by adding (or replacing) the
name key, giving it the value "hello". The transformed map becomes sbt’s
new map.
To create the map, sbt first sorts the list of settings so that all
changes to the same key are made together, and values that depend on
other keys are processed after the keys they depend on. Then sbt walks
over the sorted list of Settings and applies each one to the map in
turn.
Summary: A build definition defines Projects with a list of Setting[T], where a
Setting[T] is a transformation affecting sbt’s map of key-value pairs
and T is the type of each value.
How build.sbt defines settings
build.sbt defines a Project, which holds a list of Scala expressions called settings.
Here’s an example:
lazy val commonSettings = Seq(
  organization := "com.example",
  version := "0.1.0",
  scalaVersion := "2.11.7"
)

lazy val root = (project in file(".")).
  settings(commonSettings: _*).
  settings(
    name := "hello"
  )
Each Setting is defined with a Scala expression. The expressions in
settings are independent of one another, and they are expressions,
rather than complete Scala statements.
build.sbt may also be
interspersed with vals, lazy vals, and defs. Top-level objects and
classes are not allowed in build.sbt. Those should go in the project/
directory as full Scala source files.
On the left, name, version, and scalaVersion are keys. A key is an
instance of SettingKey[T], TaskKey[T], or InputKey[T] where T is the
expected value type. The kinds of key are explained below.
Keys have a method called :=, which returns a Setting[T]. You could use
a Java-like syntax to call the method:
lazy val root = (project in file(".")).
  settings(
    name.:=("hello")
  )
But Scala allows name := "hello" instead (in Scala, a single-parameter
method can use either syntax).
The := method on key name returns a Setting, specifically a
Setting[String]. String also appears in the type of name itself, which
is SettingKey[String]. In this case, the returned Setting[String] is a
transformation to add or replace the name key in sbt’s map, giving it
the value "hello".
If you use the wrong value type, the build definition will not compile:
lazy val root = (project in file(".")).
  settings(
    name := 42  // will not compile
  )
Keys
Types
There are three flavors of key:
SettingKey[T]: a key for a value computed once (the value is computed when loading the project, and kept around).TaskKey[T]: a key for a value, called a task, that has to be recomputed each time, potentially with side effects.InputKey[T]: a key for a task that has command line arguments as input. Check out Input Tasks for more details.
Built-in Keys
The built-in keys are just fields in an object called
Keys. A build.sbt implicitly has an
import sbt.Keys._, so sbt.Keys.name can be referred to as name.
Custom Keys
Custom keys may be defined with their respective creation methods:
settingKey, taskKey, and inputKey. Each method expects the type of the
value associated with the key as well as a description. The name of the
key is taken from the val the key is assigned to. For example, to define
a key for a new task called hello,
lazy val hello = taskKey[Unit]("An example task")
Here we have used the fact that an .sbt file can contain vals and defs
in addition to settings. All such definitions are evaluated before
settings regardless of where they are defined in the file. vals and defs
must be separated from settings by blank lines.
Note: Typically, lazy vals are used instead of vals to avoid initialization order problems.
Task vs Setting keys
A TaskKey[T] is said to define a task. Tasks are operations such as
compile or package. They may return Unit (Unit is Scala for void), or
they may return a value related to the task, for example package is a
TaskKey[File] and its value is the jar file it creates.
Each time you start a task execution, for example by typing compile at
the interactive sbt prompt, sbt will re-run any tasks involved exactly
once.
sbt’s map describing the project can keep around a fixed string value
for a setting such as name, but it has to keep around some executable
code for a task such as compile — even if that executable code
eventually returns a string, it has to be re-run every time.
A given key always refers to either a task or a plain setting. That is, “taskiness” (whether to re-run each time) is a property of the key, not the value.
Defining tasks and settings
Using :=, you can assign a value to a setting and a computation to a
task. For a setting, the value will be computed once at project load
time. For a task, the computation will be re-run each time the task is
executed.
For example, to implement the hello task from the previous section:
lazy val hello = taskKey[Unit]("An example task")

lazy val root = (project in file(".")).
  settings(
    hello := { println("Hello!") }
  )
We already saw an example of defining settings when we defined the project’s name,
lazy val root = (project in file(".")).
  settings(
    name := "hello"
  )
Types for tasks and settings
From a type-system perspective, the Setting created from a task key is
slightly different from the one created from a setting key.
taskKey := 42 results in a Setting[Task[T]] while settingKey := 42
results in a Setting[T]. For most purposes this makes no difference; the
task key still creates a value of type T when the task executes.
The T vs. Task[T] type difference has this implication: a setting can’t
depend on a task, because a setting is evaluated only once on project
load and is not re-run. More on this in
more kinds of setting, coming up soon.
Keys in sbt interactive mode
In sbt’s interactive mode, you can type the name of any task to execute
that task. This is why typing compile runs the compile task. compile is
a task key.
If you type the name of a setting key rather than a task key, the value
of the setting key will be displayed. Typing a task key name executes
the task but doesn’t display the resulting value; to see a task’s
result, use show <task name> rather than plain <task name>. The
convention for keys names is to use camelCase so that the command line
name and the Scala identifiers are the same.
To learn more about any key, type inspect <keyname> at the sbt
interactive prompt. Some of the information inspect displays won’t make
sense yet, but at the top it shows you the setting’s value type and a
brief description of the setting.
Imports in build.sbt
You can place import statements at the top of build.sbt; they need not
be separated by blank lines.
There are some implied default imports, as follows:
import sbt._
import Process._
import Keys._
(In addition, if you have .scala files, the contents of any
Build or Plugin objects in those files will be imported. More on that
when we get to .scala build definition.)
Adding library dependencies
To depend on third-party libraries, there are two options. The first is
to drop jars in lib/ (unmanaged dependencies) and the other is to add
managed dependencies, which will look like this in build.sbt:
val derby = "org.apache.derby" % "derby" % "10.4.1.3"

lazy val commonSettings = Seq(
  organization := "com.example",
  version := "0.1.0",
  scalaVersion := "2.11.7"
)

lazy val root = (project in file(".")).
  settings(commonSettings: _*).
  settings(
    name := "hello",
    libraryDependencies += derby
  )
This is how you add a managed dependency on the Apache Derby library, version 10.4.1.3.
The libraryDependencies key involves two complexities: += rather than
:=, and the % method. += appends to the key’s old value rather than
replacing it, this is explained in
more kinds of setting. The %
method is used to construct an Ivy module ID from strings, explained in
Library dependencies.
We’ll skip over the details of library dependencies until later in the Getting Started Guide. There’s a whole page covering it later on.
Scopes
This page describes scopes. It assumes you’ve read and understood the previous page, .sbt build definition.
The whole story about keys
Previously we pretended that a key like name corresponded
to one entry in sbt’s map of key-value pairs. This was a simplification.
In truth, each key can have an associated value in more than one context, called a “scope.”
Some concrete examples:
- if you have multiple projects in your build definition, a key can have a different value in each project.
- the
compilekey may have a different value for your main sources and your test sources, if you want to compile them differently. - the
packageOptionskey (which contains options for creating jar packages) may have different values when packaging class files (packageBin) or packaging source code (packageSrc).
There is no single value for a given key name, because the value may
differ according to scope.
However, there is a single value for a given scoped key.
If you think about sbt processing a list of settings to generate a
key-value map describing the project, as
discussed earlier, the keys in that key-value map are
scoped keys. Each setting defined in the build definition (for example
in build.sbt) applies to a scoped key as well.
Often the scope is implied or has a default, but if the defaults are
wrong, you’ll need to mention the desired scope in build.sbt.
Scope axes
A scope axis is a type, where each instance of the type can define its own scope (that is, each instance can have its own unique values for keys).
There are three scope axes:
- Projects
- Configurations
- Tasks
Scoping by project axis
If you put multiple projects in a single build, each project needs its own settings. That is, keys can be scoped according to the project.
The project axis can also be set to “entire build”, so a setting applies to the entire build rather than a single project. Build-level settings are often used as a fallback when a project doesn’t define a project-specific setting.
Scoping by configuration axis
A configuration defines a flavor of build, potentially with its own classpath, sources, generated packages, etc. The configuration concept comes from Ivy, which sbt uses for managed dependencies Library Dependencies, and from MavenScopes.
Some configurations you’ll see in sbt:
Compilewhich defines the main build (src/main/scala).Testwhich defines how to build tests (src/test/scala).Runtimewhich defines the classpath for theruntask.
By default, all the keys associated with compiling, packaging, and
running are scoped to a configuration and therefore may work differently
in each configuration. The most obvious examples are the task keys
compile, package, and run; but all the keys which affect those keys
(such as sourceDirectories or scalacOptions or fullClasspath) are also
scoped to the configuration.
Scoping by task axis
Settings can affect how a task works. For example, the packageSrc task
is affected by the packageOptions setting.
To support this, a task key (such as packageSrc) can be a scope for
another key (such as packageOptions).
The various tasks that build a package (packageSrc, packageBin,
packageDoc) can share keys related to packaging, such as artifactName
and packageOptions. Those keys can have distinct values for each
packaging task.
Global scope
Each scope axis can be filled in with an instance of the axis type (for
example the task axis can be filled in with a task), or the axis can be
filled in with the special value Global.
Global means what you would expect: the setting’s value applies to all
instances of that axis. For example if the task axis is Global, then the
setting would apply to all tasks.
Delegation
A scoped key may be undefined, if it has no value associated with it in its scope.
For each scope, sbt has a fallback search path made up of other scopes.
Typically, if a key has no associated value in a more-specific scope,
sbt will try to get a value from a more general scope, such as the
Global scope or the entire-build scope.
This feature allows you to set a value once in a more general scope, allowing multiple more-specific scopes to inherit the value.
You can see the fallback search path or “delegates” for a key using the
inspect command, as described below. Read on.
Referring to scoped keys when running sbt
On the command line and in interactive mode, sbt displays (and parses) scoped keys like this:
{<build-uri>}<project-id>/config:intask::key
{<build-uri>}/<project-id>identifies the project axis. The<project-id>part will be missing if the project axis has “entire build” scope.configidentifies the configuration axis.intaskidentifies the task axis.keyidentifies the key being scoped.
* can appear for each axis, referring to the Global scope.
If you omit part of the scoped key, it will be inferred as follows:
- the current project will be used if you omit the project.
- a key-dependent configuration will be auto-detected if you omit the configuration or task.
For more details, see Interacting with the Configuration System.
Examples of scoped key notation
fullClasspathspecifies just a key, so the default scopes are used: current project, a key-dependent configuration, and global task scope.test:fullClasspathspecifies the configuration, so this isfullClasspathin thetestconfiguration, with defaults for the other two scope axes.*:fullClasspathspecifiesGlobalfor the configuration, rather than the default configuration.doc::fullClasspathspecifies thefullClasspathkey scoped to thedoctask, with the defaults for the project and configuration axes.{file:/home/hp/checkout/hello/}default-aea33a/test:fullClasspathspecifies a project,{file:/home/hp/checkout/hello/}default-aea33a, where the project is identified with the build{file:/home/hp/checkout/hello/}and then a project id inside that builddefault-aea33a. Also specifies configurationtest, but leaves the default task axis.{file:/home/hp/checkout/hello/}/test:fullClasspathsets the project axis to “entire build” where the build is{file:/home/hp/checkout/hello/}.{.}/test:fullClasspathsets the project axis to “entire build” where the build is{.}.{.}can be writtenThisBuildin Scala code.{file:/home/hp/checkout/hello/}/compile:doc::fullClasspathsets all three scope axes.
Inspecting scopes
In sbt’s interactive mode, you can use the inspect command to understand
keys and their scopes. Try inspect test:fullClasspath:
$ sbt
> inspect test:fullClasspath
[info] Task: scala.collection.Seq[sbt.Attributed[java.io.File]]
[info] Description:
[info]  The exported classpath, consisting of build products and unmanaged and managed, internal and external dependencies.
[info] Provided by:
[info]  {file:/home/hp/checkout/hello/}default-aea33a/test:fullClasspath
[info] Dependencies:
[info]  test:exportedProducts
[info]  test:dependencyClasspath
[info] Reverse dependencies:
[info]  test:runMain
[info]  test:run
[info]  test:testLoader
[info]  test:console
[info] Delegates:
[info]  test:fullClasspath
[info]  runtime:fullClasspath
[info]  compile:fullClasspath
[info]  *:fullClasspath
[info]  {.}/test:fullClasspath
[info]  {.}/runtime:fullClasspath
[info]  {.}/compile:fullClasspath
[info]  {.}/*:fullClasspath
[info]  */test:fullClasspath
[info]  */runtime:fullClasspath
[info]  */compile:fullClasspath
[info]  */*:fullClasspath
[info] Related:
[info]  compile:fullClasspath
[info]  compile:fullClasspath(for doc)
[info]  test:fullClasspath(for doc)
[info]  runtime:fullClasspath
On the first line, you can see this is a task (as opposed to a setting,
as explained in .sbt build definition). The value
resulting from the task will have type
scala.collection.Seq[sbt.Attributed[java.io.File]].
“Provided by” points you to the scoped key that defines the value, in
this case
{file:/home/hp/checkout/hello/}default-aea33a/test:fullClasspath (which
is the fullClasspath key scoped to the test configuration and the
{file:/home/hp/checkout/hello/}default-aea33a project).
“Dependencies” may not make sense yet; stay tuned for the next page.
You can also see the delegates; if the value were not defined, sbt would search through:
- two other configurations (
runtime:fullClasspath,compile:fullClasspath). In these scoped keys, the project is unspecified meaning “current project” and the task is unspecified meaningGlobal - configuration set to
Global(*:fullClasspath), since project is still unspecified it’s “current project” and task is still unspecified soGlobal - project set to
{.}orThisBuild(meaning the entire build, no specific project) - project axis set to
Global(*/test:fullClasspath) (remember, an unspecified project means current, so searchingGlobalhere is new; i.e.*and “no project shown” are different for the project axis; i.e.*/test:fullClasspathis not the same astest:fullClasspath) - both project and configuration set to
Global(*/*:fullClasspath) (remember that unspecified task meansGlobalalready, so*/*:fullClasspathusesGlobalfor all three axes)
Try inspect fullClasspath (as opposed to the above example,
inspect test:fullClasspath) to get a sense of the difference. Because
the configuration is omitted, it is autodetected as compile.
inspect compile:fullClasspath should therefore look the same as
inspect fullClasspath.
Try inspect *:fullClasspath for another contrast. fullClasspath is not
defined in the Global configuration by default.
Again, for more details, see Interacting with the Configuration System.
Referring to scopes in a build definition
If you create a setting in build.sbt with a bare key, it will be scoped
to the current project, configuration Global and task Global:
lazy val root = (project in file(".")).
  settings(
    name := "hello"
  )
Run sbt and inspect name to see that it’s provided by
{file:/home/hp/checkout/hello/}default-aea33a/*:name, that is, the
project is {file:/home/hp/checkout/hello/}default-aea33a, the
configuration is * (meaning global), and the task is not shown (which
also means global).
Keys have an overloaded method called in used to set the scope. The
argument to in can be an instance of any of the scope axes. So for
example, though there’s no real reason to do this, you could set the
name scoped to the Compile configuration:
name in Compile := "hello"
or you could set the name scoped to the packageBin task (pointless! just
an example):
name in packageBin := "hello"
or you could set the name with multiple scope axes, for example in the
packageBin task in the Compile configuration:
name in (Compile, packageBin) := "hello"
or you could use Global for all axes:
name in Global := "hello"
(name in Global implicitly converts the scope axis Global to a scope
with all axes set to Global; the task and configuration are already
Global by default, so here the effect is to make the project Global,
that is, define */*:name rather than
{file:/home/hp/checkout/hello/}default-aea33a/*:name)
If you aren’t used to Scala, a reminder: it’s important to understand
that in and := are just methods, not magic. Scala lets you write them in
a nicer way, but you could also use the Java style:
name.in(Compile).:=("hello")
There’s no reason to use this ugly syntax, but it illustrates that these are in fact methods.
When to specify a scope
You need to specify the scope if the key in question is normally scoped.
For example, the compile task, by default, is scoped to Compile and Test
configurations, and does not exist outside of those scopes.
To change the value associated with the compile key, you need to write
compile in Compile or compile in Test. Using plain compile would define
a new compile task scoped to the current project, rather than overriding
the standard compile tasks which are scoped to a configuration.
If you get an error like “Reference to undefined setting“, often you’ve failed to specify a scope, or you’ve specified the wrong scope. The key you’re using may be defined in some other scope. sbt will try to suggest what you meant as part of the error message; look for “Did you mean compile:compile?”
One way to think of it is that a name is only part of a key. In
reality, all keys consist of both a name, and a scope (where the scope
has three axes). The entire expression
packageOptions in (Compile, packageBin) is a key name, in other words.
Simply packageOptions is also a key name, but a different one (for keys
with no in, a scope is implicitly assumed: current project, global
config, global task).
More kinds of setting
This page explains other ways to create a Setting, beyond the basic :=
method. It assumes you’ve read .sbt build definition and
scopes.
Refresher: Settings
Remember, a build definition creates a list of Setting,
which is then used to transform sbt’s description of the build (which is
a map of key-value pairs). A Setting is a transformation with sbt’s
earlier map as input and a new map as output. The new map becomes sbt’s
new state.
Different settings transform the map in different ways.
Earlier, you read about the := method.
The Setting which := creates puts a fixed, constant value in the new,
transformed map. For example, if you transform a map with the setting
name := "hello" the new map has the string "hello" stored under the key
name.
Appending to previous values: += and ++=
Assignment with := is the simplest transformation, but keys have other
methods as well. If the T in SettingKey[T] is a sequence, i.e. the key’s
value type is a sequence, you can append to the sequence rather than
replacing it.
+=will append a single element to the sequence.++=will concatenate another sequence.
For example, the key sourceDirectories in Compile has a Seq[File] as its
value. By default this key’s value would include src/main/scala. If you
wanted to also compile source code in a directory called source (since
you just have to be nonstandard), you could add that directory:
sourceDirectories in Compile += new File("source")
Or, using the file() function from the sbt package for convenience:
sourceDirectories in Compile += file("source")
(file() just creates a new File.)
You could use ++= to add more than one directory at a time:
sourceDirectories in Compile ++= Seq(file("sources1"), file("sources2"))
Where Seq(a, b, c, ...) is standard Scala syntax to construct a
sequence.
To replace the default source directories entirely, you use := of
course:
sourceDirectories in Compile := Seq(file("sources1"), file("sources2"))
Computing a value based on other keys’ values
Reference the value of another task or setting by calling value on the
key for the task or setting. The value method is special and may only be
called in the argument to :=, +=, or ++=.
As a first example, consider defining the project organization to be the same as the project name.
// name our organization after our project (both are SettingKey[String])
organization := name.value
Or, set the name to the name of the project’s directory:
// name is a Key[String], baseDirectory is a Key[File]
// name the project after the directory it's inside
name := baseDirectory.value.getName
This transforms the value of baseDirectory using the standard getName
method of java.io.File.
Using multiple inputs is similar. For example,
name := "project " + name.value + " from " + organization.value + " version " + version.value
This sets the name in terms of its previous value as well as the organization and version settings.
Settings with dependencies
In the setting name := baseDirectory.value.getName, name will have a
dependency on baseDirectory. If you place the above in build.sbt and
run the sbt interactive console, then type inspect name, you should see
(in part):
[info] Dependencies:
[info]  *:baseDirectory
This is how sbt knows which settings depend on which other settings. Remember that some settings describe tasks, so this approach also creates dependencies between tasks.
For example, if you inspect compile you’ll see it depends on another key
compileInputs, and if you inspect compileInputs it in turn depends on
other keys. Keep following the dependency chains and magic happens. When
you type compile sbt automatically performs an update, for example. It
Just Works because the values required as inputs to the compile
computation require sbt to do the update computation first.
In this way, all build dependencies in sbt are automatic rather than explicitly declared. If you use a key’s value in another computation, then the computation depends on that key. It just works!
When settings are undefined
Whenever a setting uses :=, +=, or ++= to create a dependency on itself
or another key’s value, the value it depends on must exist. If it does
not, sbt will complain. It might say “Reference to undefined setting“,
for example. When this happens, be sure you’re using the key in the
scope that defines it.
It’s possible to create cycles, which is an error; sbt will tell you if you do this.
Tasks based on other keys’ values
You can compute values of some tasks or settings to define or append value for another task. It’s done by using Def.task and taskValue, as argument to :=, += or ++=.
As a first example, consider appending a source generator using the project base directory and compilation classpath.
sourceGenerators in Compile += Def.task {
  myGenerator(baseDirectory.value, (managedClasspath in Compile).value)
}.taskValue
Tasks with dependencies
As noted in .sbt build definition, task keys create a
Setting[Task[T]] rather than a Setting[T] when you build a setting with
:=, etc. Tasks can use settings as inputs, but settings cannot use tasks
as inputs.
Take these two keys (from Keys):
val scalacOptions = taskKey[Seq[String]]("Options for the Scala compiler.")
val checksums = settingKey[Seq[String]]("The list of checksums to generate and to verify for dependencies.")
(scalacOptions and checksums have nothing to do with each other, they
are just two keys with the same value type, where one is a task.)
It is possible to compile a build.sbt that aliases scalacOptions to
checksums, but not the other way. For example, this is allowed:
// The scalacOptions task may be defined in terms of the checksums setting
scalacOptions := checksums.value
There is no way to go the other direction. That is, a setting key can’t depend on a task key. That’s because a setting key is only computed once on project load, so the task would not be re-run every time, and tasks expect to re-run every time.
// The checksums setting may not be defined in terms of the scalacOptions task
checksums := scalacOptions.value
Appending with dependencies: += and ++=
Other keys can be used when appending to an existing setting or task,
just like they can for assigning with :=.
For example, say you have a coverage report named after the project, and you want to add it to the files removed by clean:
cleanFiles += file("coverage-report-" + name.value + ".txt")
Library dependencies
This page assumes you’ve already read the earlier Getting Started pages, in particular .sbt build definition, scopes, and more kinds of setting.
Library dependencies can be added in two ways:
- unmanaged dependencies are jars dropped into the
libdirectory - managed dependencies are configured in the build definition and downloaded automatically from repositories
Unmanaged dependencies
Most people use managed dependencies instead of unmanaged. But unmanaged can be simpler when starting out.
Unmanaged dependencies work like this: add jars to lib and they will be
placed on the project classpath. Not much else to it!
You can place test jars such as
ScalaCheck,
Specs2, and
ScalaTest in lib as well.
Dependencies in lib go on all the classpaths (for compile, test, run,
and console). If you wanted to change the classpath for just one of
those, you would adjust dependencyClasspath in Compile or
dependencyClasspath in Runtime for example.
There’s nothing to add to build.sbt to use unmanaged dependencies,
though you could change the unmanagedBase key if you’d like to use a
different directory rather than lib.
To use custom_lib instead of lib:
unmanagedBase := baseDirectory.value / "custom_lib"
baseDirectory is the project’s root directory, so here you’re changing
unmanagedBase depending on baseDirectory using the special value method
as explained in more kinds of setting.
There’s also an unmanagedJars task which lists the jars from the
unmanagedBase directory. If you wanted to use multiple directories or do
something else complex, you might need to replace the whole
unmanagedJars task with one that does something else, e.g. empty the list for
Compile configuration regardless of the files in lib directory:
unmanagedJars in Compile := Seq.empty[sbt.Attributed[java.io.File]]
Managed Dependencies
sbt uses Apache Ivy to implement managed dependencies, so if you’re familiar with Ivy or Maven, you won’t have much trouble.
The libraryDependencies key
Most of the time, you can simply list your dependencies in the setting
libraryDependencies. It’s also possible to write a Maven POM file or Ivy
configuration file to externally configure your dependencies, and have
sbt use those external configuration files. You can learn more about
that here.
Declaring a dependency looks like this, where groupId, artifactId, and
revision are strings:
libraryDependencies += groupID % artifactID % revision
or like this, where configuration can be a string or
Configuration val:
libraryDependencies += groupID % artifactID % revision % configuration
libraryDependencies is declared in
Keys like
this:
val libraryDependencies = settingKey[Seq[ModuleID]]("Declares managed dependencies.")
The % methods create ModuleID objects from strings, then you add those
ModuleID to libraryDependencies.
Of course, sbt (via Ivy) has to know where to download the module. If your module is in one of the default repositories sbt comes with, this will just work. For example, Apache Derby is in the standard Maven2 repository:
libraryDependencies += "org.apache.derby" % "derby" % "10.4.1.3"
If you type that in build.sbt and then update, sbt should download Derby
to ~/.ivy2/cache/org.apache.derby/. (By the way, update is a dependency
of compile so there’s no need to manually type update most of the time.)
Of course, you can also use ++= to add a list of dependencies all at
once:
libraryDependencies ++= Seq(
  groupID % artifactID % revision,
  groupID % otherID % otherRevision
)
In rare cases you might find reasons to use := with libraryDependencies
as well.
Getting the right Scala version with %%
If you use groupID %% artifactID % revision rather than
groupID % artifactID % revision (the difference is the double %% after
the groupID), sbt will add your project’s Scala version to the artifact
name. This is just a shortcut. You could write this without the %%:
libraryDependencies += "org.scala-tools" % "scala-stm_2.11.1" % "0.3"
Assuming the scalaVersion for your build is 2.11.1, the following is
identical (note the double %% after "org.scala-tools"):
libraryDependencies += "org.scala-tools" %% "scala-stm" % "0.3"
The idea is that many dependencies are compiled for multiple Scala versions, and you’d like to get the one that matches your project to ensure binary compatibility.
The complexity in practice is that often a dependency will work with a
slightly different Scala version; but %% is not smart about that. So if
the dependency is available for 2.10.1 but you’re using
scalaVersion := "2.10.4", you won’t be able to use %% even though the
2.10.1 dependency likely works. If %% stops working, just go see which
versions the dependency is really built for, and hardcode the one you
think will work (assuming there is one).
See Cross Building for some more detail on this.
Ivy revisions
The revision in groupID % artifactID % revision does not have to be a
single fixed version. Ivy can select the latest revision of a module
according to constraints you specify. Instead of a fixed revision like
"1.6.1", you specify "latest.integration", "2.9.+", or "[1.0,)". See the
Ivy
revisions
documentation for details.
Resolvers
Not all packages live on the same server; sbt uses the standard Maven2 repository by default. If your dependency isn’t on one of the default repositories, you’ll have to add a resolver to help Ivy find it.
To add an additional repository, use
resolvers += name at location
with the special at between two strings.
For example:
resolvers += "Sonatype OSS Snapshots" at "https://oss.sonatype.org/content/repositories/snapshots"
The resolvers key is defined in
Keys like this:
val resolvers = settingKey[Seq[Resolver]]("The user-defined additional resolvers for automatically managed dependencies.")
The at method creates a Resolver object from two strings.
sbt can search your local Maven repository if you add it as a repository:
resolvers += "Local Maven Repository" at "file://"+Path.userHome.absolutePath+"/.m2/repository"
or, for convenience:
resolvers += Resolver.mavenLocal
See Resolvers for details on defining other types of repositories.
Overriding default resolvers
resolvers does not contain the default resolvers; only additional ones
added by your build definition.
sbt combines resolvers with some default repositories to form
externalResolvers.
Therefore, to change or remove the default resolvers, you would need to
override externalResolvers instead of resolvers.
Per-configuration dependencies
Often a dependency is used by your test code (in src/test/scala, which
is compiled by the Test configuration) but not your main code.
If you want a dependency to show up in the classpath only for the Test
configuration and not the Compile configuration, add % "test" like this:
libraryDependencies += "org.apache.derby" % "derby" % "10.4.1.3" % "test"
You may also use the type-safe version of Test configuration as follows:
libraryDependencies += "org.apache.derby" % "derby" % "10.4.1.3" % Test
Now, if you type show compile:dependencyClasspath at the sbt interactive
prompt, you should not see the derby jar. But if you type
show test:dependencyClasspath, you should see the derby jar in the list.
Typically, test-related dependencies such as
ScalaCheck,
Specs2, and
ScalaTest would be defined with % "test".
There are more details and tips-and-tricks related to library dependencies on this page.
Multi-project builds
This page introduces multiple projects in a single build.
Please read the earlier pages in the Getting Started Guide first, in particular you need to understand build.sbt before reading this page.
Multiple projects
It can be useful to keep multiple related projects in a single build, especially if they depend on one another and you tend to modify them together.
Each sub-project in a build has its own source directories, generates its own jar file when you run package, and in general works like any other project.
A project is defined by declaring a lazy val of type Project. For example, :
lazy val util = project

lazy val core = project
The name of the val is used as the project’s ID and base directory name. The ID is used to refer to the project at the command line. The base directory may be changed from the default using the in method. For example, the following is a more explicit way to write the previous example:
lazy val util = project.in(file("util"))

lazy val core = project in file("core")
Common settings
To factor out common settings across multiple projects,
create a sequence named commonSettings and call settings method
on each project. Note _* is required to pass sequence into a vararg
method.
lazy val commonSettings = Seq(
  organization := "com.example",
  version := "0.1.0",
  scalaVersion := "2.11.7"
)

lazy val core = (project in file("core")).
  settings(commonSettings: _*).
  settings(
    // other settings
  )

lazy val util = (project in file("util")).
  settings(commonSettings: _*).
  settings(
    // other settings
  )
Now we can bump up version in one place, and it will be reflected
across subprojects when you reload the build.
Dependencies
Projects in the build can be completely independent of one another, but usually they will be related to one another by some kind of dependency. There are two types of dependencies: aggregate and classpath.
Aggregation
Aggregation means that running a task on the aggregate project will also run it on the aggregated projects. For example,
lazy val root = (project in file(".")).
  aggregate(util, core)

lazy val util = project

lazy val core = project
In the above example, the root project aggregates util and core. Start
up sbt with two subprojects as in the example, and try compile. You
should see that all three projects are compiled.
In the project doing the aggregating, the root project in this case,
you can control aggregation per-task. For example, to avoid aggregating
the update task:
lazy val root = (project in file(".")).
  aggregate(util, core).
  settings(
    aggregate in update := false
  )

[...]
aggregate in update is the aggregate key scoped to the update task. (See
scopes.)
Note: aggregation will run the aggregated tasks in parallel and with no defined ordering between them.
Classpath dependencies
A project may depend on code in another project. This is done by adding
a dependsOn method call. For example, if core needed util on its
classpath, you would define core as:
lazy val core = project.dependsOn(util)
Now code in core can use classes from util. This also creates an
ordering between the projects when compiling them; util must be updated
and compiled before core can be compiled.
To depend on multiple projects, use multiple arguments to dependsOn,
like dependsOn(bar, baz).
Per-configuration classpath dependencies
foo dependsOn(bar) means that the compile configuration in foo depends
on the compile configuration in bar. You could write this explicitly as
dependsOn(bar % "compile->compile").
The -> in "compile->compile" means “depends on” so "test->compile"
means the test configuration in foo would depend on the compile
configuration in bar.
Omitting the ->config part implies ->compile, so
dependsOn(bar % "test") means that the test configuration in foo depends
on the Compile configuration in bar.
A useful declaration is "test->test" which means test depends on test.
This allows you to put utility code for testing in bar/src/test/scala
and then use that code in foo/src/test/scala, for example.
You can have multiple configurations for a dependency, separated by
semicolons. For example,
dependsOn(bar % "test->test;compile->compile").
Default root project
If a project is not defined for the root directory in the build, sbt creates a default one that aggregates all other projects in the build.
Because project hello-foo is defined with base = file("foo"), it will be
contained in the subdirectory foo. Its sources could be directly under
foo, like foo/Foo.scala, or in foo/src/main/scala. The usual sbt
directory structure applies underneath foo with the
exception of build definition files.
Any .sbt files in foo, say foo/build.sbt, will be merged with the build
definition for the entire build, but scoped to the hello-foo project.
If your whole project is in hello, try defining a different version
(version := "0.6") in hello/build.sbt, hello/foo/build.sbt, and
hello/bar/build.sbt. Now show version at the sbt interactive prompt. You
should get something like this (with whatever versions you defined):
> show version
[info] hello-foo/*:version
[info]  0.7
[info] hello-bar/*:version
[info]  0.9
[info] hello/*:version
[info]  0.5
hello-foo/*:version was defined in hello/foo/build.sbt,
hello-bar/*:version was defined in hello/bar/build.sbt, and
hello/*:version was defined in hello/build.sbt. Remember the
syntax for scoped keys. Each version key is scoped to a
project, based on the location of the build.sbt. But all three build.sbt
are part of the same build definition.
- Each project’s settings can go in
.sbtfiles in the base directory of that project, while the.scalafile can be as simple as the one shown above, listing the projects and base directories. There is no need to put settings in the.scalafile.*
You may find it cleaner to put everything including settings in .scala
files in order to keep all build definition under a single project
directory, however. It’s up to you.
You cannot have a project subdirectory or project/*.scala files in the
sub-projects. foo/project/Build.scala would be ignored.
Navigating projects interactively
At the sbt interactive prompt, type projects to list your projects and
project <projectname> to select a current project. When you run a task
like compile, it runs on the current project. So you don’t necessarily
have to compile the root project, you could compile only a subproject.
You can run a task in another project by explicitly specifying the
project ID, such as subProjectID/compile.
Common code
The definitions in .sbt files are not visible in other .sbt files. In
order to share code between .sbt files, define one or more Scala files
in the project/ directory of the build root.
See organizing the build for details.
Using plugins
Please read the earlier pages in the Getting Started Guide first, in particular you need to understand build.sbt and library dependencies, before reading this page.
What is a plugin?
A plugin extends the build definition, most commonly by adding new
settings. The new settings could be new tasks. For example, a plugin
could add a codeCoverage task which would generate a test coverage
report.
Declaring a plugin
If your project is in directory hello, and you’re adding
sbt-site plugin to the build definition, create hello/project/site.sbt
and declare the plugin dependency by passing the plugin’s Ivy module ID
to addSbtPlugin:
addSbtPlugin("com.typesafe.sbt" % "sbt-site" % "0.7.0")
If you’re adding sbt-assembly, create hello/project/assembly.sbt with the following:
addSbtPlugin("com.eed3si9n" % "sbt-assembly" % "0.11.2")
Not every plugin is located on one of the default repositories and a plugin’s documentation may instruct you to also add the repository where it can be found:
resolvers += Resolver.sonatypeRepo("public")
Plugins usually provide settings that get added to a project to enable the plugin’s functionality. This is described in the next section.
Enabling and disabling auto plugins
A plugin can declare that its settings be automatically added to the build definition, in which case you don’t have to do anything to add them.
As of sbt 0.13.5, there is a new auto plugins feature that enables plugins to automatically, and safely, ensure their settings and dependencies are on a project. Many auto plugins should have their default settings automatically, however some may require explicit enablement.
If you’re using an auto plugin that requires explicit enablement, then you
have to add the following to your build.sbt:
lazy val util = (project in file("util")).
  enablePlugins(FooPlugin, BarPlugin).
  settings(
    name := "hello-util"
  )
The enablePlugins method allows projects to explicitly define the
auto plugins they wish to consume.
Projects can also exclude plugins using the disablePlugins
method. For example, if we wish to remove the IvyPlugin settings
from util, we modify our build.sbt as follows:
lazy val util = (project in file("util")).
  enablePlugins(FooPlugin, BarPlugin).
  disablePlugins(plugins.IvyPlugin).
  settings(
    name := "hello-util"
  )
Auto plugins should document whether they need to be explicitly enabled. If you’re
curious which auto plugins are enabled for a given project, just run the
plugins command on the sbt console.
For example:
> plugins
In file:/home/jsuereth/projects/sbt/test-ivy-issues/
        sbt.plugins.IvyPlugin: enabled in scala-sbt-org
        sbt.plugins.JvmPlugin: enabled in scala-sbt-org
        sbt.plugins.CorePlugin: enabled in scala-sbt-org
        sbt.plugins.JUnitXmlReportPlugin: enabled in scala-sbt-org
Here, the plugins output is showing that the sbt default plugins are all
enabled. sbt’s default settings are provided via three plugins:
CorePlugin: Provides the core parallelism controls for tasks.IvyPlugin: Provides the mechanisms to publish/resolve modules.JvmPlugin: Provides the mechanisms to compile/test/run/package Java/Scala projects.
In addition, JUnitXmlReportPlugin provides an experimental support for
generating junit-xml.
Older non-auto plugins often require settings to be added explictly, so that multi-project build could have different types of projects. The plugin documentation will indicate how to configure it, but typically for older plugins this involves adding the base settings for the plugin and customizing as necessary.
For example, for the sbt-site plugin, create site.sbt with the following content
site.settings
to enable it for that project.
If the build defines multiple projects, instead add it directly to the project:
// don't use the site plugin for the `util` project
lazy val util = (project in file("util"))

// enable the site plugin for the `core` project
lazy val core = (project in file("core")).
  settings(site.settings : _*)
Global plugins
Plugins can be installed for all your projects at once by declaring them
in ~/.sbt/0.13/plugins/. ~/.sbt/0.13/plugins/ is an sbt project whose
classpath is exported to all sbt build definition projects. Roughly
speaking, any .sbt or .scala files in ~/.sbt/0.13/plugins/ behave as if
they were in the project/ directory for all projects.
You can create ~/.sbt/0.13/plugins//build.sbt and put addSbtPlugin()
expressions in there to add plugins to all your projects at once.
Because doing so would increase the dependency on the machine environment,
this feature should be used sparingly. See
Best Practices.
Available Plugins
There’s a list of available plugins.
Some especially popular plugins are:
- those for IDEs (to import an sbt project into your IDE)
- those supporting web frameworks, such as xsbt-web-plugin.
For more details, including ways of developing plugins, see Plugins. For best practices, see Plugins-Best-Practices.
Custom settings and tasks
This page gets you started creating your own settings and tasks.
To understand this page, be sure you’ve read earlier pages in the Getting Started Guide, especially .build.sbt and more kinds of setting.
Defining a key
Keys is packed with examples illustrating how to define keys. Most of the keys are implemented in Defaults.
Keys have one of three types. SettingKey and TaskKey are described in
.sbt build definition. Read about InputKey on the
Input Tasks page.
Some examples from Keys:
val scalaVersion = settingKey[String]("The version of Scala used for building.")
val clean = taskKey[Unit]("Deletes files produced by the build, such as generated sources, compiled classes, and task caches.")
The key constructors have two string parameters: the name of the key
("scalaVersion") and a documentation string
("The version of scala used for building.").
Remember from .sbt build definition that the type
parameter T in SettingKey[T] indicates the type of value a setting has.
T in TaskKey[T] indicates the type of the task’s result. Also remember
from .sbt build definition that a setting has a fixed
value until project reload, while a task is re-computed for every “task
execution” (every time someone types a command at the sbt interactive
prompt or in batch mode).
Keys may be defined in an .sbt file,
a .scala file, or in an auto plugin.
Any vals found under autoImport object of an enabled auto plugin
will be imported automatically into your .sbt files.
Implementing a task
Once you’ve defined a key for your task, you’ll need to complete it with
a task definition. You could be defining your own task, or you could be
planning to redefine an existing task. Either way looks the same; use :=
to associate some code with the task key:
val sampleStringTask = taskKey[String]("A sample string task.")
val sampleIntTask = taskKey[Int]("A sample int task.")

lazy val commonSettings = Seq(
  organization := "com.example",
  version := "0.1.0-SNAPSHOT"
)

lazy val library = (project in file("library")).
  settings(commonSettings: _*).
  settings(
    sampleStringTask := System.getProperty("user.home"),
    sampleIntTask := {
      val sum = 1 + 2
      println("sum: " + sum)
      sum
    }
  )
If the task has dependencies, you’d reference their value using value,
as discussed in more kinds of setting.
The hardest part about implementing tasks is often not sbt-specific; tasks are just Scala code. The hard part could be writing the “body” of your task that does whatever you’re trying to do. For example, maybe you’re trying to format HTML in which case you might want to use an HTML library (you would add a library dependency to your build definition and write code based on the HTML library, perhaps).
sbt has some utility libraries and convenience functions, in particular you can often use the convenient APIs in IO to manipulate files and directories.
Execution semantics of tasks
When depending on other tasks from a custom task using value,
an important detail to note is the execution semantics of the tasks.
By execution semantics, we mean exactly when these tasks are evaluated.
We if take sampeIntTask for instance, each line in the body of the task
should be strictly evaluated one after the other. That is sequential semantics:
sampleIntTask := {
  val sum = 1 + 2        // first
  println("sum: " + sum) // second
  sum                    // third
}
In reality JVM may inline the sum to 3, but the observable effect of the
task will remain identical as if each line were executed one after the other.
Now suppose we define two more custom tasks startServer and stopServer,
and modify sampeIntTask as follows:
val startServer = taskKey[Unit]("start server")
val stopServer = taskKey[Unit]("stop server")
val sampleIntTask = taskKey[Int]("A sample int task.")
val sampleStringTask = taskKey[String]("A sample string task.")

lazy val commonSettings = Seq(
  organization := "com.example",
  version := "0.1.0-SNAPSHOT"
)

lazy val library = (project in file("library")).
  settings(commonSettings: _*).
  settings(
    startServer := {
      println("starting...")
      Thread.sleep(500)
    },
    stopServer := {
      println("stopping...")
      Thread.sleep(500)
    },
    sampleIntTask := {
      startServer.value
      val sum = 1 + 2
      println("sum: " + sum)
      stopServer.value // THIS WON'T WORK
      sum
    },
    sampleStringTask := {
      startServer.value
      val s = sampleIntTask.value.toString
      println("s: " + s)
      s
    }
  )
Running sampleIntTask from sbt interactive prompt results to the following:
> sampleIntTask
stopping...
starting...
sum: 3
[success] Total time: 1 s, completed Dec 22, 2014 5:00:00 PM
To review what happened, let’s look at a graphical notation of sampleIntTask:

Unlike plain Scala method calls, invoking value method on tasks will not
be evaluated strictly. Instead, they simply act as placeholders to denote
that sampleIntTask depends on startServer and stopServer tasks.
When sampleIntTask is invoked by you, sbt’s tasks engine will:
- evaluate the task dependencies before evaluating
sampleIntTask(partial ordering) - try to evaluate task dependencies in parallel if they are independent (parallelization)
- each task dependency will be evaluated once and only once per command execution (deduplication)
Deduplication of task dependencies
To demonstrate the last point, we can run sampleStringTask from sbt
interactive prompt.
> sampleStringTask
stopping...
starting...
sum: 3
s: 3
[success] Total time: 1 s, completed Dec 22, 2014 5:30:00 PM
Because sampleStringTask depends on both startServer and sampleIntTask task,
and sampleIntTask also depends on startServer task, it appears twice as task dependency.
If this was a plain Scala method call it would be evaluated twice,
but since value is just denoting a task dependency, it will be evaluated once.
The following is a graphical notation of how sampeStringTask’s evalutation:

If we did not deduplicate the task dependencies, we will end up
compiling test source code many times when test task is invoked
since compile in Test appears many times as a task dependency of test in Test.
Cleanup task
How should one implement stopServer task?
The notion of cleanup task does not fit into the execution model of tasks because
tasks are about tracking dependencies.
The last operation should become the task that depends
on other intermediate tasks. For instance stopServer should depend on sampleStringTask,
at which point stopServer should be the sampleStringTask.
lazy val library = (project in file("library")).
  settings(commonSettings: _*).
  settings(
    startServer := {
      println("starting...")
      Thread.sleep(500)
    },
    sampleIntTask := {
      startServer.value
      val sum = 1 + 2
      println("sum: " + sum)
      sum
    },
    sampleStringTask := {
      startServer.value
      val s = sampleIntTask.value.toString
      println("s: " + s)
      s
    },
    sampleStringTask := {
      val old = sampleStringTask.value
      println("stopping...")
      Thread.sleep(500)
      old
    }
  )
To demonstrate that it works, run sampleStringTask from the interactive prompt:
> sampleStringTask
starting...
sum: 3
s: 3
stopping...
[success] Total time: 1 s, completed Dec 22, 2014 6:00:00 PM

Use plain Scala
Another way of making sure that something happens after some other thing is to use Scala.
Implement a simple function in project/ServerUtil.scala for example, and you can write:
sampleIntTask := {
  ServerUtil.startServer
  try {
    val sum = 1 + 2
    println("sum: " + sum)
  } finally {
    ServerUtil.stopServer
  }
  sum
}
Since plain method calls follow sequential semantics, everything happens in order. There’s no deduplication, so you have to be careful about that.
Turn them into plugins
If you find you have a lot of custom code, consider moving it to a plugin for re-use across multiple builds.
It’s very easy to create a plugin, as teased earlier and discussed at more length here.
This page has been a quick taste; there’s much much more about custom tasks on the Tasks page.
Organizing the build
This page discusses the organization of the build structure.
Please read the earlier pages in the Getting Started Guide first, in particular you need to understand build.sbt, Library dependencies, and Multi-project builds before reading this page.
sbt is recursive
build.sbt conceals how sbt really works. sbt builds are
defined with Scala code. That code, itself, has to be built. What better
way than with sbt?
The project directory is another build inside your build, which
knows how to build your build. To distinguish the builds,
we sometimes use the term proper build to refer to your build,
and meta-build to refer to the build in project.
The projects inside the metabuild can do anything
any other project can do. Your build definition is an sbt project.
And the turtles go all the way down. If you like, you can tweak the
build definition of the build definition project, by creating a
project/project/ directory.
Here’s an illustration.
hello/                  # your build's root project's base directory

    Hello.scala         # a source file in your build's root project
                        #   (could be in src/main/scala too)

    build.sbt           # build.sbt is part of the source code for
                        #   meta-build's root project inside project/;
                        #   the build definition for your build

    project/            # base directory of meta-build's root project

        Build.scala     # a source file in the meta-build's root project,
                        #   that is, a source file in the build definition
                        #   the build definition for your build

        build.sbt       # this is part of the source code for
                        #   meta-meta-build's root project in project/project;
                        #   build definition's build definition

        project/        # base directory of meta-meta-build's root project;
                        #   the build definition project for the build definition

            Build.scala # source file in the root project of
                        #   meta-meta-build in project/project/
Don’t worry! Most of the time you are not going to need all that. But understanding the principle can be helpful.
By the way: any time files ending in .scala or .sbt are used, naming
them build.sbt and Build.scala are conventions only. This also means
that multiple files are allowed.
Tracking dependencies in one place
One way of using the fact that .scala files under project becomes
part of the build definition is to create project/Dependencies.scala
to track dependencies in one place.
import sbt._

object Dependencies {
  // Versions
  lazy val akkaVersion = "2.3.8"

  // Libraries
  val akkaActor = "com.typesafe.akka" %% "akka-actor" % akkaVersion
  val akkaCluster = "com.typesafe.akka" %% "akka-cluster" % akkaVersion
  val specs2core = "org.specs2" %% "specs2-core" % "2.4.14"

  // Projects
  val backendDeps =
    Seq(akkaActor, specs2core % Test)
}
The Dependencies object will be available in build.sbt.
To use the vals under it easier, import Dependencies._.
import Dependencies._

lazy val commonSettings = Seq(
  version := "0.1.0",
  scalaVersion := "2.11.7"
)

lazy val backend = (project in file("backend")).
  settings(commonSettings: _*).
  settings(
    libraryDependencies ++= backendDeps
  )
This technique is useful when you have a multi-project build that’s getting large, and you want to make sure that subprojects to have consistent dependencies.
When to use .scala files
In .scala files, you can write any Scala code, including top-level
classes and objects.
The recommended approach is to define most settings in
a multi-project build.sbt file,
and using project/*.scala files for task implementations or to share values,
such as keys. The use of .scala files also depends on how comfortable
you or your team are with Scala.
Defining auto plugins
For more advanced users, another way of organizing your build is to
define one-off auto plugins in project/*.scala.
By defining triggered plugins, auto plugins can be used as a convenient
way to inject custom tasks and commands across all subprojects.
Getting Started summary
This page wraps up the Getting Started Guide.
To use sbt, there are a small number of concepts you must understand. These have some learning curve, but on the positive side, there isn’t much to sbt except these concepts. sbt uses a small core of powerful concepts to do everything it does.
If you’ve read the whole Getting Started series, now you know what you need to know.
sbt: The Core Concepts
- the basics of Scala. It’s undeniably helpful to be familiar with Scala syntax. Programming in Scala written by the creator of Scala is a great introduction.
- .sbt build definition
- your build definition is one big list of
Settingobjects, where aSettingtransforms the set of key-value pairs sbt uses to perform tasks. - to create a
Setting, call one of a few methods on a key::=,+=, or++=. - there is no mutable state, only transformation; for example, a
Settingtransforms sbt’s collection of key-value pairs into a new collection. It doesn’t change anything in-place. - each setting has a value of a particular type, determined by the key.
- tasks are special settings where the computation to produce the key’s value will be re-run each time you kick off a task. Non-tasks compute the value once, when first loading the build definition.
- Scopes
- each key may have multiple values, in distinct scopes.
- scoping may use three axes: configuration, project, and task.
- scoping allows you to have different behaviors per-project, per-task, or per-configuration.
- a configuration is a kind of build, such as the main one (
Compile) or the test one (Test). - the per-project axis also supports “entire build” scope.
- scopes fall back to or delegate to more general scopes.
- put most of your configuration in
build.sbt, but use.scalabuild definition files for defining classes and larger task implementations. - the build definition is an sbt project in its own right, rooted in the project directory.
- Plugins are extensions to the build definition
- add plugins with the
addSbtPluginmethod inproject/plugins.sbt(NOTbuild.sbtin the project’s base directory).
If any of this leaves you wondering rather than nodding, please ask for help, go back and re-read, or try some experiments in sbt’s interactive mode.
Good luck!
Advanced Notes
Since sbt is open source, don’t forget you can check out the source code too!
Appendix: Bare .sbt build definition
This page describes an old style of .sbt build definition.
The current recommendation is to use Multi-project .sbt build definition.
What is a bare .sbt build definition
Unlike Multi-project .sbt build definition and .scala build definition
that explicitly define a Project definition,
bare build definition implicitly defines one based on the location of the .sbt file.
Instead of defining Projects, bare .sbt build definition consists of
a list of Setting[_] expressions.
name := "hello"

version := "1.0"

scalaVersion := "2.11.7"
(Pre 0.13.7) Settings must be separated by blank lines
Note: This blank line delimitation will no longer be needed after 0.13.7.
You can’t write a bare build.sbt like this:
// will NOT compile, no blank lines
name := "hello"
version := "1.0"
scalaVersion := "2.10.3"
sbt needs some kind of delimiter to tell where one expression stops and the next begins.
Appendix: .scala build definition
This page describes an old style of .scala build definition.
In the previous versions of sbt, .scala was the only way to create multi-project build definition,
but sbt 0.13 added multi-project .sbt build definition,
which is the recommended style.
We assume you’ve read previous pages in the Getting Started Guide, especially .sbt build definition and more kinds of setting.
Relating build.sbt to Build.scala
To mix .sbt and .scala files in your build definition, you need to
understand how they relate.
The following two files illustrate. First, if your project is in hello,
create hello/project/Build.scala as follows:
import sbt._
import Keys._

object HelloBuild extends Build {
  val sampleKeyA = settingKey[String]("demo key A")
  val sampleKeyB = settingKey[String]("demo key B")
  val sampleKeyC = settingKey[String]("demo key C")
  val sampleKeyD = settingKey[String]("demo key D")

  override lazy val settings = super.settings ++
    Seq(
      sampleKeyA := "A: in Build.settings in Build.scala",
      resolvers := Seq()
    )

  lazy val root = Project(id = "hello",
    base = file("."),
    settings = Seq(
      sampleKeyB := "B: in the root project settings in Build.scala"
    ))
}
Now, create hello/build.sbt as follows:
sampleKeyC in ThisBuild := "C: in build.sbt scoped to ThisBuild"

sampleKeyD := "D: in build.sbt"
Start up the sbt interactive prompt. Type inspect sampleKeyA and you
should see (among other things):
[info] Setting: java.lang.String = A: in Build.settings in Build.scala
[info] Provided by:
[info]  {file:/home/hp/checkout/hello/}/*:sampleKeyA
and then inspect sampleKeyC and you should see:
[info] Setting: java.lang.String = C: in build.sbt scoped to ThisBuild
[info] Provided by:
[info]  {file:/home/hp/checkout/hello/}/*:sampleKeyC
Note that the “Provided by” shows the same scope for the two values.
That is, sampleKeyC in ThisBuild in a .sbt file is equivalent to placing
a setting in the Build.settings list in a .scala file. sbt takes
build-scoped settings from both places to create the build definition.
Now, inspect sampleKeyB:
[info] Setting: java.lang.String = B: in the root project settings in Build.scala
[info] Provided by:
[info]  {file:/home/hp/checkout/hello/}hello/*:sampleKeyB
Note that sampleKeyB is scoped to the project
({file:/home/hp/checkout/hello/}hello) rather than the entire build
({file:/home/hp/checkout/hello/}).
As you’ve probably guessed, inspect sampleKeyD matches sampleKeyB:
[info] Setting: java.lang.String = D: in build.sbt
[info] Provided by:
[info]  {file:/home/hp/checkout/hello/}hello/*:sampleKeyD
sbt appends the settings from .sbt files to the settings from
Build.settings and Project.settings which means .sbt settings take
precedence. Try changing Build.scala so it sets key sampleC or sampleD,
which are also set in build.sbt. The setting in build.sbt should “win”
over the one in Build.scala.
One other thing you may have noticed: sampleKeyC and sampleKeyD were
available inside build.sbt. That’s because sbt imports the contents of
your Build object into your .sbt files. In this case
import HelloBuild._ was implicitly done for the build.sbt file.
In summary:
- In
.scalafiles, you can add settings toBuild.settingsfor sbt to find, and they are automatically build-scoped. - In
.scalafiles, you can add settings toProject.settingsfor sbt to find, and they are automatically project-scoped. - Any
Buildobject you write in a.scalafile will have its contents imported and available to.sbtfiles. - The settings in
.sbtfiles are appended to the settings in.scalafiles. - The settings in
.sbtfiles are project-scoped unless you explicitly specify another scope.
The build definition project in interactive mode
You can switch the sbt interactive prompt to have the build definition
project in project/ as the current project. To do so, type
reload plugins.
> reload plugins
[info] Set current project to default-a0e8e4 (in build file:/home/hp/checkout/hello/project/)
> show sources
[info] ArrayBuffer(/home/hp/checkout/hello/project/Build.scala)
> reload return
[info] Loading project definition from /home/hp/checkout/hello/project
[info] Set current project to hello (in build file:/home/hp/checkout/hello/)
> show sources
[info] ArrayBuffer(/home/hp/checkout/hello/hw.scala)
>
As shown above, you use reload return to leave the build definition
project and return to your regular project.
Reminder: it’s all immutable
It would be wrong to think that the settings in build.sbt are added to
the settings fields in Build and Project objects. Instead, the settings
list from Build and Project, and the settings from build.sbt, are
concatenated into another immutable list which is then used by sbt. The
Build and Project objects are “immutable configuration” forming only
part of the complete build definition.
In fact, there are other sources of settings as well. They are appended in this order:
- Settings from
Build.settingsandProject.settingsin your.scalafiles. - Your user-global settings; for example in
~/.sbt/0.13/global.sbtyou can define settings affecting all your projects. - Settings injected by plugins, see using plugins coming up next.
- Settings from
.sbtfiles in the project. - Build definition projects (i.e. projects inside
project) have settings from global plugins (~/.sbt/0.13/plugins/) added. Using plugins explains this more.
Later settings override earlier ones. The entire list of settings forms the build definition.
General Information
This part of the documentation has project “meta-information” such as where to get help, find source code and how to contribute.
Credits
See the sbt contributors on GitHub and sbt GitHub organization members.
Additionally, these people have contributed ideas, documentation, or code to sbt but are not recorded in either of the above:
- Josh Cough
- Nolan Darilek
- Nathan Hamblen
- Ismael Juma
- Viktor Klang
- David R. MacIver
- Ross McDonald
- Andrew O’Malley
- Jorge Ortiz
- Mikko Peltonen
- Ray Racine
- Stuart Roebuck
- Harshad RJ
- Tony Sloane
- Seth Tisue
- Francisco Treacy
- Vesa Vilhonen
Community Plugins
sbt Organization
The sbt organization is available for use by any sbt plugin. Developers who contribute their plugins into the community organization will still retain control over their repository and its access. The goal of the sbt organization is to organize sbt software into one central location.
A side benefit to using the sbt organization for projects is that you can use gh-pages to host websites under the http://scala-sbt.org domain.
Community Ivy Repository
Typesafe has provided a freely available Ivy Repository for sbt projects to use. This Ivy repository is mirrored from the freely available Bintray service. If you’d like to submit your plugin, please follow these instructions: Bintray For Plugins.
Available Plugins
Please feel free to submit a pull request that adds your plugin to the list.
Plugins for IDEs
IntelliJ IDEA
- sbt Plugin to generate IDEA project configuration: https://github.com/mpeltonen/sbt-idea
- IDEA Plugin to embed an sbt Console into the IDE: https://github.com/orfjackal/idea-sbt-plugin
Netbeans (no support to create a new sbt project yet)
- sbt-netbeans-plugin (older): https://github.com/remeniuk/sbt-netbeans-plugin
- sbt plugin to generate NetBeans configuration: https://github.com/dcaoyuan/nbsbt
- sbt plugin to add scala support to NetBeans: https://github.com/dcaoyuan/nbscala
- Eclipse: https://github.com/typesafehub/sbteclipse
- Sublime Text: https://github.com/orrsella/sbt-sublime
- Ensime: https://github.com/aemoncannon/ensime-sbt-cmd
- sbt-mode for Emacs: https://github.com/hvesalai/sbt-mode
- sbt-ctags (manage library dependency sources for vim, emacs, sublime) https://github.com/kalmanb/sbt-ctags
Test plugins
- junitxmllistener: https://github.com/ijuma/junit_xml_listener
- sbt-growl-plugin: https://github.com/softprops/sbt-growl-plugin
- sbt-teamcity-test-reporting-plugin: https://github.com/guardian/sbt-teamcity-test-reporting-plugin
- xsbt-cucumber-plugin: https://github.com/skipoleschris/xsbt-cucumber-plugin
- sbt-multi-jvm: https://github.com/sbt/sbt-multi-jvm
- sbt-testng-interface: https://github.com/sbt/sbt-testng-interface
- sbt-doctest: https://github.com/tkawachi/sbt-doctest
- sbt-cassandra-plugin: https://github.com/hochgi/sbt-cassandra-plugin
- sbt-tabular-test-reporter: https://github.com/programmiersportgruppe/sbt-tabular-test-reporter
- sbt-notifications: https://github.com/PavelPenkov/sbt-notifications (sends notifications when test run is finished)
- sbt-dynamodb: https://github.com/localytics/sbt-dynamodb (downloads and runs DynamoDB Local for testing)
- sbt-sqs: https://github.com/localytics/sbt-sqs (downloads and runs ElasticMQ for testing)
- sbt-s3: https://github.com/localytics/sbt-s3 (downloads and runs S3Proxy for testing)
Code coverage plugins
- sbt-scct: https://github.com/sqality/sbt-scct
- sbt-scoverage: https://github.com/scoverage/sbt-scoverage
- jacoco4sbt: https://github.com/sbt/jacoco4sbt
- sbt-coveralls: https://github.com/scoverage/sbt-coveralls
- sbt-clover: https://github.com/shanbin/sbt-clover
Static code analysis plugins
- wartremover: https://github.com/puffnfresh/wartremover (WartRemover - Scala static analysis)
- cpd4sbt: https://github.com/sbt/cpd4sbt (copy/paste detection, works for Scala, too)
- findbugs4sbt: https://github.com/sbt/findbugs4sbt (FindBugs only supports Java projects atm)
- scalastyle: https://github.com/scalastyle/scalastyle-sbt-plugin (Scalastyle - static code checker for Scala)
- sbt-scapegoat: https://github.com/sksamuel/sbt-scapegoat (Scapegoat - Scala static code analysis)
- sbt-stats: https://github.com/orrsella/sbt-stats (simple, extensible source code statistics)
- sbt-checkstyle-plugin: https://github.com/etsy/sbt-checkstyle-plugin (Checkstyle - static analysis for Java code)
- sbt-jcheckstyle: https://github.com/xerial/sbt-jcheckstyle (handy checkstyle runner for Java projects)
One jar plugins
- sbt-assembly: https://github.com/sbt/sbt-assembly
- xsbt-proguard-plugin: https://github.com/adamw/xsbt-proguard-plugin
- sbt-deploy: https://github.com/reaktor/sbt-deploy
- sbt-appbundle (os x standalone): https://github.com/sbt/sbt-appbundle
- sbt-onejar (Packages your project using One-JAR™): https://github.com/sbt/sbt-onejar
Release plugins
- sbt-native-packager: https://github.com/sbt/sbt-native-packager
- sbt-ghpages (publishes generated site and api): https://github.com/sbt/sbt-ghpages
- sbt-pgp (PGP signing plugin, can generate keys too): https://github.com/sbt/sbt-pgp
- sbt-release (customizable release process): https://github.com/sbt/sbt-release
- sbt-sonatype-plugin (releases to Sonatype Nexus repository) https://github.com/xerial/sbt-sonatype
- sbt-aether-plugin (Published artifacts using Sonatype Aether): https://github.com/arktekk/sbt-aether-deploy
- posterous-sbt: https://github.com/n8han/posterous-sbt
- sbt-signer-plugin: https://github.com/rossabaker/sbt-signer-plugin
- sbt-izpack (generates IzPack an installer): http://software.clapper.org/sbt-izpack/
- sbt-unique-version (emulates unique snapshots): https://github.com/sbt/sbt-unique-version
- sbt-install4j: https://github.com/jpsacha/sbt-install4j
- sbt-pack (generates packages with dependent jars and launch scripts): https://github.com/xerial/sbt-pack
- sbt-start-script: https://github.com/sbt/sbt-start-script
- xitrum-package (collects dependency .jar files for standalone Scala programs): https://github.com/ngocdaothanh/xitrum-package
Deployment integration plugins
- sbt-appengine: https://github.com/sbt/sbt-appengine
- sbt-cloudbees-plugin: https://github.com/timperrett/sbt-cloudbees-plugin
- sbt-jelastic-deploy: https://github.com/casualjim/sbt-jelastic-deploy
- sbt-elasticbeanstalk (Deploy WAR files to AWS Elastic Beanstalk): https://github.com/sqs/sbt-elasticbeanstalk
- sbt-cloudformation (AWS CloudFormation templates and stacks management): https://github.com/tptodorov/sbt-cloudformation
- sbt-codedeploy: https://github.com/gilt/sbt-codedeploy
- sbt-heroku: https://github.com/heroku/sbt-heroku
Monitoring integration plugins
- sbt-newrelic: https://github.com/gilt/sbt-newrelic
Web and frontend development plugins
- xsbt-web-plugin: https://github.com/earldouglas/xsbt-web-plugin
- xsbt-webstart: https://github.com/ritschwumm/xsbt-webstart
- sbt-gwt-plugin: https://github.com/cdietze/sbt-gwt-plugin
- coffeescripted-sbt: https://github.com/softprops/coffeescripted-sbt
- less-sbt (for less-1.3.0): https://github.com/softprops/less-sbt
- sbt-less-plugin (it uses less-1.3.0): https://github.com/btd/sbt-less-plugin
- sbt-emberjs: https://github.com/stefri/sbt-emberjs
- sbt-closure: https://github.com/eltimn/sbt-closure
- sbt-imagej: https://github.com/jpsacha/sbt-imagej
- sbt-yui-compressor: https://github.com/indrajitr/sbt-yui-compressor
- sbt-requirejs: https://github.com/scalatra/sbt-requirejs
- sbt-vaadin-plugin: https://github.com/henrikerola/sbt-vaadin-plugin
- sbt-purescript: https://github.com/eamelink/sbt-purescript
- sbt-jasmine-plugin (Run javascript tests with jasmine within sbt): https://github.com/joescii/sbt-jasmine-plugin
- sbt-javafx (Package JavaFX applications): https://github.com/kavedaa/sbt-javafx
- sbt-phantomjs (Automated installer and configurator for PhantomJS): https://github.com/saturday06/sbt-phantomjs
- sbt-play-scalajs: https://github.com/vmunier/sbt-play-scalajs
- scalatra-sbt: https://github.com/scalatra/scalatra-sbt
Documentation plugins
- tut (Scala literate programming): https://github.com/tpolecat/tut
- sbt-site (Site generation for sbt): https://github.com/sbt/sbt-site
- sbt-lwm (Convert lightweight markup files, e.g., Markdown and Textile, to HTML): http://software.clapper.org/sbt-lwm/
- Laika (Template-based site generation, Markdown, reStructuredText, no external tools): http://planet42.github.io/Laika/
- literator-plugin (Converts sources into markdown documents): https://github.com/laughedelic/literator
- sbt-class-diagram (Create a class diagram) https://github.com/xuwei-k/sbt-class-diagram
- sbt-api-mappings (Resolves external links in ScalaDoc for common Scala libraries) https://github.com/ThoughtWorksInc/sbt-api-mappings
Library dependency plugins
- sbt-dependency-graph (Creates a graphml file of the dependency tree): https://github.com/jrudolph/sbt-dependency-graph
- ls-sbt (An sbt interface for ls.implicit.ly): https://github.com/softprops/ls
- sbt-dirty-money (Cleans Ivy2 cache): https://github.com/sbt/sbt-dirty-money
- sbt-updates (Checks Maven repos for dependency updates): https://github.com/rtimush/sbt-updates
- sbt-lock (Locks library versions for reproducible build): https://github.com/tkawachi/sbt-lock
- sbt-versions (Checks for updated versions of your dependencies): https://github.com/sksamuel/sbt-versions
- sbt-bobby (Prevents outdated dependencies from being used by your project): https://github.com/hmrc/sbt-bobby
Build interoperability plugins
- ant4sbt: https://github.com/sbt/ant4sbt
- sbt-pom-reader: https://github.com/sbt/sbt-pom-reader
Create new project plugins
- np (Dead simple new project directory generation): https://github.com/softprops/np
- npt (Creates new project skeletons based on templates): https://github.com/reikje/npt
- sbt-fresh (create an opinionated fresh sbt project): https://github.com/sbt/sbt-fresh
Utility and system plugins
- sbt-javaversioncheck (enforces build requirement for specific version level of Java): https://github.com/sbt/sbt-javaversioncheck
- sbt-scalariform (adding support for source code formatting using Scalariform): https://github.com/sbt/sbt-scalariform
- sbt-process-runner (Run your own applications from SBT console) https://github.com/whysoserious/sbt-process-runner
- jot (Write down your ideas lest you forget them) https://github.com/softprops/jot
- sbt-editsource (A poor man’s sed(1), for sbt): http://software.clapper.org/sbt-editsource/
- sbt-conflict-classes (Show conclict classes from classpath): https://github.com/todesking/sbt-conflict-classes
- sbt-cross (An alternative to
crossScalaVersions): https://github.com/lucidsoftware/sbt-cross - sbt-cross-building (Simplifies building your plugins for multiple versions of sbt): https://github.com/jrudolph/sbt-cross-building
- sbt-doge (aggregates tasks across subprojects and their
crossScalaVersions): https://github.com/sbt/sbt-doge - sbt-revolver (Triggered restart, hot reloading): https://github.com/spray/sbt-revolver
- sbt-scalaedit (Open and upgrade ScalaEdit (text editor)): https://github.com/kjellwinblad/sbt-scalaedit-plugin
- sbt-man (Looks up scaladoc): https://github.com/sbt/sbt-man
- sbt-taglist (Looks for TODO-tags in the sources): https://github.com/johanandren/sbt-taglist
- migration-manager: https://github.com/typesafehub/migration-manager
- sbt-aspectj: https://github.com/sbt/sbt-aspectj
- sbt-properties: https://github.com/sbt/sbt-properties
- sbt-multi-publish (publish to more than one repository simultaneously): https://github.com/davidharcombe/sbt-multi-publish
- sbt-about-plugins (shows some details about plugins loaded): https://github.com/jozic/sbt-about-plugins
- sbt-one-log (make Log dependency easy): https://github.com/zavakid/sbt-one-log
- sbt-git-stamp (include git metadata in MANIFEST.MF file in artifact): https://bitbucket.org/pkaeding/sbt-git-stamp
- fm-sbt-s3-resolver (Resolve and Publish using Amazon S3): https://github.com/frugalmechanic/fm-sbt-s3-resolver
- sbt-notebook (Adds scala-notebook capabilities to sbt projects): https://github.com/alexarchambault/sbt-notebook
- sbt-sh (executes shell commands): https://github.com/steppenwells/sbt-sh
- cronish-sbt (interval sbt / shell command execution): https://github.com/philcali/cronish-sbt
- git (executes git commands): https://github.com/sbt/sbt-git
- svn (execute svn commands): https://github.com/xuwei-k/sbtsvn
- sbt-groll (sbt plugin to navigate the Git history): https://github.com/sbt/sbt-groll
- sbt-twt (twitter processor for sbt): https://github.com/sbt/sbt-twt
- sbt-compile-quick-plugin (compile and package a single file): https://github.com/etsy/sbt-compile-quick-plugin
- sbt-meow (display ascii-fied random cat pictures): https://github.com/thricejamie/sbt-meow
- sbt-build-files-watcher (show message on build files changed): https://github.com/tototoshi/sbt-build-files-watcher
- sbt-backup (compress and scp a directory): https://github.com/sensatus/sbt-backup
- sbt-project-graph (visualise inter-project dependencies): https://github.com/dwijnand/sbt-project-graph
- solr-plugin (start solr search engine from sbt) https://github.com/sgrouples/sbt-solr-plugin
- sbt-todolist (find TODOs in source files and print them to console): https://github.com/fedragon/sbt-todolist
- sbt-ortho (simple spell and English style checker): https://github.com/henrikengstrom/sbt-ortho
- sbt-write-output-to-file (redirect the output of
runto a file): https://github.com/cb372/sbt-write-output-to-file
Database plugins
- flyway-sbt (Flyway - The agile database migration framework): http://flywaydb.org/getstarted/firststeps/sbt.html
- sbt-liquibase (Liquibase RDBMS database migrations): https://github.com/bigtoast/sbt-liquibase
- sbt-dbdeploy (dbdeploy, a database change management tool): https://github.com/mr-ken/sbt-dbdeploy
Code generator plugins
- sbt-planout4j (Compiling Planout4j yaml to Planout language): https://github.com/reikje/sbt-planout4j
- sbt-buildinfo (Generate Scala source for any settings): https://github.com/sbt/sbt-buildinfo
- pttrt (Pass any data from compile-time to run-time): https://github.com/Atry/pttrt
- sbt-haxe (Compiling Haxe to Java): https://github.com/qifun/sbt-haxe
- sbt-scalabuff (Google Protocol Buffers with native scala suppport thru ScalaBuff): https://github.com/sbt/sbt-scalabuff
- sbt-fmpp (FreeMarker Scala/Java Templating): https://github.com/sbt/sbt-fmpp
- sbt-scalaxb (XSD and WSDL binding): https://github.com/eed3si9n/scalaxb
- sbt-protobuf (Google Protocol Buffers): https://github.com/sbt/sbt-protobuf
- sbt-cppp (Cross-Project Protobuf Plugin for Sbt): https://github.com/Atry/sbt-cppp
- sbt-avro (Apache Avro): https://github.com/cavorite/sbt-avro
- sbt-xjc (XSD binding, using JAXB XJC ): https://github.com/sbt/sbt-xjc
- xsbt-scalate-generate (Generate/Precompile Scalate Templates): https://github.com/backchatio/xsbt-scalate-generate
- sbt-antlr (Generate Java source code based on ANTLR3 grammars): https://github.com/stefri/sbt-antlr
- sbt-antlr4 (Antlr4 runner for generating Java source code): https://github.com/ihji/sbt-antlr4
- xsbt-reflect (Generate Scala source code for project name and version): https://github.com/ritschwumm/xsbt-reflect
- lifty (Brings scaffolding to sbt): https://github.com/lifty/lifty
- sbt-thrift (Thrift Code Generation): https://github.com/bigtoast/sbt-thrift
- xsbt-hginfo (Generate Scala source code for Mercurial repository information): https://bitbucket.org/lukas_pustina/xsbt-hginfo
- sbt-scalashim (Generate Scala shim like
sys.error): https://github.com/sbt/sbt-scalashim - sbtend (Generate Java source code from xtend ): https://github.com/xuwei-k/sbtend
- sbt-boilerplate (generating scala.Tuple/Function related boilerplate code): https://github.com/sbt/sbt-boilerplate
- sbt-fxml (Generates controller classes for JavaFX FXML files): https://bitbucket.org/phdoerfler/sbt-fxml
- sbt-clojure (Compiling Clojure code): https://github.com/Geal/sbt-clojure
- sbt-build-info-conf (Generates resources.conf file with build information): https://github.com/Sensatus/sbt-build-info-conf
- sbt-frege (Build Frege code): https://github.com/earldouglas/sbt-frege
- sbt-swagger-codegen (Models, Client and Server code generation integrated as an SBT plugin. Generate code from your Swagger(https://github.com/swagger-api) files): https://github.com/unicredit/sbt-swagger-codegen
- sbt-heroku-deploy (Deploy Scala Web applications to Heroku): https://github.com/earldouglas/sbt-heroku-deploy
- scavro (Code generation from Avro schema): https://github.com/oedura/scavro
- sbt-spi-plugin (Generates provider-configuration files in the resource directory META-INF/services for later use with ServiceLoader) https://github.com/nyavro/spi-plugin
Game development plugins
- sbt-lwjgl-plugin (Light Weight Java Game Library): https://github.com/philcali/sbt-lwjgl-plugin
- sbt-scage-plugin (Scala Game Engine): https://github.com/mvallerie/sbt-scage-plugin
Android plugins
- android-plugin: https://github.com/jberkel/android-plugin
- android-sdk-plugin: https://github.com/pfn/android-sdk-plugin
iOS plugins
- sbt-robovm (Compiling Scala using RoboVM for iOS or native OSX): https://github.com/roboscala/sbt-robovm
OSGi plugin
- sbtosgi: https://github.com/sbt/sbt-osgi
C++ interop plugins
- sbt-javacpp (JavaCPP is the missing bridge between Java and native C++; this lib helps you download platform-specific presets): https://github.com/lloydmeta/sbt-javacpp
Computer vision plugins
- sbt-opencv (Start an OpenCV via JavaCV project in 1 line): https://github.com/lloydmeta/sbt-opencv
Plugin bundles
- tl-os-sbt-plugins (Version, Release, and Package Management, Play 2.0 and Git utilities) : https://github.com/trafficland/tl-os-sbt-plugins
Community Repository Policy
The community repository has the following guideline for artifacts published to it:
- All published artifacts are the authors own work or have an appropriate license which grants distribution rights.
- All published artifacts come from open source projects, that have an open patch acceptance policy.
- All published artifacts are placed under an organization in a DNS domain for which you have the permission to use or are an owner (scala-sbt.org is available for sbt plugins).
- All published artifacts are signed by a committer of the project (coming soon).
Bintray For Plugins
This is currently in Beta mode.
sbt hosts their community plugin repository on Bintray. Bintray is a repository hosting site, similar to github, which allows users to contribute their own plugins, while sbt can aggregate them together in a common repository.
This document walks you through the means to create your own repository for hosting your sbt plugins and then linking them into the sbt shared repository. This will make your plugins available for all sbt users without additonal configuration (besides declaring a dependency on your plugin).
To do this, we need to perform the following steps:
Create an account on Bintray
First, go to https://bintray.com. Click on the sign in link on the top left, and then the sign up button.
- Note: If you had an account on repo.scala-sbt.org previous, please use the same email address when you create this account.*
Create a repository for your sbt plugins
Now, we’ll create a repository to host our personal sbt plugins. In
bintray, create a generic repository called sbt-plugins.
First, go to your user page and click on the new repository link:
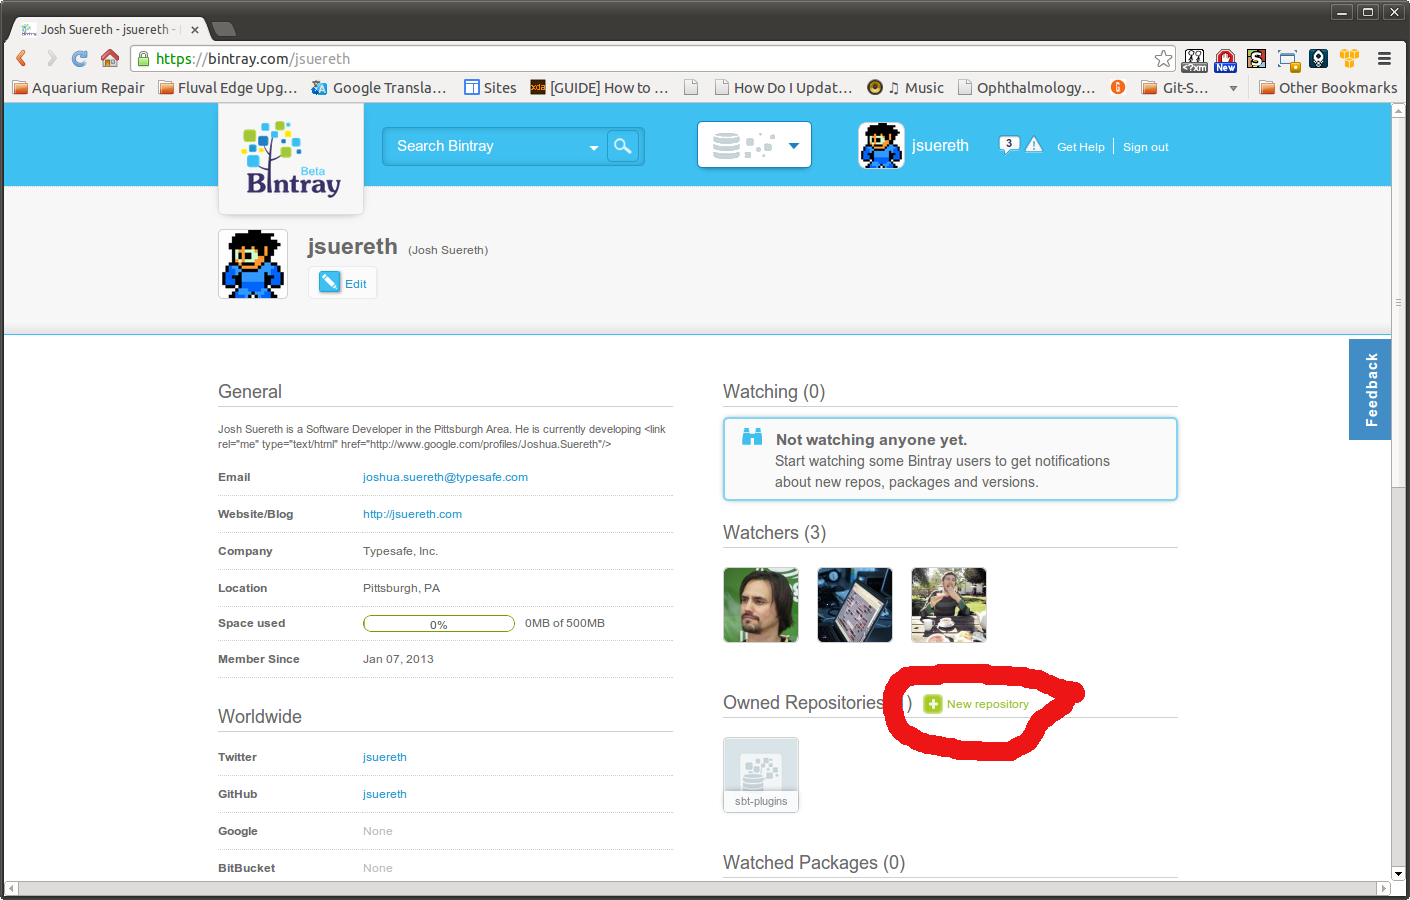
You should see the following dialog:
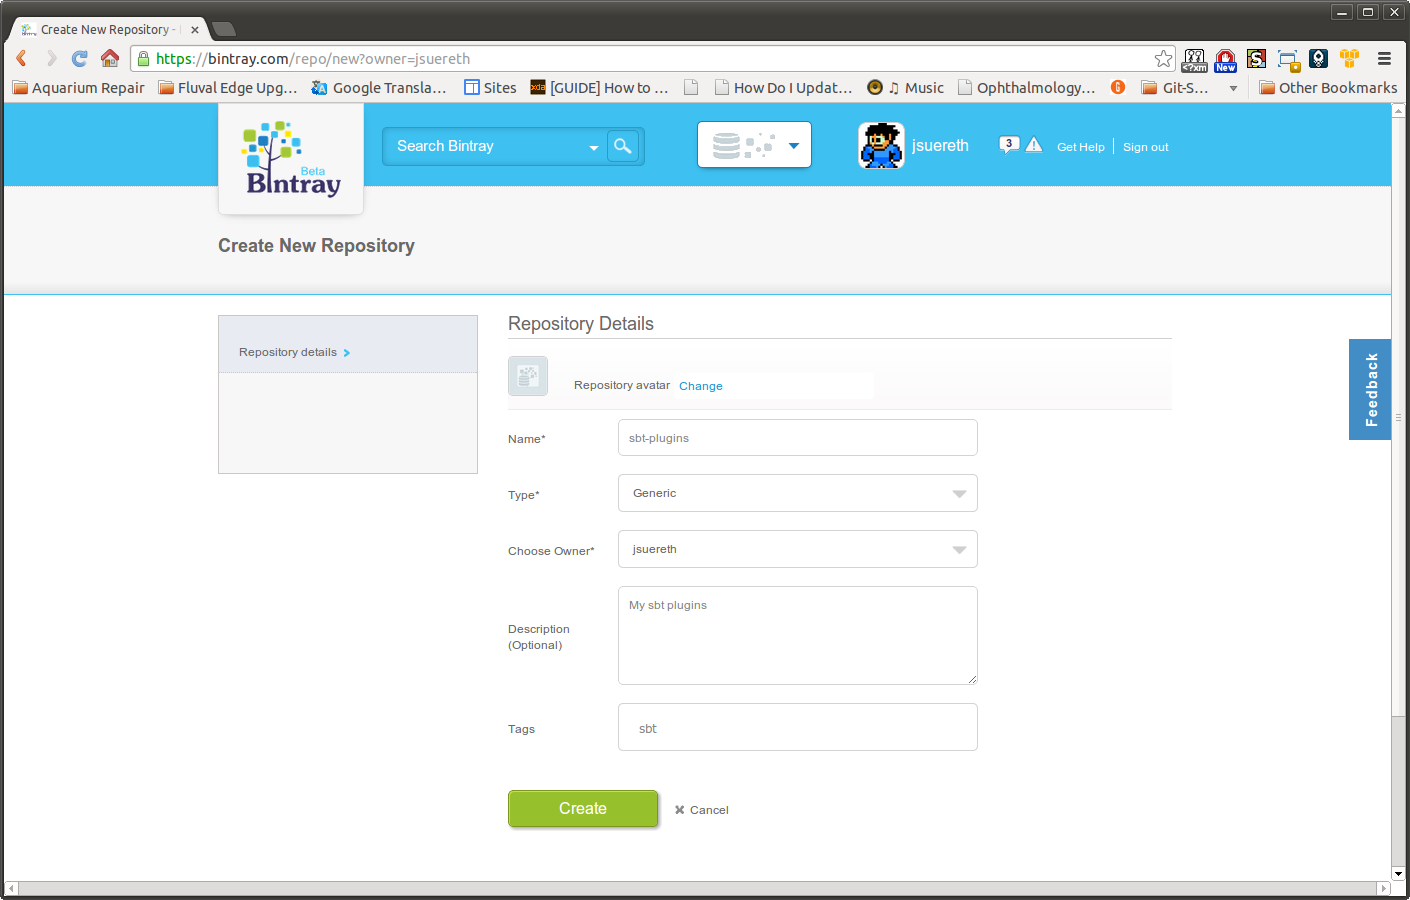
Fill it out similarly to the above image, the settings are:
- Name: sbt-plugins
- Type: Generic
- Desc: My sbt plugins
- Tags: sbt
Once this is done, you can begin to configure your sbt-plugins to publish to bintray.
Add the bintray-sbt plugin to your build.
First, add the bintray-sbt to your plugin build.
First, create a project/bintray.sbt file
addSbtPlugin("me.lessis" % "bintray-sbt" % "0.2.1")
Next, a make sure your build.sbt file has the following settings
import bintray.Keys._

lazy val commonSettings = Seq(
  version in ThisBuild := "<YOUR PLUGIN VERSION HERE>",
  organization in ThisBuild := "<INSERT YOUR ORG HERE>"
)

lazy val root = (project in file(".")).
  settings(commonSettings ++ bintrayPublishSettings: _*).
  settings(
    sbtPlugin := true,
    name := "<YOUR PLUGIN HERE>",
    description := "<YOUR DESCRIPTION HERE>",
    // This is an example.  bintray-sbt requires licenses to be specified
    // (using a canonical name).
    licenses += ("Apache-2.0", url("https://www.apache.org/licenses/LICENSE-2.0.html")),
    publishMavenStyle := false,
    repository in bintray := "sbt-plugins",
    bintrayOrganization in bintray := None
  )
Make sure your project has a valid license specified, as well as unique name and organization.
Make a release
- Note: bintray does not support snapshots. We recommend using git-revisions supplied by the sbt-git plugin*.
Once your build is configured, open the sbt console in your build and run
sbt> publish
The plugin will ask you for your credentials. If you don’t know where they are, you can find them on Bintray.
- Login to the website with your credentials.
- Click on your username
- Click on edit profile
- Click on API Key
This will get you your password. The bintray-sbt plugin will save your API key for future use.
- NOTE: We have to do this before we can link our package to the sbt org.*
Linking your package to the sbt organization
Now that your plugin is packaged on bintray, you can include it in the community sbt repository. To do so, go to the Community sbt repository screen.
- Click the green
include my packagebutton and select your plugin.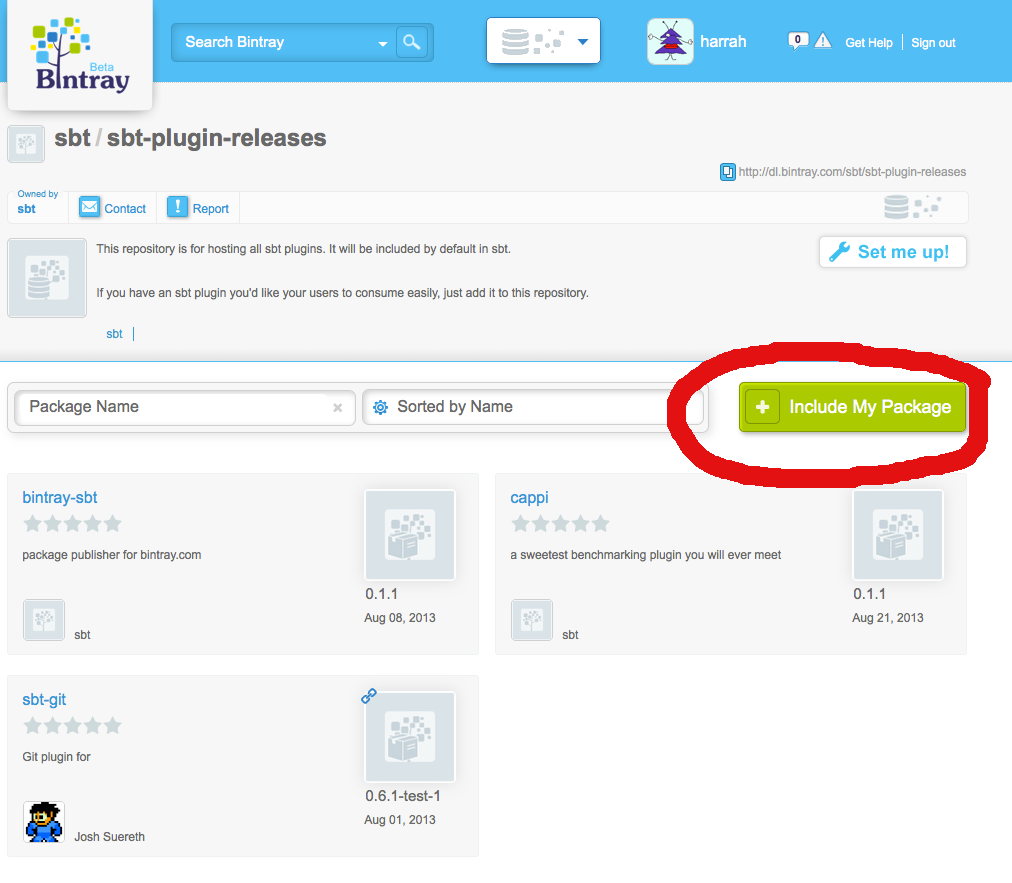
- Search for your plugin by name and click on the link.
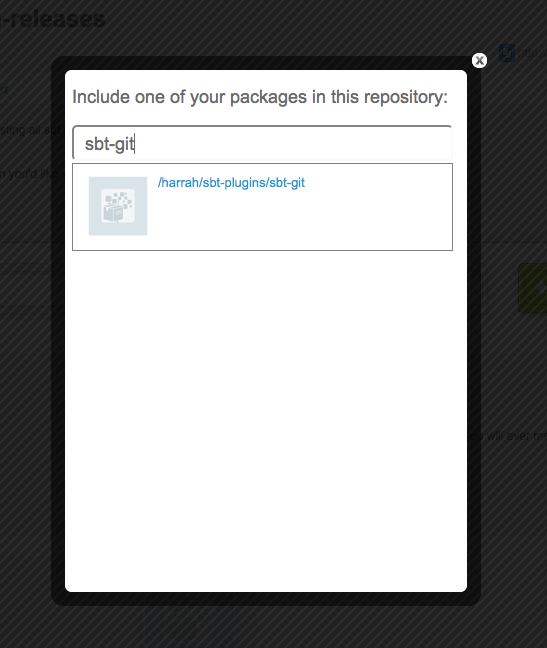
- Your request should be automatically filled out, just click send
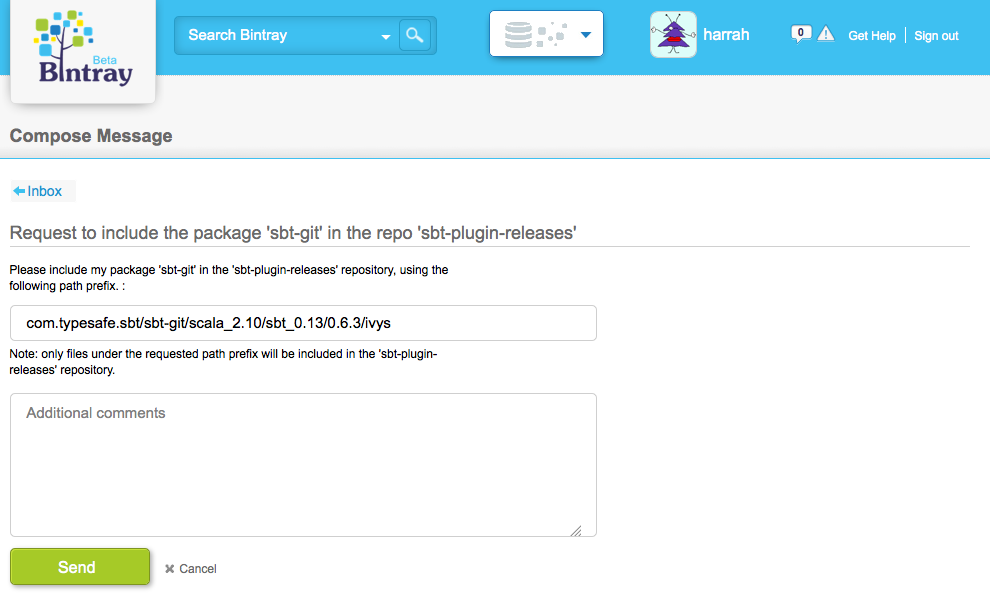
- Shortly, one of the sbt repository admins will approve your link request.
From here on, any releases of your plugin will automatically appear in the community sbt repository. Congratulations and thank you so much for your contributions!
Linking your package to the sbt organization (sbt org admins)
If you’re a member of the sbt organization on bintray, you can link your package to the sbt organization, but via a different means. To do so, first navigate to the plugin you wish to include and click on the link button:
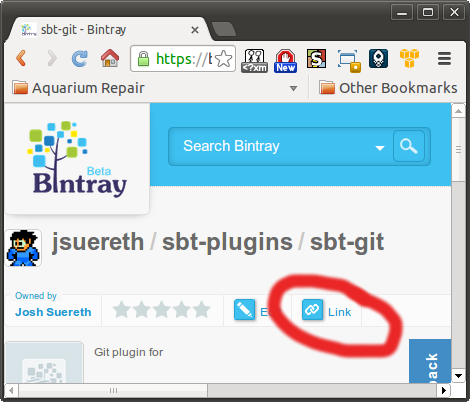
After clicking this you should see a link like the following:
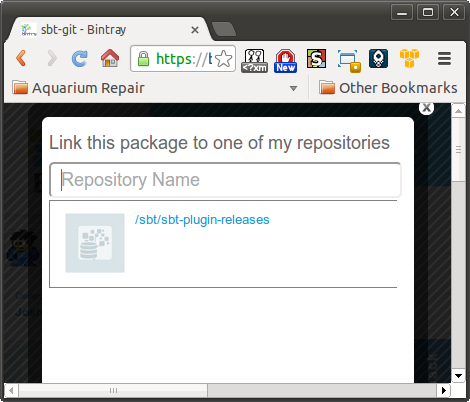
Click on the sbt/sbt-plugin-releases repository and you’re done! Any
future releases will be included in the sbt-plugin repository.
Summary
After setting up the repository, all new releases will automatically be included the sbt-plugin-releases repository, available for all users. When you create a new plugin, after the initial release you’ll have to link it to the sbt community repository, but the rest of the setup should already be completed. Thanks for you contributions and happy hacking.
Setup Notes
Some notes on how to set up your sbt script.
Do not put sbt-launch.jar on your classpath.
Do not put sbt-launch.jar in your $SCALA_HOME/lib directory, your
project’s lib directory, or anywhere it will be put on a classpath. It
isn’t a library.
Terminal encoding
The character encoding used by your terminal may differ from Java’s
default encoding for your platform. In this case, you will need to add
the option -Dfile.encoding=<encoding> in your sbt script to set the
encoding, which might look like:
java -Dfile.encoding=UTF8
JVM heap, permgen, and stack sizes
If you find yourself running out of permgen space or your workstation is low on memory, adjust the JVM configuration as you would for any application. For example a common set of memory-related options is:
java -Xmx1536M -Xss1M -XX:+CMSClassUnloadingEnabled -XX:MaxPermSize=256m
Boot directory
sbt-launch.jar is just a bootstrap; the actual meat of sbt, and the
Scala compiler and standard library, are downloaded to the shared
directory $HOME/.sbt/boot/.
To change the location of this directory, set the sbt.boot.directory
system property in your sbt script. A relative path will be resolved
against the current working directory, which can be useful if you want
to avoid sharing the boot directory between projects. For example, the
following uses the pre-0.11 style of putting the boot directory in
project/boot/:
java -Dsbt.boot.directory=project/boot/
HTTP/HTTPS/FTP Proxy
On Unix, sbt will pick up any HTTP, HTTPS, or FTP proxy settings from
the standard http_proxy, https_proxy, and ftp_proxy environment
variables. If you are behind a proxy requiring authentication, your
sbt script must also pass flags to set the http.proxyUser and
http.proxyPassword properties for HTTP, ftp.proxyUser and
ftp.proxyPassword properties for FTP, or https.proxyUser and
https.proxyPassword properties for HTTPS.
For example,
java -Dhttp.proxyUser=username -Dhttp.proxyPassword=mypassword
On Windows, your script should set properties for proxy host, port, and if applicable, username and password. For example, for HTTP:
java -Dhttp.proxyHost=myproxy -Dhttp.proxyPort=8080 -Dhttp.proxyUser=username -Dhttp.proxyPassword=mypassword
Replace http with https or ftp in the above command line to
configure HTTPS or FTP.
Deploying to Sonatype
Deploying to sonatype is easy! Just follow these simple steps:
First - PGP Signatures
You’ll need to PGP sign your artifacts for the Sonatype repository. Don’t worry, there’s a plugin for that. Follow the instructions for the plugin and you’ll have PGP signed artifacts in no time.
- Note: The plugin is a jvm-only solution to generate PGP keys and sign artifacts. It can work with the GPG command line tool, but the command line is not needed.*
If the command to generate your key fails execute the following commands and remove the displayed files:
> show */*:pgpSecretRing
[info] /home/username/.sbt/.gnupg/secring.gpg
> show */*:pgpPublicRing
[info] /home/username/.sbt/.gnupg/pubring.gpg
If your PGP key has not yet been distributed to the keyserver pool, i.e., you’ve just generated it, you’ll need to publish it. You can do so using the sbt-pgp plugin:
pgp-cmd send-key keyname hkp://pool.sks-keyservers.net
(where keyname is the name or email address used when creating the key or hexadecimal identifier for the key.)
If you see no output from sbt-pgp then the key name specified was not found.
If it fails to run the SendKey command you can try another server (for example: hkp://keyserver.ubuntu.com). A list of servers can be found at the status page of sks-keyservers.net.
Second - Maven Publishing Settings
To publish to a maven repository, you’ll need to configure a few settings so that the correct metadata is generated.
publishMavenStyle := true
is used to ensure POMs are generated and pushed. Next, you have to set up the repositories you wish to push too. Luckily, Sonatype’s OSSRH uses the same URLs for everyone:
publishTo := {
  val nexus = "https://oss.sonatype.org/"
  if (isSnapshot.value)
    Some("snapshots" at nexus + "content/repositories/snapshots")
  else
    Some("releases"  at nexus + "service/local/staging/deploy/maven2")
}
Another good idea is to not publish your test artifacts (this is the default):
publishArtifact in Test := false
Third - POM Metadata
Now, we want to control what’s available in the pom.xml file. This
file describes our project in the maven repository and is used by
indexing services for search and discover. This means it’s important
that pom.xml should have all information we wish to advertise as well
as required info!
First, let’s make sure no repositories show up in the POM file. To publish on maven-central, all required artifacts must also be hosted on maven central. However, sometimes we have optional dependencies for special features. If that’s the case, let’s remove the repositories for optional dependencies in our artifact:
pomIncludeRepository := { _ => false }
Next, the POM metadata that isn’t generated by sbt must be added. This
is done through the pomExtra configuration option:
pomExtra := (
  <url>http://jsuereth.com/scala-arm</url>
  <licenses>
    <license>
      <name>BSD-style</name>
      <url>http://www.opensource.org/licenses/bsd-license.php</url>
      <distribution>repo</distribution>
    </license>
  </licenses>
  <scm>
    <url>[email protected]:jsuereth/scala-arm.git</url>
    <connection>scm:git:[email protected]:jsuereth/scala-arm.git</connection>
  </scm>
  <developers>
    <developer>
      <id>jsuereth</id>
      <name>Josh Suereth</name>
      <url>http://jsuereth.com</url>
    </developer>
  </developers>)
Specifically, the url, license, scm.url, scm.connection and
developer sections are required. The above is an example from the
scala-arm project.
Note that sbt will automatically inject
licensesandurlnodes if they are already present in your build file. Thus an alternative to the abovepomExtrais to include the following entries:
licenses := Seq("BSD-style" -> url("http://www.opensource.org/licenses/bsd-license.php"))

homepage := Some(url("http://jsuereth.com/scala-arm"))
This might be advantageous if those keys are used also by other plugins
(e.g. ls). You cannot use both the sbt licenses key and the
licenses section in pomExtra at the same time, as this will produce
duplicate entries in the final POM file, leading to a rejection in
Sonatype’s staging process.
- The full format of a pom.xml file is outlined here.*
Fourth - Adding credentials
The credentials for your Sonatype OSSRH account need to be added
somewhere. Common convention is a ~/.sbt/0.13/sonatype.sbt file
with the following:
credentials += Credentials("Sonatype Nexus Repository Manager",
                           "oss.sonatype.org",
                           "<your username>",
                           "<your password>")
- Note: The first two strings must be
"Sonatype Nexus Repository Manager"and"oss.sonatype.org"for Ivy to use the credentials.*
Finally - Publish
In sbt, run publishSigned and you should see something like the
following:
> publishSigned
Please enter your PGP passphrase> ***********
[info] Packaging /home/josh/projects/typesafe/scala-arm/target/scala-2.9.1/scala-arm_2.9.1-1.2.jar ...
[info] Wrote /home/josh/projects/typesafe/scala-arm/target/scala-2.9.1/scala-arm_2.9.1-1.2.pom
[info] Packaging /home/josh/projects/typesafe/scala-arm/target/scala-2.9.1/scala-arm_2.9.1-1.2-javadoc.jar ...
[info] Packaging /home/josh/projects/typesafe/scala-arm/target/scala-2.9.1/scala-arm_2.9.1-1.2-sources.jar ...
[info] :: delivering :: com.jsuereth#scala-arm_2.9.1;1.2 :: 1.2 :: release :: Mon Jan 23 13:16:57 EST 2012
[info] Done packaging.
[info] Done packaging.
[info] Done packaging.
[info]  delivering ivy file to /home/josh/projects/typesafe/scala-arm/target/scala-2.9.1/ivy-1.2.xml
[info]  published scala-arm_2.9.1 to https://oss.sonatype.org/service/local/staging/deploy/maven2/com/jsuereth/scala-arm_2.9.1/1.2/scala-arm_2.9.1-1.2-sources.jar
[info]  published scala-arm_2.9.1 to https://oss.sonatype.org/service/local/staging/deploy/maven2/com/jsuereth/scala-arm_2.9.1/1.2/scala-arm_2.9.1-1.2-javadoc.jar.asc
[info]  published scala-arm_2.9.1 to https://oss.sonatype.org/service/local/staging/deploy/maven2/com/jsuereth/scala-arm_2.9.1/1.2/scala-arm_2.9.1-1.2-sources.jar.asc
[info]  published scala-arm_2.9.1 to https://oss.sonatype.org/service/local/staging/deploy/maven2/com/jsuereth/scala-arm_2.9.1/1.2/scala-arm_2.9.1-1.2.jar
[info]  published scala-arm_2.9.1 to https://oss.sonatype.org/service/local/staging/deploy/maven2/com/jsuereth/scala-arm_2.9.1/1.2/scala-arm_2.9.1-1.2.jar.asc
[info]  published scala-arm_2.9.1 to https://oss.sonatype.org/service/local/staging/deploy/maven2/com/jsuereth/scala-arm_2.9.1/1.2/scala-arm_2.9.1-1.2.pom.asc
[info]  published scala-arm_2.9.1 to https://oss.sonatype.org/service/local/staging/deploy/maven2/com/jsuereth/scala-arm_2.9.1/1.2/scala-arm_2.9.1-1.2.pom
[info]  published scala-arm_2.9.1 to https://oss.sonatype.org/service/local/staging/deploy/maven2/com/jsuereth/scala-arm_2.9.1/1.2/scala-arm_2.9.1-1.2-javadoc.jar
[success] Total time: 9 s, completed Jan 23, 2012 1:17:03 PM
After publishing you have to follow the release workflow of Nexus. The sbt-sonatype plugin allows the release workflow procedures to be performed directly from sbt.
- Note: Staged releases allow testing across large projects of independent releases before pushing the full project.*
Note: An error message of
PGPException: checksum mismatch at 0 of 20indicates that you got the passphrase wrong. We have found at least on OS X that there may be issues with characters outside the 7-bit ASCII range (e.g. Umlauts). If you are absolutely sure that you typed the right phrase and the error doesn’t disappear, try changing the passphrase.
Summary
To get your project hosted on Sonatype (and Maven Central), you will need to:
- Have GPG key pair, with published public key,
- An sbt file with your Sonatype credentials that is not pushed to the VCS,
- Add the sbt-pgp plugin to sign the artefacts,
- Modify
build.sbtwith the required elements in the generated POM.
Starting with a project that is not being published, you’ll need to install GPG, generate and publish your key. Swtiching to sbt, you’ll then need to:
~/.sbt/sonatype.sbt
This file (kept outside the VCS) contains the Sonatype credentials settings:
credentials += Credentials("Sonatype Nexus Repository Manager",
                           "oss.sonatype.org",
                           "your-sonatype-username",
                           "your-sonatype-password")
~/.sbt/plugins/gpg.sbt
The sbt-pgp plugin allows you to sign
and publish your artefacts by running publishSigned in sbt:
addSbtPlugin("com.typesafe.sbt" % "sbt-pgp" % "0.8")
build.sbt
Finally, you’ll need to tweak the generated POM in your build.sbt. The
tweaks include specifying the project’s authors, URL, SCM and many
others:
publishTo := {
  val nexus = "https://oss.sonatype.org/"
  if (isSnapshot.value)
    Some("snapshots" at nexus + "content/repositories/snapshots")
  else
    Some("releases" at nexus + "service/local/staging/deploy/maven2")
}

publishMavenStyle := true

publishArtifact in Test := false

pomIncludeRepository := { _ => false }

pomExtra := (
  <url>http://your.project.url</url>
  <licenses>
    <license>
      <name>BSD-style</name>
      <url>http://www.opensource.org/licenses/bsd-license.php</url>
      <distribution>repo</distribution>
    </license>
  </licenses>
  <scm>
    <url>[email protected]:your-account/your-project.git</url>
    <connection>scm:git:[email protected]:your-account/your-project.git</connection>
  </scm>
  <developers>
    <developer>
      <id>you</id>
      <name>Your Name</name>
      <url>http://your.url</url>
    </developer>
  </developers>
)
Contributing to sbt
Below is a running list of potential areas of contribution. This list may become out of date quickly, so you may want to check on the sbt-dev mailing list if you are interested in a specific topic.
There are plenty of possible visualization and analysis opportunities.
’compile’ produces an Analysis of the source code containing
- Source dependencies
- Inter-project source dependencies
- Binary dependencies (jars + class files)
- data structure representing the API of the source code There is some code already for generating dot files that isn’t hooked up, but graphing dependencies and inheritance relationships is a general area of work.
- ’update’ produces an [Update Report][Update-Report] mapping Configuration/ModuleID/Artifact to the retrieved File
- Ivy produces more detailed XML reports on dependencies. These
come with an XSL stylesheet to view them, but this does not
scale to large numbers of dependencies. Working on this is
pretty straightforward: the XML files are created in
~/.ivy2and the.xsland.cssare there as well, so you don’t even need to work with sbt. Other approaches described in the email thread - Tasks are a combination of static and dynamic graphs and it would be useful to view the graph of a run
- Settings are a static graph and there is code to generate the dot files, but isn’t hooked up anywhere.
- There is support for dependencies on external projects, like on GitHub. To be more useful, this should support being able to update the dependencies. It is also easy to extend this to other ways of retrieving projects. Support for svn and hg was a recent contribution, for example.
- Dependency management: see adept
- If you like parsers, sbt commands and input tasks are written using custom parser combinators that provide tab completion and error handling. Among other things, the efficiency could be improved.
- The javap task hasn’t been reintegrated
- Implement enhanced 0.11-style warn/debug/info/error/trace commands. Currently, you set it like any other setting:
set logLevel := Level.Warn
or : set logLevel in Test := Level.Warn
You could make commands that wrap this, like:
warn test:run
Also, trace is currently an integer, but should really be an abstract data type.
7. Each sbt version has more aggressive incremental compilation and reproducing bugs can be difficult. It would be helpful to have a mode that generates a diff between successive compilations and records the options passed to scalac. This could be replayed or inspected to try to find the cause.
Documentation
- There’s a lot to do with this documentation. If you check it out from git, there’s a directory called Dormant with some content that needs going through.
- the main page mentions external project references (e.g. to a git repo) but doesn’t have anything to link to that explains how to use those.
- API docs are much needed.
- Find useful answers or types/methods/values in the other docs, and pull references to them up into /faq or /Name-Index so people can find the docs. In general the /faq should feel a bit more like a bunch of pointers into the regular docs, rather than an alternative to the docs.
A lot of the pages could probably have better names, and/or little
2-4 word blurbs to the right of them in the sidebar.
Changes
These are changes made in each sbt release.
sbt 0.13.5+ Technology Previews
sbt 0.13.5+ releases of sbt are technology previews of what’s to come to sbt 1.0 with enhancements like auto plugins, launcher enhacements for sbt server, defined in the sbt-remote-control project, and other necessary API changes.
These releases maintain binary compatibility with plugins that are published against sbt 0.13.0, but add new features in preparation for sbt 1.0. The tech previews allow us to test new ideas like auto plugins and performance improvements on dependency resolution; the build users can try new features without losing the existing plugin resources; and plugin authors can gradually migrate to the new plugin system before sbt 1.0 arrives.
sbt 0.13.11
Fixes with compatibility implications
- JCenter is now opt-in. A new setting
useJCentercan be set totrueto re-include it, as the first external resolver to find library dependencies. #2217/#2467 by @eed3si9n - Adds
withInterProjectFirstto the update option, which is enabled by default. When set totrue,inter-projectresolver will be prioritized above all resolvers and Ivy cache. #1827 by @eed3si9n - Fixes update option’s
withLatestSnapshotsso it handles modules without an artifact. This flag will be enabled by default. #1514/#1616/#2313 by @eed3si9n - No longer passes
-J<flag>options to the local Java compiler. #1968/#2272 by @Duhemm - Fixes auto imports for auto plugins in global configuration files. Because this is not source compatible with 0.13.x, the fix is enabled only when
sbt.global.autoimportflag istrue. #2120/#2399 by @timcharper
Improvements
- Adds configurable compiler bridge. See below.
- Adds initial support for Dotty. See below
- Adds settings for granular inter-project dependency tracking. See below.
- Scala version used by the build is updated to 2.10.6. #2311 by @eed3si9n
- If
publishMavenStyleistrue,updatetask warns when it sees intransitive dependencies, which do not translate to Maven. #2127 by @jsuereth - Adds
Def.settings, which facilitates mixing settings with seq of settings. See below. - sbt Serialization is updated to 0.1.2. #2117 by @dwijnand
- Hides the stack trace on compilation error in build definition. #2071/#2091 by @Duhemm
- Makes the dummy
Logger.Nullpublic. #2094 by @pdalpra - Uses diagnostic classes to get lines contents in local Java compiler. #2108/#2201 by @fkorotkov
- Adds logging of javaOptions. #2087/#2103 by @pdalpra
- Warns when javaOptions are defined but fork is set to false. #2041/#2103 by @pdalpra
- Adds an
Append.Sequenceinstance forListto allow+=/++=ondeveloperssetting. #2107/#2114 by @pdalpra - Drops
sealedfrom the typeclasses inAppend. #2322 by @dwijnand - Fixes compilation warnings in sbt’s codebase, and other clean ups. #2112/#2137/#2139/#2142 by @pdalpra
- Adds
localIfFiletoMavenRepository, to force artifacts to be copied to the cache. #2172 by @dwijnand - Adds
Resolver.bintrayIvyRepo(owner, repo). #2285 by @dwijnand - Non-static annotation changes are no longer tracked by the incremental compiler. #2343 by @romanowski
- Reduces the memory usage of API info extraction in the incremental compiler. #2343 by @adriaanm
- Memory-related options can now be overridden individually via the
-Joptions. sbt/sbt-launcher-package#105
Bug fixes
- Fixes the false positive of inconsistent duplicate warnings. #1933/#2258 by @Duhemm
- Fixes task scheduling performance on large builds by skipping checks in
sbt.Execute. #2302/#2303 by @jrudolph - Fixes changes in value classes by registering signatures of method before and after erasure. #1171/#2261 by @Duhemm
- Updated Ivy to merge IVY-1526 fix. sbt/ivy#14/#2118 by @jsuereth
- Fixes
updateClassifiersdownloading updated snapshot sources and docs. #1750/sbt/ivy#17/#2163/sbt/ivy#18/#2186 by @dwijnand - Fixes
updateClassifierson Ivy modules withoutdefaultconfiguration. #2264 by @eed3si9n/@Duhemm - Updated JLine to version 2.13. #1681/#2173
- Changing the value of a constant (final-static-primitive) field will now correctly trigger incremental compilation for downstream classes. This is to account for the fact that Java compilers may inline constant fields in downstream classes. #1967/#2085 by @stuhood
- Fixes classfile location detection. #2214 by @stuhood
- Fixes a few typos in keys descriptions. #2092 by @pdalpra
- Avoids the use of
ListBuffer#readOnly. #2095 by @adriaanm - Expands transitive dependency exclusions when using sbt-maven-resolver-plugin #2109 by @jsuereth
- Fixes incremental compilation of traits by including private members into the API hash. #2155/#2160 by @Duhemm
- Fixes name hashing by removing class private members from the hash. #2324/#2325 by @gkossakowski
- Fixes name hashing error messages. #2158 by @stuhood
- Adds more robustness to
tasksandsettingscommand. #2192 by @DavidPerezIngeniero - Fixes Java compilation inconsistencies between sbt and
javacby always failing if the local Java compiler reported errors. #2228/#2271 by @Duhemm - Fixes
JavaErrorParserto parse non-compile-errors #2256/#2272 by @Duhemm - Fixes launcher configuration to add
sbt-ivy-snapshotsrepository to resolve nightly builds. @eed3si9n - Fixes performance issues during tree traversal in the incremental compiler. #2343 by @adriaanm
- Fixes the tracking of self types and F-bounded existential types in the incremental compiler. #2343 by @adriaanm
- Avoid CCE when scalac internally uses
compileLate. #2453 by @retronym - Fixes the memory-related options overriding
SBT_OPTS. sbt/sbt-launcher-package#101 by @eed3si9n
Configurable Scala compiler bridge
sbt 0.13.11 adds scalaCompilerBridgeSource setting to specify the compiler brigde source. This allows different implementation of the bridge for Scala versions, and also allows future versions of Scala compiler implementation to diverge. The source module will be retrieved using library management configured by bootIvyConfiguration task.
Dotty awareness
sbt 0.13.11 will assume that Dotty is used when scalaVersion starts with 0..
The built-in compiler bridge in sbt does not support Dotty,
but a separate compiler bridge is being developed at smarter/dotty-bridge and
an example project that uses it is available at smarter/dotty-example-project.
Inter-project dependency tracking
sbt 0.13.11 adds trackInternalDependencies and exportToInternal settings. These can be used to control whether to trigger compilation of a dependent subprojects when you call compile. Both keys will take one of three values: TrackLevel.NoTracking, TrackLevel.TrackIfMissing, and TrackLevel.TrackAlways. By default they are both set to TrackLevel.TrackAlways.
When trackInternalDependencies is set to TrackLevel.TrackIfMissing, sbt will no longer try to compile internal (inter-project) dependencies automatically, unless there are no *.class files (or JAR file when exportJars is true) in the output directory. When the setting is set to TrackLevel.NoTracking, the compilation of internal dependencies will be skipped. Note that the classpath will still be appended, and dependency graph will still show them as dependencies. The motivation is to save the I/O overhead of checking for the changes on a build with many subprojects during development. Here’s how to set all subprojects to TrackIfMissing.
lazy val root = (project in file(".")).
  aggregate(....).
  settings(
    inThisBuild(Seq(
      trackInternalDependencies := TrackLevel.TrackIfMissing,
      exportJars := true
    ))
  )
The exportToInternal setting allows the dependee subprojects to opt out of the internal tracking, which might be useful if you want to track most subprojects except for a few. The intersection of the trackInternalDependencies and exportToInternal settings will be used to determine the actual track level. Here’s an example to opt-out one project:
lazy val dontTrackMe = (project in file("dontTrackMe")).
  settings(
    exportToInternal := TrackLevel.NoTracking
  )
Def.settings
Using Def.settings it is now possible to nicely define settings as such:
val modelSettings = Def.settings(
  sharedSettings,
  libraryDependencies += foo
)
sbt 0.13.10
sbt 0.13.10 did not happen due a bug that was found after the artifact was published.
sbt 0.13.9
Fixes with compatibility implications
- Starting 0.13.9,
crossScalaVersionsdefault value is fixed back to the older 0.12.x behavior. See below for details. - Starting 0.13.9, the generated POM files no longer include dependencies on source or javadoc jars obtained via
withSources()orwithJavadoc(). See below for details. - Scala version is bumped to 2.10.5. This brings in the fix for SI-9027: XML node sequence literal bug. #1666/#2068 by @eed3si9n
Improvements
- Adds
retrieveManagedrelated improvements. See below for details. - Adds
-=and--=for settings and tasks, which are the opposites of+=and++=. #1922 by @dwijnand - Adds
inThisBuild, similar toinConfig, to allow specifying multiple settings inThisBuildscope. #1847/#1989 by @dwijnand - Adds a nicer toString to SimpleCommand to make it more human-friendly. #1998/#2000 by @dwijnand
- Adds
forceUpdatePeriodkey, that takes values ofOption[FiniteDuration]. If set, a fullupdatewill occur after that amount of time without needing to explicitly run theupdatetask. By @ajsquared - Updates
ForkError.getMessage()to include exception’s original name. #2028 by @kamilkloch - Adds help message for
inspect actual. #1651/#1990 by @dwijnand - Supports excluding tests in
testOnly/testQuickwith-, for example-MySpec. #1970 by @matthewfarwell - Adds more diagnostic info for underfined settings. #2008/#2009 by @DavidPerezIngeniero
- Adds an
Extracted.runInputTaskhelper to assist with imperatively executing input tasks. #2006 by @jroper - Renames
distinctmethod onPathFindertodistinctName. #1973 by @eed3si9n - Adds
distinctPathmethod onPathFinder. #1973 by @eed3si9n
Bug fixes
- Fixes memory/performance issue with cached resolution. See below.
- Correct incremental compile debug message for invalidated products #1961 by @jroper
- Enables forced GC by default. See below.
- Fixes Maven compatibility to read
maven-metadata.xml. See below. - Captures errors on
helpcommand. #1900/#1940 by @DavidPerezIngeniero - Prevents history command(s) from going into an infinite loop #1562 by @PanAeon
- Honors overwrite flag when publishing locally. #1960 by @asflierl
- Fixes a certain class of pom corruption that can occur in the presence of parent-poms. #1856 by @jsuereth
- Adds dependency-level exclusions in the POM for project-level exclusions. #1877/#2035 by @dwijnand
crossScalaVersions default value
As of this fix crossScalaVersions returns to the behaviour present in 0.12.4 whereby it defaults to what
scalaVersion is set to, for example if scalaVersion is set to "2.11.6", crossScalaVersions now defaults
to Seq("2.11.6").
Therefore when upgrading from any version between 0.13.0 and 0.13.8 be aware of this new default if
your build setup depended on it.
POM files no longer include certain source and javadoc jars
When declaring library dependencies using the withSources() or withJavadoc() options, sbt was also including in the pom file, as dependencies, the source or javadoc jars using the default Maven scope. Such dependencies might be erroneously processed as they were regular jars by automated tools
retrieveManaged related improvements
sbt 0.13.9 adds retrieveManagedSync key that, when set to true, enables synchronizing retrieved to the current build by removed unneeded files.
It also adds configurationsToRetrieve key, that takes values of Option[Set[Configuration]]. If set, when retrieveManaged is true only artifacts in the specified configurations will be retrieved to the current build.
#1950/#1987 by @ajsquared
Cached resolution fixes
On a larger dependency graph, the JSON file growing to be 100MB+ with 97% of taken up by caller information. To make the matter worse, these large JSON files were never cleaned up.
sbt 0.13.9 filters out artificial or duplicate callers,
which fixes OutOfMemoryException seen on some builds.
This generally shrinks the size of JSON, so it should make the IO operations faster.
Dynamic graphs will be rotated with directories named after yyyy-mm-dd,
and stale JSON files will be cleaned up after few days.
sbt 0.13.9 also fixes a correctness issue that was found in the earlier releases.
Under some circumstances, libraries that shouldn’t have been evicted was being evicted.
This occured when library A1 depended on B2, but a newer A2 dropped the dependency,
and A2 and B1 are also is in the graph. This is fixed by sorting the graph prior to eviction.
#2030/#1721/#2014/#2046/#2097 by @eed3si9n
Force GC
@cunei in #1223 discovered that sbt leaks PermGen
when it creates classloaders to call Scala Compilers.
sbt 0.13.9 will call GC on a set interval (default: 60s).
It will also call GC right before cross building.
This behavior can diabled using by setting false to forcegc
setting or sbt.task.forcegc flag.
Maven compatibility fix
To resolve dynamic versions such as SNAPSHOT and version ranges, the dependency resolution engine
queries for the list of available versions.
For Maven repositories, it was supposed read maven-metadata.xml first, but
because sbt customizes the repository layout for cross building, it has been falling back
to screen scraping of the Apache directory listing.
This problem surfaced as:
- Version range not working for artifacts hosted on Bintray. #2005
- Potentially other
SNAPSHOTrelated issues.
sbt 0.13.9 fixes this by relaxing the Maven compatiblity check, so it will read maven-metadata.xml. #2075 by @eed3si9n
sbt 0.13.8
Changes with compatibility implications
- Disable publishing on implicitly created root project by not enabling
IvyPluginby default (-Dsbt.root.ivyplugin=truewill revert this behavior). #1871/#1869 by @dwijnand - Rolls back XML parsing workaround. See below.
- Enables cross-version support for Scala sources. See below.
Improvements
- Adds Maven resolver plugin. See below.
- Adds project-level dependency exclusions. See below.
- Adds sequential tasks. See below.
- Discovered main classes will be sorted. #1180 by @kretes
- Implemented a new mechanism of forking javac, whereby errors are captured. Also more likely to run in-process. #1702 by @jsuereth
evictedwill display all evictions (including the ones not suspected of binary incompatibility). #1615 by @eed3si9n- Better abstration to track new kinds of dependencies for incremental compiler. #1340 by @Duhemm
- Source dependency uses
--depth 1for git clone. #1787 by @xuwei-k - Facilitate nicer ways of declaring project settings. See below. #1902 by @dwijnand
Fixes
- Javac warnings are treated as warnings. #1702/#875 by @jsuereth
compilerReporteris fed to javac during incremental compilation. #1542 by @jsuereth- Ignores hidden build files from the build. #1746 by @j-keck
- Fixes build.sbt parsing of multiple import. #1741 by @ajozwik
- Fixes ANSI escape code for overwriting lines on Windows. #1771 by @dwickern
- Adds null check in incremental compiler’s type tree extraction. #1754/#1655 by @Duhemm
- sbt doesn’t honor Maven’s uniqueVersions (use sbt-maven-resolver to fix). #1322 by @jsuereth
- sbt doesn’t see new SNAPSHOT dependency versions in local maven repos (use withLatestSnapshots + sbt-maven-resolver to fix) #321 by @jsuereth
- Property in pom’s version field results to wrong dependency resolution (use sbt-maven-resolver to fix). #647 by @jsuereth
- Maven local resolver with parent POM (use sbt-maven-resolver). #1616 by @jsuereth
- Fixes eviction warning being too noisy. #1615 by @eed3si9n
- Issues warning if multiple dependencies to a same library is found with different version. #1634 by @eed3si9n
- Removes “No main class detected” warning. #1766 by @eed3si9n
- Fixes sporadic ConcurrentModificationException from JUnitXmlTestsListener. #1881 by @aerskine
- Fixes handling of ANSI CSI codes. #1885 by @jsuereth
- Exempt org.scala-lang:scala-actors-migration and org.scala-lang:scala-pickling from scala binary version checks. #1818/#1899 by @dwijnand
- Fixes cached resolution handling of internal depdendencies. #1711 by @eed3si9n
- Fixes cached resolution being too verbose. #1752 by @eed3si9n
- Fixes cached resolution not evicting modules transitively. #1760 by @eed3si9n
Rolling back XML parsing workaround
sbt 0.13.7 implemented natural whitespace handling by switching build.sbt parsing to use Scala compiler, instead of blank line delimiting. We realized that some build definitions no longer parsed due to the difference in XML handling.
val a = <x/><y/>
val b = 0
At the time, we thought adding parentheses around XML nodes could work around this behavior. However, the workaround has caused more issues, and since then we have realized that this is a compiler issue SI-9027, so we have decided to roll back our workaround. In the meantime, if you have consecutive XML elements in your build.sbt, enclose them in <xml:group> tag, or parentheses.
val a = <xml:group><x/><y/></xml:group>
val b = 0
Cross-version support for Scala sources
When crossPaths setting is set to true (it is true by default), sbt 0.13.8 will include
src/main/scala-<scalaBinaryVersion>/ to the Compile compilation in addition to
src/main/scala. For example, it will include src/main/scala-2.11/ for Scala 2.11.5, and
src/main/scala-2.9.3 for Scala 2.9.3. #1799 by @indrajitr
Maven resolver plugin
sbt 0.13.8 adds an extension point in the dependency resolution to customize Maven resolvers. This allows us to write sbt-maven-resolver auto plugin, which internally uses Eclipse Aether to resolve Maven dependencies instead of Apache Ivy.
To enable this plugin, add the following to project/maven.sbt (or project/plugin.sbt the file name doesn’t matter):
addMavenResolverPlugin
This will create a new ~/.ivy2/maven-cache directory, which contains the Aether cache of files.
You may notice some file will be re-downloaded for the new cache layout.
Additionally, sbt will now be able to fully construct
maven-metadata.xml files when publishing to remote repositories or when publishing to the local ~/.m2/repository.
This should help erase many of the deficiencies encountered when using Maven and sbt together.
Notes and known limitations:
- sbt-maven-resolver requires sbt 0.13.8 and above.
- The current implementation does not support Ivy-style dynamic revisions, such as “2.10.+” or “latest.snapshot”. This is a fixable situation, but the version range query and Ivy -> Maven version range translation code has not been migrated.
- The current implementation does not support Maven-style range revisions if found on transitive dependencies. #1921
Project-level dependency exclusions
sbt 0.13.8 adds experimental project-level dependency exclusions:
excludeDependencies += "org.apache.logging.log4j"
excludeDependencies += "com.example" %% "foo"
In the first example, all artifacts from the organization "org.apache.logging.log4j" are excluded from the managed dependency.
In the second example, artifacts with the organization "com.example" and the name "foo" cross versioned to the current scalaVersion are excluded.
Note: This feature currently does not translate to pom.xml!
Sequential tasks
sbt 0.13.8 adds a new Def.sequential function to run tasks under semi-sequential semantics.
Here’s an example usage:
lazy val root = project.
  settings(
    testFile := target.value / "test.txt",
    sideEffect0 := {
      val t = testFile.value
      IO.append(t, "0")
      t
    },
    sideEffect1 := {
      val t = testFile.value
      IO.append(t, "1")
      t
    },
    foo := Def.sequential(compile in Compile, sideEffect0, sideEffect1, test in Test).value
  )
Normally sbt’s task engine will reorder tasks based on the dependencies among the tasks,
and run as many tasks in parallel (See Custom settings and tasks for more details on this).
Def.sequential instead tries to run the tasks in the specified order.
However, the task engine will still deduplicate tasks. For instance, when foo is executed, it will only compile once,
even though test in Test depends on compile. #1817/#1001 by @eed3si9n
Nicer ways of declaring project settings
Now a Seq[Setting[_]] can be passed to Project.settings without the needs for “varargs expansion”, ie. : _*
Instead of:
lazy val foo = project settings (sharedSettings: _*)
It is now possible to do:
lazy val foo = project settings sharedSettings
Also, Seq[Setting[_]] can be declared at the same level as individual settings in Project.settings, for instance:
lazy val foo = project settings (
  sharedSettings,
  version := "1.0",
  someMoreSettings
)
Bytecode Enhancers
sbt 0.13.8 adds an extension point whereby users can effectively manipulate java bytecode (.class files) before the incremental compiler attempts to cache the classfile hashes. This allows libraries like ebean to function with sbt without corrupting the compiler cache and rerunning compile every few seconds.
This splits the compile task into several subTasks:
previousCompile: This task returns the previously persistedAnalysisobject for this project.compileIncremental: This is the core logic of compiling Scala/Java files together. This task actually does the work of compiling a project incrementally, including ensuring a minimum number of source files are compiled. After this method, all .class files that would be generated by scalac + javac will be available.manipulateByteCode: This is a stub task which takes thecompileIncrementalresult and returns it. Plugins which need to manipulate bytecode are expected to override this task with their own implementation, ensuring to call the previous behavior.compile: This task depends onmanipulateBytecodeand then persists theAnalysisobject containing all incremental compiler information.
Here’s an example of how to hook the new manipulateBytecode key in your own plugin:
manipulateBytecode in Compile := {
  val previous = (manipulateBytecode in Compile).value
  doManipulateBytecode(previous)  // Note: This must return a new Compiler.CompileResult with our changes.
}
See #1714 for the full details of the implementation.
sbt 0.13.7
Fixes with compatibility implications
- Maven artifact dependencies will limit their transitive dependencies to
Compilerather than every configuration if nomasterconfiguration is found. #1586 by @jsuereth - The new natural whitspace handling parser is unable to cope with certain classes of Scala syntax. In particular, top-level pattern matches, or multi-value defintions are no longer supported.
Here are examples:
val x, y = project // BAD
val x = project    //
val y = project    //  GOOD
Improvements
- Natural whitespace handling. See below. #1606 by @rkrzewski, @ajozwik, and others at @WarsawScala
- Adds support for publishing to a custom Maven local repository. See below. #1589/#1600 by @topping
- Adds circular dependency check. See below. #1601 by @eed3si9n
- Adds cached resolution (minigraph caching). See below. #1631 by @eed3si9n
- Allows the ”-bin” Scala version suffix to specify a bincompat version. #1573 by @cunei
- Adds support for publishing to file repositories specified in
~/.sbt/repositories. #1579 by @copumpkin - Adds support for publishing to a Maven repository with
fileURLs. #1618 by @jsuereth - Don’t hardcode existing relations in
TextAnalysisFormat. #1572 by @Duhemm - Adds
developerskey. #1590 by @jedesah - Will warn when none or multiple main classes detected. #1648 by @kretes
Bug fixes
- Fixes issues with specifying
scalaHome/scalaInstanceand running tests. #1584 by @jsuereth - Fixes StackOverflow error in dependencies extraction with macro and name hashing. #1563/#1642/#1237/#1544 by @Duhemm
- Fixes
set every. #1591/#1430 by @cunei - Ivy no longer silently flops to
HttpClientresolver when httpclient is on the classpath. #1602 by @jsuereth - Backports Ivy fix to not throw exceptions when modules are evicted. #1607/#1598 by @jsuereth
- When resolving from a Maven repository, and unable to read
maven-metadata.xmlfile (common given the divergence in Maven 3 and Ivy 2), we attempt to useLastModifiedtimestamp in lieu of “published” timestamp. #1611/#1618 by @jsuereth - Fixes NullPointerException when using
ChainResolverand Maven repositories. #1611/#1618 by @jsuereth - Fixes
Resolver’surlmethod droppingdescriptorOptionalandskipConsistencyCheck. #1621 by @tmandke - Revert
useLatestSnapshotonupdateOptionsto default tofalse. Reverts chain resolver to previous behavior. #1683 by @jsuereth
Natural whitespace handling
Starting sbt 0.13.7, build.sbt will be parsed using a customized Scala parser. This eliminates the requirement to use blank line as the delimiter between each settings, and also allows blank lines to be inserted at arbitrary position within a block.
This feature can be disabled, if necessary, via the -Dsbt.parser.simple=true flag.
This feature was contributed by Andrzej Jozwik (@ajozwik), Rafał Krzewski (@rkrzewski) and others at @WarsawScala inspired by Typesafe’s @gkossakowski organizing multiple meetups and hackathons on how to patch sbt with the focus on this blank line issue. Dziękujemy! #1606
Custom Maven local repository location
Maven local repository is now resolved from the first of:
<localRepository/>element in~/.m2/settings.xml<localRepository/>element in$M2_HOME/conf/settings.xml, or- the default of
~/.m2/repositoryif neither of those configuration elements exist
If more Maven settings are required to be recovered, the proper thing to do is merge the two possible settings.xml files, then query against the element path of the merge. This code avoids the merge by checking sequentially.
Circular dependency
By default circular dependencies are warned, but they do not halt the dependency resolution. Using the following setting, circular dependencies can be treated as an error.
updateOptions := updateOptions.value.withCircularDependencyLevel(CircularDependencyLevel.Error)
Cached resolution (minigraph caching)
sbt 0.13.7 adds a new experimental update option called cached resolution, which replaces consolidated resolution:
updateOptions := updateOptions.value.withCachedResolution(true)
Unlike consolidated resolution, which only consolidated subprojects with identical dependency graph, cached resolution create an artificial graph for each direct dependency (minigraph) for all subprojects, resolves them independently, saves them into json file, and stiches the minigraphs together.
Once the minigraphs are resolved and saved as files, dependency resolution turns into a matter of loading json file from the second run onwards, which should complete in a matter of seconds even for large projects. Also, because the files are saved under a global ~/.sbt/0.13/dependency (or what’s specified by sbt.dependency.base flag), the resolution result is shared across all builds.
Breaking graphs into minigraphs allows partial resolution results to be shared, which scales better for subprojects with similar but slightly different dependencies, and also for making small changes to the dependencies graph over time. See documentation on cached resolution for more details.
sbt 0.13.6
Fixes with compatibility implications
- Maven Central Repository, Java.net Maven 2 Repository, Typesafe Repository, and sbt Plugin repository now defaults to HTTPS. (See below)
ThisProjectused to resolve to the root project in a build even when it’s place insubproj/build.sbt. sbt 0.13.6 fixes it to resolve to the sub project. #1194/#1358 by @dansanduleac- Global plugins classpath used to be injected into every build. This will no longer be the case. #1347/#1352 by @dansanduleac
- Fixes
newercommand in scripted. #1419 by @jroper - Name hashing is enabled by default.
inc.Analysis.emptyalso defaults to the one compatible with name hashing. #1546 by @gkossakowski
Improvements
- Derived settings can replace previously-defined but non-default settings. #1036 by @dansanduleac
- Sorts setting key names in the inspect tree view. #1313 by @2m
- Uses separate update caches when cross compiling scala. #1330 by @pvlugter
- Ensures sequences in analysis files are read in order. #1346 by @benjyw
- Enables tab completion for scripted task. #1383 by @xuwei-k
- Allows project reference to to a branch of a local git repository. #1409 by @vn971
- Triggered Execution is now aware of rename or move of files. #1401 by @xuwei-k
- No longer updates classifiers of
projectDependencies. #1366/#1367 by @dansanduleac - Selects the first test fingerprint for a test name for forked tests. #1450 by @pvlugter
- Allows default auto plugins to be disabled. #1451 by @jsuereth
- Allows keys defined inside
build.sbtto be used from sbt shell. #1059/#1456 - Updates internal Ivy instance to cache the results of dependency exclusion rules. #1476 by @eed3si9n
- Adds
Resolver.jcenterRepoandResolver.bintrayRepo(owner, repo)to add Bintray easier. #1405 by @evgeny-goldin - AutoPlugins with no requirements enabled by allRequirements can now be disable dby the user. #1516 by @jsuereth
Bug fixes
- Allows auto-generated projects to have overridden organization. #1315/#1378 by @jsuereth
- Fixes auto plugins declared without package object. #1423 by @lpiepiora
- Fixes
plugincommand. #1416/#1426 by @lpiepiora - Adds
scala-jarto the list of jar artifacts recognized by CustomPomParser. #1400 by @dpratt - Fixes cross versioning to recognize version number with mutiple -tags. #1433 by @henrikengstrom
- Works around “Not a simple type” breaking
-Xfatal-warnings. #1477 by @puffnfresh - Fixes sLog usage in tandem with the
setcomamnd #1486 @jsuereth - Test suites with whitespace will have prettier filenames #1487 @jsuereth
- sbt no longer crashes when run in root directory #1488 by @jsuereth
- set no longer removes any
++scala version setting. #856/#1489 by @jsuereth - Fixes
Scope.parseScopedKey. #1384 by @eed3si9n - Fixes
build.sbterrors causingArrayIndexOutOfBoundsExceptiondue to invalid source in position. #1181 by @eed3si9n - Fixes
http.proxyPasswordshowing up in launcher’s update.log. #670 by @eed3si9n - Fixes config-classes leak in loading build files. #1524 by @jsuereth
- Fixes name-conflicts in hashed settings class files. #1465 by @jsuereth
- Fixes the pom conversion of dynamic revisions like
1.1+. #1275 by @eed3si9n - Fixes
NullPointerErrorin tab completion byFileExamples. #1530 by @eed3si9n - Fixes metabuild downloading unused Scala 2.10.2. #1439 by @eed3si9n
HTTPS related changes
Thanks to Sonatype, HTTPS access to Maven Central Repository is available to public. This is now enabled by default, but if HTTP is required for some reason the following system properties can be used:
-Dsbt.repository.secure=false
Java.net Maven 2 repository, Typesafe repository, and sbt Plugin repository also defaults to HTTPS.
#1494 by @rtyley, #1536 by @benmccann, and #1541 by @eed3si9n.
enablePlugins/disablePlugins
sbt 0.13.6 now allows enablePlugins and disablePlugins to be written directly in build.sbt. #1213/#1312 by @jsuereth
Unresolved dependencies error
sbt 0.13.6 will try to reconstruct dependencies tree when it fails to resolve a managed dependency. This is an approximation, but it should help you figure out where the problematic dependency is coming from. When possible sbt will display the source position next to the modules:
[warn]  ::::::::::::::::::::::::::::::::::::::::::::::
[warn]  ::          UNRESOLVED DEPENDENCIES         ::
[warn]  ::::::::::::::::::::::::::::::::::::::::::::::
[warn]  :: foundrylogic.vpp#vpp;2.2.1: not found
[warn]  ::::::::::::::::::::::::::::::::::::::::::::::
[warn]
[warn]  Note: Unresolved dependencies path:
[warn]      foundrylogic.vpp:vpp:2.2.1
[warn]        +- org.apache.cayenne:cayenne-tools:3.0.2
[warn]        +- org.apache.cayenne.plugins:maven-cayenne-plugin:3.0.2 (/foo/some-test/build.sbt#L28)
[warn]        +- d:d_2.10:0.1-SNAPSHOT
Eviction warnings
sbt 0.13.6 displays eviction warnings when it resolves your project’s managed dependencies via update task.
Currently the eviction warnings are categorized into three layers: scalaVersion eviction, direct evictions, and transitive evictions.
By default eviction warning on update task will display only scalaVersion evictin and direct evictions.
scalaVersion eviction warns you when scalaVersion is no longer effecitive. This happens when one of your dependency depends on a newer release of scala-library than your scalaVersion.
Direct evctions are evictions related to your direct dependencies. Warnings are displayed only when API incompatibility is suspected. For Java libraries, Semantic Versioning is used for guessing, and for Scala libraries Second Segment versioning (second segment bump makes API incompatible) is used.
To display all eviction warnings with caller information, run evicted task.
[warn] There may be incompatibilities among your library dependencies.
[warn] Here are some of the libraries that were evicted:
[warn]     * com.typesafe.akka:akka-actor_2.10:2.1.4 -> 2.3.4 (caller: com.typesafe.akka:akka-remote_2.10:2.3.4,
org.w3:banana-sesame_2.10:0.4, org.w3:banana-rdf_2.10:0.4)
Latest SNAPSHOTs
sbt 0.13.6 adds a new setting key called updateOptions for customizing the details of managed dependency resolution with update task. One of its flags is called lastestSnapshots, which controls the behavior of the chained resolver. Up until 0.13.6, sbt was picking the first -SNAPSHOT revision it found along the chain. When latestSnapshots is enabled (default: true), it will look into all resolvers on the chain, and compare them using the publish date.
The tradeoff is probably a longer resolution time if you have many remote repositories on the build or you live away from the severs. So here’s how to disable it:
updateOptions := updateOptions.value.withLatestSnapshots(false)
Consolidated resolution
updateOptions can also be used to enable consolidated resolution for update task.
updateOptions := updateOptions.value.withConsolidatedResolution(true)
This feature is specifically targeted to address Ivy resolution is beging slow for multi-module projects #413. Consolidated resolution aims to fix this issue by artificially constructing an Ivy dependency graph for the unique managed dependencies. If two subprojects introduce identical external dependencies, both subprojects should consolidate to the same graph, and therefore resolve immediately for the second update. #1454 by @eed3si9n
sbt 0.13.5
sbt 0.13.5 is a technology preview of what’s to come to sbt 1.0 with enhancements like auto plugins and the necessary APIs changes and launcher for “sbt as a server.”, defined in the sbt-remote-control project.
- The Scala version for sbt and sbt plugins is now 2.10.4. This is a compatible version bump.
- Added a new setting testResultLogger to allow customisation of logging of test results. (#1225)
- When test is run and there are no tests available, omit logging output. Especially useful for aggregate modules. test-only et al unaffected. (#1185)
- sbt now uses minor-patch version of ivy 2.3 (org.scala-sbt.ivy:ivy:2.3.0-sbt-
) sbt.Plugindeprecated in favor ofsbt.AutoPlugin- name-hashing incremental compiler now supports scala macros.
testResultLoggeris now configured.- sbt-server hooks for task cancellation.
- Add
JUnitXmlReportPluginwhich generates junit-xml-reports for all tests. - Optionally enable forced garbage collection after tasks (
-Dsbt.task.forcegc=true).
sbt 0.13.0 - 0.13.2
sbt 0.13.2
- Adding new name-hashing feature to incremental compiler. Alters how scala dependencies are tracked, reducing number of recompiles necessary.
- Added the ability to launch servers via the sbt-launcher.
- Added
.previousfeature on tasks which can load the pervious value. - Added
allcommand which can run more than tasks in parallel. - Exposed the ‘overwrite’ flags from ivy. Added warning if overwriting a release version.
- Improve the error message when credentials are not found in Ivy.
- Improve task macros to handle more scala constructs.
- Fix
lastandexporttasks to read from the correct stream. - Fix issue where ivy’s
.+dependency ranges were not correctly translated to maven. - Override security manager to ignore file permissions (performance issue)
- 2.11 compatibility fixes
- Launcher can now handle ivy’s
.+revisions. SessionSettingsnow correctly overwrite existing settings.- Adding a simple
Logicsystem for inclusionary/dependency logic of plugins. - Improve build hooks for
LoggerReporterandTaskProgress. - Serialize incremental compiler analysis into text-file format.
- Issue a warning when generating Paths and separate already exists in the path.
- Migrate to Ivy 2.3.0-final.
- Docs: Use bintray as default repository host
- Docs: improved docs on test groups.
- Docs: updated documentation on the Launcher.
- Docs: started architecture document.
sbt 0.13.1
- The Scala version for sbt and sbt plugins is now 2.10.3. This is a compatible version bump.
- New method
toTaskonInitialize[InputTask[T]]to apply the full input and get a plain task out. - Improved performance of inspect tree
- Work around various issues with Maven local repositories, including resolving -SNAPSHOTs from them. (#321)
- Better representation of no cross-version suffix in suffix conflict error message: now shows
<none>instead of just_ TrapExitsupport for multiple, concurrent managed applications. Now enabled by default for allrun-like tasks. (#831)- Add minimal support for class file formats 51.0, 52.0 in incremental compiler. (#842)
- Allow main class to be non-public. (#883)
- Convert
-classpathtoCLASSPATHwhen forking on Windows and length exceeds a heuristic maximum. (#755) scalacOptionsfor.scalabuild definitions are now also used for.sbtfileserror,warn,info,debugcommands to set log level and--error, … to set the level before the project is loaded. (#806)sLogsettings that provides aLoggerfor use by settings. (#806)- Early commands: any command prefixed with
--gets moved before other commands on startup and doesn’t force sbt into batch mode. - Deprecate internal
-,--, and---commands in favor ofonFailure,sbtClearOnFailure, andresumeFromFailure. makePomno longer generates<type>elements for standard classifiers. (#728)- Fix many instances of the Turkish i bug.
- Read https+ftp proxy environment variables into system properties where Java will use them. (#886)
- The
Processmethods that are redirection-like no longer discard the exit code of the input. This addresses an inconsistency withFork, where using theCustomOutput OutputStrategymakes the exit code always zero. - Recover from failed
reloadcommand in the scripted sbt handler. - Parse external
pom.xmlwithCustomPomParserto handle multiple definitions. (#758) - Improve key collision error message (#877)
- Display the source position of an undefined setting.
- Respect the
-nowarnoption when compiling Scala sources. - Improve forked test debugging by listing tests run by sbt in debug output. (#868)
- Fix scaladoc cache to track changes to
-doc-root-content(#837) - Incremental compiler: Internal refactoring in preparation for name-hashing (#936)
- Incremental compiler: improved cache loading/saving speed by internal file names (#931)
- Docs: many contributed miscellaneous fixes and additions
- Docs: link to page source now at the bottom of the page
- Docs: sitemap now automatically generated
- Docs: custom
:key:role enables links from a key name in the docs to the val insxr/sbt/Keys.scala - Docs: restore sxr support and fix links to sxr’d sources. (#863)
sbt 0.13.0
Features, fixes, changes with compatibility implications
- Moved to Scala 2.10 for sbt and build definitions.
- Support for plugin configuration in
project/plugins/has been removed. It was deprecated since 0.11.2. - Dropped support for tab completing the right side of a setting for
the
setcommand. The new task macros make this tab completion obsolete. - The convention for keys is now camelCase only. Details below.
- Fixed the default classifier for tests to be
testsfor proper Maven compatibility. - The global settings and plugins directories are now versioned.
Global settings go in
~/.sbt/0.13/and global plugins in~/.sbt/0.13/plugins/by default. Explicit overrides, such as via thesbt.global.basesystem property, are still respected. (gh-735) - sbt no longer canonicalizes files passed to scalac. (gh-723)
- sbt now enforces that each project must have a unique
targetdirectory. - sbt no longer overrides the Scala version in dependencies. This
allows independent configurations to depend on different Scala
versions and treats Scala dependencies other than scala-library as
normal dependencies. However, it can result in resolved versions
other than
scalaVersionfor those other Scala libraries. - JLine is now configured differently for Cygwin. See Installing sbt.
- Jline and Ansi codes work better on Windows now. CI servers might
have to explictly disable Ansi codes via
-Dsbt.log.format=false. - JLine now tries to respect
~/.inputrc. - Forked tests and runs now use the project’s base directory as the current working directory.
compileInputsis now defined in(Compile,compile)instead of justCompile- The result of running tests is now Tests.Output.
Features
- Use the repositories in boot.properties as the default project
resolvers. Add
bootOnlyto a repository in boot.properties to specify that it should not be used by projects by default. (Josh S., gh-608) - Support vals and defs in .sbt files. Details below.
- Support defining Projects in .sbt files: vals of type Project are added to the Build. Details below.
- New syntax for settings, tasks, and input tasks. Details below.
Automatically link to external API scaladocs of dependencies by setting
autoAPIMappings := true. This requires at least Scala- 10.1 and for dependencies to define
apiURLfor their scaladoc location. Mappings may be manually added to theapiMappingstask as well.
- 10.1 and for dependencies to define
- Support setting Scala home directory temporary using the switch
command:
++ scala-version=/path/to/scala/home. The scala-version part is optional, but is used as the version for any managed dependencies. - Add
publishM2task for publishing to~/.m2/repository. (gh-485) - Use a default root project aggregating all projects if no root is defined. (gh-697)
- New API for getting tasks and settings from multiple projects and configurations. See the new section getting values from multiple scopes.
- Enhanced test interface for better support of test framework features. (Details pending.)
exportcommand- For tasks, prints the contents of the ‘export’ stream. By convention, this should be the equivalent command line(s) representation. compile, doc, and console show the approximate command lines for their execution. Classpath tasks print the classpath string suitable for passing as an option.
- For settings, directly prints the value of a setting instead of going through the logger
Fixes
- sbt no longer tries to warn on dependency conflicts. Configure a conflict manager instead. (gh-709)
- Run test Cleanup and Setup when forking. The test ClassLoader is not available because it is in another jvm.
Improvements
- Run the API extraction phase after the compiler’s
picklerphase instead oftyperto allow compiler plugins aftertyper. (Adriaan M., gh-609) - Record defining source position of settings.
inspectshows the definition location of all settings contributing to a defined value. - Allow the root project to be specified explicitly in
Build.rootProject. - Tasks that need a directory for storing cache information can now
use the
cacheDirectorymethod onstreams. This supersedes thecacheDirectorysetting. - The environment variables used when forking
runandtestmay be set viaenvVars, which is aTask[Map[String,String]]. (gh-665) - Restore class files after an unsuccessful compilation. This is useful when an error occurs in a later incremental step that requires a fix in the originally changed files.
- Better auto-generated IDs for default projects. (gh-554)
- Fork run directly with ‘java’ to avoid additional class loader from ‘scala’ command. (gh-702)
- Make autoCompilerPlugins support compiler plugins defined in a
internal dependency (only if
exportJars := truedue to scalac limitations) - Track ancestors of non-private templates and use this information to require fewer, smaller intermediate incremental compilation steps.
autoCompilerPluginsnow supports compiler plugins defined in a internal dependency. The plugin project must defineexportJars := true. Depend on the plugin with...dependsOn(... % Configurations.CompilerPlugin).- Add utilities for debugging API representation extracted by the incremental compiler. (Grzegorz K., gh-677, gh-793)
consoleProjectunifies the syntax for getting the value of a setting and executing a task. See Console Project.
Other
- The source layout for the sbt project itself follows the package name to accommodate to Eclipse users. (Grzegorz K., gh-613)
Details of major changes
camelCase Key names
The convention for key names is now camelCase only instead of camelCase for Scala identifiers and hyphenated, lower-case on the command line. camelCase is accepted for existing hyphenated key names and the hyphenated form will still be accepted on the command line for those existing tasks and settings declared with hyphenated names. Only camelCase will be shown for tab completion, however.
New key definition methods
There are new methods that help avoid duplicating key names by declaring keys as:
val myTask = taskKey[Int]("A (required) description of myTask.")
The name will be picked up from the val identifier by the implementation
of the taskKey macro so there is no reflection needed or runtime
overhead. Note that a description is mandatory and the method taskKey
begins with a lowercase t. Similar methods exist for keys for settings
and input tasks: settingKey and inputKey.
New task/setting syntax
First, the old syntax is still supported with the intention of allowing conversion to the new syntax at your leisure. There may be some incompatibilities and some may be unavoidable, but please report any issues you have with an existing build.
The new syntax is implemented by making :=, +=, and ++= macros and
making these the only required assignment methods. To refer to the value
of other settings or tasks, use the value method on settings and
tasks. This method is a stub that is removed at compile time by the
macro, which will translate the implementation of the task/setting to
the old syntax.
For example, the following declares a dependency on scala-reflect
using the value of the scalaVersion setting:
libraryDependencies += "org.scala-lang" % "scala-reflect" % scalaVersion.value
The value method is only allowed within a call to :=, +=, or
++=. To construct a setting or task outside of these methods, use
Def.task or Def.setting. For example,
val reflectDep = Def.setting { "org.scala-lang" % "scala-reflect" % scalaVersion.value }

libraryDependencies += reflectDep.value
A similar method parsed is defined on Parser[T],
Initialize[Parser[T]] (a setting that provides a parser), and
Initialize[State => Parser[T]] (a setting that uses the current
State to provide a Parser[T]. This method can be used when defining
an input task to get the result of user input.
myInputTask := {
     // Define the parser, which is the standard space-delimited arguments parser.
   val args = Def.spaceDelimited("<args>").parsed
     // Demonstrates using a setting value and a task result:
   println("Project name: " + name.value)
   println("Classpath: " + (fullClasspath in Compile).value.map(_.file))
   println("Arguments:")
   for(arg <- args) println("  " + arg)
}
For details, see Input Tasks.
To expect a task to fail and get the failing exception, use the
failure method instead of value. This provides an Incomplete
value, which wraps the exception. To get the result of a task whether or
not it succeeds, use result, which provides a Result[T].
Dynamic settings and tasks (flatMap) have been cleaned up. Use the
Def.taskDyn and Def.settingDyn methods to define them (better name
suggestions welcome). These methods expect the result to be a task and
setting, respectively.
.sbt format enhancements
vals and defs are now allowed in .sbt files. They must follow the same rules as settings concerning blank lines, although multiple definitions may be grouped together. For example,
val n = "widgets"
val o = "org.example"

name := n

organization := o
All definitions are compiled before settings, but it will probably be
best practice to put definitions together. Currently, the visibility of
definitions is restricted to the .sbt file it is defined in. They are
not visible in consoleProject or the set command at this time,
either. Use Scala files in project/ for visibility in all .sbt files.
vals of type Project are added to the Build so that multi-project
builds can be defined entirely in .sbt files now. For example,
lazy val a = Project("a", file("a")).dependsOn(b)

lazy val b = Project("b", file("sub")).settings(
   version := "1.0"
)
Currently, it only makes sense to defines these in the root project’s .sbt files.
A shorthand for defining Projects is provided by a new macro called
project. This requires the constructed Project to be directly assigned
to a val. The name of this val is used for the project ID and base
directory. The base directory can be changed with the in method. The
previous example can also be written as:
lazy val a = project.dependsOn(b)

lazy val b = project in file("sub") settings(
  version := "1.0"
)
This macro is also available for use in Scala files.
Control over automatically added settings
sbt loads settings from a few places in addition to the settings
explicitly defined by the Project.settings field. These include
plugins, global settings, and .sbt files. The new Project.autoSettings
method configures these sources: whether to include them for the project
and in what order.
Project.autoSettings accepts a sequence of values of type
AddSettings. Instances of AddSettings are constructed from methods
in the AddSettings companion object. The configurable settings are
per-user settings (from ~/.sbt, for example), settings from .sbt files,
and plugin settings (project-level only). The order in which these
instances are provided to autoSettings determines the order in which
they are appended to the settings explicitly provided in
Project.settings.
For .sbt files, AddSettings.defaultSbtFiles adds the settings from all
.sbt files in the project’s base directory as usual. The alternative
method AddSettings.sbtFiles accepts a sequence of Files that will be
loaded according to the standard .sbt format. Relative files are
resolved against the project’s base directory.
Plugin settings may be included on a per-Plugin basis by using the
AddSettings.plugins method and passing a Plugin => Boolean. The
settings controlled here are only the automatic per-project settings.
Per-build and global settings will always be included. Settings that
plugins require to be manually added still need to be added manually.
For example,
import AddSettings._

lazy val root = Project("root", file(".")) autoSettings(
   userSettings, allPlugins, sbtFiles(file("explicit/a.txt"))
)

lazy val sub = Project("sub", file("Sub")) autoSettings(
   defaultSbtFiles, plugins(includePlugin)
)

def includePlugin(p: Plugin): Boolean =
   p.getClass.getName.startsWith("org.example.")
Resolving Scala dependencies
Scala dependencies (like scala-library and scala-compiler) are now
resolved via the normal update task. This means:
- Scala jars won’t be copied to the boot directory, except for those needed to run sbt.
- Scala SNAPSHOTs behave like normal SNAPSHOTs. In particular, running update will properly re-resolve the dynamic revision.
- Scala jars are resolved using the same repositories and configuration as other dependencies.
- Scala dependencies are not resolved via update when scalaHome is set, but are instead obtained from the configured directory.
- The Scala version for sbt will still be resolved via the repositories configured for the launcher.
sbt still needs access to the compiler and its dependencies in order to
run compile, console, and other Scala-based tasks. So, the Scala
compiler jar and dependencies (like scala-reflect.jar and
scala-library.jar) are defined and resolved in the scala-tool
configuration (unless scalaHome is defined). By default, this
configuration and the dependencies in it are automatically added by sbt.
This occurs even when dependencies are configured in a pom.xml or
ivy.xml and so it means that the version of Scala defined for your
project must be resolvable by the resolvers configured for your project.
If you need to manually configure where sbt gets the Scala compiler and library used for compilation, the REPL, and other Scala tasks, do one of the following:
- Set scalaHome to use the existing Scala jars in a specific directory. If autoScalaLibrary is true, the library jar found here will be added to the (unmanaged) classpath.
- Set managedScalaInstance := false and explicitly define scalaInstance, which is of type ScalaInstance. This defines the compiler, library, and other jars comprising Scala. If autoScalaLibrary is true, the library jar from the defined ScalaInstance will be added to the (unmanaged) classpath.
The Configuring Scala page provides full details.
sbt 0.12.4
- Work around URI problems with encoding and resolving. (gh-725)
- Allow -cp argument to
applycommand to be quoted. (gh-724) - Make
sbtBinaryVersionuse the new approach for 0.13 and later to support cross-building plugins. - Pull
sbtDependencyversion fromsbtVersionto facilitate cross-building plugins. - Proper support for stashing on-failure handlers. (gh-732)
- Include files with zip extension in unmanaged jars. (gh-750)
- Only add automatically detected plugins to options once. (gh-757)
- Properly handle failure in a multi-command that includes
reload. (gh-732) - Fix unsynchronized caching of Scala class loaders that could result in Scala classes being loaded in multiple class loaders.
- Incremental compiler: remove resident compiler code (wasn’t used and was a compatibility liability)
- Incremental compiler: properly track
abstract overridemodifier. (gh-726) - Incremental compiler: do not normalize types in the api extraction phase. (gh-736)
- Ivy cache: account for
localOnlywhen cache subclass overridesisChanging - Ivy cache: fix corruption when developing sbt or sbt plugins. (gh-768)
- Ivy cache: invalidate when artifact download fails to avoid locking into bad resolver. (gh-760)
- Ivy cache: use publication date from metadata instead of original file’s last modified time when deleting out of date artifacts. (gh-764)
sbt 0.12.3
- Allow
cleanKeepFilesto contain directories - Disable Ivy debug-level logging for performance. (gh-635)
- Invalidate artifacts not recorded in the original metadata when a module marked as changing changes. (gh-637, gh-641)
- Ivy Artifact needs wildcard configuration added if no explicit ones are defined. (gh-439)
- Right precedence of sbt.boot.properties lookup, handle qualifier correctly. (gh-651)
- Mark the tests failed exception as having already provided feedback.
- Handle exceptions not caught by the test framework when forking. (gh-653)
- Support
reload pluginsafter ignoring a failure to load a project. - Workaround for os deadlock detection at the process level. (gh-650)
- Fix for dependency on class file corresponding to a package. (Grzegorz K., gh-620)
- Fix incremental compilation problem with package objects inheriting from invalidated sources in a subpackage.
- Use Ivy’s default name for the resolution report so that links to other configurations work.
- Include jars from java.ext.dirs in incremental classpath. (gh-678)
- Multi-line prompt text offset issue (Jibbers42, gh-625)
- Added
xml:space="preserve"attribute to extraDependencyAttributes XML Block for publishing poms for plugins dependent on other plugins (Brendan M., gh-645) - Tag the actual test task and not a later task. (gh-692)
- Make exclude-classifiers per-user instead of per-build. (gh-634)
- Load global plugins in their own class loader and replace the base loader with that. (gh-272)
- Demote the default conflict warnings to the debug level. These will be removed completely in 0.13. (gh-709)
- Fix Ivy cache issues when multiple resolvers are involved. (gh-704)
sbt 0.12.2
- Support -Yrangepos. (Lex S., gh-607)
- Only make one call to test frameworks per test name. (gh-520)
- Add
-cpoption to theapplymethod to make adding commands from an external program easier. - Stable representation of refinement typerefs. This fixes unnecessary recompilations in some cases. (Adriaan M., gh-610)
- Disable aggregation for
run-main. (gh-606) - Concurrent restrictions: Untagged should be set based on the task’s tags, not the tags of all tasks.
- When preserving the last modified time of files, convert negative values to 0
- Use
java.lang.Throwable.setStackTracewhen sending exceptions back from forked tests. (Eugene V., gh-543) - Don’t merge dependencies with mismatched transitive/force/changing values. (gh-582)
- Filter out null parent files when deleting empty directories. (Eugene V., gh-589)
- Work around File constructor not accepting URIs for UNC paths. (gh-564)
- Split ForkTests react() out to workaround SI-6526 (avoids a stackoverflow in some forked test situations)
- Maven-style ivy repo support in the launcher config (Eric B., gh-585)
- Compare external binaries with canonical files (nau, gh-584)
- Call System.exit after the main thread is finished. (Eugene V., gh-565)
- Abort running tests on the first failure to communicate results back to the main process. (Eugene V., gh-557)
- Don’t let the right side of the alias command fail the parse. (gh-572)
- API extraction: handle any type that is annotated, not just the spec’d simple type. (gh-559)
- Don’t try to look up the class file for a package. (gh-620)
sbt 0.12.1
Dependency management fixes:
- Merge multiple dependency definitions for the same ID. Workaround for gh-468, gh-285, gh-419, gh-480.
- Don’t write section of pom if scope is ‘compile’.
- Ability to properly match on artifact type. Fixes gh-507 (Thomas).
- Force
updateto run on changes to last modified time of artifacts or cached descriptor (part of fix for gh-532). It may also fix issues when working with multiple local projects via ‘publish-local’ and binary dependencies. - Per-project resolution cache that deletes cached files before update. Notes:
- The resolution cache differs from the repository cache and does not contain dependency metadata or artifacts.
- The resolution cache contains the generated ivy files, properties, and resolve reports for the project.
- There will no longer be individual files directly in
~/.ivy2/cache/- Resolve reports are now in target/resolution-cache/reports/, viewable with a browser.
- Cache location includes extra attributes so that cross builds of a plugin do not overwrite each other. Fixes gh-532.
Three stage incremental compilation:
- As before, the first step recompiles sources that were edited (or otherwise directly invalidated).
- The second step recompiles sources from the first step whose API has changed, their direct dependencies, and sources forming a cycle with these sources.
- The third step recompiles transitive dependencies of sources from the second step whose API changed.
- Code relying mainly on composition should see decreased compilation times with this approach.
- Code with deep inheritance hierarchies and large cycles between sources may take longer to compile.
last compilewill show cycles that were processed in step 2. Reducing large cycles of sources shown here may decrease compile times.
Miscellaneous fixes and improvements:
- Various test forking fixes. Fixes gh-512, gh-515.
- Proper isolation of build definition classes. Fixes gh-536, gh-511.
orbitpackaging should be handled like a standard jar. Fixes gh-499.- In
IO.copyFile, limit maximum size transferred via NIO. Fixes gh-491. - Add OSX JNI library extension in
includeFilterby default. Fixes gh-500. (Indrajit) - Translate
show x yinto;show x ;show y. Fixes gh-495. - Clean up temporary directory on exit. Fixes gh-502.
setprints the scopes+keys it defines and affects.- Tab completion for
set(experimental). - Report file name when an error occurs while opening a corrupt zip file in incremental compilation code. (James)
- Defer opening logging output files until an actual write. Helps reduce number of open file descriptors.
- Back all console loggers by a common console interface that merges (overwrites) consecutive Resolving xxxx … lines when ansi codes are enabled (as first done by Play).
Forward-compatible-only change (not present in 0.12.0):
sourcesInBasesetting controls whether sources in base directory are included. Fixes gh-494.
sbt 0.12.0
Features, fixes, changes with compatibility implications
- The cross versioning convention has changed for Scala versions 2.10 and later as well as for sbt plugins.
- When invoked directly, ‘update’ will always perform an update (gh-335)
- The sbt plugins repository is added by default for plugins and plugin definitions. gh-380
- Plugin configuration directory precedence has changed (see details section below)
- Source dependencies have been fixed, but the fix required changes (see details section below)
- Aggregation has changed to be more flexible (see details section below)
- Task axis syntax has changed from key(for task) to task::key (see details section below)
- The organization for sbt has to changed to
org.scala-sbt(was: org.scala-tools.sbt). This affects users of the scripted plugin in particular. artifactNametype has changed to(ScalaVersion, Artifact, ModuleID) => StringjavacOptionsis now a tasksession saveoverwrites settings inbuild.sbt(when appropriate). gh-369- scala-library.jar is now required to be on the classpath in order to compile Scala code. See the scala-library.jar section at the bottom of the page for details.
Features
- Support for forking tests (gh-415)
test-quick(see details section below)- Support globally overriding repositories (gh-472)
- Added
print-warningstask that will print unchecked and deprecation warnings from the previous compilation without needing to recompile (Scala 2.10+ only) - Support for loading an ivy settings file from a URL.
projects add/remove <URI>for temporarily working with other builds- Enhanced control over parallel execution (see details section below)
inspect tree <key>for callinginspectcommand recursively (gh-274)
Fixes
- Delete a symlink and not its contents when recursively deleting a directory.
- Fix detection of ancestors for java sources
- Fix the resolvers used for
update-sbt-classifiers(gh-304) - Fix auto-imports of plugins (gh-412)
- Argument quoting (see details section below)
- Properly reset JLine after being stopped by Ctrl+z (unix only). gh-394
Improvements
- The launcher can launch all released sbt versions back to 0.7.0.
- A more refined hint to run ‘last’ is given when a stack trace is suppressed.
- Use java 7 Redirect.INHERIT to inherit input stream of subprocess (gh-462,gh-327). This should fix issues when forking interactive programs. (@vigdorchik)
- Mirror ivy ‘force’ attribute (gh-361)
- Various improvements to
helpandtaskscommands as well as new settings command (gh-315) - Bump jsch version to 0.1.46. (gh-403)
- Improved help commands:
help,tasks,settings. - Bump to JLine 1.0 (see details section below)
- Global repository setting (see details section below)
- Other fixes/improvements: gh-368, gh-377, gh-378, gh-386, gh-387, gh-388, gh-389
Experimental or In-progress
- API for embedding incremental compilation. This interface is subject to change, but already being used in a branch of the scala-maven-plugin.
- Experimental support for keeping the Scala compiler resident. Enable by passing -Dsbt.resident.limit=n to sbt, where n is an integer indicating the maximum number of compilers to keep around.
- The Howto pages on the new site are at least readable now. There is more content to write and more formatting improvements are needed, so pull requests are welcome.
Details of major changes from 0.11.2 to 0.12.0
Plugin configuration directory
In 0.11.0, plugin configuration moved from project/plugins/ to just
project/, with project/plugins/ being deprecated. Only 0.11.2 had a
deprecation message, but in all of 0.11.x, the presence of the old style
project/plugins/ directory took precedence over the new style. In
0.12.0, the new style takes precedence. Support for the old style won’t
be removed until 0.13.0.
- Ideally, a project should ensure there is never a conflict. Both styles are still supported; only the behavior when there is a conflict has changed.
- In practice, switching from an older branch of a project to a new branch would often leave an empty project/plugins/ directory that would cause the old style to be used, despite there being no configuration there.
- Therefore, the intention is that this change is strictly an improvement for projects transitioning to the new style and isn’t noticed by other projects.
Parsing task axis
There is an important change related to parsing the task axis for settings and tasks that fixes gh-202
- The syntax before 0.12 has been
{build}project/config:key(for task) - The proposed (and implemented) change for 0.12 is
{build}project/config:task::key - By moving the task axis before the key, it allows for easier discovery (via tab completion) of keys in plugins.
- It is not planned to support the old syntax.
Aggregation
Aggregation has been made more flexible. This is along the direction that has been previously discussed on the mailing list.
- Before 0.12, a setting was parsed according to the current project and only the exact setting parsed was aggregated.
- Also, tab completion did not account for aggregation.
- This meant that if the setting/task didn’t exist on the current project, parsing failed even if an aggregated project contained the setting/task.
- Additionally, if compile:package existed for the current project,
*:packageexisted for an aggregated project, and the user requested ‘package’ to run (without specifying the configuration),*:packagewouldn’t be run on the aggregated project (because it isn’t the same as thecompile:packagekey that existed on the current project). In 0.12, both of these situations result in the aggregated settings being selected. For example,
- Consider a project
rootthat aggregates a subprojectsub. rootdefines*:package.subdefinescompile:packageandcompile:compile.- Running
root/packagewill runroot/*:packageandsub/compile:package - Running
root/compilewill runsub/compile:compile
- Consider a project
- This change was made possible in part by the change to task axis parsing.
Parallel Execution
Fine control over parallel execution is supported as described here: Parallel Execution.
- The default behavior should be the same as before, including the parallelExecution settings.
- The new capabilities of the system should otherwise be considered experimental.
- Therefore,
parallelExecutionwon’t be deprecated at this time.
Source dependencies
A fix for issue gh-329 is included in 0.12.0. This fix ensures that only one version of a plugin is loaded across all projects. There are two parts to this.
- The version of a plugin is fixed by the first build to load it. In particular, the plugin version used in the root build (the one in which sbt is started in) always overrides the version used in dependencies.
- Plugins from all builds are loaded in the same class loader.
Additionally, Sanjin’s patches to add support for hg and svn URIs are included.
- sbt uses subversion to retrieve URIs beginning with
svnor svn+ssh. An optional fragment identifies a specific revision to checkout. - Because a URI for mercurial doesn’t have a mercurial-specific scheme, sbt requires the URI to be prefixed with hg: to identify it as a mercurial repository.
- Also, URIs that end with
.gitare now handled properly.
Cross building
The cross version suffix is shortened to only include the major and
minor version for Scala versions starting with the 2.10 series and for
sbt versions starting with the 0.12 series. For example, sbinary_2.10
for a normal library or sbt-plugin_2.10_0.12 for an sbt plugin. This
requires forward and backward binary compatibility across incremental
releases for both Scala and sbt.
This change has been a long time coming, but it requires everyone publishing an open source project to switch to 0.12 to publish for
- 10 or adjust the cross versioned prefix in their builds appropriately.
- Obviously, using 0.12 to publish a library for 2.10 requires 0.12.0 to be released before projects publish for 2.10.
- There is now the concept of a binary version. This is a subset of
the full version string that represents binary compatibility. That
is, equal binary versions implies binary compatibility. All Scala
versions prior to 2.10 use the full version for the binary version
to reflect previous sbt behavior. For 2.10 and later, the binary
version is
<major>.<minor>. - The cross version behavior for published artifacts is configured by the crossVersion setting. It can be configured for dependencies by using the cross method on ModuleID or by the traditional %% dependency construction variant. By default, a dependency has cross versioning disabled when constructed with a single % and uses the binary Scala version when constructed with %%.
- The artifactName function now accepts a type ScalaVersion as its first argument instead of a String. The full type is now (ScalaVersion, ModuleID, Artifact) => String. ScalaVersion contains both the full Scala version (such as 2.10.0) as well as the binary Scala version (such as 2.10).
- The flexible version mapping added by Indrajit has been merged into the cross method and the %% variants accepting more than one argument have been deprecated. See Cross Build for details.
Global repository setting
Define the repositories to use by putting a standalone [repositories]
section (see the sbt Launcher page) in
~/.sbt/repositories and pass -Dsbt.override.build.repos=true to sbt.
Only the repositories in that file will be used by the launcher for
retrieving sbt and Scala and by sbt when retrieving project
dependencies. (@jsuereth)
test-quick
test-quick (gh-393) runs the tests specified as arguments (or all
tests if no arguments are given) that:
- have not been run yet OR
- failed the last time they were run OR
- had any transitive dependencies recompiled since the last successful run
Argument quoting
Argument quoting (gh-396) from the intereactive mode works like Scala string literals.
> command "arg with spaces,\n escapes interpreted"> command """arg with spaces,\n escapes not interpreted"""- For the first variant, note that paths on Windows use backslashes and need to be escaped (). Alternatively, use the second variant, which does not interpret escapes.
- For using either variant in batch mode, note that a shell will generally require the double quotes themselves to be escaped.
scala-library.jar
sbt versions prior to 0.12.0 provided the location of scala-library.jar
to scalac even if scala-library.jar wasn’t on the classpath. This
allowed compiling Scala code without scala-library as a dependency, for
example, but this was a misfeature. Instead, the Scala library should be
declared as provided:
// Don't automatically add the scala-library dependency
// in the 'compile' configuration
autoScalaLibrary := false

libraryDependencies += "org.scala-lang" % "scala-library" % "2.9.2" % "provided"
Older Changes
0.11.3 to 0.12.0
The changes for 0.12.0 are listed on a separate page. See sbt 0.12.0 changes.
0.11.2 to 0.11.3
Dropping scala-tools.org:
- The sbt group ID is changed to
org.scala-sbt(from org.scala-tools.sbt). This means you must use a 0.11.3 launcher to launch 0.11.3. - The convenience objects
ScalaToolsReleasesand ScalaToolsSnapshots now point to https://oss.sonatype.org/content/repositories/releases and …/snapshots - The launcher no longer includes
scala-tools.orgrepositories by default and instead uses the Sonatype OSS snapshots repository for Scala snapshots. The
scala-tools.orgreleases repository is no longer included as an application repository by default. The Sonatype OSS repository isnot included by default in its place.
Other fixes:
- Compiler interface works with 2.10
maxErrorssetting is no longer ignored- Correct test count. gh-372 (Eugene)
- Fix file descriptor leak in process library (Daniel)
- Buffer url input stream returned by Using. gh-437
- Jsch version bumped to 0.1.46. gh-403
- JUnit test detection handles ancestors properly (Indrajit)
- Avoid unnecessarily re-resolving plugins. gh-368
- Substitute variables in explicit version strings and custom repository definitions in launcher configuration
- Support setting sbt.version from system property, which overrides setting in a properties file. gh-354
- Minor improvements to command/key suggestions
0.11.1 to 0.11.2
Notable behavior change:
- The local Maven repository has been removed from the launcher’s list of default repositories, which is used for obtaining sbt and Scala dependencies. This is motivated by the high probability that including this repository was causing the various problems some users have with the launcher not finding some dependencies (gh-217).
Fixes:
- gh-257 Fix invalid classifiers in pom generation (Indrajit)
- gh-255 Fix scripted plugin descriptor (Artyom)
- Fix forking git on windows (Stefan, Josh)
- gh-261 Fix whitespace handling for semicolon-separated commands
- gh-263 Fix handling of dependencies with an explicit URL
- gh-272 Show deprecation message for
project/plugins/
0.11.0 to 0.11.1
Breaking change:
- The scripted plugin is now in the
sbtpackage so that it can be used from a named package
Notable behavior change:
- By default, there is more logging during update: one line per dependency resolved and two lines per dependency downloaded. This is to address the appearance that sbt hangs on larger ‘update’s.
Fixes and improvements:
- Show help for a key with
help <key> - gh-21 Reduced memory and time overhead of incremental recompilation with signature hash based approach.
- Rotate global log so that only output since last prompt is displayed for last
- gh-169 Add support for exclusions with excludeAll and exclude methods on ModuleID. (Indrajit)
- gh-235 Checksums configurable for launcher
- gh-246 Invalidate
updatewhenupdateis invalidated for an internal project dependency - gh-138 Include plugin sources and docs in
update-sbt-classifiers - gh-219 Add cleanupCommands setting to specify commands to run before interpreter exits
- gh-46 Fix regression in caching missing classifiers for
update-classifiersandupdate-sbt-classifiers. - gh-228 Set
connectInputto true to connect standard input to forked run - gh-229 Limited task execution interruption using ctrl+c
- gh-220 Properly record source dependencies from separate compilation runs in the same step.
- gh-214 Better default behavior for classpathConfiguration for external Ivy files
- gh-212 Fix transitive plugin dependencies.
- gh-222 Generate section in make-pom. (Jan)
- Build resolvers, loaders, and transformers.
- Allow project dependencies to be modified by a setting (buildDependencies) but with the restriction that new builds cannot be introduced.
- gh-174, gh-196, gh-201, gh-204, gh-207, gh-208, gh-226, gh-224, gh-253
0.10.1 to 0.11.0
Major Improvements:
- Move to 2.9.1 for project definitions and plugins
- Drop support for 2.7
- Settings overhaul, mainly to make API documentation more usable
- Support using native libraries in
runandtest(but not console, for example) Automatic plugin cross-versioning. Use
addSbtPlugin("group" % "name" % "version")in project/plugins.sbt instead of
libraryDependencies += ...See [Plugins][Plugins] for details
Fixes and Improvements:
- Display all undefined settings at once, instead of only the first one
- Deprecate separate
classpathFilter,defaultExcludes, and sourceFilter keys in favor of includeFilter and excludeFilter explicitly scoped by unmanagedSources, unmanagedResources, or unmanagedJars as appropriate (Indrajit) - Default to using shared boot directory in
~/.sbt/boot/ - Can put contents of
project/plugins/directly inproject/instead. Will likely deprecate plugins/ directory - Key display is context sensitive. For example, in a single project, the build and project axes will not be displayed
- gh-114, gh-118, gh-121, gh-132, gh-135, gh-157: Various settings and error message improvements
- gh-115: Support configuring checksums separately for
publishandupdate - gh-118: Add
aboutcommand - gh-118, gh-131: Improve
lastcommand. Aggregatelast <task>and display all recent output forlast - gh-120: Support read-only external file projects (Fred)
- gh-128: Add
skipsetting to override recompilation change detection - gh-139: Improvements to pom generation (Indrajit)
- gh-140, gh-145: Add standard manifest attributes to binary and source jars (Indrajit)
- Allow sources used for
docgeneration to be different from sources forcompile - gh-156: Made
packagean alias forpackage-bin - gh-162: handling of optional dependencies in pom generation
0.10.0 to 0.10.1
Some of the more visible changes:
- Support “provided” as a valid configuration for inter-project dependencies gh-53
- Try out some better error messages for build.sbt in a few common situations gh-58
- Drop “Incomplete tasks …” line from error messages. gh-32
- Better handling of javac logging. gc-74
- Warn when reload discards session settings
- Cache failing classifiers, making ‘update-classifiers’ a practical replacement for withSources()
- Global settings may be provided in
~/.sbt/build.sbtgh-52 - No need to define
"sbtPlugin := true"inproject/plugins/or~/.sbt/plugins/ - Provide statistics and list of evicted modules in UpdateReport
- Scope use of ‘transitive-classifiers’ by ‘update-sbt-classifiers’ and ‘update-classifiers’ for separate configuration.
- Default project ID includes a hash of base directory to avoid collisions in simple cases.
- ’extra-loggers’ setting to make it easier to add loggers
- Associate ModuleID, Artifact and Configuration with a classpath entry (moduleID, artifact, and configuration keys). gh-41
- Put httpclient on Ivy’s classpath, which seems to speed up ‘update’.
0.7.7 to 0.10.0
Major redesign, only prominent changes listed.
- Project definitions in Scala 2.8.1
- New configuration system: See .sbt build example, .scala build defnition and .sbt build definition.
- New task engine: Tasks
- New multiple project support: .scala build defnition
- More aggressive incremental recompilation for both Java and Scala sources
- Merged plugins and processors into improved plugins system: Plugins
- Web application and webstart support moved to plugins instead of core features
- Fixed all of the issues in (Google Code) issue #44
- Managed dependencies automatically updated when configuration changes
update-sbt-classifiersandupdate-classifierstasks for retrieving sources and/or javadocs for dependencies, transitively- Improved [artifact handling and configuration][Attifacts]
- Tab completion parser combinators for commands and input tasks: Commands
- No project creation prompts anymore
- Moved to GitHub: https://github.com/harrah/xsbt
0.7.5 to 0.7.7
- Workaround for Scala issue #4426
- Fix issue 156
0.7.4 to 0.7.5
- Joonas’s update to work with Jetty 7.1 logging API changes.
- Updated to work with Jetty 7.2 WebAppClassLoader binary incompatibility (issue 129).
- Provide application and boot classpaths to tests and ‘run’ning code according to https://gist.github.com/404272
- Fix
providedconfiguration. It is no longer included on the classpath of dependent projects. - Scala 2.8.1 is the default version used when starting a new project.
- Updated to Ivy 2.2.0.
- Trond’s patches that allow configuring jetty-env.xml and webdefault.xml
- Doug’s patch to make ‘projects’ command show an asterisk next to current project
- Fixed issue 122
- Implemented issue 118
- Patch from Viktor and Ross for issue 123
- (RC1) Patch from Jorge for issue 100
- (RC1) Fix
<packaging>type
0.7.3 to 0.7.4
- prefix continuous compilation with run number for better feedback when logging level is ‘warn’
- Added
pomIncludeRepository(repo: MavenRepository): Booleanthat can be overridden to exclude local repositories by default - Added
pomPostProcess(pom: Node): Nodeto make advanced manipulation of the default pom easier (pomExtra already covers basic cases) - Added
resetcommand to reset JLine terminal. This needs to be run after suspending and then resuming sbt. - Installer plugin is now a proper subproject of sbt.
- Plugins can now only be Scala sources. BND should be usable in a plugin now.
- More accurate detection of invalid test names. Invalid test names now generate an error and prevent the test action from running instead of just logging a warning.
- Fix issue with using 2.8.0.RC1 compiler in tests.
- Precompile compiler interface against 2.8.0.RC2
- Add
consoleOptionsfor specifying options to the console. It defaults to compileOptions. - Properly support sftp/ssh repositories using key-based authentication. See the updated section of the Resolvers page.
def ivyUpdateLogging = UpdateLogging.DownloadOnly | Full | Quiet. Default is DownloadOnly. Full will log metadata resolution and provide a final summary.offlineproperty for disabling checking for newer dynamic revisions (like -SNAPSHOT). This allows working offline with remote snapshots. Not honored for plugins yet.- History commands:
!!, !?string, !-n, !n, !string, !:n, !:Run ! to see help. - New section in launcher configuration
[ivy]with a single label cache-directory. Specify this to change the cache location used by the launcher. - New label
classifiersunder[app]to specify classifiers of additional artifacts to retrieve for the application. - Honor
-Xfatal-warningsoption added to compiler in 2.8.0.RC2. - Make
scaladocTaskafileTaskso that it runs only when index.html is older than some input source. - Made it easier to create default
test-*tasks with different options - Sort input source files for consistency, addressing scalac’s issues with source file ordering.
Derive Java source file from name of class file when no SourceFile attribute is present in the class file. Improves tracking when
- g:none option is used.
- Fix
FileUtilities.unzipto be tail-recursive again.
0.7.2 to 0.7.3
- Fixed issue with scala.library.jar not being on javac’s classpath
- Fixed buffered logging for parallel execution
- Fixed
test-*tab completion being permanently set on first completion - Works with Scala 2.8 trunk again.
- Launcher: Maven local repository excluded when the Scala version is a snapshot. This should fix issues with out of date Scala snapshots.
- The compiler interface is precompiled against common Scala versions (for this release, 2.7.7 and 2.8.0.Beta1).
- Added
PathFinder.distinct - Running multiple commands at once at the interactive prompt is now supported. Prefix each command with ’;’.
- Run and return the output of a process as a String with
!!or as a (blocking) Stream[String] with lines. - Java tests + Annotation detection
- Test frameworks can now specify annotation fingerprints. Specify the names of annotations and sbt discovers classes with the annotations on it or one of its methods. Use version 0.5 of the test-interface.
- Detect subclasses and annotations in Java sources (really, their class files)
- Discovered is new root of hierarchy representing discovered subclasses + annotations. TestDefinition no longer fulfills this role.
TestDefinitionis modified to be name+Fingerprintand represents a runnable test. It need not be Discovered, but could be file-based in the future, for example.- Replaced testDefinitionClassNames method with
fingerprintsin CompileConfiguration. - Added foundAnnotation to
AnalysisCallback - Added
Runner2,Fingerprint,AnnotationFingerprint, and SubclassFingerprint to the test-interface. Existing test frameworks should still work. Implement Runner2 to use fingerprints other than SubclassFingerprint.
0.7.1 to 0.7.2
Process.applyno longer usesCommandParser. This should fix issues with the android-plugin.- Added
sbt.impl.Argumentsfor parsing a command like a normal action (for Processors) - Arguments are passed to
javacusing an argument file (@) Added
webappUnmanaged: PathFindermethod to DefaultWebProject. Paths selected by this PathFinder will not be pruned by prepare-webapp and will not be packaged by package. For example, to exclude the GAE datastore directory:override def webappUnmanaged = (temporaryWarPath / "WEB-INF" / "appengine-generated" ***)- Added some String generation methods to
PathFinder:toStringfor debugging and absString and relativeString for joining the absolute (relative) paths by the platform separator. - Made tab completors lazier to reduce startup time.
- Fixed
console-projectfor custom subprojects Processorsplit intoProcessor/BasicProcessor. Processor provides high level of integration with command processing. BasicProcessor operates on a Project but does not affect command processing.- Can now use
Launcherexternally, including launchingsbtoutside of the official jar. This means a Project can now be created from tests. - Works with Scala 2.8 trunk
- Fixed logging level behavior on subprojects.
- All sbt code is now at https://github.com/harrah/xsbt in one project.
0.7.0 to 0.7.1
- Fixed Jetty 7 support to work with JRebel
- Fixed make-pom to generate valid dependencies section
0.5.6 to 0.7.0
- Unifed batch and interactive commands. All commands that can be executed at interactive prompt can be run from the command line. To run commands and then enter interactive prompt, make the last command ‘shell’.
- Properly track certain types of synthetic classes, such as for comprehension with >30 clauses, during compilation.
- Jetty 7 support
- Allow launcher in the project root directory or the
libdirectory. The jar name must have the form ‘sbt-launch.jar’ in order to be excluded from the classpath. - Stack trace detail can be controlled with
'on','off', ‘nosbt’, or an integer level. ‘nosbt’ means to show stack frames up to the first sbt method. An integer level denotes the number of frames to show for each cause. This feature is courtesty of Tony Sloane. - New action ‘test-run’ method that is analogous to ‘run’, but for test classes.
- New action ‘clean-plugins’ task that clears built plugins (useful for plugin development).
- Can provide commands from a file with new command:
<filename - Can provide commands over loopback interface with new command:
<port - Scala version handling has been completely redone.
- The version of Scala used to run sbt (currently 2.7.7) is decoupled from the version used to build the project.
- Changing between Scala versions on the fly is done with the command:
++<version> - Cross-building is quicker. The project definition does not need to be recompiled against each version in the cross-build anymore.
- Scala versions are specified in a space-delimited list in the build.scala.versions property.
- Dependency management:
make-pomtask now uses custom pom generation code instead of Ivy’s pom writer.- Basic support for writing out Maven-style repositories to the pom
- Override the ‘pomExtra’ method to provide XML (
scala.xml.NodeSeq) to insert directly into the generated pom. - Complete control over repositories is now possible by overriding ivyRepositories.
- The interface to Ivy can be used directly.
- Test framework support is now done through a uniform test interface. Implications:
- New versions of specs, ScalaCheck, and ScalaTest are supported as soon as they are released.
- Support is better, since the test framework authors provide the implementation.
- Arguments can be passed to the test framework. For example: {{{ > test-only your.test — -a -b -c }}}
- Can provide custom task start and end delimiters by defining the system properties sbt.start.delimiter and sbt.end.delimiter.
- Revamped launcher that can launch Scala applications, not just sbt
- Provide a configuration file to the launcher and it can download the application and its dependencies from a repository and run it.
- sbt’s configuration can be customized. For example,
- The
sbtversion to use in projects can be fixed, instead of read from project/build.properties. - The default values used to create a new project can be changed.
- The repositories used to fetch
sbtand its dependencies, including Scala, can be configured. - The location
sbtis retrieved to is configurable. For example, /home/user/.ivy2/sbt/ could be used instead of project/boot/.
0.5.5 to 0.5.6
- Support specs specifications defined as classes
- Fix specs support for 1.6
- Support ScalaTest 1.0
- Support ScalaCheck 1.6
- Remove remaining uses of structural types
0.5.4 to 0.5.5
- Fixed problem with classifier support and the corresponding test
- No longer need
"->default"in configurations (automatically mapped). - Can specify a specific nightly of Scala 2.8 to use (for example:
2.8.0-20090910.003346-+) - Experimental support for searching for project
(
-Dsbt.boot.search=none | only | root-first | nearest) - Fix issue where last path component of local repository was dropped if it did not exist.
- Added support for configuring repositories on a per-module basis.
- Unified batch-style and interactive-style commands. All commands that were previously interactive-only should be available batch-style. ‘reboot’ does not pick up changes to ‘scala.version’ properly, however.
0.5.2 to 0.5.4
- Many logging related changes and fixes. Added
FilterLoggerand cleaned up interaction between Logger, scripted testing, and the builder projects. This included removing the recordingDepth hack from Logger. Logger buffering is now enabled/disabled per thread. - Fix
compileOptionsbeing fixed after the first compile - Minor fixes to output directory checking
- Added
defaultLoggingLevelmethod for setting the initial level of a project’s Logger - Cleaned up internal approach to adding extra default configurations like plugin
- Added
syncPathsTaskfor synchronizing paths to a target directory - Allow multiple instances of Jetty (new
jettyRunTaskscan be defined with different ports) jettyRunTaskaccepts configuration in a single configuration wrapper object instead of many parameters- Fix web application class loading (issue #35) by using jettyClasspath=testClasspath—-jettyRunClasspath for loading Jetty. A better way would be to have a jetty configuration and have jettyClasspath=managedClasspath(’jetty’), but this maintains compatibility.
- Copy resources to
target/resourcesandtarget/test-resourcesusing copyResources and copyTestResources tasks. Properly include all resources in web applications and classpaths (issue #36). mainResources and testResources are now the definitive methods for getting resources. - Updated for 2.8 (
sbtnow compiles against September 11, 2009 nightly build of Scala) - Fixed issue with position of
^in compile errors - Changed order of repositories (local, shared, Maven Central, user, Scala Tools)
- Added Maven Central to resolvers used to find Scala library/compiler in launcher
- Fixed problem that prevented detecting user-specified subclasses
- Fixed exit code returned when exception thrown in main thread for TrapExit
Added
javaptask toDefaultProject. It has tab completion on compiled project classes and the run classpath is passed to javap so that library classes are available. Examples: :> javap your.Clazz > javap -c scala.ListAdded
exectask. MixinExecto project definition to use. This forks the command following exec. Examples: :> exec echo Hi > exec find src/main/scala -iname *.scala -exec wc -l {} ;Added
shtask for users with a unix-style shell available (runs/bin/sh -c <arguments>). Mixin Exec to project definition to use. Example: :> sh find src/main/scala -iname *.scala | xargs cat | wc -l- Proper dependency graph actions (previously was an unsupported prototype): graph-src and graph-pkg for source dependency graph and quasi-package dependency graph (based on source directories and source dependencies)
- Improved Ivy-related code to not load unnecessary default settings
- Fixed issue #39 (sources were not relative in src package)
- Implemented issue #38 (
InstallProjectwith ‘install’ task) - Vesa’s patch for configuring the output of forked Scala/Java and processes
- Don’t buffer logging of forked
runby default - Check
Project.terminateWatchto determine if triggered execution should stop for a given keypress. - Terminate triggered execution only on ‘enter’ by default (previously, any keypress stopped it)
- Fixed issue #41 (parent project should not declare jar artifact)
- Fixed issue #42 (search parent directories for
ivysettings.xml) Added support for extra attributes with Ivy. Use extra(key -> value) on ModuleIDs and Artifacts. To define for a project’s ID: :
override def projectID = super.projectID extra(key -> value)To specify in a dependency: :
val dep = normalID extra(key -> value)
0.5.1 to 0.5.2
- Fixed problem where dependencies of
sbtplugins were not on the compile classpath - Added
execTaskthat runs ansbt.ProcessBuilderwhen invoked - Added implicit conversion from
scala.xml.Elemto sbt.ProcessBuilder that takes the element’s text content, trims it, and splits it around whitespace to obtain the command. - Processes can now redirect standard input (see run with Boolean
argument or
!<operator on ProcessBuilder), off by default - Made scripted framework a plugin and scripted tests now go in src/sbt-test by default
- Can define and use an sbt test framework extension in a project
- Fixed
runaction swallowing exceptions - Fixed tab completion for method tasks for multi-project builds
- Check that tasks in
compoundTaskdo not reference static tasks - Make
toStringofPaths in subprojects relative to root project directory crossScalaVersionsis now inherited from parent if not specified- Added
scala-library.jarto thejavacclasspath - Project dependencies are added to published
ivy.xml - Added dependency tracking for Java sources using classfile parsing (with the usual limitations)
Added
Process.catthat will send contents ofURLs and Files to standard output. Alternatively, cat can be used on a single URL or File. Example: :import java.net.URL import java.io.File val spde = new URL("http://technically.us/spde/About") val dispatch = new URL("http://databinder.net/dispatch/About") val build = new File("project/build.properties") cat(spde, dispatch, build) #| "grep -i scala" !
0.4.6 to 0.5/0.5.1
- Fixed
ScalaTestframework dropping stack traces - Publish only public configurations by default
- Loader now adds
.m2/repositoryfor downloading Scala jars - Can now fork the compiler and runner and the runner can use a different working directory.
- Maximum compiler errors shown is now configurable
- Fixed rebuilding and republishing released versions of
sbtagainst new Scala versions (attempt #2) - Fixed snapshot reversion handling (Ivy needs changing pattern set on cache, apparently)
- Fixed handling of default configuration when useMavenConfiguration is true
- Cleanup on Environment, Analysis, Conditional,
MapUtilities, and more… - Tests for Environment, source dependencies, library dependency management, and more…
- Dependency management and multiple Scala versions
- Experimental plugin for producing project bootstrapper in a self-extracting jar
- Added ability to directly specify
URLto use for dependency with the from(url: URL) method defined on ModuleID - Fixed issue #30
- Support cross-building with
+when running batch actions - Additional flattening for project definitions: sources can go either in project/build/src (recursively) or project/build (flat)
- Fixed manual
rebootnot changing the version of Scala when it is manually set - Fixed tab completion for cross-building
- Fixed a class loading issue with web applications
0.4.5 to 0.4.6
- Publishing to ssh/sftp/filesystem repository supported
- Exception traces are printed by default
- Fixed warning message about no
Class-Pathattribute from showing up for run - Fixed
package-projectoperation - Fixed
Path.fromFile - Fixed issue with external process output being lost when sent to a BufferedLogger with parallelExecution enabled.
- Preserve history across
clean - Fixed issue with making relative path in jar with wrong separator
- Added cross-build functionality (prefix action with
+). - Added methods
scalaLibraryJarandscalaCompilerJarto FileUtilities - Include project dependencies for
deliver/publish - Add Scala dependencies for
make-pom/deliver/publish, which requires these to depend on package - Properly add compiler jar to run/test classpaths when main sources depend on it
TestFrameworkrootClassLoaderfilters compiler classes used by sbt, which is required for projects using the compiler.- Better access to dependencies:
mainDependenciesandtestDependenciesprovide an analysis of the dependencies of your code as determined during compilationscalaJarsis deprecated, usemainDependencies.scalaJarsinstead (provides a PathFinder, which is generally more useful)- Added
jettyPortmethod toDefaultWebProject. - Fixed
package-projectto excludeproject/bootand project/build/target - Support specs 1.5.0 for Scala 2.7.4 version.
- Parallelization at the subtask level
- Parallel test execution at the suite/specification level.
0.4.3 to 0.4.5
- Sorted out repository situation in loader
- Added support for
http_proxyenvironment variable - Added
downloadmethod from Nathan toFileUtilitiesto retrieve the contents of a URL. - Added special support for compiler plugins, see compiler plugins support page.
reloadcommand in scripted tests will now properly handle success/failure- Very basic support for Java sources: Java sources under src/main/java and src/test/java will be compiled.
parallelExecutiondefaults to value in parent project if there is one.- Added ‘console-project’ that enters the Scala interpreter with the current Project bound to the variable project.
- The default Ivy cache manager is now configured with useOrigin=true so that it doesn’t cache artifacts from the local filesystem.
- For users building from trunk, if a project specifies a version of sbt that ends in -SNAPSHOT, the loader will update sbt every time it starts up. The trunk version of sbt will always end in -SNAPSHOT now.
- Added automatic detection of classes with main methods for use when mainClass is not explicitly specified in the project definition. If exactly one main class is detected, it is used for run and package. If multiple main classes are detected, the user is prompted for which one to use for run. For package, no Main-Class attribute is automatically added and a warning is printed.
- Updated build to cross-compile against Scala 2.7.4.
- Fixed
proguardtask insbt’s project definition - Added
manifestClassPathmethod that accepts the value for the Class-Path attribute - Added
PackageOptioncalledManifestAttributesthat accepts (java.util.jar.Attributes.Name, String) or (String, String) pairs and adds them to the main manifest attributes - Fixed some situations where characters would not be echoed at prompts other than main prompt.
- Fixed issue #20 (use
http_proxyenvironment variable) - Implemented issue #21 (native process wrapper)
- Fixed issue #22 (rebuilding and republishing released versions of sbt against new Scala versions, specifically Scala 2.7.4)
- Implemented issue #23 (inherit inline repositories declared in parent project)
0.4 to 0.4.3
- Direct dependencies on Scala libraries are checked for version equality with scala.version
- Transitive dependencies on
scala-libraryandscala-compilerare filtered - They are fixed by
scala.versionand provided on the classpath by sbt - To access them, use the
scalaJarsmethod, classOf[ScalaObject].getProtectionDomain.getCodeSource, or mainCompileConditional.analysis.allExternals - The configurations checked/filtered as described above are configurable. Nonstandard configurations are not checked by default.
- Version of
sbtand Scala printed on startup - Launcher asks if you want to try a different version if
sbtor Scala could not be retrieved. - After changing
scala.versionorsbt.versionwithset, note is printed that reboot is required. - Moved managed dependency actions to
BasicManagedProject(update is now available on ParentProject) - Cleaned up
sbt’s build so that you just need to doupdateand full-build to build from source. The trunk version of sbt will be available for use from the loader. - The loader is now a subproject.
- For development, you’ll still want the usual actions (such as package) for the main builder and proguard to build the loader.
- Fixed analysis plugin improperly including traits/abstract classes in subclass search
ScalaProjects already had everything required to be parent projects: flipped the switch to enable it- Proper method task support in scripted tests (
packagegroup tests rightly pass again) - Improved tests in loader that check that all necessary libraries were downloaded properly
0.3.7 to 0.4
- Fixed issue with
build.propertiesbeing unnecessarily updated in sub-projects when loading. - Added method to compute the SHA-1 hash of a
String - Added pack200 methods
- Added initial process interface
- Added initial webstart support
- Added gzip methods
- Added
sleepandnewercommands to scripted testing. - Scripted tests now test the version of
sbtbeing built instead of the version doing the building. testResourcesis put on the test classpath instead of testResourcesPath- Added
jetty-restart, which doesjetty-stopand then jetty-run - Added automatic reloading of default web application
- Changed packaging behaviors (still likely to change)
- Inline configurations now allowed (can be used with configurations in inline XML)
- Split out some code related to managed dependencies from BasicScalaProject to new class BasicManagedProject
- Can specify that maven-like configurations should be automatically declared
- Fixed problem with nested modules being detected as tests
testResources,integrationTestResources, and mainResources should now be added to appropriate classpaths- Added project organization as a property that defaults to inheriting from the parent project.
- Project creation now prompts for the organization.
- Added method tasks, which are top-level actions with parameters.
- Made
help,actions, andmethodscommands available to batch-style invocation. - Applied Mikko’s two fixes for webstart and fixed problem with pack200+sign. Also, fixed nonstandard behavior when gzip enabled.
- Added
controlmethod toLoggerfor action lifecycle logging - Made standard logging level convenience methods final
- Made
BufferedLoggerhave a per-actor buffer instead of a global buffer - Added a
SynchronizedLoggerand aMultiLogger(intended to be used with the yet unwritten FileLogger) - Changed method of atomic logging to be a method
logAllaccepting List[LogEvent] instead of doSynchronized - Improved action lifecycle logging
- Parallel logging now provides immediate feedback about starting an action
- General cleanup, including removing unused classes and methods and reducing dependencies between classes
runis now a method task that accepts options to pass to the main method (runOptions has been removed, runTask is no longer interactive, and run no longer starts a console if mainClass is undefined)- Major task execution changes:
- Tasks automatically have implicit dependencies on tasks with the same name in dependent projects
- Implicit dependencies on interactive tasks are ignored, explicit dependencies produce an error
- Interactive tasks must be executed directly on the project on which they are defined
- Method tasks accept input arguments (
Array[String]) and dynamically create the task to run - Tasks can depend on tasks in other projects
- Tasks are run in parallel breadth-first style
- Added
test-onlymethod task, which restricts the tests to run to only those passed as arguments. - Added
test-failedmethod task, which restricts the tests to run. First, only tests passed as arguments are run. If no tests are passed, no filtering is done. Then, only tests that failed the previous run are run. - Added
test-quickmethod task, which restricts the tests to run. First, only tests passed as arguments are run. If no tests are passed, no filtering is done. Then, only tests that failed the previous run or had a dependency change are run. - Added launcher that allows declaring version of sbt/scala to build project with.
- Added tab completion with
~ - Added basic tab completion for method tasks, including
test-* - Changed default pack options to be the default options of Pack200.Packer
- Fixed
~behavior when action doesn’t exist
0.3.6 to 0.3.7
- Improved classpath methods
- Refactored various features into separate project traits
ParentProjectcan now specify dependencies- Support for
optionalscope - More API documentation
- Test resource paths provided on classpath for testing
- Added some missing read methods in
FileUtilities - Added scripted test framework
- Change detection using hashes of files
- Fixed problem with manifests not being generated (bug #14)
- Fixed issue with scala-tools repository not being included by default (again)
- Added option to set ivy cache location (mainly for testing)
- trace is no longer a logging level but a flag enabling/disabling stack traces
- Project.loadProject and related methods now accept a Logger to use
- Made hidden files and files that start with
'.'excluded by default ('.*'is required because subversion seems to not mark.svndirectories hidden on Windows) - Implemented exit codes
- Added continuous compilation command
cc
0.3.5 to 0.3.6
- Fixed bug #12.
- Compiled with 2.7.2.
0.3.2 to 0.3.5
- Fixed bug #11.
- Fixed problem with dependencies where source jars would be used instead of binary jars.
- Fixed scala-tools not being used by default for inline configurations.
- Small dependency management error message correction
- Slight refactoring for specifying whether scala-tools releases gets added to configured resolvers
- Separated repository/dependency overriding so that repositories can be specified inline for use with ivy.xml or pom.xml files
- Added ability to specify Ivy XML configuration in Scala.
- Added
clean-cacheaction for deleting Ivy’s cache - Some initial work towards accessing a resource directory from tests
- Initial tests for
Path - Some additional
FileUtilitiesmethods, someFileUtilitiesmethod adjustments and some initial tests for FileUtilities - A basic framework for testing
ReflectUtilities, not run by default because of run time - Minor cleanup to
Pathand added non-empty check to path components - Catch additional exceptions in
TestFramework - Added
copyTasktask creation method. - Added
jetty-runaction and added ability to package war files. - Added
jetty-stopaction. - Added
console-quickaction that is the same asconsolebut doesn’t compile sources first. - Moved some custom
ClassLoaders toClasspathUtilitiesand improved a check. - Added ability to specify hooks to call before
sbtshuts down. - Added
zip,unzipmethods toFileUtilities - Added
appendequivalents towrite*methods in FileUtilites - Added first draft of integration testing
- Added batch command
compile-stats - Added methods to create tasks that have basic conditional execution based on declared sources/products of the task
- Added
newerThanandolderThanmethods toPath - Added
reloadaction to reread the project definition without losing the performance benefits of an already running jvm - Added
helpaction to tab completion - Added handling of (effectively empty) scala source files that create no class files: they are always interpreted as modified.
- Added prompt to retry project loading if compilation fails
packageaction now usesfileTaskso that it only executes if files are out of date- fixed
ScalaTestframework wrapper so that it fails thetestaction if tests fail - Inline dependencies can now specify configurations
0.3.1 to 0.3.2
- Compiled jar with Java 1.5.
0.3 to 0.3.1
- Fixed bugs #8, #9, and #10.
0.2.3 to 0.3
- Version change only for first release.
0.2.2 to 0.2.3
- Added tests for
Dag,NameFilter,Version - Fixed handling of trailing
*s inGlobFilterand added some error-checking for control characters, which Pattern doesn’t seem to like - Fixed
Analysis.allProductsimplementation - It previously returned the sources instead of the generated classes
- Will only affect the count of classes (it should be correct now) and the debugging of missed classes (erroneously listed classes as missed)
- Made some implied preconditions on
BasicVersionand OpaqueVersion explicit - Made increment version behavior in
ScalaProjecteasier to overload - Added
Seq[..Option]alternative to...Option*for tasks - Documentation generation fixed to use latest value of version
- Fixed
BasicVersion.incrementMicro - Fixed test class loading so that
sbtcan test the version of sbt being developed (previously, the classes from the executing version of sbt were tested)
0.2.1 to 0.2.2
- Package name is now a call-by-name parameter for the package action
- Fixed release action calling compile multiple times
0.2.0 to 0.2.1
- Added some action descriptions
- jar name now comes from normalized name (lowercased and spaces to dashes)
- Some cleanups related to creating filters
- Path should only ‘get’ itself if the underlying file exists to be consistent with other PathFinders
- Added
---operator forPathFinderthat excludes paths from the PathFinder argument - Removed
***operator onPathFinder **operator onPathFindermatches all descendents or self that match the NameFilter argument- The above should fix bug
#6 - Added version increment and release actions.
- Can now build sbt with sbt. Build scripts
buildandcleanwill still exist.
0.1.9 to 0.2.0
- Implemented typed properties and access to system properties
- Renamed
metadatadirectory toproject - Information previously in
infofile now obtained by properties: info.name --> nameinfo.currentVersion --> version- Concrete
Projectsubclasses should have a constructor that accepts a single argument of type ProjectInfo (argument dependencies: Iterable[Project] has been merged into ProjectInfo)
0.1.8 to 0.1.9
- Better default implementation of
allSources. - Generate warning if two jars on classpath have the same name.
- Upgraded to specs 1.4.0
- Upgraded to
ScalaCheck1.5 - Changed some update options to be final vals instead of objects.
- Added some more API documentation.
- Removed release action.
- Split compilation into separate main and test compilations.
- A failure in a
ScalaTestrun now fails the test action. - Implemented reporters for
compile/scaladoc,ScalaTest, ScalaCheck, and specs that delegate to the appropriate sbt.Logger.
0.1.7 to 0.1.8
- Improved configuring of tests to exclude.
- Simplified version handling.
- Task
&&operator properly handles dependencies of tasks it combines. - Changed method of inline library dependency declarations to be simpler.
- Better handling of errors in parallel execution.
0.1.6 to 0.1.7
- Added graph action to generate dot files (for graphiz) from dependency information (work in progress).
- Options are now passed to tasks as varargs.
- Redesigned
Pathproperly, includingPathFinderreturning a Set[Path] now instead of Iterable[Path]. - Moved paths out of
ScalaProjectand intoBasicProjectPathsto keep path definitions separate from task definitions. - Added initial support for managing third-party libraries through the update task, which must be explicitly called (it is not a dependency of compile or any other task). This is experimental, undocumented, and known to be incomplete.
- Parallel execution implementation at the project level, disabled by default. To enable, add: scala override def parallelExecution = true to your project definition. In order for logging to make sense, all project logging is buffered until the project is finished executing. Still to be done is some sort of notification of project execution (which ones are currently executing, how many remain)
runandconsoleare now specified as “interactive” actions, which means they are only executed on the project in which they are defined when called directly, and not on all dependencies. Their dependencies are still run on dependent projects.- Generalized conditional tasks a bit. Of note is that analysis is no longer required to be in metadata/analysis, but is now in target/analysis by default.
- Message now displayed when project definition is recompiled on startup
- Project no longer inherits from Logger, but now has a log member.
- Dependencies passed to
projectare checked for null (may help with errors related to initialization/circular dependencies) - Task dependencies are checked for null
- Projects in a multi-project configuration are checked to ensure that output paths are different (check can be disabled)
- Made
updatetask globally synchronized because Ivy is not thread-safe. - Generalized test framework, directly invoking frameworks now (used reflection before).
- Moved license files to licenses/
- Added support for
specsand some support forScalaTest(the test action doesn’t fail if ScalaTest tests fail). - Added
specs,ScalaCheck,ScalaTestjars to lib/ - These are now required for compilation, but are optional at runtime.
- Added the appropriate licenses and notices.
- Options for
updateaction are now taken from updateOptions member. - Fixed
SbtManagerinline dependency manager to work properly. - Improved Ivy configuration handling (not compiled with test dependencies yet though).
- Added case class implementation of
SbtManagercalled SimpleManager. - Project definitions not specifying dependencies can now use just a single argument constructor.
0.1.5 to 0.1.6
runandconsolehandleSystem.exitand multiple threads in user code under certain circumstances (see running project code).
0.1.4 to 0.1.5
- Generalized interface with plugin (see Analysis Callback)
- Split out task implementations and paths from
Projectto ScalaProject - Subproject support (changed required project constructor signature: see sbt/DefaultProject.scala)
- Can specify dependencies between projects
- Execute tasks across multiple projects
- Classpath of all dependencies included when compiling
- Proper inter-project source dependency handling
- Can change to a project in an interactive session to work only on that project (and its dependencies)
- External dependency handling
- Tracks non-source dependencies (compiled classes and jars)
- Requires each class to be provided by exactly one classpath element (This means you cannot have two versions of the same class on the classpath, e.g. from two versions of a library)
- Changes in a project propagate the right source recompilations in dependent projects
- Consequences:
- Recompilation when changing java/scala version
- Recompilation when upgrading libraries (again, as indicated in the second point, situations where you have library-1.0.jar and library-2.0.jar on the classpath at the same time are not handled predictably. Replacing library-1.0.jar with library-2.0.jar should work as expected.)
- Changing sbt version will recompile project definitions
0.1.3 to 0.1.4
- Autodetection of Project definitions.
- Simple tab completion/history in an interactive session with JLine
- Added descriptions for most actions
0.1.2 to 0.1.3
- Dependency management between tasks and auto-discovery tasks.
- Should work on Windows.
0.1.1 to 0.1.2
- Should compile/build on Java 1.5
- Fixed run action implementation to include scala library on classpath
- Made project configuration easier
0.1 to 0.1.1
- Fixed handling of source files without a package
- Added easy project setup
Migrating from 0.7 to 0.10+
The assumption here is that you are familiar with sbt 0.7 but new to sbt 0.13.11.
sbt 0.13.11’s many new capabilities can be a bit overwhelming, but this page should help you migrate to 0.13.11 with a minimum of fuss.
Why move to 0.13.11?
- Faster builds (because it is smarter at re-compiling only what it must)
- Easier configuration. For simple projects a single
build.sbtfile in your root directory is easier to create than project/build/MyProject.scala was. - No more
lib_manageddirectory, reducing disk usage and avoiding backup and version control hassles. updateis now much faster and it’s invoked automatically by sbt.- Terser output. (Yet you can ask for more details if something goes wrong.)
Step 1: Read the Getting Started Guide for sbt 0.13.11
Reading the Getting Started Guide will probably save you a lot of confusion.
Step 2: Install sbt 0.13.11
Download sbt 0.13.11 as described on the setup page.
You can run 0.13.11 the same way that you run 0.7.x, either simply:
$ java -jar sbt-launch.jar
Or (as most users do) with a shell script, as described on the setup page.
For more details see the setup page.
Step 3: A technique for switching an existing project
Here is a technique for switching an existing project to 0.13.11 while retaining the ability to switch back again at will. Some builds, such as those with subprojects, are not suited for this technique, but if you learn how to transition a simple project it will help you do a more complex one next.
Preserve project/ for 0.7.x project
Rename your project/ directory to something like project-old. This
will hide it from sbt 0.13.11 but keep it in case you want to switch
back to 0.7.x.
Create build.sbt for 0.13.11
Create a build.sbt file in the root directory of your project. See
.sbt build definition in the Getting
Started Guide, and for simple examples.
If you have a simple project
then converting your existing project file to this format is largely a
matter of re-writing your dependencies and maven archive declarations in
a modified yet familiar syntax.
This build.sbt file combines aspects of the old
project/build/ProjectName.scala and build.properties files. It looks
like a property file, yet contains Scala code in a special format.
A build.properties file like:
#Project properties
#Fri Jan 07 15:34:00 GMT 2011
project.organization=org.myproject
project.name=My Project
sbt.version=0.7.7
project.version=1.0
def.scala.version=2.7.7
build.scala.versions=2.8.1
project.initialize=false
Now becomes part of your build.sbt file with lines like:
name := "My Project"

version := "1.0"

organization := "org.myproject"

scalaVersion := "2.9.2"
Currently, a project/build.properties is still needed to explicitly
select the sbt version. For example:
Run sbt 0.13.11
Now launch sbt. If you’re lucky it works and you’re done. For help debugging, see below.
Switching back to sbt 0.7.x
If you get stuck and want to switch back, you can leave your build.sbt
file alone. sbt 0.7.x will not understand or notice it. Just rename your
0.13.11 project directory to something like project10 and rename
the backup of your old project from project-old to project again.
FAQs
There’s a section in the FAQ about migration from 0.7 that covers several other important points.
Detailed Topics
This part of the documentation has pages documenting particular sbt topics in detail. Before reading anything in here, you will need the information in the Getting Started Guide as a foundation.
Other resources include the How to and Developer’s Guide sections in this reference, and the API Documentation
Using sbt
This part of the documentation has pages documenting particular sbt topics in detail. Before reading anything in here, you will need the information in the Getting Started Guide as a foundation.
Command Line Reference
This page is a relatively complete list of command line options, commands, and tasks you can use from the sbt interactive prompt or in batch mode. See Running in the Getting Started Guide for an intro to the basics, while this page has a lot more detail.
Notes on the command line
- There is a technical distinction in sbt between tasks, which are “inside” the build definition, and commands, which manipulate the build definition itself. If you’re interested in creating a command, see Commands. This specific sbt meaning of “command” means there’s no good general term for “thing you can type at the sbt prompt”, which may be a setting, task, or command.
- Some tasks produce useful values. The
toStringrepresentation of these values can be shown usingshow <task>to run the task instead of just<task>. - In a multi-project build, execution dependencies and the aggregate setting control which tasks from which projects are executed. See multi-project builds.
Project-level tasks
cleanDeletes all generated files (thetargetdirectory).publishLocalPublishes artifacts (such as jars) to the local Ivy repository as described in Publishing.publishPublishes artifacts (such as jars) to the repository defined by the publishTo setting, described in Publishing.updateResolves and retrieves external dependencies as described in library dependencies.
Configuration-level tasks
Configuration-level tasks are tasks associated with a configuration. For
example, compile, which is equivalent to compile:compile, compiles
the main source code (the compile configuration). test:compile
compiles the test source code (test test configuration). Most tasks
for the compile configuration have an equivalent in the test
configuration that can be run using a test: prefix.
compileCompiles the main sources (in thesrc/main/scaladirectory).test:compilecompiles test sources (in the src/test/scala/ directory).consoleStarts the Scala interpreter with a classpath including the compiled sources, all jars in the lib directory, and managed libraries. To return to sbt, type :quit, Ctrl+D (Unix), or Ctrl+Z (Windows). Similarly, test:console starts the interpreter with the test classes and classpath.consoleQuickStarts the Scala interpreter with the project’s compile-time dependencies on the classpath. test:consoleQuick uses the test dependencies. This task differs from console in that it does not force compilation of the current project’s sources.consoleProjectEnters an interactive session with sbt and the build definition on the classpath. The build definition and related values are bound to variables and common packages and values are imported. See the consoleProject documentation for more information.docGenerates API documentation for Scala source files insrc/main/scalausing scaladoc.test:docgenerates API documentation for source files insrc/test/scala.packageCreates a jar file containing the files insrc/main/resourcesand the classes compiled fromsrc/main/scala.test:packagecreates a jar containing the files insrc/test/resourcesand the class compiled fromsrc/test/scala.packageDocCreates a jar file containing API documentation generated from Scala source files in src/main/scala. test:packageDoc creates a jar containing API documentation for test sources files in src/test/scala.packageSrc: Creates a jar file containing all main source files and resources. The packaged paths are relative to src/main/scala and src/main/resources. Similarly, test:packageSrc operates on test source files and resources.run <argument>*Runs the main class for the project in the same virtual machine as sbt. The main class is passed the arguments provided. Please see Running Project Code for details on the use of System.exit and multithreading (including GUIs) in code run by this action.test:runruns a main class in the test code.runMain <main-class> <argument>*Runs the specified main class for the project in the same virtual machine as sbt. The main class is passed the arguments provided. Please see Running Project Code for details on the use of System.exit and multithreading (including GUIs) in code run by this action.test:runMainruns the specified main class in the test code.testRuns all tests detected during test compilation. See Testing for details.testOnly <test>*Runs the tests provided as arguments.*(will be) interpreted as a wildcard in the test name. See Testing for details.testQuick <test>*Runs the tests specified as arguments (or all tests if no arguments are given) that:- have not been run yet OR
- failed the last time they were run OR
- had any transitive dependencies recompiled since the last
successful run
*(will be) interpreted as a wildcard in the test name. See [Testing][Testing] for details.
General commands
exitorquitEnd the current interactive session or build. Additionally, Ctrl+D (Unix) or Ctrl+Z (Windows) will exit the interactive prompt.help <command>Displays detailed help for the specified command. If the command does not exist, help lists detailed help for commands whose name or description match the argument, which is interpreted as a regular expression. If no command is provided, displays brief descriptions of the main commands. Related commands are tasks and settings.projects [add|remove <URI>]List all available projects if no arguments provided or adds/removes the build at the provided URI. (See multi-project builds for details on multi-project builds.)project <project-id>Change the current project to the project with ID<project-id>. Further operations will be done in the context of the given project. (See multi-project builds for details on multiple project builds.)~ <command>Executes the project specified action or method whenever source files change. See Triggered Execution for details.< filenameExecutes the commands in the given file. Each command should be on its own line. Empty lines and lines beginning with ’#’ are ignored+ <command>Executes the project specified action or method for all versions of Scala defined in the crossScalaVersions setting.++ <version|home-directory> <command>Temporarily changes the version of Scala building the project and executes the provided command.<command>is optional. The specified version of Scala is used until the project is reloaded, settings are modified (such as by the set or session commands), or ++ is run again.<version>does not need to be listed in the build definition, but it must be available in a repository. Alternatively, specify the path to a Scala installation.; A ; BExecute A and if it succeeds, run B. Note that the leading semicolon is required.eval <Scala-expression>Evaluates the given Scala expression and returns the result and inferred type. This can be used to set system properties, as a calculator, to fork processes, etc … For example:> eval System.setProperty("demo", "true") > eval 1+1 > eval "ls -l" !
Commands for managing the build definition
reload [plugins|return]If no argument is specified, reloads the build, recompiling any build or plugin definitions as necessary. reload plugins changes the current project to the build definition project (in project/). This can be useful to directly manipulate the build definition. For example, running clean on the build definition project will force snapshots to be updated and the build definition to be recompiled. reload return changes back to the main project.set <setting-expression>Evaluates and applies the given setting definition. The setting applies until sbt is restarted, the build is reloaded, or the setting is overridden by another set command or removed by the session command. See [.sbt build definition][Basic-Def] and [inspecting settings][Inspecting-Settings] for details.session <command>Manages session settings defined by thesetcommand. It can persist settings configured at the prompt. See Inspecting-Settings for details.inspect <setting-key>Displays information about settings, such as the value, description, defining scope, dependencies, delegation chain, and related settings. See Inspecting Settings for details.
Command Line Options
System properties can be provided either as JVM options, or as SBT
arguments, in both cases as -Dprop=value. The following properties
influence SBT execution. Also see sbt launcher.
| Property | Values | Default | Meaning |
|---|---|---|---|
| sbt.log.noformat | Boolean | false | If true, disable ANSI color codes. Useful on build servers or terminals that do not support color. |
| sbt.global.base` | Directory | ~/.sbt/0.13 | The directory containing global settings and plugins |
| sbt.ivy.home | Directory | ~/.ivy2 | The directory containing the local Ivy repository and artifact cache |
| sbt.boot.directory | Directory | ~/.sbt/boot | Path to shared boot directory |
| sbt.main.class | String | ||
| xsbt.inc.debug | Boolean | false | |
| sbt.extraClasspath | Classpath Entries | (jar files or directories) that are added to sbt's classpath. Note that the entries are deliminted by comma, e.g.: entry1, entry2,... See also resource in the sbt launcher documentation. | |
| sbt.version | Version | 0.13.11 | sbt version to use, usually taken from project/build.properties. |
| sbt.boot.properties | File | The path to find the sbt boot properties file. This can be a relative path, relative to the sbt base directory, the users home directory or the location of the sbt jar file, or it can be an absolute path or an absolute file URI. | |
| sbt.override.build.repos | Boolean | false | If true, repositories configured in a build definition are ignored and the repositories configured for the launcher are used instead. See sbt.repository.config and the sbt launcher documentation. |
| sbt.repository.config | File | ~/.sbt/repositories | A file containing the repositories to use for the launcher. The format is the same as a [repositories] section for a sbt launcher configuration file. This setting is typically used in conjuction with setting sbt.override.build.repos to true (see previous row and the sbt launcher documentation). |
Console Project
Description
The consoleProject task starts the Scala interpreter with access to
your project definition and to sbt. Specifically, the interpreter is
started up with these commands already executed:
import sbt._
import Process._
import Keys._
import <your-project-definition>._
import currentState._
import extracted._
import cpHelpers._
For example, running external processes with sbt’s process library (to be included in the standard library in Scala 2.9):
> "tar -zcvf project-src.tar.gz src" !
> "find project -name *.jar" !
> "cat build.sbt" #| "grep version" #> new File("sbt-version") !
> "grep -r null src" #|| "echo null-free" !
> uri("http://databinder.net/dispatch/About").toURL #> file("About.html") !
consoleProject can be useful for creating and modifying your build in
the same way that the Scala interpreter is normally used to explore
writing code. Note that this gives you raw access to your build. Think
about what you pass to IO.delete, for example.
Accessing settings
To get a particular setting, use the form:
> val value = (<key> in <scope>).eval
Examples
> IO.delete( (classesDirectory in Compile).eval )
Show current compile options:
> (scalacOptions in Compile).eval foreach println
Show additionally configured repositories.
> resolvers.eval foreach println
Evaluating tasks
To evaluate a task (and its dependencies), use the same form:
> val value = (<key> in <scope>).eval
Examples
Show all repositories, including defaults.
> fullResolvers.eval foreach println
Show the classpaths used for compilation and testing:
> (fullClasspath in Compile).eval.files foreach println
> (fullClasspath in Test).eval.files foreach println
State
The current build State is available as
currentState. The contents of currentState are imported by default
and can be used without qualification.
Examples
Show the remaining commands to be executed in the build (more
interesting if you invoke consoleProject like
; consoleProject ; clean ; compile):
> remainingCommands
Show the number of currently registered commands:
> definedCommands.size
Cross-building
Introduction
Different versions of Scala can be binary incompatible, despite
maintaining source compatibility. This page describes how to use sbt
to build and publish your project against multiple versions of Scala and
how to use libraries that have done the same.
Publishing Conventions
The underlying mechanism used to indicate which version of Scala a
library was compiled against is to append _<scala-version> to the
library’s name. For Scala 2.10.0 and later, the binary version is used.
For example, dispatch becomes dispatch_2.8.1 for the variant
compiled against Scala 2.8.1 and dispatch_2.10 when compiled against
2.10.0, 2.10.0-M1 or any 2.10.x version. This fairly simple approach
allows interoperability with users of Maven, Ant and other build tools.
The rest of this page describes how sbt handles this for you as part
of cross-building.
Using Cross-Built Libraries
To use a library built against multiple versions of Scala, double the
first % in an inline dependency to be %%. This tells sbt that it
should append the current version of Scala being used to build the
library to the dependency’s name. For example:
libraryDependencies += "net.databinder" %% "dispatch" % "0.8.0"
A nearly equivalent, manual alternative for a fixed version of Scala is:
libraryDependencies += "net.databinder" % "dispatch_2.10" % "0.8.0"
or for Scala versions before 2.10:
libraryDependencies += "net.databinder" % "dispatch_2.8.1" % "0.8.0"
Cross-Building a Project
Define the versions of Scala to build against in the
crossScalaVersions setting. Versions of Scala 2.8.0 or later are
allowed. For example, in a .sbt build definition:
crossScalaVersions := Seq("2.8.2", "2.9.2", "2.10.0")
To build against all versions listed in build.scala.versions, prefix
the action to run with +. For example:
> + package
A typical way to use this feature is to do development on a single Scala
version (no + prefix) and then cross-build (using +) occasionally
and when releasing. The ultimate purpose of + is to cross-publish your
project. That is, by doing:
> + publish
you make your project available to users for different versions of Scala. See Publishing for more details on publishing your project.
In order to make this process as quick as possible, different output and managed dependency directories are used for different versions of Scala. For example, when building against Scala 2.10.0,
./target/becomes./target/scala_2.1.0/./lib_managed/becomes./lib_managed/scala_2.10/
Packaged jars, wars, and other artifacts have _<scala-version>
appended to the normal artifact ID as mentioned in the Publishing
Conventions section above.
This means that the outputs of each build against each version of Scala
are independent of the others. sbt will resolve your dependencies for
each version separately. This way, for example, you get the version of
Dispatch compiled against 2.8.1 for your 2.8.1 build, the version
compiled against 2.10 for your 2.10.x builds, and so on. You can have
fine-grained control over the behavior for for different Scala versions
by using the cross method on ModuleID These are equivalent:
"a" % "b" % "1.0"
"a" % "b" % "1.0" cross CrossVersion.Disabled
These are equivalent:
"a" %% "b" % "1.0"
"a" % "b" % "1.0" cross CrossVersion.binary
This overrides the defaults to always use the full Scala version instead of the binary Scala version:
"a" % "b" % "1.0" cross CrossVersion.full
This uses a custom function to determine the Scala version to use based on the binary Scala version:
"a" % "b" % "1.0" cross CrossVersion.binaryMapped {
  case "2.9.1" => "2.9.0" // remember that pre-2.10, binary=full
  case "2.10" => "2.10.0" // useful if a%b was released with the old style
  case x => x
}
This uses a custom function to determine the Scala version to use based on the full Scala version:
"a" % "b" % "1.0" cross CrossVersion.fullMapped {
  case "2.9.1" => "2.9.0"
  case x => x
}
A custom function is mainly used when cross-building and a dependency isn’t available for all Scala versions or it uses a different convention than the default.
As a final note, you can use ++ <version> to temporarily switch the
Scala version currently being used to build. <version> should be
either a version for Scala published to a repository, as in ++ 2.10.0
or the path to a Scala home directory, as in ++ /path/to/scala/home.
See Command Line Reference for details.
Interacting with the Configuration System
Central to sbt is the new configuration system, which is designed to enable extensive customization. The goal of this page is to explain the general model behind the configuration system and how to work with it. The Getting Started Guide (see .sbt files) describes how to define settings; this page describes interacting with them and exploring them at the command line.
Selecting commands, tasks, and settings
A fully-qualified reference to a setting or task looks like:
{<build-uri>}<project-id>/config:intask::key
This “scoped key” reference is used by commands like last and
inspect and when selecting a task to run. Only key is usually
required by the parser; the remaining optional pieces select the scope.
These optional pieces are individually referred to as scope axes. In the
above description, {<build-uri>} and <project-id>/ specify the
project axis, config: is the configuration axis, and intask is the
task-specific axis. Unspecified components are taken to be the current
project (project axis) or auto-detected (configuration and task axes).
An asterisk (*) is used to explicitly refer to the Global context,
as in */*:key.
Selecting the configuration
In the case of an unspecified configuration (that is, when the config:
part is omitted), if the key is defined in Global, that is selected.
Otherwise, the first configuration defining the key is selected, where
order is determined by the project definition’s configurations member.
By default, this ordering is compile, test, ...
For example, the following are equivalent when run in a project root
in the build in /home/user/sample/:
> compile
> compile:compile
> root/compile
> root/compile:compile
> {file:/home/user/sample/}root/compile:compile
As another example, run by itself refers to compile:run because
there is no global run task and the first configuration searched,
compile, defines a run. Therefore, to reference the run task for
the Test configuration, the configuration axis must be specified like
test:run. Some other examples that require the explicit test: axis:
> test:consoleQuick
> test:console
> test:doc
> test:package
Task-specific Settings
Some settings are defined per-task. This is used when there are several
related tasks, such as package, packageSrc, and packageDoc, in the
same configuration (such as compile or test). For package tasks,
their settings are the files to package, the options to use, and the
output file to produce. Each package task should be able to have
different values for these settings.
This is done with the task axis, which selects the task to apply a setting to. For example, the following prints the output jar for the different package tasks.
> package::artifactPath
[info] /home/user/sample/target/scala-2.8.1.final/demo_2.8.1-0.1.jar

> packageSrc::artifactPath
[info] /home/user/sample/target/scala-2.8.1.final/demo_2.8.1-0.1-src.jar

> packageDoc::artifactPath
[info] /home/user/sample/target/scala-2.8.1.final/demo_2.8.1-0.1-doc.jar

> test:package::artifactPath
[info] /home/user/sample/target/scala-2.8.1.final/root_2.8.1-0.1-test.jar
Note that a single colon : follows a configuration axis and a double
colon :: follows a task axis.
Discovering Settings and Tasks
This section discusses the inspect command, which is useful for
exploring relationships between settings. It can be used to determine
which setting should be modified in order to affect another setting, for
example.
Value and Provided By
The first piece of information provided by inspect is the type of a
task or the value and type of a setting. The following section of output
is labeled “Provided by”. This shows the actual scope where the setting
is defined. For example,
> inspect libraryDependencies
[info] Setting: scala.collection.Seq[sbt.ModuleID] = List(org.scalaz:scalaz-core:6.0-SNAPSHOT, org.scala-tools.testing:scalacheck:1.8:test)
[info] Provided by:
[info]  {file:/home/user/sample/}root/*:libraryDependencies
...
This shows that libraryDependencies has been defined on the current
project ({file:/home/user/sample/}root) in the global configuration
(*:). For a task like update, the output looks like:
> inspect update
[info] Task: sbt.UpdateReport
[info] Provided by:
[info]  {file:/home/user/sample/}root/*:update
...
Related Settings
The “Related” section of inspect output lists all of the definitions
of a key. For example,
> inspect compile
...
[info] Related:
[info]  test:compile
This shows that in addition to the requested compile:compile task,
there is also a test:compile task.
Dependencies
Forward dependencies show the other settings (or tasks) used to define a
setting (or task). Reverse dependencies go the other direction, showing
what uses a given setting. inspect provides this information based on
either the requested dependencies or the actual dependencies. Requested
dependencies are those that a setting directly specifies. Actual
settings are what those dependencies get resolved to. This distinction
is explained in more detail in the following sections.
Requested Dependencies
As an example, we’ll look at console:
> inspect console
...
[info] Dependencies:
[info]  compile:console::fullClasspath
[info]  compile:console::scalacOptions
[info]  compile:console::initialCommands
[info]  compile:console::cleanupCommands
[info]  compile:console::compilers
[info]  compile:console::taskTemporary-directory
[info]  compile:console::scalaInstance
[info]  compile:console::streams

...
This shows the inputs to the console task. We can see that it gets its
classpath and options from fullClasspath and
scalacOptions(for console). The information provided by the inspect
command can thus assist in finding the right setting to change. The
convention for keys, like console and fullClasspath, is that the
Scala identifier is camel case, while the String representation is
lowercase and separated by dashes. The Scala identifier for a
configuration is uppercase to distinguish it from tasks like compile
and test. For example, we can infer from the previous example how to
add code to be run when the Scala interpreter starts up:
> set initialCommands in Compile in console := "import mypackage._"
> console
...
import mypackage._
...
inspect showed that console used the setting
compile:console::initialCommands. Translating the initialCommands
string to the Scala identifier gives us initialCommands. compile
indicates that this is for the main sources. console:: indicates that
the setting is specific to console. Because of this, we can set the
initial commands on the console task without affecting the
consoleQuick task, for example.
Actual Dependencies
inspect actual <scoped-key> shows the actual dependency used. This is
useful because delegation means that the dependency can come from a
scope other than the requested one. Using inspect actual, we see
exactly which scope is providing a value for a setting. Combining
inspect actual with plain inspect, we can see the range of scopes
that will affect a setting. Returning to the example in Requested
Dependencies,
> inspect actual console
...
[info] Dependencies:
[info]  compile:scalacOptions
[info]  compile:fullClasspath
[info]  *:scalaInstance
[info]  */*:initialCommands
[info]  */*:cleanupCommands
[info]  */*:taskTemporaryDirectory
[info]  *:console::compilers
[info]  compile:console::streams
...
For initialCommands, we see that it comes from the global scope
(*/*:). Combining this with the relevant output from
inspect console:
compile:console::initialCommands
we know that we can set initialCommands as generally as the global
scope, as specific as the current project’s console task scope, or
anything in between. This means that we can, for example, set
initialCommands for the whole project and will affect console:
> set initialCommands := "import mypackage._"
...
The reason we might want to set it here this is that other console tasks
will use this value now. We can see which ones use our new setting by
looking at the reverse dependencies output of inspect actual:
> inspect actual initialCommands
...
[info] Reverse dependencies:
[info]  test:console
[info]  compile:consoleQuick
[info]  compile:console
[info]  test:consoleQuick
[info]  *:consoleProject
...
We now know that by setting initialCommands on the whole project, we
affect all console tasks in all configurations in that project. If we
didn’t want the initial commands to apply for consoleProject, which
doesn’t have our project’s classpath available, we could use the more
specific task axis:
> set initialCommands in console := "import mypackage._"
> set initialCommands in consoleQuick := "import mypackage._"`
or configuration axis:
> set initialCommands in Compile := "import mypackage._"
> set initialCommands in Test := "import mypackage._"
The next part describes the Delegates section, which shows the chain of delegation for scopes.
Delegates
A setting has a key and a scope. A request for a key in a scope A may be
delegated to another scope if A doesn’t define a value for the key. The
delegation chain is well-defined and is displayed in the Delegates
section of the inspect command. The Delegates section shows the order
in which scopes are searched when a value is not defined for the
requested key.
As an example, consider the initial commands for console again:
> inspect console::initialCommands
...
[info] Delegates:
[info]  *:console::initialCommands
[info]  *:initialCommands
[info]  {.}/*:console::initialCommands
[info]  {.}/*:initialCommands
[info]  */*:console::initialCommands
[info]  */*:initialCommands
...
This means that if there is no value specifically for
*:console::initialCommands, the scopes listed under Delegates will be
searched in order until a defined value is found.
Triggered Execution
You can make a command run when certain files change by prefixing the
command with ~. Monitoring is terminated when enter is pressed. This
triggered execution is configured by the watch setting, but typically
the basic settings watchSources and pollInterval are modified.
watchSourcesdefines the files for a single project that are monitored for changes. By default, a project watches resources and Scala and Java sources.watchTransitiveSourcesthen combines thewatchSourcesfor the current project and all execution and classpath dependencies (see .scala build definition for details on interProject dependencies).pollIntervalselects the interval between polling for changes in milliseconds. The default value is 500 ms.
Some example usages are described below.
Compile
The original use-case was continuous compilation:
> ~ test:compile

> ~ compile
Testing
You can use the triggered execution feature to run any command or task. One use is for test driven development, as suggested by Erick on the mailing list.
The following will poll for changes to your source code (main or test)
and run testOnly for the specified test.
> ~ testOnly example.TestA
Running Multiple Commands
Occasionally, you may need to trigger the execution of multiple commands. You can use semicolons to separate the commands to be triggered.
The following will poll for source changes and run clean and test.
> ~ ;clean ;test
Scripts, REPL, and Dependencies
sbt has two alternative entry points that may be used to:
- Compile and execute a Scala script containing dependency declarations or other sbt settings
- Start up the Scala REPL, defining the dependencies that should be on the classpath
These entry points should be considered experimental. A notable disadvantage of these approaches is the startup time involved.
Setup
To set up these entry points, you can either use conscript or manually construct the startup scripts. In addition, there is a setup script for the script mode that only requires a JRE installed.
Setup with Conscript
Install conscript.
$ cs sbt/sbt --branch 0.13.11
This will create two scripts: screpl and scalas.
Manual Setup
Duplicate your standard sbt script, which was set up according to
Setup, as scalas and screpl (or whatever
names you like).
scalas is the script runner and should use sbt.ScriptMain as the
main class, by adding the -Dsbt.main.class=sbt.ScriptMain parameter to
the java command. Its command line should look like:
$ java -Dsbt.main.class=sbt.ScriptMain -Dsbt.boot.directory=/home/user/.sbt/boot -jar sbt-launch.jar "$@"
For the REPL runner screpl, use sbt.ConsoleMain as the main class:
$ java -Dsbt.main.class=sbt.ConsoleMain -Dsbt.boot.directory=/home/user/.sbt/boot -jar sbt-launch.jar "$@"
In each case, /home/user/.sbt/boot should be replaced with wherever
you want sbt’s boot directory to be; you might also need to give more
memory to the JVM via -Xms512M -Xmx1536M or similar options, just like
shown in Setup.
Usage
sbt Script runner
The script runner can run a standard Scala script, but with the
additional ability to configure sbt. sbt settings may be embedded in the
script in a comment block that opens with /***.
Example
Copy the following script and make it executable. You may need to adjust
the first line depending on your script name and operating system. When
run, the example should retrieve Scala, the required dependencies,
compile the script, and run it directly. For example, if you name it
shout.scala, you would do on Unix:
chmod u+x shout.scala
./shout.scala
#!/usr/bin/env scalas

/***
scalaVersion := "2.10.6"

resolvers += Resolver.url("typesafe-ivy-repo", url("http://repo.typesafe.com/typesafe/releases"))(Resolver.ivyStylePatterns)

libraryDependencies += "org.scala-sbt" % "io" % "0.13.11"
*/

import sbt._, Path._
import java.io.File
import java.net.{URI, URL}
import sys.process._
def file(s: String): File = new File(s)
def uri(s: String): URI = new URI(s)

val targetDir = file("./target/")
val srcDir = file("./src/")
val toTarget = rebase(srcDir, targetDir)

def processFile(f: File): Unit = {
  val newParent = toTarget(f.getParentFile) getOrElse {sys.error("wat")}
  val file1 = newParent / f.name
  println(s"""$f => $file1""")
  val xs = IO.readLines(f) map { _ + "!" }
  IO.writeLines(file1, xs)
}

val fs: Seq[File] = (srcDir ** "*.scala").get
fs foreach { processFile }
This script will take all *.scala files under src/, append ”!” at the end of the
line, and write them under target/.
sbt REPL with dependencies
The arguments to the REPL mode configure the dependencies to use when starting up the REPL. An argument may be either a jar to include on the classpath, a dependency definition to retrieve and put on the classpath, or a resolver to use when retrieving dependencies.
A dependency definition looks like:
organization%module%revision
Or, for a cross-built dependency:
organization%%module%revision
A repository argument looks like:
"id at url"
Example:
To add the Sonatype snapshots repository and add Scalaz 7.0-SNAPSHOT to REPL classpath:
$ screpl "sonatype-releases at https://oss.sonatype.org/content/repositories/snapshots/" "org.scalaz%%scalaz-core%7.0-SNAPSHOT"
This syntax was a quick hack. Feel free to improve it. The relevant class is IvyConsole.
Understanding Incremental Recompilation
Compiling Scala code with Scalac is slow, but sbt often makes it faster. By understanding how, you can even understand how to make compilation even faster. Modifying source files with many dependencies might require recompiling only those source files (which might take 5 seconds for instance) instead of all the dependencies (which might take 2 minutes for instance). Often you can control which will be your case and make development faster by a few coding practices.
Improving Scala compilation performance is a major goal of sbt, and thus the speedups it gives are one of the major motivations to use it. A significant portion of sbt sources and development efforts deals with strategies for speeding up compilation.
To reduce compile times, sbt uses two strategies:
- Reduce the overhead for restarting Scalac
- Implement smart and transparent strategies for incremental recompilation, so that only modified files and the needed dependencies are recompiled.
- sbt always runs Scalac in the same virtual machine. If one compiles source code using sbt, keeps sbt alive, modifies source code and triggers a new compilation, this compilation will be faster because (part of) Scalac will have already been JIT-compiled.
- Reduce the number of recompiled source.
- When a source file
A.scalais modified, sbt goes to great effort to recompile other source files depending on A.scala only if required - that is, only if the interface of A.scala was modified. With other build management tools (especially for Java, like ant), when a developer changes a source file in a non-binary-compatible way, she needs to manually ensure that dependencies are also recompiled - often by manually running the clean command to remove existing compilation output; otherwise compilation might succeed even when dependent class files might need to be recompiled. What is worse, the change to one source might make dependencies incorrect, but this is not discovered automatically: One might get a compilation success with incorrect source code. Since Scala compile times are so high, running clean is particularly undesirable.
- When a source file
By organizing your source code appropriately, you can minimize the amount of code affected by a change. sbt cannot determine precisely which dependencies have to be recompiled; the goal is to compute a conservative approximation, so that whenever a file must be recompiled, it will, even though we might recompile extra files.
sbt heuristics
sbt tracks source dependencies at the granularity of source files. For each source file, sbt tracks files which depend on it directly; if the interface of classes, objects or traits in a file changes, all files dependent on that source must be recompiled. At the moment sbt uses the following algorithm to calculate source files dependent on a given source file:
- dependencies introduced through inheritance are included transitively; a dependency is introduced through inheritance if a class/trait in one file inherits from a trait/class in another file
- all other direct dependencies are considered by name hashing optimization; other dependencies are also called “member reference” dependencies because they are introduced by referring to a member (class, method, type, etc.) defined in some other source file
- name hashing optimization considers all member reference dependencies in context of interface changes of a given source file; it tries to prune irrelevant dependencies by looking at names of members that got modified and checking if dependent source files mention those names
The name hashing optimization is enabled by default since sbt 0.13.6.
How to take advantage of sbt heuristics
The heuristics used by sbt imply the following user-visible consequences, which determine whether a change to a class affects other classes.
- Adding, removing, modifying
privatemethods does not require recompilation of client classes. Therefore, suppose you add a method to a class with a lot of dependencies, and that this method is only used in the declaring class; marking it private will prevent recompilation of clients. However, this only applies to methods which are not accessible to other classes, hence methods marked with private or private[this]; methods which are private to a package, marked with private[name], are part of the API. - Modifying the interface of a non-private method triggers name hashing optimization
- Modifying one class does require recompiling dependencies of other classes defined in the same file (unlike said in a previous version of this guide). Hence separating different classes in different source files might reduce recompilations.
- Changing the implementation of a method should not affect its clients, unless the return type is inferred, and the new implementation leads to a slightly different type being inferred. Hence, annotating the return type of a non-private method explicitly, if it is more general than the type actually returned, can reduce the code to be recompiled when the implementation of such a method changes. (Explicitly annotating return types of a public API is a good practice in general.)
All the above discussion about methods also applies to fields and members in general; similarly, references to classes also extend to objects and traits.
Implementation of incremental recompilation
This sections goes into details of incremental compiler implementation. It’s starts with an overview of the problem incremental compiler tries to solve and then discusses design choices that led to the current implementation.
Overview
The goal of incremental compilation is detect changes to source files or to the classpath and determine a small set of files to be recompiled in such a way that it’ll yield the final result identical to the result from a full, batch compilation. When reacting to changes the incremental compiler has to goals that are at odds with each other:
- recompile as little source files as possible cover all changes to type checking and produced
- byte code triggered by changed source files and/or classpath
The first goal is about making recompilation fast and it’s a sole point of incremental compiler existence. The second goal is about correctness and sets a lower limit on the size of a set of recompiled files. Determining that set is the core problem incremental compiler tries to solve. We’ll dive a little bit into this problem in the overview to understand what makes implementing incremental compiler a challenging task.
Let’s consider this very simple example:
// A.scala
package a
class A {
  def foo(): Int = 12
}

// B.scala
package b
class B {
  def bar(x: a.A): Int = x.foo()
}
Let’s assume both of those files are already compiled and user changes A.scala so it looks like
this:
// A.scala
package a
class A {
  def foo(): Int = 23 // changed constant
}
The first step of incremental compilation is to compile modified source files. That’s minimal set of
files incremental compiler has to compile. Modified version of A.scala will be compiled
successfully as changing the constant doesn’t introduce type checking errors. The next step of
incremental compilation is determining whether changes applied to A.scala may affect other files.
In the example above only the constant returned by method foo has changed and that does not affect
compilation results of other files.
Let’s consider an other change to A.scala:
// A.scala
package a
class A {
  def foo(): String = "abc" // changed constant and return type
}
As before, the first step of incremental compilation is to compile modified files. In this case we
compile A.scala and compilation will finish successfully. The second step is again determining
whether changes to A.scala affect other files. We see that the return type of the foo public
method has changed so this might affect compilation results of other files. Indeed, B.scala
contains call to the foo method so has to be compiled in the second step. Compilation of B.scala
will fail because of type mismatch in B.bar method and that error will be reported back to the
user. That’s where incremental compilation terminates in this case.
Let’s identify the two main pieces of information that were needed to make decisions in the examples presented above. The incremental compiler algorithm needs to: index source files so it knows whether there were API changes that might affect other source files; e.g. it needs to detect changes to method signatures as in the example above track dependencies between source files; once the change to an API is detected the algorithm needs to determine the set of files that might be potentially affected by this change
Both of those pieces of information are extracted from the Scala compiler.
Interaction with the Scala compiler
Incremental compiler interacts with Scala compiler in many ways: provides three phases additional phases that extract needed information: - api phase extracts public interface of compiled sources by walking trees and indexing types - dependency phase which extracts dependencies between source files (compilation units) - analyzer phase which captures the list of emitted class files defines a custom reporter which allows sbt to gather errors and warnings subclasses Global to: - add the api, dependency and analyzer phases - set the custom reporter manages instances of the custom Global and uses them to compile files it determined that need to be compiled
API extraction phase
The API extraction phase extracts information from Trees, Types and Symbols and maps it to incremental compiler’s internal data structures described in the api.specification file.Those data structures allow to express an API in a way that is independent from Scala compiler version. Also, such representation is persistent so it is serialized on disk and reused between compiler runs or even sbt runs.
The api extraction phase consist of two major components:
- mapping Types and Symbols to incremental compiler representation of an extracted API
- hashing that representation
Mapping Types and Symbols
The logic responsible for mapping Types and Symbols is implemented in
API.scala.
With introduction of Scala reflection we have multiple variants of Types and Symbols. The
incremental compiler uses the variant defined in scala.reflect.internal package.
Also, there’s one design choice that might not be obvious. When type corresponding to a class or a
trait is mapped then all inherited members are copied instead of declarations in that class/trait.
The reason for doing so is that it greatly simplifies analysis of API representation because all
relevant information to a class is stored in one place so there’s no need for looking up parent type
representation. This simplicity comes at a price: the same information is copied over and over again
resulting in a performance hit. For example, every class will have members of java.lang.Object
duplicated along with full information about their signatures.
Hashing an API representation
The incremental compiler (as it’s implemented right now) doesn’t need very fine grained information about the API. The incremental compiler just needs to know whether an API has changed since the last time it was indexed. For that purpose hash sum is enough and it saves a lot of memory. Therefore, API representation is hashed immediately after single compilation unit is processed and only hash sum is stored persistently.
In earlier versions the incremental compiler wouldn’t hash. That resulted in a very high memory consumption and poor serialization/deserialization performance.
The hashing logic is implemented in the HashAPI.scala file.
Dependency phase
The incremental compiler extracts all Symbols given compilation unit depends on (refers to) and then
tries to map them back to corresponding source/class files. Mapping a Symbol back to a source file
is performed by using sourceFile attribute that Symbols derived from source files have set.
Mapping a Symbol back to (binary) class file is more tricky because Scala compiler does not track
origin of Symbols derived from binary files. Therefore simple heuristic is used which maps a
qualified class name to corresponding classpath entry. This logic is implemented in dependency phase
which has an access to the full classpath.
The set of Symbols given compilation unit depend on is obtained by performing a tree walk. The tree walk examines all tree nodes that can introduce a dependency (refer to another Symbol) and gathers all Symbols assigned to them. Symbols are assigned to tree nodes by Scala compiler during type checking phase.
Incremental compiler used to rely on CompilationUnit.depends for collecting dependencies.
However, name hashing requires a more precise dependency information. Check #1002 for
details.
Analyzer phase
Collection of produced class files is extracted by inspecting contents CompilationUnit.icode
property which contains all ICode classes that backend will emit as JVM class files.
Name hashing algorithm
Motivation
Let’s consider the following example:
// A.scala
class A {
  def inc(x: Int): Int = x+1
}

// B.scala
class B {
  def foo(a: A, x: Int): Int = a.inc(x)
}
Let’s assume both of those files are compiled and user changes A.scala so it looks like this:
// A.scala
class A {
  def inc(x: Int): Int = x+1
  def dec(x: Int): Int = x-1
}
Once user hits save and asks incremental compiler to recompile it’s project it will do the following:
- Recompile
A.scalaas the source code has changed (first iteration) - While recompiling it will reindex API structure of
A.scalaand detect it has changed - It will determine that
B.scaladepends onA.scalaand since the API structure ofA.scalahas changedB.scalahas to be recompiled as well (B.scalahas been invalidated) - Recompile
B.scalabecause it was invalidated in 3. due to dependency change - Reindex API structure of
B.scalaand find out that it hasn’t changed so we are done
To summarize, we’ll invoke Scala compiler twice: one time to recompile A.scala and then to
recompile B.scala because A has a new method dec.
However, one can easily see that in this simple scenario recompilation of B.scala is not needed
because addition of dec method to A class is irrelevant to the B class as its not using it
and it is not affected by it in any way.
In case of two files the fact that we recompile too much doesn’t sound too bad. However, in
practice, the dependency graph is rather dense so one might end up recompiling the whole project
upon a change that is irrelevant to almost all files in the whole project. That’s exactly what
happens in Play projects when routes are modified. The nature of routes and reversed routes is that
every template and every controller depends on some methods defined in those two classes (Routes
and ReversedRoutes) but changes to specific route definition usually affects only small subset of
all templates and controllers.
The idea behind name hashing is to exploit that observation and make the invalidation algorithm smarter about changes that can possibly affect a small number of files.
Detection of irrelevant dependencies (direct approach)
I call call a change to API of given source file X.scala irrelevant if doesn’t affect compilation
result of other file Y.scala even if Y.scala does depend on X.scala.
From that definition one can easily see that change can be declared irrelevant only in respect to given dependency. Conversely, one can declare a dependency between two source files irrelevant in respect to given change of an API in one of the files if the change doesn’t affect compilation result of the other file. From now on we’ll focus on detection of irrelevant dependencies.
A very naive way of solving a problem of detecting irrelevant dependencies would be to say that we
keep track of all used methods in Y.scala so if a method in X.scala is added/removed/modified we
just check if it’s being used in Y.scala and if it’s not then we consider dependency of Y.scala
on X.scala irrelevant in this particular case.
Just to give you a sneak preview of problems that quickly arise if you consider that strategy let’s consider those two scenarios.
Inheritance
We’ll see how method not used in other source file might affect it’s compilation result. Let’s consider this structure:
// A.scala
abstract class A

// B.scala
class B extends A
Let’s add an abstract method to class A:
// A.scala
abstract class A {
  def foo(x: Int): Int
}
Now, once we recompile A.scala we could just say that since A.foo is not used in B class then
we don’t need to recompile B.scala. However, it’s not true because B doesn’t implement a newly
introduced, abstract method and an error should be reported.
Therefore, a simple strategy of looking at used methods for determining whether a given dependency is relevant or not is not enough.
Enrichment pattern
Here we’ll see another case of newly introduced method (that is not used anywhere yet) that affects compilation results of other files. This time, no inheritance will be involved but we’ll use enrichment pattern (implicit conversions) instead.
Let’s assume we have the following structure:
// A.scala
class A

// B.scala
class B {
  class AOps(a: A) {
    def foo(x: Int): Int = x+1
  }
  implicit def richA(a: A): AOps = new AOps(a)
  def bar(a: A): Int = a.foo(12) // this is expanded to richA(a).foo so we are calling AOPs.foo method
}
Now, let’s add a foo method directly to A:
// A.scala
class A {
  def foo(x: Int): Int = x-1
}
Now, once we recompile A.scala and detect that there’s a new method defined in A class we would
need to consider whether this is relevant to dependency of B.scala on A.scala. Notice that in
B.scala we do not use A.foo (it didn’t exist at the time B.scala was compiled) but we use
AOps.foo and it’s not immediately clear that AOps.foo has anything to do with A.foo. One would
need to detect the fact that a call to AOps.foo as a result of implicit conversion richA that
was inserted because we failed to find foo on A before.
This kind of analysis gets us very quickly to implementation complexity of Scala’s type checker and is not feasible to implement in a general case.
Too much information to track
All above assumed we actually have full information about structure of API and used methods preserved so we can make use of it. However, as described in Hashing an API representation we do not store the whole representation of the API but only its hash sum. Also, dependencies are tracked at source file level and not at class/method level.
One could imagine reworking current design to track more information but it would be a very big undertake. Also, incremental compiler used to preserve a whole API structure but it switched to hashing due to infeasible memory requirements.
Detection of irrelevant dependencies (name hashing)
As we saw in previous chapter, the direct approach of tracking more information about what’s being used in files becomes tricky very quickly. One would wish to come up with some simpler and less precise approach that still yields big improvements over existing implementation.
The idea is to not track all used members and reason very precisely when given change to some members affects result of compilation of other files. We would track just used simple names instead and we would also track hash sums for all members with given simple name. The simple name means just an unqualified name of a term or a type.
Let’s see first how this simplified strategy addresses the problem with enrichment pattern. We’ll do that by simulating the name hashing algorithm. Let’s start with the original code:
// A.scala
class A

// B.scala
class B {
  class AOps(a: A) {
    def foo(x: Int): Int = x+1
  }
  implicit def richA(a: A): AOps = new AOps(a)
  def bar(a: A): Int = a.foo(12) // this is expanded to richA(a).foo so we are calling AOPs.foo method
}
During compilation of those two files we’ll extract the following information:
usedNames("A.scala"): A
usedNames("B.scala"): B, AOps, a, A, foo, x, Int, richA, AOps, bar

nameHashes("A.scala"): A -> ...
nameHashes("B.scala"): B -> ..., AOps -> ..., foo -> ..., richA -> ..., bar -> ...
The usedNames relation track all names mentioned in given source file. The nameHashes relation
gives us a hash sum of groups of members that are put together in one bucket if they have the same
simple name. In addition to information presented above we still track dependency of B.scala on
A.scala.
Now, if we add foo method to A class:
// A.scala
class A {
  def foo(x: Int): Int = x-1
}
and recompile, we’ll get the following (updated) information:
usedNames("A.scala"): A, foo
nameHashes("A.scala"): A -> ..., foo -> ...
The incremental compiler compares name hashes before and after the change and detects that the hash
sum of foo name has changed (it’s been added). Therefore, it looks at all source files that depend
on A.scala, in our case it’s just B.scala, and checks whether foo appears as used name. It
does, therefore it recompiles B.scala as intendent.
You can see now, that if we added other method to A like xyz then B.scala wouldn’t be
recompiled because nowhere in B.scala the name xyz is mentioned. Therefore, if you have
reasonably non-clashing names you should benefit from a lot of dependencies between source files
marked as irrelevant.
It’s very nice that this simple, name-based heuristic manages to withstand “enrichment pattern” test. However, name-hashing fails to pass other test of inheritance. In order to address that problem, we’ll need to have a closer look at dependencies introduced by inheritance vs dependencies introduced by member references.
Dependencies introduced by member reference and inheritance
The core assumption behind name-hashing algorithm is that if a user adds/modifies/removes a member of a class (e.g. a method) then other results of compilation of classes won’t be affected unless they are using that particular member. Inheritance with various override checks makes the whole situation much more complicated; if you combine it with mix-in composition that introduces a new fields to classes inheriting from traits then you quickly realize that inheritance requires special handling.
The idea is that for now we would switch back to the old scheme whenever inheritance is involved. Therefore, we track dependencies introduced by member reference separately from dependencies introduced by inheritance. All dependencies introduced by inheritance are not a subject to name- hashing analysis so they are never marked as irrelevant.
The intuition behind dependency introduced by inheritance is very simple: it’s a dependency a class/trait introduces by inheriting from other class/trait. All other dependencies are called dependencies by member reference because they are introduced by referring (selecting) a member (method, type alis, inner class, val, etc.) from another class. Notice that in order to inherit from a class you need to refer to it so dependencies introduced by inheritance are a strict subset of member reference dependencies.
Here’s an example which illustrates the distinction:
// A.scala
class A {
  def foo(x: Int): Int = x+1
}

// B.scala
class B(val a: A)

// C.scala
trait C

// D.scala
trait D[T]

// X.scala
class X extends A with C with D[B] {
  // dependencies by inheritance: A, C, D
  // dependencies by member reference: A, C, D, B
}

// Y.scala
class Y {
  def test(b: B): Int = b.a.foo(12)
  // dependencies by member reference: B, Int, A
}
There are two things to notice:
Xdoes not depend onBby inheritance becauseBis passed as type parameter toD; weconsider only types that appear as parents to
XYdoes depend onAeven if there’s no explicit mention ofAin the source file; weselect a method
foodefined inAand that’s enough to introduce a dependency
To sum it up, the way we want to handle inheritance and problems it introduces is to track all dependencies introduced by inheritance separately and have much more strict way of invalidating dependencies. Essentially, whenever there’s a dependency by inheritance it will react to any (even minor) change in parent types.
Computing name hashes
One thing we skimmed over so far is how name hashes are actually computed.
As mentioned before, all definitions are grouped together by simple name and then hashed as one bucket. If a definition (for example a class) contains other definition then those nested definitions do not contribute to a hash sum. The nested definitions will contribute to hashes of buckets selected by their name.
What is included in the interface of a Scala class
It is surprisingly tricky to understand which changes to a class require recompiling its clients. The rules valid for Java are much simpler (even if they include some subtle points as well); trying to apply them to Scala will prove frustrating. Here is a list of a few surprising points, just to illustrate the ideas; this list is not intended to be complete.
- Since Scala supports named arguments in method invocations, the name of method arguments are part of its interface.
- Adding a method to a trait requires recompiling all implementing classes. The same is true for most changes to a method signature in a trait.
- Calls to
super.methodNamein traits are resolved to calls to an abstract method calledfullyQualifiedTraitName$$super$methodName; such methods only exist if they are used. Hence, adding the first call to super.methodName for a specific methodName changes the interface. At present, this is not yet handled—see #466. sealedhierarchies of case classes allow to check exhaustiveness of pattern matching. Hence pattern matches using case classes must depend on the complete hierarchy - this is one reason why dependencies cannot be easily tracked at the class level (see Scala issue SI-2559 for an example.). Check #1104 for detailed discussion of tracking dependencies at class level.
Debugging an interface representation
If you see spurious incremental recompilations or you want understand what changes to an extracted interface cause incremental recompilation then sbt 0.13 has the right tools for that.
In order to debug the interface representation and its changes as you modify and recompile source code you need to do two things:
- Enable incremental compiler’s apiDebug option.
- Add diff-utils library to sbt’s
classpath. Check documentation of
sbt.extraClasspathsystem property in the Command-Line-Reference.
warning
Enabling the
apiDebugoption increases significantly memory consumption and degrades performance of the incremental compiler. The underlying reason is that in order to produce meaningful debugging information about interface differences incremental compiler has to retain the full representation of the interface instead of just hash sum as it does by default.Keep this option enabled when you are debugging incremental compiler problem only.
Below is complete transcript which shows how to enable interface
debugging in your project. First, we download the diffutils jar and
pass it to sbt:
curl -O https://java-diff-utils.googlecode.com/files/diffutils-1.2.1.jar
sbt -Dsbt.extraClasspath=diffutils-1.2.1.jar
[info] Loading project definition from /Users/grek/tmp/sbt-013/project
[info] Set current project to sbt-013 (in build file:/Users/grek/tmp/sbt-013/)
> set incOptions := incOptions.value.copy(apiDebug = true)
[info] Defining *:incOptions
[info] The new value will be used by compile:incCompileSetup, test:incCompileSetup
[info] Reapplying settings...
[info] Set current project to sbt-013 (in build file:/Users/grek/tmp/sbt-013/)
Let’s suppose you have the following source code in Test.scala:
class A {
  def b: Int = 123
}
compile it and then change the Test.scala file so it looks like:
class A {
   def b: String = "abc"
}
and run compile task again. Now if you run last compile you should
see the following lines in the debugging log
> last compile
[...]
[debug] Detected a change in a public API:
[debug] --- /Users/grek/tmp/sbt-013/Test.scala
[debug] +++ /Users/grek/tmp/sbt-013/Test.scala
[debug] @@ -23,7 +23,7 @@
[debug]  ^inherited^ final def ##(): scala.this#Int
[debug]  ^inherited^ final def synchronized[ java.lang.Object.T0 >: scala.this#Nothing <: scala.this#Any](x$1: <java.lang.Object.T0>): <java.lang.Object.T0>
[debug]  ^inherited^ final def $isInstanceOf[ java.lang.Object.T0 >: scala.this#Nothing <: scala.this#Any](): scala.this#Boolean
[debug]  ^inherited^ final def $asInstanceOf[ java.lang.Object.T0 >: scala.this#Nothing <: scala.this#Any](): <java.lang.Object.T0>
[debug]  def <init>(): this#A
[debug] -def b: scala.this#Int
[debug] +def b: java.lang.this#String
[debug]  }
You can see an unified diff of two interface textual represetantions. As
you can see, the incremental compiler detected a change to the return
type of b method.
Why changing the implementation of a method might affect clients, and why type annotations help
This section explains why relying on type inference for return types of public methods is not always appropriate. However this is an important design issue, so we cannot give fixed rules. Moreover, this change is often invasive, and reducing compilation times is not often a good enough motivation. That is why we discuss also some of the implications from the point of view of binary compatibility and software engineering.
Consider the following source file A.scala:
import java.io._
object A {
  def openFiles(list: List[File]) =
    list.map(name => new FileWriter(name))
}
Let us now consider the public interface of trait A. Note that the
return type of method openFiles is not specified explicitly, but
computed by type inference to be List[FileWriter]. Suppose that after
writing this source code, we introduce client code and then modify
A.scala as follows:
import java.io._
object A {
  def openFiles(list: List[File]) =
    Vector(list.map(name => new BufferedWriter(new FileWriter(name))): _*)
}
Type inference will now compute as result type Vector[BufferedWriter];
in other words, changing the implementation lead to a change of the
public interface, with two undesirable consequences:
- Concerning our topic, client code needs to be recompiled, since changing the return type of a method, in the JVM, is a binary-incompatible interface change.
- If our component is a released library, using our new version requires recompiling all client code, changing the version number, and so on. Often not good, if you distribute a library where binary compatibility becomes an issue.
- More in general, client code might now even be invalid. The following code will for instance become invalid after the change:
val res: List[FileWriter] = A.openFiles(List(new File("foo.input")))
Also the following code will break:
val a: Seq[Writer] = new BufferedWriter(new FileWriter("bar.input"))
A.openFiles(List(new File("foo.input")))
How can we avoid these problems?
Of course, we cannot solve them in general: if we want to alter the
interface of a module, breakage might result. However, often we can
remove implementation details from the interface of a module. In the
example above, for instance, it might well be that the intended return
type is more general - namely Seq[Writer]. It might also not be the
case - this is a design choice to be decided on a case-by-case basis. In
this example I will assume however that the designer chooses
Seq[Writer], since it is a reasonable choice both in the above
simplified example and in a real-world extension of the above code.
The client snippets above will now become
val res: Seq[Writer] =
  A.openFiles(List(new File("foo.input")))

val a: Seq[Writer] =
  new BufferedWriter(new FileWriter("bar.input")) +:
  A.openFiles(List(new File("foo.input")))
Further references
The incremental compilation logic is implemented in https://github.com/sbt/sbt/blob/0.13/compile/inc/src/main/scala/inc/Incremental.scala. Some discussion on the incremental recompilation policies is available in issue #322, #288 and #1010.
Configuration
This part of the documentation has pages documenting particular sbt topics in detail. Before reading anything in here, you will need the information in the Getting Started Guide as a foundation.
Classpaths, sources, and resources
This page discusses how sbt builds up classpaths for different actions,
like compile, run, and test and how to override or augment these
classpaths.
Basics
In sbt 0.10 and later, classpaths now include the Scala library and
(when declared as a dependency) the Scala compiler. Classpath-related
settings and tasks typically provide a value of type Classpath. This
is an alias for Seq[Attributed[File]].
Attributed is a type that associates
a heterogeneous map with each classpath entry. Currently, this allows
sbt to associate the Analysis resulting from compilation with the
corresponding classpath entry and for managed entries, the ModuleID
and Artifact that defined the dependency.
To explicitly extract the raw Seq[File], use the files method
implicitly added to Classpath:
val cp: Classpath = ...
val raw: Seq[File] = cp.files
To create a Classpath from a Seq[File], use classpath and to
create an Attributed[File] from a File, use Attributed.blank:
val raw: Seq[File] = ...
val cp: Classpath = raw.classpath

val rawFile: File = ..
val af: Attributed[File] = Attributed.blank(rawFile)
Unmanaged vs managed
Classpaths, sources, and resources are separated into two main categories: unmanaged and managed. Unmanaged files are manually created files that are outside of the control of the build. They are the inputs to the build. Managed files are under the control of the build. These include generated sources and resources as well as resolved and retrieved dependencies and compiled classes.
Tasks that produce managed files should be inserted as follows:
sourceGenerators in Compile +=
    generate( (sourceManaged in Compile).value / "some_directory")
In this example, generate is some function of type File => Seq[File]
that actually does the work. So, we are appending a new task to the list
of main source generators (sourceGenerators in Compile).
To insert a named task, which is the better approach for plugins:
val mySourceGenerator = taskKey[Seq[File]](...)

mySourceGenerator in Compile :=
  generate( (sourceManaged in Compile).value / "some_directory")

sourceGenerators in Compile += (mySourceGenerator in Compile).task
The task method is used to refer to the actual task instead of the
result of the task.
For resources, there are similar keys resourceGenerators and
resourceManaged.
Excluding source files by name
The project base directory is by default a source directory in addition
to src/main/scala. You can exclude source files by name
(butler.scala in the example below) like:
excludeFilter in unmanagedSources := "butler.scala"
Read more on How to exclude .scala source file in project folder - Google Groups
External vs internal
Classpaths are also divided into internal and external dependencies. The internal dependencies are inter-project dependencies. These effectively put the outputs of one project on the classpath of another project.
External classpaths are the union of the unmanaged and managed classpaths.
Keys
For classpaths, the relevant keys are:
unmanagedClasspathmanagedClasspathexternalDependencyClasspathinternalDependencyClasspath
For sources:
unmanagedSourcesThese are by default built up from unmanagedSourceDirectories, which consists of scalaSource and javaSource.managedSourcesThese are generated sources.sourcesCombinesmanagedSourcesandunmanagedSources.sourceGeneratorsThese are tasks that generate source files. Typically, these tasks will put sources in the directory provided by sourceManaged.
For resources
unmanagedResourcesThese are by default built up from unmanagedResourceDirectories, which by default is resourceDirectory, excluding files matched by defaultExcludes.managedResourcesBy default, this is empty for standard projects. sbt plugins will have a generated descriptor file here.resourceGeneratorsThese are tasks that generate resource files. Typically, these tasks will put resources in the directory provided by resourceManaged.
Use the inspect command for more details.
See also a related StackOverflow answer.
Example
You have a standalone project which uses a library that loads xxx.properties from classpath at run time. You put xxx.properties inside directory “config”. When you run “sbt run”, you want the directory to be in classpath.
unmanagedClasspath in Runtime += baseDirectory.value / "config"
Compiler Plugin Support
There is some special support for using compiler plugins. You can set
autoCompilerPlugins to true to enable this functionality.
autoCompilerPlugins := true
To use a compiler plugin, you either put it in your unmanaged library
directory (lib/ by default) or add it as managed dependency in the
plugin configuration. addCompilerPlugin is a convenience method for
specifying plugin as the configuration for a dependency:
addCompilerPlugin("org.scala-tools.sxr" %% "sxr" % "0.3.0")
The compile and testCompile actions will use any compiler plugins
found in the lib directory or in the plugin configuration. You are
responsible for configuring the plugins as necessary. For example, Scala
X-Ray requires the extra option:
// declare the main Scala source directory as the base directory
scalacOptions :=
    scalacOptions.value :+ ("-Psxr:base-directory:" + (scalaSource in Compile).value.getAbsolutePath)
You can still specify compiler plugins manually. For example:
scalacOptions += "-Xplugin:<path-to-sxr>/sxr-0.3.0.jar"
Continuations Plugin Example
Support for continuations in Scala 2.8 is implemented as a compiler plugin. You can use the compiler plugin support for this, as shown here.
autoCompilerPlugins := true

addCompilerPlugin("org.scala-lang.plugins" % "continuations" % "2.8.1")

scalacOptions += "-P:continuations:enable"
Version-specific Compiler Plugin Example
Adding a version-specific compiler plugin can be done as follows:
autoCompilerPlugins := true

libraryDependencies +=
    compilerPlugin("org.scala-lang.plugins" % "continuations" % scalaVersion.value)

scalacOptions += "-P:continuations:enable"
Configuring Scala
sbt needs to obtain Scala for a project and it can do this automatically or you can configure it explicitly. The Scala version that is configured for a project will compile, run, document, and provide a REPL for the project code. When compiling a project, sbt needs to run the Scala compiler as well as provide the compiler with a classpath, which may include several Scala jars, like the reflection jar.
Automatically managed Scala
The most common case is when you want to use a version of Scala that is available in a repository. The only required configuration is the Scala version you want to use. For example,
scalaVersion := "2.10.0"
This will retrieve Scala from the repositories configured via the
resolvers setting. It will use this version for building your project:
compiling, running, scaladoc, and the REPL.
Configuring the scala-library dependency
By default, the standard Scala library is automatically added as a dependency. If you want to configure it differently than the default or you have a project with only Java sources, set:
autoScalaLibrary := false
In order to compile Scala sources, the Scala library needs to be on the
classpath. When autoScalaLibrary is true, the Scala library will be on
all classpaths: test, runtime, and compile. Otherwise, you need to add
it like any other dependency. For example, the following dependency
definition uses Scala only for tests:
autoScalaLibrary := false

libraryDependencies += "org.scala-lang" % "scala-library" % scalaVersion.value % "test"
Configuring additional Scala dependencies
When using a Scala dependency other than the standard library, add it as a normal managed dependency. For example, to depend on the Scala compiler,
libraryDependencies += "org.scala-lang" % "scala-compiler" % scalaVersion.value
Note that this is necessary regardless of the value of the
autoScalaLibrary setting described in the previous section.
Configuring Scala tool dependencies
In order to compile Scala code, run scaladoc, and provide a Scala REPL,
sbt needs the scala-compiler jar. This should not be a normal
dependency of the project, so sbt adds a dependency on scala-compiler
in the special, private scala-tool configuration. It may be desirable
to have more control over this in some situations. Disable this
automatic behavior with the managedScalaInstance key:
managedScalaInstance := false
This will also disable the automatic dependency on scala-library. If
you do not need the Scala compiler for anything (compiling, the REPL,
scaladoc, etc…), you can stop here. sbt does not need an instance of
Scala for your project in that case. Otherwise, sbt will still need
access to the jars for the Scala compiler for compilation and other
tasks. You can provide them by either declaring a dependency in the
scala-tool configuration or by explicitly defining scalaInstance.
In the first case, add the scala-tool configuration and add a
dependency on scala-compiler in this configuration. The organization
is not important, but sbt needs the module name to be scala-compiler
and scala-library in order to handle those jars appropriately. For
example,
managedScalaInstance := false

// Add the configuration for the dependencies on Scala tool jars
// You can also use a manually constructed configuration like:
//   config("scala-tool").hide
ivyConfigurations += Configurations.ScalaTool

// Add the usual dependency on the library as well on the compiler in the
//  'scala-tool' configuration
libraryDependencies ++= Seq(
   "org.scala-lang" % "scala-library" % scalaVersion.value,
   "org.scala-lang" % "scala-compiler" % scalaVersion.value % "scala-tool"
)
In the second case, directly construct a value of type
ScalaInstance, typically using a
method in the companion object,
and assign it to scalaInstance. You will also need to add the
scala-library jar to the classpath to compile and run Scala sources.
For example,
managedScalaInstance := false

scalaInstance := ...

unmanagedJars in Compile += scalaInstance.value.libraryJar
Switching to a local Scala version
To use a locally built Scala version, configure Scala home as described in the following section. Scala will still be resolved as before, but the jars will come from the configured Scala home directory.
Using Scala from a local directory
The result of building Scala from source is a Scala home directory
<base>/build/pack/ that contains a subdirectory lib/ containing the
Scala library, compiler, and other jars. The same directory layout is
obtained by downloading and extracting a Scala distribution. Such a
Scala home directory may be used as the source for jars by setting
scalaHome. For example,
scalaHome := Some(file("/home/user/scala-2.10/"))
By default, lib/scala-library.jar will be added to the unmanaged
classpath and lib/scala-compiler.jar will be used to compile Scala
sources and provide a Scala REPL. No managed dependency is recorded on
scala-library. This means that Scala will only be resolved from a
repository if you explicitly define a dependency on Scala or if Scala is
depended on indirectly via a dependency. In these cases, the artifacts
for the resolved dependencies will be substituted with jars in the Scala
home lib/ directory.
Mixing with managed dependencies
As an example, consider adding a dependency on scala-reflect when
scalaHome is configured:
scalaHome := Some(file("/home/user/scala-2.10/"))

libraryDependencies += "org.scala-lang" % "scala-reflect" % scalaVersion.value
This will be resolved as normal, except that sbt will see if
/home/user/scala-2.10/lib/scala-reflect.jar exists. If it does, that
file will be used in place of the artifact from the managed dependency.
Using unmanaged dependencies only
Instead of adding managed dependencies on Scala jars, you can directly
add them. The scalaInstance task provides structured access to the
Scala distribution. For example, to add all jars in the Scala home
lib/ directory,
scalaHome := Some(file("/home/user/scala-2.10/"))

unmanagedJars in Compile ++= scalaInstance.value.jars
To add only some jars, filter the jars from scalaInstance before
adding them.
sbt’s Scala version
sbt needs Scala jars to run itself since it is written in Scala. sbt uses that same version of Scala to compile the build definitions that you write for your project because they use sbt APIs. This version of Scala is fixed for a specific sbt release and cannot be changed. For sbt 0.13.11, this version is Scala 2.10.6. Because this Scala version is needed before sbt runs, the repositories used to retrieve this version are configured in the sbt launcher.
Forking
By default, the run task runs in the same JVM as sbt. Forking is
required under certain circumstances, however.
Or, you might want to fork Java processes when implementing new tasks.
By default, a forked process uses the same Java and Scala versions being
used for the build and the working directory and JVM options of the
current process. This page discusses how to enable and configure forking
for both run and test tasks. Each kind of task may be configured
separately by scoping the relevant keys as explained below.
Enable forking
The fork setting controls whether forking is enabled (true) or not
(false). It can be set in the run scope to only fork run commands or
in the test scope to only fork test commands.
To fork all test tasks (test, testOnly, and testQuick) and run
tasks (run, runMain, test:run, and test:runMain),
fork := true
To enable forking run tasks only, set fork to true in the run
scope.
fork in run := true
To only fork test:run and test:runMain:
fork in (Test, run) := true
Similarly, set fork in (Compile,run) := true to only fork the main
run tasks. run and runMain share the same configuration and cannot
be configured separately.
To enable forking all test tasks only, set fork to true in the
test scope:
fork in test := true
See Testing for more control over how tests are assigned to JVMs and what options to pass to each group.
Change working directory
To change the working directory when forked, set baseDirectory in run
or baseDirectory in test:
// sets the working directory for all `run`-like tasks
baseDirectory in run := file("/path/to/working/directory/")

// sets the working directory for `run` and `runMain` only
baseDirectory in (Compile,run) := file("/path/to/working/directory/")

// sets the working directory for `test:run` and `test:runMain` only
baseDirectory in (Test,run) := file("/path/to/working/directory/")

// sets the working directory for `test`, `testQuick`, and `testOnly`
baseDirectory in test := file("/path/to/working/directory/")
Forked JVM options
To specify options to be provided to the forked JVM, set javaOptions:
javaOptions in run += "-Xmx8G"
or specify the configuration to affect only the main or test run
tasks:
javaOptions in (Test,run) += "-Xmx8G"
or only affect the test tasks:
javaOptions in test += "-Xmx8G"
Java Home
Select the Java installation to use by setting the javaHome directory:
javaHome := Some(file("/path/to/jre/"))
Note that if this is set globally, it also sets the Java installation
used to compile Java sources. You can restrict it to running only by
setting it in the run scope:
javaHome in run := Some(file("/path/to/jre/"))
As with the other settings, you can specify the configuration to affect
only the main or test run tasks or just the test tasks.
Configuring output
By default, forked output is sent to the Logger, with standard output
logged at the Info level and standard error at the Error level. This
can be configured with the outputStrategy setting, which is of type
OutputStrategy.
// send output to the build's standard output and error
outputStrategy := Some(StdoutOutput)

// send output to the provided OutputStream `someStream`
outputStrategy := Some(CustomOutput(someStream: OutputStream))

// send output to the provided Logger `log` (unbuffered)
outputStrategy := Some(LoggedOutput(log: Logger))

// send output to the provided Logger `log` after the process terminates
outputStrategy := Some(BufferedOutput(log: Logger))
As with other settings, this can be configured individually for main or
test run tasks or for test tasks.
Configuring Input
By default, the standard input of the sbt process is not forwarded to
the forked process. To enable this, configure the connectInput
setting:
connectInput in run := true
Direct Usage
To fork a new Java process, use the
Fork API. The values of interest are
Fork.java, Fork.javac, Fork.scala, and Fork.scalac. These are of
type Fork and provide apply and fork
methods. For example, to fork a new Java process, :
val options = ForkOptions(...)
val arguments: Seq[String] = ...
val mainClass: String = ...
val exitCode: Int = Fork.java(options, mainClass +: arguments)
ForkOptions defines the Java installation to use, the working directory, environment variables, and more. For example, :
val cwd: File = ...
val javaDir: File = ...
val options = ForkOptions(
   envVars = Map("KEY" -> "value"),
   workingDirectory = Some(cwd),
   javaHome = Some(javaDir)
)
Global Settings
Basic global configuration file
Settings that should be applied to all projects can go in
~/.sbt/0.13/global.sbt (or any file in ~/.sbt/0.13 with a .sbt
extension). Plugins that are defined globally in ~/.sbt/0.13/plugins/
are available to these settings. For example, to change the default
shellPrompt for your projects:
~/.sbt/0.13/global.sbt
shellPrompt := { state =>
  "sbt (%s)> ".format(Project.extract(state).currentProject.id)
}
You can also configure plugins globally added in ~/.sbt/0.13/plugins/build.sbt
(see next paragraph) in that file, but you need to use fully qualified
names for their properties. For example, for sbt-eclipse property withSource
documented in https://github.com/typesafehub/sbteclipse/wiki/Using-sbteclipse,
you need to use:
com.typesafe.sbteclipse.core.EclipsePlugin.EclipseKeys.withSource := true
Global Settings using a Global Plugin
The ~/.sbt/0.13/plugins/ directory is a global plugin project. This
can be used to provide global commands, plugins, or other code.
To add a plugin globally, create ~/.sbt/0.13/plugins/build.sbt containing
the dependency definitions. For example:
addSbtPlugin("org.example" % "plugin" % "1.0")
To change the default shellPrompt for every project using this
approach, create a local plugin ~/.sbt/0.13/plugins/ShellPrompt.scala:
import sbt._
import Keys._

object ShellPrompt extends Plugin {
  override def settings = Seq(
    shellPrompt := { state =>
      "sbt (%s)> ".format(Project.extract(state).currentProject.id) }
  )
}
The ~/.sbt/0.13/plugins/ directory is a full project that is
included as an external dependency of every plugin project. In practice,
settings and code defined here effectively work as if they were defined
in a project’s project/ directory. This means that
~/.sbt/0.13/plugins/ can be used to try out ideas for plugins such as
shown in the shellPrompt example.
Java Sources
sbt has support for compiling Java sources with the limitation that dependency tracking is limited to the dependencies present in compiled class files.
Usage
compilewill compile the sources undersrc/main/javaby default.testCompilewill compile the sources undersrc/test/javaby default.
Pass options to the Java compiler by setting javacOptions:
javacOptions += "-g:none"
As with options for the Scala compiler, the arguments are not parsed by
sbt. Multi-element options, such as -source 1.5, are specified like:
javacOptions ++= Seq("-source", "1.5")
You can specify the order in which Scala and Java sources are built with
the compileOrder setting. Possible values are from the CompileOrder
enumeration: Mixed, JavaThenScala, and ScalaThenJava. If you have
circular dependencies between Scala and Java sources, you need the
default, Mixed, which passes both Java and Scala sources to scalac
and then compiles the Java sources with javac. If you do not have
circular dependencies, you can use one of the other two options to speed
up your build by not passing the Java sources to scalac. For example,
if your Scala sources depend on your Java sources, but your Java sources
do not depend on your Scala sources, you can do:
compileOrder := CompileOrder.JavaThenScala
To specify different orders for main and test sources, scope the setting by configuration:
// Java then Scala for main sources
compileOrder in Compile := CompileOrder.JavaThenScala

// allow circular dependencies for test sources
compileOrder in Test := CompileOrder.Mixed
Note that in an incremental compilation setting, it is not practical to ensure complete isolation between Java sources and Scala sources because they share the same output directory. So, previously compiled classes not involved in the current recompilation may be picked up. A clean compile will always provide full checking, however.
Known issues in mixed mode compilation
The Scala compiler does not identify compile-time constant variables (Java specification 4.12.4) as such when parsing a Java file from source. This issue has several symptoms, described in the Scala ticket SI-5333:
- The selection of a constant variable is rejected when used as an argument to a Java annotation (a compile-time constant expression is required).
- The selection of a constant variable is not replaced by its value, but compiled as an actual field load (the Scala specification 4.1 defines that constant expressions should be replaced by their values).
- Exhaustiveness checking does not work when pattern matching on the values of a Java enumeration (SI-8700).
Since Scala 2.11.4, a similar issue arises when using a Java-defined annotation in
a Scala class. The Scala compiler does not recognize @Retention annotations when
parsing the annotation @interface from source and therefore emits the annotation
with visibility RUNTIME (SI-8928).
Ignoring the Scala source directories
By default, sbt includes src/main/scala and src/main/java in its
list of unmanaged source directories. For Java-only projects, the
unnecessary Scala directories can be ignored by modifying
unmanagedSourceDirectories:
// Include only src/main/java in the compile configuration
unmanagedSourceDirectories in Compile := (javaSource in Compile).value :: Nil

// Include only src/test/java in the test configuration
unmanagedSourceDirectories in Test := (javaSource in Test).value :: Nil
However, there should not be any harm in leaving the Scala directories if they are empty.
Mapping Files
Tasks like package, packageSrc, and packageDoc accept mappings of
type Seq[(File, String)] from an input file to the path to use in the
resulting artifact (jar). Similarly, tasks that copy files accept
mappings of type Seq[(File, File)] from an input file to the
destination file. There are some methods on
PathFinder and
Path that can be useful for constructing
the Seq[(File, String)] or Seq[(File, File)] sequences.
A common way of making this sequence is to start with a PathFinder or
Seq[File] (which is implicitly convertible to PathFinder) and then
call the pair method. See the
PathFinder API for details, but
essentially this method accepts a function File => Option[String] or
File => Option[File] that is used to generate mappings.
Relative to a directory
The Path.relativeTo method is used to map a File to its path
String relative to a base directory or directories. The relativeTo
method accepts a base directory or sequence of base directories to
relativize an input file against. The first directory that is an
ancestor of the file is used in the case of a sequence of base
directories.
For example:
import Path.relativeTo
val files: Seq[File] = file("/a/b/C.scala") :: Nil
val baseDirectories: Seq[File] = file("/a") :: Nil
val mappings: Seq[(File,String)] = files pair relativeTo(baseDirectories)

val expected = (file("/a/b/C.scala") -> "b/C.scala") :: Nil
assert( mappings == expected )
Rebase
The Path.rebase method relativizes an input file against one or more
base directories (the first argument) and then prepends a base String or
File (the second argument) to the result. As with relativeTo, the
first base directory that is an ancestor of the input file is used in
the case of multiple base directories.
For example, the following demonstrates building a Seq[(File, String)]
using rebase:
import Path.rebase
val files: Seq[File] = file("/a/b/C.scala") :: Nil
val baseDirectories: Seq[File] = file("/a") :: Nil
val mappings: Seq[(File,String)] = files pair rebase(baseDirectories, "pre/")

val expected = (file("/a/b/C.scala") -> "pre/b/C.scala" ) :: Nil
assert( mappings == expected )
Or, to build a Seq[(File, File)]:
import Path.rebase
val files: Seq[File] = file("/a/b/C.scala") :: Nil
val baseDirectories: Seq[File] = file("/a") :: Nil
val newBase: File = file("/new/base")
val mappings: Seq[(File,File)] = files pair rebase(baseDirectories, newBase)

val expected = (file("/a/b/C.scala") -> file("/new/base/b/C.scala") ) :: Nil
assert( mappings == expected )
Flatten
The Path.flat method provides a function that maps a file to the last
component of the path (its name). For a File to File mapping, the input
file is mapped to a file with the same name in a given target directory.
For example:
import Path.flat
val files: Seq[File] = file("/a/b/C.scala") :: Nil
val mappings: Seq[(File,String)] = files pair flat

val expected = (file("/a/b/C.scala") -> "C.scala" ) :: Nil
assert( mappings == expected )
To build a Seq[(File, File)] using flat:
import Path.flat
val files: Seq[File] = file("/a/b/C.scala") :: Nil
val newBase: File = file("/new/base")
val mappings: Seq[(File,File)] = files pair flat(newBase)

val expected = (file("/a/b/C.scala") -> file("/new/base/C.scala") ) :: Nil
assert( mappings == expected )
Alternatives
To try to apply several alternative mappings for a file, use |, which
is implicitly added to a function of type A => Option[B]. For example,
to try to relativize a file against some base directories but fall back
to flattening:
import Path.relativeTo
val files: Seq[File] = file("/a/b/C.scala") :: file("/zzz/D.scala") :: Nil
val baseDirectories: Seq[File] = file("/a") :: Nil
val mappings: Seq[(File,String)] = files pair ( relativeTo(baseDirectories) | flat )

val expected = (file("/a/b/C.scala") -> "b/C.scala") ) :: (file("/zzz/D.scala") -> "D.scala") ) :: Nil
assert( mappings == expected )
Local Scala
To use a locally built Scala version, define the scalaHome setting,
which is of type Option[File]. This Scala version will only be used
for the build and not for sbt, which will still use the version it was
compiled against.
Example:
scalaHome := Some(file("/path/to/scala"))
Using a local Scala version will override the scalaVersion setting and
will not work with cross building.
sbt reuses the class loader for the local Scala version. If you recompile your local Scala version and you are using sbt interactively, run
> reload
to use the new compilation results.
Macro Projects
Introduction
Some common problems arise when working with macros.
- The current macro implementation in the compiler requires that macro implementations be compiled before they are used. The solution is typically to put the macros in a subproject or in their own configuration.
- Sometimes the macro implementation should be distributed with the main code that uses them and sometimes the implementation should not be distributed at all.
The rest of the page shows example solutions to these problems.
Defining the Project Relationships
The macro implementation will go in a subproject in the macro/
directory. The core project in the core/ directory will depend
on this subproject and use the macro. This configuration is shown in the
following build definition. build.sbt:
lazy val commonSettings = Seq(
  scalaVersion := "2.11.7",
  organization := "com.example"
)
lazy val scalaReflect = Def.setting { "org.scala-lang" % "scala-reflect" % scalaVersion.value }

lazy val core = (project in file("core")).
  dependsOn(macroSub).
  settings(commonSettings: _*).
  settings(
    // other settings here
  )

lazy val macroSub = (project in file("macro")).
  settings(commonSettings: _*).
  settings(
    libraryDependencies += scalaReflect.value
    // other settings here
  )
This specifies that the macro implementation goes in
macro/src/main/scala/ and tests go in macro/src/test/scala/. It also
shows that we need a dependency on the compiler for the macro
implementation. As an example macro, we’ll use desugar from
macrocosm. macro/src/main/scala/demo/Demo.scala:
package demo

import language.experimental.macros
import scala.reflect.macros.Context

object Demo {

  // Returns the tree of `a` after the typer, printed as source code.
  def desugar(a: Any): String = macro desugarImpl

  def desugarImpl(c: Context)(a: c.Expr[Any]) = {
    import c.universe._

    val s = show(a.tree)
    c.Expr(
      Literal(Constant(s))
    )
  }
}
macro/src/test/scala/demo/Usage.scala:
package demo

object Usage {
   def main(args: Array[String]) {
      val s = Demo.desugar(List(1, 2, 3).reverse)
      println(s)
   }
}
This can be then be run at the console:
Actual tests can be defined and run as usual with macro/test.
The main project can use the macro in the same way that the tests do. For example,
core/src/main/scala/MainUsage.scala:
package demo

object Usage {
   def main(args: Array[String]) {
      val s = Demo.desugar(List(6, 4, 5).sorted)
      println(s)
   }
}
Common Interface
Sometimes, the macro implementation and the macro usage should share some common code. In this case, declare another subproject for the common code and have the main project and the macro subproject depend on the new subproject. For example, the project definitions from above would look like:
lazy val commonSettings = Seq(
  scalaVersion := "2.11.7",
  organization := "com.example"
)
lazy val scalaReflect = Def.setting { "org.scala-lang" % "scala-reflect" % scalaVersion.value }

lazy val core = (project in file("core")).
  dependsOn(macroSub, util).
  settings(commonSettings: _*).
  settings(
    // other settings here
  )

lazy val macroSub = (project in file("macro")).
  dependsOn(util).
  settings(commonSettings: _*).
  settings(
    libraryDependencies += scalaReflect.value
    // other settings here
  )

lazy util = (project in file("util")).
  settings(commonSettings: _*).
  settings(
    // other setting here
  )
Code in util/src/main/scala/ is available for both the macroSub and
main projects to use.
Distribution
To include the macro code with the core code, add the binary and source
mappings from the macro subproject to the core project. For example, the
core Project definition above would now look like:
lazy val core = (project in file("core")).
  dependsOn(macroSub).
  settings(commonSettings: _*).
  settings(
    // include the macro classes and resources in the main jar
    mappings in (Compile, packageBin) ++= mappings.in(macroSub, Compile, packageBin).value,
    // include the macro sources in the main source jar
    mappings in (Compile, packageSrc) ++= mappings.in(macroSub, Compile, packageSrc).value
  )
You may wish to disable publishing the macro implementation. This is
done by overriding publish and publishLocal to do nothing:
lazy val macroSub = (project in file("macro")).
  settings(commonSettings: _*).
  settings(
    libraryDependencies += scalaReflect.value,
    publish := {},
    publishLocal := {}
  )
The techniques described here may also be used for the common interface described in the previous section.
Paths
This page describes files, sequences of files, and file filters. The base type used is java.io.File, but several methods are augmented through implicits:
- RichFile adds methods to File
- PathFinder adds methods to File and Seq[File]
- Path and IO provide general methods related to files and I/O.
Constructing a File
sbt 0.10+ uses
java.io.File
to represent a file instead of the custom sbt.Path class that was in
sbt 0.7 and earlier. sbt defines the alias File for java.io.File so
that an extra import is not necessary. The file method is an alias for
the single-argument File constructor to simplify constructing a new
file from a String:
val source: File = file("/home/user/code/A.scala")
Additionally, sbt augments File with a / method, which is an alias for
the two-argument File constructor for building up a path:
def readme(base: File): File = base / "README"
Relative files should only be used when defining the base directory of a
Project, where they will be resolved properly.
val root = Project("root", file("."))
Elsewhere, files should be absolute or be built up from an absolute base
File. The baseDirectory setting defines the base directory of the
build or project depending on the scope.
For example, the following setting sets the unmanaged library directory to be the “custom_lib” directory in a project’s base directory:
unmanagedBase := baseDirectory.value /"custom_lib"
Or, more concisely:
unmanagedBase := baseDirectory.value /"custom_lib"
This setting sets the location of the shell history to be in the base directory of the build, irrespective of the project the setting is defined in:
historyPath := Some( (baseDirectory in ThisBuild).value / ".history"),
Path Finders
A PathFinder computes a Seq[File] on demand. It is a way to build a
sequence of files. There are several methods that augment File and
Seq[File] to construct a PathFinder. Ultimately, call get on the
resulting PathFinder to evaluate it and get back a Seq[File].
Selecting descendants
The ** method accepts a java.io.FileFilter and selects all files
matching that filter.
def scalaSources(base: File): PathFinder = (base / "src") ** "*.scala"
get
This selects all files that end in .scala that are in src or a
descendent directory. The list of files is not actually evaluated until
get is called:
def scalaSources(base: File): Seq[File] = {
  val finder: PathFinder = (base / "src") ** "*.scala"
  finder.get
}
If the filesystem changes, a second call to get on the same
PathFinder object will reflect the changes. That is, the get method
reconstructs the list of files each time. Also, get only returns
Files that existed at the time it was called.
Selecting children
Selecting files that are immediate children of a subdirectory is done
with a single *:
def scalaSources(base: File): PathFinder = (base / "src") * "*.scala"
This selects all files that end in .scala that are in the src
directory.
Existing files only
If a selector, such as /, **, or *, is used on a path that does
not represent a directory, the path list will be empty:
def emptyFinder(base: File) = (base / "lib" / "ivy.jar") * "not_possible"
Name Filter
The argument to the child and descendent selectors * and ** is
actually a NameFilter. An implicit is used to convert a String to a
NameFilter that interprets * to represent zero or more characters of
any value. See the Name Filters section below for more information.
Combining PathFinders
Another operation is concatenation of PathFinders:
def multiPath(base: File): PathFinder =
   (base / "src" / "main") +++
   (base / "lib") +++
   (base / "target" / "classes")
When evaluated using get, this will return src/main/, lib/, and
target/classes/. The concatenated finder supports all standard
methods. For example,
def jars(base: File): PathFinder =
   (base / "lib" +++ base / "target") * "*.jar"
selects all jars directly in the “lib” and “target” directories.
A common problem is excluding version control directories. This can be accomplished as follows:
def sources(base: File) =
   ( (base / "src") ** "*.scala") --- ( (base / "src") ** ".svn" ** "*.scala")
The first selector selects all Scala sources and the second selects all
sources that are a descendent of a .svn directory. The --- method
removes all files returned by the second selector from the sequence of
files returned by the first selector.
Filtering
There is a filter method that accepts a predicate of type
File => Boolean and is non-strict:
// selects all directories under "src"
def srcDirs(base: File) = ( (base / "src") ** "*") filter { _.isDirectory }

// selects archives (.zip or .jar) that are selected by 'somePathFinder'
def archivesOnly(base: PathFinder) = base filter ClasspathUtilities.isArchive
Empty PathFinder
PathFinder.empty is a PathFinder that returns the empty sequence
when get is called:
assert( PathFinder.empty.get == Seq[File]() )
PathFinder to String conversions
Convert a PathFinder to a String using one of the following methods:
toStringis for debugging. It puts the absolute path of each component on its own line.absStringgets the absolute paths of each component and separates them by the platform’s path separator.getPathsproduces aSeq[String]containing the absolute paths of each component
Mappings
The packaging and file copying methods in sbt expect values of type
Seq[(File,String)] and Seq[(File,File)], respectively. These are
mappings from the input file to its (String) path in the jar or its
(File) destination. This approach replaces the relative path approach
(using the ## method) from earlier versions of sbt.
Mappings are discussed in detail on the Mapping-Files page.
File Filters
The argument to * and ** is of type
java.io.FileFilter.
sbt provides combinators for constructing FileFilters.
First, a String may be implicitly converted to a FileFilter. The
resulting filter selects files with a name matching the string, with a
* in the string interpreted as a wildcard. For example, the following
selects all Scala sources with the word “Test” in them:
def testSrcs(base: File): PathFinder = (base / "src") * "*Test*.scala"
There are some useful combinators added to FileFilter. The || method
declares alternative FileFilters. The following example selects all
Java or Scala source files under “src”:
def sources(base: File): PathFinder = (base / "src") ** ("*.scala" || "*.java")
The -- method excludes a files matching a second filter from the files
matched by the first:
def imageResources(base: File): PathFinder =
   (base/"src"/"main"/"resources") * ("*.png" -- "logo.png")
This will get right.png and left.png, but not logo.png, for
example.
Parallel Execution
Task ordering
Task ordering is specified by declaring a task’s inputs. Correctness of execution requires correct input declarations. For example, the following two tasks do not have an ordering specified:
write := IO.write(file("/tmp/sample.txt"), "Some content.")

read := IO.read(file("/tmp/sample.txt"))
sbt is free to execute write first and then read, read first and
then write, or read and write simultaneously. Execution of these
tasks is non-deterministic because they share a file. A correct
declaration of the tasks would be:
write := {
  val f = file("/tmp/sample.txt")
  IO.write(f, "Some content.")
  f
}

read := IO.read(write.value)
This establishes an ordering: read must run after write. We’ve also
guaranteed that read will read from the same file that write
created.
Practical constraints
Note: The feature described in this section is experimental. The default configuration of the feature is subject to change in particular.
Background
Declaring inputs and dependencies of a task ensures the task is properly ordered and that code executes correctly. In practice, tasks share finite hardware and software resources and can require control over utilization of these resources. By default, sbt executes tasks in parallel (subject to the ordering constraints already described) in an effort to utilize all available processors. Also by default, each test class is mapped to its own task to enable executing tests in parallel.
Prior to sbt 0.12, user control over this process was restricted to:
- Enabling or disabling all parallel execution (parallelExecution := false, for example).
- Enabling or disabling mapping tests to their own tasks (parallelExecution in Test := false, for example).
(Although never exposed as a setting, the maximum number of tasks running at a given time was internally configurable as well.)
The second configuration mechanism described above only selected between running all of a project’s tests in the same task or in separate tasks. Each project still had a separate task for running its tests and so test tasks in separate projects could still run in parallel if overall execution was parallel. There was no way to restriction execution such that only a single test out of all projects executed.
Configuration
sbt 0.12.0 introduces a general infrastructure for restricting task concurrency beyond the usual ordering declarations. There are two parts to these restrictions.
- A task is tagged in order to classify its purpose and resource utilization. For example, the compile task may be tagged as Tags.Compile and Tags.CPU.
- A list of rules restrict the tasks that may execute concurrently. For example, Tags.limit(Tags.CPU, 4) would allow up to four computation-heavy tasks to run at a time.
The system is thus dependent on proper tagging of tasks and then on a good set of rules.
Tagging Tasks
In general, a tag is associated with a weight that represents the task’s
relative utilization of the resource represented by the tag. Currently,
this weight is an integer, but it may be a floating point in the future.
Initialize[Task[T]] defines two methods for tagging the constructed
Task: tag and tagw. The first method, tag, fixes the weight to be
1 for the tags provided to it as arguments. The second method, tagw,
accepts pairs of tags and weights. For example, the following associates
the CPU and Compile tags with the compile task (with a weight of
1).
def myCompileTask = Def.task { ... } tag(Tags.CPU, Tags.Compile)

compile := myCompileTask.value
Different weights may be specified by passing tag/weight pairs to
tagw:
def downloadImpl = Def.task { ... } tagw(Tags.Network -> 3)

download := downloadImpl.value
Defining Restrictions
Once tasks are tagged, the concurrentRestrictions setting sets
restrictions on the tasks that may be concurrently executed based on the
weighted tags of those tasks. This is necessarily a global set of rules,
so it must be scoped in Global. For example,
concurrentRestrictions in Global := Seq(
  Tags.limit(Tags.CPU, 2),
  Tags.limit(Tags.Network, 10),
  Tags.limit(Tags.Test, 1),
  Tags.limitAll( 15 )
)
The example limits:
- the number of CPU-using tasks to be no more than 2
- the number of tasks using the network to be no more than 10
- test execution to only one test at a time across all projects
- the total number of tasks to be less than or equal to 15
Note that these restrictions rely on proper tagging of tasks. Also, the value provided as the limit must be at least 1 to ensure every task is able to be executed. sbt will generate an error if this condition is not met.
Most tasks won’t be tagged because they are very short-lived. These
tasks are automatically assigned the label Untagged. You may want to
include these tasks in the CPU rule by using the limitSum method. For
example:
...
Tags.limitSum(2, Tags.CPU, Tags.Untagged)
...
Note that the limit is the first argument so that tags can be provided as varargs.
Another useful convenience function is Tags.exclusive. This specifies
that a task with the given tag should execute in isolation. It starts
executing only when no other tasks are running (even if they have the
exclusive tag) and no other tasks may start execution until it
completes. For example, a task could be tagged with a custom tag
Benchmark and a rule configured to ensure such a task is executed by
itself:
...
Tags.exclusive(Benchmark)
...
Finally, for the most flexibility, you can specify a custom function of
type Map[Tag,Int] => Boolean. The Map[Tag,Int] represents the
weighted tags of a set of tasks. If the function returns true, it
indicates that the set of tasks is allowed to execute concurrently. If
the return value is false, the set of tasks will not be allowed to
execute concurrently. For example, Tags.exclusive(Benchmark) is
equivalent to the following:
...
Tags.customLimit { (tags: Map[Tag,Int]) =>
  val exclusive = tags.getOrElse(Benchmark, 0)
   //  the total number of tasks in the group
  val all = tags.getOrElse(Tags.All, 0)
   // if there are no exclusive tasks in this group, this rule adds no restrictions
  exclusive == 0 ||
    // If there is only one task, allow it to execute.
    all == 1
}
...
There are some basic rules that custom functions must follow, but the main one to be aware of in practice is that if there is only one task, it must be allowed to execute. sbt will generate a warning if the user defines restrictions that prevent a task from executing at all and will then execute the task anyway.
Built-in Tags and Rules
Built-in tags are defined in the Tags object. All tags listed below
must be qualified by this object. For example, CPU refers to the
Tags.CPU value.
The built-in semantic tags are:
Compile- describes a task that compiles sources.Test- describes a task that performs a test.PublishUpdateUntagged- automatically added when a task doesn’t explicitly define any tags.All- automatically added to every task.
The built-in resource tags are:
Network- describes a task’s network utilization.Disk- describes a task’s filesystem utilization.CPU- describes a task’s computational utilization.
The tasks that are currently tagged by default are:
compile:Compile,CPUtest:Testupdate:Update,Networkpublish,publishLocal:Publish,Network
Of additional note is that the default test task will propagate its
tags to each child task created for each test class.
The default rules provide the same behavior as previous versions of sbt:
concurrentRestrictions in Global := {
  val max = Runtime.getRuntime.availableProcessors
  Tags.limitAll(if(parallelExecution.value) max else 1) :: Nil
}
As before, parallelExecution in Test controls whether tests are mapped
to separate tasks. To restrict the number of concurrently executing
tests in all projects, use:
concurrentRestrictions in Global += Tags.limit(Tags.Test, 1)
Custom Tags
To define a new tag, pass a String to the Tags.Tag method. For
example:
val Custom = Tags.Tag("custom")
Then, use this tag as any other tag. For example:
def aImpl = Def.task { ... } tag(Custom)

aCustomTask := aImpl.value

concurrentRestrictions in Global +=
  Tags.limit(Custom, 1)
Future work
This is an experimental feature and there are several aspects that may change or require further work.
Tagging Tasks
Currently, a tag applies only to the immediate computation it is defined on. For example, in the following, the second compile definition has no tags applied to it. Only the first computation is labeled.
def myCompileTask = Def.task { ... } tag(Tags.CPU, Tags.Compile)

compile := myCompileTask.value

compile := {
  val result = compile.value
  ... do some post processing ...
}
Is this desirable? expected? If not, what is a better, alternative behavior?
Fractional weighting
Weights are currently ints, but could be changed to be doubles if
fractional weights would be useful. It is important to preserve a
consistent notion of what a weight of 1 means so that built-in and
custom tasks share this definition and useful rules can be written.
Default Behavior
User feedback on what custom rules work for what workloads will help determine a good set of default tags and rules.
Adjustments to Defaults
Rules should be easier to remove or redefine, perhaps by giving them
names. As it is, rules must be appended or all rules must be completely
redefined. Also, tags can only be defined for tasks at the original
definition site when using the := syntax.
For removing tags, an implementation of removeTag should follow from
the implementation of tag in a straightforward manner.
Other characteristics
The system of a tag with a weight was selected as being reasonably
powerful and flexible without being too complicated. This selection is
not fundamental and could be enhance, simplified, or replaced if
necessary. The fundamental interface that describes the constraints the
system must work within is sbt.ConcurrentRestrictions. This interface
is used to provide an intermediate scheduling queue between task
execution (sbt.Execute) and the underlying thread-based parallel
execution service (java.util.concurrent.CompletionService). This
intermediate queue restricts new tasks from being forwarded to the
j.u.c.CompletionService according to the sbt.ConcurrentRestrictions
implementation. See the
sbt.ConcurrentRestrictions
API documentation for details.
External Processes
Usage
sbt includes a process library to simplify working with external
processes. The library is available without import in build definitions
and at the interpreter started by the consoleProject
task.
To run an external command, follow it with an exclamation mark !:
"find project -name *.jar" !
An implicit converts the String to sbt.ProcessBuilder, which defines
the ! method. This method runs the constructed command, waits until
the command completes, and returns the exit code. Alternatively, the
run method defined on ProcessBuilder runs the command and returns an
instance of sbt.Process, which can be used to destroy the process
before it completes. With no arguments, the ! method sends output to
standard output and standard error. You can pass a Logger to the !
method to send output to the Logger:
"find project -name *.jar" ! log
Two alternative implicit conversions are from scala.xml.Elem or
List[String] to sbt.ProcessBuilder. These are useful for
constructing commands. An example of the first variant from the android
plugin:
<x> {dxPath.absolutePath} --dex --output={classesDexPath.absolutePath} {classesMinJarPath.absolutePath}</x> !
If you need to set the working directory or modify the environment, call
sbt.Process explicitly, passing the command sequence (command and
argument list) or command string first and the working directory second.
Any environment variables can be passed as a vararg list of key/value
String pairs.
Process("ls" :: "-l" :: Nil, Path.userHome, "key1" -> value1, "key2" -> value2) ! log
Operators are defined to combine commands. These operators start with
# in order to keep the precedence the same and to separate them from
the operators defined elsewhere in sbt for filters. In the following
operator definitions, a and b are subcommands.
a #&& bExecutea. If the exit code is nonzero, return that exit code and do not execute b. If the exit code is zero, execute b and return its exit code.a #|| bExecutea. If the exit code is zero, return zero for the exit code and do not execute b. If the exit code is nonzero, execute b and return its exit code.a #| bExecuteaandb, piping the output ofato the input of b.
There are also operators defined for redirecting output to Files and
input from Files and URLs. In the following definitions, url is an
instance of URL and file is an instance of File.
a #< urlorurl #> aUseurlas the input toa.amay be a File or a command.a #< fileorfile #> aUsefileas the input toa. a may be a File or a command.a #> fileorfile #< aWrite the output ofatofile. a may be a File, URL, or a command.a #>> fileorfile #<< aAppend the output ofato file. a may be a File, URL, or a command.
There are some additional methods to get the output from a forked
process into a String or the output lines as a Stream[String]. Here
are some examples, but see the
ProcessBuilder API for details.
val listed: String = "ls" !!
val lines2: Stream[String] = "ls" lines_!
Finally, there is a cat method to send the contents of Files and
URLs to standard output.
Examples
Download a URL to a File:
url("http://databinder.net/dispatch/About") #> file("About.html") !
// or
file("About.html") #< url("http://databinder.net/dispatch/About") !
Copy a File:
file("About.html") #> file("About_copy.html") !
// or
file("About_copy.html") #< file("About.html") !
Append the contents of a URL to a File after filtering through
grep:
url("http://databinder.net/dispatch/About") #> "grep JSON" #>> file("About_JSON") !
// or
file("About_JSON") #<< ( "grep JSON" #< url("http://databinder.net/dispatch/About") )  !
Search for uses of null in the source directory:
"find src -name *.scala -exec grep null {} ;" #| "xargs test -z" #&& "echo null-free" #|| "echo null detected" !
Use cat:
val spde = url("http://technically.us/spde/About")
val dispatch = url("http://databinder.net/dispatch/About")
val build = file("project/build.properties")
cat(spde, dispatch, build) #| "grep -i scala" !
Running Project Code
The run and console actions provide a means for running user code in
the same virtual machine as sbt.
run also exists in a variant called runMain that takes an
additional initial argument allowing you to specify the fully
qualified name of the main class you want to run. run andrunMain
share the same configuration and cannot be configured separately.
This page describes the problems with running user code in the same virtual machine as sbt, how sbt handles these problems, what types of code can use this feature, and what types of code must use a forked jvm. Skip to User Code if you just want to see when you should use a forked jvm.
Problems
System.exit
User code can call System.exit, which normally shuts down the JVM.
Because the run and console actions run inside the same JVM as sbt,
this also ends the build and requires restarting sbt.
Threads
User code can also start other threads. Threads can be left running
after the main method returns. In particular, creating a GUI creates
several threads, some of which may not terminate until the JVM
terminates. The program is not completed until either System.exit is
called or all non-daemon threads terminate.
Deserialization and class loading
During deserialization, the wrong class loader might be used for various complex reasons. This can happen in many scenarios, and running under SBT is just one of them. This is discussed for instance in issues #163 and #136. The reason is explained here.
sbt’s Solutions
System.exit
User code is run with a custom SecurityManager that throws a custom
SecurityException when System.exit is called. This exception is
caught by sbt. sbt then disposes of all top-level windows, interrupts
(not stops) all user-created threads, and handles the exit code. If the
exit code is nonzero, run and console complete unsuccessfully. If
the exit code is zero, they complete normally.
Threads
sbt makes a list of all threads running before executing user code.
After the user code returns, sbt can then determine the threads created
by the user code. For each user-created thread, sbt replaces the
uncaught exception handler with a custom one that handles the custom
SecurityException thrown by calls to System.exit and delegates to
the original handler for everything else. sbt then waits for each
created thread to exit or for System.exit to be called. sbt handles a
call to System.exit as described above.
A user-created thread is one that is not in the system thread group
and is not an AWT implementation thread (e.g. AWT-XAWT,
AWT-Windows). User-created threads include the AWT-EventQueue-*
thread(s).
User Code
Given the above, when can user code be run with the run and console
actions?
The user code cannot rely on shutdown hooks and at least one of the following situations must apply for user code to run in the same JVM:
- User code creates no threads.
- User code creates a GUI and no other threads.
- The program ends when user-created threads terminate on their own.
System.exitis used to end the program and user-created threads terminate when interrupted.- No deserialization is done, or the deserialization code ensures that the right class loader is used, as in https://github.com/NetLogo/NetLogo/blob/5.x/src/main/org/nlogo/util/ClassLoaderObjectInputStream.scala or https://github.com/scala/scala/blob/2.11.x/src/actors/scala/actors/remote/JavaSerializer.scala#L20.
The requirements on threading and shutdown hooks are required because the JVM does not actually shut down. So, shutdown hooks cannot be run and threads are not terminated unless they stop when interrupted. If these requirements are not met, code must run in a forked jvm.
The feature of allowing System.exit and multiple threads to be used
cannot completely emulate the situation of running in a separate JVM and
is intended for development. Program execution should be checked in a
forked jvm when using multiple threads or System.exit.
As of sbt 0.13.1, multiple run instances can be managed. There can
only be one application that uses AWT at a time, however.
Testing
Basics
The standard source locations for testing are:
- Scala sources in
src/test/scala/ - Java sources in
src/test/java/ - Resources for the test classpath in
src/test/resources/
The resources may be accessed from tests by using the getResource
methods of java.lang.Class or java.lang.ClassLoader.
The main Scala testing frameworks ( specs2, ScalaCheck, and ScalaTest) provide an implementation of the common test interface and only need to be added to the classpath to work with sbt. For example, ScalaCheck may be used by declaring it as a managed dependency:
lazy val scalacheck = "org.scalacheck" %% "scalacheck" % "1.12.0"
libraryDependencies += scalacheck % Test
Test is the configuration and means that ScalaCheck will
only be on the test classpath and it isn’t needed by the main sources.
This is generally good practice for libraries because your users don’t
typically need your test dependencies to use your library.
With the library dependency defined, you can then add test sources in
the locations listed above and compile and run tests. The tasks for
running tests are test and testOnly. The test task accepts no
command line arguments and runs all tests:
> test
testOnly
The testOnly task accepts a whitespace separated list of test names to
run. For example:
> testOnly org.example.MyTest1 org.example.MyTest2
It supports wildcards as well:
> testOnly org.example.*Slow org.example.MyTest1
testQuick
The testQuick task, like testOnly, allows to filter the tests to run
to specific tests or wildcards using the same syntax to indicate the
filters. In addition to the explicit filter, only the tests that satisfy
one of the following conditions are run:
- The tests that failed in the previous run
- The tests that were not run before
- The tests that have one or more transitive dependencies, maybe in a different project, recompiled.
Tab completion
Tab completion is provided for test names based on the results of the
last test:compile. This means that a new sources aren’t available for
tab completion until they are compiled and deleted sources won’t be
removed from tab completion until a recompile. A new test source can
still be manually written out and run using testOnly.
Other tasks
Tasks that are available for main sources are generally available for
test sources, but are prefixed with test: on the command line and are
referenced in Scala code with in Test. These tasks include:
test:compiletest:consoletest:consoleQuicktest:runtest:runMain
See Running for details on these tasks.
Output
By default, logging is buffered for each test source file until all
tests for that file complete. This can be disabled by setting
logBuffered:
logBuffered in Test := false
Test Reports
By default, sbt will generate JUnit XML test reports for all tests in
the build, located in the target/test-reports directory for a project.
This can be disabled by disabling the JUnitXmlReportPlugin
val myProject = (project in file(".")).disablePlugins(plugins.JUnitXmlReportPlugin)
Options
Test Framework Arguments
Arguments to the test framework may be provided on the command line to
the testOnly tasks following a -- separator. For example:
> testOnly org.example.MyTest -- -verbosity 1
To specify test framework arguments as part of the build, add options
constructed by Tests.Argument:
testOptions in Test += Tests.Argument("-verbosity", "1")
To specify them for a specific test framework only:
testOptions in Test += Tests.Argument(TestFrameworks.ScalaCheck, "-verbosity", "1")
Setup and Cleanup
Specify setup and cleanup actions using Tests.Setup and
Tests.Cleanup. These accept either a function of type () => Unit or
a function of type ClassLoader => Unit. The variant that accepts a
ClassLoader is passed the class loader that is (or was) used for running
the tests. It provides access to the test classes as well as the test
framework classes.
Note: When forking, the ClassLoader containing the test classes cannot be provided because it is in another JVM. Only use the () => Unit variants in this case.
Examples:
testOptions in Test += Tests.Setup( () => println("Setup") )

testOptions in Test += Tests.Cleanup( () => println("Cleanup") )

testOptions in Test += Tests.Setup( loader => ... )

testOptions in Test += Tests.Cleanup( loader => ... )
Disable Parallel Execution of Tests
By default, sbt runs all tasks in parallel and within the same JVM as sbt itself. Because each test is mapped to a task, tests are also run in parallel by default. To make tests within a given project execute serially: :
parallelExecution in Test := false
Test can be replaced with IntegrationTest to only execute
integration tests serially. Note that tests from different projects may
still execute concurrently.
Filter classes
If you want to only run test classes whose name ends with “Test”, use
Tests.Filter:
testOptions in Test := Seq(Tests.Filter(s => s.endsWith("Test")))
Forking tests
The setting:
fork in Test := true
specifies that all tests will be executed in a single external JVM. See
Forking for configuring standard options for forking. By default,
tests executed in a forked JVM are executed sequentially. More control
over how tests are assigned to JVMs and what options to pass to those is
available with testGrouping key. For example in build.sbt:
import Tests._

{
  def groupByFirst(tests: Seq[TestDefinition]) =
    tests groupBy (_.name(0)) map {
      case (letter, tests) => new Group(letter.toString, tests, SubProcess(Seq("-Dfirst.letter"+letter)))
    } toSeq

    testGrouping in Test <<= groupByFirst( (definedTests in Test).value )
}
The tests in a single group are run sequentially. Control the number of
forked JVMs allowed to run at the same time by setting the limit on
Tags.ForkedTestGroup tag, which is 1 by default. Setup and Cleanup
actions cannot be provided with the actual test class loader when a
group is forked.
In addition, forked tests can optionally be run in parallel. This feature is still considered experimental, and may be enabled with the following setting :
testForkedParallel in Test := true
Additional test configurations
You can add an additional test configuration to have a separate set of test sources and associated compilation, packaging, and testing tasks and settings. The steps are:
- Define the configuration
- Add the tasks and settings
- Declare library dependencies
- Create sources
- Run tasks
The following two examples demonstrate this. The first example shows how to enable integration tests. The second shows how to define a customized test configuration. This allows you to define multiple types of tests per project.
Integration Tests
The following full build configuration demonstrates integration tests.
lazy val commonSettings = Seq(
  scalaVersion := "2.11.7",
  organization := "com.example"
)
lazy val specs2core = "org.specs2" %% "specs2-core" % "2.4.14"

lazy val root = (project in file(".")).
  configs(IntegrationTest).
  settings(commonSettings: _*).
  settings(Defaults.itSettings: _*).
  settings(
    libraryDependencies += specs2core % "it,test"
    // other settings here
  )
configs(IntegrationTest)adds the predefined integration test configuration. This configuration is referred to by the name it.settings(Defaults.itSettings : _*)adds compilation, packaging, and testing actions and settings in the IntegrationTest configuration.settings(libraryDependencies += specs2core % "it,test")adds specs2 to both the standard test configuration and the integration test configuration it. To define a dependency only for integration tests, use “it” as the configuration instead of “it,test”.
The standard source hierarchy is used:
src/it/scalafor Scala sourcessrc/it/javafor Java sourcessrc/it/resourcesfor resources that should go on the integration test classpath
The standard testing tasks are available, but must be prefixed with
it:. For example,
> it:testOnly org.example.AnIntegrationTest
Similarly the standard settings may be configured for the
IntegrationTest configuration. If not specified directly, most
IntegrationTest settings delegate to Test settings by default. For
example, if test options are specified as:
testOptions in Test += ...
then these will be picked up by the Test configuration and in turn by
the IntegrationTest configuration. Options can be added specifically
for integration tests by putting them in the IntegrationTest
configuration:
testOptions in IntegrationTest += ...
Or, use := to overwrite any existing options, declaring these to be
the definitive integration test options:
testOptions in IntegrationTest := Seq(...)
Custom test configuration
The previous example may be generalized to a custom test configuration.
lazy val commonSettings = Seq(
scalaVersion := "2.11.7",
organization := "com.example"
)
lazy val specs2core = "org.specs2" %% "specs2-core" % "2.4.14"
lazy val FunTest = config("fun") extend(Test)
lazy val root = (project in file(".")).
configs(FunTest).
settings(commonSettings: _*).
settings(inConfig(FunTest)(Defaults.testSettings): _*).
settings(
libraryDependencies += specs2core % FunTest
// other settings here
)
Instead of using the built-in configuration, we defined a new one:
lazy val FunTest = config("fun") extend(Test)
The extend(Test) part means to delegate to Test for undefined
FunTest settings. The line that adds the tasks and settings for the
new test configuration is:
settings(inConfig(FunTest)(Defaults.testSettings): _*)
This says to add test and settings tasks in the FunTest configuration.
We could have done it this way for integration tests as well. In fact,
Defaults.itSettings is a convenience definition:
val itSettings = inConfig(IntegrationTest)(Defaults.testSettings).
The comments in the integration test section hold, except with
IntegrationTest replaced with FunTest and "it" replaced with
"fun". For example, test options can be configured specifically for
FunTest:
testOptions in FunTest += ...
Test tasks are run by prefixing them with fun:
> fun:test
Additional test configurations with shared sources
An alternative to adding separate sets of test sources (and compilations) is to share sources. In this approach, the sources are compiled together using the same classpath and are packaged together. However, different tests are run depending on the configuration.
lazy val commonSettings = Seq(
scalaVersion := "2.11.7",
organization := "com.example"
)
lazy val specs2core = "org.specs2" %% "specs2-core" % "2.4.14"
lazy val FunTest = config("fun") extend(Test)
def itFilter(name: String): Boolean = name endsWith "ITest"
def unitFilter(name: String): Boolean = (name endsWith "Test") && !itFilter(name)
lazy val root = (project in file(".")).
configs(FunTest).
settings(commonSettings: _*).
settings(inConfig(FunTest)(Defaults.testTasks): _*).
settings(
libraryDependencies += specs2core % FunTest,
testOptions in Test := Seq(Tests.Filter(unitFilter)),
testOptions in FunTest := Seq(Tests.Filter(itFilter))
// other settings here
)
The key differences are:
- We are now only adding the test tasks (inConfig(FunTest)(Defaults.testTasks)) and not compilation and packaging tasks and settings.
- We filter the tests to be run for each configuration.
To run standard unit tests, run test (or equivalently, test:test):
> test
To run tests for the added configuration (here, "fun"), prefix it with
the configuration name as before:
> fun:test
> fun:testOnly org.example.AFunTest
Application to parallel execution
One use for this shared-source approach is to separate tests that can
run in parallel from those that must execute serially. Apply the
procedure described in this section for an additional configuration.
Let’s call the configuration serial:
lazy val Serial = config("serial") extend(Test)
Then, we can disable parallel execution in just that configuration using:
parallelExecution in Serial := false
The tests to run in parallel would be run with test and the ones to
run in serial would be run with serial:test.
JUnit
Support for JUnit is provided by junit-interface. To add JUnit support into your project, add the junit-interface dependency in your project’s main build.sbt file.
libraryDependencies += "com.novocode" % "junit-interface" % "0.11" % Test
Extensions
This page describes adding support for additional testing libraries and
defining additional test reporters. You do this by implementing sbt
interfaces (described below). If you are the author of the testing
framework, you can depend on the test interface as a provided
dependency. Alternatively, anyone can provide support for a test
framework by implementing the interfaces in a separate project and
packaging the project as an sbt Plugin.
Custom Test Framework
The main Scala testing libraries have built-in support for sbt. To add support for a different framework, implement the uniform test interface.
Custom Test Reporters
Test frameworks report status and results to test reporters. You can create a new test reporter by implementing either TestReportListener or TestsListener.
Using Extensions
To use your extensions in a project definition:
Modify the testFrameworks setting to reference your test framework:
testFrameworks += new TestFramework("custom.framework.ClassName")
Specify the test reporters you want to use by overriding the
testListeners setting in your project definition.
testListeners += customTestListener
where customTestListener is of type sbt.TestReportListener.
Dependency Management
This part of the documentation has pages documenting particular sbt topics in detail. Before reading anything in here, you will need the information in the Getting Started Guide as a foundation.
Artifacts
Selecting default artifacts
By default, the published artifacts are the main binary jar, a jar containing the main sources and resources, and a jar containing the API documentation. You can add artifacts for the test classes, sources, or API or you can disable some of the main artifacts.
To add all test artifacts:
publishArtifact in Test := true
To add them individually:
// enable publishing the jar produced by `test:package`
publishArtifact in (Test, packageBin) := true
// enable publishing the test API jar
publishArtifact in (Test, packageDoc) := true
// enable publishing the test sources jar
publishArtifact in (Test, packageSrc) := true
To disable main artifacts individually:
// disable publishing the main jar produced by `package`
publishArtifact in (Compile, packageBin) := false
// disable publishing the main API jar
publishArtifact in (Compile, packageDoc) := false
// disable publishing the main sources jar
publishArtifact in (Compile, packageSrc) := false
Modifying default artifacts
Each built-in artifact has several configurable settings in addition to
publishArtifact. The basic ones are artifact (of type
SettingKey[Artifact]), mappings (of type TaskKey[(File,String)]),
and artifactPath (of type SettingKey[File]). They are scoped by
(<config>, <task>) as indicated in the previous section.
To modify the type of the main artifact, for example:
artifact in (Compile, packageBin) := {
val previous: Artifact = (artifact in (Compile, packageBin)).value
previous.copy(`type` = "bundle")
}
The generated artifact name is determined by the artifactName setting.
This setting is of type (ScalaVersion, ModuleID, Artifact) => String.
The ScalaVersion argument provides the full Scala version String and the
binary compatible part of the version String. The String result is the
name of the file to produce. The default implementation is
Artifact.artifactName _. The function may be modified to produce
different local names for artifacts without affecting the published
name, which is determined by the artifact definition combined with the
repository pattern.
For example, to produce a minimal name without a classifier or cross path:
artifactName := { (sv: ScalaVersion, module: ModuleID, artifact: Artifact) =>
artifact.name + "-" + module.revision + "." + artifact.extension
}
(Note that in practice you rarely want to drop the classifier.)
Finally, you can get the (Artifact, File) pair for the artifact by
mapping the packagedArtifact task. Note that if you don’t need the
Artifact, you can get just the File from the package task (package,
packageDoc, or packageSrc). In both cases, mapping the task to get
the file ensures that the artifact is generated first and so the file is
guaranteed to be up-to-date.
For example:
val myTask = taskKey[Unit]("My task.")
myTask := {
val (art, file) = packagedArtifact.in(Compile, packageBin).value
println("Artifact definition: " + art)
println("Packaged file: " + file.getAbsolutePath)
}
Defining custom artifacts
In addition to configuring the built-in artifacts, you can declare other artifacts to publish. Multiple artifacts are allowed when using Ivy metadata, but a Maven POM file only supports distinguishing artifacts based on classifiers and these are not recorded in the POM.
Basic Artifact construction look like:
Artifact("name", "type", "extension")
Artifact("name", "classifier")
Artifact("name", url: URL)
Artifact("name", Map("extra1" -> "value1", "extra2" -> "value2"))
For example:
Artifact("myproject", "zip", "zip")
Artifact("myproject", "image", "jpg")
Artifact("myproject", "jdk15")
See the Ivy documentation for more details on artifacts. See the Artifact API for combining the parameters above and specifying [Configurations] and extra attributes.
To declare these artifacts for publishing, map them to the task that generates the artifact:
val myImageTask = taskKey[File](...)
myImageTask := {
val artifact: File = makeArtifact(...)
artifact
}
addArtifact( Artifact("myproject", "image", "jpg"), myImageTask )
addArtifact returns a sequence of settings (wrapped in a
SettingsDefinition). In a
full build configuration, usage looks like:
...
lazy val proj = Project(...).
settings( addArtifact(...).settings : _* )
...
Publishing .war files
A common use case for web applications is to publish the .war file
instead of the .jar file.
// disable .jar publishing
publishArtifact in (Compile, packageBin) := false
// create an Artifact for publishing the .war file
artifact in (Compile, packageWar) := {
val previous: Artifact = (artifact in (Compile, packageWar)).value
previous.copy(`type` = "war", extension = "war")
}
// add the .war file to what gets published
addArtifact(artifact in (Compile, packageWar), packageWar)
Using dependencies with artifacts
To specify the artifacts to use from a dependency that has custom or
multiple artifacts, use the artifacts method on your dependencies. For
example:
libraryDependencies += "org" % "name" % "rev" artifacts(Artifact("name", "type", "ext"))
The from and classifer methods (described on the
Library Management page) are actually convenience
methods that translate to artifacts:
def from(url: String) = artifacts( Artifact(name, new URL(url)) )
def classifier(c: String) = artifacts( Artifact(name, c) )
That is, the following two dependency declarations are equivalent:
libraryDependencies += "org.testng" % "testng" % "5.7" classifier "jdk15"
libraryDependencies += "org.testng" % "testng" % "5.7" artifacts(Artifact("testng", "jdk15") )
Dependency Management Flow
sbt 0.12.1 addresses several issues with dependency management. These fixes were made possible by specific, reproducible examples, such as a situation where the resolution cache got out of date (gh-532). A brief summary of the current work flow with dependency management in sbt follows.
Background
update resolves dependencies according to the settings in a build
file, such as libraryDependencies and resolvers. Other tasks use the
output of update (an UpdateReport) to form various classpaths. Tasks
that in turn use these classpaths, such as compile or run, thus
indirectly depend on update. This means that before compile can run,
the update task needs to run. However, resolving dependencies on every
compile would be unnecessarily slow and so update must be particular
about when it actually performs a resolution.
Caching and Configuration
- Normally, if no dependency management configuration has changed since the last successful resolution and the retrieved files are still present, sbt does not ask Ivy to perform resolution.
- Changing the configuration, such as adding or removing dependencies or changing the version or other attributes of a dependency, will automatically cause resolution to be performed. Updates to locally published dependencies should be detected in sbt 0.12.1 and later and will force an update. Dependent tasks like compile and run will get updated classpaths.
- Directly running the
updatetask (as opposed to a task that depends on it) will force resolution to run, whether or not configuration changed. This should be done in order to refresh remote SNAPSHOT dependencies. - When
offline := true, remote SNAPSHOTs will not be updated by a resolution, even an explicitly requested update. This should effectively support working without a connection to remote repositories. Reproducible examples demonstrating otherwise are appreciated. Obviously, update must have successfully run before going offline. - Overriding all of the above,
skip in update := truewill tell sbt to never perform resolution. Note that this can cause dependent tasks to fail. For example, compilation may fail if jars have been deleted from the cache (and so needed classes are missing) or a dependency has been added (but will not be resolved because skip is true). Also, update itself will immediately fail if resolution has not been allowed to run since the last clean.
General troubleshooting steps
- Run
updateexplicitly. This will typically fix problems with out of date SNAPSHOTs or locally published artifacts. - If a file cannot be found, look at the output of update to see where Ivy is looking for the file. This may help diagnose an incorrectly defined dependency or a dependency that is actually not present in a repository.
last updatecontains more information about the most recent resolution and download. The amount of debugging output from Ivy is high, so you may want to use lastGrep (run help lastGrep for usage).- Run
cleanand thenupdate. If this works, it could indicate a bug in sbt, but the problem would need to be reproduced in order to diagnose and fix it. - Before deleting all of the Ivy cache, first try deleting files in
~/.ivy2/cacherelated to problematic dependencies. For example, if there are problems with dependency"org.example" % "demo" % "1.0", delete~/.ivy2/cache/org.example/demo/1.0/and retry update. This avoids needing to redownload all dependencies. - Normal sbt usage should not require deleting files from
~/.ivy2/cache, especially if the first four steps have been followed. If deleting the cache fixes a dependency management issue, please try to reproduce the issue and submit a test case.
Plugins
These troubleshooting steps can be run for plugins by changing to the build definition project, running the commands, and then returning to the main project. For example:
> reload plugins
> update
> reload return
Notes
- Configure offline behavior for all projects on a machine by putting
offline := truein~/.sbt/0.13/global.sbt. A command that does this for the user would make a nice pull request. Perhaps the setting of offline should go into the output of about or should it be a warning in the output of update or both? - The cache improvements in 0.12.1 address issues in the change detection for update so that it will correctly re-resolve automatically in more situations. A problem with an out of date cache can usually be attributed to a bug in that change detection if explicitly running update fixes the problem.
- A common solution to dependency management problems in sbt has been
to remove
~/.ivy2/cache. Before doing this with 0.12.1, be sure to follow the steps in the troubleshooting section first. In particular, verify that a clean and an explicit update do not solve the issue. - There is no need to mark SNAPSHOT dependencies as
changing()because sbt configures Ivy to know this already.
Library Management
There’s now a getting started page about library management, which you may want to read first.
Documentation Maintenance Note: it would be nice to remove the overlap between this page and the getting started page, leaving this page with the more advanced topics such as checksums and external Ivy files.
Introduction
There are two ways for you to manage libraries with sbt: manually or
automatically. These two ways can be mixed as well. This page discusses
the two approaches. All configurations shown here are settings that go
either directly in a
.sbt file or are
appended to the settings of a Project in a
.scala file.
Manual Dependency Management
Manually managing dependencies involves copying any jars that you want
to use to the lib directory. sbt will put these jars on the classpath
during compilation, testing, running, and when using the interpreter.
You are responsible for adding, removing, updating, and otherwise
managing the jars in this directory. No modifications to your project
definition are required to use this method unless you would like to
change the location of the directory you store the jars in.
To change the directory jars are stored in, change the unmanagedBase
setting in your project definition. For example, to use custom_lib/:
unmanagedBase := baseDirectory.value / "custom_lib"
If you want more control and flexibility, override the unmanagedJars
task, which ultimately provides the manual dependencies to sbt. The
default implementation is roughly:
unmanagedJars in Compile := (baseDirectory.value ** "*.jar").classpath
If you want to add jars from multiple directories in addition to the default directory, you can do:
unmanagedJars in Compile ++= {
val base = baseDirectory.value
val baseDirectories = (base / "libA") +++ (base / "b" / "lib") +++ (base / "libC")
val customJars = (baseDirectories ** "*.jar") +++ (base / "d" / "my.jar")
customJars.classpath
}
See Paths for more information on building up paths.
Automatic Dependency Management
This method of dependency management involves specifying the direct dependencies of your project and letting sbt handle retrieving and updating your dependencies. sbt supports three ways of specifying these dependencies:
- Declarations in your project definition
- Maven POM files (dependency definitions only: no repositories)
- Ivy configuration and settings files
sbt uses Apache Ivy to implement dependency management in all three cases. The default is to use inline declarations, but external configuration can be explicitly selected. The following sections describe how to use each method of automatic dependency management.
Inline Declarations
Inline declarations are a basic way of specifying the dependencies to be automatically retrieved. They are intended as a lightweight alternative to a full configuration using Ivy.
Dependencies
Declaring a dependency looks like:
libraryDependencies += groupID % artifactID % revision
or
libraryDependencies += groupID % artifactID % revision % configuration
See configurations for details on configuration mappings. Also, several dependencies can be declared together:
libraryDependencies ++= Seq(
groupID %% artifactID % revision,
groupID %% otherID % otherRevision
)
If you are using a dependency that was built with sbt, double the first
% to be %%:
libraryDependencies += groupID %% artifactID % revision
This will use the right jar for the dependency built with the version of Scala that you are currently using. If you get an error while resolving this kind of dependency, that dependency probably wasn’t published for the version of Scala you are using. See Cross Build for details.
Ivy can select the latest revision of a module according to constraints
you specify. Instead of a fixed revision like "1.6.1", you specify
"latest.integration", "2.9.+", or "[1.0,)". See the
Ivy revisions
documentation for details.
Resolvers
sbt uses the standard Maven2 repository by default.
Declare additional repositories with the form:
resolvers += name at location
For example:
libraryDependencies ++= Seq(
"org.apache.derby" % "derby" % "10.4.1.3",
"org.specs" % "specs" % "1.6.1"
)
resolvers += "Sonatype OSS Snapshots" at "https://oss.sonatype.org/content/repositories/snapshots"
sbt can search your local Maven repository if you add it as a repository:
resolvers += "Local Maven Repository" at "file://"+Path.userHome.absolutePath+"/.m2/repository"
See Resolvers for details on defining other types of repositories.
Override default resolvers
resolvers configures additional, inline user resolvers. By default,
sbt combines these resolvers with default repositories (Maven Central
and the local Ivy repository) to form externalResolvers. To have more
control over repositories, set externalResolvers directly. To only
specify repositories in addition to the usual defaults, configure
resolvers.
For example, to use the Sonatype OSS Snapshots repository in addition to the default repositories,
resolvers += "Sonatype OSS Snapshots" at "https://oss.sonatype.org/content/repositories/snapshots"
To use the local repository, but not the Maven Central repository:
externalResolvers := Resolver.withDefaultResolvers(resolvers.value, mavenCentral = false)
Override all resolvers for all builds
The repositories used to retrieve sbt, Scala, plugins, and application dependencies can be configured globally and declared to override the resolvers configured in a build or plugin definition. There are two parts:
- Define the repositories used by the launcher.
- Specify that these repositories should override those in build definitions.
The repositories used by the launcher can be overridden by defining
~/.sbt/repositories, which must contain a [repositories] section
with the same format as the Launcher configuration file. For example:
[repositories]
local
my-maven-repo: https://example.org/repo
my-ivy-repo: https://example.org/ivy-repo/, [organization]/[module]/[revision]/[type]s/[artifact](-[classifier]).[ext]
A different location for the repositories file may be specified by the
sbt.repository.config system property in the sbt startup script. The
final step is to set sbt.override.build.repos to true to use these
repositories for dependency resolution and retrieval.
Explicit URL
If your project requires a dependency that is not present in a repository, a direct URL to its jar can be specified as follows:
libraryDependencies += "slinky" % "slinky" % "2.1" from "https://slinky2.googlecode.com/svn/artifacts/2.1/slinky.jar"
The URL is only used as a fallback if the dependency cannot be found through the configured repositories. Also, the explicit URL is not included in published metadata (that is, the pom or ivy.xml).
Disable Transitivity
By default, these declarations fetch all project dependencies,
transitively. In some instances, you may find that the dependencies
listed for a project aren’t necessary for it to build. Projects using
the Felix OSGI framework, for instance, only explicitly require its main
jar to compile and run. Avoid fetching artifact dependencies with either
intransitive() or notTransitive(), as in this example:
libraryDependencies += "org.apache.felix" % "org.apache.felix.framework" % "1.8.0" intransitive()
Classifiers
You can specify the classifier for a dependency using the classifier
method. For example, to get the jdk15 version of TestNG:
libraryDependencies += "org.testng" % "testng" % "5.7" classifier "jdk15"
For multiple classifiers, use multiple classifier calls:
libraryDependencies +=
"org.lwjgl.lwjgl" % "lwjgl-platform" % lwjglVersion classifier "natives-windows" classifier "natives-linux" classifier "natives-osx"
To obtain particular classifiers for all dependencies transitively, run
the updateClassifiers task. By default, this resolves all artifacts
with the sources or javadoc classifier. Select the classifiers to
obtain by configuring the transitiveClassifiers setting. For example,
to only retrieve sources:
transitiveClassifiers := Seq("sources")
Exclude Transitive Dependencies
To exclude certain transitive dependencies of a dependency, use the
excludeAll or exclude methods. The exclude method should be used
when a pom will be published for the project. It requires the
organization and module name to exclude. For example,
libraryDependencies +=
"log4j" % "log4j" % "1.2.15" exclude("javax.jms", "jms")
The excludeAll method is more flexible, but because it cannot be
represented in a pom.xml, it should only be used when a pom doesn’t need
to be generated. For example,
libraryDependencies +=
"log4j" % "log4j" % "1.2.15" excludeAll(
ExclusionRule(organization = "com.sun.jdmk"),
ExclusionRule(organization = "com.sun.jmx"),
ExclusionRule(organization = "javax.jms")
)
See ModuleID for API details.
Download Sources
Downloading source and API documentation jars is usually handled by an
IDE plugin. These plugins use the updateClassifiers and
updateSbtClassifiers tasks, which produce an Update-Report
referencing these jars.
To have sbt download the dependency’s sources without using an IDE
plugin, add withSources() to the dependency definition. For API jars,
add withJavadoc(). For example:
libraryDependencies +=
"org.apache.felix" % "org.apache.felix.framework" % "1.8.0" withSources() withJavadoc()
Note that this is not transitive. Use the update-*classifiers tasks
for that.
Extra Attributes
Extra attributes
can be specified by passing key/value pairs to the extra method.
To select dependencies by extra attributes:
libraryDependencies += "org" % "name" % "rev" extra("color" -> "blue")
To define extra attributes on the current project:
projectID := {
val previous = projectID.value
previous.extra("color" -> "blue", "component" -> "compiler-interface")
}
Inline Ivy XML
sbt additionally supports directly specifying the configurations or dependencies sections of an Ivy configuration file inline. You can mix this with inline Scala dependency and repository declarations.
For example:
ivyXML :=
<dependencies>
<dependency org="javax.mail" name="mail" rev="1.4.2">
<exclude module="activation"/>
</dependency>
</dependencies>
Ivy Home Directory
By default, sbt uses the standard Ivy home directory location
${user.home}/.ivy2/. This can be configured machine-wide, for use by
both the sbt launcher and by projects, by setting the system property
sbt.ivy.home in the sbt startup script (described in
Setup).
For example:
java -Dsbt.ivy.home=/tmp/.ivy2/ ...
Checksums
sbt (through Ivy) verifies the checksums of downloaded files by default. It also publishes checksums of artifacts by default. The checksums to use are specified by the checksums setting.
To disable checksum checking during update:
checksums in update := Nil
To disable checksum creation during artifact publishing:
checksums in publishLocal := Nil
checksums in publish := Nil
The default value is:
checksums := Seq("sha1", "md5")
Conflict Management
The conflict manager decides what to do when dependency resolution
brings in different versions of the same library. By default, the latest
revision is selected. This can be changed by setting conflictManager,
which has type ConflictManager.
See the
Ivy documentation
for details on the different conflict managers. For example, to specify
that no conflicts are allowed,
conflictManager := ConflictManager.strict
With this set, any conflicts will generate an error. To resolve a conflict, you must configure a dependency override, which is explained in a later section.
Eviction warning
The following direct dependencies will introduce a conflict on the akka-actor version because banana-rdf requires akka-actor 2.1.4.
libraryDependencies ++= Seq(
"org.w3" %% "banana-rdf" % "0.4",
"com.typesafe.akka" %% "akka-actor" % "2.3.7",
)
The default conflict manager will select the newer version of akka-actor,
2.3.7. This can be confirmed in the output of show update, which
shows the newer version as being selected and the older version as evicted.
> show update
[info] compile:
[info] com.typesafe.akka:akka-actor_2.10
[info] - 2.3.7
...
[info] - 2.1.4
...
[info] evicted: true
[info] evictedReason: latest-revision
...
[info] callers: org.w3:banana-rdf_2.10:0.4
Furthermore, the binary version compatibility of the akka-actor 2.1.4 and 2.3.7 are not guaranteed since the second segment has bumped up. sbt 0.13.6+ detects this automatically and prints out the following warning:
[warn] There may be incompatibilities among your library dependencies.
[warn] Here are some of the libraries that were evicted:
[warn] * com.typesafe.akka:akka-actor_2.10:2.1.4 -> 2.3.7
[warn] Run 'evicted' to see detailed eviction warnings
Since akka-actor 2.1.4 and 2.3.7 are not binary compatible, the only way to fix this is to downgrade your dependency to akka-actor 2.1.4, or upgrade banana-rdf to use akka-actor 2.3.
Overriding a version
For binary compatible conflicts, sbt provides dependency overrides.
They are configured with the
dependencyOverrides setting, which is a set of ModuleIDs. For
example, the following dependency definitions conflict because spark
uses log4j 1.2.16 and scalaxb uses log4j 1.2.17:
libraryDependencies ++= Seq(
"org.spark-project" %% "spark-core" % "0.5.1",
"org.scalaxb" %% "scalaxb" % "1.0.0"
)
The default conflict manager chooses the latest revision of log4j, 1.2.17:
> show update
[info] compile:
[info] log4j:log4j:1.2.17: ...
...
[info] (EVICTED) log4j:log4j:1.2.16
...
To change the version selected, add an override:
dependencyOverrides += "log4j" % "log4j" % "1.2.16"
This will not add a direct dependency on log4j, but will force the
revision to be 1.2.16. This is confirmed by the output of show update:
> show update
[info] compile:
[info] log4j:log4j:1.2.16
...
Note: this is an Ivy-only feature and will not be included in a published pom.xml.
Unresolved dependencies error
Adding the following dependency to your project will result to an unresolved dependencies error of vpp 2.2.1:
libraryDependencies += "org.apache.cayenne.plugins" % "maven-cayenne-plugin" % "3.0.2"
sbt 0.13.6+ will try to reconstruct dependencies tree when it fails to resolve a managed dependency. This is an approximation, but it should help you figure out where the problematic dependency is coming from. When possible sbt will display the source position next to the modules:
[warn] ::::::::::::::::::::::::::::::::::::::::::::::
[warn] :: UNRESOLVED DEPENDENCIES ::
[warn] ::::::::::::::::::::::::::::::::::::::::::::::
[warn] :: foundrylogic.vpp#vpp;2.2.1: not found
[warn] ::::::::::::::::::::::::::::::::::::::::::::::
[warn]
[warn] Note: Unresolved dependencies path:
[warn] foundrylogic.vpp:vpp:2.2.1
[warn] +- org.apache.cayenne:cayenne-tools:3.0.2
[warn] +- org.apache.cayenne.plugins:maven-cayenne-plugin:3.0.2 (/foo/some-test/build.sbt#L28)
[warn] +- d:d_2.10:0.1-SNAPSHOT
Cached resolution
See Cached resolution for performance improvement option.
Publishing
See Publishing for how to publish your project.
Configurations
Ivy configurations are a useful feature for your build when you need custom groups of dependencies, such as for a plugin. Ivy configurations are essentially named sets of dependencies. You can read the Ivy documentation for details.
The built-in use of configurations in sbt is similar to scopes in Maven. sbt adds dependencies to different classpaths by the configuration that they are defined in. See the description of Maven Scopes for details.
You put a dependency in a configuration by selecting one or more of its
configurations to map to one or more of your project’s configurations.
The most common case is to have one of your configurations A use a
dependency’s configuration B. The mapping for this looks like
"A->B". To apply this mapping to a dependency, add it to the end of
your dependency definition:
libraryDependencies += "org.scalatest" %% "scalatest" % "2.1.3" % "test->compile"
This says that your project’s "test" configuration uses ScalaTest’s
"compile" configuration. See the
Ivy documentation
for more advanced mappings. Most projects published to Maven
repositories will use the "compile" configuration.
A useful application of configurations is to group dependencies that are
not used on normal classpaths. For example, your project might use a
"js" configuration to automatically download jQuery and then include
it in your jar by modifying resources. For example:
ivyConfigurations += config("js") hide
libraryDependencies += "jquery" % "jquery" % "1.3.2" % "js->default" from "https://jqueryjs.googlecode.com/files/jquery-1.3.2.min.js"
resources ++= update.value.select(configurationFilter("js"))
The config method defines a new configuration with name "js" and
makes it private to the project so that it is not used for publishing.
See Update Report for more information on selecting
managed artifacts.
A configuration without a mapping (no "->") is mapped to "default"
or "compile". The -> is only needed when mapping to a different
configuration than those. The ScalaTest dependency above can then be
shortened to:
libraryDependencies += "org.scalatest" %% "scalatest" % "2.1.3" % "test"
External Maven or Ivy
For this method, create the configuration files as you would for Maven
(pom.xml) or Ivy (ivy.xml and optionally ivysettings.xml).
External configuration is selected by using one of the following
expressions.
Ivy settings (resolver configuration)
externalIvySettings()
or
externalIvySettings(baseDirectory.value / "custom-settings-name.xml")
or
externalIvySettingsURL(url("your_url_here"))
Ivy file (dependency configuration)
externalIvyFile()
or
externalIvyFile(Def.setting(baseDirectory.value / "custom-name.xml"))
Because Ivy files specify their own configurations, sbt needs to know
which configurations to use for the compile, runtime, and test
classpaths. For example, to specify that the Compile classpath should
use the ‘default’ configuration:
classpathConfiguration in Compile := config("default")
Maven pom (dependencies only)
externalPom()
or
externalPom(Def.setting(baseDirectory.value / "custom-name.xml"))
Full Ivy Example
For example, a build.sbt using external Ivy files might look like:
externalIvySettings()
externalIvyFile(Def.setting(baseDirectory.value / "ivyA.xml"))
classpathConfiguration in Compile := Compile
classpathConfiguration in Test := Test
classpathConfiguration in Runtime := Runtime
Forcing a revision (Not recommended)
Note: Forcing can create logical inconsistencies so it’s no longer recommended.
To say that we prefer the version we’ve specified over the version from
indirect dependencies, use force():
libraryDependencies ++= Seq(
"org.spark-project" %% "spark-core" % "0.5.1",
"log4j" % "log4j" % "1.2.14" force()
)
Note: this is an Ivy-only feature and cannot be included in a published pom.xml.
Known limitations
Maven support is dependent on Ivy’s support for Maven POMs. Known issues with this support:
- Specifying
relativePathin theparentsection of a POM will produce an error. - Ivy ignores repositories specified in the POM. A workaround is to
specify repositories inline or in an Ivy
ivysettings.xmlfile.
Proxy Repositories
It’s often the case that users wish to set up a maven/ivy proxy repository inside their corporate firewall, and have developer sbt instances resolve artifacts through such a proxy. Let’s detail what exact changes must be made for this to work.
Overview
The situation arises when many developers inside an organization are attempting to resolve artifacts. Each developer’s machine will hit the internet and download an artifact, regardless of whether or not another on the team has already done so. Proxy repositories provide a single point of remote download for an organization. In addition to control and security concerns, Proxy repositories are primarily important for increased speed across a team.
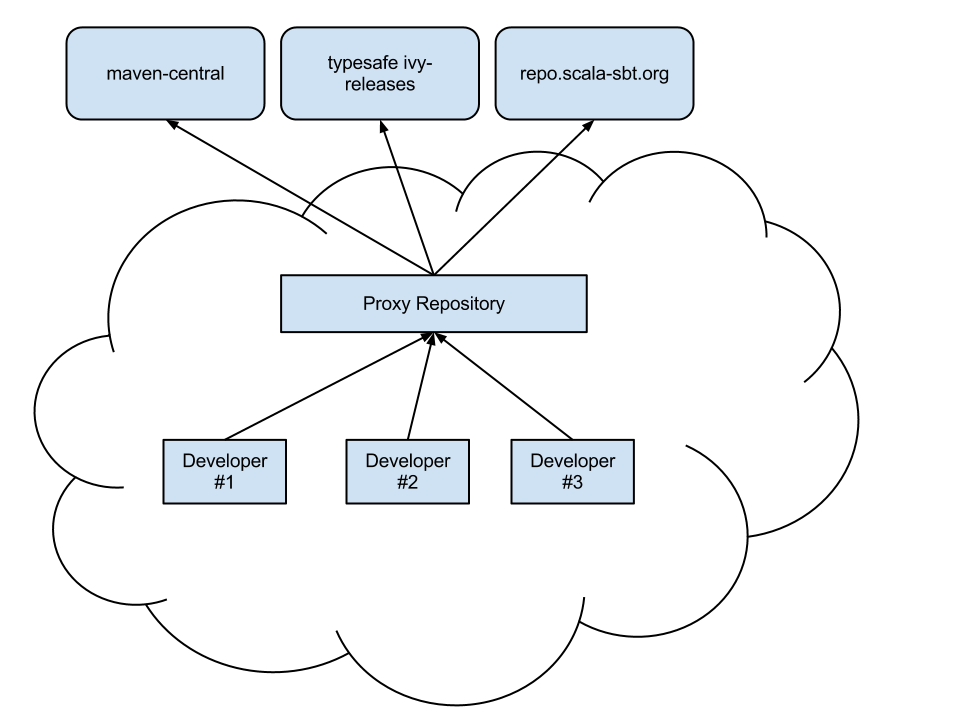
There are many good proxy repository solutions out there, with the big three being (in alphabetical order):
Once you have a proxy repository installed and configured, then it’s time to configure sbt for your needs. Read the note at the bottom about proxy issues with ivy repositories.
sbt Configuration
sbt requires configuration in two places to make use of a proxy
repository. The first is the ~/.sbt/repositories file, and the second
is the launcher script.
~/.sbt/repositories
The repositories file is an external configuration for the Launcher. The exact syntax for the configuration file is detailed in the sbt Launcher Configuration.
Here’s an example config:
[repositories]
local
my-ivy-proxy-releases: http://repo.company.com/ivy-releases/, [organization]/[module]/(scala_[scalaVersion]/)(sbt_[sbtVersion]/)[revision]/[type]s/[artifact](-[classifier]).[ext]
my-maven-proxy-releases: http://repo.company.com/maven-releases/
This example configuration has three repositories configured for sbt.
The first resolver is local, and is used so that artifacts pushed
using publish-local will be seen in other sbt projects.
The second resolver is my-ivy-proxy-releases. This repository is used
to resolve sbt itself from the company proxy repository, as well as
any sbt plugins that may be required. Note that the ivy resolver pattern
is important, make sure that yours matches the one shown or you may not
be able to resolve sbt plugins.
The final resolver is my-maven-proxy-releases. This repository is a
proxy for all standard maven repositories, including maven central.
This repositories file is all that’s required to use a proxy repository. These repositories will get included first in any sbt build, however you can add some addtiionaly configuration to force the use of the proxy repository instead of other configurations.
Launcher Script
The sbt launcher supports two configuration options that allow the usage
of proxy repositories. The first is the sbt.override.build.repos
setting and the second is the sbt.repository.config setting.
sbt.override.build.repos
This setting is used to specify that all sbt project added resolvers
should be ignored in favor of those configured in the repositories
configuration. Using this with a properly configured
~/.sbt/repositories file leads to only your proxy repository used for
builds.
It is specified like so:
-Dsbt.override.build.repos=true
The value defaults to false and must be explicitly enabled.
sbt.repository.config
If you are unable to create a ~/.sbt/repositories file, due to user
permission errors or for convenience of developers, you can modify the
sbt start script directly with the following:
-Dsbt.repository.config=<path-to-your-repo-file>
This is only necessary if users do not already have their own default repository file.
Proxying Ivy Repositories
The most common mistake made when setting up a proxy repository for sbt is the attempting to merge both maven and ivy repositories into the same proxy repository. While some repository managers will allow this, it’s not recommended to do so.
Even if your company does not use ivy, sbt uses a custom layout to handle binary compatibility constraints of its own plugins. To ensure that these are resolved correctly, simple set up two virtual/proxy repositories, one for maven and one for ivy.
Here’s an example setup:
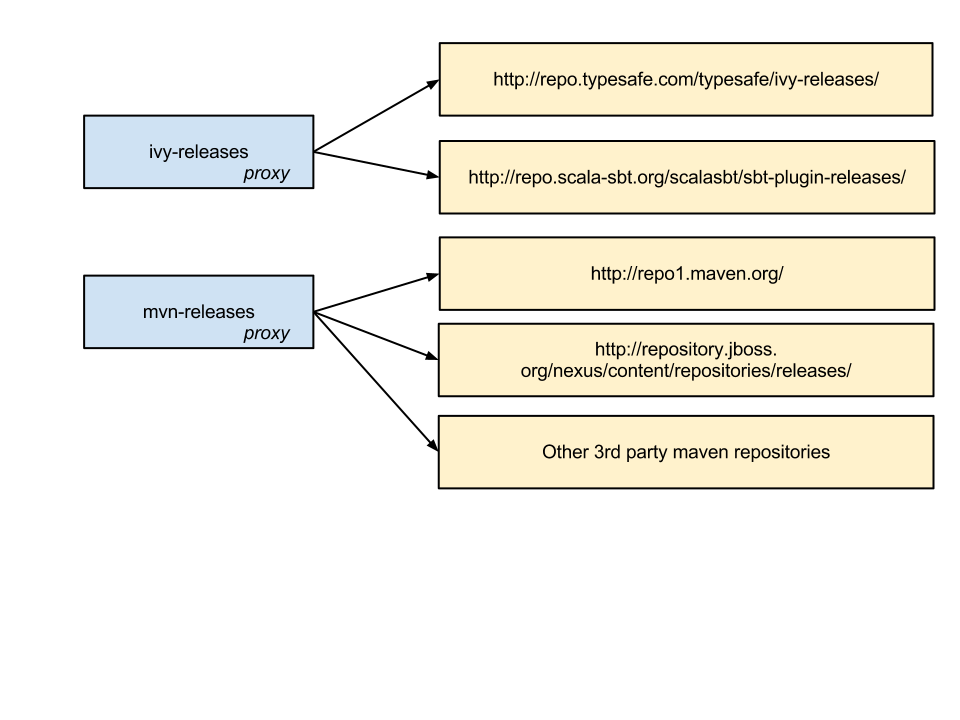
Publishing
This page describes how to publish your project. Publishing consists of uploading a descriptor, such as an Ivy file or Maven POM, and artifacts, such as a jar or war, to a repository so that other projects can specify your project as a dependency.
The publish action is used to publish your project to a remote
repository. To use publishing, you need to specify the repository to
publish to and the credentials to use. Once these are set up, you can
run publish.
The publishLocal action is used to publish your project to a local Ivy
repository. You can then use this project from other projects on the
same machine.
Define the repository
To specify the repository, assign a repository to publishTo and
optionally set the publishing style. For example, to upload to Nexus:
publishTo := Some("Sonatype Snapshots Nexus" at "https://oss.sonatype.org/content/repositories/snapshots")
To publish to a local repository:
publishTo := Some(Resolver.file("file", new File( "path/to/my/maven-repo/releases" )) )
Publishing to the users local maven repository:
publishTo := Some(Resolver.file("file", new File(Path.userHome.absolutePath+"/.m2/repository")))
If you’re using Maven repositories you will also have to select the
right repository depending on your artifacts: SNAPSHOT versions go to
the /snapshot repository while other versions go to the /releases
repository. Doing this selection can be done by using the value of the
isSnapshot SettingKey:
publishTo := {
val nexus = "https://my.artifact.repo.net/"
if (isSnapshot.value)
Some("snapshots" at nexus + "content/repositories/snapshots")
else
Some("releases" at nexus + "service/local/staging/deploy/maven2")
}
Credentials
There are two ways to specify credentials for such a repository. The first is to specify them inline:
credentials += Credentials("Some Nexus Repository Manager", "my.artifact.repo.net", "admin", "admin123")
The second and better way is to load them from a file, for example:
credentials += Credentials(Path.userHome / ".ivy2" / ".credentials")
The credentials file is a properties file with keys realm, host,
user, and password. For example:
realm=My Nexus Repository Manager
host=my.artifact.repo.net
user=admin
password=admin123
Cross-publishing
To support multiple incompatible Scala versions, enable cross building
and do + publish (see Cross Build). See [Resolvers] for other
supported repository types.
Published artifacts
By default, the main binary jar, a sources jar, and a API documentation jar are published. You can declare other types of artifacts to publish and disable or modify the default artifacts. See the Artifacts page for details.
Modifying the generated POM
When publishMavenStyle is true, a POM is generated by the makePom
action and published to the repository instead of an Ivy file. This POM
file may be altered by changing a few settings. Set pomExtra to
provide XML (scala.xml.NodeSeq) to insert directly into the generated
pom. For example:
pomExtra :=
<licenses>
<license>
<name>Apache 2</name>
<url>https://www.apache.org/licenses/LICENSE-2.0.txt</url>
<distribution>repo</distribution>
</license>
</licenses>
makePom adds to the POM any Maven-style repositories you have
declared. You can filter these by modifying pomRepositoryFilter, which
by default excludes local repositories. To instead only include local
repositories:
pomIncludeRepository := { (repo: MavenRepository) =>
repo.root.startsWith("file:")
}
There is also a pomPostProcess setting that can be used to manipulate
the final XML before it is written. It’s type is Node => Node.
pomPostProcess := { (node: Node) =>
...
}
Publishing Locally
The publishLocal command will publish to the local Ivy repository. By
default, this is in ${user.home}/.ivy2/local. Other projects on the
same machine can then list the project as a dependency. For example, if
the SBT project you are publishing has configuration parameters like:
name := "My Project"
organization := "org.me"
version := "0.1-SNAPSHOT"
Then another project can depend on it:
libraryDependencies += "org.me" %% "my-project" % "0.1-SNAPSHOT"
The version number you select must end with SNAPSHOT, or you must
change the version number each time you publish. Ivy maintains a cache,
and it stores even local projects in that cache. If Ivy already has a
version cached, it will not check the local repository for updates,
unless the version number matches a
changing pattern,
and SNAPSHOT is one such pattern.
Resolvers
Maven
Resolvers for Maven2 repositories are added as follows:
resolvers +=
"Sonatype OSS Snapshots" at "https://oss.sonatype.org/content/repositories/snapshots"
This is the most common kind of user-defined resolvers. The rest of this page describes how to define other types of repositories.
Predefined
A few predefined repositories are available and are listed below
DefaultMavenRepositoryThis is the main Maven repository at https://repo1.maven.org/maven2/ and is included by defaultJavaNet1RepositoryThis is the Maven 1 repository at http://download.java.net/maven/1/Resolver.sonatypeRepo("public")(or “snapshots”, “releases”) This is Sonatype OSS Maven Repository at https://oss.sonatype.org/content/repositories/publicResolver.typesafeRepo("releases")(or “snapshots”) This is Typesafe Repository at https://repo.typesafe.com/typesafe/releasesResolver.typesafeIvyRepo("releases")(or “snapshots”) This is Typesafe Ivy Repository at https://repo.typesafe.com/typesafe/ivy-releasesResolver.sbtPluginRepo("releases")(or “snapshots”) This is sbt Community Repository at https://repo.scala-sbt.org/scalasbt/sbt-plugin-releasesResolver.bintrayRepo("owner", "repo")This is the Bintray repository at https://dl.bintray.com/[owner]/[repo]/Resolver.jcenterRepoThis is the Bintray JCenter repository at https://jcenter.bintray.com/
For example, to use the java.net repository, use the following setting
in your build definition:
resolvers += JavaNet1Repository
Predefined repositories will go under Resolver going forward so they are in one place:
Resolver.sonatypeRepo("releases") // Or "snapshots"
Custom
sbt provides an interface to the repository types available in Ivy: file, URL, SSH, and SFTP. A key feature of repositories in Ivy is using patterns to configure repositories.
Construct a repository definition using the factory in sbt.Resolver
for the desired type. This factory creates a Repository object that
can be further configured. The following table contains links to the Ivy
documentation for the repository type and the API documentation for the
factory and repository class. The SSH and SFTP repositories are
configured identically except for the name of the factory. Use
Resolver.ssh for SSH and Resolver.sftp for SFTP.
| Type | Factory | Ivy Docs | Factory API | Repository Class API |
|---|---|---|---|---|
| Filesystem | Resolver.file | Ivy filesystem | filesystem factory | FileRepository API |
| SFTP | Resolver.sftp | Ivy sftp | sftp factory | SftpRepository API |
| SSH | Resolver.ssh | Ivy ssh | ssh factory | SshRepository API |
| URL | Resolver.url | Ivy url | url factory | URLRepository API |
Basic Examples
These are basic examples that use the default Maven-style repository layout.
Filesystem
Define a filesystem repository in the test directory of the current
working directory and declare that publishing to this repository must be
atomic.
resolvers += Resolver.file("my-test-repo", file("test")) transactional()
URL
Define a URL repository at "https://example.org/repo-releases/".
resolvers += Resolver.url("my-test-repo", url("https://example.org/repo-releases/"))
To specify an Ivy repository, use:
resolvers += Resolver.url("my-test-repo", url)(Resolver.ivyStylePatterns)
or customize the layout pattern described in the Custom Layout section below.
SFTP and SSH Repositories
The following defines a repository that is served by SFTP from host
"example.org":
resolvers += Resolver.sftp("my-sftp-repo", "example.org")
To explicitly specify the port:
resolvers += Resolver.sftp("my-sftp-repo", "example.org", 22)
To specify a base path:
resolvers += Resolver.sftp("my-sftp-repo", "example.org", "maven2/repo-releases/")
Authentication for the repositories returned by sftp and ssh can be
configured by the as methods.
To use password authentication:
resolvers += Resolver.ssh("my-ssh-repo", "example.org") as("user", "password")
or to be prompted for the password:
resolvers += Resolver.ssh("my-ssh-repo", "example.org") as("user")
To use key authentication:
resolvers += {
val keyFile: File = ...
Resolver.ssh("my-ssh-repo", "example.org") as("user", keyFile, "keyFilePassword")
}
or if no keyfile password is required or if you want to be prompted for it:
resolvers += Resolver.ssh("my-ssh-repo", "example.org") as("user", keyFile)
To specify the permissions used when publishing to the server:
resolvers += Resolver.ssh("my-ssh-repo", "example.org") withPermissions("0644")
This is a chmod-like mode specification.
Custom Layout
These examples specify custom repository layouts using patterns. The
factory methods accept an Patterns instance that defines the patterns
to use. The patterns are first resolved against the base file or URL.
The default patterns give the default Maven-style layout. Provide a
different Patterns object to use a different layout. For example:
resolvers += Resolver.url("my-test-repo", url)( Patterns("[organisation]/[module]/[revision]/[artifact].[ext]") )
You can specify multiple patterns or patterns for the metadata and artifacts separately. You can also specify whether the repository should be Maven compatible (as defined by Ivy). See the patterns API for the methods to use.
For filesystem and URL repositories, you can specify absolute patterns
by omitting the base URL, passing an empty Patterns instance, and
using ivys and artifacts:
resolvers += Resolver.url("my-test-repo") artifacts
"https://example.org/[organisation]/[module]/[revision]/[artifact].[ext]"
Update Report
update and related tasks produce a value of type
sbt.UpdateReport This data
structure provides information about the resolved configurations,
modules, and artifacts. At the top level, UpdateReport provides
reports of type ConfigurationReport for each resolved configuration. A
ConfigurationReport supplies reports (of type ModuleReport) for each
module resolved for a given configuration. Finally, a ModuleReport
lists each successfully retrieved Artifact and the File it was
retrieved to as well as the Artifacts that couldn’t be downloaded.
This missing Arifact list is always empty for update, which will
fail if it is non-empty. However, it may be non-empty for
updateClassifiers and updateSbtClassifers.
Filtering a Report and Getting Artifacts
A typical use of UpdateReport is to retrieve a list of files matching
a filter. A conversion of type UpdateReport => RichUpdateReport
implicitly provides these methods for UpdateReport. The filters are
defined by the
DependencyFilter,
ConfigurationFilter,
ModuleFilter, and
ArtifactFilter types. Using
these filter types, you can filter by the configuration name, the module
organization, name, or revision, and the artifact name, type, extension,
or classifier.
The relevant methods (implicitly on UpdateReport) are:
def matching(f: DependencyFilter): Seq[File]
def select(configuration: ConfigurationFilter = ...,
module: ModuleFilter = ...,
artifact: ArtifactFilter = ...): Seq[File]
Any argument to select may be omitted, in which case all values are
allowed for the corresponding component. For example, if the
ConfigurationFilter is not specified, all configurations are accepted.
The individual filter types are discussed below.
Filter Basics
Configuration, module, and artifact filters are typically built by
applying a NameFilter to each component of a Configuration,
ModuleID, or Artifact. A basic NameFilter is implicitly
constructed from a String, with * interpreted as a wildcard.
import sbt._
// each argument is of type NameFilter
val mf: ModuleFilter = moduleFilter(organization = "*sbt*",
name = "main" | "actions", revision = "1.*" - "1.0")
// unspecified arguments match everything by default
val mf: ModuleFilter = moduleFilter(organization = "net.databinder")
// specifying "*" is the same as omitting the argument
val af: ArtifactFilter = artifactFilter(name = "*", `type` = "source",
extension = "jar", classifier = "sources")
val cf: ConfigurationFilter = configurationFilter(name = "compile" | "test")
Alternatively, these filters, including a NameFilter, may be directly
defined by an appropriate predicate (a single-argument function
returning a Boolean).
import sbt._
// here the function value of type String => Boolean is implicitly converted to a NameFilter
val nf: NameFilter = (s: String) => s.startsWith("dispatch-")
// a Set[String] is a function String => Boolean
val acceptConfigs: Set[String] = Set("compile", "test")
// implicitly converted to a ConfigurationFilter
val cf: ConfigurationFilter = acceptConfigs
val mf: ModuleFilter = (m: ModuleID) => m.organization contains "sbt"
val af: ArtifactFilter = (a: Artifact) => a.classifier.isEmpty
ConfigurationFilter
A configuration filter essentially wraps a NameFilter and is
explicitly constructed by the configurationFilter method:
def configurationFilter(name: NameFilter = ...): ConfigurationFilter
If the argument is omitted, the filter matches all configurations.
Functions of type String => Boolean are implicitly convertible to a
ConfigurationFilter. As with ModuleFilter, ArtifactFilter, and
NameFilter, the &, |, and - methods may be used to combine
ConfigurationFilters.
import sbt._
val a: ConfigurationFilter = Set("compile", "test")
val b: ConfigurationFilter = (c: String) => c.startsWith("r")
val c: ConfigurationFilter = a | b
(The explicit types are optional here.)
ModuleFilter
A module filter is defined by three NameFilters: one for the
organization, one for the module name, and one for the revision. Each
component filter must match for the whole module filter to match. A
module filter is explicitly constructed by the moduleFilter method:
def moduleFilter(organization: NameFilter = ..., name: NameFilter = ..., revision: NameFilter = ...): ModuleFilter
An omitted argument does not contribute to the match. If all arguments
are omitted, the filter matches all ModuleIDs. Functions of type
ModuleID => Boolean are implicitly convertible to a ModuleFilter. As
with ConfigurationFilter, ArtifactFilter, and NameFilter, the &,
|, and - methods may be used to combine ModuleFilters:
import sbt._
val a: ModuleFilter = moduleFilter(name = "dispatch-twitter", revision = "0.7.8")
val b: ModuleFilter = moduleFilter(name = "dispatch-*")
val c: ModuleFilter = b - a
(The explicit types are optional here.)
ArtifactFilter
An artifact filter is defined by four NameFilters: one for the name,
one for the type, one for the extension, and one for the classifier.
Each component filter must match for the whole artifact filter to match.
An artifact filter is explicitly constructed by the artifactFilter
method:
def artifactFilter(name: NameFilter = ..., `type`: NameFilter = ...,
extension: NameFilter = ..., classifier: NameFilter = ...): ArtifactFilter
Functions of type Artifact => Boolean are implicitly convertible to an
ArtifactFilter. As with ConfigurationFilter, ModuleFilter, and
NameFilter, the &, |, and - methods may be used to combine
ArtifactFilters:
import sbt._
val a: ArtifactFilter = artifactFilter(classifier = "javadoc")
val b: ArtifactFilter = artifactFilter(`type` = "jar")
val c: ArtifactFilter = b - a
(The explicit types are optional here.)
DependencyFilter
A DependencyFilter is typically constructed by combining other
DependencyFilters together using &&, ||, and --. Configuration,
module, and artifact filters are DependencyFilters themselves and can
be used directly as a DependencyFilter or they can build up a
DependencyFilter. Note that the symbols for the DependencyFilter
combining methods are doubled up to distinguish them from the
combinators of the more specific filters for configurations, modules,
and artifacts. These double-character methods will always return a
DependencyFilter, whereas the single character methods preserve the
more specific filter type. For example:
import sbt._
val df: DependencyFilter =
configurationFilter(name = "compile" | "test") &&
artifactFilter(`type` = "jar") ||
moduleFilter(name = "dispatch-*")
Here, we used && and || to combine individual component filters into
a dependency filter, which can then be provided to the
UpdateReport.matches method. Alternatively, the UpdateReport.select
method may be used, which is equivalent to calling matches with its
arguments combined with &&.
Cached resolution
Cached resolution is an experimental feature of sbt added since 0.13.7 to address the scalability performance of dependency resolution.
Setup
To set up cached resolution include the following setting in your project’s build:
updateOptions := updateOptions.value.withCachedResolution(true)
Dependency as a graph
A project declares its own library dependency using libaryDependencies setting. The libraries you added also bring in their transitive dependencies. For example, your project may depend on dispatch-core 0.11.2; dispatch-core 0.11.2 depends on async-http-client 1.8.10; async-http-client 1.8.10 depends on netty 3.9.2.Final, and so forth. If we think of each library to be a node with arrows going out to dependent nodes, we can think of the entire dependencies to be a graph — specifically a directed acyclic graph.
This graph-like structure, which was adopted from Apache Ivy, allows us to define override rules and exclusions transitively, but as the number of the node increases, the time it takes to resolve dependencies grows significantly. See Motivation section later in this page for the full description.
Cached resolution
Cached resolution feature is akin to incremental compilation, which only recompiles the sources that have been changed since the last compile. Unlike Scala compiler, Ivy does not have the concept of separate compilation, so that needed to be implemented.
Instead of resolving the full dependency graph, cached resolution feature creates minigraphs — one for each direct dependency appearing in all related subprojects. These minigraphs are resolved using Ivy’s resolution engine, and the result is stored locally under ~/.sbt/0.13/dependency/ (or what’s specified by sbt.dependency.base flag) shared across all builds. After all minigraphs are resolved, they are stitched together by applying the conflict resolution algorithm (typically picking the latest version).
When you add a new library to your project, cached resolution feature will check for the minigraph files under ~/.sbt/0.13/dependency/ and load the previously resolved nodes, which incurs negligible I/O overhead, and only resolve the newly added library. The intended performance improvement is that the second and third subprojects can take advantage of the resolved minigraphs from the first one and avoid duplicated work. The following figure illustrates the proj A, B, and C all hitting the same set of json file.
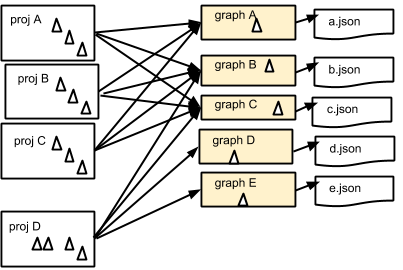
The actual speedup will depend case by case, but you should see significant speedup if you have many subprojects. An initial report from a user showed change from 260s to 25s. Your milage may vary.
Caveats and known issues
Cached resolution is an experimental feature, and you might run into some issues. When you see them please report to Github Issue or sbt-dev list.
First runs
The first time you run cached resolution will likely be slow since it needs to resolve all minigraphs and save the result into filesystem. Whenever you add a new node the system has not seen, it will save the minigraph. The second run onwards should be faster, but comparing full-resolution update with second run onwards might not be a fair comparison.
Ivy fidelity is not guaranteed
Some of the Ivy behavior doesn’t make sense, especially around Maven emulation. For example, it seem to treat all transitive dependencies introduced by Maven-published library as force() even when the original pom.xml doesn’t say to:
$ cat ~/.ivy2/cache/com.ning/async-http-client/ivy-1.8.10.xml | grep netty
<dependency org="io.netty" name="netty" rev="3.9.2.Final" force="true" conf="compile->compile(*),master(*);runtime->runtime(*)"/>
There are also some issues around multiple dependencies to the same library with different Maven classifiers. In these cases, reproducing the exact result as normal update may not make sense or is downright impossible.
SNAPSHOT and dynamic dependencies
When a minigraph contains either a SNAPSHOT or dynamic dependency, the graph is considered dynamic, and it will be invalidated after a single task execution. Therefore, if you have any SNAPSHOT in your graph, your exeperience may degrade. (This could be improved in the future)
Motivation
sbt internally uses Apache Ivy to resolve library dependencies. While sbt has benefited from not having to reinvent depenendency resolution engine all these years, we are increasingly seeing scalability challenges especially for projects with both multiple subprojects and large dependency graph. There are several factors involved in sbt’s resolution scalability:
- Number of transitive nodes (libraries) in the graph
- Exclusion and override rules
- Number of subprojects
- Configurations
- Number of repositories and their availability
- Classifiers (additional sources and docs used by IDE)
Of the above factors, the one that has the most impact is the number of transitive nodes.
- The more nodes there are, the chances of version conflict increases. Conflicts are resolved typically by picking the latest version within the same library.
- The more nodes there are, the more it needs to backtrack to check for exlusion and override rules.
Exclusion and override rules are applied transitively, so any time a new node is introduced to the graph it needs to check its parent node’s rules, its grandparent node’s rules, great-grandparent node’s rules, etc.
sbt treats configurations and subprojects to be independent dependency graph. This allows us to include arbitrary libraries for different configurations and subprojects, but if the dependency resolution is slow, the linear scaling starts to hurt. There have been prior efforts to cache the result of library dependencies, but it still resulted in full resolution when libraryDependencies has changed.
Tasks and Commands
This part of the documentation has pages documenting particular sbt topics in detail. Before reading anything in here, you will need the information in the Getting Started Guide as a foundation.
Tasks
Tasks and settings are introduced in the getting started guide, which you may wish to read first. This page has additional details and background and is intended more as a reference.
Introduction
Both settings and tasks produce values, but there are two major differences between them:
- Settings are evaluated at project load time. Tasks are executed on demand, often in response to a command from the user.
- At the beginning of project loading, settings and their dependencies are fixed. Tasks can introduce new tasks during execution, however.
Features
There are several features of the task system:
- By integrating with the settings system, tasks can be added, removed, and modified as easily and flexibly as settings.
- Input Tasks use parser combinators to define the syntax for their arguments. This allows flexible syntax and tab-completions in the same way as Commands.
- Tasks produce values. Other tasks can access a task’s value by
calling
valueon it within a task definition. - Dynamically changing the structure of the task graph is possible. Tasks can be injected into the execution graph based on the result of another task.
- There are ways to handle task failure, similar to
try/catch/finally. - Each task has access to its own Logger that by default persists the logging for that task at a more verbose level than is initially printed to the screen.
These features are discussed in detail in the following sections.
Defining a Task
Hello World example (sbt)
build.sbt:
lazy val hello = taskKey[Unit]("Prints 'Hello World'")
hello := println("hello world!")
Run “sbt hello” from command line to invoke the task. Run “sbt tasks” to see this task listed.
Define the key
To declare a new task, define a lazy val of type TaskKey:
lazy val sampleTask = taskKey[Int]("A sample task.")
The name of the val is used when referring to the task in Scala code
and at the command line. The string passed to the taskKey method is a
description of the task. The type parameter passed to taskKey (here,
Int) is the type of value produced by the task.
We’ll define a couple of other keys for the examples:
lazy val intTask = taskKey[Int]("An int task")
lazy val stringTask = taskKey[String]("A string task")
The examples themselves are valid entries in a build.sbt or can be
provided as part of a sequence to Project.settings (see
.scala build definition).
Implement the task
There are three main parts to implementing a task once its key is defined:
- Determine the settings and other tasks needed by the task. They are the task’s inputs.
- Define the code that implements the task in terms of these inputs.
- Determine the scope the task will go in.
These parts are then combined just like the parts of a setting are combined.
Defining a basic task
A task is defined using :=
intTask := 1 + 2
stringTask := System.getProperty("user.name")
sampleTask := {
val sum = 1 + 2
println("sum: " + sum)
sum
}
As mentioned in the introduction, a task is evaluated on demand. Each
time sampleTask is invoked, for example, it will print the sum. If the
username changes between runs, stringTask will take different values
in those separate runs. (Within a run, each task is evaluated at most
once.) In contrast, settings are evaluated once on project load and are
fixed until the next reload.
Tasks with inputs
Tasks with other tasks or settings as inputs are also defined using
:=. The values of the inputs are referenced by the value method.
This method is special syntax and can only be called when defining a
task, such as in the argument to :=. The following defines a task that
adds one to the value produced by intTask and returns the result.
sampleTask := intTask.value + 1
Multiple settings are handled similarly:
stringTask := "Sample: " + sampleTask.value + ", int: " + intTask.value
Task Scope
As with settings, tasks can be defined in a specific scope. For example,
there are separate compile tasks for the compile and test scopes.
The scope of a task is defined the same as for a setting. In the
following example, test:sampleTask uses the result of
compile:intTask.
sampleTask in Test := (intTask in Compile).value * 3
On precedence
As a reminder, infix method precedence is by the name of the method and postfix methods have lower precedence than infix methods.
- Assignment methods have the lowest precedence. These are methods
with names ending in
=, except for!=,<=,>=, and names that start with=. - Methods starting with a letter have the next highest precedence.
Methods with names that start with a symbol and aren’t included in
- have the highest precedence. (This category is divided further according to the specific character it starts with. See the Scala specification for details.)
Therefore, the the previous example is equivalent to the following:
(sampleTask in Test).:=( (intTask in Compile).value * 3 )
Additionally, the braces in the following are necessary:
helloTask := { "echo Hello" ! }
Without them, Scala interprets the line as
( helloTask.:=("echo Hello") ).! instead of the desired
helloTask.:=( "echo Hello".! ).
Separating implementations
The implementation of a task can be separated from the binding. For example, a basic separate definition looks like:
// Define a new, standalone task implemention
lazy val intTaskImpl: Initialize[Task[Int]] =
Def.task { sampleTask.value - 3 }
// Bind the implementation to a specific key
intTask := intTaskImpl.value
Note that whenever .value is used, it must be within a task
definition, such as within Def.task above or as an argument to :=.
Modifying an Existing Task
In the general case, modify a task by declaring the previous task as an input.
// initial definition
intTask := 3
// overriding definition that references the previous definition
intTask := intTask.value + 1
Completely override a task by not declaring the previous task as an
input. Each of the definitions in the following example completely
overrides the previous one. That is, when intTask is run, it will only
print #3.
intTask := {
println("#1")
3
}
intTask := {
println("#2")
5
}
intTask := {
println("#3")
sampleTask.value - 3
}
Getting values from multiple scopes
Introduction
The general form of an expression that gets values from multiple scopes is:
<setting-or-task>.all(<scope-filter>).value
The all method is implicitly added to tasks and settings. It accepts a
ScopeFilter that will select the Scopes. The result has type
Seq[T], where T is the key’s underlying type.
Example
A common scenario is getting the sources for all subprojects for
processing all at once, such as passing them to scaladoc. The task that
we want to obtain values for is sources and we want to get the values
in all non-root projects and in the Compile configuration. This looks
like:
lazy val core = project
lazy val util = project
lazy val root = project.settings(
sources := {
val filter = ScopeFilter( inProjects(core, util), inConfigurations(Compile) )
// each sources definition is of type Seq[File],
// giving us a Seq[Seq[File]] that we then flatten to Seq[File]
val allSources: Seq[Seq[File]] = sources.all(filter).value
allSources.flatten
}
)
The next section describes various ways to construct a ScopeFilter.
ScopeFilter
A basic ScopeFilter is constructed by the ScopeFilter.apply method.
This method makes a ScopeFilter from filters on the parts of a
Scope: a ProjectFilter, ConfigurationFilter, and TaskFilter. The
simplest case is explicitly specifying the values for the parts:
val filter: ScopeFilter =
ScopeFilter(
inProjects( core, util ),
inConfigurations( Compile, Test )
)
Unspecified filters
If the task filter is not specified, as in the example above, the default is to select scopes without a specific task (global). Similarly, an unspecified configuration filter will select scopes in the global configuration. The project filter should usually be explicit, but if left unspecified, the current project context will be used.
More on filter construction
The example showed the basic methods inProjects and
inConfigurations. This section describes all methods for constructing
a ProjectFilter, ConfigurationFilter, or TaskFilter. These methods
can be organized into four groups:
- Explicit member list (
inProjects,inConfigurations,inTasks) - Global value (
inGlobalProject,inGlobalConfiguration,inGlobalTask) - Default filter (
inAnyProject,inAnyConfiguration,inAnyTask) - Project relationships (
inAggregates,inDependencies)
See the API documentation for details.
Combining ScopeFilters
ScopeFilters may be combined with the &&, ||, --, and -
methods:
a && bSelects scopes that match both a and ba || bSelects scopes that match either a or ba -- bSelects scopes that match a but not b-bSelects scopes that do not match b
For example, the following selects the scope for the Compile and
Test configurations of the core project and the global configuration
of the util project:
val filter: ScopeFilter =
ScopeFilter( inProjects(core), inConfigurations(Compile, Test)) ||
ScopeFilter( inProjects(util), inGlobalConfiguration )
More operations
The all method applies to both settings (values of type
Initialize[T]) and tasks (values of type Initialize[Task[T]]). It
returns a setting or task that provides a Seq[T], as shown in this
table:
| Target | Result |
|---|---|
| Initialize[T] | Initialize[Seq[T]] |
| Initialize[Task[T]] | Initialize[Task[Seq[T]]] |
This means that the all method can be combined with methods that
construct tasks and settings.
Missing values
Some scopes might not define a setting or task. The ? and ?? methods
can help in this case. They are both defined on settings and tasks and
indicate what to do when a key is undefined.
| ? | On a setting or task with underlying type T, this accepts no arguments and returns a setting or task (respectively) of type Option[T]. The result is None if the setting/task is undefined and Some[T] with the value if it is. |
| ?? | On a setting or task with underlying type T, this accepts an argument of type T and uses this argument if the setting/task is undefined. |
The following contrived example sets the maximum errors to be the maximum of all aggregates of the current project.
maxErrors := {
// select the transitive aggregates for this project, but not the project itself
val filter: ScopeFilter =
ScopeFilter( inAggregates(ThisProject, includeRoot=false) )
// get the configured maximum errors in each selected scope,
// using 0 if not defined in a scope
val allVersions: Seq[Int] =
(maxErrors ?? 0).all(filter).value
allVersions.max
}
Multiple values from multiple scopes
The target of all is any task or setting, including anonymous ones.
This means it is possible to get multiple values at once without
defining a new task or setting in each scope. A common use case is to
pair each value obtained with the project, configuration, or full scope
it came from.
resolvedScoped: Provides the full enclosing ScopedKey (which is a Scope +AttributeKey[_])thisProject: Provides the Project associated with this scope (undefined at the global and build levels)thisProjectRef: Provides the ProjectRef for the context (undefined at the global and build levels)configuration: Provides the Configuration for the context (undefined for the global configuration)
For example, the following defines a task that prints non-Compile configurations that define sbt plugins. This might be used to identify an incorrectly configured build (or not, since this is a fairly contrived example):
// Select all configurations in the current project except for Compile
lazy val filter: ScopeFilter = ScopeFilter(
inProjects(ThisProject),
inAnyConfiguration -- inConfigurations(Compile)
)
// Define a task that provides the name of the current configuration
// and the set of sbt plugins defined in the configuration
lazy val pluginsWithConfig: Initialize[Task[ (String, Set[String]) ]] =
Def.task {
( configuration.value.name, definedSbtPlugins.value )
}
checkPluginsTask := {
val oddPlugins: Seq[(String, Set[String])] =
pluginsWithConfig.all(filter).value
// Print each configuration that defines sbt plugins
for( (config, plugins) <- oddPlugins if plugins.nonEmpty )
println(s"$config defines sbt plugins: ${plugins.mkString(", ")}")
}
Advanced Task Operations
The examples in this section use the task keys defined in the previous section.
Streams: Per-task logging
Per-task loggers are part of a more general system for task-specific data called Streams. This allows controlling the verbosity of stack traces and logging individually for tasks as well as recalling the last logging for a task. Tasks also have access to their own persisted binary or text data.
To use Streams, get the value of the streams task. This is a special
task that provides an instance of
TaskStreams for the defining
task. This type provides access to named binary and text streams, named
loggers, and a default logger. The default
Logger, which is the most commonly used
aspect, is obtained by the log method:
myTask := {
val s: TaskStreams = streams.value
s.log.debug("Saying hi...")
s.log.info("Hello!")
}
You can scope logging settings by the specific task’s scope:
logLevel in myTask := Level.Debug
traceLevel in myTask := 5
To obtain the last logging output from a task, use the last command:
$ last myTask
[debug] Saying hi...
[info] Hello!
The verbosity with which logging is persisted is controlled using the
persistLogLevel and persistTraceLevel settings. The last command
displays what was logged according to these levels. The levels do not
affect already logged information.
Dynamic Computations with Def.taskDyn
It can be useful to use the result of a task to determine the next tasks
to evaluate. This is done using Def.taskDyn. The result of taskDyn
is called a dynamic task because it introduces dependencies at runtime.
The taskDyn method supports the same syntax as Def.task and :=
except that you return a task instead of a plain value.
For example,
val dynamic = Def.taskDyn {
// decide what to evaluate based on the value of `stringTask`
if(stringTask.value == "dev")
// create the dev-mode task: this is only evaluated if the
// value of stringTask is "dev"
Def.task {
3
}
else
// create the production task: only evaluated if the value
// of the stringTask is not "dev"
Def.task {
intTask.value + 5
}
}
myTask := {
val num = dynamic.value
println(s"Number selected was $num")
}
The only static dependency of myTask is stringTask. The dependency
on intTask is only introduced in non-dev mode.
Note: A dynamic task cannot refer to itself or a circular dependency will result. In the example above, there would be a circular dependency if the code passed to taskDyn referenced myTask.
Using Def.sequential
sbt 0.13.8 added Def.sequential function to run tasks under semi-sequential semantics.
This is similar to the dynamic task, but easier to define.
To demonstrate the sequential task, let’s create a custom task called compilecheck that runs compile in Compile and then scalastyle in Compile task added by scalastyle-sbt-plugin.
lazy val compilecheck = taskKey[Unit]("compile and then scalastyle")
lazy val root = (project in file(".")).
settings(
compilecheck in Compile := Def.sequential(
compile in Compile,
(scalastyle in Compile).toTask("")
).value
)
To call this task type in compilecheck from the shell. If the compilation fails, compilecheck would stop the execution.
root> compilecheck
[info] Compiling 1 Scala source to /Users/x/proj/target/scala-2.10/classes...
[error] /Users/x/proj/src/main/scala/Foo.scala:3: Unmatched closing brace '}' ignored here
[error] }
[error] ^
[error] one error found
[error] (compile:compileIncremental) Compilation failed
Handling Failure
This section discusses the failure, result, and andFinally
methods, which are used to handle failure of other tasks.
failure
The failure method creates a new task that returns the Incomplete
value when the original task fails to complete normally. If the original
task succeeds, the new task fails.
Incomplete is an exception with
information about any tasks that caused the failure and any underlying
exceptions thrown during task execution.
For example:
intTask := error("Failed.")
intTask := {
println("Ignoring failure: " + intTask.failure.value)
3
}
This overrides the intTask so that the original exception is printed
and the constant 3 is returned.
failure does not prevent other tasks that depend on the target from
failing. Consider the following example:
intTask := if(shouldSucceed) 5 else error("Failed.")
// Return 3 if intTask fails. If intTask succeeds, this task will fail.
aTask := intTask.failure.value - 2
// A new task that increments the result of intTask.
bTask := intTask.value + 1
cTask := aTask.value + bTask.value
The following table lists the results of each task depending on the initially invoked task:
| invoked task | intTask result | aTask result | bTask result | cTask result | overall result |
|---|---|---|---|---|---|
| intTask | failure | not run | not run | not run | failure |
| aTask | failure | success | not run | not run | success |
| bTask | failure | not run | failure | not run | failure |
| cTask | failure | success | failure | failure | failure |
| intTask | success | not run | not run | not run | success |
| aTask | success | failure | not run | not run | failure |
| bTask | success | not run | success | not run | success |
| cTask | success | failure | success | failure | failure |
The overall result is always the same as the root task (the directly
invoked task). A failure turns a success into a failure, and a failure
into an Incomplete. A normal task definition fails when any of its
inputs fail and computes its value otherwise.
result
The result method creates a new task that returns the full Result[T]
value for the original task. Result has
the same structure as Either[Incomplete, T] for a task result of type
T. That is, it has two subtypes:
Inc, which wrapsIncompletein case of failureValue, which wraps a task’s result in case of success.
Thus, the task created by result executes whether or not the original
task succeeds or fails.
For example:
intTask := error("Failed.")
intTask := intTask.result.value match {
case Inc(inc: Incomplete) =>
println("Ignoring failure: " + inc)
3
case Value(v) =>
println("Using successful result: " + v)
v
}
This overrides the original intTask definition so that if the original
task fails, the exception is printed and the constant 3 is returned.
If it succeeds, the value is printed and returned.
andFinally
The andFinally method defines a new task that runs the original task
and evaluates a side effect regardless of whether the original task
succeeded. The result of the task is the result of the original task.
For example:
intTask := error("I didn't succeed.")
lazy val intTaskImpl = intTask andFinally { println("andFinally") }
intTask := intTaskImpl.value
This modifies the original intTask to always print “andFinally” even
if the task fails.
Note that andFinally constructs a new task. This means that the new
task has to be invoked in order for the extra block to run. This is
important when calling andFinally on another task instead of overriding
a task like in the previous example. For example, consider this code:
intTask := error("I didn't succeed.")
lazy val intTaskImpl = intTask andFinally { println("andFinally") }
otherIntTask := intTaskImpl.value
If intTask is run directly, otherIntTask is never involved in
execution. This case is similar to the following plain Scala code:
def intTask(): Int =
error("I didn't succeed.")
def otherIntTask(): Int =
try { intTask() }
finally { println("finally") }
intTask()
It is obvious here that calling intTask() will never result in “finally” being printed.
Input Tasks
Input Tasks parse user input and produce a task to run. Parsing Input describes how to use the parser combinators that define the input syntax and tab completion. This page describes how to hook those parser combinators into the input task system.
Input Keys
A key for an input task is of type InputKey and represents the input
task like a SettingKey represents a setting or a TaskKey represents
a task. Define a new input task key using the inputKey.apply factory
method:
// goes in project/Build.scala or in build.sbt
val demo = inputKey[Unit]("A demo input task.")
The definition of an input task is similar to that of a normal task, but it can also use the result of a
Parser applied to user input. Just as
the special value method gets the value of a setting or task, the
special parsed method gets the result of a Parser.
Basic Input Task Definition
The simplest input task accepts a space-delimited sequence of arguments.
It does not provide useful tab completion and parsing is basic. The
built-in parser for space-delimited arguments is constructed via the
spaceDelimited method, which accepts as its only argument the label to
present to the user during tab completion.
For example, the following task prints the current Scala version and then echoes the arguments passed to it on their own line.
demo := {
// get the result of parsing
val args: Seq[String] = spaceDelimited("<arg>").parsed
// Here, we also use the value of the `scalaVersion` setting
println("The current Scala version is " + scalaVersion.value)
println("The arguments to demo were:")
args foreach println
}
Input Task using Parsers
The Parser provided by the spaceDelimited method does not provide any
flexibility in defining the input syntax. Using a custom parser is just
a matter of defining your own Parser as described on the
Parsing Input page.
Constructing the Parser
The first step is to construct the actual Parser by defining a value
of one of the following types:
Parser[I]: a basic parser that does not use any settingsInitialize[Parser[I]]: a parser whose definition depends on one or more settingsInitialize[State => Parser[I]]: a parser that is defined using both settings and the current state
We already saw an example of the first case with spaceDelimited, which
doesn’t use any settings in its definition. As an example of the third
case, the following defines a contrived Parser that uses the project’s
Scala and sbt version settings as well as the state. To use these
settings, we need to wrap the Parser construction in Def.setting and
get the setting values with the special value method:
import complete.DefaultParsers._
val parser: Initialize[State => Parser[(String,String)]] =
Def.setting {
(state: State) =>
( token("scala" <~ Space) ~ token(scalaVersion.value) ) |
( token("sbt" <~ Space) ~ token(sbtVersion.value) ) |
( token("commands" <~ Space) ~
token(state.remainingCommands.size.toString) )
}
This Parser definition will produce a value of type (String,String).
The input syntax defined isn’t very flexible; it is just a
demonstration. It will produce one of the following values for a
successful parse (assuming the current Scala version is 2.10.6,
the current sbt version is 0.13.11, and there are 3 commands left to
run):
Again, we were able to access the current Scala and sbt version for the project because they are settings. Tasks cannot be used to define the parser.
Constructing the Task
Next, we construct the actual task to execute from the result of the
Parser. For this, we define a task as usual, but we can access the
result of parsing via the special parsed method on Parser.
The following contrived example uses the previous example’s output (of
type (String,String)) and the result of the package task to print
some information to the screen.
demo := {
val (tpe, value) = parser.parsed
println("Type: " + tpe)
println("Value: " + value)
println("Packaged: " + packageBin.value.getAbsolutePath)
}
The InputTask type
It helps to look at the InputTask type to understand more advanced
usage of input tasks. The core input task type is:
class InputTask[T](val parser: State => Parser[Task[T]])
Normally, an input task is assigned to a setting and you work with
Initialize[InputTask[T]].
Breaking this down,
- You can use other settings (via Initialize) to construct an input task.
- You can use the current State to construct the parser.
- The parser accepts user input and provides tab completion.
- The parser produces the task to run.
So, you can use settings or State to construct the parser that defines
an input task’s command line syntax. This was described in the previous
section. You can then use settings, State, or user input to construct
the task to run. This is implicit in the input task syntax.
Using other input tasks
The types involved in an input task are composable, so it is possible to
reuse input tasks. The .parsed and .evaluated methods are defined on
InputTasks to make this more convenient in common situations:
- Call
.parsedon anInputTask[T]orInitialize[InputTask[T]]to get theTask[T]created after parsing the command line - Call
.evaluatedon anInputTask[T]orInitialize[InputTask[T]]to get the value of typeTfrom evaluating that task
In both situations, the underlying Parser is sequenced with other
parsers in the input task definition. In the case of .evaluated, the
generated task is evaluated.
The following example applies the run input task, a literal separator
parser --, and run again. The parsers are sequenced in order of
syntactic appearance, so that the arguments before -- are passed to
the first run and the ones after are passed to the second.
val run2 = inputKey[Unit](
"Runs the main class twice with different argument lists separated by --")
val separator: Parser[String] = "--"
run2 := {
val one = (run in Compile).evaluated
val sep = separator.parsed
val two = (run in Compile).evaluated
}
For a main class Demo that echoes its arguments, this looks like:
$ sbt
> run2 a b -- c d
[info] Running Demo c d
[info] Running Demo a b
c
d
a
b
Preapplying input
Because InputTasks are built from Parsers, it is possible to
generate a new InputTask by applying some input programmatically. (It
is also possible to generate a Task, which is covered in the next
section.) Two convenience methods are provided on InputTask[T] and
Initialize[InputTask[T]] that accept the String to apply.
partialInputapplies the input and allows further input, such as from the command linefullInputapplies the input and terminates parsing, so that further input is not accepted
In each case, the input is applied to the input task’s parser. Because input tasks handle all input after the task name, they usually require initial whitespace to be provided in the input.
Consider the example in the previous section. We can modify it so that we:
- Explicitly specify all of the arguments to the first
run. We usenameandversionto show that settings can be used to define and modify parsers. - Define the initial arguments passed to the second
run, but allow further input on the command line.
Note: the current implementation of
:=doesn’t actually support applying input derived from settings yet.
lazy val run2 = inputKey[Unit]("Runs the main class twice: " +
"once with the project name and version as arguments"
"and once with command line arguments preceded by hard coded values.")
// The argument string for the first run task is ' <name> <version>'
lazy val firstInput: Initialize[String] =
Def.setting(s" ${name.value} ${version.value}")
// Make the first arguments to the second run task ' red blue'
lazy val secondInput: String = " red blue"
run2 := {
val one = (run in Compile).fullInput(firstInput.value).evaluated
val two = (run in Compile).partialInput(secondInput).evaluated
}
For a main class Demo that echoes its arguments, this looks like:
$ sbt
> run2 green
[info] Running Demo demo 1.0
[info] Running Demo red blue green
demo
1.0
red
blue
green
Get a Task from an InputTask
The previous section showed how to derive a new InputTask by applying
input. In this section, applying input produces a Task. The toTask
method on Initialize[InputTask[T]] accepts the String input to apply
and produces a task that can be used normally. For example, the
following defines a plain task runFixed that can be used by other
tasks or run directly without providing any input, :
lazy val runFixed = taskKey[Unit]("A task that hard codes the values to `run`")
runFixed := {
val _ = (run in Compile).toTask(" blue green").value
println("Done!")
}
For a main class Demo that echoes its arguments, running runFixed
looks like:
$ sbt
> runFixed
[info] Running Demo blue green
blue
green
Done!
Each call to toTask generates a new task, but each task is configured
the same as the original InputTask (in this case, run) but with
different input applied. For example, :
lazy val runFixed2 = taskKey[Unit]("A task that hard codes the values to `run`")
fork in run := true
runFixed2 := {
val x = (run in Compile).toTask(" blue green").value
val y = (run in Compile).toTask(" red orange").value
println("Done!")
}
The different toTask calls define different tasks that each run the
project’s main class in a new jvm. That is, the fork setting
configures both, each has the same classpath, and each run the same main
class. However, each task passes different arguments to the main class.
For a main class Demo that echoes its arguments, the output of running
runFixed2 might look like:
$ sbt
> runFixed2
[info] Running Demo blue green
[info] Running Demo red orange
blue
green
red
orange
Done!
Commands
What is a “command”?
A “command” looks similar to a task: it’s a named operation that can be executed from the sbt console.
However, a command’s implementation takes as its parameter the entire state of the build (represented by State) and computes a new State. This means that a command can look at or modify other sbt settings, for example. Typically, you would resort to a command when you need to do something that’s impossible in a regular task.
Introduction
There are three main aspects to commands:
The syntax used by the user to invoke the command, including:
- Tab completion for the syntax
- The parser to turn input into an appropriate data structure
- The action to perform using the parsed data structure. This action transforms the build State.
- Help provided to the user
In sbt, the syntax part, including tab completion, is specified with
parser combinators. If you are familiar with the parser combinators in
Scala’s standard library, these are very similar. The action part is a
function (State, T) => State, where T is the data structure produced
by the parser. See the
Parsing Input page for how to
use the parser combinators.
State provides access to the build state,
such as all registered Commands, the remaining commands to execute,
and all project-related information. See States and Actions for details on
State.
Finally, basic help information may be provided that is used by the
help command to display command help.
Defining a Command
A command combines a function State => Parser[T] with an action
(State, T) => State. The reason for State => Parser[T] and not
simply Parser[T] is that often the current State is used to build
the parser. For example, the currently loaded projects (provided by
State) determine valid completions for the project command. Examples
for the general and specific cases are shown in the following sections.
See Command.scala for the source API details for constructing commands.
General commands
General command construction looks like:
val action: (State, T) => State = ...
val parser: State => Parser[T] = ...
val command: Command = Command("name")(parser)(action)
No-argument commands
There is a convenience method for constructing commands that do not accept any arguments.
val action: State => State = ...
val command: Command = Command.command("name")(action)
Single-argument command
There is a convenience method for constructing commands that accept a single argument with arbitrary content.
// accepts the state and the single argument
val action: (State, String) => State = ...
val command: Command = Command.single("name")(action)
Multi-argument command
There is a convenience method for constructing commands that accept multiple arguments separated by spaces.
val action: (State, Seq[String]) => State = ...
// <arg> is the suggestion printed for tab completion on an argument
val command: Command = Command.args("name", "<arg>")(action)
Full Example
The following example is a sample build that adds commands to a project. To try it out:
- Create
build.sbtandproject/CommandExample.scala. - Run sbt on the project.
- Try out the
hello,helloAll,failIfTrue,color, and printState commands. - Use tab-completion and the code below as guidance.
Here’s build.sbt:
import CommandExample._
lazy val commonSettings = Seq(
scalaVersion := "2.11.7",
)
lazy val root = (project in file(".")).
settings(commonSettings: _*).
settings(
commands ++= Seq(hello, helloAll, failIfTrue, changeColor, printState)
)
Here’s project/CommandExample.scala:
import sbt._
import Keys._
// imports standard command parsing functionality
import complete.DefaultParsers._
object CommandExample {
// A simple, no-argument command that prints "Hi",
// leaving the current state unchanged.
def hello = Command.command("hello") { state =>
println("Hi!")
state
}
// A simple, multiple-argument command that prints "Hi" followed by the arguments.
// Again, it leaves the current state unchanged.
def helloAll = Command.args("helloAll", "<name>") { (state, args) =>
println("Hi " + args.mkString(" "))
state
}
// A command that demonstrates failing or succeeding based on the input
def failIfTrue = Command.single("failIfTrue") {
case (state, "true") => state.fail
case (state, _) => state
}
// Demonstration of a custom parser.
// The command changes the foreground or background terminal color
// according to the input.
lazy val change = Space ~> (reset | setColor)
lazy val reset = token("reset" ^^^ "\033[0m")
lazy val color = token( Space ~> ("blue" ^^^ "4" | "green" ^^^ "2") )
lazy val select = token( "fg" ^^^ "3" | "bg" ^^^ "4" )
lazy val setColor = (select ~ color) map { case (g, c) => "\033[" + g + c + "m" }
def changeColor = Command("color")(_ => change) { (state, ansicode) =>
print(ansicode)
state
}
// A command that demonstrates getting information out of State.
def printState = Command.command("printState") { state =>
import state._
println(definedCommands.size + " registered commands")
println("commands to run: " + show(remainingCommands))
println()
println("original arguments: " + show(configuration.arguments))
println("base directory: " + configuration.baseDirectory)
println()
println("sbt version: " + configuration.provider.id.version)
println("Scala version (for sbt): " + configuration.provider.scalaProvider.version)
println()
val extracted = Project.extract(state)
import extracted._
println("Current build: " + currentRef.build)
println("Current project: " + currentRef.project)
println("Original setting count: " + session.original.size)
println("Session setting count: " + session.append.size)
state
}
def show[T](s: Seq[T]) =
s.map("'" + _ + "'").mkString("[", ", ", "]")
}
Parsing and tab completion
This page describes the parser combinators in sbt. These parser combinators are typically used to parse user input and provide tab completion for Input Tasks and Commands. If you are already familiar with Scala’s parser combinators, the methods are mostly the same except that their arguments are strict. There are two additional methods for controlling tab completion that are discussed at the end of the section.
Parser combinators build up a parser from smaller parsers. A Parser[T]
in its most basic usage is a function String => Option[T]. It accepts
a String to parse and produces a value wrapped in Some if parsing
succeeds or None if it fails. Error handling and tab completion make
this picture more complicated, but we’ll stick with Option for this
discussion.
The following examples assume the imports: :
import sbt._
import complete.DefaultParsers._
Basic parsers
The simplest parser combinators match exact inputs:
// A parser that succeeds if the input is 'x', returning the Char 'x'
// and failing otherwise
val singleChar: Parser[Char] = 'x'
// A parser that succeeds if the input is "blue", returning the String "blue"
// and failing otherwise
val litString: Parser[String] = "blue"
In these examples, implicit conversions produce a literal Parser from
a Char or String. Other basic parser constructors are the
charClass, success and failure methods:
// A parser that succeeds if the character is a digit, returning the matched Char
// The second argument, "digit", describes the parser and is used in error messages
val digit: Parser[Char] = charClass( (c: Char) => c.isDigit, "digit")
// A parser that produces the value 3 for an empty input string, fails otherwise
val alwaysSucceed: Parser[Int] = success( 3 )
// Represents failure (always returns None for an input String).
// The argument is the error message.
val alwaysFail: Parser[Nothing] = failure("Invalid input.")
Built-in parsers
sbt comes with several built-in parsers defined in sbt.complete.DefaultParsers. Some commonly used built-in parsers are:
Space,NotSpace,OptSpace, andOptNotSpacefor parsing spaces or non-spaces, required or not.StringBasicfor parsing text that may be quoted.IntBasicfor parsing a signed Int value.DigitandHexDigitfor parsing a single decimal or hexadecimal digit.Boolfor parsing aBooleanvalue
See the DefaultParsers API for details.
Combining parsers
We build on these basic parsers to construct more interesting parsers. We can combine parsers in a sequence, choose between parsers, or repeat a parser.
// A parser that succeeds if the input is "blue" or "green",
// returning the matched input
val color: Parser[String] = "blue" | "green"
// A parser that matches either "fg" or "bg"
val select: Parser[String] = "fg" | "bg"
// A parser that matches "fg" or "bg", a space, and then the color, returning the matched values.
// ~ is an alias for Tuple2.
val setColor: Parser[String ~ Char ~ String] =
select ~ ' ' ~ color
// Often, we don't care about the value matched by a parser, such as the space above
// For this, we can use ~> or <~, which keep the result of
// the parser on the right or left, respectively
val setColor2: Parser[String ~ String] = select ~ (' ' ~> color)
// Match one or more digits, returning a list of the matched characters
val digits: Parser[Seq[Char]] = charClass(_.isDigit, "digit").+
// Match zero or more digits, returning a list of the matched characters
val digits0: Parser[Seq[Char]] = charClass(_.isDigit, "digit").*
// Optionally match a digit
val optDigit: Parser[Option[Char]] = charClass(_.isDigit, "digit").?
Transforming results
A key aspect of parser combinators is transforming results along the way
into more useful data structures. The fundamental methods for this are
map and flatMap. Here are examples of map and some convenience
methods implemented on top of map.
// Apply the `digits` parser and apply the provided function to the matched
// character sequence
val num: Parser[Int] = digits map { (chars: Seq[Char]) => chars.mkString.toInt }
// Match a digit character, returning the matched character or return '0' if the input is not a digit
val digitWithDefault: Parser[Char] = charClass(_.isDigit, "digit") ?? '0'
// The previous example is equivalent to:
val digitDefault: Parser[Char] =
charClass(_.isDigit, "digit").? map { (d: Option[Char]) => d getOrElse '0' }
// Succeed if the input is "blue" and return the value 4
val blue = "blue" ^^^ 4
// The above is equivalent to:
val blueM = "blue" map { (s: String) => 4 }
Controlling tab completion
Most parsers have reasonable default tab completion behavior. For
example, the string and character literal parsers will suggest the
underlying literal for an empty input string. However, it is impractical
to determine the valid completions for charClass, since it accepts an
arbitrary predicate. The examples method defines explicit completions
for such a parser:
val digit = charClass(_.isDigit, "digit").examples("0", "1", "2")
Tab completion will use the examples as suggestions. The other method
controlling tab completion is token. The main purpose of token is to
determine the boundaries for suggestions. For example, if your parser
is:
("fg" | "bg") ~ ' ' ~ ("green" | "blue")
then the potential completions on empty input are:
console fg green fg blue bg green bg blue
Typically, you want to suggest smaller segments or the number of suggestions becomes unmanageable. A better parser is:
token( ("fg" | "bg") ~ ' ') ~ token("green" | "blue")
Now, the initial suggestions would be (with _ representing a space):
console fg_ bg_
Be careful not to overlap or nest tokens, as in
token("green" ~ token("blue")). The behavior is unspecified (and
should generate an error in the future), but typically the outer most
token definition will be used.
State and actions
State is the entry point to all available information in sbt. The key methods are:
definedCommands: Seq[Command]returns all registered Command definitionsremainingCommands: Seq[String]returns the remaining commands to be runattributes: AttributeMapcontains generic data.
The action part of a command performs work and transforms State. The
following sections discuss State => State transformations. As
mentioned previously, a command will typically handle a parsed value as
well: (State, T) => State.
Command-related data
A Command can modify the currently registered commands or the commands to be executed. This is done in the action part by transforming the (immutable) State provided to the command. A function that registers additional power commands might look like:
val powerCommands: Seq[Command] = ...
val addPower: State => State =
(state: State) =>
state.copy(definedCommands =
(state.definedCommands ++ powerCommands).distinct
)
This takes the current commands, appends new commands, and drops duplicates. Alternatively, State has a convenience method for doing the above:
val addPower2 = (state: State) => state ++ powerCommands
Some examples of functions that modify the remaining commands to execute:
val appendCommand: State => State =
(state: State) =>
state.copy(remainingCommands = state.remainingCommands :+ "cleanup")
val insertCommand: State => State =
(state: State) =>
state.copy(remainingCommands = "next-command" +: state.remainingCommands)
The first adds a command that will run after all currently specified commands run. The second inserts a command that will run next. The remaining commands will run after the inserted command completes.
To indicate that a command has failed and execution should not continue,
return state.fail.
(state: State) => {
val success: Boolean = ...
if(success) state else state.fail
}
Project-related data
Project-related information is stored in attributes. Typically,
commands won’t access this directly but will instead use a convenience
method to extract the most useful information:
val state: State
val extracted: Extracted = Project.extract(state)
import extracted._
Extracted provides:
- Access to the current build and project (
currentRef) - Access to initialized project setting data (
structure.data) - Access to session
Settings and the original, permanent settings from .sbt and .scala files (session.append and session.original, respectively) - Access to the current Eval instance for evaluating Scala expressions in the build context.
Project data
All project data is stored in structure.data, which is of type
sbt.Settings[Scope]. Typically, one gets information of type T in
the following way:
val key: SettingKey[T]
val scope: Scope
val value: Option[T] = key in scope get structure.data
Here, a SettingKey[T] is typically obtained from
Keys and is the same type that is used to
define settings in .sbt files, for example.
Scope selects the scope the key is
obtained for. There are convenience overloads of in that can be used
to specify only the required scope axes. See
Structure.scala for where in
and other parts of the settings interface are defined. Some examples:
import Keys._
val extracted: Extracted
import extracted._
// get name of current project
val nameOpt: Option[String] = name in currentRef get structure.data
// get the package options for the `test:packageSrc` task or Nil if none are defined
val pkgOpts: Seq[PackageOption] = packageOptions in (currentRef, Test, packageSrc) get structure.data getOrElse Nil
BuildStructure contains information about build and project relationships. Key members are:
units: Map[URI, LoadedBuildUnit]
root: URI
A URI identifies a build and root identifies the initial build
loaded. LoadedBuildUnit
provides information about a single build. The key members of
LoadedBuildUnit are:
// Defines the base directory for the build
localBase: File
// maps the project ID to the Project definition
defined: Map[String, ResolvedProject]
ResolvedProject has the same
information as the Project used in a project/Build.scala except that
ProjectReferences are resolved
to ProjectRefs.
Classpaths
Classpaths in sbt 0.10+ are of type Seq[Attributed[File]]. This allows
tagging arbitrary information to classpath entries. sbt currently uses
this to associate an Analysis with an entry. This is how it manages
the information needed for multi-project incremental recompilation. It
also associates the ModuleID and Artifact with managed entries (those
obtained by dependency management). When you only want the underlying
Seq[File], use files:
val attributedClasspath: Seq[Attribute[File]] = ...
val classpath: Seq[File] = attributedClasspath.files
Running tasks
It can be useful to run a specific project task from a
command (not from another task) and get its result. For
example, an IDE-related command might want to get the classpath from a
project or a task might analyze the results of a compilation. The
relevant method is Project.runTask, which has the following
signature:
def runTask[T](taskKey: ScopedKey[Task[T]], state: State,
checkCycles: Boolean = false): Option[(State, Result[T])]
For example,
val eval: State => State = (state: State) => {
// This selects the main 'compile' task for the current project.
// The value produced by 'compile' is of type inc.Analysis,
// which contains information about the compiled code.
val taskKey = Keys.compile in Compile
// Evaluate the task
// None if the key is not defined
// Some(Inc) if the task does not complete successfully (Inc for incomplete)
// Some(Value(v)) with the resulting value
val result: Option[(State, Result[inc.Analysis])] = Project.runTask(taskKey, state)
// handle the result
result match
{
case None => // Key wasn't defined.
case Some((newState, Inc(inc))) => // error detail, inc is of type Incomplete, use Incomplete.show(inc.tpe) to get an error message
case Some((newState, Value(v))) => // do something with v: inc.Analysis
}
}
For getting the test classpath of a specific project, use this key:
val projectRef: ProjectRef = ...
val taskKey: Task[Seq[Attributed[File]]] =
Keys.fullClasspath in (projectRef, Test)
Using State in a task
To access the current State from a task, use the state task as an
input. For example,
myTask := ... state.value ...
Tasks/Settings: Motivation
This page motivates the task and settings system. You should already know how to use tasks and settings, which are described in the getting started guide and on the Tasks page.
An important aspect of the task system is to combine two common, related steps in a build:
- Ensure some other task is performed.
- Use some result from that task.
Earlier versions of sbt configured these steps separately using
- Dependency declarations
- Some form of shared state
To see why it is advantageous to combine them, compare the situation to that of deferring initialization of a variable in Scala. This Scala code is a bad way to expose a value whose initialization is deferred:
// Define a variable that will be initialized at some point
// We don't want to do it right away, because it might be expensive
var foo: Foo = _
// Define a function to initialize the variable
def makeFoo(): Unit = ... initialize foo ...
Typical usage would be:
makeFoo()
doSomething(foo)
This example is rather exaggerated in its badness, but I claim it is nearly the same situation as our two step task definitions. Particular reasons this is bad include:
- A client needs to know to call
makeFoo()first. foocould be changed by other code. There could be a def makeFoo2(), for example.- Access to foo is not thread safe.
The first point is like declaring a task dependency, the second is like two tasks modifying the same state (either project variables or files), and the third is a consequence of unsynchronized, shared state.
In Scala, we have the built-in functionality to easily fix this:
lazy val.
lazy val foo: Foo = ... initialize foo ...
with the example usage:
doSomething(foo)
Here, lazy val gives us thread safety, guaranteed initialization
before access, and immutability all in one, DRY construct. The task
system in sbt does the same thing for tasks (and more, but we won’t go
into that here) that lazy val did for our bad example.
A task definition must declare its inputs and the type of its output. sbt will ensure that the input tasks have run and will then provide their results to the function that implements the task, which will generate its own result. Other tasks can use this result and be assured that the task has run (once) and be thread-safe and typesafe in the process.
The general form of a task definition looks like:
myTask := {
val a: A = aTask.value
val b: B = bTask.value
... do something with a, b and generate a result ...
}
(This is only intended to be a discussion of the ideas behind tasks, so
see the sbt Tasks page for details on usage.)
Here, aTask is assumed to produce a result of type A and bTask is
assumed to produce a result of type B.
Application
As an example, consider generating a zip file containing the binary jar,
source jar, and documentation jar for your project. First, determine
what tasks produce the jars. In this case, the input tasks are
packageBin, packageSrc, and packageDoc in the main Compile
scope. The result of each of these tasks is the File for the jar that
they generated. Our zip file task is defined by mapping these package
tasks and including their outputs in a zip file. As good practice, we
then return the File for this zip so that other tasks can map on the zip
task.
zip := {
val bin: File = (packageBin in Compile).value
val src: File = (packageSrc in Compile).value
val doc: File = (packageDoc in Compile).value
val out: File = zipPath.value
val inputs: Seq[(File,String)] = Seq(bin, src, doc) x Path.flat
IO.zip(inputs, out)
out
}
The val inputs line defines how the input files are mapped to paths in
the zip. See Mapping Files for details. The explicit
types are not required, but are included for clarity.
The zipPath input would be a custom task to define the location of the
zip file. For example:
zipPath := target.value / "out.zip"
Plugins and Best Practices
This part of the documentation has pages documenting particular sbt topics in detail. Before reading anything in here, you will need the information in the Getting Started Guide as a foundation.
General Best Practices
This page describes best practices for working with sbt.
project/ vs. ~/.sbt/
Anything that is necessary for building the project should go in
project/. This includes things like the web plugin. ~/.sbt/ should
contain local customizations and commands for working with a build, but
are not necessary. An example is an IDE plugin.
Local settings
There are two options for settings that are specific to a user. An example of such a setting is inserting the local Maven repository at the beginning of the resolvers list:
resolvers := {
val localMaven = "Local Maven Repository" at "file://"+Path.userHome.absolutePath+"/.m2/repository"
localMaven +: resolvers.value
}
- Put settings specific to a user in a global
.sbtfile, such as~/.sbt/0.13/global.sbt. These settings will be applied to all projects. - Put settings in a
.sbtfile in a project that isn’t checked into version control, such as<project>/local.sbt. sbt combines the settings from multiple .sbt files, so you can still have the standard<project>/build.sbtand check that into version control.
.sbtrc
Put commands to be executed when sbt starts up in a .sbtrc file, one
per line. These commands run before a project is loaded and are useful
for defining aliases, for example. sbt executes commands in
$HOME/.sbtrc (if it exists) and then <project>/.sbtrc (if it
exists).
Generated files
Write any generated files to a subdirectory of the output directory,
which is specified by the target setting. This makes it easy to clean
up after a build and provides a single location to organize generated
files. Any generated files that are specific to a Scala version should
go in crossTarget for efficient cross-building.
For generating sources and resources, see Generating Files.
Don’t hard code
Don’t hard code constants, like the output directory target/. This is
especially important for plugins. A user might change the target
setting to point to build/, for example, and the plugin needs to
respect that. Instead, use the setting, like:
myDirectory := target.value / "sub-directory"
Don’t “mutate” files
A build naturally consists of a lot of file manipulation. How can we reconcile this with the task system, which otherwise helps us avoid mutable state? One approach, which is the recommended approach and the approach used by sbt’s default tasks, is to only write to any given file once and only from a single task.
A build product (or by-product) should be written exactly once by only one task. The task should then, at a minimum, provide the Files created as its result. Another task that wants to use Files should map the task, simultaneously obtaining the File reference and ensuring that the task has run (and thus the file is constructed). Obviously you cannot do much about the user or other processes modifying the files, but you can make the I/O that is under the build’s control more predictable by treating file contents as immutable at the level of Tasks.
For example:
lazy val makeFile = taskKey[File]("Creates a file with some content.")
// define a task that creates a file,
// writes some content, and returns the File
makeFile := {
val f: File = file("/tmp/data.txt")
IO.write(f, "Some content")
f
}
// The result of makeFile is the constructed File,
// so useFile can map makeFile and simultaneously
// get the File and declare the dependency on makeFile
useFile :=
doSomething( makeFile.value )
This arrangement is not always possible, but it should be the rule and not the exception.
Use absolute paths
Construct only absolute Files. Either specify an absolute path
file("/home/user/A.scala")
or construct the file from an absolute base:
base / "A.scala"
This is related to the no hard coding best practice because the proper
way involves referencing the baseDirectory setting. For example, the
following defines the myPath setting to be the <base>/licenses/
directory.
myPath := baseDirectory.value / "licenses"
In Java (and thus in Scala), a relative File is relative to the current working directory. The working directory is not always the same as the build root directory for a number of reasons.
The only exception to this rule is when specifying the base directory for a Project. Here, sbt will resolve a relative File against the build root directory for you for convenience.
Parser combinators
- Use
tokeneverywhere to clearly delimit tab completion boundaries. - Don’t overlap or nest tokens. The behavior here is unspecified and will likely generate an error in the future.
- Use
flatMapfor general recursion. sbt’s combinators are strict to limit the number of classes generated, so use flatMap like:
lazy val parser: Parser[Int] =
token(IntBasic) flatMap { i =>
if(i <= 0)
success(i)
else
token(Space ~> parser)
}
This example defines a parser a whitespace-delimited list of integers, ending with a negative number, and returning that final, negative number.
Plugins
There’s a getting started page focused on using existing plugins, which you may want to read first.
A plugin is a way to use external code in a build definition.
A plugin can be a library used to implement a task (you might use
Knockoff to write a
markdown processing task). A plugin can define a sequence of sbt settings
that are automatically added to all projects or that are explicitly
declared for selected projects. For example, a plugin might add a
proguard task and associated (overridable) settings. Finally, a plugin
can define new commands (via the commands setting).
sbt 0.13.5 intoduces auto plugin with improved dependency management among the plugins and explicitly scoped auto importing. Going forward, our recommendation is to migrate to the auto plugins. The Plugins Best Practices page describes the currently evolving guidelines to writing sbt plugins. See also the general best practices.
Using an auto plugin
A common situation is when using a binary plugin published to a repository.
If you’re adding sbt-assembly, create project/assembly.sbt with the following:
addSbtPlugin("com.eed3si9n" % "sbt-assembly" % "0.11.2")
Alternatively, you can create project/plugins.sbt with
all of the desired sbt plugins, any general dependencies, and any necessary repositories:
addSbtPlugin("org.example" % "plugin" % "1.0")
addSbtPlugin("org.example" % "another-plugin" % "2.0")
// plain library (not an sbt plugin) for use in the build definition
libraryDependencies += "org.example" % "utilities" % "1.3"
resolvers += "Example Plugin Repository" at "https://example.org/repo/"
Many of the auto plugins automatically adds settings into projects, however, some may require explicit enablement. Here’s an example:
lazy val util = (project in file("util")).
enablePlugins(FooPlugin, BarPlugin).
disablePlugins(plugins.IvyPlugin).
settings(
name := "hello-util"
)
See using plugins in the Getting Started guide for more details on using plugins.
By Description
A plugin definition is a project under project/ folder. This
project’s classpath is the classpath used for build definitions in
project/ and any .sbt files in the project’s base
directory. It is also used for the eval and set commands.
Specifically,
- Managed dependencies declared by the
project/project are retrieved and are available on the build definition classpath, just like for a normal project. - Unmanaged dependencies in
project/lib/are available to the build definition, just like for a normal project. - Sources in the
project/project are the build definition files and are compiled using the classpath built from the managed and unmanaged dependencies. - Project dependencies can be declared in
project/plugins.sbt(similarly tobuild.sbtfile in a normal project) orproject/project/Build.scala(similarly toproject/Build.scalain a normal project) and will be available to the build definition sources. Think of project/project/ as the build definition for the build definition (worth to repeat it here again: “sbt is recursive”, remember?).
The build definition classpath is searched for sbt/sbt.plugins
descriptor files containing the names of
sbt.AutoPlugin or sbt.Plugin implementations.
The reload plugins command changes the current build to
the (root) project’s project/ build definition. This allows manipulating
the build definition project like a normal project. reload return changes back
to the original build. Any session settings for the plugin definition
project that have not been saved are dropped.
An auto plugin is a module that defines settings to automatically inject to projects. In addition an auto plugin provides the following feature:
- Automatically import selective names to
.sbtfiles and theevalandsetcommands. - Specify plugin dependencies to other auto plugins.
- Automatically activate itself when all dependencies are present.
- Specify
projectSettings,buildSettings, andglobalSettingsas appropriate.
Plugin dependencies
When a traditional plugin wanted to reuse some functionality from an existing plugin, it would pull in the plugin as a library dependency, and then it would either:
- add the setting sequence from the dependency as part of its own setting sequence, or
- tell the build users to include them in the right order.
This becomes complicated as the number of plugins increase within an application, and becomes more error prone. The main goal of auto plugin is to alleviate this setting dependency problem. An auto plugin can depend on other auto plugins and ensure these dependency settings are loaded first.
Suppose we have the SbtLessPlugin and the SbtCoffeeScriptPlugin, which in turn depends on the SbtJsTaskPlugin, SbtWebPlugin, and JvmPlugin. Instead of manually activating all of these plugins, a project can just activate the SbtLessPlugin and SbtCoffeeScriptPlugin like this:
lazy val root = (project in file(".")).
enablePlugins(SbtLessPlugin, SbtCoffeeScriptPlugin)
This will pull in the right setting sequence from the plugins in the right order. The key notion here is you declare the plugins you want, and sbt can fill in the gap.
A plugin implementation is not required to produce an auto plugin, however. It is a convenience for plugin consumers and because of the automatic nature, it is not always appropriate.
Global plugins
The ~/.sbt/0.13/plugins/ directory is treated as a global plugin
definition project. It is a normal sbt project whose classpath is
available to all sbt project definitions for that user as described
above for per-project plugins.
Creating an auto plugin
A minimal sbt plugin is a Scala library that is built against the version of Scala that sbt runs (currently, 2.10.6) or a Java library. Nothing special needs to be done for this type of library. A more typical plugin will provide sbt tasks, commands, or settings. This kind of plugin may provide these settings automatically or make them available for the user to explicitly integrate.
To make an auto plugin, create a project and configure sbtPlugin to true.
sbtPlugin := true
Then, write the plugin code and publish your project to a repository. The plugin can be used as described in the previous section.
First, in an appropriate namespace, define your auto plugin object
by extending sbt.AutoPlugin.
projectSettings and buildSettings
With auto plugins, all provided settings (e.g. assemblySettings) are provided by the plugin directly via the projectSettings method. Here’s an example plugin that adds a command named hello to sbt projects:
package sbthello
import sbt._
import Keys._
object HelloPlugin extends AutoPlugin {
override lazy val projectSettings = Seq(commands += helloCommand)
lazy val helloCommand =
Command.command("hello") { (state: State) =>
println("Hi!")
state
}
}
This example demonstrates how to take a Command (here, helloCommand) and
distribute it in a plugin. Note that multiple commands can be included
in one plugin (for example, use commands ++= Seq(a,b)). See
Commands
for defining more useful commands, including ones that accept arguments
and affect the execution state.
If the plugin needs to append settings at the build-level (that is, in ThisBuild) there’s a buildSettings method. The settings returned here are guaranteed to be added to a given build scope only once
regardless of how many projects for that build activate this AutoPlugin.
override def buildSettings: Seq[Setting[_]] = Nil
The globalSettings is appended once to the global settings (in Global).
These allow a plugin to automatically provide new functionality or new defaults.
One main use of this feature is to globally add commands, such as for IDE plugins.
override def globalSettings: Seq[Setting[_]] = Nil
Use globalSettings to define the default value of a setting.
Implementing plugin dependencies
Next step is to define the plugin dependencies.
package sbtless
import sbt._
import Keys._
object SbtLessPlugin extends AutoPlugin {
override def requires = SbtJsTaskPlugin
override lazy val projectSettings = ...
}
The requires method returns a value of type Plugins, which is a DSL for constructing the dependency list. The requires method typically contains one of the following values:
empty(No plugins, this is the default)- other auto plugins
&&operator (for defining multiple dependencies)
Root plugins and triggered plugins
Some plugins should always be explicitly enabled on projects. we call these root plugins, i.e. plugins that are “root” nodes in the plugin dependency graph. An auto plugin is by default a root plugin.
Auto plugins also provide a way for plugins to automatically attach themselves to
projects if their dependencies are met. We call these triggered plugins,
and they are created by overriding the trigger method.
For example, we might want to create a triggered plugin that can append commands automatically to the build. To do this, set the requires method to return empty (this is the default), and override the trigger method with allRequirements.
package sbthello
import sbt._
import Keys._
object HelloPlugin2 extends AutoPlugin {
override def trigger = allRequirements
override lazy val buildSettings = Seq(commands += helloCommand)
lazy val helloCommand =
Command.command("hello") { (state: State) =>
println("Hi!")
state
}
}
The build user still needs to include this plugin in project/plugins.sbt, but it is no longer needed to be included in build.sbt. This becomes more interesting when you do specify a plugin with requirements. Let’s modify the SbtLessPlugin so that it depends on another plugin:
package sbtless
import sbt._
import Keys._
object SbtLessPlugin extends AutoPlugin {
override def trigger = allRequirements
override def requires = SbtJsTaskPlugin
override lazy val projectSettings = ...
}
As it turns out, PlayScala plugin (in case you didn’t know, the Play framework is an sbt plugin) lists SbtJsTaskPlugin as one of it required plugins. So, if we define a build.sbt with:
lazy val root = (project in file(".")).
enablePlugins(PlayScala)
then the setting sequence from SbtLessPlugin will be automatically appended somewhere after the settings from PlayScala.
This allows plugins to silently, and correctly, extend existing plugins with more features. It also can help remove the burden of ordering from the user, allowing the plugin authors greater freedom and power when providing feature for their users.
Controlling the import with autoImport
When an auto plugin provides a stable field such as val or object
named autoImport, the contents of the field are wildcard imported
in set, eval, and .sbt files. In the next example, we’ll replace
our hello command with a task to get the value of greeting easily.
In practice, it’s recommended to prefer settings or tasks to commands.
package sbthello
import sbt._
import Keys._
object HelloPlugin3 extends AutoPlugin {
object autoImport {
val greeting = settingKey[String]("greeting")
val hello = taskKey[Unit]("say hello")
}
import autoImport._
override def trigger = allRequirements
override lazy val buildSettings = Seq(
greeting := "Hi!",
hello := helloTask.value)
lazy val helloTask =
Def.task {
println(greeting.value)
}
}
Typically, autoImport is used to provide new keys - SettingKeys, TaskKeys,
or InputKeys - or core methods without requiring an import or qualification.
Example Plugin
An example of a typical plugin:
build.sbt:
sbtPlugin := true
name := "sbt-obfuscate"
organization := "org.example"
ObfuscatePlugin.scala:
package sbtobfuscate
import sbt._
object ObfuscatePlugin extends AutoPlugin {
// by defining autoImport, the settings are automatically imported into user's `*.sbt`
object autoImport {
// configuration points, like the built-in `version`, `libraryDependencies`, or `compile`
val obfuscate = taskKey[Seq[File]]("Obfuscates files.")
val obfuscateLiterals = settingKey[Boolean]("Obfuscate literals.")
// default values for the tasks and settings
lazy val baseObfuscateSettings: Seq[Def.Setting[_]] = Seq(
obfuscate := {
Obfuscate(sources.value, (obfuscateLiterals in obfuscate).value)
},
obfuscateLiterals in obfuscate := false
)
}
import autoImport._
override def requires = sbt.plugins.JvmPlugin
// This plugin is automatically enabled for projects which are JvmPlugin.
override def trigger = allRequirements
// a group of settings that are automatically added to projects.
override val projectSettings =
inConfig(Compile)(baseObfuscateSettings) ++
inConfig(Test)(baseObfuscateSettings)
}
object Obfuscate {
def apply(sources: Seq[File]): Seq[File] := sources
}
Usage example
A build definition that uses the plugin might look like. obfuscate.sbt:
obfuscateLiterals in obfuscate := true
Global plugins example
The simplest global plugin definition is declaring a library or plugin
in ~/.sbt/0.13/plugins/build.sbt:
libraryDependencies += "org.example" %% "example-plugin" % "0.1"
This plugin will be available for every sbt project for the current user.
In addition:
- Jars may be placed directly in
~/.sbt/0.13/plugins/lib/and will be available to every build definition for the current user. - Dependencies on plugins built from source may be declared in
~/.sbt/0.13/plugins/project/Build.scalaas described at .scala build definition. - A Plugin may be directly defined in Scala
source files in
~/.sbt/0.13/plugins/, such as~/.sbt/0.13/plugins/MyPlugin.scala.~/.sbt/0.13/plugins//build.sbtshould containsbtPlugin := true. This can be used for quicker turnaround when developing a plugin initially:
- Edit the global plugin code
reloadthe project you want to use the modified plugin insbt will rebuild the plugin and use it for the project.
Additionally, the plugin will be available in other projects on the machine without recompiling again. This approach skips the overhead of
publishLocalandcleaning the plugins directory of the project using the plugin.
These are all consequences of ~/.sbt/0.13/plugins/ being a standard
project whose classpath is added to every sbt project’s build
definition.
Using a library in a build definition example
As an example, we’ll add the Grizzled Scala library as a plugin. Although this does not provide sbt-specific functionality, it demonstrates how to declare plugins.
1a) Manually managed
- Download the jar manually from https://oss.sonatype.org/content/repositories/releases/org/clapper/grizzled-scala2.8.1/1.0.4/grizzled-scala2.8.1-1.0.4.jar
- Put it in
project/lib/
1b) Automatically managed: direct editing approach
Edit project/plugins.sbt to contain:
libraryDependencies += "org.clapper" %% "grizzled-scala" % "1.0.4"
If sbt is running, do reload.
1c) Automatically managed: command-line approach
We can change to the plugins project in project/ using
reload plugins.
$ sbt
> reload plugins
[info] Set current project to default (in build file:/Users/sbt/demo2/project/)
>
Then, we can add dependencies like usual and save them to
project/plugins.sbt. It is useful, but not required, to run update
to verify that the dependencies are correct.
> set libraryDependencies += "org.clapper" %% "grizzled-scala" % "1.0.4"
...
> update
...
> session save
...
To switch back to the main project use reload return:
> reload return
[info] Set current project to root (in build file:/Users/sbt/demo2/)
1d) Project dependency
This variant shows how to use sbt’s external project support to declare a source dependency on a plugin. This means that the plugin will be built from source and used on the classpath.
Edit project/plugins.sbt
lazy val root = (project in file(".")).dependsOn(assemblyPlugin)
lazy val assemblyPlugin = uri("git://github.com/sbt/sbt-assembly")
If sbt is running, run reload.
Note that this approach can be useful used when developing a plugin. A
project that uses the plugin will rebuild the plugin on reload. This
saves the intermediate steps of publishLocal and update. It can also
be used to work with the development version of a plugin from its
repository.
It is however recommended to explicitly specify the commit or tag by appending it to the repository as a fragment:
lazy val assemblyPlugin = uri("git://github.com/sbt/sbt-assembly#0.9.1")
One caveat to using this method is that the local sbt will try to run the remote plugin’s build. It is quite possible that the plugin’s own build uses a different sbt version, as many plugins cross-publish for several sbt versions. As such, it is recommended to stick with binary artifacts when possible.
2) Use the library
Grizzled Scala is ready to be used in build definitions. This includes
the eval and set commands and .sbt and project/*.scala files.
> eval grizzled.sys.os
In a build.sbt file:
import grizzled.sys._
import OperatingSystem._
libraryDependencies ++=
if(os == Windows)
Seq("org.example" % "windows-only" % "1.0")
else
Seq.empty
Best Practices
If you’re a plugin writer, please consult the Plugins Best Practices page; it contains a set of guidelines to help you ensure that your plugin is consistent and plays well with other plugins.
Plugins Best Practices
This page is intended primarily for sbt plugin authors. This page assumes you’ve read using plugins and Plugins.
A plugin developer should strive for consistency and ease of use. Specifically:
- Plugins should play well with other plugins. Avoiding namespace clashes (in both sbt and Scala) is paramount.
- Plugins should follow consistent conventions. The experiences of an sbt user should be consistent, no matter what plugins are pulled in.
Here are some current plugin best practices.
Note: Best practices are evolving, so check back frequently.
Get your plugins known
Make sure people can find your plugin. Here are some of the recommended steps:
- Mention @scala_sbt in your announcement, and we will RT it.
- Accounce it on implicit.ly using n8han/herald.
- Send a pull req to sbt/website and add your plugin on the plugins list.
Don’t use default package
Users who have their build files in some package will not be able to use your plugin if it’s defined in default (no-name) package.
Follow the naming conventions
Use the sbt-$projectname scheme to name your library and artifact.
A plugin ecosystem with a consistent naming convention makes it easier for users to tell whether a
project or dependency is an SBT plugin.
If the project’s name is foobar the following holds:
- BAD:
foobar - BAD:
foobar-sbt - BAD:
sbt-foobar-plugin - GOOD:
sbt-foobar
If your plugin provides an obvious “main” task, consider naming it foobar or foobar... to make
it more intuitive to explore the capabilities of your plugin within the sbt shell and tab-completion.
Use settings and tasks. Avoid commands.
Your plugin should fit in naturally with the rest of the sbt ecosystem.
The first thing you can do is to avoid defining commands,
and use settings and tasks and task-scoping instead (see below for more on task-scoping).
Most of the interesting things in sbt like
compile, test and publish are provided using tasks.
Tasks can take advantage of duplication reduction and parallel execution by the task engine.
With features like ScopeFilter, many of the features that previously required
commands are now possible using tasks.
Settings can be composed from other settings and tasks.
Tasks can be composed from other tasks and input tasks.
Commands, on the other hand, cannot be composed from any of the above.
In general, use the minimal thing that you need.
One legitimate use of commands may be using plugin to access the build definition itself not the code.
sbt-inspectr was implemented using a command before it became inspect tree.
Use sbt.AutoPlugin
sbt is in the process of migrating to sbt.AutoPlugin from sbt.Plugin.
The new mechanism features a set of user-level
controls and dependency declarations that cleans up a lot of
long-standing issues with plugins.
Reuse existing keys
sbt has a number of predefined keys. Where possible, reuse them in your plugin. For instance, don’t define:
val sourceFiles = settingKey[Seq[File]]("Some source files")
Instead, simply reuse sbt’s existing sources key.
Avoid namespace clashes
Sometimes, you need a new key, because there is no existing sbt key. In this case, use a plugin-specific prefix.
package sbtobfuscate
import sbt._, Keys._
object ObfuscatePlugin extends sbt.AutoPlugin {
object autoImport {
lazy val obfuscateStylesheet = settingKey[File]("obfuscate stylesheet")
}
}
In this approach, every lazy val starts with obfuscate. A user of the
plugin would refer to the settings like this:
obfuscateStylesheet := file("something.txt")
Provide core feature in a plain old Scala object
The core feature of sbt’s package task, for example, is implemented in sbt.Package,
which can be called via its apply method.
This allows greater reuse of the feature from other plugins such as sbt-assembly,
which in return implements sbtassembly.Assembly object to implement its core feature.
Follow their lead, and provide core feature in a plain old Scala object.
Configuration advices
If your plugin introduces either a new set of source code or its own library dependencies, only then you want your own configuration.
You probably won’t need your own configuration
Configurations should not be used to namespace keys for a plugin. If you’re merely adding tasks and settings, don’t define your own configuration. Instead, reuse an existing one or scope by the main task (see below).
package sbtwhatever
import sbt._, Keys._
object WhateverPlugin extends sbt.AutoPlugin {
override def requires = plugins.JvmPlugin
override def trigger = allRequirements
object autoImport {
// BAD sample
lazy val Whatever = config("whatever") extend(Compile)
lazy val dude = settingKey[String]("A plugin specific key")
}
import autoImport._
override lazy val projectSettings = Seq(
dude in Whatever := "your opinion man" // DON'T DO THIS
)
}
When to define your own configuration
If your plugin introduces either a new set of source code or
its own library dependencies, only then you want your own configuration.
For instance, suppose you’ve built a plugin that performs fuzz testing
that requires its own fuzzing library and fuzzing source code.
scalaSource key can be reused similar to Compile and Test configuration,
but scalaSource scoped to Fuzz configuration (denoted as scalaSource in Fuzz)
can point to src/fuzz/scala so it is distinct from other Scala source directories.
Thus, these three definitions use
the same key, but they represent distinct values. So, in a user’s
build.sbt, we might see:
scalaSource in Fuzz := baseDirectory.value / "source" / "fuzz" / "scala"
scalaSource in Compile := baseDirectory.value / "source" / "main" / "scala"
In the fuzzing plugin, this is achieved with an inConfig definition:
package sbtfuzz
import sbt._, Keys._
object FuzzPlugin extends sbt.AutoPlugin {
override def requires = plugins.JvmPlugin
override def trigger = allRequirements
object autoImport {
lazy val Fuzz = config("fuzz") extend(Compile)
}
import autoImport._
lazy val baseFuzzSettings: Seq[Def.Setting[_]] = Seq(
test := {
println("fuzz test")
}
)
override lazy val projectSettings = inConfig(Fuzz)(baseFuzzSettings)
}
When defining a new type of configuration, e.g.
lazy val Fuzz = config("fuzz") extend(Compile)
should be used to create a configuration. Configurations actually tie into dependency resolution (with Ivy) and can alter generated pom files.
Playing nice with configurations
Whether you ship with a configuration or not, a plugin should strive to support multiple configurations, including those created by the build user. Some tasks that are tied to a particular configuration can be re-used in other configurations. While you may not see the need immediately in your plugin, some project may and will ask you for the flexibility.
Provide raw settings and configured settings
Split your settings by the configuration axis like so:
package sbtobfuscate
import sbt._, Keys._
object ObfuscatePlugin extends sbt.AutoPlugin {
override def requires = plugins.JvmPlugin
override def trigger = allRequirements
object autoImport {
lazy val obfuscate = taskKey[Seq[File]]("obfuscate the source")
lazy val obfuscateStylesheet = settingKey[File]("obfuscate stylesheet")
}
import autoImport._
lazy val baseObfuscateSettings: Seq[Def.Setting[_]] = Seq(
obfuscate := Obfuscate((sources in obfuscate).value),
sources in obfuscate := sources.value
)
override lazy val projectSettings = inConfig(Compile)(baseObfuscateSettings)
}
// core feature implemented here
object Obfuscate {
def apply(sources: Seq[File]): Seq[File] = {
sources
}
}
The baseObfuscateSettings value provides base configuration for the
plugin’s tasks. This can be re-used in other configurations if projects
require it. The obfuscateSettings value provides the default Compile
scoped settings for projects to use directly. This gives the greatest
flexibility in using features provided by a plugin. Here’s how the raw
settings may be reused:
import sbtobfuscate.ObfuscatePlugin
lazy val app = (project in file("app")).
settings(inConfig(Test)(ObfuscatePlugin.baseObfuscateSettings): _*)
Using a “main” task scope for settings
Sometimes you want to define some settings for a particular “main” task
in your plugin. In this instance, you can scope your settings using the
task itself. See the baseObfuscateSettings:
lazy val baseObfuscateSettings: Seq[Def.Setting[_]] = Seq(
obfuscate := Obfuscate((sources in obfuscate).value),
sources in obfuscate := sources.value
)
In the above example, sources in obfuscate is scoped under the main
task, obfuscate.
Mucking with globalSettings
There may be times when you need to muck with globalSettings. The
general rule is be careful what you touch.
When overriding global settings, care should be taken to ensure previous
settings from other plugins are not ignored. e.g. when creating a new
onLoad handler, ensure that the previous onLoad handler is not
removed.
package sbtsomething
import sbt._, Keys._
object MyPlugin extends AutoPlugin {
override def requires = plugins.JvmPlugin
override def trigger = allRequirements
override val globalSettings: Seq[Def.Setting[_]] = Seq(
onLoad in Global := (onLoad in Global).value andThen { state =>
... return new state ...
}
)
}
Setting up Travis CI with sbt
Travis CI is a hosted continuous integration service for open source and private projects. Many of the OSS projects hosted on Github uses open source edition of Travis CI to validate pushes and pull requests. We’ll discuss some of the best practices setting up Travis CI.
Set project/build.properties
Continuous integration is a great way of checking that your code works outside of your machine.
If you haven’t created one already, make sure to create project/build.properties and explicitly set the
sbt.version number:
sbt.version=0.13.11
Your build will now use 0.13.11.
Read the Travis manual
A treasure trove of Travis tricks can be found in the Travis’s official documentation. Use this guide as an inspiration, but consult the official source for more details.
Basic setup
Setting up your build for Travis CI is mostly about setting up .travis.yml.
Scala page says the basic file can look like:
language: scala
scala:
- 2.10.4
- 2.11.7
By default Travis CI executes sbt ++$TRAVIS_SCALA_VERSION test.
Let’s specify that explicitly:
language: scala
scala:
- 2.10.4
- 2.11.7
script:
- sbt ++$TRAVIS_SCALA_VERSION test
More info on script section can be found in Configuring your build.
As noted on the Scala page, Travis CI uses paulp/sbt-extras as the sbt command.
This becomes relevant when you want to override JVM options, which we’ll see later.
Plugin build setup
For sbt plugins, there is no need for cross building on Scala, so the following is all you need:
language: scala
script:
- sbt scripted
Another source of good information is to read the output by Travis CI itself to learn about how the virtual environment is set up.
For example, from the following output we learn that it is using JVM_OPTS environment variable to pass in the JVM options.
$ export JVM_OPTS=@/etc/sbt/jvmopts
$ export SBT_OPTS=@/etc/sbt/sbtopts
Custom JVM options
The default sbt and JVM options are set by Travis CI people,
and it should work for most cases.
If you do decide to customize it, read what they currently use as the defaults first.
Because Travis is already using the environment varible JVM_OPTS, we can instead create a file travis/jvmopts:
-Dfile.encoding=UTF8
-Xms2048M
-Xmx2048M
-Xss6M
-XX:MaxPermSize=512M
-XX:ReservedCodeCacheSize=256M
and then write out the script section with -jvm-opts option:
script:
- sbt ++$TRAVIS_SCALA_VERSION -jvm-opts travis/jvmopts test
After making the change, confirm on the Travis log to see if the flags are taking effect:
# Executing command line:
/usr/lib/jvm/java-7-oracle/bin/java
-Dfile.encoding=UTF8
-Xms2048M
-Xmx2048M
-Xss6M
-XX:MaxPermSize=512M
-XX:ReservedCodeCacheSize=256M
-jar
/home/travis/.sbt/launchers/0.13.6/sbt-launch.jar
It seems to be working. One downside of setting all of the parameters is that we might be left behind when the environment updates and the default values gives us more memory in the future.
Here’s how we can add just a few JVM options:
script:
- sbt ++$TRAVIS_SCALA_VERSION -Dfile.encoding=UTF8 -J-XX:ReservedCodeCacheSize=256M -J-Xms1024M test
sbt-extra script passes any arguments starting with either -D or -J directly to JVM.
Again, let’s check the Travis log to see if the flags are taking effect:
# Executing command line:
/usr/lib/jvm/java-7-oracle/bin/java
-Xms2048M
-Xmx2048M
-Xss6M
-XX:MaxPermSize=512M
-Dfile.encoding=UTF8
-XX:ReservedCodeCacheSize=256M
-Xms1024M
-jar
/home/travis/.sbt/launchers/0.13.6/sbt-launch.jar
Note: This duplicates the -Xms flag as intended, which might not the best thing to do.
(Experimental) Reusing Ivy cache
In late 2014, thanks to Travis CI members sending pull requests on Github, we learned that Ivy cache can be shared across the Travis builds. The public availability of caching is part of the benefit for trying the new container-based infrastructure.
Jobs running on container-based infrastructure:
- start up faster
- allow the use of caches for public repositories
- disallow the use of
sudo, setuid and setgid executables
To opt into the container-based infrastructure, put the following in .travis.yml:
# Use container-based infrastructure
sudo: false
Next, we can put cache section as follows:
# These directories are cached to S3 at the end of the build
cache:
directories:
- $HOME/.ivy2/cache
- $HOME/.sbt/boot/
Finally, the following a few lines of cleanup script are added:
before_cache:
# Tricks to avoid unnecessary cache updates
- find $HOME/.ivy2 -name "ivydata-*.properties" -delete
- find $HOME/.sbt -name "*.lock" -delete
With the above changes combined Travis CI will tar up the cached directories and uploads them to Amazon S3. Overall, the use of the new infrastructure and caching seems to shave off a few minutes of build time per job.
Note: The Travis documentation states caching features are still experimental.
Build matrix
We’ve already seen the example of Scala cross building.
language: scala
scala:
- 2.10.4
- 2.11.7
script:
- sbt ++$TRAVIS_SCALA_VERSION test
This is a form of a build matrix. Travis CI comes with variety of the ways to run builds against different runtimes and parameters. Here’s how to build on OpenJDK 6, OpenJDK 7, and Oracle JDK 8.
jdk:
- openjdk6
- openjdk7
- oraclejdk8
We can also form a build matrix using environment variables:
env:
global:
- SOME_VAR="1"
# This splits the build into two parts
matrix:
- TEST_COMMAND="scripted sbt-assembly/*"
- TEST_COMMAND="scripted merging/* caching/*"
script:
- sbt "$TEST_COMMAND"
Now two jobs will be created to build this sbt plugin, simultaneously running different integration tests. This technique is described in Parallelizing your builds across virtual machines.
Notification
You can configure Travis CI to notify you.
By default, email notifications will be sent to the committer and the commit author, if they are members of the repository[…].
And it will by default send emails when, on the given branch:
- a build was just broken or still is broken
- a previously broken build was just fixed
The default behavior looks reasonable, but if you want, we can override the notifications section to email you on successful builds too, or to use some other channel of communication like IRC.
# Email specific recipient all the time
notifications:
email:
recipients:
- [email protected]
on_success: always # default: change
This might also be a good time to read up on encryption using the command line travis tool.
$ travis encrypt [email protected]
Dealing with flaky network or tests
For builds that are more prone to flaky network or tests, Travis CI has created some tricks described in the page My builds is timing out.
Starting your command with travis_retry retries the command three times if the return code is non-zero.
With caching, hopefully the effect of flaky network is reduced, but it’s an interesting one nonetheless.
Here are some cautionary words from the documentation:
We recommend careful use of
travis_retry, as overusing it can extend your build time when there could be a deeper underlying issue.
Another tidbit about Travis is the output timeout:
Our builds have a global timeout and a timeout that’s based on the output. If no output is received from a build for 10 minutes, it’s assumed to have stalled for unknown reasons and is subsequently killed.
There’s a function called travis_wait that can extend this to 20 minutes.
More things
There are more thing you can do, such as set up databases, installing Ubuntu packages, and deploy continuously.
Sample setting
Here’s a sample that puts them all together. Remember, most of the sections are optional.
# Use container-based infrastructure
sudo: false
language: scala
# These directories are cached to S3 at the end of the build
cache:
directories:
- $HOME/.ivy2/cache
- $HOME/.sbt/boot/
# This is an sbt plugin, so this section is for demo purpose
scala:
- 2.10.4
jdk:
- openjdk7
env:
# This splits the build into two parts
matrix:
- TEST_COMMAND="scripted sbt-assembly/*"
- TEST_COMMAND="scripted merging/* caching/*"
script:
- sbt ++$TRAVIS_SCALA_VERSION -Dfile.encoding=UTF8 -J-XX:ReservedCodeCacheSize=256M "$TEST_COMMAND"
# Tricks to avoid unnecessary cache updates
- find $HOME/.sbt -name "*.lock" | xargs rm
- find $HOME/.ivy2 -name "ivydata-*.properties" | xargs rm
# Email specific recipient all the time
notifications:
email:
recipients:
secure: "Some/BASE64/STUFF="
on_success: always # default: change
How to…
See Detailed Table of Contents for the list of all the how-tos.
Classpaths
Include a new type of managed artifact on the classpath, such as mar
The classpathTypes setting controls the types of managed artifacts
that are included on the classpath by default. To add a new type, such
as mar,
classpathTypes += "mar"
Get the classpath used for compilation
See the default types included by running show classpathTypes at the
sbt prompt.
The dependencyClasspath task scoped to Compile provides the
classpath to use for compilation. Its type is Seq[Attributed[File]],
which means that each entry carries additional metadata. The files
method provides just the raw Seq[File] for the classpath. For example,
to use the files for the compilation classpath in another task, :
example := {
val cp: Seq[File] = (dependencyClasspath in Compile).value.files
...
}
Note: This classpath does not include the class directory, which may be necessary for compilation in some situations.
Get the runtime classpath, including the project’s compiled classes
The fullClasspath task provides a classpath including both the
dependencies and the products of project. For the runtime classpath,
this means the main resources and compiled classes for the project as
well as all runtime dependencies.
The type of a classpath is Seq[Attributed[File]], which means that
each entry carries additional metadata. The files method provides just
the raw Seq[File] for the classpath. For example, to use the files for
the runtime classpath in another task, :
example := {
val cp: Seq[File] = (fullClasspath in Runtime).value.files
...
}
Get the test classpath, including the project’s compiled test classes
The fullClasspath task provides a classpath including both the
dependencies and the products of a project. For the test classpath, this
includes the main and test resources and compiled classes for the
project as well as all dependencies for testing.
The type of a classpath is Seq[Attributed[File]], which means that
each entry carries additional metadata. The files method provides just
the raw Seq[File] for the classpath. For example, to use the files for
the test classpath in another task, :
example := {
val cp: Seq[File] = (fullClasspath in Test).value.files
...
}
Use packaged jars on classpaths instead of class directories
By default, fullClasspath includes a directory containing class files
and resources for a project. This in turn means that tasks like
compile, test, and run have these class directories on their
classpath. To use the packaged artifact (such as a jar) instead,
configure exportJars :
exportJars := true
This will use the result of packageBin on the classpath instead of the
class directory.
Note: Specifically, fullClasspath is the concatentation of dependencyClasspath and exportedProducts. When exportJars is true, exportedProducts is the output of packageBin. When exportJars is false, exportedProducts is just products, which is by default the directory containing class files and resources.
Get all managed jars for a configuration
The result of the update task has type
UpdateReport, which contains the
results of dependency resolution. This can be used to extract the files
for specific types of artifacts in a specific configuration. For
example, to get the jars and zips of dependencies in the Compile
configuration, :
example := {
val artifactTypes = Set("jar", "zip")
val files: Seq[File] =
Classpaths.managedJars(Compile, artifactTypes, update.value)
...
}
Get the files included in a classpath
A classpath has type Seq[Attributed[File]], which means that each
entry carries additional metadata. The files method provides just the
raw Seq[File] for the classpath. For example, :
val cp: Seq[Attributed[File]] = ...
val files: Seq[File] = cp.files
Get the module and artifact that produced a classpath entry
A classpath has type Seq[Attributed[File]], which means that each
entry carries additional metadata. This metadata is in the form of an
AttributeMap. Useful keys for
entries in the map are artifact.key, moduleID.key, and analysis. For
example,
val classpath: Seq[Attributed[File]] = ???
for(entry <- classpath) yield {
val art: Option[Artifact] = entry.get(artifact.key)
val mod: Option[ModuleID] = entry.get(moduleID.key)
val an: Option[inc.Analysis] = entry.get(analysis)
...
}
Note: Entries may not have some or all metadata. Only entries from source dependencies, such as internal projects, have an incremental compilation Analysis. Only entries for managed dependencies have an Artifact and ModuleID.
Customizing paths
This page describes how to modify the default source, resource, and library directories and what files get included from them.
Change the default Scala source directory
The directory that contains the main Scala sources is by default
src/main/scala. For test Scala sources, it is src/test/scala. To
change this, modify scalaSource in the Compile (for main sources) or
Test (for test sources). For example,
scalaSource in Compile := baseDirectory.value / "src"
scalaSource in Test := baseDirectory.value / "test-src"
Note: The Scala source directory can be the same as the Java source directory.
Change the default Java source directory
The directory that contains the main Java sources is by default
src/main/java. For test Java sources, it is src/test/java. To change
this, modify javaSource in the Compile (for main sources) or Test
(for test sources).
For example,
javaSource in Compile := baseDirectory.value / "src"
javaSource in Test := baseDirectory.value / "test-src"
Note: The Scala source directory can be the same as the Java source directory.
Change the default resource directory
The directory that contains the main resources is by default
src/main/resources. For test resources, it is src/test/resources. To
change this, modify resourceDirectory in either the Compile or
Test configuration.
For example,
resourceDirectory in Compile := baseDirectory.value / "resources"
resourceDirectory in Test := baseDirectory.value / "test-resources"
Change the default (unmanaged) library directory
The directory that contains the unmanaged libraries is by default
lib/. To change this, modify unmanagedBase. This setting can be
changed at the project level or in the Compile, Runtime, or Test
configurations.
When defined without a configuration, the directory is the default
directory for all configurations. For example, the following declares
jars/ as containing libraries:
unmanagedBase := baseDirectory.value / "jars"
When set for Compile, Runtime, or Test, unmanagedBase is the
directory containing libraries for that configuration, overriding the
default. For example, the following declares lib/main/ to contain jars
only for Compile and not for running or testing: :
unmanagedBase in Compile := baseDirectory.value / "lib" / "main"
Disable using the project’s base directory as a source directory
By default, sbt includes .scala files from the project’s base
directory as main source files. To disable this, configure
sourcesInBase:
sourcesInBase := false
Add an additional source directory
sbt collects sources from unmanagedSourceDirectories, which by
default consists of scalaSource and javaSource. Add a directory to
unmanagedSourceDirectories in the appropriate configuration to add a
source directory. For example, to add extra-src to be an additional
directory containing main sources,
unmanagedSourceDirectories in Compile += baseDirectory.value / "extra-src"
Note: This directory should only contain unmanaged sources, which are sources that are manually created and managed. See [Generating Files][Howto-Generating-Files] for working with automatically generated sources.
Add an additional resource directory
sbt collects resources from unmanagedResourceDirectories, which by
default consists of resourceDirectory. Add a directory to
unmanagedResourceDirectories in the appropriate configuration to add
another resource directory. For example, to add extra-resources to be
an additional directory containing main resources,
unmanagedResourceDirectories in Compile += baseDirectory.value / "extra-resources"
Note: This directory should only contain unmanaged resources, which are resources that are manually created and managed. See [Generating Files][Howto-Generating-Files] for working with automatically generated resources.
Include/exclude files in the source directory
When sbt traverses unmanagedSourceDirectories for sources, it only
includes directories and files that match includeFilter and do not
match excludeFilter. includeFilter and excludeFilter have type
java.io.FileFilter and sbt
provides some useful combinators for constructing a
FileFilter. For example, in addition to the default hidden files
exclusion, the following also ignores files containing impl in their
name,
excludeFilter in unmanagedSources := HiddenFileFilter || "*impl*"
To have different filters for main and test libraries, configure
Compile and Test separately:
includeFilter in (Compile, unmanagedSources) := "*.scala" || "*.java"
includeFilter in (Test, unmanagedSources) := HiddenFileFilter || "*impl*"
Note: By default, sbt includes
.scalaand.javasources, excluding hidden files.
Include/exclude files in the resource directory
When sbt traverses unmanagedResourceDirectories for resources, it only
includes directories and files that match includeFilter and do not
match excludeFilter. includeFilter and excludeFilter have type
java.io.FileFilter and sbt
provides some useful combinators for constructing a
FileFilter. For example, in addition to the default hidden files
exclusion, the following also ignores files containing impl in their
name,
excludeFilter in unmanagedSources := HiddenFileFilter || "*impl*"
To have different filters for main and test libraries, configure
Compile and Test separately:
includeFilter in (Compile, unmanagedSources) := "*.txt"
includeFilter in (Test, unmanagedSources) := "*.html"
Note: By default, sbt includes all files that are not hidden.
Include only certain (unmanaged) libraries
When sbt traverses unmanagedBase for resources, it only includes
directories and files that match includeFilter and do not match
excludeFilter. includeFilter and excludeFilter have type
java.io.FileFilter and sbt
provides some useful combinators for constructing a
FileFilter. For example, in addition to the default hidden files
exclusion, the following also ignores zips,
excludeFilter in unmanagedJars := HiddenFileFilter || "*.zip"
To have different filters for main and test libraries, configure
Compile and Test separately:
includeFilter in (Compile, unmanagedJars) := "*.jar"
includeFilter in (Test, unmanagedJars) := "*.jar" || "*.zip"
Note: By default, sbt includes jars, zips, and native dynamic libraries, excluding hidden files.
Generating files
sbt provides standard hooks for adding source and resource generation tasks.
Generate sources
A source generation task should generate sources in a subdirectory of
sourceManaged and return a sequence of files generated. The signature
of a source generation function (that becomes a basis for a task) is
usually as follows:
def makeSomeSources(base: File): Seq[File]
The key to add the task to is called sourceGenerators. Because we want
to add the task, and not the value after its execution, we use
taskValue instead of the usual value. sourceGenerators should be
scoped according to whether the generated files are main (Compile) or
test (Test) sources. This basic structure looks like:
sourceGenerators in Compile += <task of type Seq[File]>.taskValue
For example, assuming a method
def makeSomeSources(base: File): Seq[File],
sourceGenerators in Compile += Def.task {
makeSomeSources((sourceManaged in Compile).value / "demo")
}.taskValue
As a specific example, the following source generator generates
Test.scala application object that once executed, prints "Hi" to the
console:
sourceGenerators in Compile += Def.task {
val file = (sourceManaged in Compile).value / "demo" / "Test.scala"
IO.write(file, """object Test extends App { println("Hi") }""")
Seq(file)
}.taskValue
Executing run will print "Hi".
> run
[info] Running Test
Hi
Change Compile to Test to make it a test source. For efficiency, you
would only want to generate sources when necessary and not every run.
By default, generated sources are not included in the packaged source artifact. To do so, add them as you would other mappings. See Adding files to a package. A source generator can return both Java and Scala sources mixed together in the same sequence. They will be distinguished by their extension later.
Generate resources
A resource generation task should generate resources in a subdirectory
of resourceManaged and return a sequence of files generated. Like a
source generation function, the signature of a resource generation
function (that becomes a basis for a task) is usually as follows:
def makeSomeResources(base: File): Seq[File]
The key to add the task to is called resourceGenerators. Because we
want to add the task, and not the value after its execution, we use
taskValue instead of the usual value. It should be scoped according
to whether the generated files are main (Compile) or test (Test)
resources. This basic structure looks like:
resourceGenerators in Compile += <task of type Seq[File]>.taskValue
For example, assuming a method
def makeSomeResources(base: File): Seq[File],
resourceGenerators in Compile += Def.task {
makeSomeResources((resourceManaged in Compile).value / "demo")
}.taskValue
As a specific example, the following generates a properties file
myapp.properties containing the application name and version:
resourceGenerators in Compile += Def.task {
val file = (resourceManaged in Compile).value / "demo" / "myapp.properties"
val contents = "name=%s\nversion=%s".format(name.value,version.value)
IO.write(file, contents)
Seq(file)
}.taskValue
Change Compile to Test to make it a test resource. Normally, you
would only want to generate resources when necessary and not every run.
By default, generated resources are not included in the packaged source artifact. To do so, add them as you would other mappings. See Adding files to a package.
Inspect the build
Show or search help for a command, task, or setting
The help command is used to show available commands and search the
help for commands, tasks, or settings. If run without arguments, help
lists the available commands.
> help
help Displays this help message or prints detailed help on
requested commands (run 'help <command>').
about Displays basic information about sbt and the build.
reload (Re)loads the project in the current directory
...
> help compile
If the argument passed to help is the name of an existing command,
setting or task, the help for that entity is displayed. Otherwise, the
argument is interpreted as a regular expression that is used to search
the help of all commands, settings and tasks.
The tasks command is like help, but operates only on tasks.
Similarly, the settings command only operates on settings.
See also help help, help tasks, and help settings.
List available tasks
The tasks command, without arguments, lists the most commonly used
tasks. It can take a regular expression to search task names and
descriptions. The verbosity can be increased to show or search less
commonly used tasks. See help tasks for details.
The settings command, without arguments, lists the most commonly used
settings. It can take a regular expression to search setting names and
descriptions. The verbosity can be increased to show or search less
commonly used settings. See help settings for details.
List available settings
The inspect command displays several pieces of information about a
given setting or task, including the dependencies of a task/setting as
well as the tasks/settings that depend on the it. For example,
> inspect test:compile
...
[info] Dependencies:
[info] test:compile::compileInputs
[info] test:compile::streams
[info] Reverse dependencies:
[info] test:definedTestNames
[info] test:definedSbtPlugins
[info] test:printWarnings
[info] test:discoveredMainClasses
[info] test:definedTests
[info] test:exportedProducts
[info] test:products
...
See the Inspecting Settings page for details.
Display tree of setting/task dependencies
In addition to displaying immediate forward and reverse dependencies as
described in the previous section, the inspect command can display the
full dependency tree for a task or setting. For example,
> inspect tree clean
[info] *:clean = Task[Unit]
[info] +-*:cleanFiles = List(<project>/lib_managed, <project>/target)
[info] | +-{.}/*:managedDirectory = lib_managed
[info] | +-*:target = target
[info] | +-*:baseDirectory = <project>
[info] | +-*:thisProject = Project(id: demo, base: <project>, ...
[info] |
[info] +-*:cleanKeepFiles = List(<project>/target/.history)
[info] +-*:history = Some(<project>/target/.history)
...
For each task, inspect tree show the type of the value generated by
the task. For a setting, the toString of the setting is displayed. See
the Inspecting Settings page for details on the
inspect command.
Display the description and type of a setting or task
While the help, settings, and tasks commands display a description
of a task, the inspect command also shows the type of a setting or
task and the value of a setting. For example:
> inspect update
[info] Task: sbt.UpdateReport
[info] Description:
[info] Resolves and optionally retrieves dependencies, producing a report.
...
> inspect scalaVersion
[info] Setting: java.lang.String = 2.9.2
[info] Description:
[info] The version of Scala used for building.
...
See the Inspecting Settings page for details.
Display the delegation chain of a setting or task
See the Inspecting Settings page for details.
Display related settings or tasks
The inspect command can help find scopes where a setting or task is
defined. The following example shows that different options may be
specified to the Scala for testing and API documentation generation.
> inspect scalacOptions
...
[info] Related:
[info] compile:doc::scalacOptions
[info] test:scalacOptions
[info] */*:scalacOptions
[info] test:doc::scalacOptions
See the Inspecting Settings page for details.
Show the list of projects and builds
The projects command displays the currently loaded projects. The
projects are grouped by their enclosing build and the current project is
indicated by an asterisk. For example,
> projects
[info] In file:/home/user/demo/
[info] * parent
[info] sub
[info] In file:/home/user/dep/
[info] sample
Show the current session (temporary) settings
session list displays the settings that have been added at the command
line for the current project. For example,
> session list
1. maxErrors := 5
2. scalacOptions += "-explaintypes"
session list-all displays the settings added for all projects. For
details, see help session.
Show basic information about sbt and the current build
> about
[info] This is sbt 0.12.0
[info] The current project is {file:~/code/sbt.github.com/}default
[info] The current project is built against Scala 2.9.2
[info] Available Plugins: com.jsuereth.ghpages.GhPages, com.jsuereth.git.GitPlugin, com.jsuereth.sbtsite.SitePlugin
[info] sbt, sbt plugins, and build definitions are using Scala 2.9.2
Show the value of a setting
The inspect command shows the value of a setting as part of its
output, but the show command is dedicated to this job. It shows the
output of the setting provided as an argument. For example,
> show organization
[info] com.github.sbt
The show command also works for tasks, described next.
Show the result of executing a task
> show update
... <output of update> ...
[info] Update report:
[info] Resolve time: 122 ms, Download time: 5 ms, Download size: 0 bytes
[info] compile:
[info] org.scala-lang:scala-library:2.9.2: ...
The show command will execute the task provided as an argument and
then print the result. Note that this is different from the behavior of
the inspect command (described in other sections), which does not
execute a task and thus can only display its type and not its generated
value.
> show compile:dependencyClasspath
...
[info] ArrayBuffer(Attributed(~/.sbt/0.12.0/boot/scala-2.9.2/lib/scala-library.jar))
Show the classpath used for compilation or testing
For the test classpath,
> show test:dependencyClasspath
...
[info] ArrayBuffer(Attributed(~/code/sbt.github.com/target/scala-2.9.2/classes), Attributed(~/.sbt/0.12.0/boot/scala-2.9.2/lib/scala-library.jar), Attributed(~/.ivy2/cache/junit/junit/jars/junit-4.8.2.jar))
Show the main classes detected in a project
sbt detects the classes with public, static main methods for use by the
run method and to tab-complete the runMain method. The
discoveredMainClasses task does this discovery and provides as its
result the list of class names. For example, the following shows the
main classes discovered in the main sources:
> show compile:discoveredMainClasses
... <runs compile if out of date> ...
[info] List(org.example.Main)
Show the test classes detected in a project
sbt detects tests according to fingerprints provided by test frameworks.
The definedTestNames task provides as its result the list of test
names detected in this way. For example,
> show test:definedTestNames
... < runs test:compile if out of date > ...
[info] List(org.example.TestA, org.example.TestB)
Interactive mode
Use tab completion
By default, sbt’s interactive mode is started when no commands are
provided on the command line or when the shell command is invoked.
As the name suggests, tab completion is invoked by hitting the tab key. Suggestions are provided that can complete the text entered to the left of the current cursor position. Any part of the suggestion that is unambiguous is automatically appended to the current text. Commands typically support tab completion for most of their syntax.
As an example, entering tes and hitting tab:
> tes<TAB>
results in sbt appending a t:
> test
To get further completions, hit tab again:
> test<TAB>
testFrameworks testListeners testLoader testOnly testOptions test:
Now, there is more than one possibility for the next character, so sbt
prints the available options. We will select testOnly and get more
suggestions by entering the rest of the command and hitting tab twice:
> testOnly<TAB><TAB>
-- sbt.DagSpecification sbt.EmptyRelationTest sbt.KeyTest sbt.RelationTest sbt.SettingsTest
The first tab inserts an unambiguous space and the second suggests names
of tests to run. The suggestion of -- is for the separator between
test names and options provided to the test framework. The other
suggestions are names of test classes for one of sbt’s modules. Test
name suggestions require tests to be compiled first. If tests have been
added, renamed, or removed since the last test compilation, the
completions will be out of date until another successful compile.
Show more tab completion suggestions
Some commands have different levels of completion. Hitting tab multiple
times increases the verbosity of completions. (Presently, this feature
is only used by the set command.)
Modify the default JLine keybindings
JLine, used by both Scala and sbt, uses a configuration file for many of
its keybindings. The location of this file can be changed with the
system property jline.keybindings. The default keybindings file is
included in the sbt launcher and may be used as a starting point for
customization.
Configure the prompt string
By default, sbt only displays > to prompt for a command. This can be
changed through the shellPrompt setting, which has type
State => String. State contains all state
for sbt and thus provides access to all build information for use in the
prompt string.
Examples:
// set the prompt (for this build) to include the project id.
shellPrompt in ThisBuild := { state => Project.extract(state).currentRef.project + "> " }
// set the prompt (for the current project) to include the username
shellPrompt := { state => System.getProperty("user.name") + "> " }
Use history
Interactive mode remembers history even if you exit sbt and restart it.
The simplest way to access history is to press the up arrow key to cycle
through previously entered commands. Use Ctrl+r to incrementally
search history backwards. The following commands are supported:
!Show history command help.!!Execute the previous command again.!:Show all previous commands.!:nShow the last n commands.!nExecute the command with indexn, as shown by the!:command.!-nExecute the nth command before this one.!stringExecute the most recent command starting with ‘string’!?stringExecute the most recent command containing ‘string’
Change the location of the interactive history file
By default, interactive history is stored in the target/ directory for
the current project (but is not removed by a clean). History is thus
separate for each subproject. The location can be changed with the
historyPath setting, which has type Option[File]. For example,
history can be stored in the root directory for the project instead of
the output directory:
historyPath := Some(baseDirectory.value / ".history")
The history path needs to be set for each project, since sbt will use
the value of historyPath for the current project (as selected by the
project command).
Use the same history for all projects
The previous section describes how to configure the location of the
history file. This setting can be used to share the interactive history
among all projects in a build instead of using a different history for
each project. The way this is done is to set historyPath to be the
same file, such as a file in the root project’s target/ directory:
historyPath :=
Some( (target in LocalRootProject).value / ".history")
The in LocalRootProject part means to get the output directory for the
root project for the build.
Disable interactive history
If, for whatever reason, you want to disable history, set historyPath
to None in each project it should be disabled in:
> historyPath := None
Run commands before entering interactive mode
Interactive mode is implemented by the shell command. By default, the
shell command is run if no commands are provided to sbt on the command
line. To run commands before entering interactive mode, specify them on
the command line followed by shell. For example,
$ sbt clean compile shell
This runs clean and then compile before entering the interactive
prompt. If either clean or compile fails, sbt will exit without
going to the prompt. To enter the prompt whether or not these initial
commands succeed, prepend -shell, which means to run shell if any
command fails. For example,
$ sbt -shell clean compile shell
Configure and use logging
View the logging output of the previously executed command
When a command is run, more detailed logging output is sent to a file
than to the screen (by default). This output can be recalled for the
command just executed by running last.
For example, the output of run when the sources are uptodate is:
> run
[info] Running A
Hi!
[success] Total time: 0 s, completed Feb 25, 2012 1:00:00 PM
The details of this execution can be recalled by running last:
> last
[debug] Running task... Cancelable: false, max worker threads: 4, check cycles: false
[debug]
[debug] Initial source changes:
[debug] removed:Set()
[debug] added: Set()
[debug] modified: Set()
[debug] Removed products: Set()
[debug] Modified external sources: Set()
[debug] Modified binary dependencies: Set()
[debug] Initial directly invalidated sources: Set()
[debug]
[debug] Sources indirectly invalidated by:
[debug] product: Set()
[debug] binary dep: Set()
[debug] external source: Set()
[debug] Initially invalidated: Set()
[debug] Copy resource mappings:
[debug]
[info] Running A
[debug] Starting sandboxed run...
[debug] Waiting for threads to exit or System.exit to be called.
[debug] Classpath:
[debug] /tmp/e/target/scala-2.9.2/classes
[debug] /tmp/e/.sbt/0.12.0/boot/scala-2.9.2/lib/scala-library.jar
[debug] Waiting for thread runMain to exit
[debug] Thread runMain exited.
[debug] Interrupting remaining threads (should be all daemons).
[debug] Sandboxed run complete..
[debug] Exited with code 0
[success] Total time: 0 s, completed Jan 1, 2012 1:00:00 PM
Configuration of the logging level for the console and for the backing file are described in following sections.
View the previous logging output of a specific task
When a task is run, more detailed logging output is sent to a file than
to the screen (by default). This output can be recalled for a specific
task by running last <task>. For example, the first time compile is
run, output might look like:
> compile
[info] Updating {file:/.../demo/}example...
[info] Resolving org.scala-lang#scala-library;2.9.2 ...
[info] Done updating.
[info] Compiling 1 Scala source to .../demo/target/scala-2.9.2/classes...
[success] Total time: 0 s, completed Jun 1, 2012 1:11:11 PM
The output indicates that both dependency resolution and compilation were performed. The detailed output of each of these may be recalled individually. For example,
> last compile
[debug]
[debug] Initial source changes:
[debug] removed:Set()
[debug] added: Set(/home/mark/tmp/a/b/A.scala)
[debug] modified: Set()
...
and:
> last update
[info] Updating {file:/.../demo/}example...
[debug] post 1.3 ivy file: using exact as default matcher
[debug] :: resolving dependencies :: example#example_2.9.2;0.1-SNAPSHOT
[debug] confs: [compile, runtime, test, provided, optional, compile-internal, runtime-internal, test-internal, plugin, sources, docs, pom]
[debug] validate = true
[debug] refresh = false
[debug] resolving dependencies for configuration 'compile'
...
Show warnings from the previous compilation
The Scala compiler does not print the full details of warnings by
default. Compiling code that uses the deprecated error method from
Predef might generate the following output:
> compile
[info] Compiling 1 Scala source to <...>/classes...
[warn] there were 1 deprecation warnings; re-run with -deprecation for details
[warn] one warning found
The details aren’t provided, so it is necessary to add -deprecation to
the options passed to the compiler (scalacOptions) and recompile. An
alternative when using Scala 2.10 and later is to run printWarnings.
This task will display all warnings from the previous compilation. For
example,
> printWarnings
[warn] A.scala:2: method error in object Predef is deprecated: Use sys.error(message) instead
[warn] def x = error("Failed.")
[warn] ^
Change the logging level globally
The quickest way to change logging levels is by using the error,
warn, info, or debug commands. These set the default logging level
for commands and tasks. For example,
> warn
will by default show only warnings and errors. To set the logging level
before any commands are executed on startup, use -- before the logging
level. For example,
$ sbt --warn
> compile
[warn] there were 2 feature warning(s); re-run with -feature for details
[warn] one warning found
[success] Total time: 4 s, completed ...
>
The logging level can be overridden at a finer granularity, which is described next.
Change the logging level for a specific task, configuration, or project
The amount of logging is controlled by the logLevel setting, which
takes values from the Level enumeration. Valid values are Error,
Warn, Info, and Debug in order of increasing verbosity. The
logging level may be configured globally, as described in the previous
section, or it may be applied to a specific project, configuration, or
task. For example, to change the logging level for compilation to only
show warnings and errors:
> set logLevel in compile := Level.Warn
To enable debug logging for all tasks in the current project,
> set logLevel := Level.Warn
A common scenario is that after running a task, you notice that you need
more information than was shown by default. A logLevel based solution
typically requires changing the logging level and running a task again.
However, there are two cases where this is unnecessary. First, warnings
from a previous compilation may be displayed using printWarnings for
the main sources or test:printWarnings for test sources. Second,
output from the previous execution is available either for a single task
or for in its entirety. See the section on
printWarnings and the sections on
previous output.
Configure printing of stack traces
By default, sbt hides the stack trace of most exceptions thrown during execution. It prints a message that indicates how to display the exception. However, you may want to show more of stack traces by default.
The setting to configure is traceLevel, which is a setting with an Int
value. When traceLevel is set to a negative value, no stack traces are
shown. When it is zero, the stack trace is displayed up to the first sbt
stack frame. When positive, the stack trace is shown up to that many
stack frames.
For example, the following configures sbt to show stack traces up to the first sbt frame:
> set every traceLevel := 0
The every part means to override the setting in all scopes. To change
the trace printing behavior for a single project, configuration, or
task, scope traceLevel appropriately:
> set traceLevel in Test := 5
> set traceLevel in update := 0
> set traceLevel in ThisProject := -1
Print the output of tests immediately instead of buffering
By default, sbt buffers the logging output of a test until the whole
class finishes. This is so that output does not get mixed up when
executing in parallel. To disable buffering, set the logBuffered
setting to false:
logBuffered := false
Add a custom logger
The setting extraLoggers can be used to add custom loggers. A custom
logger should implement [AbstractLogger]. extraLoggers is a function
ScopedKey[_] => Seq[AbstractLogger]. This means that it can provide
different logging based on the task that requests the logger.
extraLoggers := {
val currentFunction = extraLoggers.value
(key: ScopedKey[_]) => {
myCustomLogger(key) +: currentFunction(key)
}
}
Here, we take the current function currentFunction for the setting and
provide a new function. The new function prepends our custom logger to
the ones provided by the old function.
Log messages in a task
The special task streams provides per-task logging and I/O via a
Streams instance. To log, a task uses
the log member from the streams task:
myTask := {
val log = streams.value.log
log.warn("A warning.")
}
Project metadata
Set the project name
A project should define name and version. These will be used in
various parts of the build, such as the names of generated artifacts.
Projects that are published to a repository should also override
organization.
name := "Your project name"
For published projects, this name is normalized to be suitable for use
as an artifact name and dependency ID. This normalized name is stored in
normalizedName.
Set the project version
version := "1.0"
Set the project organization
organization := "org.example"
By convention, this is a reverse domain name that you own, typically one specific to your project. It is used as a namespace for projects.
A full/formal name can be defined in the organizationName setting.
This is used in the generated pom.xml. If the organization has a web
site, it may be set in the organizationHomepage setting. For example:
organizationName := "Example, Inc."
organizationHomepage := Some(url("http://example.org"))
Set the project’s homepage and other metadata
homepage := Some(url("http://scala-sbt.org"))
startYear := Some(2008)
description := "A build tool for Scala."
licenses += "GPLv2" -> url("https://www.gnu.org/licenses/gpl-2.0.html")
Configure packaging
Use the packaged jar on classpaths instead of class directory
By default, a project exports a directory containing its resources and
compiled class files. Set exportJars to true to export the packaged
jar instead. For example,
exportJars := true
The jar will be used by run, test, console, and other tasks that
use the full classpath.
Add manifest attributes
By default, sbt constructs a manifest for the binary package from
settings such as organization and mainClass. Additional attributes
may be added to the packageOptions setting scoped by the configuration
and package task.
Main attributes may be added with Package.ManifestAttributes. There
are two variants of this method, once that accepts repeated arguments
that map an attribute of type java.util.jar.Attributes.Name to a
String value and other that maps attribute names (type String) to the
String value.
For example,
packageOptions in (Compile, packageBin) +=
Package.ManifestAttributes( java.util.jar.Attributes.Name.SEALED -> "true" )
Other attributes may be added with Package.JarManifest.
packageOptions in (Compile, packageBin) += {
import java.util.jar.{Attributes, Manifest}
val manifest = new Manifest
manifest.getAttributes("foo/bar/").put(Attributes.Name.SEALED, "false")
Package.JarManifest( manifest )
}
Or, to read the manifest from a file:
packageOptions in (Compile, packageBin) += {
val file = new java.io.File("META-INF/MANIFEST.MF")
val manifest = Using.fileInputStream(file)( in => new java.util.jar.Manifest(in) )
Package.JarManifest( manifest )
}
Change the file name of a package
The artifactName setting controls the name of generated packages. See
the Artifacts page for details.
Modify the contents of the package
The contents of a package are defined by the mappings task, of type
Seq[(File,String)]. The mappings task is a sequence of mappings from
a file to include in the package to the path in the package. See
Mapping Files for convenience functions for
generating these mappings. For example, to add the file in/example.txt
to the main binary jar with the path “out/example.txt”,
mappings in (Compile, packageBin) += {
(baseDirectory.value / "in" / "example.txt") -> "out/example.txt"
}
Note that mappings is scoped by the configuration and the specific
package task. For example, the mappings for the test source package are
defined by the mappings in (Test, packageSrc) task.
Running commands
Pass arguments to a command or task in batch mode
sbt interprets each command line argument provided to it as a command together with the command’s arguments. Therefore, to run a command that takes arguments in batch mode, quote the command and its arguments. For example,
$ sbt 'project X' clean '~ compile'
Provide multiple commands to run consecutively
Multiple commands can be scheduled at once by prefixing each command
with a semicolon. This is useful for specifying multiple commands where
a single command string is accepted. For example, the syntax for
triggered execution is ~ <command>. To have more than one command run
for each triggering, use semicolons. For example, the following runs
clean and then compile each time a source file changes:
> ~ ;clean;compile
Read commands from a file
The < command reads commands from the files provided to it as
arguments. Run help < at the sbt prompt for details.
Define an alias for a command or task
The alias command defines, removes, and displays aliases for commands.
Run help alias at the sbt prompt for details.
Example usage:
> alias a=about
> alias
a = about
> a
[info] This is sbt ...
> alias a=
> alias
> a
[error] Not a valid command: a ...
Quickly evaluate a Scala expression
The eval command compiles and runs the Scala expression passed to it
as an argument. The result is printed along with its type. For example,
> eval 2+2
4: Int
Variables defined by an eval are not visible to subsequent evals,
although changes to system properties persist and affect the JVM that is
running sbt. Use the Scala REPL (console and related commands) for
full support for evaluating Scala code interactively.
Configure and use Scala
Set the Scala version used for building the project
The scalaVersion configures the version of Scala used for compilation.
By default, sbt also adds a dependency on the Scala library with this
version. See the next section for how to disable this automatic
dependency. If the Scala version is not specified, the version sbt was
built against is used. It is recommended to explicitly specify the
version of Scala.
For example, to set the Scala version to “2.11.1”,
scalaVersion := "2.11.1"
Disable the automatic dependency on the Scala library
sbt adds a dependency on the Scala standard library by default. To
disable this behavior, set the autoScalaLibrary setting to false.
autoScalaLibrary := false
Temporarily switch to a different Scala version
To set the Scala version in all scopes to a specific value, use the ++
command. For example, to temporarily use Scala 2.10.4, run:
> ++ 2.10.4
Use a local Scala installation for building a project
Defining the scalaHome setting with the path to the Scala home
directory will use that Scala installation. sbt still requires
scalaVersion to be set when a local Scala version is used. For
example,
scalaVersion := "2.10.0-local"
scalaHome := Some(file("/path/to/scala/home/"))
Build a project against multiple Scala versions
See cross building.
Enter the Scala REPL with a project’s dependencies on the classpath, but not the compiled project classes
The consoleQuick action retrieves dependencies and puts them on the
classpath of the Scala REPL. The project’s sources are not compiled, but
sources of any source dependencies are compiled. To enter the REPL with
test dependencies on the classpath but without compiling test sources,
run test:consoleQuick. This will force compilation of main sources.
Enter the Scala REPL with a project’s dependencies and compiled code on the classpath
The console action retrieves dependencies and compiles sources and
puts them on the classpath of the Scala REPL. To enter the REPL with
test dependencies and compiled test sources on the classpath, run
test:console.
Enter the Scala REPL with plugins and the build definition on the classpath
> consoleProject
For details, see the consoleProject page.
Define the initial commands evaluated when entering the Scala REPL
Set initialCommands in console to set the initial statements to
evaluate when console and consoleQuick are run. To configure
consoleQuick separately, use initialCommands in consoleQuick. For
example,
initialCommands in console := """println("Hello from console")"""
initialCommands in consoleQuick := """println("Hello from consoleQuick")"""
The consoleProject command is configured separately by
initialCommands in consoleProject. It does not use the value from
initialCommands in console by default. For example,
initialCommands in consoleProject := """println("Hello from consoleProject")"""
Define the commands evaluated when exiting the Scala REPL
Set cleanupCommands in console to set the statements to evaluate after
exiting the Scala REPL started by console and consoleQuick. To
configure consoleQuick separately, use
cleanupCommands in consoleQuick. For example,
cleanupCommands in console := """println("Bye from console")"""
cleanupCommands in consoleQuick := """println("Bye from consoleQuick")"""
The consoleProject command is configured separately by
cleanupCommands in consoleProject. It does not use the value from
cleanupCommands in console by default. For example,
cleanupCommands in consoleProject := """println("Bye from consoleProject")"""
Use the Scala REPL from project code
sbt runs tests in the same JVM as sbt itself and Scala classes are not
in the same class loader as the application classes. This is also the
case in console and when run is not forked. Therefore, when using
the Scala interpreter, it is important to set it up properly to avoid an
error message like:
Failed to initialize compiler: class scala.runtime.VolatileBooleanRef not found.
** Note that as of 2.8 scala does not assume use of the java classpath.
** For the old behavior pass -usejavacp to scala, or if using a Settings
** object programmatically, settings.usejavacp.value = true.
The key is to initialize the Settings for the interpreter using embeddedDefaults. For example:
val settings = new Settings
settings.embeddedDefaults[MyType]
val interpreter = new Interpreter(settings, ...)
Here, MyType is a representative class that should be included on the
interpreter’s classpath and in its application class loader. For more
background, see the
original proposal that resulted in
embeddedDefaults being added.
Similarly, use a representative class as the type argument when using the break and breakIf methods of ILoop, as in the following example:
def x(a: Int, b: Int) = {
import scala.tools.nsc.interpreter.ILoop
ILoop.breakIf[MyType](a != b, "a" -> a, "b" -> b )
}
Generate API documentation
Select javadoc or scaladoc
sbt will run javadoc if there are only Java sources in the project. If
there are any Scala sources, sbt will run scaladoc. (This situation
results from scaladoc not processing Javadoc comments in Java sources
nor linking to Javadoc.)
Set the options used for generating scaladoc independently of compilation
Scope scalacOptions to the doc task to configure scaladoc. Use
:= to definitively set the options without appending to the options
for compile. Scope to Compile for main sources or to Test for test
sources. For example,
scalacOptions in (Compile,doc) := Seq("-groups", "-implicits")
Add options for scaladoc to the compilation options
Scope scalacOptions to the doc task to configure scaladoc. Use
+= or ++= to append options to the base options. To append a single
option, use +=. To append a Seq[String], use ++=. Scope to
Compile for main sources or to Test for test sources. For example,
scalacOptions in (Compile,doc) ++= Seq("-groups", "-implicits")
Set the options used for generating javadoc independently of compilation
Scope javacOptions to the doc task to configure javadoc. Use :=
to definitively set the options without appending to the options for
compile. Scope to Compile for main sources or to Test for test
sources.
Add options for javadoc to the compilation options
Scope javacOptions to the doc task to configure javadoc. Use +=
or ++= to append options to the base options. To append a single
option, use +=. To append a Seq[String], use ++=. Scope to
Compile for main sources or to Test for test sources. For example,
javacOptions in (Compile,doc) ++= Seq("-notimestamp", "-linksource")
Enable automatic linking to the external Scaladoc of managed dependencies
Set autoAPIMappings := true for sbt to tell scaladoc where it can
find the API documentation for managed dependencies. This requires that
dependencies have this information in its metadata and you are using
scaladoc for Scala 2.10.2 or later.
Enable manual linking to the external Scaladoc of managed dependencies
Add mappings of type (File, URL) to apiMappings to manually tell
scaladoc where it can find the API documentation for dependencies.
(This requires scaladoc for Scala 2.10.2 or later.) These mappings are
used in addition to autoAPIMappings, so this manual configuration is
typically done for unmanaged dependencies. The File key is the
location of the dependency as passed to the classpath. The URL value
is the base URL of the API documentation for the dependency. For
example,
apiMappings += (
(unmanagedBase.value / "a-library.jar") ->
url("https://example.org/api/")
)
Define the location of API documentation for a library
Set apiURL to define the base URL for the Scaladocs for your
library. This will enable clients of your library to automatically link
against the API documentation using autoAPIMappings. (This only works
for Scala 2.10.2 and later.) For example,
apiURL := Some(url("https://example.org/api/"))
This information will get included in a property of the published
pom.xml, where it can be automatically consumed by sbt.
Triggered execution
Run a command when sources change
You can make a command run when certain files change by prefixing the
command with ~. Monitoring is terminated when enter is pressed. This
triggered execution is configured by the watch setting, but typically
the basic settings watchSources and pollInterval are modified as
described in later sections.
The original use-case for triggered execution was continuous compilation:
> ~ test:compile
> ~ compile
You can use the triggered execution feature to run any command or task,
however. The following will poll for changes to your source code (main
or test) and run testOnly for the specified test.
> ~ testOnly example.TestA
Run multiple commands when sources change
The command passed to ~ may be any command string, so multiple
commands may be run by separating them with a semicolon. For example,
> ~ ;a ;b
This runs a and then b when sources change.
Configure the sources that are checked for changes
watchSourcesdefines the files for a single project that are monitored for changes. By default, a project watches resources and Scala and Java sources.watchTransitiveSourcesthen combines thewatchSourcesfor the current project and all execution and classpath dependencies (see .scala build definition for details on inter-project dependencies).
To add the file demo/example.txt to the files to watch,
watchSources += baseDirectory.value / "demo" / "examples.txt"
Set the time interval between checks for changes to sources
pollInterval selects the interval between polling for changes in
milliseconds. The default value is 500 ms. To change it to 1 s,
pollInterval := 1000 // in ms
Define Custom Tasks
Define a Task that runs tests in specific sub-projects
Consider a hypothetical multi-build project with 3 subprojects. The following defines a task myTestTask that will
run the test Task in specific subprojects core and tools but not client:
``` lazy val core = project.in(file(”./core”))
lazy val tools = project.in(file(”./tools”))
lazy val client = project.in(file(”./client”))
lazy val myTestTask = TaskKeyUnit
myTestTask <<= Seq( test in (core, Test) test in (tools, Test) ).dependOn ```
Sequencing
One of the most frequently asked questions is in the form of “how do I do X and then do Y in sbt”?
Generally speaking, that’s not how sbt tasks are set up. build.sbt is a DSL to define dependency graph of tasks. This is covered in Execution semantics of tasks. So ideally, what you should do is define task Y yourself, and depend on the task X.
taskY := {
val x = taskX.value
x + 1
}
This is more constrained compared to the imperative style plain Scala code with side effects such as the follows:
def foo(): Unit = {
doX()
doY()
}
The benefit of the dependency-oriented programming model is that sbt’s task engine is able to reorder the task execution. When possible we run dependent tasks in parallel. Another benefit is that we can deduplicate the graph, and make sure that the task evaluation, such as compile in Compile, is called once per command execution, as opposed to compiling the same source many times.
Because task system is generally set up this way, running something sequentially is possible, but you will be fighting the system a bit, and it’s not always going to be easy.
- Defining a sequential task with Def.sequential
- Defining a dynamic task with Def.taskDyn
- Doing something after an input task
- Defining a dynamic input task with Def.inputTaskDyn
- How to sequence using commands
Defining a sequential task with Def.sequential
sbt 0.13.8 added Def.sequential function to run tasks under semi-sequential semantics.
To demonstrate the sequential task, let’s create a custom task called compilecheck that runs compile in Compile and then scalastyle in Compile task added by scalastyle-sbt-plugin.
Here’s how to set it up
project/build.properties
sbt.version=0.13.11
project/style.sbt
addSbtPlugin("org.scalastyle" %% "scalastyle-sbt-plugin" % "0.8.0")
build.sbt
lazy val compilecheck = taskKey[Unit]("compile and then scalastyle")
lazy val root = (project in file(".")).
settings(
compilecheck in Compile := Def.sequential(
compile in Compile,
(scalastyle in Compile).toTask("")
).value
)
To call this task type in compilecheck from the shell. If the compilation fails, compilecheck would stop the execution.
root> compilecheck
[info] Compiling 1 Scala source to /Users/x/proj/target/scala-2.10/classes...
[error] /Users/x/proj/src/main/scala/Foo.scala:3: Unmatched closing brace '}' ignored here
[error] }
[error] ^
[error] one error found
[error] (compile:compileIncremental) Compilation failed
Looks like we were able to sequence these tasks.
Defining a dynamic task with Def.taskDyn
If sequential task is not enough, another step up is the dynamic task. Unlike Def.task which expects you to return pure value A, with a Def.taskDyn you return a task sbt.Def.Initialize[sbt.Task[A]] which the task engine can continue the rest of the computation with.
Let’s try implementing a custom task called compilecheck that runs compile in Compile and then scalastyle in Compile task added by scalastyle-sbt-plugin.
project/build.properties
sbt.version=0.13.11
project/style.sbt
addSbtPlugin("org.scalastyle" %% "scalastyle-sbt-plugin" % "0.8.0")
build.sbt v1
lazy val compilecheck = taskKey[sbt.inc.Analysis]("compile and then scalastyle")
lazy val root = (project in file(".")).
settings(
compilecheck := (Def.taskDyn {
val c = (compile in Compile).value
Def.task {
val x = (scalastyle in Compile).toTask("").value
c
}
}).value
)
Now we have the same thing as the sequential task, except we can now return the result c from the first task.
build.sbt v2
If we can return the same return type as compile in Compile, might actually rewire the key to our dynamic task.
lazy val root = (project in file(".")).
settings(
compile in Compile := (Def.taskDyn {
val c = (compile in Compile).value
Def.task {
val x = (scalastyle in Compile).toTask("").value
c
}
}).value
)
Now we can actually call compile in Compile from the shell and make it do what we want it to do.
Doing something after an input task
Thus far we’ve mostly looked at tasks. There’s another kind of tasks called input tasks that accepts user input from the shell.
A typical example for this is the run in Compile task. The scalastyle task is actually an input task too. See input task for the details of the input tasks.
Now suppose we want to call run in Compile task and then open the browser for testing purposes.
src/main/scala/Greeting.scala
object Greeting extends App {
println("hello " + args.toList)
}
build.sbt v1
lazy val runopen = inputKey[Unit]("run and then open the browser")
lazy val root = (project in file(".")).
settings(
runopen := {
(run in Compile).evaluated
println("open browser!")
}
)
Here, I’m faking the browser opening using println as the side effect. We can now call this task from the shell:
> runopen foo
[info] Compiling 1 Scala source to /x/proj/...
[info] Running Greeting foo
hello List(foo)
open browser!
build.sbt v2
We can actually remove runopen key, by rewriting the new input task to run in Compile:
lazy val root = (project in file(".")).
settings(
run in Compile := {
(run in Compile).evaluated
println("open browser!")
}
)
Defining a dynamic input task with Def.inputTaskDyn
Let’s suppose that there’s a task already that does the bowser opening called openbrowser because of a plugin. Here’s how we can sequence a task after an input tasks.
build.sbt v1
lazy val runopen = inputKey[Unit]("run and then open the browser")
lazy val openbrowser = taskKey[Unit]("open the browser")
lazy val root = (project in file(".")).
settings(
runopen := (Def.inputTaskDyn {
import sbt.complete.Parsers.spaceDelimited
val args = spaceDelimited("<args>").parsed
Def.taskDyn {
(run in Compile).toTask(" " + args.mkString(" ")).value
openbrowser
}
}).evaluated,
openbrowser := {
println("open browser!")
}
)
build.sbt v2
Trying to rewire run in Compile is going to be complicated. Since the reference to the inner run in Compile is already inside the continuation task, simply rewiring runopen to run in Compile will create a cyclic reference.
To break the cycle, we will introduce a clone of run in Compile called actualRun in Compile:
lazy val actualRun = inputKey[Unit]("The actual run task")
lazy val openbrowser = taskKey[Unit]("open the browser")
lazy val root = (project in file(".")).
settings(
run in Compile := (Def.inputTaskDyn {
import sbt.complete.Parsers.spaceDelimited
val args = spaceDelimited("<args>").parsed
Def.taskDyn {
(actualRun in Compile).toTask(" " + args.mkString(" ")).value
openbrowser
}
}).evaluated,
actualRun in Compile := Defaults.runTask(
fullClasspath in Runtime,
mainClass in (Compile, run),
runner in (Compile, run)
).evaluated,
openbrowser := {
println("open browser!")
}
)
The actualRun in Compile’s implementation was copy-pasted from run task’s implementation in Defaults.scala.
Now we can call run foo from the shell and it will evaluate actualRun in Compile with the passed in argument, and then evaluate the openbrowser task.
How to sequence using commands
If all you care about is the side effects, and you really just want to emulate humans typing in one command after another, a custom command might be just want you need. This comes in handy for release procedures.
Here’s from the build script of sbt itself:
commands += Command.command("releaseNightly") { state =>
"stampVersion" ::
"clean" ::
"compile" ::
"publish" ::
"bintrayRelease" ::
state
}
Examples
This section of the documentation has example sbt build definitions and code. Contributions are welcome!
You may want to read the Getting Started Guide as a foundation for understanding the examples.
.sbt build examples
Note: As of sbt 0.13.7 blank lines are no longer used to delimit build.sbt files. The following example requires sbt 0.13.7+.
Listed here are some examples of settings (each setting is independent). See .sbt build definition for details.
// factor out common settings into a sequence
lazy val commonSettings = Seq(
organization := "org.myproject",
version := "0.1.0",
// set the Scala version used for the project
scalaVersion := "2.11.7"
)
// define ModuleID for library dependencies
lazy val scalacheck = "org.scalacheck" %% "scalacheck" % "1.12.0"
// define ModuleID using string interpolator
lazy val osmlibVersion = "2.5.2-RC1"
lazy val osmlib = ("net.sf.travelingsales" % "osmlib" % osmlibVersion from
s"""http://downloads.sourceforge.net/project/travelingsales/libosm/$osmlibVersion/libosm-$osmlibVersion.jar""")
lazy val root = (project in file(".")).
settings(commonSettings: _*).
settings(
// set the name of the project
name := "My Project",
// set the main Scala source directory to be <base>/src
scalaSource in Compile := baseDirectory.value / "src",
// set the Scala test source directory to be <base>/test
scalaSource in Test := baseDirectory.value / "test",
// add a test dependency on ScalaCheck
libraryDependencies += scalacheck % Test,
// add compile dependency on osmlib
libraryDependencies += osmlib,
// reduce the maximum number of errors shown by the Scala compiler
maxErrors := 20,
// increase the time between polling for file changes when using continuous execution
pollInterval := 1000,
// append several options to the list of options passed to the Java compiler
javacOptions ++= Seq("-source", "1.5", "-target", "1.5"),
// append -deprecation to the options passed to the Scala compiler
scalacOptions += "-deprecation",
// define the statements initially evaluated when entering 'console', 'consoleQuick', or 'consoleProject'
initialCommands := """
|import System.{currentTimeMillis => now}
|def time[T](f: => T): T = {
| val start = now
| try { f } finally { println("Elapsed: " + (now - start)/1000.0 + " s") }
|}""".stripMargin,
// set the initial commands when entering 'console' or 'consoleQuick', but not 'consoleProject'
initialCommands in console := "import myproject._",
// set the main class for packaging the main jar
// 'run' will still auto-detect and prompt
// change Compile to Test to set it for the test jar
mainClass in (Compile, packageBin) := Some("myproject.MyMain"),
// set the main class for the main 'run' task
// change Compile to Test to set it for 'test:run'
mainClass in (Compile, run) := Some("myproject.MyMain"),
// add <base>/input to the files that '~' triggers on
watchSources += baseDirectory.value / "input",
// add a maven-style repository
resolvers += "name" at "url",
// add a sequence of maven-style repositories
resolvers ++= Seq("name" at "url"),
// define the repository to publish to
publishTo := Some("name" at "url"),
// set Ivy logging to be at the highest level
ivyLoggingLevel := UpdateLogging.Full,
// disable updating dynamic revisions (including -SNAPSHOT versions)
offline := true,
// set the prompt (for this build) to include the project id.
shellPrompt in ThisBuild := { state => Project.extract(state).currentRef.project + "> " },
// set the prompt (for the current project) to include the username
shellPrompt := { state => System.getProperty("user.name") + "> " },
// disable printing timing information, but still print [success]
showTiming := false,
// disable printing a message indicating the success or failure of running a task
showSuccess := false,
// change the format used for printing task completion time
timingFormat := {
import java.text.DateFormat
DateFormat.getDateTimeInstance(DateFormat.SHORT, DateFormat.SHORT)
},
// disable using the Scala version in output paths and artifacts
crossPaths := false,
// fork a new JVM for 'run' and 'test:run'
fork := true,
// fork a new JVM for 'test:run', but not 'run'
fork in Test := true,
// add a JVM option to use when forking a JVM for 'run'
javaOptions += "-Xmx2G",
// only use a single thread for building
parallelExecution := false,
// Execute tests in the current project serially
// Tests from other projects may still run concurrently.
parallelExecution in Test := false,
// set the location of the JDK to use for compiling Java code.
// if 'fork' is true, this is used for 'run' as well
javaHome := Some(file("/usr/lib/jvm/sun-jdk-1.6")),
// Use Scala from a directory on the filesystem instead of retrieving from a repository
scalaHome := Some(file("/home/user/scala/trunk/")),
// don't aggregate clean (See FullConfiguration for aggregation details)
aggregate in clean := false,
// only show warnings and errors on the screen for compilations.
// this applies to both test:compile and compile and is Info by default
logLevel in compile := Level.Warn,
// only show warnings and errors on the screen for all tasks (the default is Info)
// individual tasks can then be more verbose using the previous setting
logLevel := Level.Warn,
// only store messages at info and above (the default is Debug)
// this is the logging level for replaying logging with 'last'
persistLogLevel := Level.Debug,
// only show 10 lines of stack traces
traceLevel := 10,
// only show stack traces up to the first sbt stack frame
traceLevel := 0,
// add SWT to the unmanaged classpath
unmanagedJars in Compile += Attributed.blank(file("/usr/share/java/swt.jar")),
// publish test jar, sources, and docs
publishArtifact in Test := true,
// disable publishing of main docs
publishArtifact in (Compile, packageDoc) := false,
// change the classifier for the docs artifact
artifactClassifier in packageDoc := Some("doc"),
// Copy all managed dependencies to <build-root>/lib_managed/
// This is essentially a project-local cache and is different
// from the lib_managed/ in sbt 0.7.x. There is only one
// lib_managed/ in the build root (not per-project).
retrieveManaged := true,
/* Specify a file containing credentials for publishing. The format is:
realm=Sonatype Nexus Repository Manager
host=nexus.scala-tools.org
user=admin
password=admin123
*/
credentials += Credentials(Path.userHome / ".ivy2" / ".credentials"),
// Directly specify credentials for publishing.
credentials += Credentials("Sonatype Nexus Repository Manager", "nexus.scala-tools.org", "admin", "admin123"),
// Exclude transitive dependencies, e.g., include log4j without including logging via jdmk, jmx, or jms.
libraryDependencies +=
"log4j" % "log4j" % "1.2.15" excludeAll(
ExclusionRule(organization = "com.sun.jdmk"),
ExclusionRule(organization = "com.sun.jmx"),
ExclusionRule(organization = "javax.jms")
)
)
.sbt build with .scala files example
.sbt builds can be supplemented with project/*.scala files.
When the build file gets large enough, the first thing to factor out are resolvers and dependencies.
project/Resolvers.scala
import sbt._
import Keys._
object Resolvers {
val sunrepo = "Sun Maven2 Repo" at "http://download.java.net/maven/2"
val sunrepoGF = "Sun GF Maven2 Repo" at "http://download.java.net/maven/glassfish"
val oraclerepo = "Oracle Maven2 Repo" at "http://download.oracle.com/maven"
val oracleResolvers = Seq(sunrepo, sunrepoGF, oraclerepo)
}
project/Dependencies.scala
import sbt._
import Keys._
object Dependencies {
val logbackVersion = "0.9.16"
val grizzlyVersion = "1.9.19"
val logbackcore = "ch.qos.logback" % "logback-core" % logbackVersion
val logbackclassic = "ch.qos.logback" % "logback-classic" % logbackVersion
val jacksonjson = "org.codehaus.jackson" % "jackson-core-lgpl" % "1.7.2"
val grizzlyframwork = "com.sun.grizzly" % "grizzly-framework" % grizzlyVersion
val grizzlyhttp = "com.sun.grizzly" % "grizzly-http" % grizzlyVersion
val grizzlyrcm = "com.sun.grizzly" % "grizzly-rcm" % grizzlyVersion
val grizzlyutils = "com.sun.grizzly" % "grizzly-utils" % grizzlyVersion
val grizzlyportunif = "com.sun.grizzly" % "grizzly-portunif" % grizzlyVersion
val sleepycat = "com.sleepycat" % "je" % "4.0.92"
val apachenet = "commons-net" % "commons-net" % "2.0"
val apachecodec = "commons-codec" % "commons-codec" % "1.4"
val scalatest = "org.scalatest" %% "scalatest" % "2.2.1"
}
These files can be used mange library dependencies in one place.
project/ShellPrompPlugin.scala
When you want to implement custom commands or tasks, you can organize your build by defining an one-off auto plugin.
import sbt._
import Keys._
// Shell prompt which show the current project and git branch
object ShellPromptPlugin extends AutoPlugin {
override def trigger = allRequirements
override lazy val projectSettings = Seq(
shellPrompt := buildShellPrompt
)
val devnull: ProcessLogger = new ProcessLogger {
def info (s: => String) {}
def error (s: => String) { }
def buffer[T] (f: => T): T = f
}
def currBranch =
("git status -sb" lines_! devnull headOption).
getOrElse("-").stripPrefix("## ")
val buildShellPrompt: State => String = {
case (state: State) =>
val currProject = Project.extract (state).currentProject.id
s"""$currProject:$currBranch> """
}
}
This auto plugin will display the current project name and the git branch.
build.sbt
Now that we factored out custom settings and dependencies out to project/*.scala, we can make use of them in build.sbt:
import Resolvers._
import Dependencies._
// factor out common settings into a sequence
lazy val buildSettings = Seq(
organization := "com.example",
version := "0.1.0",
scalaVersion := "2.11.7"
)
// Sub-project specific dependencies
lazy val commonDeps = Seq(
logbackcore,
logbackclassic,
jacksonjson,
scalatest % Test
)
lazy val serverDeps = Seq(
grizzlyframwork,
grizzlyhttp,
grizzlyrcm,
grizzlyutils,
grizzlyportunif,
sleepycat,
scalatest % Test
)
lazy val pricingDeps = Seq(
apachenet,
apachecodec,
scalatest % Test
)
lazy val cdap2 = (project in file(".")).
aggregate(common, server, compact, pricing, pricing_service).
settings(buildSettings: _*)
lazy val common = (project in file("cdap2-common")).
settings(buildSettings: _*).
settings(
libraryDependencies ++= commonDeps
)
lazy val server = (project in file("cdap2-server")).
dependsOn(common).
settings(buildSettings: _*).
settings(
resolvers := oracleResolvers,
libraryDependencies ++= serverDeps
)
lazy val pricing = (project in file("cdap2-pricing")).
dependsOn(common, compact, server).
settings(buildSettings: _*).
settings(
libraryDependencies ++= pricingDeps
)
lazy val pricing_service = (project in file("cdap2-pricing-service")).
dependsOn(pricing, server).
settings(buildSettings: _*)
lazy val compatct = (project in file("compact-hashmap")).
settings(buildSettings: _*)
Advanced configurations example
This is an example .sbt build definition that demonstrates using configurations to group dependencies.
The utils module provides utilities for other modules. It uses
configurations to group dependencies so that a dependent project doesn’t
have to pull in all dependencies if it only uses a subset of
functionality. This can be an alternative to having multiple utilities
modules (and consequently, multiple utilities jars).
In this example, consider a utils project that provides utilities
related to both Scalate and Saxon. It therefore needs both Scalate and
Saxon on the compilation classpath and a project that uses all of the
functionality of ‘utils’ will need these dependencies as well. However,
project a only needs the utilities related to Scalate, so it doesn’t
need Saxon. By depending only on the scalate configuration of utils,
it only gets the Scalate-related dependencies.
/********* Configurations *******/
// Custom configurations
lazy val Common = config("common") describedAs("Dependencies required in all configurations.")
lazy val Scalate = config("scalate") extend(Common) describedAs("Dependencies for using Scalate utilities.")
lazy val Saxon = config("saxon") extend(Common) describedAs("Dependencies for using Saxon utilities.")
// Define a customized compile configuration that includes
// dependencies defined in our other custom configurations
lazy val CustomCompile = config("compile") extend(Saxon, Common, Scalate)
/********** Projects ************/
// factor out common settings into a sequence
lazy val commonSettings = Seq(
organization := "com.example",
version := "0.1.0",
scalaVersion := "2.10.4"
)
// An example project that only uses the Scalate utilities.
lazy val a = (project in file("a")).
dependsOn(utils % "compile->scalate").
settings(commonSettings: _*)
// An example project that uses the Scalate and Saxon utilities.
// For the configurations defined here, this is equivalent to doing dependsOn(utils),
// but if there were more configurations, it would select only the Scalate and Saxon
// dependencies.
lazy val b = (project in file("b")).
dependsOn(utils % "compile->scalate,saxon").
settings(commonSettings: _*)
// Defines the utilities project
lazy val utils = (project in file("utils")).
settings(commonSettings: _*).
settings(inConfig(Common)(Defaults.configSettings): _*). // Add the src/common/scala/ compilation configuration.
settings(addArtifact(artifact in (Common, packageBin), packageBin in Common): _*). // Publish the common artifact
settings(
// We want our Common sources to have access to all of the dependencies on the classpaths
// for compile and test, but when depended on, it should only require dependencies in 'common'
classpathConfiguration in Common := CustomCompile,
// Modify the default Ivy configurations.
// 'overrideConfigs' ensures that Compile is replaced by CustomCompile
ivyConfigurations := overrideConfigs(Scalate, Saxon, Common, CustomCompile)(ivyConfigurations.value),
// Put all dependencies without an explicit configuration into Common (optional)
defaultConfiguration := Some(Common),
// Declare dependencies in the appropriate configurations
libraryDependencies ++= Seq(
"org.fusesource.scalate" % "scalate-core" % "1.5.0" % Scalate,
"org.squeryl" %% "squeryl" % "0.9.5-6" % Scalate,
"net.sf.saxon" % "saxon" % "8.7" % Saxon
)
)
Advanced command example
This is an advanced example showing some of the power of the new
settings system. It shows how to temporarily modify all declared
dependencies in the build, regardless of where they are defined. It
directly operates on the final Seq[Setting[_]] produced from every
setting involved in the build.
The modifications are applied by running canonicalize. A reload or using set reverts the modifications, requiring canonicalize to be run again.
This particular example shows how to transform all declared dependencies on ScalaCheck to use version 1.8. As an exercise, you might try transforming other dependencies, the repositories used, or the scalac options used. It is possible to add or remove settings as well.
This kind of transformation is possible directly on the settings of Project, but it would not include settings automatically added from plugins or build.sbt files. What this example shows is doing it unconditionally on all settings in all projects in all builds, including external builds.
import sbt._
import Keys._
object Canon extends Plugin {
// Registers the canonicalize command in every project
override def settings = Seq(commands += canonicalize)
// Define the command. This takes the existing settings (including any session settings)
// and applies 'f' to each Setting[_]
def canonicalize = Command.command("canonicalize") { (state: State) =>
val extracted = Project.extract(state)
import extracted._
val transformed = session.mergeSettings map ( s => f(s) )
val newStructure = Load.reapply(transformed, structure)
Project.setProject(session, newStructure, state)
}
// Transforms a Setting[_].
def f(s: Setting[_]): Setting[_] = s.key.key match {
// transform all settings that modify libraryDependencies
case Keys.libraryDependencies.key =>
// hey scalac. T == Seq[ModuleID]
s.asInstanceOf[Setting[Seq[ModuleID]]].mapInit(mapLibraryDependencies)
// preserve other settings
case _ => s
}
// This must be idempotent because it gets applied after every transformation.
// That is, if the user does:
// libraryDependencies += a
// libraryDependencies += b
// then this method will be called for Seq(a) and Seq(a,b)
def mapLibraryDependencies(key: ScopedKey[Seq[ModuleID]], value: Seq[ModuleID]): Seq[ModuleID] =
value map mapSingle
// This is the fundamental transformation.
// Here we map all declared ScalaCheck dependencies to be version 1.8
def mapSingle(module: ModuleID): ModuleID =
if(module.name == "scalacheck") module.copy(revision = "1.8")
else module
}
Frequently Asked Questions
Project Information
How do I get help?
- See Get Involved
How do I report a bug?
- See Get Involved
How can I help?
- See Get Involved
Usage
My last command didn’t work but I can’t see an explanation. Why?
sbt 0.13.11 by default suppresses most stack traces and debugging
information. It has the nice side effect of giving you less noise on
screen, but as a newcomer it can leave you lost for explanation. To see
the previous output of a command at a higher verbosity, type
last <task> where <task> is the task that failed or that you want to
view detailed output for. For example, if you find that your update
fails to load all the dependencies as you expect you can enter:
> last update
and it will display the full output from the last run of the update
command.
How do I disable ansi codes in the output?
Sometimes sbt doesn’t detect that ansi codes aren’t supported and you get output that looks like:
[0m[ [0minfo [0m] [0mSet current project to root
or ansi codes are supported but you want to disable colored output. To
completely disable ansi codes, set the sbt.log.format system property
to false. For example,
How can I start a Scala interpreter (REPL) with sbt project configuration (dependencies, etc.)?
You may run sbt console.
Build definitions
What are the :=, +=, and ++= methods?
These are methods on keys used to construct a Setting or a Task. The
Getting Started Guide covers all these methods, see
.sbt build definition and
more kinds of setting for
example.
What is the % method?
It’s used to create a ModuleID from strings, when specifying managed
dependencies. Read the Getting Started Guide about
library dependencies.
What is ModuleID, Project, …?
To figure out an unknown type or method, have a look at the Getting Started Guide if you have not. Also try the index of commonly used methods, values, and types, the API Documentation and the hyperlinked sources.
How do I add files to a jar package?
The files included in an artifact are configured by default by a task
mappings that is scoped by the relevant package task. The mappings
task returns a sequence Seq[(File,String)] of mappings from the file
to include to the path within the jar. See
mapping files for details on creating these mappings.
For example, to add generated sources to the packaged source artifact:
mappings in (Compile, packageSrc) ++= {
import Path.{flat, relativeTo}
val base = (sourceManaged in Compile).value
val srcs = (managedSources in Compile).value
srcs x (relativeTo(base) | flat)
}
This takes sources from the managedSources task and relativizes them
against the managedSource base directory, falling back to a flattened
mapping. If a source generation task doesn’t write the sources to the
managedSource directory, the mapping function would have to be
adjusted to try relativizing against additional directories or something
more appropriate for the generator.
How can I generate source code or resources?
See Generating Files.
How can a task avoid redoing work if the input files are unchanged?
There is basic support for only doing work when input files have changed or when the outputs haven’t been generated yet. This support is primitive and subject to change.
The relevant methods are two overloaded methods called FileFunction.cached. Each requires a directory in which to store cached data. Sample usage is:
// define a task that takes some inputs
// and generates files in an output directory
myTask := {
// wraps a function taskImpl in an uptodate check
// taskImpl takes the input files, the output directory,
// generates the output files and returns the set of generated files
val cachedFun = FileFunction.cached(cacheDirectory.value / "my-task") { (in: Set[File]) =>
taskImpl(in, target.value) : Set[File]
}
// Applies the cached function to the inputs files
cachedFun(inputs.value)
}
There are two additional arguments for the first parameter list that
allow the file tracking style to be explicitly specified. By default,
the input tracking style is FilesInfo.lastModified, based on a file’s
last modified time, and the output tracking style is FilesInfo.exists,
based only on whether the file exists. The other available style is
FilesInfo.hash, which tracks a file based on a hash of its contents.
See the FilesInfo API for details.
A more advanced version of FileFunction.cached passes a data structure
of type ChangeReport describing the
changes to input and output files since the last evaluation. This
version of cached also expects the set of files generated as output to
be the result of the evaluated function.
Extending sbt
How can I add a new configuration?
The following example demonstrates adding a new set of compilation
settings and tasks to a new configuration called samples. The sources
for this configuration go in src/samples/scala/. Unspecified settings
delegate to those defined for the compile configuration. For example,
if scalacOptions are not overridden for samples, the options for the
main sources are used.
Options specific to samples may be declared like:
scalacOptions in Samples += "-deprecation"
This uses the main options as base options because of +=. Use := to
ignore the main options:
scalacOptions in Samples := "-deprecation" :: Nil
The example adds all of the usual compilation related settings and tasks
to samples:
samples:run
samples:runMain
samples:compile
samples:console
samples:consoleQuick
samples:scalacOptions
samples:fullClasspath
samples:package
samples:packageSrc
...
How do I add a test configuration?
See the Additional test configurations section of Testing.
How can I create a custom run task, in addition to run?
This answer is extracted from a mailing list discussion.
Read the Getting Started Guide up to custom settings for background.
A basic run task is created by:
lazy val myRunTask = taskKey[Unit]("A custom run task.")
// this can go either in a `build.sbt` or the settings member
// of a Project in a full configuration
fullRunTask(myRunTask, Test, "foo.Foo", "arg1", "arg2")
If you want to be able to supply arguments on the command line, replace
TaskKey with InputKey and fullRunTask with fullRunInputTask. The
Test part can be replaced with another configuration, such as
Compile, to use that configuration’s classpath.
This run task can be configured individually by specifying the task key in the scope. For example:
fork in myRunTask := true
javaOptions in myRunTask += "-Xmx6144m"
How should I express a dependency on an outside tool such as proguard?
Tool dependencies are used to implement a task and are not needed by project source code. These dependencies can be declared in their own configuration and classpaths. These are the steps:
- Define a new configuration.
- Declare the tool dependencies in that configuration.
- Define a classpath that pulls the dependencies from the
Update Report produced by
update. - Use the classpath to implement the task.
As an example, consider a proguard task. This task needs the ProGuard
jars in order to run the tool. First, define and add the new
configuration:
val ProguardConfig = config("proguard") hide
ivyConfigurations += ProguardConfig
Then,
// Add proguard as a dependency in the custom configuration.
// This keeps it separate from project dependencies.
libraryDependencies +=
"net.sf.proguard" % "proguard" % "4.4" % ProguardConfig.name
// Extract the dependencies from the UpdateReport.
managedClasspath in proguard := {
// these are the types of artifacts to include
val artifactTypes: Set[String] = (classpathTypes in proguard).value
Classpaths.managedJars(proguardConfig, artifactTypes, update.value)
}
// Use the dependencies in a task, typically by putting them
// in a ClassLoader and reflectively calling an appropriate
// method.
proguard := {
val cp: Seq[File] = (managedClasspath in proguard).value
// ... do something with , which includes proguard ...
}
Defining the intermediate classpath is optional, but it can be useful
for debugging or if it needs to be used by multiple tasks. It is also
possible to specify artifact types inline. This alternative proguard
task would look like:
proguard := {
val artifactTypes = Set("jar")
val cp: Seq[File] =
Classpaths.managedJars(proguardConfig, artifactTypes, update.value)
// ... do something with , which includes proguard ...
}
How would I change sbt’s classpath dynamically?
It is possible to register additional jars that will be placed on sbt’s
classpath (since version 0.10.1). Through
State, it is possible to obtain a
xsbti.ComponentProvider, which
manages application components. Components are groups of files in the
~/.sbt/boot/ directory and, in this case, the application is sbt. In
addition to the base classpath, components in the “extra” component are
included on sbt’s classpath.
(Note: the additional components on an application’s classpath are
declared by the components property in the [main] section of the
launcher configuration file boot.properties.)
Because these components are added to the ~/.sbt/boot/ directory and
~/.sbt/boot/ may be read-only, this can fail. In this case, the user
has generally intentionally set sbt up this way, so error recovery is
not typically necessary (just a short error message explaining the
situation.)
Example of dynamic classpath augmentation
The following code can be used where a State => State is required,
such as in the onLoad setting (described below) or in a
command. It adds some files to the “extra”
component and reloads sbt if they were not already added. Note that
reloading will drop the user’s session state.
def augment(extra: Seq[File])(s: State): State = {
// Get the component provider
val cs: xsbti.ComponentProvider = s.configuration.provider.components()
// Adds the files in 'extra' to the "extra" component
// under an exclusive machine-wide lock.
// The returned value is 'true' if files were actually copied and 'false'
// if the target files already exists (based on name only).
val copied: Boolean = s.locked(cs.lockFile, cs.addToComponent("extra", extra.toArray))
// If files were copied, reload so that we use the new classpath.
if(copied) s.reload else s
}
How can I take action when the project is loaded or unloaded?
The single, global setting onLoad is of type State => State (see
State and Actions) and is executed once, after all projects are
built and loaded. There is a similar hook onUnload for when a project
is unloaded. Project unloading typically occurs as a result of a
reload command or a set command. Because the onLoad and onUnload
hooks are global, modifying this setting typically involves composing a
new function with the previous value. The following example shows the
basic structure of defining onLoad:
// Compose our new function 'f' with the existing transformation.
{
val f: State => State = ...
onLoad in Global := {
val previous = (onLoad in Global).value
f compose previous
}
}
Example of project load/unload hooks
The following example maintains a count of the number of times a project has been loaded and prints that number:
{
// the key for the current count
val key = AttributeKey[Int]("loadCount")
// the State transformer
val f = (s: State) => {
val previous = s get key getOrElse 0
println("Project load count: " + previous)
s.put(key, previous + 1)
}
onLoad in Global := {
val previous = (onLoad in Global).value
f compose previous
}
}
Errors
On project load, “Reference to uninitialized setting“
Setting initializers are executed in order. If the initialization of a setting depends on other settings that has not been initialized, sbt will stop loading.
In this example, we try to append a library to libraryDependencies
before it is initialized with an empty sequence.
object MyBuild extends Build {
val root = Project(id = "root", base = file("."),
settings = Seq(
libraryDependencies += "commons-io" % "commons-io" % "1.4" % "test"
)
).disablePlugins(plugins.IvyModule)
}
To correct this, include the IvyModule plugin settings, which includes
libraryDependencies := Seq(). So, we just drop the explicit disabling.
object MyBuild extends Build {
val root = Project(id = "root", base = file("."),
settings = Seq(
libraryDependencies += "commons-io" % "commons-io" % "1.4" % "test"
)
)
}
A more subtle variation of this error occurs when using scoped settings.
// error: Reference to uninitialized setting
settings = Seq(
libraryDependencies += "commons-io" % "commons-io" % "1.2" % "test",
fullClasspath := fullClasspath.value.filterNot(_.data.name.contains("commons-io"))
)
This setting varies between the test and compile scopes. The solution is use the scoped setting, both as the input to the initializer, and the setting that we update.
fullClasspath in Compile := (fullClasspath in Compile).value.filterNot(_.data.name.contains("commons-io"))
Dependency Management
How do I resolve a checksum error?
This error occurs when the published checksum, such as a sha1 or md5 hash, differs from the checksum computed for a downloaded artifact, such as a jar or pom.xml. An example of such an error is:
[warn] problem while downloading module descriptor:
https://repo1.maven.org/maven2/commons-fileupload/commons-fileupload/1.2.2/commons-fileupload-1.2.2.pom:
invalid sha1: expected=ad3fda4adc95eb0d061341228cc94845ddb9a6fe computed=0ce5d4a03b07c8b00ab60252e5cacdc708a4e6d8 (1070ms)
The invalid checksum should generally be reported to the repository owner (as was done for the above error). In the meantime, you can temporarily disable checking with the following setting:
checksums in update := Nil
See library management for details.
I’ve added a plugin, and now my cross-compilations fail!
This problem crops up frequently. Plugins are only published for the Scala version that sbt uses (currently, 2.9.1). You can still use plugins during cross-compilation, because sbt only looks for a 2.9.1 version of the plugin.
… unless you specify the plugin in the wrong place!
A typical mistake is to put global plugin definitions in
~/.sbt/plugins.sbt. THIS IS WRONG. .sbt files in ~/.sbt are
loaded for each build—that is, for each cross-compilation. So, if
you build for Scala 2.9.0, sbt will try to find a version of the plugin
that’s compiled for 2.9.0—and it usually won’t. That’s because it
doesn’t know the dependency is a plugin.
To tell sbt that the dependency is an sbt plugin, make sure you define
your global plugins in a .sbt file in ~/.sbt/plugins/. sbt knows
that files in ~/.sbt/plugins are only to be used by sbt itself, not as
part of the general build definition. If you define your plugins in a
file under that directory, they won’t foul up your cross-compilations.
Any file name ending in .sbt will do, but most people use
~/.sbt/plugins/build.sbt or ~/.sbt/plugins/plugins.sbt.
Miscellaneous
How do I use the Scala interpreter in my code?
sbt runs tests in the same JVM as sbt itself and Scala classes are not in the same class loader as the application classes. Therefore, when using the Scala interpreter, it is important to set it up properly to avoid an error message like:
Failed to initialize compiler: class scala.runtime.VolatileBooleanRef not found.
** Note that as of 2.8 scala does not assume use of the java classpath.
** For the old behavior pass -usejavacp to scala, or if using a Settings
** object programmatically, settings.usejavacp.value = true.
The key is to initialize the Settings for the interpreter using embeddedDefaults. For example:
val settings = new Settings
settings.embeddedDefaults[MyType]
val interpreter = new Interpreter(settings, ...)
Here, MyType is a representative class that should be included on the interpreter’s classpath and in its application class loader. For more background, see the original proposal that resulted in embeddedDefaults being added.
Similarly, use a representative class as the type argument when using the break and breakIf methods of ILoop, as in the following example:
def x(a: Int, b: Int) = {
import scala.tools.nsc.interpreter.ILoop
ILoop.breakIf[MyType](a != b, "a" -> a, "b" -> b )
}
0.7 to 0.10+ Migration
How do I migrate from 0.7 to 0.10+?
See the migration page first and then the following questions.
Where has 0.7’s lib_managed gone?
By default, sbt 0.13.11 loads managed libraries from your ivy cache
without copying them to a lib_managed directory. This fixes some bugs
with the previous solution and keeps your project directory small. If
you want to insulate your builds from the ivy cache being cleared, set
retrieveManaged := true and the dependencies will be copied to
lib_managed as a build-local cache (while avoiding the issues of
lib_managed in 0.7.x).
This does mean that existing solutions for sharing libraries with your favoured IDE may not work. Refer to Community Plugins page for a list of currently available plugins for your IDE.
What are the commands I can use in 0.13.11 vs. 0.7?
For a list of commands, run help. For details on a specific command,
run help <command>. To view a list of tasks defined on the current
project, run tasks. Alternatively, see the
Running page in the Getting Started Guide
for descriptions of common commands and tasks.
If in doubt start by just trying the old command as it may just work. The built in TAB completion will also assist you, so you can just press TAB at the beginning of a line and see what you get.
The following commands work pretty much as in 0.7 out of the box:
reload
update
compile
test
testOnly
publishLocal
exit
Why have the resolved dependencies in a multi-module project changed since 0.7?
sbt 0.10 fixes a flaw in how dependencies get resolved in multi-module projects. This change ensures that only one version of a library appears on a classpath.
Use last update to view the debugging output for the last update
run. Use show update to view a summary of files comprising managed
classpaths.
My tests all run really fast but some are broken that weren’t in 0.7!
Be aware that compilation and tests run in parallel by default in sbt
0.13.11. If your test code isn’t thread-safe then you may want to
change this behaviour by adding one of the following to your
build.sbt:
// Execute tests in the current project serially.
// Tests from other projects may still run concurrently.
parallelExecution in Test := false
// Execute everything serially (including compilation and tests)
parallelExecution := false
What happened to the web development and Web Start support since 0.7?
Web application support was split out into a plugin. See the xsbt-web-plugin project.
For an early version of an xsbt Web Start plugin, visit the xsbt-webstart project.
How are inter-project dependencies different in 0.13.11 vs. 0.7?
In 0.13.11, there are three types of project dependencies (classpath, execution, and configuration) and they are independently defined. These were combined in a single dependency type in 0.7.x. A declaration like:
lazy val a = project("a", "A")
lazy val b = project("b", "B", a)
meant that the B project had a classpath and execution dependency on
A and A had a configuration dependency on B. Specifically, in
0.7.x:
- Classpath: Classpaths for
Awere available on the appropriate classpath for B. - Execution: A task executed on
Bwould be executed onAfirst. - Configuration: For some settings, if they were not overridden in A, they would default to the value provided in B.
In 0.13.11, declare the specific type of dependency you want. Read about multi-project builds in the Getting Started Guide for details.
Where did class/object X go since 0.7?
| 0.7 | 0.13.11 |
|---|---|
| FileUtilities | IO |
| Path class and object | Path object, File, RichFile |
| PathFinder class | Seq[File], PathFinder class, PathFinder object |
Where can I find plugins for 0.13.11?
See Community Plugins for a list of currently available plugins.
Index
This is an index of common methods, types, and values you might find in an sbt build definition. For command names, see Running. For available plugins, see the plugins list.
Values and Types
Dependency Management
- ModuleID is the type of a dependency definition. See Library Management.
- Artifact represents a single artifact (such as a jar or a pom) to be built and published. See Library Management and Artifacts.
- A Resolver can resolve and retrieve dependencies. Many types of Resolvers can publish dependencies as well. A repository is a closely linked idea that typically refers to the actual location of the dependencies. However, sbt is not very consistent with this terminology and repository and resolver are occasionally used interchangeably.
- A [ModuleConfiguration] defines a specific resolver to use for a group of dependencies.
- A Configuration is a useful Ivy construct for grouping dependencies. See ivy-configurations. It is also used for scoping settings.
Compile,Test,Runtime,Provided, andOptionalare predefined configurations.
Settings and Tasks
- A Setting describes how to initialize a specific setting in the build. It can use the values of other settings or the previous value of the setting being initialized.
- A SettingsDefinition is the actual type of an expression in a build.sbt. This allows either a single Setting or a sequence of settings (SettingList) to be defined at once. The types in a .scala build definition always use just a plain Setting.
- Initialize describes how to initialize a setting using other settings, but isn’t bound to a particular setting yet. Combined with an initialization method and a setting to initialize, it produces a full Setting.
- TaskKey, SettingKey, and InputKey are keys that represent a task or setting. These are not the actual tasks, but keys that are used to refer to them. They can be scoped to produce ScopedTask, ScopedSetting, and ScopedInput. These form the base types that provide the Settings methods.
- InputTask parses and tab completes user input, producing a task to run.
- Task is the type of a task. A task is an action that runs on demand. This is in contrast to a setting, which is run once at project initialization.
Process
- A ProcessBuilder is the type used to define a process. It provides combinators for building up processes from smaller processes.
- A Process represents the actual forked process.
- The Process companion object provides methods for constructing primitive processes.
Build Structure
- Build is the trait implemented for a .scala build definition, which defines project relationships and settings.
- Plugin is the trait implemented for sbt plugins.
- Project is both a trait and a companion object that declares a single module in a build. See .scala build definition.
- Keys is an object that provides all of the built-in keys for settings and tasks.
- State contains the full state for a build. It is mainly used by Commands and sometimes Input Tasks. See also State and Actions.
Methods
Settings and Tasks
See the Getting Started Guide for details.
:=,+=,++=These construct a Setting, which is the fundamental type in the settings system.valueThis uses the value of another setting or task in the definition of a new setting or task. This method is special (it is a macro) and cannot be used except in the argument of one of the setting definition methods above (:=, …) or in the standalone construction methods Def.setting and Def.task. See more about settings for details.inspecifies the Scope or part of the Scope of a setting being referenced. See scopes.
File and IO
See RichFile, PathFinder, and Paths for the full documentation.
/When called on a single File, this isnew File(x,y). For Seq[File], this is applied for each member of the sequence..*and**are methods for selecting children (*) or descendants (**) of a File or Seq[File] that match a filter.|,||,&&,&,-, and--are methods for combining filters, which are often used for selecting Files. See NameFilter and FileFilter. Note that methods with these names also exist for other types, such as collections (like Seq) and Parser (see Parsing Input).pairUsed to construct mappings from aFileto anotherFileor to a String. See Mapping Files.getforces a PathFinder (a call-by-name data structure) to a strictSeq[File]representation. This is a common name in Scala, used by types like Option.
Dependency Management
See Library Management for full documentation.
%This is used to build up a ModuleID.%%This is similar to%except that it identifies a dependency that has been cross built.fromUsed to specify the fallback URL for a dependencyclassifierUsed to specify the classifier for a dependency.atUsed to define a Maven-style resolver.intransitiveMarks a dependency or Configuration as being intransitive.hideMarks a Configuration as internal and not to be included in the published metadata.
Parsing
These methods are used to build up Parsers from smaller Parsers. They closely follow the names of the standard library’s parser combinators. See Parsing Input for the full documentation. These are used for Input Tasks and Commands.
~,~>,<~Sequencing methods.??,?Methods for making a Parser optional.?is postfix.idUsed for turning a Char or String literal into a Parser. It is generally used to trigger an implicit conversion to a Parser.|,||Choice methods. These are common method names in Scala.^^^Produces a constant value when a Parser matches.+,*Postfix repetition methods. These are common method names in Scala.map,flatMapTransforms the result of a Parser. These are common method names in Scala.filterRestricts the inputs that a Parser matches on. This is a common method name in Scala.-Prefix negation. Only matches the input when the original parser doesn’t match the input.examples,tokenTab completion!!!Provides an error message to use when the original parser doesn’t match the input.
Processes
These methods are used to
fork external processes. Note that this API
has been included in the Scala standard library for version 2.9.
ProcessBuilder is the builder type
and Process is the type representing the
actual forked process. The methods to combine processes start with #
so that they share the same precedence.
run,!,!!,!<,lines,lines_!are different ways to start a process once it has been defined. The lines variants produce a Stream[String] to obtain the output lines.#<,#<<,#>are used to get input for a process from a source or send the output of a process to a sink.#|is used to pipe output from one process into the input of another.#||,#&&,###sequence processes in different ways.
Developer’s Guide (Work in progress)
This is the set of documentation about the future architecture of sbt. The target audience of this document is the sbt plugin authors and sbt developers. See also How can I help?
Towards sbt 1.0
On 2008-12-18, Mark Harrah announced sbt 0.3.2 as the initial release of sbt. Mark remained the primary author of sbt until sbt 0.13.1 (2013-12-11). In 2014, sbt project was handed over to the authors of this document Josh Suereth and Eugene Yokota.
As we move towards sbt 1.0, we wish to stablize what’s already stable and innovate where it matters. There are several levels of stability:
- conceptual stability
- source compatibility of the build defnition
- binary compatibility of the plugins
Concepts
Concepturally, sbt has been stable on what it does:
- incremental compilation that supports Scala
- dependency management that’s aware of Scala’s binary compatibility
- task and plugins system that’s extensible using Scala
- a text-based interactive shell
The only thing that we plan to change is the last point. In sbt 1.0, we will replace the interactive shell with sbt server that’s accessible via JSON API and a text-based client.
Source compatibility of the build deinition
Source compatibility means that a build source that worked for sbt version A works for another version B without modification. Our goal for sbt 1.0 is to adopt Semantic Versioning, and maintain source compatibility of the build during 1.x.y.
Binary compatibility of the plugins
Binary compatibility (“bincompat”) of the plugins means that a plugin that was published for sbt version A works for another version B without recompilaition. sbt 0.13 has kept binary compatibility for 18 months as of March 2015. The stability here helps maintaining sbt plug ecosystem. Our goal for sbt 1.0 is to adopt Semantic Versioning, and maintain binary compatibility of the build during 1.x.y.
From the development perspective, maintaining binary compatibility becomes an additional constraint that we need to worry about whenever we make changes. The of the problem is that sbt 0.13 does not distinguish between public API and internal impelmentation. Most things are open to plugins.
Modularization
The process we aim to take for sbt 1.0 is to disassemble sbt into smaller modules and layers. To be clear sbt 0.13’s codebase already does consists of numerous subprojects.
Layers are more course-grained sets of subproject(s) that can be used independently. Another purpose of the modularization is to distinguish between public API and internal implementation. Reducing the surface area of the sbt code base have several benefits:
- It makes it easier for the build users and the plugin authors to learn the APIs.
- It makes it easier for us to maintain binary and semantic compatibilities.
- It encourages the reuse of the modules.
The following is a conceptual diagram of the layers:
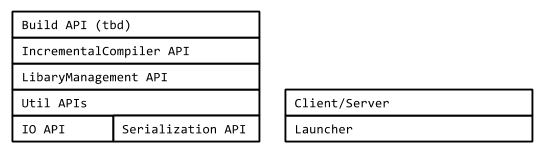
We’ll discuss the details in the next page.
Module summary
The following is a conceptual diagram of the modular layers:
This diagram is arranged such that each layer depends only on the layers underneath it.
IO API (sbt/io)
IO API is a low level API to deal with files and directories.
Serialization API (sbt/serialization)
Serialization API is an opinionated wrapper around Scala Pickling. The responsibility of the serialization API is to turn values into JSON.
Util APIs (sbt/util)
Util APIs provide commonly used features like logging and internal datatypes used by sbt.
LibraryManagement API (sbt/librarymanagement)
sbt’s library management system is based on Apache Ivy, and as such the concepts and terminology around library management system is also influenced by Ivy. The responsibility of the library management API is to calcuate the transitive dependency graph, and download artifacts from the given repositories.
IncrementalCompiler API (sbt/incrementalcompiler)
Incremental compiler of Scala is so fundamental, that we now seldom think of it as a feature of sbt. There are number of subprojects/classes involved that are actually internal details that we should use this opportunity to hide.
Build API (tbd)
This is the part that’s exposed to build.sbt.
The responsibility of the module is to load the build files and plugins,
and provide a way for commands to be executed on the state.
This might remain at sbt/sbt.
sbt Launcher (sbt/launcher)
The sbt launcher provides a generic container that can load and run programs resolved using the Ivy dependency manager. sbt uses this as the deployment mechanism, but it can be used for other purposes.
See n8han/conscript and Launcher for more details.
Client/Server (tbd)
Currently developed in sbt/sbt-remote-control. sbt Server provides a JSON-based API wrapping functionality of the commandline experience.
One of the clients will be the “terminal client”, which subsumes the commandline sbt shell. Other clients that are planned are integration with the IDEs.
Website (sbt/website)
This website’s source.
sbt Coding Guideline
This page discusses the coding style and other guidelines for sbt 1.0.
General goal
sbt 1.0 will primarily target Scala 2.11. We will cross build against Scala 2.10.
Clean up old deprecation
Before 1.0 is release, we should clean up deprecations.
Aim for zero warnings (except deprecation)
On Scala 2.11 we should aim for zero warnings. One exception may be deprecation if it’s required for 2.10 cross building.
Modular design
Aim small
The fewer methods we can expose to the build user, the easier it becomes to maintain it.
Public APIs should be coded against “interfaces“
Code against interface.
Hide implementation details
The implementation details should be hidden behind sbt.internal.x package,
where x could be the name of the main package (like io).
Depend less
Making independent modules with fewer dependent libraries make it easier to reuse them.
Hide external classes
Avoid exposing external classes out to API, except for standard Scala and Java classes.
Hide internal modules
A module may be declared internal if there’s no use for public.
Compiler flags
-encoding utf8
-deprecation
-feature
-unchecked
-Xlint
-language:higherKinds
-language:implicitConversions
-Xfuture
-Yinline-warnings
-Yno-adapted-args
-Ywarn-dead-code
-Ywarn-numeric-widen
-Ywarn-value-discard
-Xfatal-warnings
The -Xfatal-warnings may be removed if there are unavoidable warnings.
Package name and organization name
Use the package name appended with the layer name, such as sbt.io for IO layer.
The organization name for the publish artifacts should remain org.scala-sbt.
Binary resiliency
A good overview on the topic of binary resiliency is Josh's 2012 talk Binary resiliency. The guideline here applies mostly to publicly exposed APIs.
MiMa
Use MiMa.
Public traits should contain def declarations only
valorvarintraitresults to codegen at subclass and at the artificialFoo$class.$init$.lazy valresults to codegen at subclass
Abstract classes are also useful
To trait, or not to trait?. It is less flexible compared to trait, but easier to maintain binary compatibility. It also has better Java interop.
Seal the traits and abstract classes
If there’s no need to keep the classes open, seal it.
Finalize the leaf classes
If there’s no need to keep the classes open, finalize it.
Typeclass and subclass inheritance
Typeclass pattern with pure trait might be easier to maintain binary compatibility than subclassing.
Avoid case classes, use sbt-datatype
case class involves various codegen, which makes it harder to maintain binary compatibility over time.
Prefer method overloading over default parameter values
The default parameter values are effectively codegen, which makes it difficult to maintain.
Other public API matter
Here are other guidelines about public API.
Avoid Stringly-typed programming
Define datatypes.
Avoid overuse of def apply
def apply should be reserved for factory methods
in a companion object that returns type T.
Use specific datatype (Vector, List, or Array) rather than Seq.
scala.Seq is scala.collection.Seq, which is not immutable.
Default to Vector. Use List if constant prepending is needed.
Use Array if Java interop is needed.
Note using mutable collection is perfectly fine within the implementation.
Avoid calling toSeq or anything side-effecty on Set
Set is fine if you stick with set operations, like contains and subsetOf.
More often than not, toSeq is called explicitly or implicitly,
or some side effecting method is called from map.
This introduces non-determinism to the code.
Avoid calling toSeq on Map
Same as above. That will introduce non-determinism.
Avoid functions and tuples in the signature, if Java interop is needed
Instead of functions and tuples, turn them into a trait. This is if Java interop is a concern, like implementing incremental compiler.
Style matter
Use scalariform
sbt-houserules comes with scalariform.
Avoid procedure syntax
Return Unit.
Typeclass instances are encouraged to be defined in the companions
final class FooID {}
object FooID {
implicit val fooIdPicklerUnpicker: PicklerUnpickler[FooID] = ???
}
Implicit converter for syntax (enrich-my-library) should be imported
Avoid defining implicit converters in companion objects and package objects.
Suppose IO module introduces URL enrichment called RichURI;
and LibraryManagement introduces String enrichment called GroupID (for ModuleID syntax).
These implicit converters should be defined in an object named syntax in respective packge:
package sbt.io
object syntax {
implicit def uriToRichURI(uri: URI): RichURI = new RichURI(uri)
}
When all the layers are available, sbt package should also define an object called syntax,
which forwards all the implicit converters from all the layers:
package sbt
object syntax {
implicit def uriToRichURI(uri: URI): io.RichURI = io.syntax.uriToRichURI(uri)
....
}
Datatype
sbt-datatype is a code generation library and an sbt autoplugin that generates growable datatypes and helps developers avoid breakage of binary compatibility.
Unlike standard Scala case classes, the datatypes generated by this library
allow the developer to add new fields to the defined datatypes without breaking
binary compatibility while offering (almost) the same functionalities as plain
case classes. The only difference is that datatype doesn’t generate unapply
methods, because they would break binary compatibility.
Our plugin takes as input a datatype definition in the form of a JSON object,
whose format is based on the format defined by
Apache Avro, and generates the corresponding code in
Java or Scala along with the boilerplate code that will allow the generated
classes to remain binary compatible with previous versions of the datatype.
The source code of the library and autoplugin can be found on GitHub.
Using the plugin
To enable the plugin for your build, put the following line in
project/datatype.sbt:
addSbtPlugin("org.scala-sbt" % "sbt-datatype" % "0.0.3")
Your datatype definitions should be placed by default in src/main/datatype
and src/test/datatype. This location can be changed by setting a new location
in your build definition:
datatypeSource in generateDatatypes := file("some/location")
The plugin exposes two other settings for Scala code generation:
datatypeScalaFileNames in generateDatatypesThis setting accepts a functionDefinition => Filewhich will determine the filename for every generated Scala definition.datatypeScalaSealProtocols in generateDatatypesThis setting accepts a boolean value, and will determine whether protocols should besealed or not.
Types generated
datatype is able to generate three kinds of types:
- Protocols
- Records
- Enumerations
Protocols
Protocols are mapped to Java abstract classes or Scala
sealed abstract classes. They can be extended by other protocols or records.
Example:
{
"types": [
{
"name": "Person",
"type": "protocol",
"target": "Java",
"fields": [
{
"name": "name",
"type": "String"
},
{
"name": "age",
"type": "int"
}
]
}
]
}
This definition will generate the following Java class:
public abstract class Person implements java.io.Serializable {
private String name;
private int age;
public Person(String _name, int _age) {
super();
name = _name;
age = _age;
}
public String name() {
return this.name;
}
public int age() {
return this.age;
}
public boolean equals(Object obj) {
if (this == obj) {
return true;
} else if (!(obj instanceof Person)) {
return false;
} else {
Person o = (Person)obj;
return name().equals(o.name()) && (age() == o.age());
}
}
public int hashCode() {
return 37 * (37 * (17 + name().hashCode()) + (new Integer(age())).hashCode());
}
public String toString() {
return "Person(" + "name: " + name() + ", " + "age: " + age() + ")";
}
}
Or the following Scala class (after changing the target property):
abstract class Person(
val name: String,
val age: Int) extends Serializable {
override def equals(o: Any): Boolean = o match {
case x: Person => (this.name == x.name) && (this.age == x.age)
case _ => false
}
override def hashCode: Int = {
37 * (37 * (17 + name.##) + age.##)
}
override def toString: String = {
"Person(" + name + ", " + age + ")"
}
}
Records
Records are mapped to Java or Scala classes.
Example:
{
"types": [
{
"name": "Person",
"type": "record",
"target": "Java"
"fields": [
{
"name": "name",
"type": "String"
},
{
"name": "age",
"type": "int"
}
]
}
]
}
This schema will produce the following Java class:
public final class Person implements java.io.Serializable {
private String name;
private int age;
public Person(String _name, int _age) {
super();
name = _name;
age = _age;
}
public String name() {
return this.name;
}
public int age() {
return this.age;
}
public boolean equals(Object obj) {
if (this == obj) {
return true;
} else if (!(obj instanceof Person)) {
return false;
} else {
Person o = (Person)obj;
return name().equals(o.name()) && (age() == o.age());
}
}
public int hashCode() {
return 37 * (37 * (17 + name().hashCode()) + (new Integer(age())).hashCode());
}
public String toString() {
return "Person(" + "name: " + name() + ", " + "age: " + age() + ")";
}
}
Or the following Scala code (after changing the target property):
final class Person(
val name: String,
val age: Int) extends Serializable {
override def equals(o: Any): Boolean = o match {
case x: Person => (this.name == x.name) && (this.age == x.age)
case _ => false
}
override def hashCode: Int = {
37 * (37 * (17 + name.##) + age.##)
}
override def toString: String = {
"Person(" + name + ", " + age + ")"
}
private[this] def copy(name: String = name, age: Int = age): Person = {
new Person(name, age)
}
def withName(name: String): Person = {
copy(name = name)
}
def withAge(age: Int): Person = {
copy(age = age)
}
}
object Person {
def apply(name: String, age: Int): Person = new Person(name, age)
}
Enumerations
Enumerations are mapped to Java enumerations or Scala case objects.
Example:
{
"types": [
{
"name": "Weekdays",
"type": "enumeration",
"target": "Java",
"types": [
"Monday", "Tuesday", "Wednesday", "Thursday",
"Friday", "Saturday", "Sunday"
]
}
]
}
This schema will generate the following Java code:
public enum Weekdays {
Monday,
Tuesday,
Wednesday,
Thursday,
Friday,
Saturday,
Sunday
}
Or the following Scala code (after changing the target property to):
sealed abstract class Weekdays extends Serializable
object Weekdays {
case object Monday extends Weekdays
case object Tuesday extends Weekdays
case object Wednesday extends Weekdays
case object Thursday extends Weekdays
case object Friday extends Weekdays
case object Saturday extends Weekdays
case object Sunday extends Weekdays
}
Existing parameters for protocols, records, etc.
All the elements of the schema definition accept a number of parameters that will influence the generated code. These parameters are not available for every node of the schema. Please refer to the syntax summary to see whether a parameters can be defined for a node.
name
This parameter defines the name of a field, record, field, etc.
target
This parameter determines whether the code will be generated in Java or Scala.
namespace
This parameter exists only for Definitions. It determines the package in
which the code will be generated.
doc
The Javadoc that will accompany the generated element.
fields
For a protocol or a record only, it describes all the fields that compose
the generated entity.
types
For a protocol, it defines the child protocols and records that extend
it.
For an enumeration, it defines the values of the enumeration.
since
This parameter exists for fields only. It indicates the version in which the
field has been added to its parent protocol or record.
When this parameter is defined, default must also be defined.
default
This parameter exists for fields only. It indicates what the default value
should be for this field, in case it is used by a class that has been compiled
against an ealier version of this datatype.
It must contain an expression which is valid in the target language of the
parent protocol or record.
type for fields
It indicates what is the underlying type of the field.
Always use the type that you want to see in Scala. For instance, if your field
will contain an integer value, use Int rather than Java’s int. datatype
will automatically use Java’s primitive types if they are available.
For non-primitive types, it is recommended to write the fully qualified type.
type for other definitions
It simply indicates the kind of entity that you want to generate: protocol,
record or enumeration.
Using datatype to retain binary compatibility
By using the since and default parameters, it is possible to grow existing
datatypes while remaining binary compatible with classes that have been
compiled against an earlier version of your datatype definition.
Consider the following initial version of a datatype:
{
"types": [
{
"name": "Greeting",
"type": "record",
"target": "Scala",
"fields": [
{
"name": "message",
"type": "String"
}
]
}
]
}
The generated code could be used in a Scala program using the following code:
val greeting = Greeting("hello")
Imagine now that you would like to extend your datatype to include a date to
the Greetings. The datatype can be modified accordingly:
{
"types": [
{
"name": "Greeting",
"type": "record",
"target": "Scala",
"fields": [
{
"name": "message",
"type": "String"
},
{
"name": "date",
"type": "java.util.Date"
}
]
}
]
}
Unfortunately, the code that used Greeting would no longer compile, and
classes that have been compiled against the previous version of the datatype
would crash with a NoSuchMethodError.
To circumvent this problem and allow you to grow your datatypes, it is possible
to indicate the version since the field exists and a default value in the
datatype definition:
{
"types": [
{
"name": "Greeting",
"type": "record",
"target": "Scala",
"fields": [
{
"name": "message",
"type": "String"
},
{
"name": "date",
"type": "java.util.Date",
"since": "0.2.0",
"default": "new java.util.Date()"
}
]
}
]
}
Now the code that was compiled against previous definitions of the datatype will still run.
Syntax summary
Schema := { "types": [ Definition* ] }
Definition := Protocol | Record | Enumeration
Protocol := { "name": ID,
"type": "protocol",
"target": ("Scala" | "Java")
(, "namespace": string constant)?
(, "doc": string constant)?
(, "fields": [ Field* ])?
(, "types": [ Definition* ])? }
Record := { "name": ID,
"type": "record",
"target": ("Scala" | "Java")
(, "namespace": string constant)?
(, "doc": string constant)?
(, "fields": [ Field* ])? }
Enumeration := { "name": ID,
"type": "enumeration",
"target": ("Scala" | "Java")
(, "namespace": string constant)?
(, "doc": string constant)?
(, "types": [ EnumerationValue* ])? }
EnumerationValue := ID
| { "name": ID
(, "doc": string constant)? }
Field := { "name": ID,
"type": ID
(, "doc": string constant)?
(, "since": version number string)?
(, "default": string constant)? }
Compiler Interface
The compiler interface is the communication link between sbt and the Scala compiler.
It is used to get information from the Scala compiler, and must therefore be compiled against the Scala version in used for the configured projects.
The code for this project can be found in the folder compile/interface.
Fetching the most specific sources
Because the compiler interface is recompiled against each Scala version in use in your project, its source must stay compatible with all the Scala versions that sbt supports (from Scala 2.8 to the latest version of Scala).
This comes at great cost for both the the sbt maintainers and the Scala compiler authors:
- The compiler authors cannot remove old and deprecated public APIs from the Scala compiler.
- sbt cannot use new APIs defined in the Scala compiler.
- sbt must implement all kinds of hackery to remain source compatible all versions of the Scala compiler and support new features.
To circumvent this problem, a new mechanism that allows sbt to fetch the version of the sources for the compiler interface that are the most specific for the Scala version in use has been implemented in sbt.
For instance, for a project that is compiled using Scala 2.11.8-M2, sbt will look for the following version of the sources for the compiler interface, in this order:
- 2.11.8-M2
- 2.11.8
- 2.11
- The default sources.
This new mechanism allows both the Scala compiler and sbt to move forward and enjoy new APIs while being certain than users of older versions of Scala will still be able to use sbt.
Finally, another advantage of this technique is that it relies on Ivy to retrieve the sources of the compiler bridge, but can be easily ported for use with Maven, which is the distribution mechanism that the sbt maintainers would like to use to distribute sbt’s modules.
sbt Launcher
The sbt launcher provides a generic container that can load and run programs resolved using the Ivy dependency manager. Sbt uses this as its own deployment mechanism.
The code is hosted at sbt/launcher.
Getting Started with the sbt launcher
The sbt launcher provides two parts:
- An interface for launched applications to interact with the launcher code
- A minimal sbt-launch.jar that can launch application by resolving them through ivy.
The sbt launcher component is a self-contained jar that boots a Scala application or server without Scala or the application already existing on the system. The only prerequisites are the launcher jar itself, an optional configuration file, and a java runtime version 1.6 or greater.
Overview
A user downloads the launcher jar and creates a script to run it. In
this documentation, the script will be assumed to be called launch.
For unix, the script would look like: java -jar sbt-launcher.jar "$@"
The user can now launch servers and applications which provide sbt launcher configuration.
Alternatively, you can repackage the launcher with a launcher configuration file. The sbt/sbt for example pulls in the raw JAR and injects the appropriate boot.properties files for sbt.
Applications
To launch an application, the user then downloads the configuration file
for the application (call it my.app.configuration) and creates a
script to launch it (call it myapp):
launch @my.app.configuration "$@"
The user can then launch the application using myapp arg1 arg2 ...
More on launcher configuration can be found at Launcher Configuration
Servers
The sbt launcher can be used to launch and discover running servers on the system. The launcher can be used to launch servers similarly to applications. However, if desired, the launcher can also be used to ensure that only one instance of a server is running at time. This is done by having clients always use the launcher as a service locator.
To discover where a server is running (or launch it if it is not
running), the user downloads the configuration file for the server (call
it my.server.configuration) and creates a script to discover the
server (call it find-myserver):
launch --locate @my.server.properties.
This command will print out one string, the URI at which to reach the
server, e.g. sbt://127.0.0.1:65501. Clients should use the IP/port to
connect to to the server and initiate their connection.
When using the locate feature, the sbt launcher makes these following
restrictions to servers:
- The Server must have a starting class that extends the xsbti.ServerMain class
- The Server must have an entry point (URI) that clients can use to detect the server
- The server must have defined a lock file which the launcher can use to ensure that only one instance is running at a time
- The filesystem on which the lock file resides must support locking.
- The server must allow the launcher to open a socket against the port without sending any data. This is used to check if a previous server is still alive.
Resolving Applications/Servers
Like the launcher used to distribute sbt, the downloaded launcher jar
will retrieve Scala and the application according to the provided
configuration file. The versions may be fixed or read from a different
configuration file (the location of which is also configurable). The
location to which the Scala and application jars are downloaded is
configurable as well. The repositories searched are configurable.
Optional initialization of a properties file on launch is configurable.
Once the launcher has downloaded the necessary jars, it loads the
application/server and calls its entry point. The application is passed
information about how it was called: command line arguments, current
working directory, Scala version, and application ID (organization,
name, version). In addition, the application can ask the launcher to
perform operations such as obtaining the Scala jars and a ClassLoader
for any version of Scala retrievable from the repositories specified in
the configuration file. It can request that other applications be
downloaded and run. When the application completes, it can tell the
launcher to exit with a specific exit code or to reload the application
with a different version of Scala, a different version of the
application, or different arguments.
There are some other options for setup, such as putting the configuration file inside the launcher jar and distributing that as a single download. The rest of this documentation describes the details of configuring, writing, distributing, and running the application.
Creating a Launched Application
This section shows how to make an application that is launched by this launcher. First, declare a dependency on the launcher-interface. Do not declare a dependency on the launcher itself. The launcher interface consists strictly of Java interfaces in order to avoid binary incompatibility between the version of Scala used to compile the launcher and the version used to compile your application. The launcher interface class will be provided by the launcher, so it is only a compile-time dependency. If you are building with sbt, your dependency definition would be:
Make the entry point to your class implement ‘xsbti.AppMain’. An example that uses some of the information:
package xsbt.test
class Main extends xsbti.AppMain
{
def run(configuration: xsbti.AppConfiguration) =
{
// get the version of Scala used to launch the application
val scalaVersion = configuration.provider.scalaProvider.version
// Print a message and the arguments to the application
println("Hello world! Running Scala " + scalaVersion)
configuration.arguments.foreach(println)
// demonstrate the ability to reboot the application into different versions of Scala
// and how to return the code to exit with
scalaVersion match
{
case "2.9.3" =>
new xsbti.Reboot {
def arguments = configuration.arguments
def baseDirectory = configuration.baseDirectory
def scalaVersion = "2.10.2
def app = configuration.provider.id
}
case "2.10.2" => new Exit(1)
case _ => new Exit(0)
}
}
class Exit(val code: Int) extends xsbti.Exit
}
Next, define a configuration file for the launcher. For the above class, it might look like:
Then, publishLocal or +publishLocal the application to make it
available. For more information, see
Launcher Configuration.
Running an Application
As mentioned above, there are a few options to actually run the application. The first involves providing a modified jar for download. The second two require providing a configuration file for download.
- Replace the
/sbt/sbt.boot.propertiesfile in the launcher jar and distribute the modified jar. The user would need a script to runjava -jar your-launcher.jar arg1 arg2 .... The user downloads the launcher jar and you provide the configuration file.
- The user needs to run
java -Dsbt.boot.properties=your.boot.properties -jar launcher.jar. - The user already has a script to run the launcher (call it
‘launch’). The user needs to run
launch @your.boot.properties your-arg-1 your-arg-2
- The user needs to run
Execution
Let’s review what’s happening when the launcher starts your application.
On startup, the launcher searches for its configuration and then parses
it. Once the final configuration is resolved, the launcher proceeds to
obtain the necessary jars to launch the application. The
boot.directory property is used as a base directory to retrieve jars
to. Locking is done on the directory, so it can be shared system-wide.
The launcher retrieves the requested version of Scala to
${boot.directory}/${scala.version}/lib/
If this directory already exists, the launcher takes a shortcut for startup performance and assumes that the jars have already been downloaded. If the directory does not exist, the launcher uses Apache Ivy to resolve and retrieve the jars. A similar process occurs for the application itself. It and its dependencies are retrieved to
${boot.directory}/${scala.version}/${app.org}/${app.name}/.
Once all required code is downloaded, the class loaders are set up. The
launcher creates a class loader for the requested version of Scala. It
then creates a child class loader containing the jars for the requested
‘app.components’ and with the paths specified in app.resources. An
application that does not use components will have all of its jars in
this class loader.
The main class for the application is then instantiated. It must be a
public class with a public no-argument constructor and must conform to
xsbti.AppMain. The run method is invoked and execution passes to the
application. The argument to the ‘run’ method provides configuration
information and a callback to obtain a class loader for any version of
Scala that can be obtained from a repository in [repositories]. The
return value of the run method determines what is done after the
application executes. It can specify that the launcher should restart
the application or that it should exit with the provided exit code.
Sbt Launcher Architecture
The sbt launcher is a mechanism whereby modules can be loaded from ivy and executed within a jvm. It abstracts the mechanism of grabbing and caching jars, allowing users to focus on what application they want and control its versions.
The launcher’s primary goal is to take configuration for applications, mostly just ivy coordinates and a main class, and start the application. The launcher resolves the ivy module, caches the required runtime jars and starts the application.
The sbt launcher provides the application with the means to load a different application when it completes, exit normally, or load additional applications from inside another.
The sbt launcher provides these core functions:
- Module Resolution
- Classloader Caching and Isolation
- File Locking
- Service Discovery and Isolation
Module Resolution
The primary purpose of the sbt launcher is to resolve applications and
run them. This is done through the [app] configuration section. See
[launcher configuration][Launcher-Configuration] for more information on how to configure module
resolution.
Module resolution is performed using the Ivy dependency managemnet library. This library supports loading artifacts from Maven repositories as well.
Classloader Caching and Isolation
The sbt launcher’s classloading structure is different than just
starting an application in the standard java mechanism. Every
application loaded by by the launcher is given its own classloader. This
classloader is a child of the Scala classloader used by the application.
The Scala classloader can see all of the xsbti.* classes from the
launcher itself.
Here’s an example classloader layout from an sbt launched application.
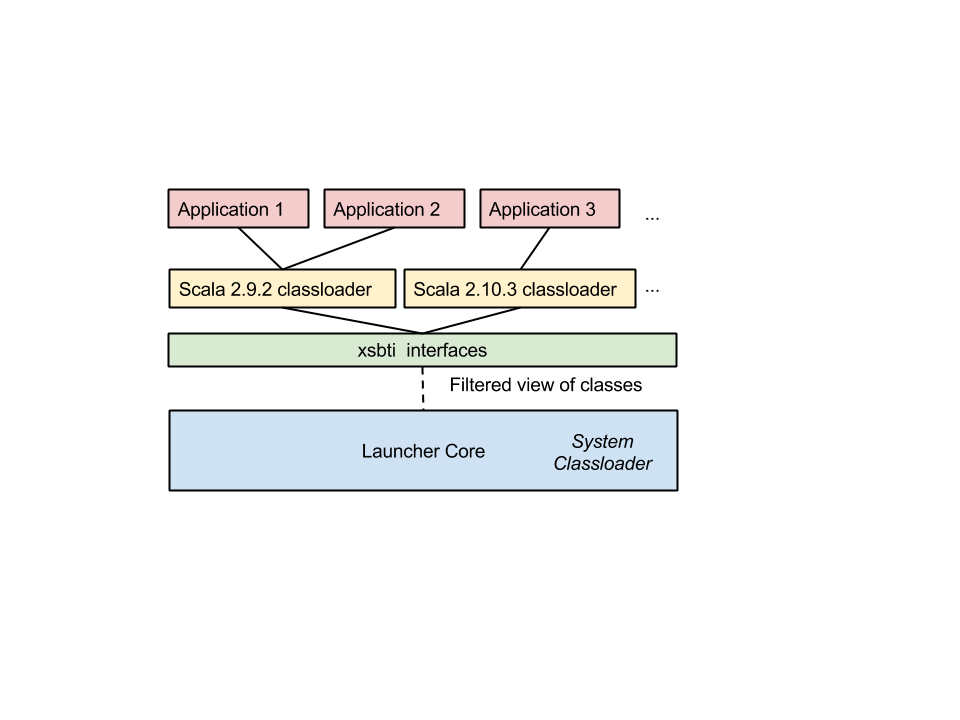
In this diagram, three different applications were loaded. Two of these use the same version of Scala (2.9.2). In this case, sbt can share the same classloader for these applications. This has the benefit that any JIT optimisations performed on scala classes can be re-used between applications thanks to the shared classloader.
Caching
The sbt launcher creates a secondary cache on top of Ivy’s own cache.
This helps isolate applications from errors resulting from unstable
revisions, like -SNAPSHOT. For any launched application, the launcher
creates a directory to store all its jars. Here’s an example layout.
Locking
In addition to providing a secondary cache, the launcher also provides a mechanism of safely doing file-based locks. This is used in two places directly by the launcher:
- Locking the boot directory.
- Ensuring located servers have at most one active process.
This feature requires a filesystem which supports locking. It is exposed
via the xsbti.GlobalLock interface.
- Note: This is both a thread and file lock. Not only are we limiting access to a single process, but also a single thread within that process.*
Service Discovery and Isolation
The launcher also provides a mechanism to ensure that only one instance
of a server is running, while dynamically starting it when a client
requests. This is done through the --locate flag on the launcher. When
the launcher is started with the --locate flag it will do the
following:
- Lock on the configured server lock file.
- Read the server properties to find the URI of the previous server.
- If the port is still listening to connection requests, print this URI on the command line.
- If the port is not listening, start a new server and write the URI on the command line.
- Release all locks and shutdown.
The configured server.lock file is thus used to prevent multiple
servers from running. Sbt itself uses this to prevent more than one
server running on any given project directory by configuring
server.lock to be ${user.dir}/.sbtserver.
Sbt Launcher Configuration
The launcher may be configured in one of the following ways in increasing order of precedence:
- Replace the
/sbt/sbt.boot.propertiesfile in the launcher jar - Put a configuration file named
sbt.boot.propertieson the classpath. Put it in the classpath root without the /sbt prefix. - Specify the location of an alternate configuration on the command line, either as a path or an absolute URI. This can be done by either specifying the location as the system property sbt.boot.properties or as the first argument to the launcher prefixed by ’@’. The system property has lower precedence. Resolution of a relative path is first attempted against the current working directory, then against the user’s home directory, and then against the directory containing the launcher jar.
An error is generated if none of these attempts succeed.
Example
The default configuration file for sbt as an application looks like:
Let’s look at all the launcher configuration sections in detail:
1. Scala Configuration
The [scala] section is used to configure the version of Scala. It has
one property:
version- The version of scala an application uses, orautoif the application is not cross-versioned.classifiers- The (optional) list of additional scala artifacts to resolve, e.g. sources.
2. Application Identification
The [app] section configures how the launcher will look for your
application using the Ivy dependency manager. It consists of the
following properties:
org- The organization associated with the Ivy module. (groupId in maven vernacular)name- The name of the Ivy module. (artifactIdin maven vernacular)version- The revision of the Ivy module.class- The name of the “entry point” into the application. An entry point must be a class which meets one of the following critera- Extends the xsbti.AppMain interface.
- Extends the xsbti.ServerMain interfaces.
- Contains a method with the signature static void main(String[])
- Contains a method with the signature static int main(String[])
- Contains a method with the signature static xsbti.Exit main(String[])
components- An optional list of additional components that Ivy should resolve.cross-versioned- An optional string denoting how this application is published. If app.cross-versioned is binary, the resolved module ID is{app.name+'_'+CrossVersion.binaryScalaVersion(scala.version)}. If app.cross-versioned is true or full, the resolved module ID is{app.name+'_'+scala.version}. The scala.version property must be specified and cannot be auto when cross-versioned.resources- An optional list of jar files that should be added to the application’s classpath.classifiers- An optional list of additional classifiers that should be resolved with this application, e.g. sources.
3. Repositories Section
The [repositories] section configures where and how Ivy will look for
your application. Each line denotes a repository where Ivy will look.
- Note: This section configured the default location where Ivy will look, but this can be overriden via user configuration.*
There are several built-in strings that can be used for common repositories:
local- the local ivy repository~/.ivy2/local.maven-local- The local maven repository~/.m2/repository.maven-central- The maven central repositoryrepo.maven.org.
Besides built in repositories, other repositories can be configured using the following syntax:
name: url(, pattern)(,descriptorOptional)(,skipConsistencyCheck)
The name property is an identifier which Ivy uses to cache modules
resolved from this location. The name should be unique across all
repositories.
The url property is the base url where Ivy should look for modules.
The pattern property is an optional specification of how Ivy should
look for modules. By default, the launcher assumes repositories are in
the maven style format.
The skipConsistencyCheck string is used to tell ivy not to validate
checksums and signatures of files it resolves.
4. The Boot section
The [boot] section is used to configure where the sbt launcher will
store its cache and configuration information. It consists of the
following properties:
directory- The directory defined here is used to store all cached JARs resolved launcher.properties- (optional) A properties file to use for anyreadvariables.
5. The Ivy section
The [ivy] section is used to configure the Ivy dependency manager for
resolving applications. It consists of the following properties:
ivy-home- The home directory for Ivy. This determines where the ivy-local repository is located, and also where the ivy cache is stored. Defaults to~/.ivy2checksums- The comma-separated list of checksums that Ivy should use to verify artifacts have correctly resolved, e.g. md5 or sha1.override-build-repos- If this is set, then theisOverrideRepositoriesmethod on xsbti.Launcher interface will return its value. The use of this method is application specific, but in the case of sbt denotes that the configuration of repositories in the launcher should override those used by any build. Applications should respect this convention if they can.repository-config- This specifies a configuration location where ivy repositories can also be configured. If this file exists, then its contents override the [repositories] section.
6. The Server Section
When using the --locate feature of the launcher, this section
configures how a server is started. It consists of the following
properties:
lock- The file that controls access to the running server. This file will contain the active port used by a server and must be located on a a filesystem that supports locking.jvmargs- A file that contains line-separated JVM arguments that where : use when starting the server.jvmprops- The location of a properties file that will define override properties in the server. All properties defined in this file will be set as -D java properties.
Variable Substitution
Property values may include variable substitutions. A variable substitution has one of these forms:
${variable.name}${variable.name-default}
where variable.name is the name of a system property. If a system
property by that name exists, the value is substituted. If it does not
exists and a default is specified, the default is substituted after
recursively substituting variables in it. If the system property does
not exist and no default is specified, the original string is not
substituted.
There is also a special variable substitution:
read(property.name)[default]
This will look in the file configured by boot.properties for a value.
If there is no boot.properties file configured, or the property does
not existt, then the default value is chosen.
Syntax
The configuration file is line-based, read as UTF-8 encoded, and defined
by the following grammar. 'nl' is a newline or end of file and
'text' is plain text without newlines or the surrounding delimiters
(such as parentheses or square brackets):
configuration: scala app repositories boot log appProperties
scala: "[" "scala" "]" nl version nl classifiers nl
app: "[" "app" "]" nl org nl name nl version nl components nl class nl crossVersioned nl resources nl classifiers nl
repositories: "[" "repositories" "]" nl (repository nl)*
boot: "[" "boot" "]" nl directory nl bootProperties nl search nl promptCreate nl promptFill nl quickOption nl
log: "["' "log" "]" nl logLevel nl
appProperties: "[" "app-properties" "]" nl (property nl)*
ivy: "[" "ivy" "]" nl homeDirectory nl checksums nl overrideRepos nl repoConfig nl
directory: "directory" ":" path
bootProperties: "properties" ":" path
search: "search" ":" ("none" | "nearest" | "root-first" | "only" ) ("," path)*
logLevel: "level" ":" ("debug" | "info" | "warn" | "error")
promptCreate: "prompt-create" ":" label
promptFill: "prompt-fill" ":" boolean
quickOption: "quick-option" ":" boolean
version: "version" ":" versionSpecification
versionSpecification: readProperty | fixedVersion
readProperty: "read" "(" propertyName ")" "[" default "]"
fixedVersion: text
classifiers: "classifiers" ":" text ("," text)*
homeDirectory: "ivy-home" ":" path
checksums: "checksums" ":" checksum ("," checksum)*
overrideRepos: "override-build-repos" ":" boolean
repoConfig: "repository-config" ":" path
org: "org" ":" text
name: "name" ":" text
class: "class" ":" text
components: "components" ":" component ("," component)*
crossVersioned: "cross-versioned" ":" ("true" | "false" | "none" | "binary" | "full")
resources: "resources" ":" path ("," path)*
repository: ( predefinedRepository | customRepository ) nl
predefinedRepository: "local" | "maven-local" | "maven-central"
customRepository: label ":" url [ ["," ivyPattern] ["," artifactPattern] [", mavenCompatible"] [", bootOnly"]]
property: label ":" propertyDefinition ("," propertyDefinition)*
propertyDefinition: mode "=" (set | prompt)
mode: "quick" | "new" | "fill"
set: "set" "(" value ")"
prompt: "prompt" "(" label ")" ("[" default "]")?
boolean: "true" | "false"
nl: "\r\n" | "\n" | "\r"
path: text
propertyName: text
label: text
default: text
checksum: text
ivyPattern: text
artifactPattern: text
url: text
component: text
Notes
Here are some more docs that used to be part of Developer Guide.
Core Principles
This document details the core principles overarching sbt’s design and code style. Sbt’s core principles can be stated quite simply:
- Everything should have a
Type, enforced as much as is practical. - Dependencies should be explicit.
- Once learned, a concept should hold throughout all parts of sbt.
- Parallel is the default.
With these principles in mind, let’s walk through the core design of sbt.
Introduction to build state
This is the first piece you hit when starting sbt. Sbt’s command engine is the means by which it processes user requests using the build state. The command engine is essentially a means of applying state transformations on the build state, to execute user requests.
In sbt, commands are functions that take the current build state
(sbt.State) and produce the next state. In other words, they are
essentially functions of sbt.State => sbt.State. However, in reality,
Commands are actually string processors which take some string input and
act on it, returning the next build state.
So, the entirety of sbt is driven off the sbt.State class. Since this
class needs to be resilient in the face of custom code and plugins, it
needs a mechanism to store the state from any potential client. In
dynamic languages, this can be done directly on objects.
A naive approach in Scala is to use a Map<String,Any>. However, this
vioaltes tennant #1: Everythign should have a Type. So, sbt defines a
new type of map called an AttributeMap. An AttributeMap is a
key-value storage mechanism where keys are both strings and expected
Types for their value.
Here is what the typesafe AttributeKey key looks like :
sealed trait AttributeKey[T] {
/** The label is the identifier for the key and is camelCase by convention. */
def label: String
/** The runtime evidence for ``T`` */
def manifest: Manifest[T]
}
These keys store both a label (string) and some runtime type
information (manifest). To put or get something on the AttributeMap,
we first need to construct one of these keys. Let’s look at the basic
definition of the AttributeMap :
trait AttributeMap {
/** Gets the value of type ``T`` associated with the key ``k`` or ``None`` if no value is associated.
* If a key with the same label but a different type is defined, this method will return ``None``. */
def get[T](k: AttributeKey[T]): Option[T]
/** Adds the mapping ``k -> value`` to this map, replacing any existing mapping for ``k``.
* Any mappings for keys with the same label but different types are unaffected. */
def put[T](k: AttributeKey[T], value: T): AttributeMap
}
Now that there’s a definition of what build state is, there needs to be
a way to dynamically construct it. In sbt, this is done through the
Setting[_] sequence.
Settings Architecture
A Setting represents the means of constructing the value of one
particular AttributeKey[_] in the AttributeMap of build state. A
setting consists of two pieces:
- The
AttributeKey[T]where the value of the setting should be assigned. - An
Initialize[T]object which is able to construct the value for this setting.
Sbt’s initialization time is basically just taking a sequence of these
Setting[_] objects and running their initialization objects and then
storing the value into the AttributeMap. This means overwriting an
exisitng value at a key is as easy as appending a Setting[_] to the
end of the sequence which does so.
Where it gets interesting is that Initialize[T] can depend on other
AttributeKey[_]s in the build state. Each Initialize[_] can pull
values from any AttributeKey[_] in the build state’s AttributeMap to
compute its value. Sbt ensures a few things when it comes to
Initialize[_] dependencies:
- There can be no circular dependencies
If one
Initialize[_]depends on anotherInitialize[_]key, thenall associated
Initialize[_]blocks for that key must have run before we load the value.
Let’s look at what gets stored for the setting :
normalizedName := normalize(name.value)
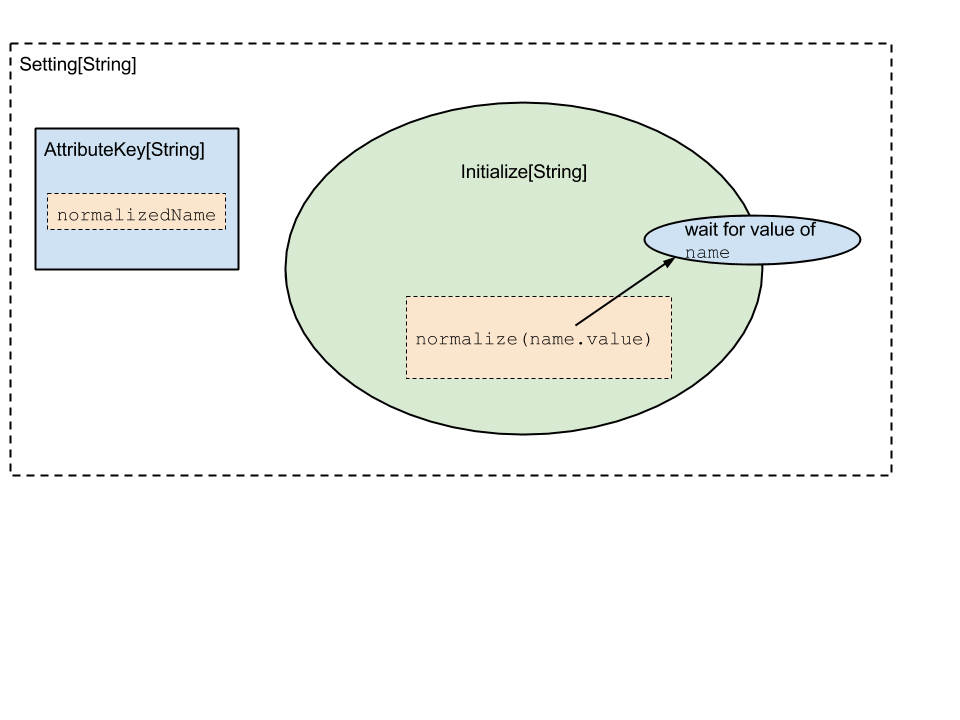
Here, a Setting[_] is constructed that understands it depends on the
value in the name AttributeKey. Its initialize block first grabs the
value of the name key, then runs the function normalize on it to
compute its value.
This represents the core mechanism of how to construct sbt’s build state. Conceptually, at some point we have a graph of dependencies and initialization functions which we can use to construct the first build state. Once this is completed, we can then start to process user requests.
Task Architecture
The next layer in sbt is around these user request, or tasks. When a
user configures a build, they are defining a set of repeatable tasks
that they can run on their project. Things like compile or test.
These tasks also have a dependency graph, where e.g. the test task
requires that compile has run before it can successfully execute.
Sbt’s defines a class Task[T]. The T type parameter represents the
type of data returned by a task. Remember the tenets of sbt? “All things
have types” and “Dependencies are explicit” both hold true for tasks.
Sbt promotes a style of task dependencies that is closer to functional
programming: Return data for your users rather than using shared mutable
state.
Most build tools communciate over the filesystem, and indeed sbt, by necessity, does some of this. However, for stable parallelization it is far better to keep tasks isolated on the filesystem and communicate directly through types.
Similarly to how a Setting[_] stores both dependencies and an
initialization function, a Task[_] stores both its
Task[_]dependencies and its behavior (a function).
TODO - More on Task[_]
TODO - Transition into InputTask[_], rehash Command
TODO - Tansition into Scope.
Settings Core
This page describes the core settings engine a bit. This may be useful for using it outside of sbt. It may also be useful for understanding how sbt works internally.
The documentation is comprised of two parts. The first part shows an example settings system built on top of the settings engine. The second part comments on how sbt’s settings system is built on top of the settings engine. This may help illuminate what exactly the core settings engine provides and what is needed to build something like the sbt settings system.
Example
Setting up
To run this example, first create a new project with the following build.sbt file:
libraryDependencies += "org.scala-sbt" %% "collections" % sbtVersion.value
resolvers += sbtResolver.value
Then, put the following examples in source files SettingsExample.scala
and SettingsUsage.scala. Finally, run sbt and enter the REPL using
console. To see the output described below, enter SettingsUsage.
Example Settings System
The first part of the example defines the custom settings system. There are three main parts:
- Define the Scope type.
- Define a function that converts that Scope (plus an AttributeKey) to a String.
- Define a delegation function that defines the sequence of Scopes in which to look up a value.
There is also a fourth, but its usage is likely to be specific to sbt at this time. The example uses a trivial implementation for this part.
SettingsExample.scala
import sbt._
/** Define our settings system */
// A basic scope indexed by an integer.
final case class Scope(index: Int)
// Extend the Init trait.
// (It is done this way because the Scope type parameter is used everywhere in Init.
// Lots of type constructors would become binary, which as you may know requires lots of type lambdas
// when you want a type function with only one parameter.
// That would be a general pain.)
object SettingsExample extends Init[Scope]
{
// Provides a way of showing a Scope+AttributeKey[_]
val showFullKey: Show[ScopedKey[_]] = new Show[ScopedKey[_]] {
def apply(key: ScopedKey[_]) = key.scope.index + "/" + key.key.label
}
// A sample delegation function that delegates to a Scope with a lower index.
val delegates: Scope => Seq[Scope] = { case s @ Scope(index) =>
s +: (if(index <= 0) Nil else delegates(Scope(index-1)) )
}
// Not using this feature in this example.
val scopeLocal: ScopeLocal = _ => Nil
// These three functions + a scope (here, Scope) are sufficient for defining our settings system.
}
Example Usage
This part shows how to use the system we just defined. The end result is
a Settings[Scope] value. This type is basically a mapping
Scope -> AttributeKey[T] -> Option[T]. See the
Settings API documentation for
details. SettingsUsage.scala:
/** Usage Example **/
import sbt._
import SettingsExample._
import Types._
object SettingsUsage {
// Define some keys
val a = AttributeKey[Int]("a")
val b = AttributeKey[Int]("b")
// Scope these keys
val a3 = ScopedKey(Scope(3), a)
val a4 = ScopedKey(Scope(4), a)
val a5 = ScopedKey(Scope(5), a)
val b4 = ScopedKey(Scope(4), b)
// Define some settings
val mySettings: Seq[Setting[_]] = Seq(
setting( a3, value( 3 ) ),
setting( b4, map(a4)(_ * 3)),
update(a5)(_ + 1)
)
// "compiles" and applies the settings.
// This can be split into multiple steps to access intermediate results if desired.
// The 'inspect' command operates on the output of 'compile', for example.
val applied: Settings[Scope] = make(mySettings)(delegates, scopeLocal, showFullKey)
// Show results.
for(i <- 0 to 5; k <- Seq(a, b)) {
println( k.label + i + " = " + applied.get( Scope(i), k) )
}
}
This produces the following output when run:
a0 = None
b0 = None
a1 = None
b1 = None
a2 = None
b2 = None
a3 = Some(3)
b3 = None
a4 = Some(3)
b4 = Some(9)
a5 = Some(4)
b5 = Some(9)
- For the None results, we never defined the value and there was no value to delegate to.
- For a3, we explicitly defined it to be 3.
- a4 wasn’t defined, so it delegates to a3 according to our delegates function.
- b4 gets the value for a4 (which delegates to a3, so it is 3) and multiplies by 3
- a5 is defined as the previous value of a5 + 1 and since no previous value of a5 was defined, it delegates to a4, resulting in 3+1=4.
- b5 isn’t defined explicitly, so it delegates to b4 and is therefore equal to 9 as well
sbt Settings Discussion
Scopes
sbt defines a more complicated scope than the one shown here for the
standard usage of settings in a build. This scope has four components:
the project axis, the configuration axis, the task axis, and the extra
axis. Each component may be
Global (no specific value),
This
(current context), or
Select (containing a specific value). sbt
resolves This_ to either
Global or
Select
depending on the context.
For example, in a project, a
This project axis becomes a
Select referring to the defining project. All other axes that are
This are
translated to
Global. Functions like inConfig and inTask transform
This into a
Select for a specific value. For example,
inConfig(Compile)(someSettings) translates the configuration axis for
all settings in someSettings to be Select(Compile) if the axis value
is
This.
So, from the example and from sbt’s scopes, you can see that the core
settings engine does not impose much on the structure of a scope. All it
requires is a delegates function Scope => Seq[Scope] and a display
function. You can choose a scope type that makes sense for your
situation.
Constructing settings
The app, value, update, and related methods are the core methods for constructing settings. This example obviously looks rather different from sbt’s interface because these methods are not typically used directly, but are wrapped in a higher-level abstraction.
With the core settings engine, you work with HLists to access other settings. In sbt’s higher-level system, there are wrappers around HList for TupleN and FunctionN for N = 1-9 (except Tuple1 isn’t actually used). When working with arbitrary arity, it is useful to make these wrappers at the highest level possible. This is because once wrappers are defined, code must be duplicated for every N. By making the wrappers at the top-level, this requires only one level of duplication.
Additionally, sbt uniformly integrates its task engine into the settings
system. The underlying settings engine has no notion of tasks. This is
why sbt uses a SettingKey type and a TaskKey type. Methods on an
underlying TaskKey[T] are basically translated to operating on an
underlying SettingKey[Task[T]] (and they both wrap an underlying
AttributeKey).
For example, a := 3 for a SettingKey a will very roughly translate
to setting(a, value(3)). For a TaskKey a, it will roughly translate
to setting(a, value( task { 3 } ) ). See
main/Structure.scala for details.
Settings definitions
sbt also provides a way to define these settings in a file (build.sbt
and Build.scala). This is done for build.sbt using basic parsing and
then passing the resulting chunks of code to compile/Eval.scala. For
all definitions, sbt manages the classpaths and recompilation process to
obtain the settings. It also provides a way for users to define project,
task, and configuration delegation, which ends up being used by the
delegates function.
Setting Initialization
This page outlines the mechanisms by which sbt loads settings for a particular build, including the hooks where users can control the ordering of everything.
As stated elsewhere, sbt constructs its initialization graph and task
graph via Setting[_] objects. A setting is something which can take
the values stored at other Keys in the build state, and generates a new
value for a particular build key. Sbt converts all registered
Setting[_] objects into a giant linear sequence and compiles them
into the a task graph. This task graph is then used to execute your
build.
All of sbt’s loading semantics are contained within the Load.scala file. It is approximately the following:
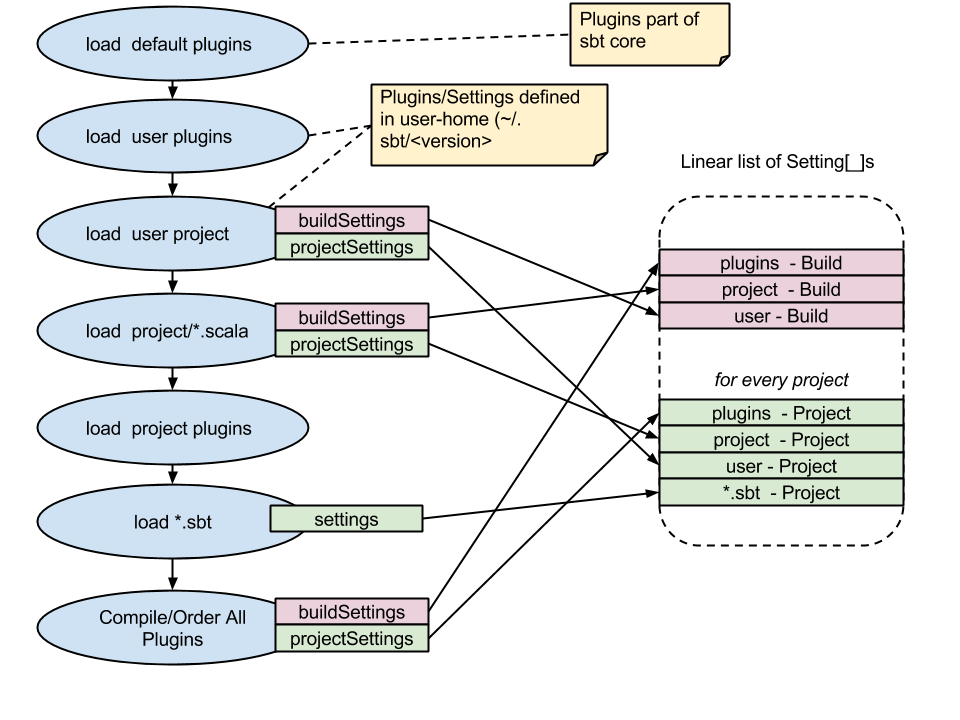
The blue circles represent actions happening when sbt loads a project. We can see that sbt performs the following actions in load:
Compile the user-level project (
~/.sbt/<version>/)a. Load any plugins defined by this project (
~/.sbt/<version>/plugins/*.sbtand~/.sbt/<version>/plugins/project/*.scala) b. Load all settings defined (~/.sbt/<version>/*.sbtand~/.sbt/<version>/plugins/*.scala)Compile the current project (
<working-directory/project)a. Load all defined plugins (
project/plugins.sbtandproject/project/*.scala) b. Load/Compile the project (project/*.scala)- Load project
*.sbtfiles (build.sbtand friends).
Each of these loads defines several sequences of settings. The diagram shows the two most important:
buildSettings- These are settings defined to bein ThisBuildor directly against theBuildobject. They are initialized once for the build. You can add these, e.g. inproject/build.scala:object MyBuild extends Build { override val settings = Seq(foo := "hi") }or in a
build.sbtfile :foo in ThisBuild := "hi"projectSettings- These are settings specific to a project. They are specific to a particular sub project in the build. A plugin may be contributing its settings to more than on project, in which case the values are duplicated for each project. You add project specific settings, eg. inproject/build.scala:object MyBuild extends Build { val test = project.in(file(".")).settings(...) }
After loading/compiling all the build definitions, sbt has a series of
Seq[Setting[_]] that it must order. As shown in the diagram, the
default inclusion order for sbt is:
- All AutoPlugin settings
- All settings defined in
project/Build.scala - All settings defined in the user directory
(
~/.sbt/<verison>/*.sbt) - All local configurations (
build.sbt)
Controlling Initialization
The order which sbt uses to load settings is configurable at a project
level. This means that we can’t control the order of settings added to
Build/Global namespace, but we can control how each project loads, e.g.
plugins and .sbt files. To do so, use the AddSettings class :
import sbt._
import Keys._
import AddSettings._
object MyOwnOrder extends Build {
// here we load config from a txt file.
lazy val root = project.in(file(".")).settingSets( autoPlugins, buildScalaFiles, sbtFiles(file("silly.txt")) )
}
In the above project, we’ve modified the order of settings to be:
- All AutoPlugin settings.
- All settings defined in the
project/Build.scalafile (shown above). - All settings found in the
silly.txtfile.
What we’ve excluded:
- All settings from the user directory (
~/.sbt/<verison>) - All
*.sbtsettings.
The AddSettings object provides the following “groups” of settings you can use for ordering:
autoPluginsAll the ordered settings of plugins after they’ve gone through dependency resolutionbuildScalaFilesThe full sequence of settings defined directly inproject/*.scalabuilds.sbtFiles(*)Specifies the exact setting DSL files to include (files must use the.sbtfile format)userSettingsAll the settings defined in the user directory~/.sbt/<version>/.defaultSbtFilesInclude all local*.sbtfile settings.
- Note: Be very careful when reordering settings. It’s easy to accidentally remove core functionality.*
For example, let’s see what happens if we move the build.sbt files
before the buildScalaFile.
Let’s create an example project the following defintiion. project/build.scala :
object MyTestBuild extends Build {
val testProject = project.in(file(".")).settingSets(autoPlugins, defaultSbtFiles, buildScalaFile).settings(
version := scalaBinaryVersion.value match {
case "2.10" => "1.0-SNAPSHOT"
case v => "1.0-for-${v}-SNAPSHOT"
}
)
}
This build defines a version string which appends the scala version if
the current scala version is not the in the 2.10.x series. Now, when
issuing a release we want to lock down the version. Most tools assume
this can happen by writing a version.sbt file. version.sbt :
version := "1.0.0"
However, when we load this new build, we find that the version in
version.sbt has been overriden by the one defined in
project/Build.scala because of the order we defined for settings, so
the new version.sbt file has no effect.
Build Loaders
Build loaders are the means by which sbt resolves, builds, and transforms build definitions. Each aspect of loading may be customized for special applications. Customizations are specified by overriding the buildLoaders methods of your build definition’s Build object. These customizations apply to external projects loaded by the build, but not the (already loaded) Build in which they are defined. Also documented on this page is how to manipulate inter-project dependencies from a setting.
Custom Resolver
The first type of customization introduces a new resolver. A resolver provides support for taking a build URI and retrieving it to a local directory on the filesystem. For example, the built-in resolver can checkout a build using git based on a git URI, use a build in an existing local directory, or download and extract a build packaged in a jar file. A resolver has type:
ResolveInfo => Option[() => File]
The resolver should return None if it cannot handle the URI or Some containing a function that will retrieve the build. The ResolveInfo provides a staging directory that can be used or the resolver can determine its own target directory. Whichever is used, it should be returned by the loading function. A resolver is registered by passing it to BuildLoader.resolve and overriding Build.buildLoaders with the result:
...
object Demo extends Build {
...
override def buildLoaders =
BuildLoader.resolve(demoResolver) ::
Nil
def demoResolver: BuildLoader.ResolveInfo => Option[() => File] = ...
}
API Documentation
Relevant API documentation for custom resolvers:
Full Example
import sbt._
import Keys._
object Demo extends Build
{
// Define a project that depends on an external project with a custom URI
lazy val root = Project("root", file(".")).dependsOn(
uri("demo:a")
)
// Register the custom resolver
override def buildLoaders =
BuildLoader.resolve(demoResolver) ::
Nil
// Define the custom resolver, which handles the 'demo' scheme.
// The resolver's job is to produce a directory containing the project to load.
// A subdirectory of info.staging can be used to create new local
// directories, such as when doing 'git clone ...'
def demoResolver(info: BuildLoader.ResolveInfo): Option[() => File] =
if(info.uri.getScheme != "demo")
None
else
{
// Use a subdirectory of the staging directory for the new local build.
// The subdirectory name is derived from a hash of the URI,
// and so identical URIs will resolve to the same directory (as desired).
val base = RetrieveUnit.temporary(info.staging, info.uri)
// Return a closure that will do the actual resolution when requested.
Some(() => resolveDemo(base, info.uri.getSchemeSpecificPart))
}
// Construct a sample project on the fly with the name specified in the URI.
def resolveDemo(base: File, ssp: String): File =
{
// Only create the project if it hasn't already been created.
if(!base.exists)
IO.write(base / "build.sbt", template.format(ssp))
base
}
def template = """
name := "%s"
version := "1.0"
"""
}
Custom Builder
Once a project is resolved, it needs to be built and then presented to
sbt as an instance of sbt.BuildUnit. A custom builder has type:
BuildInfo => Option[() => BuildUnit]
A builder returns None if it does not want to handle the build
identified by the BuildInfo. Otherwise, it provides a function that
will load the build when evaluated. Register a builder by passing it to
BuildLoader.build and overriding Build.buildLoaders with the result:
...
object Demo extends Build {
...
override def buildLoaders =
BuildLoader.build(demoBuilder) ::
Nil
def demoBuilder: BuildLoader.BuildInfo => Option[() => BuildUnit] = ...
}
API Documentation
Relevant API documentation for custom builders:
Example
This example demonstrates the structure of how a custom builder could read configuration from a pom.xml instead of the standard .sbt files and project/ directory.
... imports ...
object Demo extends Build
{
lazy val root = Project("root", file(".")) dependsOn( file("basic-pom-project") )
override def buildLoaders =
BuildLoader.build(demoBuilder) ::
Nil
def demoBuilder: BuildInfo => Option[() => BuildUnit] = info =>
if(pomFile(info).exists)
Some(() => pomBuild(info))
else
None
def pomBuild(info: BuildInfo): BuildUnit =
{
val pom = pomFile(info)
val model = readPom(pom)
val n = Project.normalizeProjectID(model.getName)
val base = Option(model.getProjectDirectory) getOrElse info.base
val root = Project(n, base) settings( pomSettings(model) : _*)
val build = new Build { override def projects = Seq(root) }
val loader = this.getClass.getClassLoader
val definitions = new LoadedDefinitions(info.base, Nil, loader, build :: Nil, Nil)
val plugins = new LoadedPlugins(info.base / "project", Nil, loader, Nil, Nil)
new BuildUnit(info.uri, info.base, definitions, plugins)
}
def readPom(file: File): Model = ...
def pomSettings(m: Model): Seq[Setting[_]] = ...
def pomFile(info: BuildInfo): File = info.base / "pom.xml"
Custom Transformer
Once a project has been loaded into an sbt.BuildUnit, it is
transformed by all registered transformers. A custom transformer has
type:
TransformInfo => BuildUnit
A transformer is registered by passing it to BuildLoader.transform and overriding Build.buildLoaders with the result:
...
object Demo extends Build {
...
override def buildLoaders =
BuildLoader.transform(demoTransformer) ::
Nil
def demoTransformer: BuildLoader.TransformInfo => BuildUnit = ...
}
API Documentation
Relevant API documentation for custom transformers:
Manipulating Project Dependencies in Settings
The buildDependencies setting, in the Global scope, defines the
aggregation and classpath dependencies between projects. By default,
this information comes from the dependencies defined by Project
instances by the aggregate and dependsOn methods. Because
buildDependencies is a setting and is used everywhere dependencies
need to be known (once all projects are loaded), plugins and build
definitions can transform it to manipulate inter-project dependencies at
setting evaluation time. The only requirement is that no new projects
are introduced because all projects are loaded before settings get
evaluated. That is, all Projects must have been declared directly in a
Build or referenced as the argument to Project.aggregate or
Project.dependsOn.
The BuildDependencies type
The type of the buildDependencies setting is
BuildDependencies.
BuildDependencies provides mappings from a project to its aggregate or
classpath dependencies. For classpath dependencies, a dependency has
type ClasspathDep[ProjectRef], which combines a ProjectRef with a
configuration (see ClasspathDep
and ProjectRef). For aggregate
dependencies, the type of a dependency is just ProjectRef.
The API for BuildDependencies is not extensive, covering only a little
more than the minimum required, and related APIs have more of an
internal, unpolished feel. Most manipulations consist of modifying the
relevant map (classpath or aggregate) manually and creating a new
BuildDependencies instance.
Example
As an example, the following replaces a reference to a specific build URI with a new URI. This could be used to translate all references to a certain git repository to a different one or to a different mechanism, like a local directory.
buildDependencies in Global := {
val deps = (buildDependencies in Global).value
val oldURI = uri("...") // the URI to replace
val newURI = uri("...") // the URI replacing oldURI
def substitute(dep: ClasspathDep[ProjectRef]): ClasspathDep[ProjectRef] =
if(dep.project.build == oldURI)
ResolvedClasspathDependency(ProjectRef(newURI, dep.project.project), dep.configuration)
else
dep
val newcp =
for( (proj, deps) <- deps.cp) yield
(proj, deps map substitute)
BuildDependencies(newcp, deps.aggregate)
}
It is not limited to such basic translations, however. The configuration
a dependency is defined in may be modified and dependencies may be added
or removed. Modifying buildDependencies can be combined with modifying
libraryDependencies to convert binary dependencies to and from source
dependencies, for example.
Creating Command Line Applications Using sbt
There are several components of sbt that may be used to create a command line application. The launcher and the command system are the two main ones illustrated here.
As described on the launcher page, a launched application implements the xsbti.AppMain interface and defines a brief configuration file that users pass to the launcher to run the application. To use the command system, an application sets up a State instance that provides command implementations and the initial commands to run. A minimal hello world example is given below.
Hello World Example
There are three files in this example:
- build.sbt
- Main.scala
- hello.build.properties
To try out this example:
- Put the first two files in a new directory
- Run
sbt publishLocalin that directory - Run
sbt @path/to/hello.build.propertiesto run the application.
Like for sbt itself, you can specify commands from the command line (batch mode) or run them at an prompt (interactive mode).
Build Definition: build.sbt
The build.sbt file should define the standard settings: name, version,
and organization. To use the sbt command system, a dependency on the
command module is needed. To use the task system, add a dependency on
the task-system module as well.
organization := "org.example"
name := "hello"
version := "0.1-SNAPSHOT"
libraryDependencies += "org.scala-sbt" % "command" % "0.12.0"
Application: Main.scala
The application itself is defined by implementing xsbti.AppMain. The basic steps are
- Provide command definitions. These are the commands that are available for users to run.
- Define initial commands. These are the commands that are initially scheduled to run. For example, an application will typically add anything specified on the command line (what sbt calls batch mode) and if no commands are defined, enter interactive mode by running the ‘shell’ command.
- Set up logging. The default setup in the example rotates the log file after each user interaction and sends brief logging to the console and verbose logging to the log file.
package org.example
import sbt._
import java.io.{File, PrintWriter}
final class Main extends xsbti.AppMain
{
/** Defines the entry point for the application.
* The call to `initialState` sets up the application.
* The call to runLogged starts command processing. */
def run(configuration: xsbti.AppConfiguration): xsbti.MainResult =
MainLoop.runLogged( initialState(configuration) )
/** Sets up the application by constructing an initial State instance with the supported commands
* and initial commands to run. See the State API documentation for details. */
def initialState(configuration: xsbti.AppConfiguration): State =
{
val commandDefinitions = hello +: BasicCommands.allBasicCommands
val commandsToRun = Hello +: "iflast shell" +: configuration.arguments.map(_.trim)
State( configuration, commandDefinitions, Set.empty, None, commandsToRun, State.newHistory,
AttributeMap.empty, initialGlobalLogging, State.Continue )
}
// defines an example command. see the Commands page for details.
val Hello = "hello"
val hello = Command.command(Hello) { s =>
s.log.info("Hello!")
s
}
/** Configures logging to log to a temporary backing file as well as to the console.
* An application would need to do more here to customize the logging level and
* provide access to the backing file (like sbt's last command and logLevel setting).*/
def initialGlobalLogging: GlobalLogging =
GlobalLogging.initial(MainLogging.globalDefault _, File.createTempFile("hello", "log"))
}
Launcher configuration file: hello.build.properties
The launcher needs a configuration file in order to retrieve and run an
application. hello.build.properties:
[scala]
version: 2.9.1
[app]
org: org.example
name: hello
version: 0.1-SNAPSHOT
class: org.example.Main
components: xsbti
cross-versioned: true
[repositories]
local
maven-central
typesafe-ivy-releases: http://repo.typesafe.com/typesafe/ivy-releases/, [organization]/[module]/[revision]/[type]s/[artifact](-[classifier]).[ext]
Nightly Builds
The latest development versions of 0.13.11 are available as nightly builds on Typesafe Snapshots.
To use a nightly build, the instructions are the same for normal manual setup except:
- Download the launcher jar from one of the subdirectories of |nightly-launcher|. They should be listed in chronological order, so the most recent one will be last.
- The version number is the name of the subdirectory and is of the
form
0.13.11.x-yyyyMMdd-HHmmss. Use this in a build.properties file. - Call your script something like
sbt-nightlyto retain access to a stable sbt launcher. The documentation will refer to the script as sbt, however.
Related to the third point, remember that an sbt.version setting in
<build-base>/project/build.properties determines the version of sbt to
use in a project. If it is not present, the default version associated
with the launcher is used. This means that you must set
sbt.version=yyyyMMdd-HHmmss in an existing
<build-base>/project/build.properties. You can verify the right
version of sbt is being used to build a project by running about.
To reduce problems, it is recommended to not use a launcher jar for one nightly version to launch a different nightly version of sbt.
