To find out what the different settings are for, just leave your mouse pointer a second on the editbox/checkbox... and a helpful tooltip will popup.

This dialog allows you to specify your preferred language,
and the Subversion-specific settings.
- Language
Selects your user interface language. What else did you expect?
- Automatically check for newer versions every week
If checked, TortoiseSVN will contact its download site once a week to see if there is a newer version of the program available. Use if you want an answer right away. The new version will not be downloaded; you simply receive an information dialog telling you that the new version is available.
- System sounds
TortoiseSVN has three custom sounds which are installed by default.
Error
Notice
Warning
You can select different sounds (or turn these sounds off completely) using the Windows Control Panel. is a shortcut to the Control Panel.
- Global ignore pattern
Global ignore patterns are used to prevent unversioned files from showing up e.g. in the commit dialog. Files matching the patterns are also ignored by an import. Ignore files or directories by typing in the names or extensions. Patterns are separated by spaces e.g.
*/bin */obj *.bak *.~?? *.jar *.[Tt]mp. Remember that these patterns may be used against paths which include N levels of parent directory. Setting ignore patterns for anything other than simple file extensions is not as trivial as it first appears, so be sure to read the section called “Pattern Matching in Ignore Lists” for more information on the pattern-matching syntax, and how paths are checked.Note that the ignore patterns you specify here will also affect other Subversion clients running on your PC, including the command line client.
Caution
If you use the Subversion configuration file to set a
global-ignorespattern, it will override the settings you make here. The Subversion configuration file is accessed using the as described below.This ignore pattern will affect all your projects. It is not versioned, so it will not affect other users. By contrast you can also use the versioned
svn:ignoreproperty to exclude files or directories from version control. Read the section called “Ignoring Files And Directories” for more information.- Set file dates to the “last commit time”
This option tells TortoiseSVN to set the file dates to the last commit time when doing a checkout or an update. Otherwise TortoiseSVN will use the current date. If you are developing software it is generally best to use the current date because build systems normally look at the date stamps to decide which files need compiling. If you use “last commit time” and revert to an older file revision, your project may not compile as you expect it to.
- Subversion configuration file
Use to edit the Subversion configuration file directly. Some settings cannot be modified directly by TortoiseSVN, and need to be set here instead. For more information about the Subversion
configfile see the Runtime Configuration Area . The section on Automatic Property Setting is of particular interest, and that is configured here. Note that Subversion can read configuration information from several places, and you need to know which one takes priority. Refer to Configuration and the Windows Registry to find out more.- Use
_svninstead of.svndirectories VS.NET when used with web projects can't handle the
.svnfolders that Subversion uses to store its internal information. This is not a bug in Subversion. The bug is in VS.NET and the frontpage extensions it uses. Read the section called “Subversion Working Folders” to find out more about this issue.If you want to change the behaviour of Subversion and TortoiseSVN, you can use this checkbox to set the environment variable which controls this.
You should note that changing this option will not automatically convert existing working copies to use the new admin directory. You will have to do that yourself using a script (See our FAQ) or simply check out a fresh working copy.
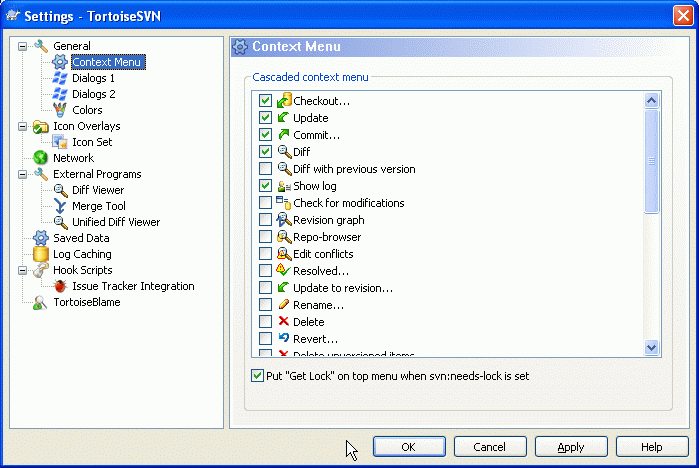
This page allows you to specify which of the TortoiseSVN context menu
entries will show up in the main context menu, and which will appear
in the TortoiseSVN submenu. By default most items are unchecked and
appear in the submenu.
There is a special case for Get Lock. You can of
course promote it to the top level using the list above, but as most
files don't need locking this just adds clutter. However, a file with
the svn:needs-lock property needs this action every
time it is edited, so in that case it is very useful to have at the top
level. Checking the box here means that when a file is selected which has
the svn:needs-lock property set,
Get Lock will always appear at the top level.

This dialog allows you to configure some of TortoiseSVN's
dialogs the way you like them.
- Default number of log messages
Limits the number of log messages that TortoiseSVN fetches when you first select → Useful for slow server connections. You can always use or to get more messages.
- Font for log messages
Selects the font face and size used to display the log message itself in the middle pane of the Revision Log dialog, and when composing log messages in the Commit dialog.
- Short date / time format in log messages
If the standard long messages use up too much space on your screen use the short format.
- Progress Dialog
TortoiseSVN can automatically close all progress dialogs when the action is finished without error. This setting allows you to select the conditions for closing the dialogs. The default (recommended) setting is Close manually which allows you to review all messages and check what has happened. However, you may decide that you want to ignore some types of message and have the dialog close automatically if there are no critical changes.
Auto-close if no merges, adds or deletes means that the progress dialog will close if there were simple updates, but if changes from the repository were merged with yours, or if any files were added or deleted, the dialog will remain open. It will also stay open if there were any conflicts or errors during the operation.
Auto-close if no merges, adds or deletes for local operations means that the progress dialog will close as for Auto-close if no merges, adds or deletes but only for local operations like adding files or reverting changes. For remote operations the dialog will stay open.
Auto-close if no conflicts relaxes the criteria further and will close the dialog even if there were merges, adds or deletes. However, if there were any conflicts or errors, the dialog remains open.
Auto-close if no errors always closes the dialog even if there were conflicts. The only condition that keeps the dialog open is an error condition, which occurs when Subversion is unable to complete the task. For example, an update fails because the server is inaccessible, or a commit fails because the working copy is out-of-date.
- Use URL of WC as the default “From:” URL
In the merge dialog, the default behaviour is for the From: URL to be remembered between merges. However, some people like to perform merges from many different points in their hierarchy, and find it easier to start out with the URL of the current working copy. This can then be edited to refer to a parallel path on another branch.
- Default checkout path
You can specify the default path for checkouts. If you keep all your checkouts in one place, it is useful to have the drive and folder pre-filled so you only have to add the new folder name to the end.
- Default checkout URL
You can also specify the default URL for checkouts. If you often checkout sub-projects of some very large project, it can be useful to have the URL pre-filled so you only have to add the sub-project name to the end.
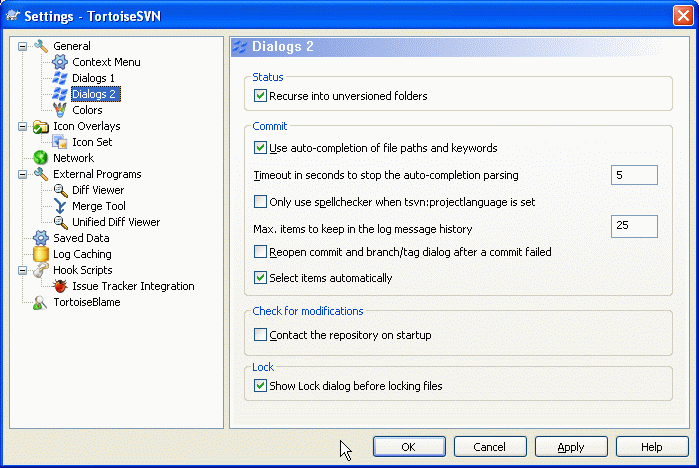
- Recurse into unversioned folders
If this box is checked (default state), then whenever the status of an unversioned folder is shown in the Add, Commit or Check for Modifications dialog, every child file and folder is also shown. If you uncheck this box, only the unversioned parent is shown. Unchecking reduces clutter in these dialogs. In that case if you select an unversioned folder for Add, it is added recursively.
- Use auto-completion of file paths and keywords
The commit dialog includes a facility to parse the list of filenames being committed. When you type the first 3 letters of an item in the list, the auto-completion box pops up, and you can press Enter to complete the filename. Check the box to enable this feature.
- Timeout in seconds to stop the auto-completion parsing
The auto-completion parser can be quite slow if there are a lot of large files to check. This timeout stops the commit dialog being held up for too long. If you are missing important auto-completion information, you can extend the timeout.
- Only use spellchecker when
tsvn:projectlanguageis set If you don't wish to use the spellchecker for all commits, check this box. The spellchecker will still be enabled where the project properties require it.
- Max. items to keep in the log message history
TortoiseSVN stores the last 25 log messages you entered for each repository. You can customize the number stored here. If you have many different repositories, you may wish to reduce this to avoid filling your registry.
- Re-open commit and branch/tag dialog after a commit failed
When a commit fails for some reason (working copy needs updating, pre-commit hook rejects commit, network error, etc), you can select this option to keep the commit dialog open ready to try again. However, you should be aware that this can lead to problems. If the failure means you need to update your working copy, and that update leads to conflicts you must resolve those first.
- Select items automatically
The normal behaviour in the commit dialog is for all modified (versioned) items to be selected for commit automatically. If you prefer to start with nothing selected and pick the items for commit manually, uncheck this box.
- Contact the repository on startup
The Check for Modifications dialog checks the working copy by default, and only contacts the repository when you click . If you always want to check the repository, you can use this setting to make that action happen automatically.
- Show Lock dialog before locking files
When you select one or more files and then use → to take out a lock on those files, on some projects it is customary to write a lock message explaining why you have locked the files. If you do not use lock messages, you can uncheck this box to skip that dialog and lock the files immediately.
If you use the lock command on a folder, you are always presented with the lock dialog as that also gives you the option to select files for locking.
If your project is using the
tsvn:lockmsgminsizeproperty, you will see the lock dialog regardless of this setting because the project requires lock messages.
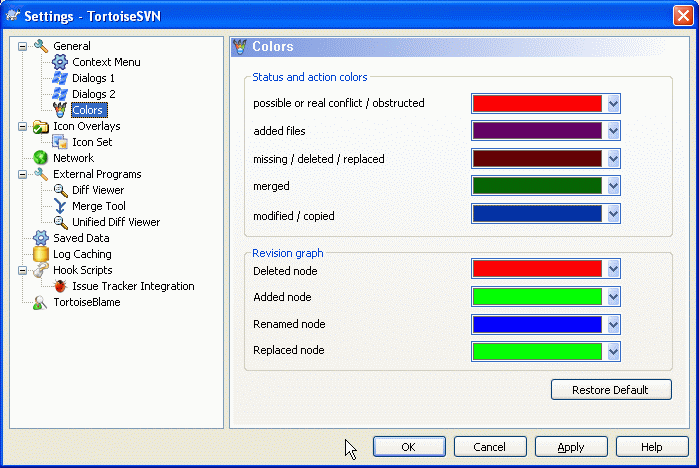
This dialog allows you to configure the text colours
used in TortoiseSVN's dialogs the way you like them.
- Possible or real conflict / obstructed
A conflict has occurred during update, or may occur during merge. Update is obstructed by an existing unversioned file/folder of the same name as a versioned one.
This colour is also used for error messages in the progress dialogs.
- Added files
Items added to the repository.
- Missing / deleted / replaced
Items deleted from the repository, missing from the working copy, or deleted from the working copy and replaced with another file of the same name.
- Merged
Changes from the repository successfully merged into the WC without creating any conflicts.
- Modified / copied
Add with history, or paths copied in the repository. Also used in the log dialog for entries which include copied items.
- Deleted node
An item which has been deleted from the repository.
- Added node
An item which has been added to the repository, by an add, copy or move operation.
- Renamed node
An item which has been renamed within the repository.
- Replaced node
The original item has been deleted and a new item with the same name replaces it.
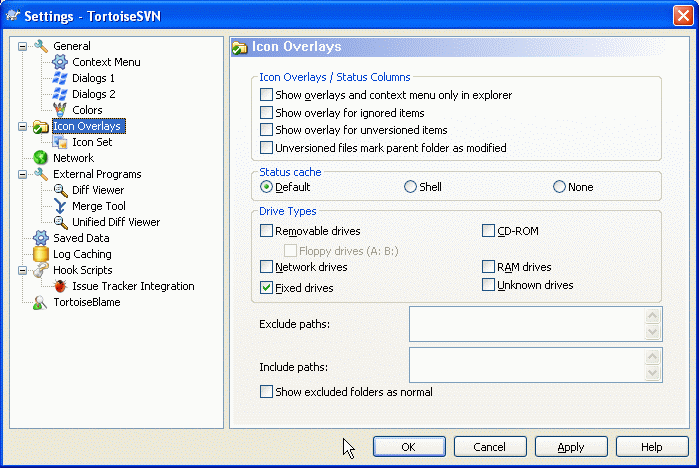
This page allows you to choose the items for which TortoiseSVN will
display icon overlays.
By default, overlay icons and context menus will appear in all open/save dialogs as well as in Windows Explorer. If you want them to appear only in Windows Explorer, check the Show overlays and context menu only in explorer box.
Ignored items and Unversioned items are not usually given an overlay. If you want to show an overlay in these cases, just check the boxes.
You can also choose to mark folders as modified if they contain unversioned items. This could be useful for reminding you that you have created new files which are not yet versioned. This option is only available when you use the default status cache option (see below).
Since it takes quite a while to fetch the status of a working copy, TortoiseSVN uses a cache to store the status so the explorer doesn't get hogged too much when showing the overlays. You can choose which type of cache TortoiseSVN should use according to your system and working copy size here:
- Default
Caches all status information in a separate process (
TSVNCache.exe). That process watches all drives for changes and fetches the status again if files inside a working copy get modified. The process runs with the least possible priority so other programs don't get hogged because of it. That also means that the status information is not real time but it can take a few seconds for the overlays to change.Advantage: the overlays show the status recursively, i.e. if a file deep inside a working copy is modified, all folders up to the working copy root will also show the modified overlay. And since the process can send notifications to the shell, the overlays on the left tree view usually change too.
Disadvantage: the process runs constantly, even if you're not working on your projects. It also uses around 10-50 MB of RAM depending on number and size of your working copies.
- Shell
Caching is done directly inside the shell extension dll, but only for the currently visible folder. Each time you navigate to another folder, the status information is fetched again.
Advantage: needs only very little memory (around 1 MB of RAM) and can show the status in real time.
Disadvantage: Since only one folder is cached, the overlays don't show the status recursively. For big working copies, it can take more time to show a folder in explorer than with the default cache. Also the mime-type column is not available.
- None
With this setting, the TortoiseSVN does not fetch the status at all in Explorer. Because of that, files don't get an overlay and folders only get a 'normal' overlay if they're versioned. No other overlays are shown, and no extra columns are available either.
Advantage: uses absolutely no additional memory and does not slow down the Explorer at all while browsing.
Disadvantage: Status information of files and folders is not shown in Explorer. To see if your working copies are modified, you have to use the “Check for modifications” dialog.
The next group allows you to select which classes of storage should show overlays. By default, only hard drives are selected. You can even disable all icon overlays, but where's the fun in that?
Network drives can be very slow, so by default icons are not shown for working copies located on network shares.
USB Flash drives appear to be a special case in that the drive type is identified by the device itself. Some appear as fixed drives, and some as removable drives.
The Exclude Paths are used to tell TortoiseSVN those paths for which it should not show icon overlays and status columns. This is useful if you have some very big working copies containing only libraries which you won't change at all and therefore don't need the overlays. For example:
f:\development\SVN\Subversion will disable
the overlays only on that specific folder. You
still can see the overlays on all files and folder inside that folder.
f:\development\SVN\Subversion* will disable the
overlays on all files and folders whose path
starts with f:\development\SVN\Subversion. That
means you won't see overlays for any files and folders below that
path.
The same applies to the Include Paths. Except that for those paths the overlays are shown even if the overlays are disabled for that specific drive type, or by an exclude path specified above.
Users sometimes ask how these three settings interact, and the definitive answer is:
if (path is in include list)
  show overlays
if (path is allowed drive type) AND (path is not in exclude list)
  show overlays
The include list always makes the overlays show. Otherwise, overlays are shown for all marked drive types unless the path is excluded.
TSVNCache.exe also uses these paths to restrict its scanning. If you want it to look only in particular folders, disable all drive types and include only the folders you specifically want to be scanned.
Exclude SUBST Drives
It is often convenient to use a SUBST drive
to access your working copies, e.g. using the command
subst T: C:\TortoiseSVN\trunk\doc
However this can cause the overlays not to update, as
TSVNCache will only receive one notification when
a file changes, and that is normally for the original path. This means
that your overlays on the subst path may never
be updated.
An easy way to work around this is to exclude the original path
from showing overlays, so that the overlays show up on the
subst path instead.
Sometimes you will exclude areas that contain working copies, which saves TSVNCache from scanning and monitoring for changes, but you still want a visual indication that such folders are versioned. The Show excluded folders as 'normal' checkbox allows you to do this. With this option, versioned folders in any excluded area (drive type not checked, or specifically excluded) will show up as normal and up-to-date, with a green check mark. This reminds you that you are looking at a working copy, even though the folder overlays may not be correct. Files do not get an overlay at all. Note that the context menus still work, even though the overlays are not shown.
As a special exception to this, drives A:
and B: are never considered for the
Show excluded folders as 'normal' option.
This is because Windows is forced to look on the drive, which can
result in a delay of several seconds when starting Explorer, even
if your PC does have a floppy drive.

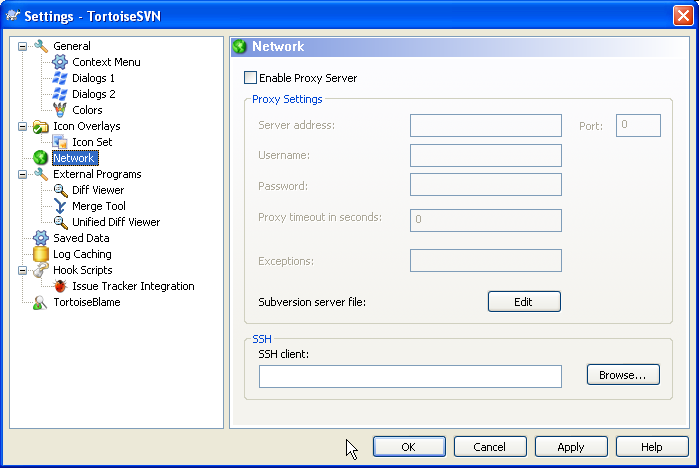
Here you can configure your proxy server, if you need one to get
through your company's firewall.
If you need to set up per-repository proxy settings, you will
need to use the Subversion servers file to
configure this. Use to get there
directly. Consult the
Runtime Configuration Area
for details on how to use this file.
You can also specify which program TortoiseSVN should use to establish a secure connection to a svn+ssh repository. We recommend that you use TortoisePlink.exe. This is a version of the popular Plink program, and is included with TortoiseSVN, but it is compiled as a Windowless app, so you don't get a DOS box popping up every time you authenticate.
You must specify the full path to the executable. For TortoisePlink.exe this is the standard TortoiseSVN bin directory. Use the button to help locate it.
One side-effect of not having a window is that there is nowhere for any error messages to go, so if authentication fails you will simply get a message saying something like “Unable to write to standard output”. For this reason we recommend that you first set up using standard Plink. When everything is working, you can use TortoisePlink with exactly the same parameters.
TortoisePlink does not have any documentation of its own because it is just a minor variant of Plink. Find out about command line parameters from the PuTTY website
To avoid being prompted for a password repeatedly, you might also consider using a password caching tool such as Pageant. This is also available for download from the PuTTY website.
Finally, setting up SSH on server and clients is a non-trivial process which is beyond the scope of this help file. However, you can find a guide in the TortoiseSVN FAQ listed under Subversion/TortoiseSVN SSH How-To .
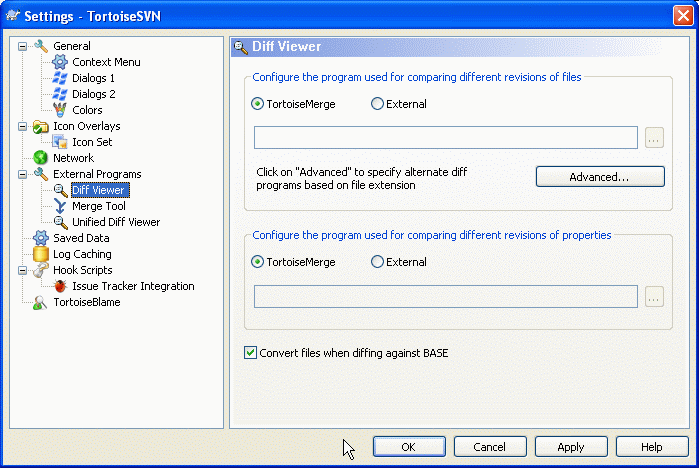
Here you can define your own diff/merge programs that TortoiseSVN
should use. The default setting is to use TortoiseMerge
which is installed alongside TortoiseSVN.
Read the section called “External Diff/Merge Tools” for a list of some of the external diff/merge programs that people are using with TortoiseSVN.
An external diff program may be used for comparing different
revisions of files. The external program will need to
obtain the filenames from the command line, along with
any other command line options. TortoiseSVN uses
substitution parameters prefixed with %.
When it encounters one of these it will substitute the
appropriate value. The order of the parameters will depend
on the Diff program you use.
- %base
The original file without your changes
- %bname
The window title for the base file
- %mine
Your own file, with your changes
- %yname
The window title for your file
The window titles are not pure filenames.
TortoiseSVN treats that as a name to display and creates
the names accordingly. So e.g. if you're doing a
diff from a file in revision 123 with a file
in your working copy, the names will be
filename : revision 123
and
filename : working copy
For example, with ExamDiff Pro:
C:\Path-To\ExamDiff.exe %base %mine
or with KDiff3:
C:\Path-To\kdiff3.exe %base %mine --L1 %bname --L2 %yname
or with WinMerge:
C:\Path-To\WinMerge.exe -e -ub -dl %bname -dr %yname %base %mine
or with Araxis:
C:\Path-To\compare.exe /max /wait /title1:%bname /title2:%yname
    %base %mine
If you use the svn:keywords property to
expand keywords, and in particular the revision
of a file, then there may be a difference between files which
is purely due to the current value of the keyword. Also if you use
svn:eol-style = native the BASE file will have
pure LF line endings whereas your file will
have CR-LF line endings. TortoiseSVN will normally hide
these differences automatically by first parsing the BASE file to
expand keywords and line endings before doing the diff operation.
However, this can take a long time with large files. If
Convert files when diffing against BASE
is unchecked then TortoiseSVN will skip pre-processing the files.
You can also specify a different diff tool to use on Subversion properties. Since these tend to be short simple text strings, you may want to use a simpler more compact viewer.
If you have configured an alternate diff tool, you can access TortoiseMerge and the third party tool from the context menus. → uses the primary diff tool, and Shift+ → uses the secondary diff tool.
An external merge program used to resolve conflicted files. Parameter substitution is used in the same way as with the Diff Program.
- %base
the original file without your or the others changes
- %bname
The window title for the base file
- %mine
your own file, with your changes
- %yname
The window title for your file
- %theirs
the file as it is in the repository
- %tname
The window title for the file in the repository
- %merged
the conflicted file, the result of the merge operation
- %mname
The window title for the merged file
For example, with Perforce Merge:
C:\Path-To\P4Merge.exe %base %theirs %mine %merged
or with KDiff3:
C:\Path-To\kdiff3.exe %base %mine %theirs -o %merged
    --L1 %bname --L2 %yname --L3 %tname
or with Araxis:
C:\Path-To\compare.exe /max /wait /3 /title1:%tname /title2:%bname
    /title3:%yname %theirs %base %mine %merged /a2
or with WinMerge (2.8 or later):
C:\Path-To\WinMerge.exe %merged
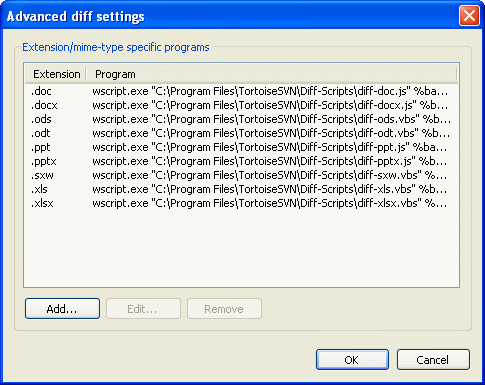
In the advanced settings, you can define a different diff and merge
program for every file extension. For instance you could associate
Photoshop as the “Diff” Program for .jpg files :-)
You can also associate the svn:mime-type property
with a diff or merge program.
To associate using a file extension, you need to specify the extension.
Use .bmp to describe Windows bitmap files.
To associate using the svn:mime-type property, specify
the mime type, including a slash, for example
text/xml.
A viewer program for unified-diff files (patch files).
No parameters are required.
The Default option is to check for
a file association for .diff files,
and then for .txt files.
If you don't have a viewer for .diff
files, you will most likely get NotePad.
The original Windows NotePad program does not behave well on files which do not have standard CR-LF line-endings. Since most unified diff files have pure LF line-endings, they do not view well in NotePad. However, you can download a free NotePad replacement Notepad2 which not only displays the line-endings correctly, but also colour codes the added and removed lines.
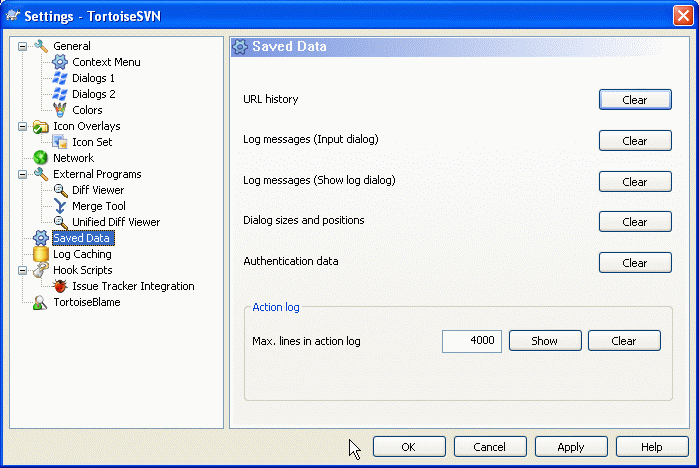
For your convenience, TortoiseSVN saves many of the settings
you use, and remembers where you have been lately. If you
want to clear out that cache of data, you can do it here.
- URL history
Whenever you checkout a working copy, merge changes or use the repository browser, TortoiseSVN keeps a record of recently used URLs and offers them in a combo box. Sometimes that list gets cluttered with outdated URLs so it is useful to flush it out periodically.
If you want to remove a single item from one of the combo boxes you can do that in-place. Just click on the arrow to drop the combo box down, move the mouse over the item you want to remove and type Shift+Del.
- Log messages (Input dialog)
TortoiseSVN stores recent commit log messages that you enter. These are stored per repository, so if you access many repositories this list can grow quite large.
- Log messages (Show log dialog)
TortoiseSVN caches log messages fetched by the Show Log dialog to save time when you next show the log. If someone else edits a log message and you already have that message cached, you will not see the change until you clear the cache. Log message caching is enabled on the Log Cache tab.
- Dialog sizes and positions
Many dialogs remember the size and screen position that you last used.
- Authentication data
When you authenticate with a Subversion server, the username and password are cached locally so you don't have to keep entering them. You may want to clear this for security reasons, or because you want to access the repository under a different username ... does John know you are using his PC?
If you want to clear authentication data for one particular server only, read the section called “Authentication” for instructions on how to find the cached data.
- Action log
TortoiseSVN keeps a log of everything written to its progress dialogs. This can be useful when, for example, you want to check what happened in a recent update command.
The log file is limited in length and when it grows too big the oldest content is discarded. By default 4000 lines are kept, but you can customize that number.
From here you can view the log file content, and also clear it.
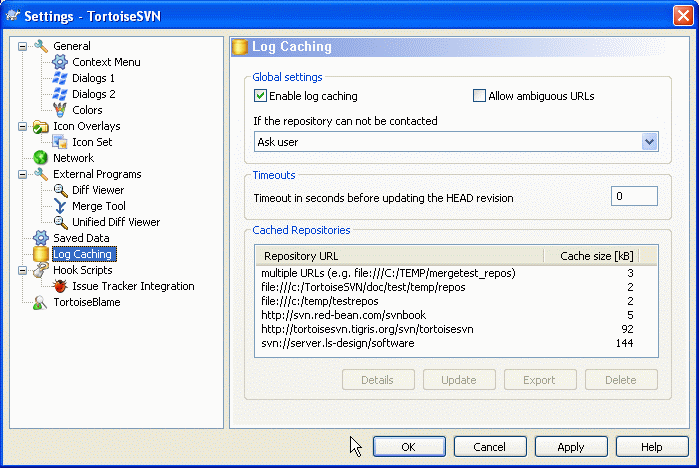
This dialog allows you to configure the log caching feature of
TortoiseSVN, which retains a local copy of log messages and changed
paths to avoid time-consuming downloads from the server. Using the
log cache can dramatically speed up the log dialog and the revision graph.
Another useful feature is that the log messages can still be
accessed when offline.
- Enable log caching
Enables log caching whenever log data is requested. If checked, data will be retrieved from the cache when available, and any messages not in the cache will be retrieved from the server and added to the cache.
If caching is disabled, data will always be retrieved directly from the server and not stored locally.
- If the repository cannot be contacted
If you are working offline, or if the repository server is down, the log cache can still be used to supply log messages already held in the cache. Of course the cache may not be up-to-date, so there are options to allow you to select whether this feature should be used.
When log data is being taken from the cache without contacting the server, the dialog using those message will show the offline state in its title bar.
- Timeout before updating the HEAD revision
When you invoke the log dialog you will normally want to contact the server to check for any newer log messages. If the timeout set here is non-zero then the server will only be contacted when the timeout has elapsed since the last time contact. This can reduce server round-trips if you open the log dialog frequently and the server is slow, but the data shown may not be completely up-to-date. If you want to use this feature we suggest using a value of 300 (5 minutes) as a compromise.
Below the settings you can see a list of the repositories that are cached locally, and the space used for the cache. If you select one of the repositories you can then use the buttons underneath.
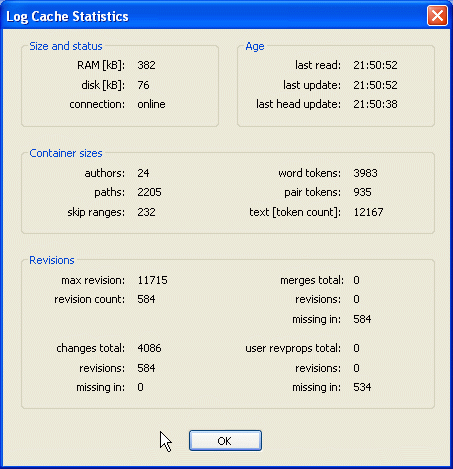
Click on the button to see
detailed statistics for a particular cache. Many of the fields
shown here are mainly of interest to the developers of TortoiseSVN,
so they are not all described in detail.
- RAM
The amount of memory required to service this cache.
- Disk
The amount of disk space used for the cache. Data is compressed, so disk usage is generally fairly modest.
- Connection
Shows whether the repository was available last time the cache was used.
- Last update
The last time the cache content was changed.
- Last head update
The last time we requested the HEAD revision from the server.
- Authors
The number of different authors with messages recorded in the cache.
- Paths
The number of paths listed, as you would see using
svn log -v.- Skip ranges
The number of revision ranges which we have not fetched, simply because they haven't been requested. This is a measure of the number of holes in the cache.
- Max revision
The highest revision number stored in the cache.
- Revision count
The number of revisions stored in the cache. This is another measure of cache completeness.
Click on the to completely refresh the cache and fill in any holes. For a large repository this could be very time consuming, but useful if you are about to go offline and want the best available cache.
Click on the button to export the entire cache as a set of CSV files. This could be useful if you want to process the log data using an external program, although it is mainly useful to the developers.
Click on to remove all cached data for the selected repositories. This does not disable caching for the repository so the next time you request log data, a new cache will be created.

This dialog allows you to set up hook scripts which will be
executed automatically when certain Subversion actions are performed.
As opposed to the hook scripts explained in the section called “Hook Scripts”,
these scripts are executed locally on the client.
One application for such hooks might be to call a program like
SubWCRev.exe to update version numbers after a commit,
and perhaps to trigger a rebuild.
For various security and implementation reasons, hook scripts are defined locally on a machine, rather than as project properties. You define what happens, no matter what someone else commits to the repository. Of course you can always choose to call a script which is itself under version control.
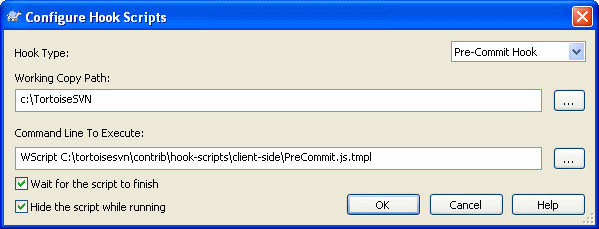
To add a new hook script, simply click
and fill in the details.
There are currently six types of hook script available
- Start-commit
Called before the commit dialog is shown. You might want to use this if the hook modifies a versioned file and affects the list of files that need to be committed and/or commit message.
- Pre-commit
Called after the user clicks in the commit dialog, and before the actual commit begins.
- Post-commit
Called after the commit finishes (whether successful or not).
- Start-update
Called before the update-to-revision dialog is shown.
- Pre-update
Called before the actual Subversion update begins.
- Post-update
Called after the update finishes (whether successful or not).
A hook is defined for a particular working copy path. You only need to specify the top level path; if you perform an operation in a sub-folder, TortoiseSVN will automatically search upwards for a matching path.
Next you must specify the command line to execute, starting with the path to the hook script or executable. This could be a batch file, an executable file or any other file which has a valid windows file association, eg. a perl script.
The command line includes several parameters which get filled in by TortoiseSVN. The parameters available depend upon which hook is called. Each hook has its own parameters which are passed in the following order:
- Start-commit
PATHMESSAGEFILECWD- Pre-commit
PATHDEPTHMESSAGEFILECWD- Post-commit
PATHDEPTHMESSAGEFILEREVISIONERRORCWD- Start-update
PATHCWD- Pre-update
PATHDEPTHREVISIONCWD- Post-update
PATHDEPTHREVISIONERRORCWD
The meaning of each of these parameters is described here:
- PATH
A path to a temporary file which contains all the paths for which the operation was started. Each path is on a separate line in the temp file.
- DEPTH
The depth with which the commit/update is done.
Possible values are:
- -2
svn_depth_unknown- -1
svn_depth_exclude- 0
svn_depth_empty- 1
svn_depth_files- 2
svn_depth_immediates- 3
svn_depth_infinity
- MESSAGEFILE
Path to a file containing the log message for the commit. The file contains the text in UTF-8 encoding. After successful execution of the start-commit hook, the log message is read back, giving the hook a chance to modify it.
- REVISION
The repository revision to which the update should be done or after a commit completes.
- ERROR
Path to a file containing the error message. If there was no error, the file will be empty.
- CWD
The current working directory with which the script is run. This is set to the common root directory of all affected paths.
If you want the Subversion operation to hold off until the hook has completed, check Wait for the script to finish.
Normally you will want to hide ugly DOS boxes when the script runs, so Hide the script while running is checked by default.
TortoiseSVN can use a COM plugin to query issue trackers when in the commit dialog. The use of such plugins is described in the section called “Getting Information from the Issue Tracker”. If your system administrator has provided you with a plugin, which you have already installed and registered, this is the place to specify how it integrates with your working copy.
Click on to use the plugin with
a particular working copy. Here you can specify the working copy
path, choose which plugin to use from a drop down list of all
registered issue tracker plugins, and any parameters to pass.
The parameters will be specific to the plugin, but might include
your user name on the issue tracker so that the plugin can
query for issues which are assigned to you.
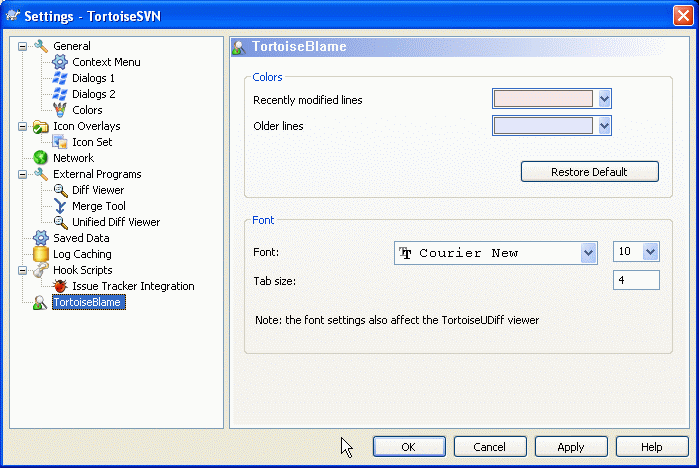
The settings used by TortoiseBlame are controlled from the
main context menu, not directly with TortoiseBlame itself.
- Colors
TortoiseBlame can use the background colour to indicate the age of lines in a file. You set the endpoints by specifying the colours for the newest and oldest revisions, and TortoiseBlame uses a linear interpolation between these colours according to the repository revision indicated for each line.
- Font
You can select the font used to display the text, and the point size to use. This applies both to the file content, and to the author and revision information shown in the left pane.
- Tabs
Defines how many spaces to use for expansion when a tab character is found in the file content.
A few infrequently used settings are available only by editing the registry directly.
- Configuration
You can specify a different location for the Subversion configuration file using registry location
HKCU\Software\TortoiseSVN\ConfigDir. This will affect all TortoiseSVN operations.- Cache tray icon
To add a cache tray icon for the TSVNCache program, create a
DWORDkey with a value of 1 atHKCU\Software\TortoiseSVN\CacheTrayIcon. This is really only useful for developers as it allows you to terminate the program gracefully.- Filenames without extensions in auto-completion list
The auto-completion list shown in the commit message editor displays the names of files listed for commit. To also include these names with extensions removed, create a
DWORDkey with a value of 1 atHKCU\Software\TortoiseSVN\AutocompleteRemovesExtensions.- Explorer columns everywhere
The extra columns the TortoiseSVN adds to the details view in Windows Explorer are normally only active in a working copy. If you want those to be accessible everywhere, not just in working copies, create a
DWORDkey with a value of 1 atHKCU\Software\TortoiseSVN\ColumnsEveryWhere.- Merge log separator
When you merge revisions from another branch, and merge tracking information is available, the log messages from the revisions you merge will be collected to make up a commit log message. A pre-defined string is used to separate the individual log messages of the merged revisions. If you prefer, you can create a
SZkey atHKCU\Software\TortoiseSVN\MergeLogSeparatorcontaining a separator string of your choice.- Always blame changes with TortoiseMerge
TortoiseSVN allows you to assign external diff viewer. Most such viewers, however, are not suited for change blaming (the section called “Blame Differences”), so you might wish to fall back to TortoiseMerge in this case. To do so, create a
DWORDkey with a value of 1 atHKCU\Software\TortoiseSVN\DiffBlamesWithTortoiseMerge.
VS.NET 2003 when used with web projects can't handle the .svn
folders that Subversion uses to store its internal information.
This is not a bug in Subversion. The bug is in VS.NET 2003 and the frontpage
extensions it uses.
As of Version 1.3.0 of Subversion and TortoiseSVN, you can set
the environment variable SVN_ASP_DOT_NET_HACK.
If that variable is set, then Subversion will use _svn
folders instead of .svn folders. You must restart
your shell for that environment variable to take effect. Normally that means
rebooting your PC. To make this easier, you can now do this from
the general settings page using a simple checkbox -
refer to the section called “General Settings”.
For more information, and other ways to avoid this problem in the first place, check out the article about this in our FAQ .