Table of Contents
- Getting Started
- Importing Data Into A Repository
- Checking Out A Working Copy
- Committing Your Changes To The Repository
- Update Your Working Copy With Changes From Others
- Resolving Conflicts
- Getting Status Information
- Change Lists
- Revision Log Dialog
- Viewing Differences
- Adding New Files And Directories
- Copying/Moving/Renaming Files and Folders
- Ignoring Files And Directories
- Deleting, Moving and Renaming
- Undo Changes
- Cleanup
- Project Settings
- Branching / Tagging
- Merging
- Locking
- Creating and Applying Patches
- Who Changed Which Line?
- The Repository Browser
- Revision Graphs
- Exporting a Subversion Working Copy
- Relocating a working copy
- Integration with Bug Tracking Systems / Issue Trackers
- Integration with Web-based Repository Viewers
- TortoiseSVN's Settings
- Final Step
This document describes day to day usage of the TortoiseSVN client. It is not an introduction to version control systems, and not an introduction to Subversion (SVN). It is more like a place you may turn to when you know approximately what you want to do, but don't quite remember how to do it.
If you need an introduction to version control with Subversion, then we recommend you read the fantastic book: Version Control with Subversion .
This document is also a work in progress, just as TortoiseSVN and Subversion are. If you find any mistakes, please report them to the mailing list so we can update the documentation. Some of the screenshots in the Daily Use Guide (DUG) might not reflect the current state of the software. Please forgive us. We're working on TortoiseSVN in our free time.
In order to get the most out of the Daily Use Guide:
You should have installed TortoiseSVN already.
You should be familiar with version control systems.
You should know the basics of Subversion.
You should have set up a server and/or have access to a Subversion repository.
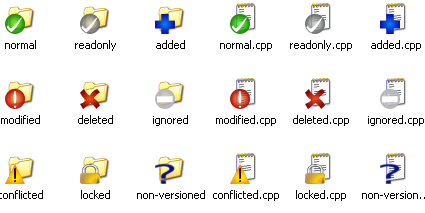
One of the most visible features of TortoiseSVN is the icon
overlays which appear on files in your working copy. These
show you at a glance which of your files have been modified.
Refer to the section called “Icon Overlays” to find out
what the different overlays represent.
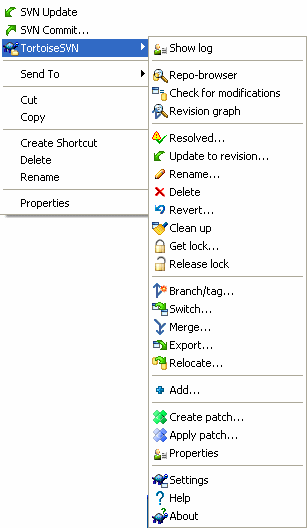
All TortoiseSVN commands are invoked from the context menu of the windows
explorer. Most are directly visible, when you right click
on a file or folder. The commands that are available depend on whether the
file or folder or its parent folder is under version control or not.
You can also see the TortoiseSVN menu as part of the Explorer file menu.
Tip
Some commands which are very rarely used are only available in the extended context menu. To bring up the extended context menu, hold down the Shift key when you right-click.
In some cases you may see several TortoiseSVN entries. This is not a bug!
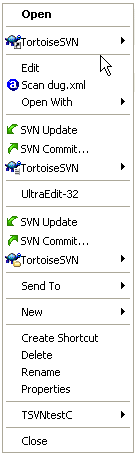
This example is for an unversioned shortcut within a versioned folder, and
in the Explorer file menu there are three entries
for TortoiseSVN. One is for the folder, one for the shortcut itself,
and the third for the object the shortcut is pointing to.
To help you distinguish between them, the icons have an indicator in the
lower right corner to show whether the menu entry is for a file,
a folder, a shortcut or for multiple selected items.
If you are using Windows 2000 you will find that the context menus are shown as plain text, without the menu icons shown above. We are aware that this was working in previous versions, but Microsoft has changed the way its icon handlers work for Vista, requiring us to use a different display method which unfortunately does not work on Windows 2000.

Other commands are available as drag handlers, when you right drag
files or folders to a new location inside working copies or when you
right drag a non-versioned file or folder into a directory
which is under version control.
Some common operations have well-known Windows shortcuts, but do not appear on buttons or in menus. If you can't work out how to do something obvious, like refreshing a view, check here.
- F1
Help, of course.
- F5
Refresh the current view. This is perhaps the single most useful one-key command. For example ... In Explorer this will refresh the icon overlays on your working copy. In the commit dialog it will re-scan the working copy to see what may need to be committed. In the Revision Log dialog it will contact the repository again to check for more recent changes.
- Ctrl-A
Select all. This can be used if you get an error message and want to copy and paste into an email. Use Ctrl-A to select the error message and then ...
- Ctrl-C
... Copy the selected text.
If the repository that you are trying to access is password protected, an authentication Dialog will show up.
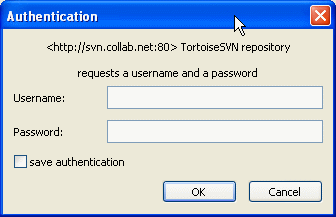
Enter your username and password. The checkbox will make TortoiseSVN
store the credentials in Subversion's default directory:
%APPDATA%\Subversion\auth in three subdirectories:
svn.simplecontains credentials for basic authentication (username/password).svn.ssl.servercontains SSL server certificates.svn.usernamecontains credentials for username-only authentication (no password needed).
If you want to clear the authentication cache for all
servers, you can do so from the Saved Data page
of TortoiseSVN's settings dialog. That button will clear all cached
authentication data from the Subversion auth
directories, as well as any authentication
data stored in the registry by earlier versions of TortoiseSVN.
Refer to the section called “Saved Data Settings”.
For more information on how to set up your server for authentication and access control, refer to Chapter 3, Setting Up A Server
Many of TortoiseSVN's dialogs have a lot of information to display, but it is often useful to maximize only the height, or only the width, rather than maximizing to fill the screen. As a convenience, there are shortcuts for this on the Maximize button. Use the middle mouse button to maximize vertically, and right mouse to maximize horizontally.