NavMesh Layers (Pro only)
The primary task of the navigation system is finding the optimal path between two points in navigation-space. In the simplest case, the optimal path is the shortest path. However, in many complex environments, some areas are harder to move thru than others (for example, crossing a river can be more costly than running across a bridge). To model this, Unity utilizes the concept of cost and the optimal path is defined as the path with the lowest cost. To manage costs, Unity has the concept of Navmesh Layers. Each geometry marked up as Navmesh Static will belong to a Navmesh Layer.
During pathfinding, instead of comparing lengths of potential path segments, the cost of each segment is evaluated. This is a done by scaling the length of each segment by the cost of the navmesh layer for that particular segment. Note that when all costs are set to 1, the optimal path is equivalent to the shortest path.
To define custom navmesh layers for a project, you should click on the tab.
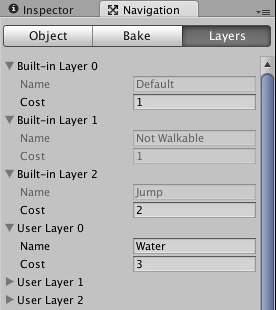
You then need to open one of the User Layer foldouts, and set up the name and cost values. The name will be used throughout the editor and from scripts to identify the navmesh layer. The cost indicates how "difficult" it is to traverse the NavMesh layer; the difficulty can refer to the quality of terrain (eg, muddy ground is slower to cross than solid ground), the degree of danger (eg, exposed areas are more open to gunfire than covered areas) or various other concepts that affect AI behaviour. The default value for the cost is 1 and other values indicate the cost difference in proportion to the default.
There are also three built-in layers you can use. Default is used for all navmesh areas that are not covered by any other layers. Not walkable indicates to the navigation system that an area can't be crossed and so the cost is ignored. Jump specifies the cost of automatically generated off-mesh links.
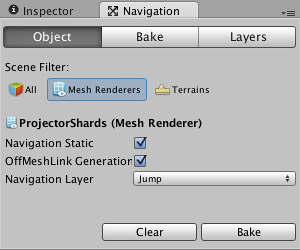
To apply custom layers to specific geometry, firstly select the geometry in the editor and then open the window (->). Go to the tab, and select the desired for that object.
If you have enabled in the window, the different layers will show up in different colors in the editor.
You can also specify which layers a given agent can or cannot traverse. To do this, select NavMeshAgent component of the agent's geometry and modify the NavMesh Walkable property. You also need to set the agent's destination property appropriately from a script
Note: Setting the cost value below 1 is not recommended, as the underlying pathfinding method does not guarantee an optimal path in this case.
Page last updated: 2013-09-19