YUI Library Examples: Uploader Control (experimental): Advanced Uploader Example
Uploader Control (experimental): Advanced Uploader Example
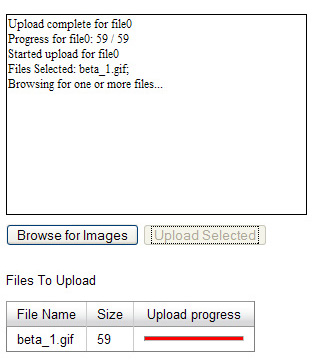
In this example, we will pair the YUI Uploader Control with the DataTable Control to give the user visual feedback on the progress of their file upload. When the user selects multiple files for upload, a DataTable will be populated with the list of files and their sizes. When the user starts the upload process, they'll see progress bars next to each of the files as they upload.
Note: The YUI Uploader Control requires Flash Player 9.0.45 or higher. The latest version of Flash Player is available at the Adobe Flash Player Download Center.
Note: The YUI Uploader Control requires the uploader.swf Flash file that is distributed as part of the YUI package, in the uploader/assets folder. Copy the uploader.swf to your server and set the YAHOO.Uploader.SWFURL variable to its full path.
Note: This example requires a backend component to receive uploaded files. Download the source for this example below to use on your own server.
When you have the example running on your own server, it should look like the screenshot below:
Using Uploader with the DataTable Control to Handle Multi-file Uploads with Progress Feedback
Just as we did in the Simple Example, we start with including all the necessary files. We will need the base YUI files, as well as files specific to the Logger, Uploader, and DataTable.
Next, just as we did in the Simple Example, we add a container div where the Uploader Control will be placed. If you don't want it to be visible, feel free to set the size of the container element to height:0; width:0 (with overflow:hidden). We also add the "Browse" and "Upload" buttons:
We also need to put in one additional placeholder div into which we'll render the DataTable:
Next, we initialize the Logger and the Uploader, and place them on the page. We'll also initialize an uploadCounter that we will use to upload the files one at a time, a fileIdHash to keep the record between rows of the DataTable and the file ids, and a dataArr where we'll hold the necessary file information (we'll also use it to instantiate the DataTable).
In the browse() function, we clear the file list, and call the uploader.browse function, passing true as the first argument (which means the user will be able to select multiple files by holding the Shift button). We also pass the file extension filter array, allowing for three types of image files:
Once we have received the list of files from the onFileSelect function (defined below), we will call the createDataTable function that will populate our variables, create a new DataSource based on the file list, and create the DataTable to display it:
In the upload function, we initiate the upload of the file that's indicated by the uploadCounter. The uploadCounter is incremented every time a preceding upload is complete (see onUploadComplete below):
When we receive the uploadProgress event, we need to update the corresponding row of the DataTable. We use a simple HTML horizontal rule as a progress bar and update its width based on the progress of the upload:
When files are selected, we call createDataTable (described above):
After the start of each file upload, it may be awhile before the first uploadProgress event comes in. Thus, we want the user know that the upload has started. On the uploadStart event, we update the respective row of the DataTable to reflect that the upload is in progress:
Finally, when the upload is complete, we either initiate the next upload, or, if the uploadCounter has equalized with the number of files, we send an appropriate message to the Logger and halt:
Uploader Control (experimental) Examples:
More Uploader Control (experimental) Resources:
- User's Guide (external)
- API Documentation
- Cheat Sheet PDF (external)
- Yahoo! UI Library
- Home (external)
- YUIBlog (external)
- YUI Discussion Forum (external)
- YUI on Sourceforge (external)
- API Documentation
- Functional Examples
- YUI Theater (external)
- YUI License (external)
- YUI Functional Examples
- Animation
- AutoComplete
- Browser History Manager
- Button
- Calendar
- Charts (experimental)
- Color Picker
- Cookie (beta)
- Connection Manager
- Container
- DataTable (beta)
- Dom
- Drag & Drop
- Event
- Get
- ImageCropper (beta)
- ImageLoader
- JSON
- Layout Manager (beta)
- Logger
- Menu
- Profiler (beta)
- ProfilerViewer (beta)
- Resize (beta)
- Rich Text Editor (beta)
- Selector (beta)
- Slider
- TabView
- TreeView
- Uploader (experimental)
- YAHOO Global Object
- YUI Loader (beta)
- YUI Test
- Reset CSS
- Base CSS
- Fonts CSS
- Grids CSS
- YUI Articles on the YUI Website
- YUI FAQ (external)
- Graded Browser Support (external)
- Bug Reports/Feature Requests (external)
- Serving YUI Files from Yahoo! (external)
- Security Best Practices (external)
Copyright © 2008 Yahoo! Inc. All rights reserved.
Privacy Policy - Terms of Service - Copyright Policy - Job Openings