| Inkscape » Editing Basics » Selecting Objects |    |
|---|
| Inkscape » Editing Basics » Selecting Objects | |
|---|
Before objects can be manipulated, they must be selected. This section covers the myriad of ways selection can be done.
Normally, the Strumento Selettore is used for selecting
objects. To activate, click on the
![]() icon in the Casella degli Strumenti or use the keyboard shortcut (F1).
One can toggle between another tool (except the Strumento Testo when in
text enter mode) and the Strumento Selettore by
using the Space Bar if that other tool was selected
first.
icon in the Casella degli Strumenti or use the keyboard shortcut (F1).
One can toggle between another tool (except the Strumento Testo when in
text enter mode) and the Strumento Selettore by
using the Space Bar if that other tool was selected
first.
Some objects can be directly selected by other tools. For example, shapes (e.g., Rettangoli) can be directly selected with any of the strumenti forma.
Rapid double clicking on an object when the Strumento Selettore is active will select an object and change the tool to a tool appropriate for editing that object. For example, double clicking on a rectangle will select the rectangle and change the tool to the Strumento Rettangolo.
Multiple objects can be selected at the same time.
The Area di Notifica lists the number and type of objects
selected. This is especially useful when objects overlap and it
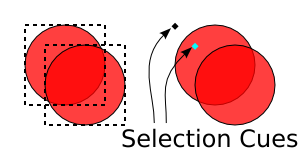
isn't clear which are selected. By default, a box is drawn around
each selected object. This can be changed to a small diamond
Selection Cue under the
Tools-Selector tab of the
Preferenze di Inkscape dialog
( →
![]() Preferenze di Inkscape...
(Shift+Ctrl+P)).
Preferenze di Inkscape...
(Shift+Ctrl+P)).
The Trova dialog ( →
![]() Trova...
(Ctrl+F)) discussed at the end of this
section, is another way of selecting objects.
Trova...
(Ctrl+F)) discussed at the end of this
section, is another way of selecting objects.
![[Suggerimento]](../images/admons/tip.png) | Suggerimento |
|---|---|
If an object cannot be selected, it may be locked. Objects can be locked against modification in the Proprietà Oggetto dialog ( → (Shift+Ctrl+O)). Unlocking individual objects requires use of the Editor XML (look for the locked object and then either delete the «sodipidi:insensitive» attribute or uncheck the Lock box in the Proprietà Oggetto dialog; see Capitolo 15, XML Editor). As of v0.46 one can unlock all objects with the command → . Objects may also be in a locked Livello (see la sezione chiamata «Layers»). |
| Suggerimento |
|---|---|
It is possible to «hide» an object by checking the
Hide box in the Proprietà Oggetto dialog.[10]Which raises the question: how do you select a hidden
object? There are several ways.
One is to use the Trova dialog ( →
|
This section covers selecting objects with a mouse. By adding Ctrl to many of the commands below, objects within a Gruppo can be selected (see la sezione chiamata «Groups»).
Left Mouse Click: Select Object: Select an object by clicking on it.
Shift+Left Mouse Click: Toggle Selection: Add or subtract an object to or from a selection. This allows multiple objects to be selected. If the object clicked on is not already selected, it will be. If it is already selected, it will be deselected.
Alt+Left Mouse Click: Select Under: Select next object below the currently selected object under the pointer. This allows one to select objects covered by others. Repeat to move downward in z-order. If the bottommost object is already selected, this will select the topmost object.
Left Mouse Drag: Select Multiple Objects: When started from empty space, this will select all objects that are completely within the rectangle that is formed by the start and stop points of the drag. This is often referred to as elastico selecting. The rubber band is the temporary line drawn while dragging.
Shift+Left Mouse Drag: Add Objects to Collection: Add objects within the rubber band to a preexisting selection. Also inhibits selection of an object under the start of the drag (without the shift, an object under the start of a drag is selected and moved). Selected objects within the rubber band are not deselected.
Alt+Left Mouse Drag: Touch Select Multiple Objects: This will select all objects that the mouse cursor touches while being dragged. A red line will indicate the path the cursor took. This is very useful when needing to select multiple paths as found in engravings or hair. The drag must begin with no object selected and at a point where no object is under the cursor (otherwise the selected object[s] or object under the cursor will be moved).
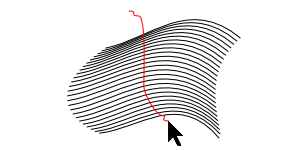
New in v0.46.
Shift+Alt+Left Mouse Drag: Touch-Add Multiple Objects to Collection: This will add all objects touched to a selection. It can also be used when the drag begins over an object.
Most selecting of objects is done with the mouse. However, there are a few handy keyboard shortcuts.
Tab: Select next object in z-order, that is the next object above the previous selected object. If no object is selected, it will select the lowest object. Works for objects in current Livello.
Shift+Tab: Select previous object in z-order, that is the next object below the previous selected object. If no object is selected, it will select the highest object, which is normally the last object created. Works for objects in current Livello.
Ctrl+A: Select All: Selects all objects in current Livello.
Shift+Ctrl+A: Select All in All Layers: Selects all objects in all visible and unlocked Livelli.
!: Invert Selection: Invert selection in current Livello. That is, all selected objects are deselected and all unselected objects are selected.
Alt+!: Invert selection in all visible and unlocked Livelli. That is, all selected objects are deselected and all unselected objects are selected.
Esc: Deselect: Deselect all selected objects.
Select All, Select All in All Layers, Invert Selection, and Deselect are also available under the Edit menu.
The Trova dialog ( →
![]() Trova...
(Ctrl+F)) is another way to select
objects with common features. A search is made through the
SVG file and the found objects are selected on
the Inkscape canvas.
Trova...
(Ctrl+F)) is another way to select
objects with common features. A search is made through the
SVG file and the found objects are selected on
the Inkscape canvas.
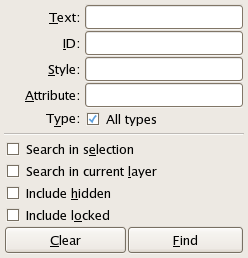
The Trova dialog has two parts. The top part defines what is searched for while the bottom part defines where to search.
You can specify a Text string (in a text object), ID name (e.g., «rect1314»), Style feature (e.g., «fill-opacity»), or an Attribute type (e.g., «width») for the search. The matches can be full or partial (i.e., «rect» would match «rect1314» and «rect1316»).
With the check boxes, you can specify where to search. If the All types box is checked, the search will take place in all objects (shapes, paths, text strings...). If the box is not checked, a list of object types is presented that can be individually include or excluded from the search.
The Search in selection box determines if the search is limited to the currently selected objects. The Search in current layer box determines if the search is limited to the currently selected layer. The Include hidden box determines if hidden objects are included in the search while the Include locked box determines if locked objects are included in the search.
At the very bottom of the dialog are two buttons: the first, Clear, to clear the search entry boxes and the second, Find, to perform the actual search. All objects that are found to match the search criteria are selected.
[10] Why would you want to hide and object? One example would be to save a text object before converting it into a path in case you ever wanted to edit the text again.
| |  | |
| Undo and Redo |  | Copying, Pasting, and Deleting Objects |
© 2005-2008 Tavmjong Bah. | Get the book. |