Fades
From Audacity Manual
Linear Fades
These basic fades apply a fade to the selected audio such that the amplitude of the selection goes from absolute silence to the original amplitude (Fade In), or from the original amplitude to absolute silence (Fade Out). The shape of the fade is linear, so it appears as a straight line from beginning to end (when viewed in the default linear Waveform View Mode). The speed of the fade in or out is therefore constant throughout its length and depends entirely on the length selected for the fade.
Fade In
- Accessed by:

A fade in is often applied over a very short audio selection (less than a second). You may get a more "musical" result by applying a linear fade in three times to the same audio selection. This approximates an exponentially shaped fade in.
Fade Out
- Accessed by:

A fade out is often applied to a longer selection than a fade in, typically to a selection up to about ten seconds long.
Cross Fades
Despite their names these effects do not perform an automatic "crossfade" between two tracks or adjoining audio, where the audio coming to an end would fade out at the same time the following audio fades in. Instead Cross Fades apply a curve that is different from the linear Fade in and Fade Out. The curve used is one that will result in equal RMS (average) volume throughout the faded section once the faded in and faded out sections are mixed.
As with linear fades and Studio Fade Out, the fades are between silence and original volume.
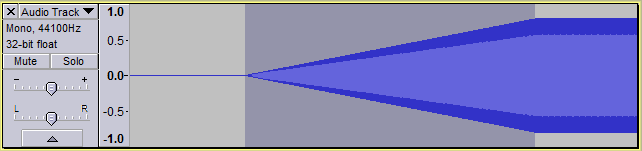
Cross Fade In
- Accessed by:


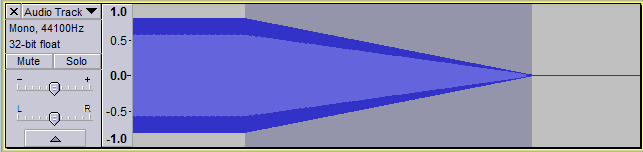
Cross Fade Out
- Accessed by:
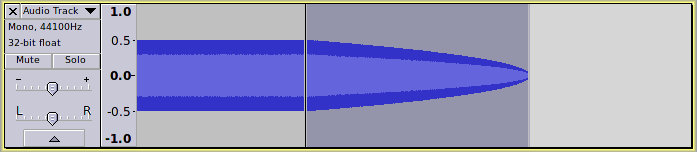

After a Cross Fade
If the two waveforms above (Cross Fade In and Out) were on separate tracks then rendered so as to mix the waveforms together, a section of audio with equal average volume (the inner light blue part of the waveform) would result as below. The peak volume of the crossfade (the outer dark blue part) does increase, but the volume still sounds constant because average volume level is a much stronger indicator than peak levels of "perceived" loudness.

| We chose constant amplitude white noise rather than tones to illustrate the crossfade because two sections of noise are much less correlated (alike) than two sections of tone. As a result, the raising of peak level in the fade is much less extreme than if we had crossfaded tones. Had we crossfaded music (which is usually a little more correlated than noise), average volume would still have remained constant. The peak level could possibly have risen too, though this would appear much less obvious because of the naturally more "spiky" (variable) peak levels. |
- Depending on the material, both these methods might cause a gain in peak amplitude (as illustrated above) with a risk of clipping. In that case, try using the linear fades or the "S" curves in Adjustable Fade.
Additional Shaped Fades
Studio Fade Out
- Accessed by:
Produces a smooth and "musical" sounding fade out from original volume to silence by applying a doubly-curved (S-shape) fade and fading out the higher frequencies a little quicker than the lower frequencies. It gives a "going off into the distance" type of sound rather than sounding like a "mechanical" fade out. This technique has found favor in recording studios for CD and LP tracks.

Adjustable Fade
This has a dialog box where you can choose the shape of the fade in or fade out to be applied. You can also create "partial" fades to and from other than silence and original volume. An example of this might be a fade in from 20% of the original volume to 80% of the original volume. The "Handy Presets" at the bottom offer a choice of six pairs of fade in or fade out shapes, fading between silence and original volume.
- Accessed by:
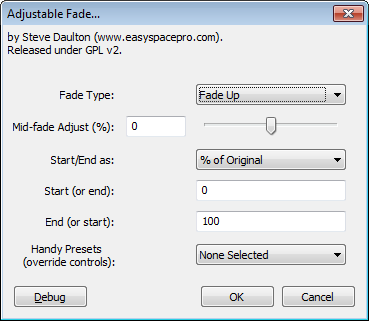

| Choosing a preset disables all the other controls irrespective of their setting. Therefore to make a partial fade you must choose the Start and End values then use the other controls above to determine the fade shape and direction. |
Example of fading using Adjustable Fade
The image below shows the result of a partial fade down from original volume to 30%, applied to a the selected part of a constant amplitude sine tone. The shape is exponential (the fade down becomes slower with time), as produced by setting "Mid-fade Adjust" to a value of -50%.

By using Adjustable Fade with different settings on different sections of the audio, almost any fade shape or combination of shapes can be produced, entirely using the keyboard.