Couchbase in the cloud
Couchbase Server is extremely easy to deploy in the cloud.
From the software’s perspective, there is really no difference between being installed on bare-metal or virtualized operating systems. On the other hand, the management and deployment characteristics of the cloud warrant a separate discussion on the best ways to use Couchbase.
For the purposes of this discussion, “the cloud” is referred to as Amazon’s EC2 environment since that is by far the most common cloud-based environment. However, the same considerations apply to any environment that acts like EC2 (an organization’s private cloud for example). In terms of the software itself, extensive testing has been done within EC2 (and some of Couchbase's largest customers have already deployed Couchbase there for production use). Because of this, we have encountered and resolved a variety of bugs only exposed by the sometimes unpredictable characteristics of this environment.
We have written a number of RightScale templates to help you deploy within Amazon. Sign up for a free RightScale account to try it out. The templates handle almost all of the special configuration needed to make your experience within EC2 successful. Direct integration with RightScale also enables us to do some pretty cool things with auto-scaling and prepackaged deployment.
We’ve also authored an AMI for use within EC2 independent of RightScale. When using these, you will have to handle the specific complexities yourself. You can find this AMI by searching for ‘couchbase’ in Amazon’s EC2 portal.
When deploying within the cloud, consider the following areas:
- Local storage being ephemeral
- IP addresses of a server changing from runtime to runtime
- Security groups/firewall settings
Handling instance reboot in cloud
Many cloud providers warn users that they need to reboot certain instances for maintenance. Couchbase Server ensures these reboots won’t disrupt your application. Take the following steps to make that happen:
- Install Couchbase on the new node.
- From the user interface, add the new node to the cluster.
- From the user interface, remove the node that you wish to reboot.
- Rebalance the cluster.
- Shut down the instance.
Local storage
Dealing with local storage is not very much different than a data center deployment. However, EC2 provides an interesting solution. Through the use of EBS storage, you can prevent data loss when an instance fails. Writing Couchbase data and configuration to EBS creates a reliable medium of storage. There is direct support for using EBS within RightScale and, of course, you can set it up manually.
Using EBS is definitely not required, but you should make sure to follow the best practices around performing backups.
Keep in mind that you will have to update the per-node disk path when configuring Couchbase to point to wherever you have mounted an external volume.
Handling changes in IP addresses
When you use Couchbase Server in the cloud, server nodes can use internal or public IP addresses. Because IP addresses in the cloud can change quite frequently, you can configure Couchbase to use a hostname instead of an IP address.
For Amazon EC2 we recommend you use Amazon-generated hostnames which then will automatically resolve to either the internal or external address.
By default Couchbase Servers use specific IP addresses as a unique identifier. If the IP changes, an individual node will not be able to identify its own address, and other servers in the same cluster will not be able to access it. To configure Couchbase Server instances in the cloud to use hostnames, follow the steps later in this section. Note that RightScale server templates provided by Couchbase can automatically configure a node with a provided hostname.
Make sure that your hostname always resolves to the IP address of the node. This can be accomplished by using a dynamic DNS service such as DNSMadeEasy which will allow you to automatically update the hostname when an underlying IP address changes.
The following steps completely destroys any data and configuration from the node, so you should start with a fresh Couchbase install. If you already have a running cluster, you can rebalance a node out of the cluster, make the change, and then rebalance it back into the cluster.
Nodes with both IPs and hostnames can exist in the same cluster. When you set the IP address using this method, you should not specify the address as localhost or 127.0.0.1 as this will be invalid when used as the identifier for multiple nodes within the cluster. Instead, use the correct IP address for your host.
Linux and Windows 2.1 and above
As a rule, you should set the hostname before you add a node to a cluster. You can also provide a hostname in these ways: when you install a Couchbase Server node or when you do a REST API call before the node is part of a cluster. You can also add a hostname to an existing cluster for an online upgrade. If you restart, any hostname you establish with one of these methods will be used.
Linux and Windows 2.0.1 and earlier
For Couchbase Server 2.0.1 and earlier you must follow a manual process where you edit config files for each node which we describe below for Couchbase in the cloud.
Security groups/firewall settings
It’s important to make sure you have both allowed AND restricted access to the appropriate ports in a Couchbase deployment. Nodes must be able to talk to one another on various ports, and it is important to restrict both external and internal access to only authorized individuals. Unlike a typical data center deployment, cloud systems are open to the world by default, and steps must be taken to restrict access.
Using Couchbase Server on RightScale
Couchbase partners with RightScale to provide preconfigured RightScale ServerTemplates that you can use to create an individual or array of servers and start them as a cluster. Couchbase Server RightScale ServerTemplates enable you to quickly set up Couchbase Server on Amazon Elastic Compute Cloud (Amazon EC2) servers in the Amazon Web Services (AWS) cloud through RightScale.
The templates also provide support for Amazon Elastic Block Store (Amazon EBS) standard volumes and Provisioned IOPS volumes. (IOPS is an acronym for input/output operations per second.) For more information about Amazon EBS volumes and their capabilities and limitations, see Amazon EBS Volume Types.
Couchbase provides RightScale ServerTemplates based on Chef and, for compatibility with existing systems, non-Chef-based ServerTemplates.
Before you can set up Couchbase Server on RightScale, you need a RightScale account and an AWS account that is connected to your RightScale account.
At a minimum, you need RightScale user role privileges to work with the Couchbase RightScale ServerTemplates: actor, designer, library, observer, and server_login. To add privileges: from the RightScale menu bar, click Settings > Account Settings > Users and modify the permission list.
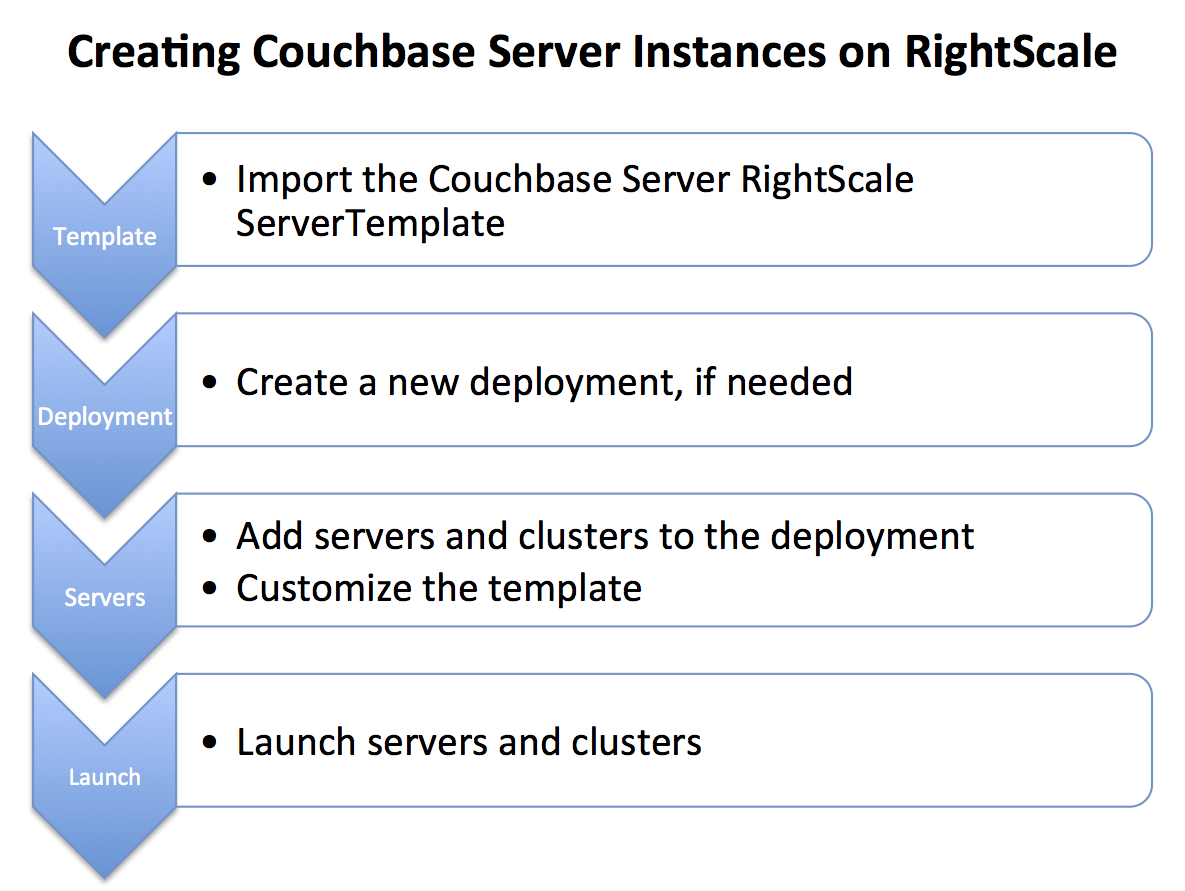
To set up Couchbase Server on RightScale, you need to import and customize a ServerTemplate. After the template is customized, you can launch server and cluster instances. The following figure illustrates the workflow:
The following procedures do not describe every parameter that you can modify when working with the RightScale ServerTemplates. If you need more information about a parameter, click the info button located near the parameter name.
To import the Couchbase Server RightScale ServerTemplate:
- From the RightScale menu bar, select Design > MultiCloud Marketplace > ServerTemplates.
- In the Keywords box on the left under Search, type couchbase, and then click Go.
- In the search results list, click on the latest version of the Couchbase Server
ServerTemplate.
The name of each Couchbase template in the list contains the Couchbase Server version number.
- Click Import.
- Review each page of the end user license agreement, and then click Finish to accept the agreement.
To create a new deployment:
- From the RightScale menu bar, select Manage > Deployments > New.
- Enter a Nickname and Description for the new deployment.
- Click Save.
To add a server or cluster to a deployment:
- From the RightScale menu bar, select Manage > Deployments.
- Click the nickname of the deployment that you want to place the server or cluster in.
- From the deployment page menu bar, add the server or cluster:
- To add a server, click Add Server.
- To add a cluster, click Add Array.
- In the Add to Deployment window, select a cloud and click Continue.
- On the Server Template page, select a template from the list.
If you have many server templates in your account, you can reduce the number of entries in the list by typing a keyword from the template name into the Server Template Name box under Filter Options.
- Click Server Details.
- On the Server Details page, choose settings for Hardware:
Server Name or Array Name—Enter a name for the new server or array.
Instance Type—The default is extra large. The template supports only large or extra large instances and requires a minimum of 4 cores.
EBS Optimized—Select the check box to enable EBS-optimized volumes for Provisioned IOPS.
- Choose settings for Networking:
-
SSH Key—Choose an SSH key.
-
Security Groups—Choose one or more security groups.
-
- If you are adding a cluster, click Array Details, and then choose settings for
Autoscaling Policy and Array Type Details.
Under Autoscaling Policy, you can set the minimum and maximum number of active servers in the cluster by modifying the Min Count and Max Count parameters. If you want a specific number of servers, set both parameters to the same value.
- Click Finish.
To customize the template for a server or a cluster:
- From the RightScale menu bar, select Manage > Deployments.
- Click the nickname of the deployment that the server or cluster is in.
- Click the nickname of the server or cluster.
- On the Server or Server Array page, click the Inputs tab, and then click edit.
- Expand the BLOCK_DEVICE category and modify inputs as needed.
The BLOCK_DEVICE category contains input parameters that are specific to storage. Here’s a list of some advanced inputs that you might want to modify:
- I/O Operations per Second—Number of input/output operations per second (IOPS) that the volume can support
- Volume Type—Type of storage device
- Expand the DB_COUCHBASE category and modify inputs as needed.
The DB_COUCHBASE category contains input parameters that are specific to Couchbase Server. In general, the default values are suitable for one server. If you want to create a cluster, you need to modify the input parameter values. Here’s a list of the advanced inputs that you can modify:
-
Bucket Name—Name of the bucket. The default bucket name is default.
-
Bucket Password—Password for the bucket.
-
Bucket RAM Quota—RAM quota for the bucket in MB.
-
Bucket Replica Count—Bucket replica count.
-
Cluster REST/Web Password—Password for the administrator account. The default is password.
-
Cluster REST/Web Username—Administrator account user name for access to the cluster via the REST or web interface. The default is Administrator.
-
Cluster Tag—Tag for nodes in the cluster that are automatically joined.
-
Couchbase Server Edition—The edition of Couchbase Server. The default is enterprise.
-
Rebalance Count—The number of servers to launch before doing a rebalance. Set this value to the total number of target servers you plan to have in the cluster. If you set the value to 0, Couchbase Server does a rebalance after each server joins the cluster.
-
- Click Save.
- If you are ready to launch the server or cluster right now, click Launch.
To launch servers or clusters:
- From the RightScale menu bar, select Manage > Deployments.
- Click the nickname of the deployment that the server or cluster is in.
- Click the nickname of the server or cluster.
- On the Server or Server Array page, click Launch.
To log in to the Couchbase Web Console:
You can log in to the Couchbase Web Console by using your web browser to connect to the public IP address on port 8091. The general format is http://<server:port>. For example: if the public IP address is 192.236.176.4, enter http://192.236.176.4:8091/ in the web browser location bar.