Initial server setup
After installation is completed, Couchbase Server has to be set up.
- Open Couchbase Web Console.
- Set up the disk storage and cluster configuration.
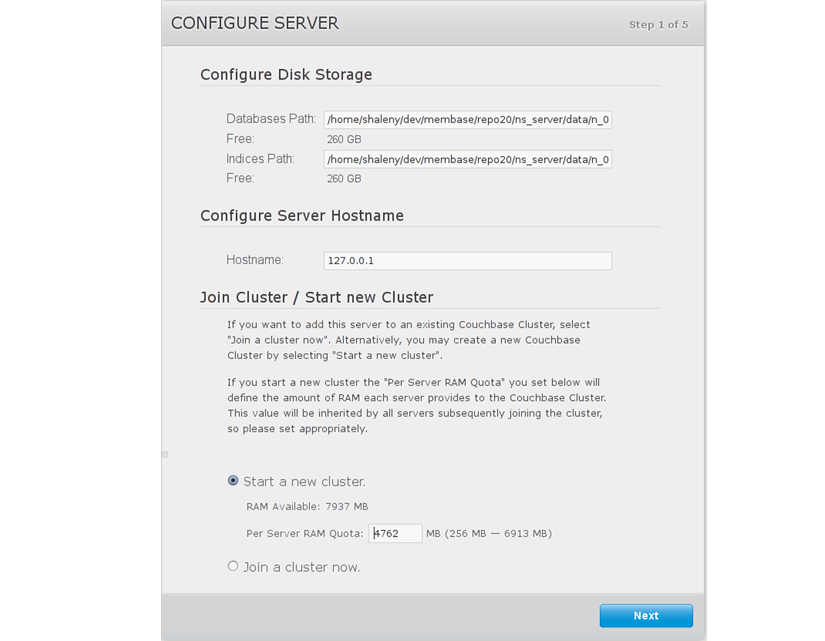
- The Configure Disk Storage option specifies the location of the
persistent storage used by the Couchbase Server. The setting affects only this node and
sets the directory where all the data is stored on disk. It also sets the location where
the indexes created by views are stored.
If you are not indexing data with views, you can accept the default setting. For the best performance, you can configure different disks for the server, for storing your document and for index data.
- The Configure Server Memory section sets the amount of physical RAM that will be allocated by
the Couchbase Server for storage.
If you are creating a new cluster, this is the amount of memory that is allocated on each node within your Couchbase cluster. Same amount of memory is allocated to each node in the cluster. Since the same setting applies to the whole cluster, specify a value that can be supported by all nodes. The default value is 60% of your total free RAM and is calculated to provide a RAM capacity for use by the operating system caching layer when accessing and using views.
- The Configure Disk Storage option specifies the location of the
persistent storage used by the Couchbase Server. The setting affects only this node and
sets the directory where all the data is stored on disk. It also sets the location where
the indexes created by views are stored.
- Provide a node IP or host name under Configure Server Hostname.
- Provide the IP address or host name of an existing node and administrative credentials for that existing cluster.
- To join an existing cluster, check the radio button Join a cluster now.
- Click Next.
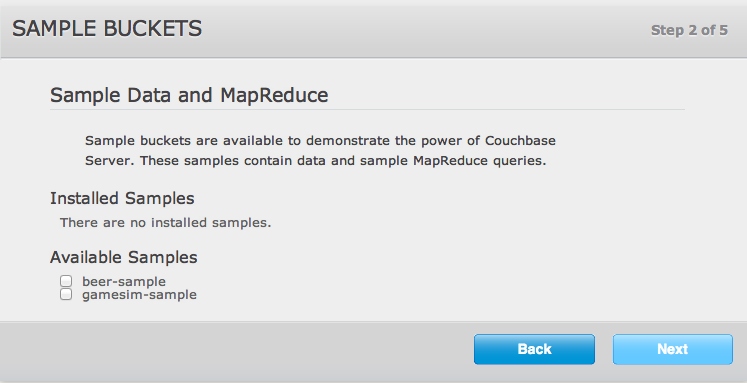
The Sample Buckets panel appears where you can select the sample data buckets you want to load.
- Click the names of sample buckets to load to the Couchbase Server. These data sets
demonstrate Couchbase Server's features and help you understand and develop views. If you
decide to install sample data, the installer creates one Couchbase bucket for each set of
sample data you choose.
After you create sample data buckets, the Create Bucket panel appears where you create new data buckets
- Set up a test bucket for Couchbase Server. You can change all bucket settings later, except
for the bucket name.
Enter default as the bucket name and accept all other defaults in this panel.
Couchbase Server will create a new data bucket named default. You can use this test bucket to learn more about Couchbase Server and use it in a test environment.
- Select Update Notifications.Couchbase Web Console communicates with
Couchbase nodes and confirms the version numbers of each node.
As long as you have Internet access this information will be sent anonymously to Couchbase corporate, which uses this information only to provide you with updates and information to help improve Couchbase Server and related products. When you provide an email address, it is added to the Couchbase community mailing list for news and update information about Couchbase and related products. You can unsubscribe from the mailing list at any time using the Unsubscribe link provided in each newsletter.
Couchbase Web Console communicates the following information:
- The current version. When a new version of Couchbase Server exists, you get information about where you can download the new version.
- Information about the size and configuration of your Couchbase cluster to Couchbase corporate. This information helps prioritize the development efforts.
- Enter a username and password. Your username must have up to 24 characters, and your password must have 6 to 24 characters. Use these credentials each time you add a new server into the cluster. These are the same credentials you use for Couchbase REST API.
- After you finish this setup, you see the Couchbase Web Console with the Cluster
Overview page:
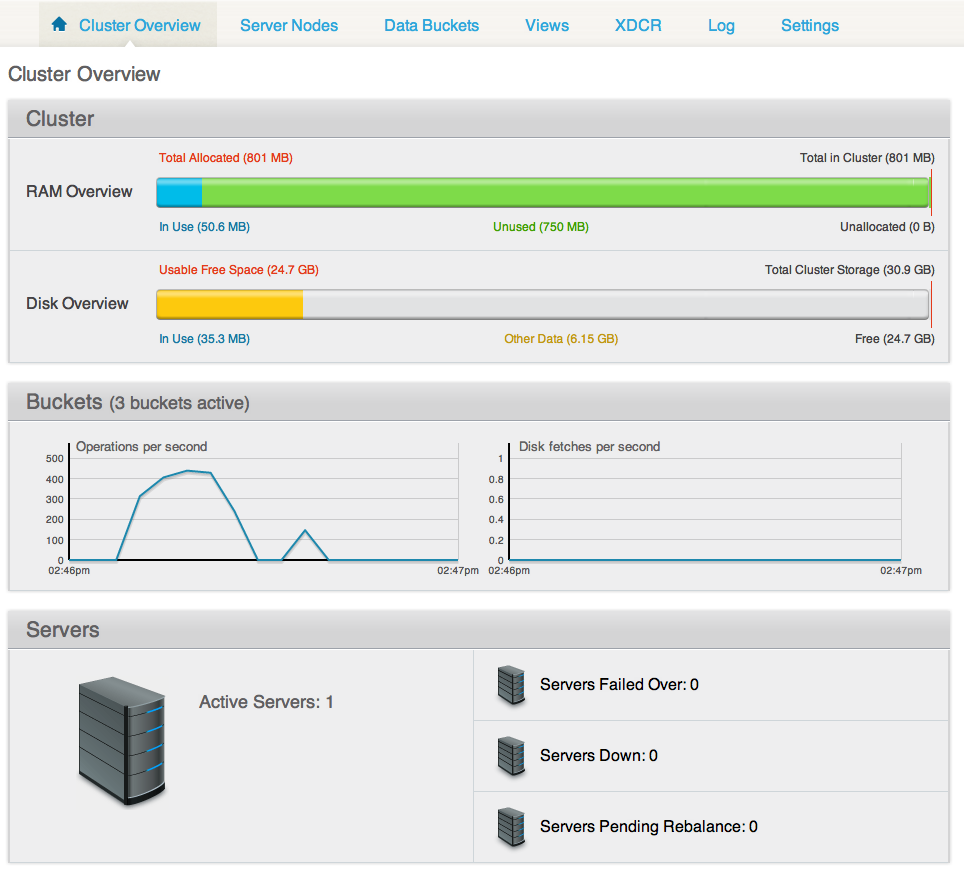
Couchbase Server is now running and ready to use.
After you complete the installation and the initial server setup, you can also optionally configure other settings, such as the port and RAM, using any of the following methods:
- Command-line tools
- The command line-tools included in your Couchbase Server installation includes couchbase-cli, which allows access to the core functionality of the Couchbase Server by providing a wrapper to the REST API. For more information, see couchbase-cli tool.
- REST API
- Couchbase Server can be configured and controlled using the REST API on which both the command-line tools and Web interface to Couchbase Server are based.For more information see REST API.