
")

The following alternative authentication mechanisms are supported for the Apache ActiveMQ JMX connector:
Simple authentication—configure authentication by providing two files: a
jmx.passwordfile, which contains login details, and ajmx.accessfile, which defines access rights for the defined users.JAAS authentication—configure authentication using JAAS realms and login modules.
To enable the simple authentication mechanism for the Apache ActiveMQ JMX connector, perform the following steps:
If not already present in the
ACTIVEMQ_BASE/conf/ACTIVEMQ_BASE/conf/jmx.password# The "admin" user has password "activemq". admin activemq
The preceding file defines a single user identity,
admin, and the corresponding password,activemq.If not already present in the
ACTIVEMQ_BASE/conf/ACTIVEMQ_BASE/conf/jmx.access# The "admin" user has readwrite access. admin readwrite
This file enables you to define two kinds of access:
readonlyUsers can read MBean attributes.
readwriteUsers can read and write MBean attributes, invoke operations on MBeans, and create and delete MBeans. Additional clauses can be added to
readwriteaccess in order to specify which types of MBean users can create and to specify whether or not users have permission to delete MBeans. For details of this syntax, see the comments in theJAVA_HOME/jre/lib/management/jmxremote.accessfile.
Using file system permissions, ensure that the
jmx.passwordfile you created in the previous step is readable and writable only by the user that runs the Apache ActiveMQ broker. All other users must have read and write permissions disabled.- Windows
Form Windows Explorer, right-click on
jmx.passwordand select Properties. Click on the Security tab and remove all groups or users that have access to this file, except for the current user.- *NIX
While logged in as the user that runs the broker, enter the following command to clear all permissions for group and others on the
jmx.passwordfile:chmod u=rw,go= jmx.password
![[Note]](imagesdb/note.gif)
Note If you do not modify the file permissions as specified here, the Apache ActiveMQ broker will refuse to start up, when JMX authentication is enabled.
Using your favorite text editor, edit the broker configuration file,
ACTIVEMQ_BASE/conf/activemq.xml<beans ... > <broker xmlns="http://activemq.apache.org/schema/core" ... > ... <managementContext> <managementContext createConnector="true" connectorPort="2011" jmxDomainName="org.apache.activemq"> <property xmlns="http://www.springframework.org/schema/beans" name="environment"> <map xmlns="http://www.springframework.org/schema/beans"> <entry xmlns="http://www.springframework.org/schema/beans" key="jmx.remote.x.password.file" value="${activemq.base}/conf/jmx.password"/> <entry xmlns="http://www.springframework.org/schema/beans" key="jmx.remote.x.access.file" value="${activemq.base}/conf/jmx.access"/> </map> </property> </managementContext> </managementContext> ... </broker> ... </beans>![[Warning]](imagesdb/warning.gif)
Warning In the current example, SSL is disabled. This configuration is not recommended in a production environment, because it leaves your JMX login credentials vulnerable to snooping.
Start up the standalone broker. Open a new command prompt and run the startup script, as follows:
bin/activemq
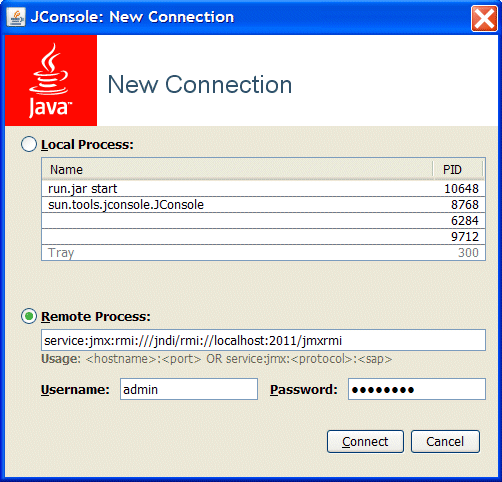
You should now be able to connect to the JVM platform JMX connector using the following JMX URL:
service:jmx:rmi:///jndi/rmi://
Hostname:2011/jmxrmiWhere you substitute
Hostnamewith the name of the host where the broker is running. In the course of establishing the connection, you will be prompted to log in.For example, to run the standard JConsole provided with the JDK, enter the following command at a command prompt:
jconsole
When the JConsole: New Connection dialog pops up, enter the preceding JMX URL in the Remote Process: field, and enter the credentials for one of the JMX users in the Username and Password fields, as shown. Click Connect.
To enable JAAS authentication for the Apache ActiveMQ JMX connector, perform the following steps:
Using your favorite text editor, create the file,
conf/login.config, and add the following lines:PropertiesAuth { org.apache.activemq.jaas.PropertiesLoginModule required debug=true org.apache.activemq.jaas.properties.user="users.properties" org.apache.activemq.jaas.properties.group="groups.properties"; };Note The current example illustrates how to configure JAAS using the
PropertiesLoginModule, as described in JAAS Username/Password Authentication Plug-In. In practice, however, you could use any of the login modules described in JAAS Authentication.Create the
conf/users.propertiesfile (which defines credentials in the format,User=Passwordsystem=manager
Create the
conf/groups.propertiesfile (which defines user groups in the format,Group=UserListadmins=system readwrite=system users=system
Using your favorite text editor, edit the broker configuration file,
ACTIVEMQ_BASE/conf/activemq.xml<beans ... > <broker xmlns="http://activemq.apache.org/schema/core" ... > ... <managementContext> <managementContext createConnector="true" connectorPort="2010"> <property xmlns="http://www.springframework.org/schema/beans" name="environment"> <map xmlns="http://www.springframework.org/schema/beans"> <entry xmlns="http://www.springframework.org/schema/beans" key="jmx.remote.x.login.config" value="PropertiesAuth"/> </map> </property> </managementContext> </managementContext> ... </broker> ... </beans>Warning In the current example, SSL is disabled. This configuration is not recommended in a production environment, because it leaves your JMX login credentials vulnerable to snooping.
Start up the standalone broker. Open a new command prompt and run the startup script, as follows:
bin/activemq
Using a JMX client, you should now be able to connect to the JVM platform JMX connector using the following JMX URL:
service:jmx:rmi:///jndi/rmi://
Hostname:2010/jmxrmiWhen prompted, enter one of the configured credentials to log on to JMX—for example, with the username,
system, and the password,manager.
 |  |  |
 |
