Before enabling LDAP authorization in the broker, you need to create a suitable tree of entries in the directory server to represent permissions. You need to create the following kinds of entry:
- Queue entries
For each queue in your application, you need to create an entry that specifies the admin, read, and write permissions.
- Topic entries
For each topic in your application, you need to create an entry that specifies the admin, read, and write permissions.
- Advisory topics entry
A single advisory topics entry contains the admin, read, and write permissions that apply to all advisory topics.
- Temporary queues entry
A single temporary queues entry contains the admin, read, and write permissions that apply to all temporary queues.
As an alternative to creating the authorization entries manually, as described here, you could create the entries by importing an LDIF file—for details, see Appendix B.
Perform the following steps to add authorization entries to the directory server:
The next few steps describe how to create the
ou=Destination,ou=Queue, andou=Topicnodes.Right-click on the
ou=ActiveMQnode and select |. The New Entry wizard appears.In the Entry Creation Method pane, select the Create entry from scratch radiobutton. Click Next.
In the Object Classes pane, select
organisationalUnitfrom the list of Available object classes on the left and then click Add to populate the list of Selected object classes. Click Next.In the Distinguished Name pane, complete the RDN field, putting
ouin front andDestinationafter the equals sign. Click Next and then click Finish.In a similar manner as described in steps 1–4, by right-clicking on the
ou=Destinationnode and invoking the New Entry wizard, create the followingorganisationalUnitnodes as children of theou=Destinationnode:ou=Queue,ou=Destination,ou=ActiveMQ,ou=system ou=Topic,ou=Destination,ou=ActiveMQ,ou=system
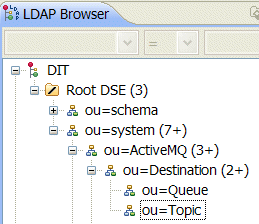
In the LDAP Browser window, you should now see the following tree:
The next few steps describe how to create the
cn=TEST.FOO,ou=Queue,ou=Destination,cn=ActiveMQ.Advisory,ou=Topic,ou=Destination, andcn=ActiveMQ.Temp,ou=Topic,ou=Destinationnodes.Right-click on the
ou=Queuenode and select |. The New Entry wizard appears.In the Entry Creation Method pane, select the Create entry from scratch radiobutton. Click Next.
In the Object Classes pane, select
applicationProcessfrom the list of Available object classes on the left and then click Add to populate the list of Selected object classes. Click Next.In the Distinguished Name pane, complete the RDN field, putting
cnin front andTEST.FOOafter the equals sign. Click Next and then click Finish.In a similar manner as described in steps 6–9, by right-clicking on the
ou=Topicnode and invoking the New Entry wizard, create the followingapplicationProcessnodes as children of theou=Topicnode:cn=ActiveMQ.Advisory,ou=Topic,ou=Destination,ou=ActiveMQ,ou=system cn=ActiveMQ.Temp,ou=Topic,ou=Destination,ou=ActiveMQ,ou=system
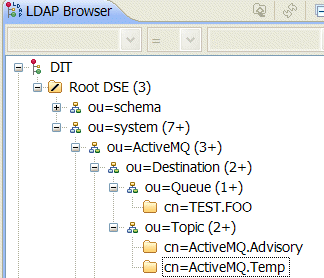
In the LDAP Browser window, you should now see the following tree:
The next few steps describe how to create nodes that represent
admin,read, andwritepermissions for the queues and topics.Right-click on the
cn=TEST.FOOnode and select |. The New Entry wizard appears.In the Entry Creation Method pane, select the Create entry from scratch radiobutton. Click Next.
In the Object Classes pane, select
groupOfNamesfrom the list of Available object classes on the left and then click Add to populate the list of Selected object classes. Click Next.In the Distinguished Name pane, complete the RDN field, putting
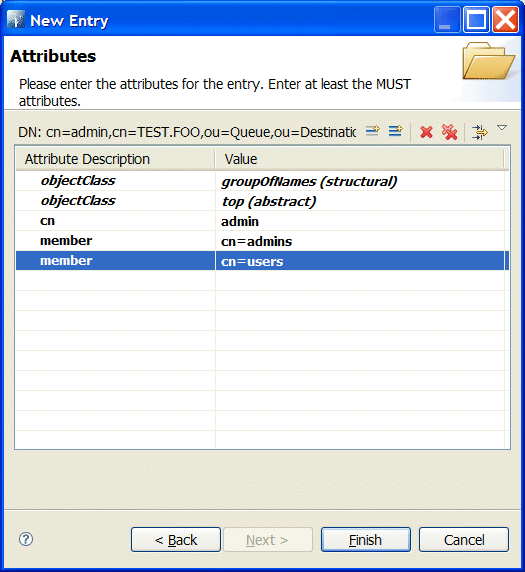
cnin front andadminafter the equals sign. Click Next.You are now prompted to provide a value for the mandatory
memberattribute, through the DN Editor dialog. In the text field, enter the last part of the DN for theadminsgroup,cn=admins. Click Ok.Add another
memberattribute in the Attributes pane. Right-click inside the list of attributes and select New Attribute. The New Attribute wizard appears.In the Attribute type field, enter
member(if you want to use the drop-down list, you must first uncheck the Hide existing attributes option). Click Finish.The DN Editor dialog opens. In the text field, enter the last part of the DN for the
usersgroup,cn=users. Click Ok.Click Finish, to close the New Entry wizard.
In a similar manner as described in steps 11–19, by right-clicking on the
cn=TEST.FOOnode and invoking the New Entry wizard, create the followinggroupOfNamesnodes as children of thecn=TEST.FOOnode:cn=read,cn=TEST.FOO,ou=Queue,ou=Destination,ou=ActiveMQ,ou=system cn=write,cn=TEST.FOO,ou=Queue,ou=Destination,ou=ActiveMQ,ou=system
The new
cn=readnode and the newcn=writenode should include both of the members,cn=adminsandcn=users.Copy the
cn=admin,cn=read, andcn=writepermission nodes and paste them as children of thecn=ActiveMQ.Advisorynode, as follows.Using a combination of mouse and keyboard, select the three nodes,
cn=admin,cn=read, andcn=write, and typeCtrl-Cto copy them. Select thecn=ActiveMQ.Advisorynode and typeCtrl-Vto paste the copied nodes as children.Similarly, copy the
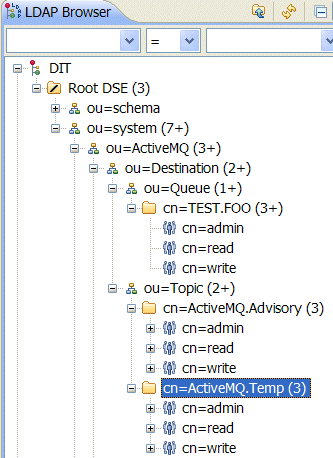
cn=admin,cn=read, andcn=writepermission nodes and paste them as children of thecn=ActiveMQ.Tempnode.In the LDAP Browser window, you should now see the following tree:


