

|
|
|
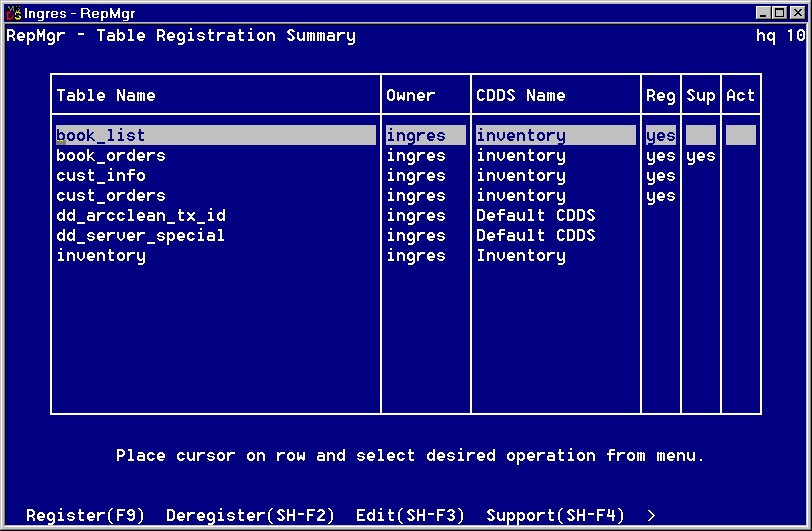
The Table Registration Summary window (shown here) appears when you choose the Tables option from the Configuration menu. Once you have registered tables under a CDDS, this screen shows which tables are assigned to a particular CDDS. For more information, see Register Tables.
This window contains a list of all tables in the database and shows their registration, support, and activation status. By default they are assigned to Default CDDS (0). Ingres Replicator can only detect changes from tables that are activated.
For a description of the fields in this window, see online help.
You can perform the following tasks from the Table Registration Summary window:
|
|
|
You must register all tables that you want to replicate. By default, tables are initially registered as belonging to CDDS 0. Once you have registered them, you can edit their registration information, including the CDDS number. For more information on editing a table's registration, see Table Registration Details Window.
To register a table or all tables
A new menu line appears.
A yes appears in the Reg column of the Table Registration Summary window next to the table or tables you registered.
Note: To be registered, a table must have a unique primary storage structure or a unique secondary index.
|
|
|
When you deregister a table, all support objects are destroyed.
To deregister a table
A new menu line appears.
Blanks appear in the Reg, Sup, and Act columns of the Table Registration Summary window next to the table or tables you deregistered.
|
|
|
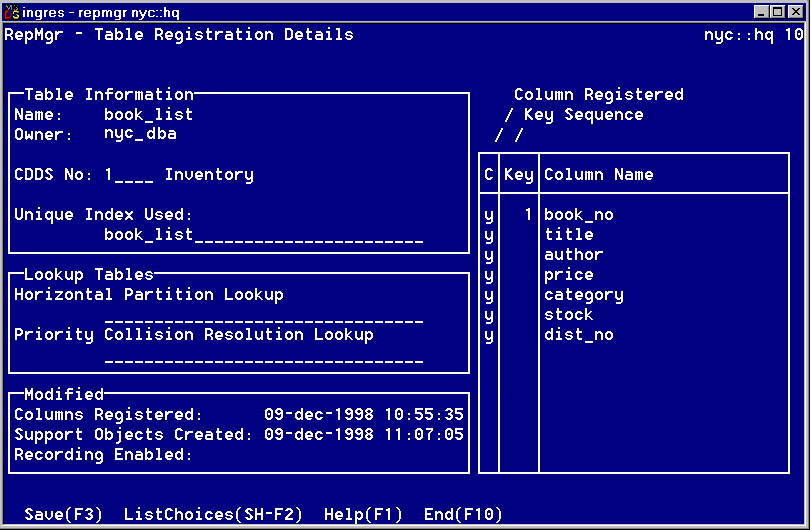
The Table Registration Details window appears (shown here) when you choose the Edit option from the Table Registration Summary window.
Note: If you attempt to edit a table that has not yet been registered, you are prompted to accept the default registration.
From this window you can perform the following tasks:
If you edit table registration information after creating support objects, when you select Save, the following message appears:
There are existing support objects for this table.
Saving this table registration requires that they be dropped. Do you want to do that now?
If you answer yes, the existing objects are dropped and you must recreate them using the Support menu item in the Table Registration Summary window.
For a description of the fields in this window, see online help.
|
|
|
To deregister a column from the Column Registered field
Note: Key columns and mandatory (NOT NULL NOT DEFAULT) columns cannot be deregistered.
Use the arrow keys to move to other columns to be deregistered.
Use the Tab key to move to other fields in the window,
Your changes are saved and you are returned to the Table Registration Summary window.
|
|
|
You can move a table from the default CDDS to any other CDDS. We recommend that you assign tables to CDDSs before creating support objects.
To assign a different CDDS to a table
Your changes are saved and you are returned to the Table Registration Summary window.
|
|
|
To use horizontal partitioning or priority collision resolution, you must use lookup tables that specify your parameters.
You must create the lookup table before you can assign it to a CDDS. You must create the lookup table individually for each database that needs it. For instructions on creating lookup tables, see Lookup Tables.
To assign a lookup table to a CDDS
Your changes are saved and you are returned to the Table Registration Summary window.
|
|
|
Before you can create Ingres Replicator support objects for a table, you must have registered it. Support objects include Replicator Server database procedures and the shadow and archive tables, all of which are created individually for each table.
Note: To create support objects, the relationship between the CDDS assigned to the table and local database must be defined. In addition, to correctly configure a horizontally partitioned table, the CDDS lookup table must exist and be populated with the required rows.
To create support objects for a table or all tables
A new menu line appears.
A yes appears in the Sup column of the Table Registration Summary window next to the table or tables for which you created support objects.
If the table is assigned to a CDDS that is full peer in the local database, a shadow table, archive table, and remote replication procedures are created. If the table is assigned to a CDDS that is protected read-only in the local database, a shadow table and remote replication procedures are created. If the table is assigned to a CDDS that is unprotected read-only in the local database, no support objects are necessary.
|
|
|
You can activate or deactivate individual tables. Activating a table enables change recording, and deactivating a table disables the change recording.
Note: Typically, it is not necessary or advisable to activate or deactivate individual tables. For instructions on activating or deactivating CDDSs, databases, or the entire replication scheme, see Activate Change Recording Window.
To activate or deactivate a table
The menu line changes to:
Activate DeActivate Cancel
The selected table is activated or deactivated accordingly. A yes appears in the Act column if the table has been activated.
|
|
|
The CreateKeys option creates replicated transaction keys for every row in the base table and populates the shadow table. It can optionally populate the input queue. You must use CreateKeys if you install Ingres Replicator on an existing database that contains data. If you install Ingres Replicator on empty databases, replicated transaction keys are created and the shadow table is populated automatically when you insert data.
How you use CreateKeys varies depending on the contents of your databases. There are two options when using CreateKeys:
This option populates the local shadow table. You need to copy the populated shadow table to all Full Peer or Protected Read-only targets that are part of the table's CDDS.
Note: Once you use ShadowTableOnly on a database, you need to use the copydb utility to copy the resulting shadow table to other databases in the CDDS. In other words, you cannot use ShadowTableOnly against the same table in two different databases, because the resulting replicated transaction keys do not match.
This option populates the shadow table and the input queue. Use this option if your databases are not synchronized; the altered rows are placed in the input queue for reconciliation or distribution. This option also needs to be used if the table is horizontally partitioned.
The following table explains when to use which CreateKeys option:
Databases |
How To Use CreateKeys |
|---|---|
Both are empty |
Do not need to use CreateKeys. Because there are no rows of data, no replicated transaction keys can be generated. |
One contains data, one is empty |
Only use BothQueue&ShadowTable option of CreateKeys if your database is very small. The recommended procedure is to unload the tables with data and reload them into the empty database. |
Both contain data and are synchronized |
Use the ShadowTableOnly option of CreateKeys. This option populates the shadow tables so that Ingres Replicator does not detect collisions when manipulating rows for the first time. |
Both contain data but are not synchronized |
If a table to be replicated is rather large, attempt to synchronize the databases through some other means or use the BothQueue&ShadowTable option of CreateKeys. Ingres Replicator populates the shadow tables and sends the rows from the local database to the target database. Nonmatching rows cause collisions, which need to be resolved manually or by using collision resolution. For more information on collision handling, see Collision Design. |
Note: If the BothQueue&ShadowTable option of CreateKeys is used, the rows placed in the input queue are not immediately transferred to the distribution queue. To effect the transfer, ensure that all users disconnect from the database. The transfer takes place when you re-connect.
|
|
|
To create the replicated transaction keys for the table
The following menu line appears:
ThisTable AllTables End
The following menu line appears:
ShadowTableOnly BothQueue&ShadowTable Cancel
The replicated transaction keys are created and placed in the shadow table. The input queue is populated, if appropriate.