| Inkscape » Paths » Creating Paths |    |
|---|
Paths can be created by the Freehand, Bezier, and Calligraphy drawing tools. They can also be created by conversion from a regular shape or text object.
The Freehand (or pencil) Tool is perhaps the
easiest tool with which to draw a path. Simply click on the
![]() icon (F6 or p) in the
Tool Box
and then click-drag the mouse over the canvas to draw a
line. Holding down the Shift key while drawing
temporary disables nodes snapping to the
Grid or Guide Lines.
icon (F6 or p) in the
Tool Box
and then click-drag the mouse over the canvas to draw a
line. Holding down the Shift key while drawing
temporary disables nodes snapping to the
Grid or Guide Lines.
As long as a path is selected, you can extend the path by click-dragging from one of the path's ends. To prevent adding to a path, deselect the path with the Esc key.
New in v0.46.
To delete an unfinished path, use Esc or Ctrl+Z.
Paths drawn with the Freehand Tool tend to be composed of many Bezier curves leading to an erratic-looking path. One can smooth and simplify such curves by using the → (Ctrl+L) command one or more times.
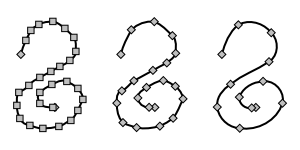
New in v0.45.
There are two possible modes for this command. The default is to
treat all of the selected paths as one object. The second mode is
to treat each sub-path separately. To use the second mode, add an
entry in the “options” section with
“simplifyindividualpaths” set to '1' in the
file .inkscape/preferences.xml.
New in v0.46.
Single dots can be created by using Ctrl+Left Mouse Click. The size of the dot can be set in the Pencil section of the Inkscape Preferences dialog as a multiple of the current Stroke width. The dot is represented in SVG as a filled path. Adding the Shift key doubles the dot size while adding the Alt creates a random size dot. The Bezier Tool has the same options.
As mentioned previously, all paths are represented in Inkscape as a
series of Bezier curves. The
Bezier (or pen) Tool
allows you more directly control the Bezier
parameters as you draw a path. To select the tool, click on the
![]() icon
(Shift+F6
or b)
in the Tool Box.
icon
(Shift+F6
or b)
in the Tool Box.
![[Sugerencia]](../images/admons/tip.png) | Sugerencia |
|---|---|
This is one place where paying attention to the Notification Region is especially useful. The region not only lists your options at each step but also gives the distance and angle the cursor is from the last node when placing a new node or dragging a handle. |
To begin to draw a curve, click-drag on the canvas. The point where you click becomes the end point or node of the curve. As you drag the cursor, you'll see a gray line between the end point and the cursor. This line is a tangent to your curve at the end point. Release the mouse button to establish the first control point.

Move the cursor to the position of the next Bezier curve end point or node. A red line will show you the shape of the curve.
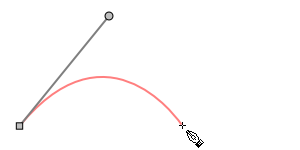
Click-drag from the end point to draw out a handle that allows you to set the second control point. The pointer is actually pointing to the sister of the second control point, which is the initial control point of a second Bezier curve to be attached to the first. The two points are collinear with and the same distance from the Bezier curve end point or node.

Next, move the cursor to the end point of the second Bezier curve.

One can repeat the above steps to add as many Bezier curves to the path as required. To end the path, press Enter or do a Right Mouse Click after placing the last Bezier curve end point.

Other useful things to know while using the Bezier Tool:
To create a path of straight lines, click rather than click-drag at each node.
You can use the Arrow keys to move the last node created while drawing a path. Shift+Arrow moves the node by ten times the normal step, Alt+Arrow will move the node by a screen pixel.
To set the two control points of a node separately (and force the node to be a corner point), first set the control point for the end point of the previous Bezier curve, then hold down the Shift key while setting the control point for the next Bezier curve.
To constrain a node to be at a multiple of the Rotation snap angle with respect to the previous node, hold down the Ctrl key while setting it.
To constrain a control point to be at a multiple of the of the Rotation snap angle with respect to a node, hold down the Ctrl key while setting it. (Can be used in conjunction with the Shift key.)
To delete the last node drawn, use the Backspace key or the Del key.
To delete an unfinished path, use Esc or Ctrl+Z.
To change an unfinished segment (the red line) from a curve to a line, use Shift+L. To change an unfinished segment from a line to a curve, use Shift+U.
To extend a previously drawn path, select the path, then click or click-drag on an end point.
To close a path, click on the first endpoint when placing the last endpoint.
New in v0.46.
Single dots can be created by using Ctrl+Left Mouse Click. The size of the dot can be set in the Pen section of the Inkscape Preferences dialog as a multiple of the current Stroke width. The dot is represented in SVG as a filled path. Adding the Shift key doubles the dot size while adding the Alt creates a random size dot. The Freehand Tool has the same options.
As the name suggests, the Calligraphy Tool can be used to draw calligraphic lines. The resulting paths are a bit different than those drawn with the Freehand and Bezier tools in that they are composed of two parallel (or almost parallel) sub-paths, allowing the resulting line to have a variable width. The path is not stroked but the Fill is solid (see Capítulo 9, Attributes).
To begin drawing a Calligraphy path, select the tool by clicking on the
![]() icon
(Ctrl+F6 or
c)
in the Tool Box and then click-drag the mouse
over the canvas to draw a line. The line will have by default the
Current style. You can choose to draw all lines with a fixed style
by selecting the This tool's own style option
under the Calligraphy section in the Inkscape Preferences dialog.
If you turn off the Keep selected option in the
dialog, a newly drawn object will not remain selected; you can then choose
a color from the Palette for the next calligraphic stroke without changing
the color of the previously drawn stroke.
icon
(Ctrl+F6 or
c)
in the Tool Box and then click-drag the mouse
over the canvas to draw a line. The line will have by default the
Current style. You can choose to draw all lines with a fixed style
by selecting the This tool's own style option
under the Calligraphy section in the Inkscape Preferences dialog.
If you turn off the Keep selected option in the
dialog, a newly drawn object will not remain selected; you can then choose
a color from the Palette for the next calligraphic stroke without changing
the color of the previously drawn stroke.
The Calligraphy Tutorial ( → → ) has many ideas on how to use the Calligraphy Tool.
The Calligraphy Tool has many options, two accessible from the keyboard and the rest from the Tool Controls. It is best just to try changing the various option settings to get the feel for them.
Options with keyboard:
To change the pen width while drawing: Left Arrow and Right Arrow. New in v0.46: The Home key sets the width to the minimum while the End key sets the width to the maximum. Typing Alt+X will enable the Width entry box in the Tool Controls; enter a number and then hit Enter to set an exact width while drawing.
To change the pen angle while drawing: Up Arrow and Down Arrow.
New in v0.46.
To add to an existing path (form a union), hold the Shift down while drawing.
New in v0.46.
To delete an unfinished path, use Esc or Ctrl+Z.
The Tool Controls contains too many options to all be shown at the default Inkscape window width. To access all the options, widen the Inkscape window or click on the triangle at the right of the bar, which will show a drop-down menu with the missing options.

Pen width (1 to 100): number is tenths of percent of canvas width (i.e., 15 is 1.5% of canvas width). Note that if you change the zoom level, the effective pen width will change. To keep the pen width constant, check the Width is in absolute units box under the Tools-Calligraphy page in the Inkscape Preferences dialog. The pen width will then be in units of px.
![]() :
On/Off button: Use tablet pressure for width (requires tablet input device).
:
On/Off button: Use tablet pressure for width (requires tablet input device).
New in v0.46.
![]() :
Trace background:
Vary the width of the pen as a function of the background. A dark background
yields a wider pen.
:
Trace background:
Vary the width of the pen as a function of the background. A dark background
yields a wider pen.
Thinning (-1.0 to 1.0): How the width change depends on the speed of the drawing stroke:
> 0.0: Line width decreases with speed.
= 0.0: Line width independent of speed.
< 0.0: Line width increases with speed.
Angle (-90 to 90 degrees): Angle of pen relative to horizontal axis.
![]() :
On/Off button: Use tablet tilt for pen orientation (requires tablet input device).
:
On/Off button: Use tablet tilt for pen orientation (requires tablet input device).
Fixation (0.0 to 1.0): How the angle of the pen follows the direction of the pen.
0.0: Angle follows pen direction (always perpendicular to motion).
1.0: Angle fixed to angle defined in Angle entry.
New in v0.45.
Caps (0.0 to 5.0): How round is the end of the stroke. This can be used to produce round end-caps when the fixation is small (i.e., simulating a round brush). Note that the cap extends beyond where the stroke would normally end.
0.0: Flat end.
1.0: Approximately semicircular.
5.0: Elliptical, approximately five times longer than wide.
Tremor (0.0 to 1.0): How much random shake should the stroke have. This parameter can be used to create a more realistic looking calligraphic stroke by adding some randomness to the thickness of the stroke. It works by adding randomness to the node handle orientations.
0.0: Smooth
1.0: Chaotic.
Renamed from Drag (with the numerical values inverted) in v0.45.
Wiggle (0.0 to 1.0): How resistant the pen is to movement. With a value of 1.0, the pen will wiggle all over the paper.
Mass (0.0 to 1.0): How the line follows pen movement. The more massive the pen, the smoother the stroke but the less responsive the pen will be. Try a value of 0.10 for a good compromise between smoothness and responsiveness.
![]() Restore default values.
Restore default values.
Two options require the use a tablet (e.g., Wacom): using tablet pressure to control the width of a stroke and using tablet tilt to control the orientation of the pen's nib. This is discussed in the next section.
Inkscape can make good use of a tablet for input. This is especially true with the Calligraphy Tool where stroke width and nib orientation can be controlled directly with a pen. Before using a tablet, the extended input devices must be configured and enabled with the Input Devices dialog ( → ).
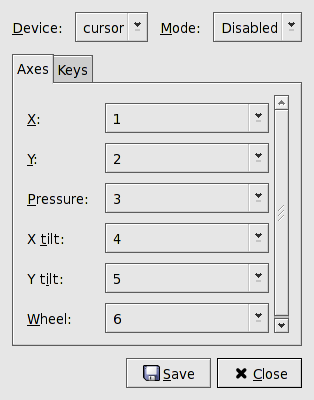
This dialog is the same as used by Gimp; however, not all features may work the same.
To enable pressure and tilt control, select the device to be used from the pull-down menu at the top left and enable it with the pull-down menu on the top right. In principle, there are three options for the latter pull-down menu:
The Axes tab allows you to swap input assignments; i.e., the x-axis for the y-axis if you rotate the tablet by 90 degrees. This doesn't seem to work. (Bug?)
The Keys tab allows you to assign key combinations to the macro keys, if any, on the tablet.
Pressure and tilt do not work properly on OS X due to problems with the X11 implementation.

Updated for v0.45.
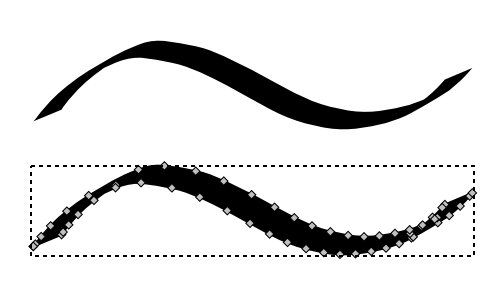
A stroke made using a Wacom tablet with pressure sensitivity may create a mess at the beginning of the stroke or where there is a quick change in direction. This is especially true when the Fixation is set to a small number. Below is an example of this. By removing some of the nodes, the stroke can be cleaned up. The significance of this problem has been dramatically reduced as of v0.45.

New in v0.46.
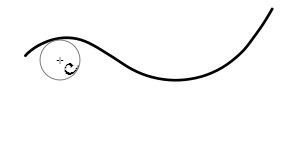
The Calligraphy Tool has an option that allows parallel lines (hatchings), as found in engravings, to be easily drawn. To use this option, first select a guide path. Any path, Shape or text can be used as a guide. Then with the Ctrl key held down, drag the pointer along a line parallel to the guide path. The closest distance between the start of the drag and the guide path determines the distance the new line will be away from the guide. This is indicated by the gray circle around the pointer. As you begin to drag, the circle turns green. This indicates that the cursor is tracking the guide. When you finish drawing a line, don't release the Ctrl! Just start drawing (Left Mouse Drag) another line. As long as you hold the Ctrl key down, each new line will use the last drawn line as a guide and the spacing will remain the same.
If you deviate too far from the guide, the pointer will break free. This is indicated by a red circle. This is an intentional design decision to allow one to continue a line past the end of the guide. If you accidently break free, you can delete the last path and start again; but you must reset the interline spacing. A slow steady hand works best. If the cursor is consistently closer or farther away from the guide path than the set spacing, the interline spacing will gradually decrease or increase. This is a subtle effect.
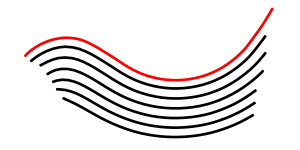
The Trace Background
(
![]() ) option can be used to generate
hatchings with pen width reflecting the background darkness as
shown below.
) option can be used to generate
hatchings with pen width reflecting the background darkness as
shown below.

By default, each new line uses the previous line as its guide path. To use the original guide path for each line, turn off the option Select new path found under the Calligraphy Tool section in the Inkscape Preferences dialog. The author finds it easier to make hatchings with this option turned off.
![[Sugerencia]](../images/admons/tip.png) | Sugerencia |
|---|---|
Use Touch selection to select the lines in the hatchings. It is often easier to keep hatchings in a separate Layer. |
There are several ways to generate paths indirectly. One is to convert a regular shape or text object into a path. Another is to use Stroke to Path, which converts a path into a closed path with two parallel sub-paths. A third way to generate a path is to trace a bitmap image. This method is considered in Capítulo 16, Tracing Bitmaps.
To convert a regular shape or text object to a path, use → (Mayús.+Ctrl+C). Once an object is converted, the object loses any special knowledge associated with its previous existence. For example, the text font cannot be changed. But once an object is converted to a path, it can be modified in any arbitrary way, as shown in “Logo de un Club de Senderismo - Un Ejercicio con Trazos”.
A stroked path can be converted to a filled object consisting of two parallel sub-paths using → (Ctrl+Alt+C). The path should have a non-zero thickness. The before and after objects look the same but have different structure and behavior. See the difference in the nodes in the figures below.
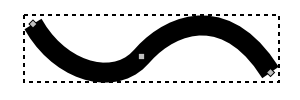
A stroked path consisting of three nodes.
|
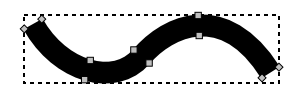
A filled path made from the stroked path by using the Stroke to Path
command. It consists of ten nodes.
|
The
Stroke to Path command can be used to
make a sets of parallel lines. Simply draw the path you desire,
setting the width to the desired gap plus the desired final
stroke width. Convert the stroke to path, remove the fill, and add
the stroke paint. The line segments at the ends can be removed if
desired by selecting each pair of end nodes and using the
Split path between two non-end nodes
![]() command in the
Node Tool-Tool Controls (see next section). The
Path Offset commands (for
closed paths) or
Complex Strokes
are alternative ways of creating parallel lines.
command in the
Node Tool-Tool Controls (see next section). The
Path Offset commands (for
closed paths) or
Complex Strokes
are alternative ways of creating parallel lines.

The Stroke to Path command can also be used to make polygons with uniformly rounded corners, as shown below. The trick is to use a wide Stroke and set the Join style to Round.

© 2005-2008 Tavmjong Bah. | Get the book. |