| Inkscape » Paths » Editing Paths |    |
|---|
The primary means for editing paths is to use the Node Tool to modify one or more path nodes. A few exceptions are covered at the end of this section (simplifying, reversing, and offsetting paths).
Paths are normally edited using the Node Tool. This flexible tool enables the addition, deletion, and movement of nodes. A Sculpting mode allows easy fine tuning of paths with many nodes.
Select the
Node Tool by clicking on the
![]() icon
(F2
or n)
in the Tool Box.
Then click on the path you wish to edit. All of the path's nodes will
be shown.
icon
(F2
or n)
in the Tool Box.
Then click on the path you wish to edit. All of the path's nodes will
be shown.
![[Nota]](../images/admons/note.png) | Nota |
|---|---|
Many of the things you can do with objects, you can do with nodes using the same methods. This is especially true for selecting and moving nodes. For example, the Arrow keys move selected objects by the Nudge factor when the Select Tool is active; they move selected nodes by the Nudge factor when the Node Tool is active. (The Nudge factor is a parameter that can be set in Inkscape Preferences dialog ( → (Mayús.+Ctrl+P)) dialog under the Steps tab). Knowing this should make learning to use the Node Tool quicker. |
Nodes must be selected before they can be edited.
Selected nodes are indicated by a change in color as well as a slight
enlargement in size. The handles of the selected nodes are shown, as are
the handles for adjacent nodes. If the handles get in the way of
selecting nodes, they can be toggled off by clicking on the
Hide Handles icon
![]() in the Tool Controls. Clicking the icon
a second time toggles the handles back on.
in the Tool Controls. Clicking the icon
a second time toggles the handles back on.
Nodes can be selected for editing a number of ways:
Left Mouse Click on a node to select that node. A node turns red when the pointer hovers over it and it can be selected (or deselected).
Left Mouse Click on the path to select the nearest node on each side of the place where you clicked. The hand symbol is added to the pointer when hovering over a clickable path. Note that a node can be selected and moved in one step by click-dragging on the node.
Left Mouse Drag will select all nodes within the rubber-band box. The drag must not begin on a path unless the Shift is used. Using the Shift key allows the drag to begin on a path except over a node.
Nodes can be added (or removed) from the selection by holding down the Shift key while using one of the above methods.
New in v0.45.
Nodes can also be added to or removed from the selection by hovering the cursor over a node and using the Mouse Wheel, moving “up” to add nodes and “down” to remove nodes. The Page Up and Page Down keys can be used in place of the Mouse Wheel. This selection technique is especially useful in conjunction with node sculpting.
Two modes are possible: The default mode adds nodes based on the spatial distance from the cursor. If the Ctrl key is held down, the nodes are selected based on the linear distance measured along the path. In this latter case, only nodes in the same sub-path can be selected.
Tab selects the next node in a path if one is already selected. This is usually the adjacent node in the direction the path was drawn. If no node is selected, it will select the first node. Shift+Tab will select the previous node in a path. Ctrl+A selects all nodes in a selected path. ! inverts the node selection for any sub-path with at least one node selected. Alt+! inverts the node selection for the entire path.
The mouse can be used to move nodes and handles by dragging them. It can also be used to alter the shape of a path between two nodes by dragging the path. And finally, nodes can be inserted anywhere along a path by double clicking the path or by clicking the path while holding down the Ctrl+Alt keys.
Left Mouse Drag: Move selected nodes: If the pointer starts over a selected node, all selected nodes will move. If the pointer starts over an unselected node, that node will be selected and moved.
Ctrl+Left Mouse Drag: Move selected nodes in either the horizontal or vertical direction.
Ctrl+Alt+Left Mouse Drag: Move selected nodes along a line collinear with a node handle or to its perpendicular (passing through the node). The handles used are those belonging to the node where the pointer begins the drag.
Shift+Left Mouse Drag: Temporarily disable snapping nodes to the Grid or to Guide Lines (if snapping of nodes enabled).
Left Mouse Drag+Space: While dragging, drop an unlinked copy of the nodes. The copy is of the entire path even if only a few nodes are selected.
A handle becomes active when the mouse hovers over its control point. The control point will turn red. The Shift, Ctrl, and Alt keys can be used in combination for the options listed below.
Left Mouse Drag: Move handle.
Shift+Left Mouse Drag: Rotate both handles of a node together.
Ctrl+Left Mouse Drag: Snap handle to either a multiple of the Rotation snap angle (15 degrees by default), or a line collinear with or orthogonal to the original handle.
Alt+Left Mouse Drag: Allow only angle and not length to change as handle is dragged.
This section covers using the keyboard to move nodes and to adjust their handles. The keyboard can also be used to add and delete nodes, change the type of node, and to join or break paths. For these latter uses, see the keyboard shortcuts in the following section on the Node Tool-Tool Controls.
In this section, Left- and Right- applied to the Ctrl and Alt modifying keys refers to the keys on the left and right side of the Space bar. Using a left modifying key causes the left handle of a node to be modified; using a right modifying key modifies the rightmost handle. The definition of which handle is left or right is not always completely obvious as when one handle is directly above the other or when the leftmost handle is moved to the right of the former rightmost handle.
![[Nota]](../images/admons/note.png) | Nota |
|---|---|
Updated for v0.46. The scaling and rotating operations described below are different if one node is selected as compared to two or more nodes. If two or more nodes are selected, the nodes act like an object and scale or rotate around the center of the selection, as described in “Transforms with the Keyboard” in Capítulo 5, Positioning and Transforming. If the mouse is over a node, then that node is used as the center of rotation. It is also possible to flip the nodes horizontally and vertically by using keyboard shortcuts. 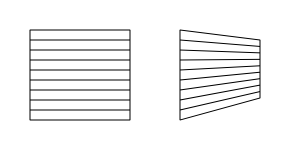
An example of editing multiple nodes. The rectangles on the
right are formed by one path. By selecting all the nodes on
the right side of the path and using the normal transformation
commands a perspective effect can be achieved.
Use < to move the nodes closer together
and the Arrow keys to move the nodes to the
left and up.
|
Same as for translating objects.
Arrow: Move selected nodes by the Nudge factor (2 SVG pixels by default).
Shift+Arrow: Move selected nodes by ten times the Nudge factor.
Alt+Arrow: Move selected nodes one Screen pixel.
Alt+Shift+Arrow: Move selected nodes ten Screen pixels.
Scaling applies to the the node handles and is not directly mappable to scaling objects. These items only apply when one node is selected.
. or >: Expand handles on both sides of selected node by Scale step (2 SVG pixels by default).
, or <: Shorten handles on both sides of selected node by Scale step (2 SVG pixels by default).
Left-Ctrl+. , Left-Ctrl+> , Right-Ctrl+. , Right-Ctrl+> : Expand handle on one side of selected node by Scale step. Left-Ctrl selects the leftmost handle while Right-Ctrl selects the rightmost handle.
Left-Ctrl+, , Left-Ctrl+< , Right-Ctrl+, , Right-Ctrl+< : Shorten handles on one side of selected nodes by Scale step. See above for usage of Left vs. Right Ctrl keys.
Left-Alt+. , Left-Alt+> , Right-Alt+. , Right-Alt+> : Expand handle on one side of selected node by one Screen pixel. See above for usage of Left vs. Right Alt keys.
Left-Alt+, , Left-Alt+< , Right-Alt+, , Right-Alt+< : Shorten handle on one side of selected node by one Screen pixel. See above for usage of Left vs. Right Alt keys.
Rotating applies to the the node handles and is not directly mappable to rotating objects. These items only apply when one node is selected.
[ : Rotate handles of selected node counter-clockwise by the Rotation snap angle (15 degrees by default).
] : Rotate handles of selected node clockwise by the Rotation snap angle (15 degrees by default).
Left-Ctrl+[, Right-Ctrl+[: Rotate handle on one side of selected node counter-clockwise by the Rotation snap angle. Left-Ctrl selects the leftmost handle while Right-Ctrl selects the rightmost handle, as described earlier.
Left-Ctrl+], Right-Ctrl+]: Rotate handle on one side of selected node clockwise by the Rotation snap angle. See above for usage of Left vs. Right Ctrl keys.
Left-Alt+[, Right-Alt+[: Rotate handle on one side of selected node counter-clockwise by one Screen pixel. See above for usage of Left vs. Right Alt keys.
Left-Alt+], Right-Alt+]: Rotate handle on one side of selected node clockwise by one Screen pixel. See above for usage of Left vs. Right Alt keys.
The Node Tool-Tool Controls provides an easy way to access many of the methods of editing nodes.

![]() (Insert): Insert node between adjacent
selected nodes. (Note: Clicking on the path will select
the nearest node on both sides of the point where the path
was clicked. Double clicking on the path or
clicking the path once using the
Ctrl+Alt
keys will also insert a node, in this case under the pointer.
Inkscape will try to add the node without changing
the shape of the path by adjusting the handles of the nodes adjacent
to the new node.)
(Insert): Insert node between adjacent
selected nodes. (Note: Clicking on the path will select
the nearest node on both sides of the point where the path
was clicked. Double clicking on the path or
clicking the path once using the
Ctrl+Alt
keys will also insert a node, in this case under the pointer.
Inkscape will try to add the node without changing
the shape of the path by adjusting the handles of the nodes adjacent
to the new node.)
![]() (Backspace, Delete, or
Ctrl+Alt+Left Mouse Click):
Delete selected nodes. Inkscape will attempt to preserve the shape
of the path when nodes are removed by adjusting the handles of adjacent
nodes. If you wish to remove a node and not change
the handles of adjacent nodes use
Ctrl+Backspace
or
Ctrl+Delete.
(Backspace, Delete, or
Ctrl+Alt+Left Mouse Click):
Delete selected nodes. Inkscape will attempt to preserve the shape
of the path when nodes are removed by adjusting the handles of adjacent
nodes. If you wish to remove a node and not change
the handles of adjacent nodes use
Ctrl+Backspace
or
Ctrl+Delete.
![]() (Shift+J):
Join (merge) two selected end nodes. Normally the merged node
is placed at the midpoint between the end nodes. With the
keyboard shortcut, hovering the mouse over one of the end nodes
will result in the merged node being placed at the position
of that end node.
(Shift+J):
Join (merge) two selected end nodes. Normally the merged node
is placed at the midpoint between the end nodes. With the
keyboard shortcut, hovering the mouse over one of the end nodes
will result in the merged node being placed at the position
of that end node.
![]() :
Join two selected end nodes with a path segment.
:
Join two selected end nodes with a path segment.
![]() :
Delete segment between selected nodes.
:
Delete segment between selected nodes.
![]() (Shift+B):
Break path into sub-paths at selected nodes. Each selected node is converted
into two end nodes.
(Shift+B):
Break path into sub-paths at selected nodes. Each selected node is converted
into two end nodes.
![]() (Shift+C):
Change selected nodes to corner or cusp nodes.
(Shift+C):
Change selected nodes to corner or cusp nodes.
![]() (Shift+S):
Change selected nodes to smooth nodes. When the keyboard
shortcut is used, placing the mouse over one of the handles
will preserve the position of that handle, rotating the
partner handle of the node to match.
(Shift+S):
Change selected nodes to smooth nodes. When the keyboard
shortcut is used, placing the mouse over one of the handles
will preserve the position of that handle, rotating the
partner handle of the node to match.
![]() (Shift+Y):
Change selected nodes to symmetric smooth nodes.
(Shift+Y):
Change selected nodes to symmetric smooth nodes.
![]() (Shift+L):
Change selected segments to straight lines. One or more segments must be
selected (by selecting nodes on both ends of the segment).
(Shift+L):
Change selected segments to straight lines. One or more segments must be
selected (by selecting nodes on both ends of the segment).
![]() (Shift+U):
Change selected segments to curved lines. One or more segments must be
selected.
(Shift+U):
Change selected segments to curved lines. One or more segments must be
selected.
![]() (Shift+Ctrl+C):
Convert selected objects to paths.
(Shift+Ctrl+C):
Convert selected objects to paths.
![]() (Ctrl+Alt+C):
Convert stroke of selected objects to path.
(Ctrl+Alt+C):
Convert stroke of selected objects to path.
![]() :
Toggle on/off display of handles.
:
Toggle on/off display of handles.
New in v0.46.
![]() :
Toggle though parameter list for an LPE.
:
Toggle though parameter list for an LPE.
New in v0.46.
Entry box for x coordinate of selected nodes.
New in v0.46.
Entry box for y coordinate of selected nodes.
New in v0.46.
Units for x and y coordinates.
The Align and Distribute dialog ( → (Mayús.+Ctrl+A)) has special commands for editing nodes when the Node Tool is in use.

The commands will align or distribute selected nodes and can be useful to evenly place markers on a straight line (as shown in the figure below).
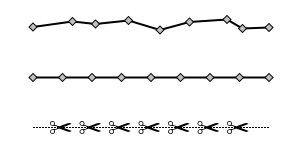
The commands available are:
![]() Align selected nodes along a horizontal line.
Align selected nodes along a horizontal line.
![]() Align selected nodes along a vertical line.
Align selected nodes along a vertical line.
![]() Distribute selected nodes horizontally.
Distribute selected nodes horizontally.
![]() Distribute selected nodes vertically.
Distribute selected nodes vertically.
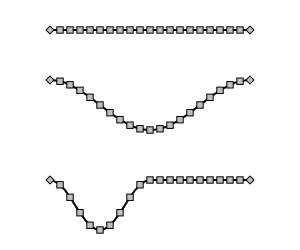
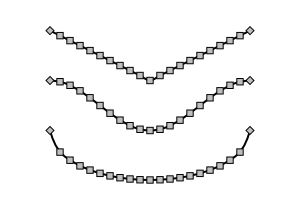
The Sculpting mode of the Node Tool allows one to easily manipulate a complex path, adjusting multiple nodes at the same time. The basic use is to select a group of nodes and then drag one of the selected nodes with the mouse while holding down the Alt key. Only the dragged node moves the full amount. The selected nodes at the end remain fixed and all the other selected nodes will move a distance that is a function of how far they are from the dragged node. The function takes the form of a Bell Curve distribution. This is best illustrated by the following diagram.
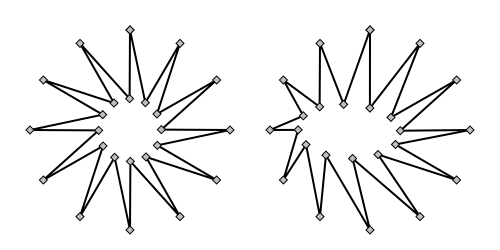
As usual with the Node Tool, only paths may be sculpted. Any other objects must be converted to a path first. In the following illustration, a star has been converted to a path and then the innermost nodes were selected and one was dragged.
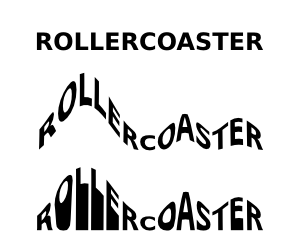
The uses of Sculpting are endless. One can easily manipulate text into interesting shapes. In the following example, the text is sculpted in two different ways.
With a tablet, pressure sensitivity can be used to control the extent to which neighbor points are dragged. Neighbor nodes will move farther if the pressure used is greater. The tablet input device must be enabled; see the Calligraphy Tool section.
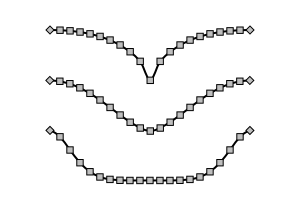
A number of different “profiles” are available. As of now, it is
not possible to switch between the profiles using the GUI. You
can switch by editing the sculpting_profile
parameter in the file preferences.xml in
your Inkscape profile directory.
There are four commands grouped under this category, although one of them might be better thought of as a cloning tool. Each allows a path to be enlarged or reduced by moving each point perpendicular to a line tangent to the path at that point. A regular shape or text object is converted to a path automatically, except for the Linked offset command. The new paths are all closed, even if the original is open.
→ (Ctrl+( ) Inset path: Moves path inward by the Inset/Outset step (default 2 px).
→ (Ctrl+) ) Outset path: Moves path outward by the Inset/Outset step (default 2 px).

→ (Ctrl+J) Dynamic offset: Moves path inward or outward. A handle (viewable when Node Tool selected) controls the magnitude of the offset. The original path is stored so that further changes in the offset do not degrade the path. The original path is not editable after conversion. To edit, convert the dynamic offset path to a normal path with the → (Mayús.+Ctrl+C) command.
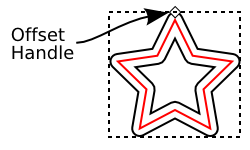
→ (Ctrl+Alt+J) Linked offset: Makes a copy of a path that can then be enlarged or shrunk. A handle controls the magnitude of the offset. The original object is not converted to a path and remains editable, and the changes are reflected in linked copies. More than one link can be made.

The commands have in common that they act on the entire path, and not on a subset of a path's nodes.
→ (Ctrl+K) Combine paths: Combine selected paths into a compound path.
→ (Mayús.+Ctrl+K) Break apart paths: Break selected compound path(s) into simple paths.
→ (Mayús.+R) (keyboard shortcut only works with Node Tool): Reverse path: Reversing the direction of a path will affect things like the order in which nodes are selected by Tab and in the direction of Markers (e.g., arrows).
→ (Ctrl+L) Simplify path: This command reduces the number of nodes in a path while keeping the shape of the path almost the same. The larger the selection, the more aggressive the simplification. The command may be repeated. If repeated within a set time period (0.5 seconds), the simplification also becomes more aggressive. The Simplification threshold can be changed under the Misc tab in the Inkscape Preferences dialog ( → (Mayús.+Ctrl+P)).
© 2005-2008 Tavmjong Bah. | Get the book. |