This subsection of the Dialup Administration Window (AW) is divided into five different editable sections and is only applicable if you are accessing the Internet using an analog modem, an ISDN device or a DSL connection.
Note that you cannot select or modify a profile while IPCop is online, or waiting to go online in “Dial on Demand” mode. Before using this page, go to the Home AW and if the status line reports Connected or Dial on Demand waiting then the click on the button before returning to this Window. After setting up or selecting Profiles, remember to return to the Home AW and click the button, if you want your IPCop to go back online.
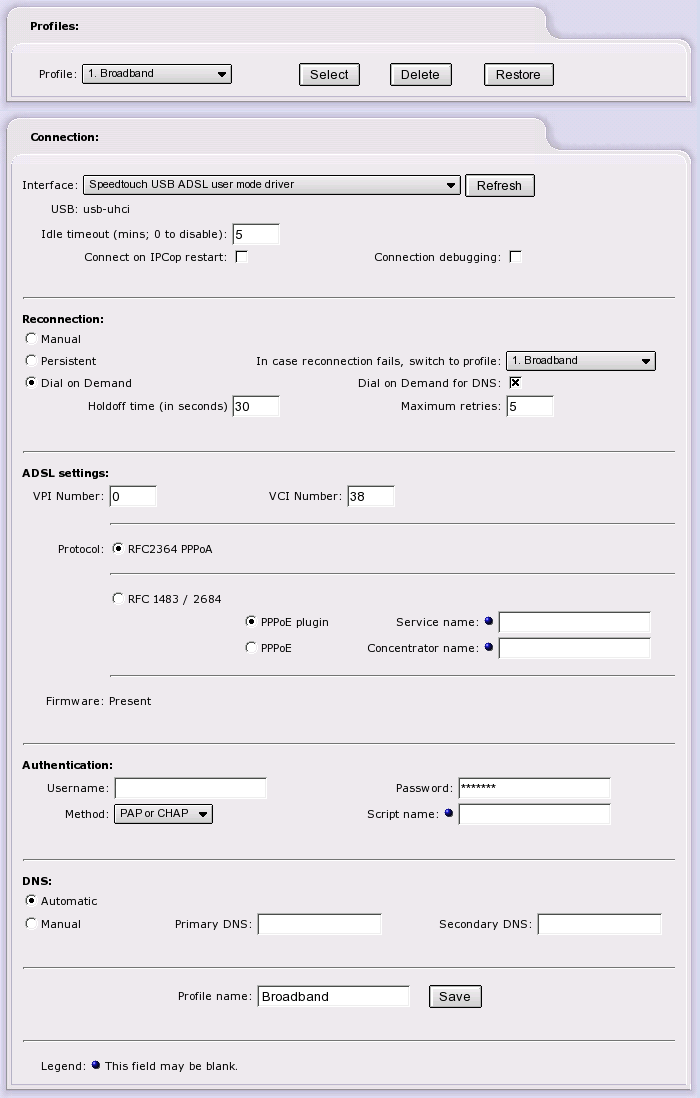
Profiles. This section provides the facilities to name and set up new Dialup Profiles (up to a total of five), or to rename existing Profiles and change their parameters.
Select a Profile to be created or modified from the drop-down list. Fill in or change the parameters for the profile (see below) and click on the button. To select the Profile to be used for future connections, use the drop-down list to make your choice and click the button at the bottom of the page. Use the button while editing a Profile to reinstate the previous Profile settings.
Connection. Select the appropriate Interface type for your Internet connection device from the drop down menu, and click the button to populate the Connection section with the content relevant to your device.
-
Interface. This will be either a Communications port (COM1-COM5, ACM0-ACM3 or USB0-USB1) used mostly for modems and ISDN cards, or PPPoE which is used mostly for DSL connections.
-
Select the appropriate Computer to modem rate. This will decide how quickly data is passed to and from your connection device. With older computer systems or modems, you may find it necessary to use one of the lower data rates to establish reliable computer/modem communications.
-
Enter the correct Number to dial for your Internet connection. If connecting through the PPPoE interface then chances are you will probably be leaving this blank.
-
Modem speaker on. Tick this checkbox if you want the modem speaker on. With the speaker on you to hear the connection taking place and this can be a useful diagnostic aid when troubleshooting. This option is only likely to be useful if you are connecting via an analog modem.
-
Select your Dialing mode. Use Tone dialing unless your telephone connection only recognizes Pulse dialing. Pulse dialing is a lot slower than Tone dialing.
-
ISP Requires Carriage Return. Some ISPs require that the modem sends a carriage return to signal that it has finished sending data. If your ISP requires this, then check this box. The default is unchecked.
-
Enter your Idle timeout. This will decide how IPCop handles your Internet connection when nothing is actually being sent or received via the Internet connection. The number you enter here indicates to IPCop how long it should wait after any Internet activity before it disconnects the modem link. If you set this parameter to 0 then IPCop, once connected, will not disconnect from the Internet of its own accord.
-
Connect on IPCop Restart will make IPCop connect after booting, if Dial on Demand is not selected.
You will probably want to set this option as active if you are also using Dial on Demand. This is because the combination of settings will automatically put IPCop into Dial on Demand waiting mode each time IPCop is switched on or rebooted.
-
Connection debugging. Tick this checkbox to write extra log information in the RED category of the . This can be a very useful addition when troubleshooting “failure to connect” situations.
Reconnection. You can reconnect in one of three ways: Manual, Persistent, and Dial on Demand.
-
With the Manual connection method you will have to click the button on the Homepage.
-
The Persistent connection radiobutton is used to instruct IPCop to maintain the modem connection at all times, even in the absence of Internet activity.
In this mode it will attempt to reconnect the Internet connection whenever the link fails for any reason, such as a connection time-out at the ISP end of the modem link.
Use this mode with caution. If you have metered connection charges you probably will not want to use this feature. However, if you have unlimited service time (often called 'Flatrate') with your ISP, you may want to use this in order to keep the link connected as much as possible.
Note that in Persistent mode, IPCop will cease reconnecting after more than the number of consecutive failed dial attempts set in Maximum Retries. In this event, you have to use the button on the Homepage.
-
Dial on Demand is available by selecting the appropriate radiobutton. Note that after enabling Dial on Demand, you still have to click the button on the Homepage before IPCop will start connecting automatically when it detects Internet activity. The Dial on Demand option is not available for PPPoE connections.
-
The In case reconnection fails, switch to profile drop down menu allows you to pick an alternative profile to automatically switch to if your main connection fails.
-
The Dial on Demand for DNS option determines whether IPCop will connect automatically when it detects DNS requests. This will usually be what you want to happen.
-
The Holdoff time is the period, in seconds, that IPCop should wait between retries. The default is thirty seconds.
-
Enter your desired Maximum retries. This will decide how often IPCop attempts to connect to the Internet after a failed connection attempt.
ADSL settings. If either PPPoE or USB ADSL is enabled, additional configuration options are available.
In this section you can select different protocols, encapsulation methods, or add optional parameters, such as a service name, or a concentrator name, which some ISPs require. If your ISP does not require them, or does not give you any, then you may leave these two fields blank.
Your ISP will give you two settings, VPI and VCI, which you must enter if you are using a USB ADSL connection.
Authentication. User Name and Password are the username and password that your ISP should have supplied to you when you opened your account with them.
There are several ways in which ISPs use this username and password to login to their systems. The most common methods are PAP or CHAP. Select this if your ISP uses either of those two.
In the rare event that your ISP uses a text-based login
script, you will need to login to IPCop and create a file in
the /etc/ppp/ folder/directory.
This filename (without the /etc/ppp/ prefix) should be entered into
the Script name field. The file
should contain 'expect send' pairs, separated by a tab.
Examine the file /etc/ppp/demonloginscript for an example of
what should be in this file. USERNAME will be substituted
for the username and PASSWORD for the password.
DNS. Select Automatic if your ISP supports automatic DNS server configuration, as is now usually the case. Alternatively, select Manual and put IP addresses in the Primary DNS and Secondary DNS fields. These IP addresses will generally be provided, where necessary, by your ISP.
Profile name. To name, or re-name, a profile, enter it in this field.
Save. To save your configuration, click the Save button.
Follow the instructions and links on this page to download the files necessary for supporting various modems to your desktop machine, and then upload the files to your IPCop.
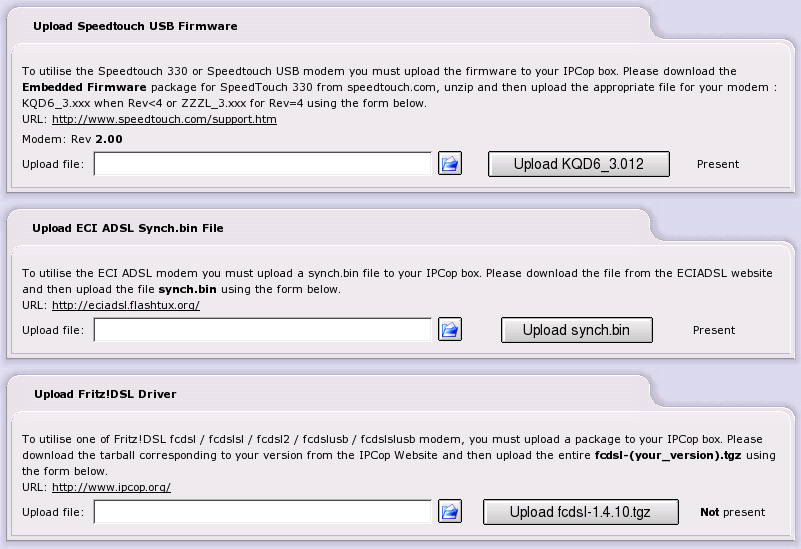
Upload Speedtouch USB Firmware. Use this section to upload the firmware file to IPCop - USB ADSL will not function before this has been done.
You need one file for Speedtouch Revision 4 modems, and a
different one for earlier models. Use the file KQD6_3.012 for Revisions 1 and 2, and
ZZZL_3.012 for Revision 4
modems.
Use the link specified to go to the web page and download the file to your desktop machine. Then choose the file on your desktop machine, and then press the button to transfer it to IPCop. Once this has been successfully uploaded, you can use USB ADSL.
Upload ECI ADSL Synch.bin
File. Use this section to upload the
synch.bin file to IPCop - ECI
ADSL will not function before this has been done.
Use the link specified to go to the web page and download the file to your desktop machine. Then choose the file on your desktop machine, and then press the button to transfer it to IPCop. Once this has been successfully uploaded, you can use ECI ADSL.
Upload Fritz!DSL
Driver. Use this section to upload the
fcdsl.o file to IPCop -
Fritz!DSL will not function before this has been done.
Use the link specified to go to the web page and download the file to your desktop machine. Then choose the file on your desktop machine, and then press the button to transfer it to IPCop. Once this has been successfully uploaded, you can use Fritz!DSL.
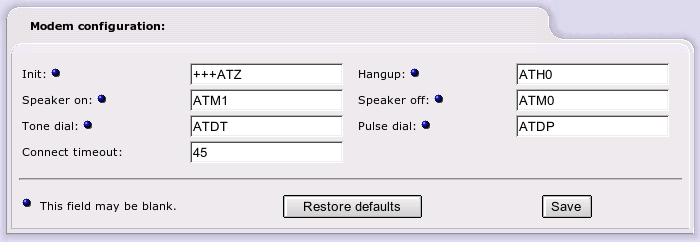
Modem Configuration. Is only applicable if you are attempting to connect to the Internet with a standard analog modem. The default settings that appear in this Administration Window are appropriate for most analog modems. However if you are experiencing problems connecting, then compare these settings with those suggested in the modem manual for use with your particular modem. Any or all of these settings may be left blank.
Init - The standard Initialization string used by most Hayes-compatible modems is already provided for you in this field. If, however, your modem requires a different setting then by all means change it.
Hangup - The standard Hang up string used by most Hayes-compatible modems is already provided for you in this field. If, however, your modem requires a different setting then by all means change it.
Speaker on - The standard Speaker on string used by most Hayes-compatible modems is already provided for you in this field. If, however, your modem requires a different setting then by all means change it.
Speaker off - The standard Speaker-off string used by most Hayes-compatible modems is already provided for you in this field. If, however, your modem requires a different setting then by all means change it.
Tone Dial - The standard Tone Dial string used by most Hayes-compatible modems is already provided for you in this field. If your modem and telephone line can support the Tone Dial feature and you are experiencing problems connecting then make sure that this string is appropriate for use with your modem.
Pulse Dial - The standard Pulse Dial string used by most Hayes-compatible modems is already provided for you in this field. You should not need to change it, but if your telephone service does not support Tone Dialing then you may need to make sure this is the correct string for your modem.
Connect Timeout - The only section in this area that may not be blank is the Connect Timeout. This tells IPCop the amount of time to allow the modem to attempt to connect. After this number of seconds has elapsed without proper response on the receiving end, IPCop will give up and move on to the next connection attempt. The default should work fine for you but if you notice that the connection is being dropped in the middle of the negotiation sequence (turn on the modem speaker and listen to the attempted connection) then you may need to increase this parameter slightly until it connects successfully.
Note
This Administrative Web Page will only appear as a menu item if your RED interface is STATIC.
In some cases, your ISP may assign you a range of IP addresses for your network.
If you have multiple IP addresses, only, so that you can connect multiple, non-server computers, to the Internet, you will no longer need the extra addresses. IPCop should connect directly to your modem or the Internet.
On the other hand, if you are providing a server on one of internal computers you may need to use multiple aliases on your RED interface. To use this facility effectively, you may have to adjust IPCop's routing tables by hand.

Add a new alias. Section to be written...
Once you have entered all the information, click the Enabled box and press . This will move the entry to the next section, and list it as an alias.
Current aliases. This section lists the aliases that are in effect. To remove one, click the “Trash Can” icon. To edit one, click the “Yellow Pencil” icon.
To enable or disable a rule - click on the “Enabled” icon (the checkbox on the left of the Action column) for the particular entry you want to enable or disable. The icon changes to an empty box when a rule is disabled. Click on the checkbox to enable it again.