As well as performing its core function of Internet firewall, IPCop can provide a number of other services that are useful in a small network.
These are:
Proxy (Web Proxy Server)
Edit Hosts (Local DNS Server)
In a larger network it is likely that these services will be provided by dedicated servers and should be disabled here.
A web proxy server is a program that makes requests for web pages on behalf of all the other machines on your intranet. The proxy server will cache the pages it retrieves from the web so that if 3 machines request the same page only one transfer from the Internet is required. If your organization has a number of commonly used web sites this can save on Internet accesses.
Normally you must configure the web browsers used on your network to use the proxy server for Internet access. You should set the name/address of the proxy to that of the IPCop machine and the port to the one you have entered into the box, default 800. This configuration allows browsers to bypass the proxy if they wish. It is also possible to run the proxy in “transparent” mode. In this case the browsers need no special configuration and the firewall automatically redirects all traffic on port 80, the standard HTTP port, to the proxy server.

You can choose if you want to proxy requests from your Green (private) network and/or your Blue (wireless) network. Just tick the relevant boxes.
Log enabled. If you choose to enable the proxy then you can also log web accesses by ticking the box. Accesses made through the proxy can be seen by clicking the Proxy Logs choice of the Logs menu.
If your ISP requires you to use their cache for web access then you should specify the hostname and port in the text box. If your ISP's proxy requires a user name and password then enter them in the and boxes.
Your extension_methods
list.
Squid only knows about standard HTTP request methods.
Unknown methods are denied, unless you add them to the
extension_methods list.
You can add up to 20 additional "extension"
methods here.
For example, subversion
uses some non-standard methods that squid blocks.
To allow subversion to work through IPCop's transparent proxy,
you will have to add REPORT
MKACTIVITY CHECKOUT and
MERGE to the
extension_methods list.
Disallow local proxying on blue/green networks. Check this option to disable proxying to green and blue networks (if blue is available). This closes a possible hole between Green and Blue if they are run in “transparent” mode.
or specify a list of destinations
which are not to be proxied.
This gives somewhat more flexibility, allowing you to
define which destination networks are to be DENIED
through the proxy. You can specify a network (or
networks) with an IP Address and Netmask, for example:
192.168.3.0/255.255.255.0
Cache Management. You can choose how much disk space should be used for caching web pages in the Cache Management section. You can also set the size of the smallest object to be cached, normally 0, and the largest, 4096KB. For privacy reasons, the proxy will not cache pages received via https, or other pages where a username and password are submitted via the URL.
Repair cache. You can repair the proxy cache by clicking the button.
Clear cache. You can flush all pages out of the proxy cache at any time by clicking the button.
Transfer limits. The web proxy can also be used to control how your users access the web. The only control accessible via the web interface is the maximum size of data received from and sent to the web. You can use this to prevent your users downloading large files and slowing Internet access for everyone else. Set the two fields to 0, the default, to remove all restrictions.
Save. To save any changes, press the button.
Warning
Caching can take up a lot of space on your hard drive. If you use a large cache, then the minimum size hard drive listed in the IPCop documentation will not be large enough.
The larger the cache you choose the more memory is required by the proxy server to manage the cache. If you are running IPCop on a machine with low memory do not choose a large cache.
DHCP (Dynamic Host Configuration Protocol) allows you to control the network configuration of all your computers or devices from your IPCop machine. When a computer (or a device like a printer, pda, etc.) joins your network it will be given a valid IP address and its DNS and WINS configuration will be set from the IPCop machine. To use this feature new machines must be set to obtain their network configuration automatically.

You can choose if you want to provide this service to your Green (private) network and/or your Blue (wireless) network. Just tick the relevant box.
For a full explanation of DHCP you may want to read Linux Magazine's “ Network Nirvana - How to make Network Configuration as easy as DHCP ”
The following DHCP parameters can be set from the web interface:
Enabled. Check this box to enable the DHCP server for this interface.
IP Address/Netmask. The IP Address of the network interface and it's Netmask are displayed here for reference.
Start Address (optional). You can specify the lowest and highest addresses that the server will hand out to other requestors. The default is to hand out all the addresses within the subnet you set up when you installed IPCop. If you have machines on your network that do not use DHCP, and have their IP addresses set manually, you should set the start and end address so that the server will not hand out any of these manual IPs.
You should also make sure that any addresses listed in the fixed lease section (see below) are also outside this range.
End Address (optional). Specify the highest address you will handout (see above).
Note
To enable DHCP to provide fixed leases without handing out dynamic leases, leave both Start and End Address fields blank. However, if you provide a Start Address, you also have to provide an End Address, and vice versa.
Base IP for fixed lease creation (optional). The ability to add fixed leases from the list of dynamic leases was added in v1.4.12.
You can specify an IP Address which will be used as the base from which new fixed leases will be incremented.
Default lease time. This can be left at its default value unless you need to specify your own value. The default lease time is the time interval IP address leases are good for. Before the lease time for an address expires your computers will request a renewal of their lease, specifying their current IP address. If DHCP parameters have been changed, when a lease renewal request is made the changes will be propagated. Generally, leases are renewed by the server.
Maximum lease time. This can be left at its default value unless you need to specify your own value. The maximum lease time is the time interval during which the DHCP server will always honor client renewal requests for their current IP addresses. After the maximum lease time, client IP addresses may be changed by the server. If the dynamic IP address range has changed, the server will hand out an IP address in the new dynamic range.
Domain name suffix (optional). There should not be a leading period in this box. Sets the domain name that the DHCP server will pass to the clients. If any host name cannot be resolved, the client will try again after appending the specified name to the original host name. Many ISP's DHCP servers set the default domain name to their network and tell customers to get to the web by entering “www” as the default home page on their browser. “www” is not a fully qualified domain name. But the software in your computer will append the domain name suffix supplied by the ISP's DHCP server to it, creating a FQDN for the web server. If you do not want your users to have to unlearn addresses like www, set the Domain name suffix identically to the one your ISP's DHCP server specifies.
Allow bootp clients. Check this box to enable bootp Clients to obtain leases on this network interface. By default, IPCop's DHCP server ignores Bootstrap Protocol (BOOTP) request packets.
Primary DNS. Specifies what the DHCP server should tell its clients to use for their Primary DNS server. Because IPCop runs a DNS proxy, you will probably want to leave the default alone so the Primary DNS server is set to the IPCop box's IP address. If you have your own DNS server then specify it here.
Secondary DNS (optional). You can also specify a second DNS server which will be used if the primary is unavailable. This could be another DNS server on your network or that of your ISP.
Primary NTP Server (optional). If you are using IPCop as an NTP Server, or want to pass the address of another NTP Server to devices on your network, you can put its IP address in this box. The DHCP server will pass this address to all clients when they get their network parameters.
Secondary NTP Server (optional). If you have a second NTP Server address, put it in this box. The DHCP server will pass this address to all clients when they get their network parameters.
Primary WINS server address (optional). If you are running a Windows network and have a Windows Naming Service (WINS) server, you can put its IP address in this box. The DHCP server will pass this address to all hosts when they get their network parameters.
Secondary WINS server address (optional). If you have a second WINS Server, you can put its IP address in this box. The DHCP server will pass this address to all hosts when they get their network parameters.
When you press , the change is acted upon.
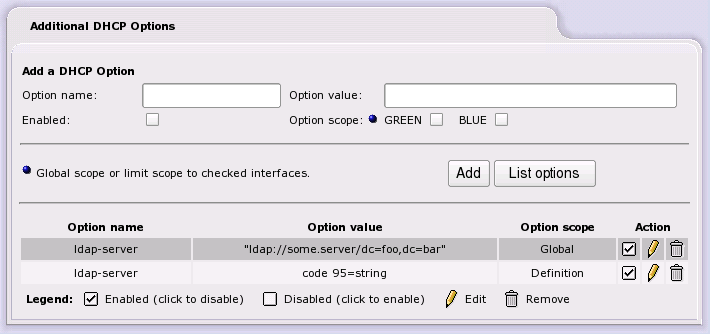
If you have any special parameters you want to distribute to your network via the DHCP server, you add them here. (This functionality was added in v1.4.6).
You can add additional DHCP Options here:
Option name.
You specify the name of the DHCP option here,
for example:
smtp-server or
tcp-keepalive-interval.
Option value. The value, appropriate to the option, goes here. It could be a string, an integer, an IP Address, or an on/off flag, depending on the option.
Possible option formats are: boolean, integer 8, integer 16, integer 32, signed integer 8, signed integer 16, signed integer 32, unsigned integer 8, unsigned integer 16, unsigned integer 32, ip-address, text, string, array of ip-address.
The following formats were added in v1.4.12: array of integer 8, array of integer 16, array of integer 32, array of signed integer 8, array of signed integer 16, array of signed integer 32, array of unsigned integer 8, array of unsigned integer 16, array of unsigned integer 32.
Option scope (optional). The scope of the option will be Global, unless one of the interface checkboxes is checked, in which case it will only apply to that interface.
Enabled. Click on this check box to tell the DHCP server to hand out this option. If the entry is not enabled, it will be stored in IPCop's files, but the DHCP server will not issue the option.
Add. Click on this button to add the option.
List options. Click on this button to display a list of options with possible values.
Adding custom DHCP options
If the option you want is not included in the built-in list of options, you can add your own custom definitions. The syntax required is listed at the foot of the Options List.
For example, to add the ldap-server option (code 95) to the
list, firstly,
Add a DHCP Option with name: ldap-server
and value: code 95=string
(be sure to enter value correctly, 1 space between code and
95 and no spaces around the = sign).
You should then see an entry with Option name:
ldap-server, Option value:
code 95=string and Option scope:
Definition.
Now you can add an ldap-server as you would with any built-in
DHCP option, with Option name:
ldap-server and Option value:
"ldap://some.server/dc=foo,dc=bar"
If you have machines whose IP addresses you would like to manage centrally but require that they always get the same fixed IP address you can tell the DHCP server to assign a fixed IP based on the MAC address of the network card in the machine.
This is different to using manual addresses as these machines will still contact the DHCP server to ask for their IP address and will take whatever we have configured for them.
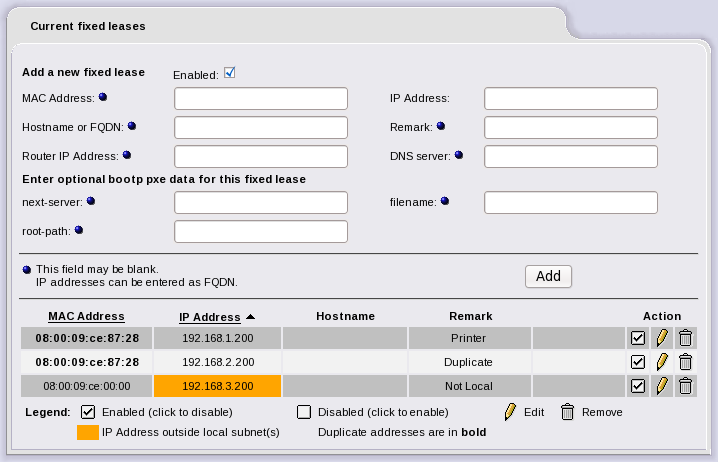
Add a new fixed lease. You can specify the following fixed lease parameters:
Enabled. Click on this check box to tell the DHCP server to hand out this static lease. If the entry is not enabled, it will be stored in IPCop's files, but the DHCP server will not issue this lease.
MAC Address (optional). The six octet/byte colon separated MAC address of the machine that will be given the fixed lease.
If you leave the MAC Address field blank, the DHCP server will try to assign a fixed lease based on the hostname or fully qualified domain name (FQDN) of the client.
If you provide a MAC Address and a hostname in the Hostname or FQDN field, the DHCP server will provide that hostname to the client.
Warning
The format of the MAC address is xx:xx:xx:xx:xx:xx, not xx-xx-xx-xx-xx-xx, as some machines show, i.e. 00:e5:b0:00:02:d2.
It is possible to assign different fixed leases to the same device, provided the IP addresses are in different subnets. Duplicated addresses are highlighted in the table in bold text.
IP Address. The static lease IP address that the DHCP server will always hand out for the associated MAC address. Do not use an address in the server's dynamic address range.
It is possible to assign an IP Address outwith the local subnets to a device. The IP address will be highlighted in orange in the table.
Hostname or FQDN (optional).
The client will receive a hostname, or in the case of a
Fully Qualified Domain Name, a hostname and domain name, if
a MAC address is also provided.
If the MAC Address field is blank, the
DHCP server will try to assign a fixed lease based on the
hostname or FQDN of the client, using the
dhcp-client-identifier option.
Remark (optional). If you want, you can include a string of text to identify the device using the fixed lease.
Router IP Address (optional). For fixed leases, it is possible to send the Client a router (gateway) address that is different from the IPCop address.
DNS Server (optional). Send the Client another DNS server, not the DNS server(s) configured in the DHCP settings section.
Enter optional bootp pxe data for this fixed lease. Some machines on your network may be thin clients that need to load a boot file from a network server.
next-server (optional). You can specify the server here if needed.
filename (optional). Specify the boot file for this machine.
root-path (optional). If the boot file is not in the default directory then specify the full path to it here.
The current fixed leases are displayed at the foot of this section, and they can be enabled/disabled, edited or deleted.
You can sort the display of the fixed leases by clicking on the underlined headings or . Another click on the heading will reverse the sort order.
To edit an existing lease, click on its pencil icon. The fixed leases values will be displayed in the Edit an existing lease section of the page. The fixed lease being edited will be highlighted in yellow. Click the button to save any changes.
To remove an existing profile, click on its trash can icon. The lease will be removed.
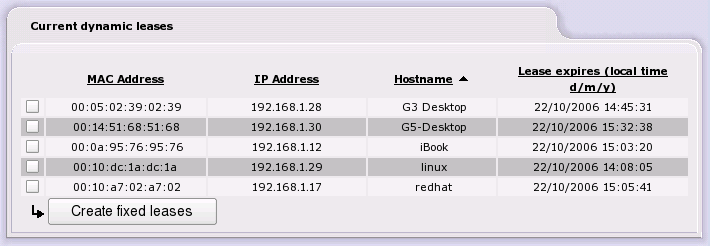
If DHCP is enabled, this section lists the dynamic leases
contained in the
/var/state/dhcp/dhcpd.leases file.
The IP Address, MAC Address, hostname (if available) and
lease expiry time of each record are shown, sorted by IP
Address.
You can re-sort the display of dynamic leases by clicking on any of the four underlined column headings. A further click will reverse the sort order.
It is easy to cut and paste a MAC Address from here into the fixed lease section, if needed.
A new method of adding fixed leases from the list of dynamic leases was added in v1.4.12. Used in conjunction with the Base IP for fixed lease creation field, you can select one or more checkboxes, and click the button to quickly add a number of devices to the fixed lease list.
Lease times that have already expired are “struck through”.
Dynamic DNS (DYNDNS) allows you to make your server available to the Internet even though it does not have a static IP address. To use DYNDNS you must first register a subdomain with a DYNDNS provider. Then whenever your server connects to the Internet and is given an IP address by your ISP it must inform the DYNDNS server of that IP address. When a client machine wishes to connect to your server it will resolve the address by going to the DYNDNS server, which will give it the latest value. If this is up to date then the client will be able to contact your server (assuming your firewall rules allow this). IPCop makes the process of keeping your DYNDNS address up to date easier by providing automatic updates for many of the DYNDNS providers.
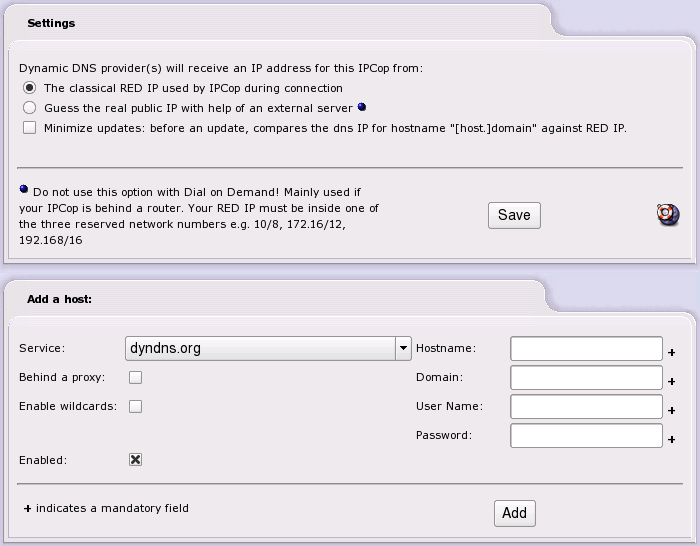
The following DYNDNS parameters can be set from the web interface:
Service. Choose a DYNDNS provider from the dropdown. You should have already registered with that provider.
Behind a proxy. This tick box should be ticked only if you are using the no-ip.com service and your IPCop is behind a proxy. This tick box is ignored by other services.
Enable wildcards. Enable Wildcards will allow you to have all the subdomains of your dynamic DNS hostname pointing to the same IP as your hostname (e.g. with this tick box enabled, www.ipcop.dyndns.org will point to the same IP as ipcop.dyndns.org). This tick box is useless with no-ip.com service, as they only allow this to be activated or deactivated directly on their website.
Hostname. Enter the hostname you registered with your DYNDNS provider.
Domain. Enter the domain name you registered with your DYNDNS provider.
Username. Enter the username you registered with your DYNDNS provider.
Password. Enter the password for your username.
Enabled. If this is not ticked then IPCop will not update the information on the DYNDNS server. It will retain the information so you can re-enable DYNDNS updates without reentering the data.
This section shows the DYNDNS entries you have currently configured.

To edit an entry click on its pencil icon. The entry's data will be displayed in the form above. Make your changes and click the button on the form.
You can also update the Behind a proxy, Use wildcards and Enabled tick boxes directly from the current hosts list entry.
You can force IPCop to refresh the information manually by pressing , however, it is best to only update when the IP address has actually changed, as dynamic DNS service providers don't like to handle updates that make no changes. Once the host entries have been enabled your IP will automatically be updated each time your IP changes.
As well as caching DNS information from the Internet, the DNS proxy on IPCop allows you to manually enter hosts whose address you want to maintain locally. These could be addresses of local machines or machines on the Internet whose address you might want to override.
The following parameters can be set from the web interface:
Host IP Address. Enter the IP address here.
Hostname. Enter the host name here.
Domain name (optional). If the host is in another domain then enter it here.
Enabled. Check this box to enable the entry.
When you press , the details will be saved.
This section shows the local DNS entries you have currently configured.
You can re-sort the display by clicking on any of the three underlined column headings. A further click will reverse the sort order.
To enable or disable an entry - click on the “Enabled” icon (the checkbox in the Action column) for the particular item you want to enable or disable. The icon changes to an empty box when a rule is disabled. Click on the checkbox to enable it again.
To edit an entry click on its Pencil icon. The entry's data will be displayed in the form above. Make your changes and click the button on the form.
To delete an entry click on its Trash Can icon.
IPCop can be configured to obtain the time from a known accurate timeserver on the Internet. In addition to this it can also provide this time to other machines on your network.
To configure the time system, make sure that the Enabled box is ticked and enter the full name of the timeserver you want to use in the Primary NTP Server box. You can also enter an optional Secondary NTP Server if you want.
We suggest that, for efficiency, you synchronize IPCop with your ISP's time servers, where available. If they are not provided, try the www.pool.ntp.org project, which is “a big virtual cluster of timeservers striving to provide reliable easy to use NTP service for millions of clients without putting a strain on the big popular timeservers.”
Follow their instructions on how to use country zones (for example 0.us.pool.ntp.org) rather than the global zone (0.pool.ntp.org), to further improve efficiency.
In January 2008 the IPCop vendor pool became available. Please use 0.ipcop.pool.ntp.org 1.ipcop.pool.ntp.org or 2.ipcop.pool.ntp.org instead of the previous default zone names.
If you want to provide a time service to the rest of your network then tick the Provide time to local network checkbox.
You can choose to update the time on IPCop on a periodic basis, for instance every hour, or to update it when you wish from this web page (just click Set Time Now).
To save your configuration click the Save button.
Note
Although IPCop can act as a timeserver for your network, it uses the ntpdate command to update its time on a periodic basis instead of allowing the more accurate ntpd server to maintain the time continuously. This means that the IPCop clock is more likely to drift out of synchronisation with the real time but does not require that IPCop is permanently connected to the Internet.
How to improve IPCop's clock accuracy
If you find IPCop's onboard clock is being stepped by a large amount
when it synchronizes with another NTP Server, you can apply a correction
factor in the /etc/ntp/drift file to compensate.
You can find the step amount in the System Logs, in the NTP section. You should see something like:
10:40:00 ntpdate step time server 192.168.1.1 offset 3.371245 sec
If you divide the time error by the time passed, and multiply by one
million, you get the value (in parts per million) to put in
/etc/ntp/drift
In the example below, 3.37 is the daily offset; 86400 equals the number of seconds in a day; and the result in PPM is 39.004:
(3.37 ÷ 86400 × 1000000) = 39.004
Change the value in the drift file with the command (as root):
$echo 39.004 > /etc/ntp/drift
If you do not want to use an Internet timeserver you can enter the time manually and click the button.
Warning
If you correct the time by a large amount, and offset the clock ahead of itself, the fcron server that runs regular cron jobs can appear to stop while it waits for the time to catch up. This can affect graph generation and other regular tasks that run in the background.
If this happens, try running the command fcrontab -z in a terminal to reset the fcron server.
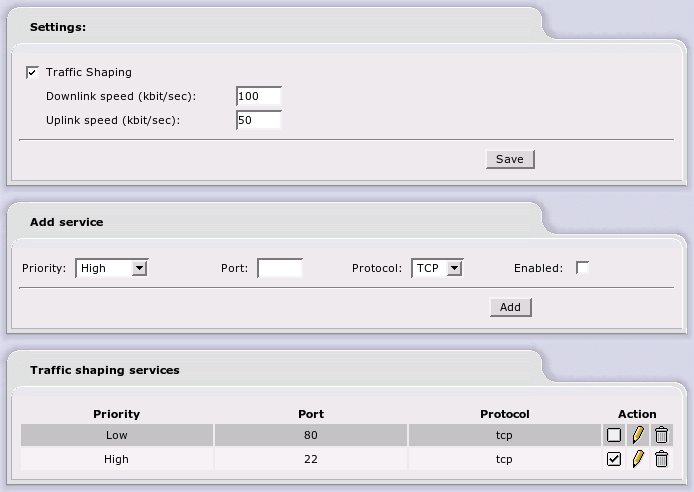
Traffic Shaping allows you to prioritize IP traffic moving through your firewall. IPCop uses WonderShaper to accomplish this. WonderShaper was designed to minimize ping latency, ensure that interactive traffic like SSH is responsive all while downloading or uploading bulk traffic.
Many ISPs sell speed as download rates, not as latency. To maximize download speeds, they configure their equipment to hold large queues of your traffic. When interactive traffic is mixed into these large queues, their latency shoots way up, as ACK packets must wait in line before they reach you. IPCop takes matters into its own hands and prioritizes your traffic the way you want it. This is done by setting traffic into High, Medium and Low priority categories. Ping traffic always has the highest priority — to let you show off how fast your connection is while doing massive downloads.
To use Traffic Shaping in IPCop:
Use well known fast sites to estimate your maximum upload and download speeds. Fill in the speeds in the corresponding boxes of the Settings portion of the web page.
Enable traffic shaping by checking the Enable box.
Identify what services are used behind your firewall.
Then sort these into your 3 priority levels. For example:
Interactive traffic such as SSH (port 22) and VOIP (voice over IP) go into the high priority group.
Your normal surfing and communicating traffic like the web (port 80) and streaming video/audio to into the medium priority group.
Put your bulk traffic such as P2P file sharing into the low traffic group.
Create a list of services and priorities using the Add service portion of the web page.
The services, above, are only examples of the potential Traffic Shaping configuration. Depending on your usage, you will undoubtedly want to rearrange your choices of high, medium and low priority traffic.
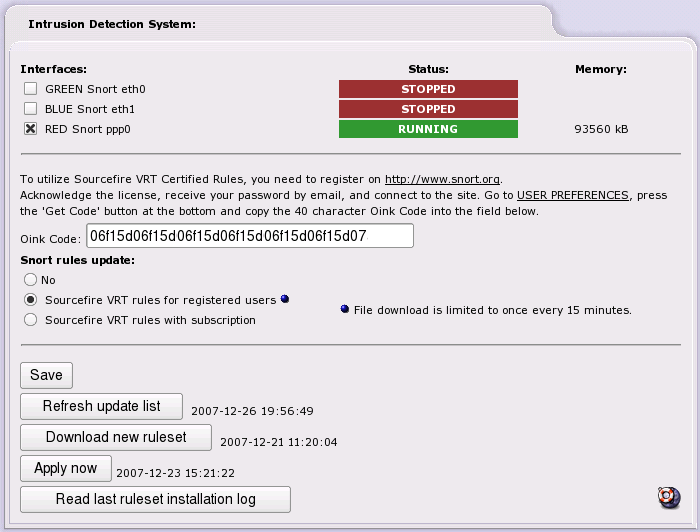
IPCop contains a powerful intrusion detection system, Snort, which analyses the contents of packets received by the firewall and searches for known signatures of malicious activity.
Snort is a passive system which requires management by the
User. You need to monitor the logs, and interpret the
information. Snort only logs suspicious activity, so if
you need an active system, consider
snort_inline or the
guardian addon.
You should also note that Snort is memory hungry, with newer versions using about 80Mb per interface. This depends in part on the ruleset used, and can be reduced by selection of the rules used.
IPCop can monitor packets on the Green, Blue, Orange and Red interfaces. Just tick the relevant boxes and click the Save button.
A standard installation of IPCop comes with a set of Snort's default rules. As more attacks are discovered, the rules Snort uses to recognize them will be updated. To utilize Sourcefire VRT Certified rules you need to register on Snort's website www.snort.org and obtain an “Oink Code”.
Select the correct radio button, add your Oink Code and click the Save button before your first attempt to download a ruleset.
Then, click the Refresh update list button, followed by the Download new ruleset button, and finally click Apply now.
After a successful operation the date and time will be displayed beside each button.
The final button - Read last ruleset installation log - will display the last installation log.
