This group of web pages is designed to help you administer and control the IPCop server itself. To get to these web pages, select from the tab bar at the top of the screen. The following choices will appear in a dropdown:
-
— Allows you to set the admin and optionally, the dial password.
-
— Allows you to enable and configure Secure Shell, SSH, access to IPCop.
-
— Enables or disables the use of JavaScript and allows you to set the language of the web display.
-
— Backs up your IPCop settings either to files or to a floppy disk. You can also restore your settings from this web page.
-
— This web page lists the many volunteers and other projects that make IPCop so great.
This page has two sections:
-
The first box shows a list of available updates and links to enable you to download and apply patches. You can also select a kernel type to save space when disk space is low.
-
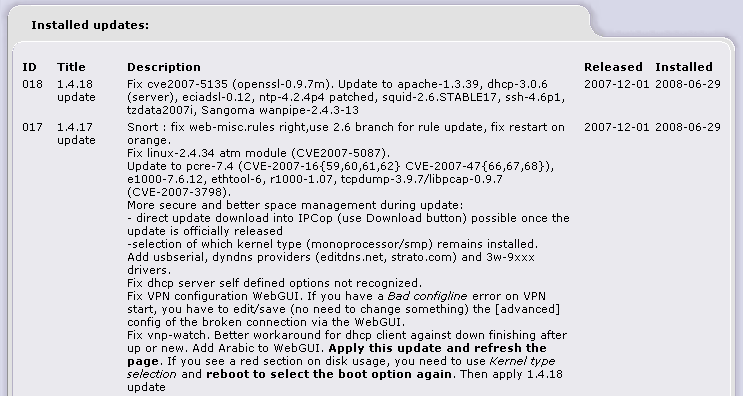
A second box lists the updates that have been installed.
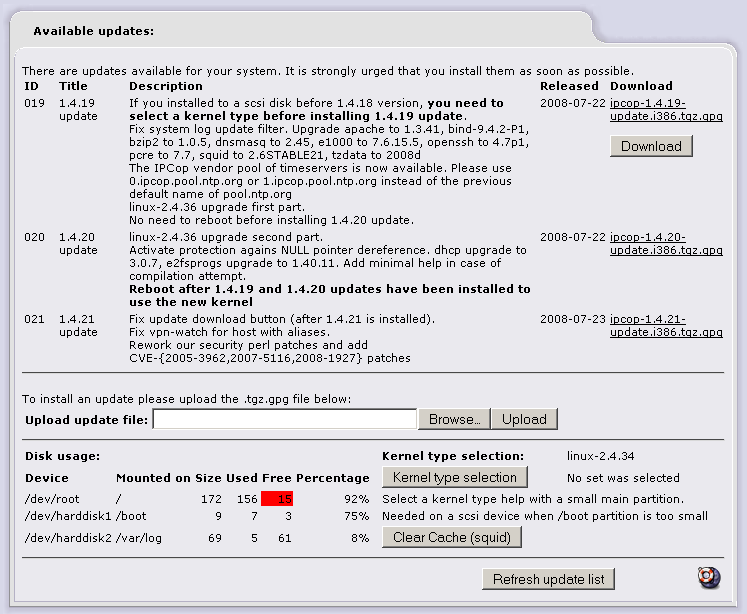
Every time you connect to the Internet IPCop will check for any new updates that may be available. You may also manually check for updates by clicking the button. When a new update is available you will see the information on screen with a short description and a link to download the update file.
Clicking on the
button will download the .tgz.gpg file directly onto the IPCop
system. (A bug in the 1.4.20 update broke this feature, which
is why you still have to manually install the 1.4.21
update).
The earlier manual method requires you to download the
.tgz.gpg file onto your client
PC with a web browser, not directly onto IPCop. Once you have
downloaded the file, in the Upload [the] update file: section, by
using the button to
locate the file on your client PC, the button then uploads the
.tgz.gpg file to IPCop and
applies the changes.
Kernel updates are sometimes split into two parts to accommodate lack of free space on disks.
A way of recovering some free space has been created, allowing you to select one of the two 'kernel types' installed - monoprocessor or smp kernel.
After installing IPCop 1.4.17, Use the button to see the new
Update page. If you see a red section in Disk usage, you need
to click the button to select a 'kernel type'. That will
free up space on the /dev/root
and /boot partitions. On the
next reboot, you may need to select the kernel from the grub
boot menu if the wrong kernel is not on the first line.
The limits for the red disk usage warning are 20 MB free
on /dev/root, and 1 MB on
/boot. Any scsi disk with two
kernel versions (2.4.31 and 2.4.34) and two kernel types will
have filled the /boot
partition. Starting from IPCop 1.4.18, the /boot partition size was increased from 8
to 10 MB.
Clearing the web proxy's cache (squid) can also save disk
space on /var/log. The
button is
provided for this purpose.
Note
Only IPCop official patches will actually install on your IPCop server. Some updates may require you to reboot your IPCop server, so please read all patch information thoroughly before applying the update.
Troubleshooting
If you get an error message “This is not an authorised update”, check if your IPCop server's clock is in the past, as gpg will think the signature date is in the future, and will stop with an error.
Check the log file /var/log/httpd/error_log to confirm.
IPCop is often run on old hardware, and the battery can go flat, causing the system clock to fail.
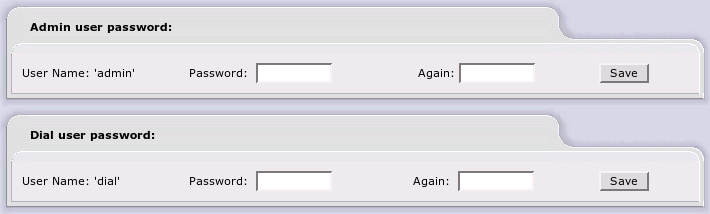
The Passwords page allows you to change the Admin and/or Dial User passwords, as you deem necessary. Simply enter the desired password once in each field for the User you wish to update and click on .
Entering the Dial password activates the Dial user ID. This special user has the ability to use the buttons on the IPCop Home web page but cannot get to any other IPCop web pages. Use this facility if you have a dial up connection and want to allow users to connect to the Internet, but not have admin authority on the firewall.
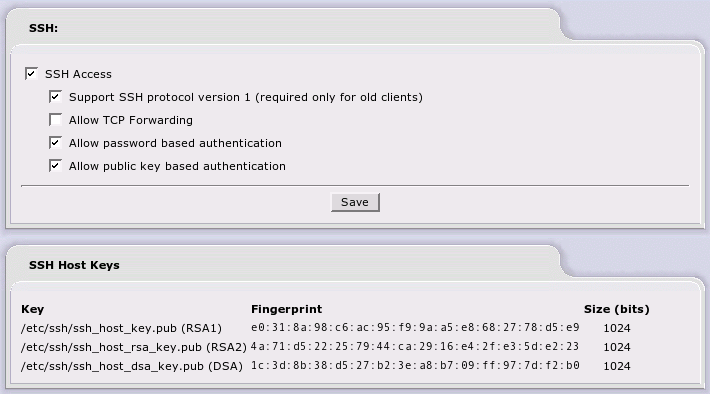
The SSH Access page allows you to decide if remote SSH access is available on your IPCop server or not. By placing a checkmark in the box you will activate remote SSH access. It is also possible to configure several SSH daemon parameters from this web page. The SSH option is disabled by default and we would advise enabling it only as needed and then disabling it afterwards.
Similar to the HTTP and HTTPS ports for the IPCop machine being switched to ports 81 and 445, the SSH port on the IPCop machine is switched to 222. If you are using a GUI based application to access your IPCop machine, remember to specify port 222. If you are using the ssh, scp or sftp commands, the syntax for specifying non-standard ports is different for each command, even though they are related. Assuming your IPCop machine is at IP address 192.168.254.1, the commands would be:
- SSH
-
$ssh -p 222 [email protected] - SCP
-
$scp -P 222 some/file [email protected]: - SFTP
-
$sftp -o port=222 [email protected]
Use your desktop machine's man pages to get a more complete explanation of these commands.
The following SSH options are available from the web page:
- SSH Access
-
Checking this box enables SSH. Unless you use external access, SSH will only be available from the GREEN network. With SSH enabled it possible for anyone with the IPCop root password to log into your firewall at the command prompt.
- Support SSH protocol version 1 (required only for old clients)
-
Checking this box enables support of SSH version 1 clients. Use of this option is strongly discouraged. There are known vulnerabilities with SSH version 1. Use this option only for temporary access, if you only have SSH version 1 clients and there is no way to upgrade to SSH version 2. Most, if not all, of the current SSH clients support version 2. Upgrade your clients if at all possible.
- Allow TCP Forwarding
-
Checking this box, allows you to create SSH encrypted tunnels between machines inside your firewall and external users.
What use is this when IPCop already has a VPN?
You are on the road and something goes wrong with one of your servers. You haven't set up a road warrior VPN connection. If you know your IPCop root password you can use SSH port forwarding to get through your firewall and get access to a server on one of your protected networks. These next few paragraphs will discuss how to do this, assuming you have a Telnet server running on an internal computer at 10.0.0.20. It also assumes your remote machine is a Linux machine. The putty SSH command on Windows has the same capabilities, but they are accessed via dialog boxes. You may already have done one or more of the first two steps.
-
Enable or have someone else enable external access for port 445, the HTTPS port.
-
Use the IPCop web pages to enable SSH access, port forwarding and external access for port 222.
-
Create an SSH tunnel between your remote machine and the internal server running an SSH daemon by issuing the command:
$ssh -p 222 -N -f -L 12345:10.0.0.20:23 root@ipcop- -p 222
-
IPCop listens for SSH on port 222, not the normal 22.
- -N
-
in conjunction with -f, tells SSH to run in the background without terminating. If you use this option, you will have to remember to use kill to terminate the SSH process. As an alternative, you may want to add the command
sleep
                            100
to the end of the command line, and not use the -N option. If you do this the SSH invoked by the ssh command will terminate after 100 seconds, but the telnet session and its tunnel will not terminate. - -f
-
option to run SSH in the background.
- -L
-
tells SSH to build a port forwarding tunnel as specified by the next parameters.
- 12345
-
The local port that will be used to tunnel to the remote service. This should be greater than 1024, otherwise you must be running as root to bind to well known ports.
- 10.0.0.20
-
This is the GREEN address of the remote server.
- 23
-
This specifies the remote port number to be used, Telnet.
- [email protected]
-
Finally, this specifies you will be using your IPCop firewall as the port forwarding agent. You need a user ID to log in as, and the only one available on IPCop is root. You will be prompted for IPCop's root password.
-
Finally, log into the remote Telnet using the tunnel.
$telnet localhost 12345localhost is the machine you are running on. The loopback address 127.0.0.1 is defined as localhost. 12345 is the local tunnel port specified on the previous command.
There is a tutorial on SSH port forwarding at Dev Shed.
-
- Allow password based authentication
-
Allows users to log into the IPCop server using the root password. If you decide to turn this off, set up your SSH key files first, and then verify you can log in using your key files.
- Allow public key based authentication
-
By checking this box, public key authentication can be used by SSH. This is the preferred method of securing IPCop using SSH. This article has a discussion about using SSH-keygen to generate RSA keys and how to use them with SSH.
This section lists the host key fingerprints used by SSH on IPCop to verify you are opening a session with the right machine. The first time a session is opened, one of the fingerprints will be displayed by SSH and you will be asked to verify it's correct. If you wish, you verify can it by looking at this web page.
This web page governs how the IPCop web pages function and appear.
After making any changes, remember to press the button.
To restore the default settings, press the button, then press the button.
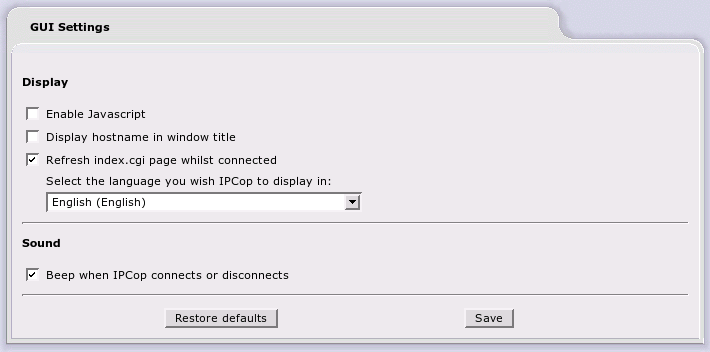
Enable Javascript . The 1.4.0 administrative web pages use JavaScript extensively to provide an improved look and feel. However, some browsers do not work properly with JavaScript. If this button is not checked, the various drop down menus will be disabled and your choices on any page will appear across the top of the page.
Display hostname in window title . This checkbox will turn on the display of an IPCop's hostname at the top of each web page. If you are maintaining more than one IPCop machine, this will be advantageous, since you will be able to tell which machine your browser is currently displaying.
Refresh index.cgi page whilst connected . By default, the Home page refreshes once when IPCop connects to the Internet, and a manual click on the “Refresh” button forces the Home page to update with the latest connection time.
Enabling this option forces the Home page to refresh every 30 seconds, so the connection time is regularly updated, and if the connection drops due to lack of demand, the “Dial on Demand waiting” status message will appear.
Select the language you wish IPCop to display in: . This drop down menu will let you choose which one of the 34 languages currently available for IPCop web pages, this IPCop will use for its display.
You can also select the language to be used by IPCop during installation. However, your desired language may not be available during installation. The IPCop translation group is planning on making more languages available as volunteers aid the translation effort. When new languages become available, these are added via the regular system updates.
Of course, you may wish to translate IPCop to another
language yourself. If you do, we urge you to contact the
IPCop Translation Coordinator, Eric Oberlander,
<[email protected]>,
first. He may be aware of on-going translation projects for
your language. Please check the IPCop How To Translate web page for more
details.
The Backup Web Page was overhauled in v1.4.11, and the changes include:
-
The new backup supports USB keys.
-
Unencrypted backups were removed for security reasons.
-
Export of
backup.keyKey is encrypted with a 'backup' password needed for reinstallation, hostname is included in the exported key file.
-
backup.datnow includes the hostname and timestamp of the backup.Before reinstalling, remove the timestamp from the filename you want to use for the restore.
A comment field is available for each backup. The comment will be restored on backup upload (if available).
-
Floppy backup
Display size used. Check that backup is not too big. Display errors for bad floppy, missing disk etc.

The top section of the panel of the Backup Web Page will let you back up your IPCop configuration to a floppy disk. The only current way to restore your configuration from a floppy is to re-install IPCop from CD-ROM or HTTP/FTP. Early in the installation process, you will be asked if you have a floppy with an IPCop system configuration on it. Your configuration will be restored and installation will terminate.
Place a floppy disk in the floppy disk drive and click the button. Your configuration will be written to the floppy and verified.
All error messages and any information generated during a backup will appear at the foot of the panel.
The rest of the panel allows you to create multiple Backup Sets, and to select different media onto which you can save the files. The default is IPCop's hard drive, but removable usb-stick devices are supported.
For security, backups created on the Backup Web Page are encrypted using your 'backup' password. To be safe, enter your backup password and export the backup key, using the button provided, in addition to exporting your backups. You will need the backup key if you want to install from a usb-stick, or if you need to restore settings after a hard disk failure.
To import a backup during IPCop installation, you will be prompted for your backup key.
Backup password
There is a new menu item in the setup command to enter your 'backup' password which you will have found if you have done a fresh installation. If you are upgrading, you can re-run setup to do this.
Log in as root, via the console, or with putty or ssh on port 222 on your IPCop v1.4.11 firewall.
Enter setup on the
command line. Select the 'backup'
password menu item and enter a password. Password
length is a minimum of 6 characters. Exit the command and
log off.
To use the new Web Backup Key Export, do the following:
-
Set a 'backup' password.
-
On the Backup Web page type this password in the appropriate field. The key is exported encrypted and you have to choose where to write the file when you click the button.
-
Create a backup and export the
.dat(you don't need to fill in the 'backup' password field this time).You now have everything you need to be able to install a system configuration from a usb key, or http/ftp server.
-
Write the
.datfile, without the timestamp in the name, and the encrypted key file on the media you want to use to restore from (usb key or http/ftp server), and the restore will work if you type the right 'backup' password and the hostname matches the encrypted key and the .dat file's name.
This page allows you to either or the IPCop server. You can simply click the button for the option you want, or schedule a cronjob to reboot or shutdown IPCop at a particular time.

The ability to schedule reboots or shutdowns was added in version 1.4.10. A cronjob is added to root's crontab. To schedule IPCop to reboot once a day on a regular schedule, select the time from the drop down menu; check the day (or days) you require; select or ; and press the button.
To remove a schedule, clear (uncheck) all the checkboxes and press the button.