
Adding HTML Elements
Now that we've added some buttons, let's add some other elements.
Adding HTML Elements to a Window
In addition to all of the XUL elements that are available, you can also add HTML elements directly within a XUL file. You can actually use any HTML element in a XUL file, meaning that Java applets and tables can be placed in a window. You should avoid using HTML elements in XUL files if you can. However, this section will describe how to use them anyways. Remember that XML is case-sensitive though, so you'll have to enter the tags and attributes in lowercase.
In order to use HTML elements in a XUL file, you must declare that you are doing so using the XHTML namespace. This way, Mozilla can distinguish the HTML tags from the XUL ones. The attribute below should to be added to the window tag of the XUL file, or to the outermost HTML element.
xmlns:html="http://www.w3.org/1999/xhtml"
This is a declaration of HTML much like the one we used to declare XUL. This must be entered exactly as shown or it won't work correctly. Note that Mozilla does not actually download this URL, but it does recognize it as being HTML.
Here is an example as it might be added to the find file window:
<?xml version="1.0"?>
<?xml-stylesheet href="chrome://global/skin/" type="text/css"?>
<window
    id="findfile-window"
    title="Find Files"
    orient="horizontal"
    xmlns:html="http://www.w3.org/1999/xhtml"
    xmlns="http://www.mozilla.org/keymaster/gatekeeper/there.is.only.xul">
Then, you can use HTML tags as you would normally, keeping in mind the following:
- You must add a html: prefix to the beginning of each tag, assuming you declared the HTML namespace as above.
- The tags must be entered in lowercase.
- Quotes must be placed around all attribute values.
- XML requires a trailing slash at the end of tags that have no content. This may be clearer from the examples below.
You can use any HTML tag although some such as head and body are not really useful. Some examples of using HTML elements are shown below.
<html:img src="banner.jpg"/>

<html:input type="checkbox" value="true"/>

<html:table>
  <html:tr>
    <html:td>
      A simple table
    </html:td>
  </html:tr>
</html:table>
These examples will create an image from the file banner.jpg, a checkbox and a single-cell table. You should always use XUL features if they are available and you probably should not use tables for layout in XUL. (There are XUL elements for doing layout). Notice that the prefix html: was added to the front of each tag. This is so that Mozilla knows that this is an HTML tag and not a XUL one. If you left out the html: part, the browser would think that the elements were XUL elements and they would not display because img, input, table, and so on are not valid XUL tags.
In XUL, you can add labels with the description or label element. You should use these elements when you can. You can also add labels to controls either by using the HTML label element, or you can simply put the text inside another HTML block element (such as p or div) as in the example below.
Example 2.7.1: Source View<html:p> Search for: <html:input id="find-text"/> <button id="okbutton" label="OK"/> </html:p>
This code will cause the text 'Search for:' to be displayed, followed by an input element and an OK button. Notice that the XUL button can appear inside the HTML elements, as it does here. Plain text will only be displayed when placed inside an HTML element that would normally allow you to display text (such as a p tag). Text outside of one will not be displayed, unless the XUL element the text is inside allows this (the description element, for example). The examples below may help.
Examples of HTML elements
What follows are some examples of adding HTML elements to windows. In each case, the window and other common information has been left out for simplicitiy.
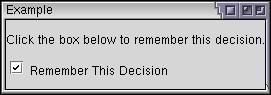
1. A dialog with a check box
Example 2.7.2: Source View<html:p>
Click the box below to remember this decision.
<html:p>
<html:input id="rtd" type="checkbox"/>
<html:label for="rtd">Remember This Decision</html:label>
</html:p>
</html:p>In this case, one p tag was used to place the text in and another was used to break apart the text into multiple lines.
2. Text outside of HTML blocks
Example 2.7.3: Source View<html:div>
Would you like to save the following documents?
<html:hr/>
</html:div>
Expense Report 1
What I Did Last Summer
<button id="yes" label="Yes"/>
<button id="no" label="No"/>
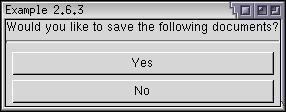
As can be seen in the image, the text inside the div tag was displayed but the other text (Expense Report 1 and What I Did Last Summer) was not. This is because there is no HTML or XUL element capable of displaying text enclosing it. To have this text appear, you would need to put it inside the div tag, or enclose the text in a description tag.
3. Invalid HTML elements
<html:po>Case 1</html:po>
<div>Case 2</div>
<html:description value="Case 3"/>
All three of the cases above will not display, each for a different
reason.
Case 1: po is not a valid
HTML tag and Mozilla has no idea what to do with it.
Case 2: div is valid but only
in HTML. To get it to work, you will need to add the html: qualifier.
Case 3: A description element is only
valid in XUL and not in HTML. It should not have the html: qualifier.
(Next) Next, we'll learn how to adding spacing between elements.