Table of Contents
MySQL Workbench provides a visual GUI to administer your MySQL environment. The available visual tools help configure your MySQL servers, administer users, perform backup and recovery, inspect audit data, and view database health.
Manage your MySQL instances with a comprehensive view of your MySQL server connections. The visual tree based navigation provides detailed information about server and status variables, including the number of threads, bytes sent and received by clients, buffer allocations size, and more.
The Navigator panel has a Management tab with functionality to monitor and configure your selected MySQL connection.
The Navigator panel also has a Schemas tab for managing databases using your MySQL Connection. For information about the Schemas tab, see Section 8.2.1, “Object Browser and Editor Navigator”.
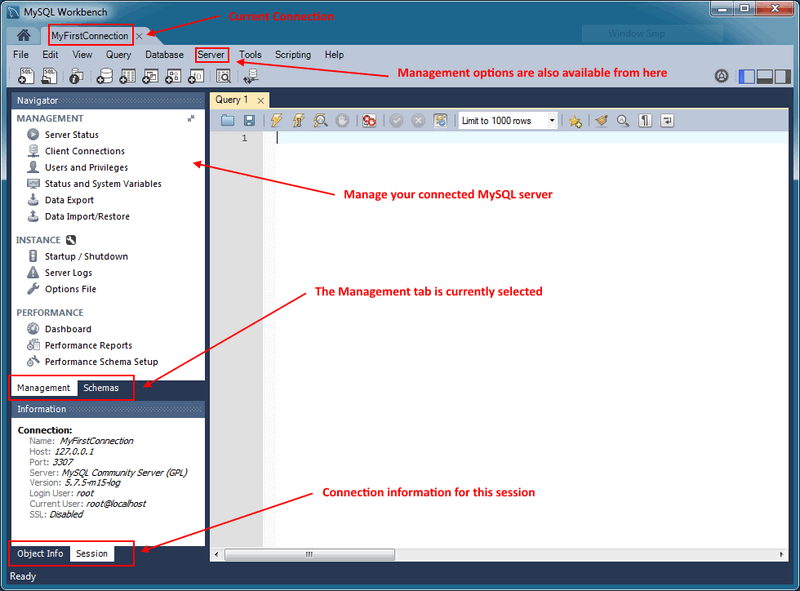
The Navigator Management tab is separated into the MANAGEMENT, INSTANCE, and PERFORMANCE sections, and the Commercial edition of MySQL Workbench also includes the MYSQL ENTERPRISE section.
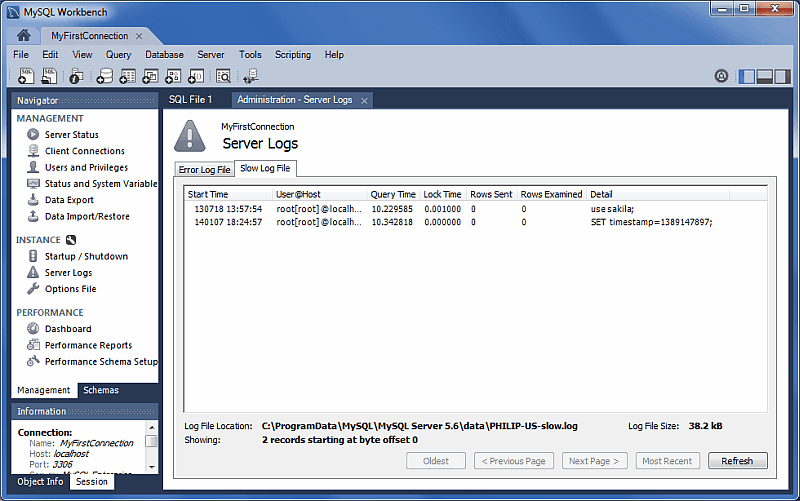
The Server Logs page features two subtabs:
Error Log File
General MySQL errors, for more information see The Error Log

Slow Log File
Slow queries (when available), for more information see The Slow Query Log
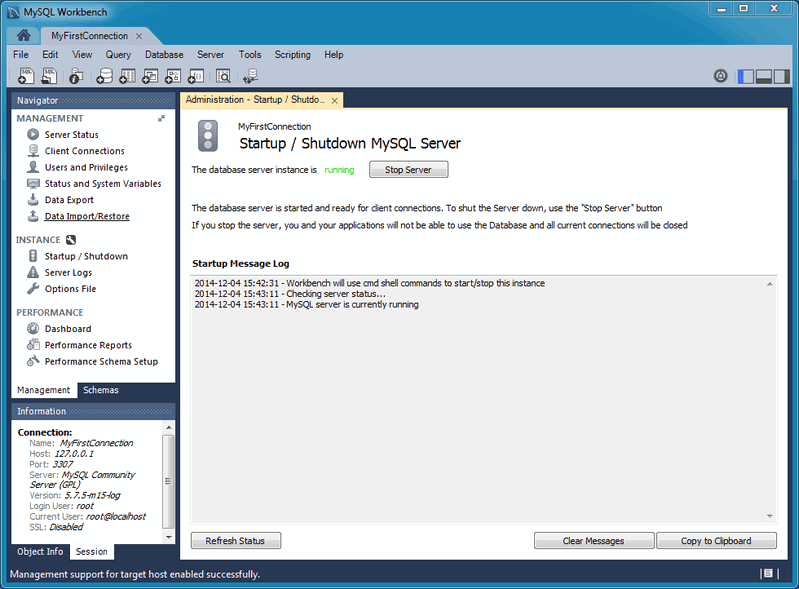
The Startup / Shutdown functionality includes:
Viewing the Startup Message Log
Start up and shut down the MySQL instance
View the current status of the MySQL instance
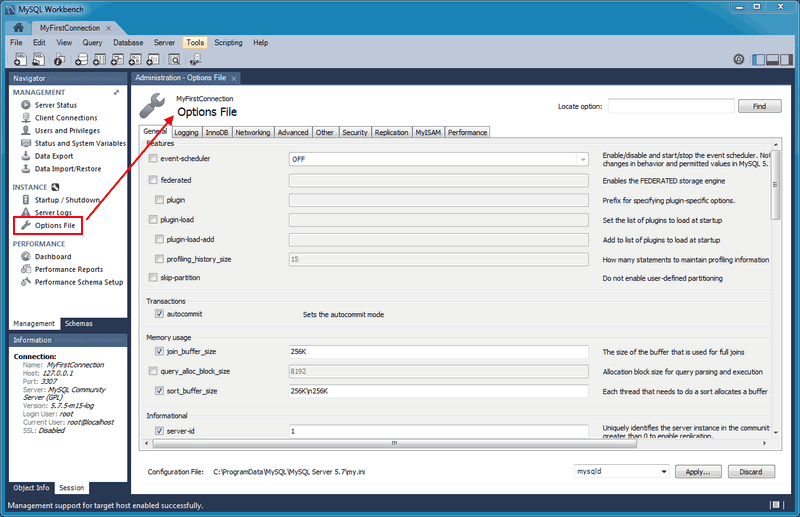
The Options File editor is used to view and
edit the MySQL configuration
file (my.ini on Windows, or
my.cnf on Linux / OS X) by selecting check
boxes and other GUI controls, and then making edits. MySQL Workbench
divides the options file into its own groupings as a set of tabs
(such as General, Logging, InnoDB, and more). Make an edit and click
to commit the changes.
The options file editor includes the following components:
Option file groupings, as divided into convenient tabs by MySQL Workbench
A Locate option search field to search your MySQL options configuration file
Configuration File path, so you know the configuration file you are editing
An options file group selector, to select the option [group] to edit. Because the same option can be defined under multiple groupings, it is important to choose the correct group when making edits.
[mysqld](the MySQL server) is the default and most common group. For additional information about groups, see Using Option Files.
A screenshot with the General tab selected:
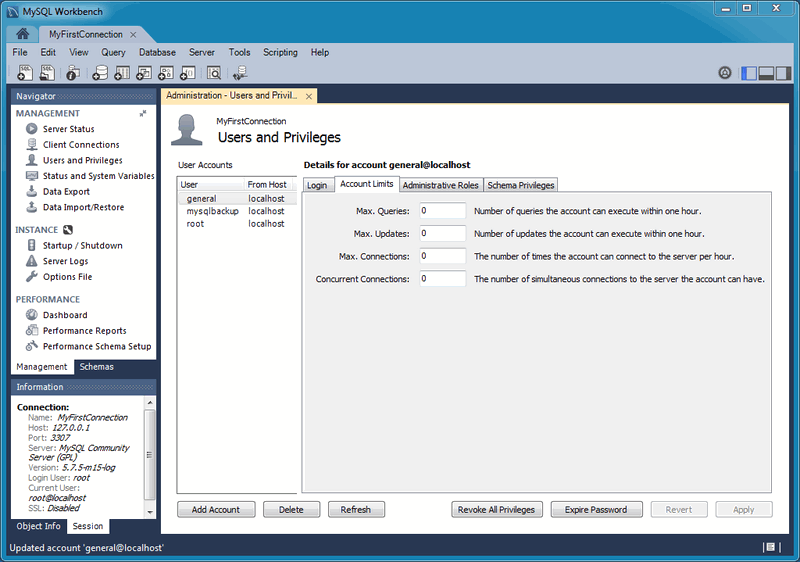
A listing of all users and privileges that relate to the MySQL connection. You may also manage (add) user accounts, adjust privileges, and expire passwords.
The Users and Privileges page has several sections:
User Accounts
Lists each user account that is associated to the active MySQL connection.
Login
Login information related to the selected user account.

Account Limits
Define limits for the user account, such as the maximum number of queries, updates, connections, and concurrent connections that an account can execute in one hour.
Administrative Roles
To aid in assigning privileges to MySQL Server users, MySQL Workbench
introduces the concept of Administrative Roles. Roles are a quick
way of granting a set of privileges to a user, based on the work the
user must carry out on the server. It is also possible to assign
multiple roles to a user. To assign roles, click the User Account
you wish to modify, then click the Administrative
Roles tab. Then click the check boxes according to the
roles you wish to allocate to the user. After you select a role to a
user, you will see the accumulated privileges in the
Global Privileges Assigned to User panel. For
example, if you select the role BackupAdmin, the
privileges granted include EVENT, LOCK
TABLES, SELECT, SHOW
DATABASES. If you also select the role of
ReplicationAdmin, the list of privileges expands
to include REPLICATION CLIENT,
REPLICATION SLAVE and SUPER.
These roles are available:
DBA: Grants all privileges
MaintenanceAdmin: Grants privileges to maintain the server
ProcessAdmin: Grants privileges to monitor and kill user processes
UserAdmin: Grants privileges to create users and reset passwords
SecurityAdmin: Grants privileges to manage logins and grant and revoke server privileges
MonitorAdmin: Grants privileges to monitor the server
DBManager: Grants privileges to manage databases
DBDesigner: Grants privileges to create and reverse engineer any database schema
ReplicationAdmin: Grants privileges to set up and manage replication
BackupAdmin: Grants privileges required to back up databases
Custom: Lists other (custom) privileges that are assigned to the user account
The Password Validation Plugin (available as of MySQL Server 5.6.6) is supported in Workbench. For information about what these settings mean, see The Password Validation Plugin.

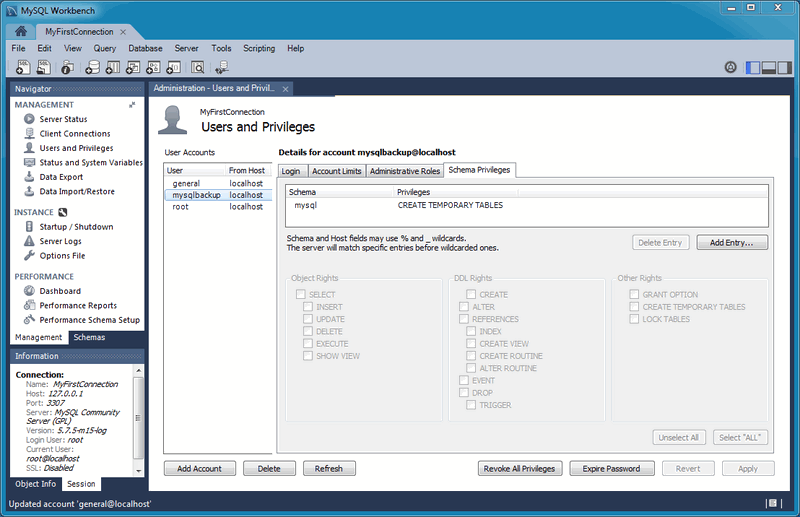
Schema Privileges
Additional schema privileges that the account can use. For example,
the standard mysqlbackup user has "CREATE
TEMPORARY TABLES" on the mysql schema.
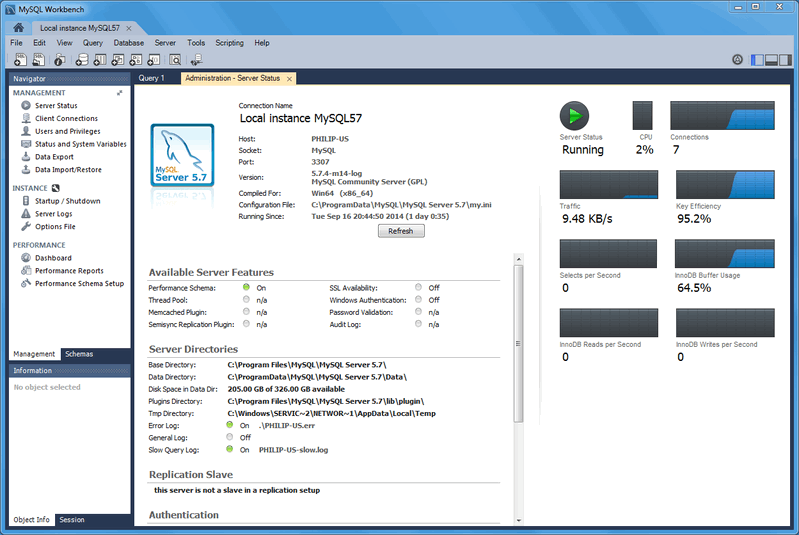
Get an immediate view into the basic health indicators and counters for your MySQL environment. This includes viewing the server's running state (stopped/running), available features, primary server directories, replication state, and security settings for authentication and SSL. Reports also include information and graphs to track memory usage, connections, hit rates, and more.
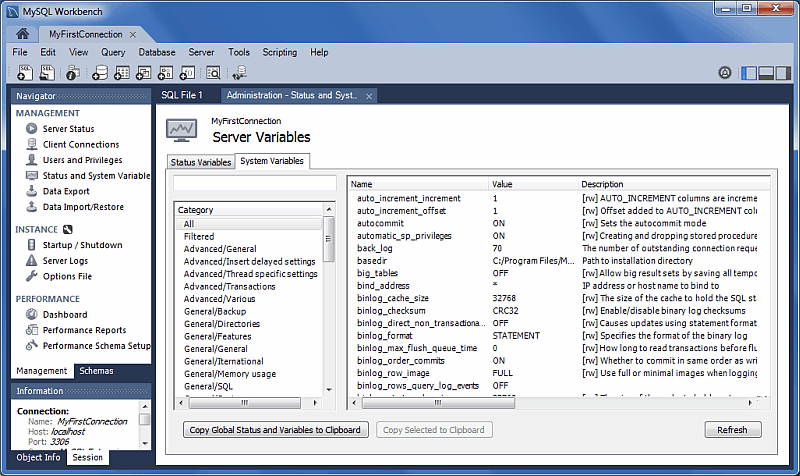
Status and System Variables: Lists all server variables for the MySQL connection. You may also copy all or selected variables to your clipboard.
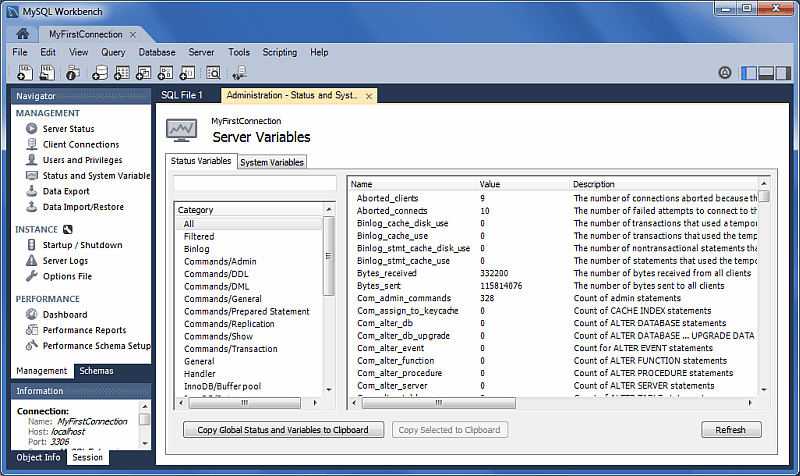
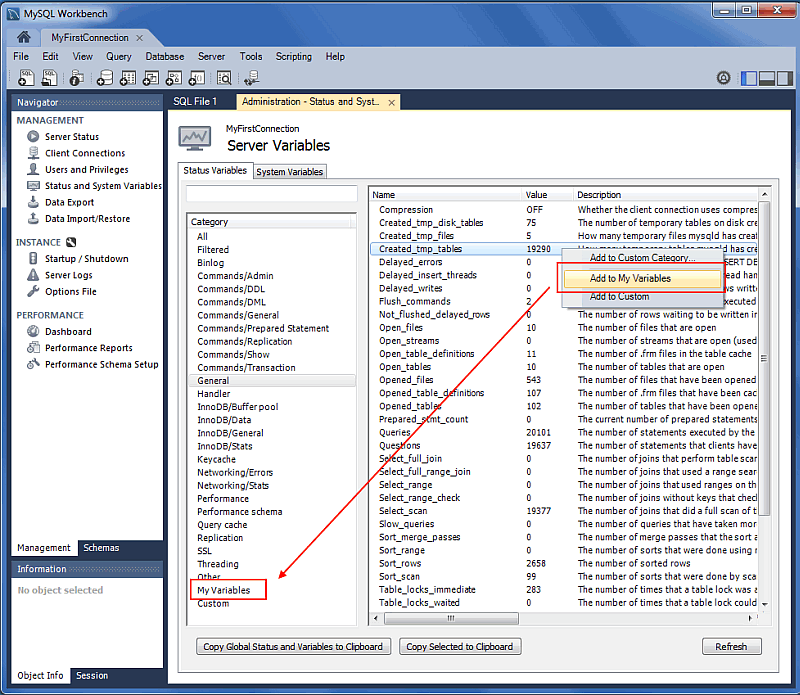
Custom Variable Grouping
The status and system variables are each categorized by groups (such as InnoDB or Logging), and you may also create your own custom groups. Right-click on a variable, choose the custom group (or create a new one), and add the variable to the aforementioned group. Your custom groups are listed along with the pre-existing groups.
In the example below, we created a custom group titled "My
Variables" and are in the process of adding the
Created_tmp_variables variable to it.
There are three ways to export and import data in MySQL Workbench, each serving a different purpose.
Table 6.1 Methods to Export or Import data in MySQL Workbench
| GUI Location | Data Set | Export Types | Import Types | Additional Details |
|---|---|---|---|---|
| Object Browser context menu | Tables | JSON, CSV | JSON, CSV | Simple table operations, includes moderate control over the output type (this method was added in version 6.3.0) |
| Result Grid menu under the SQL editor | Result set (after performing an SQL query) | CSV, HTML, JSON, SQL, XML, Excel XML, TXT | CSV | Simple data operations, includes little control |
| Management Navigator | Databases and/or Tables | SQL | SQL | Detailed database and table operations, standard backup/restore behavior using the mysqldump command and meta data, includes control over how data is handled, and includes meta data |
| Management Navigator | Databases and/or Tables | SQL | SQL | Detailed database and table operations, includes control over how data is handled, can be scheduled and incremental, includes meta data, uses MySQL Enterprise Backup (commercial) |
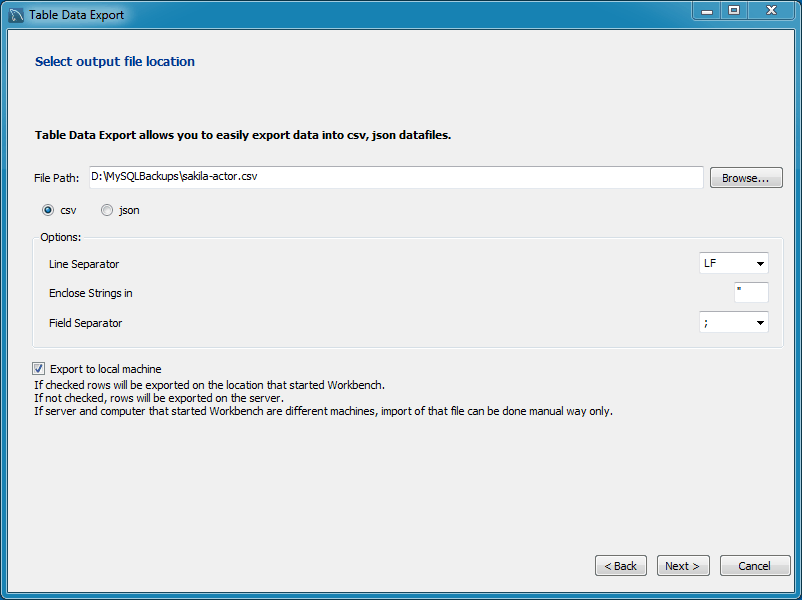
This wizard supports import and export operations using CSV and JSON files, and includes several configuration options (separators, column selection, encoding selection, and more). The wizard can be performed against local or remotely connected MySQL servers, and the import action includes table, column, and type mapping.
This wizard only exports/imports tables using the JSON or CSV format. For an overview of the data export and import options in MySQL Workbench, see Section 6.5, “Data Export and Import”.
The wizard is accessible from the object browser's context menu by right-clicking on a table and choose either or .
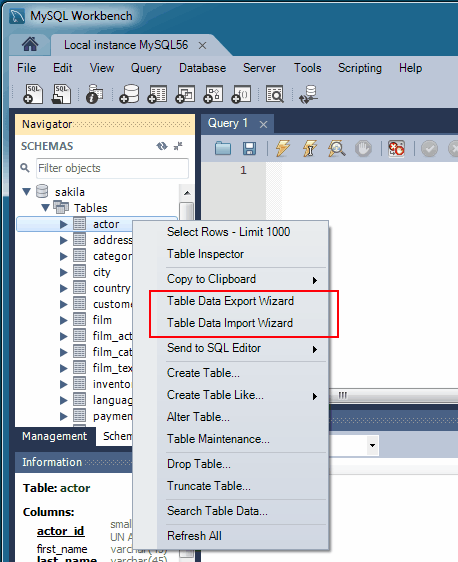
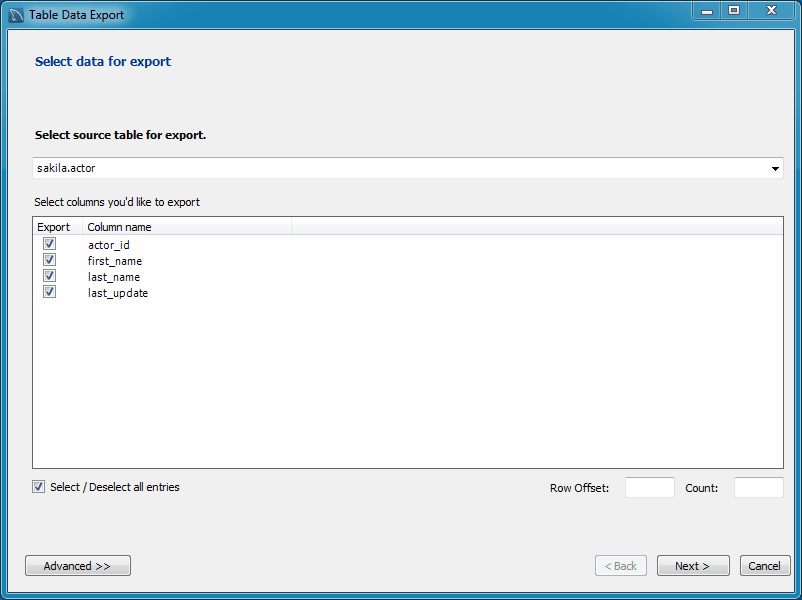
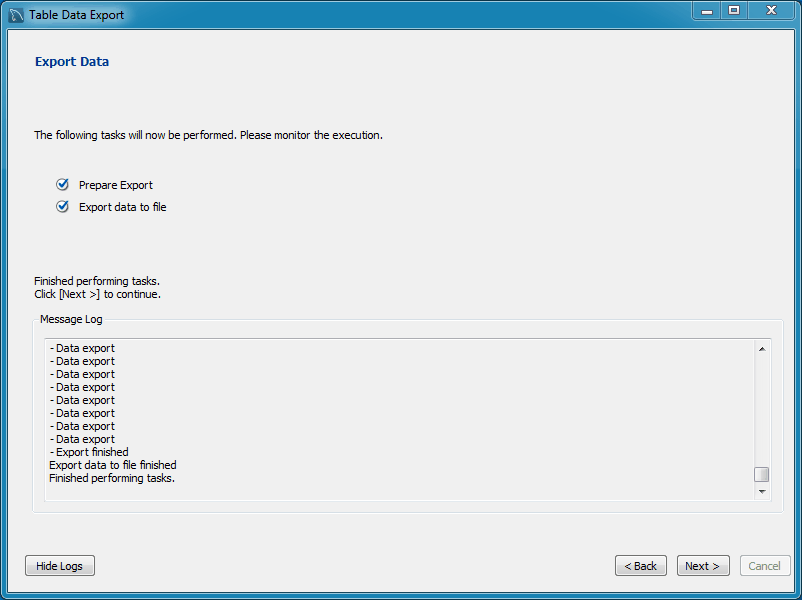
Export table data to either a JSON or CSV file. The following example exports the sakila.actor table to a CSV file.
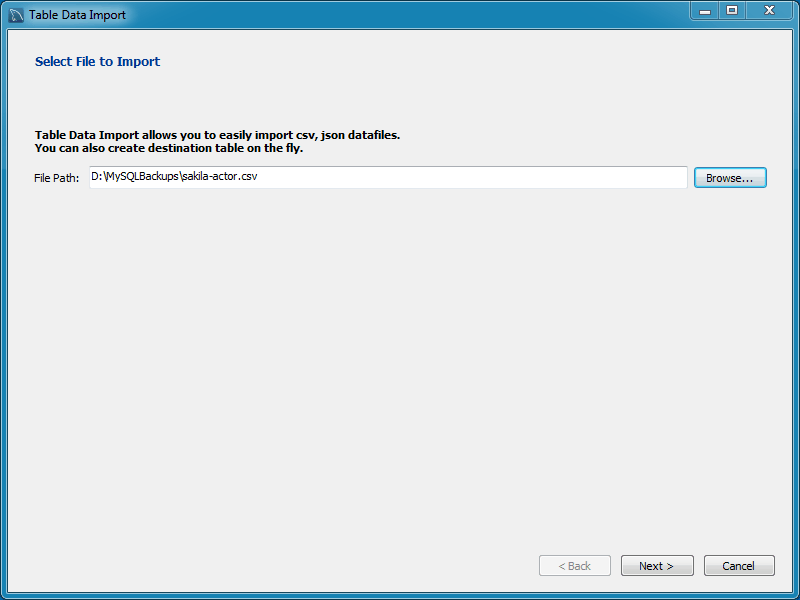
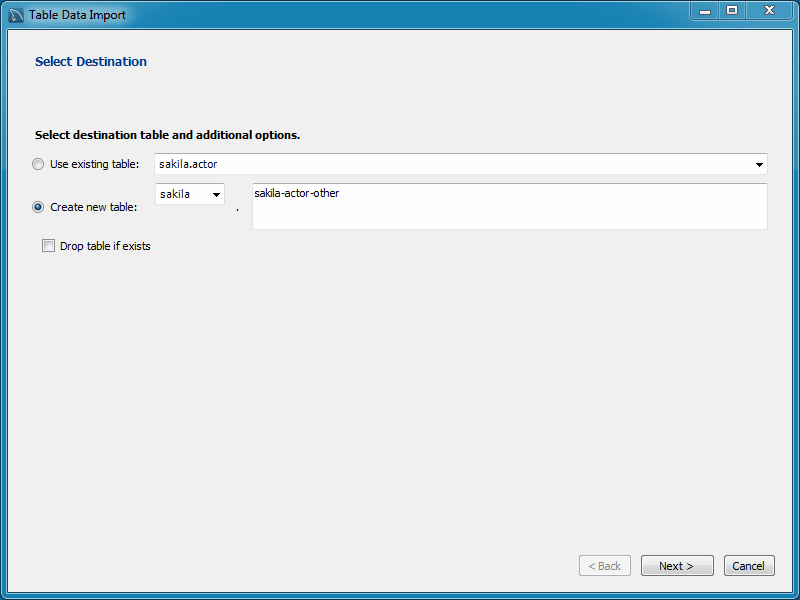
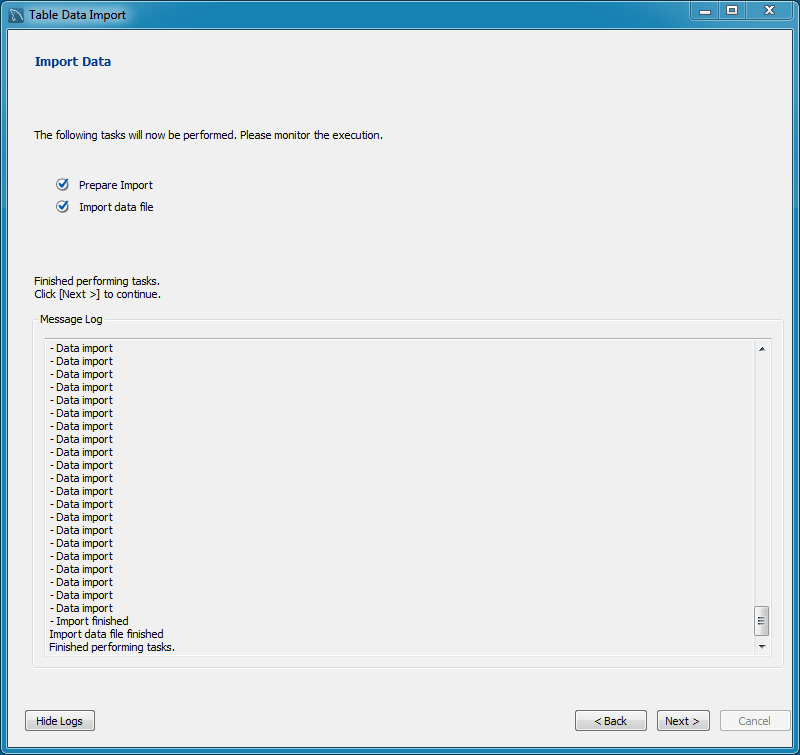
Import table data from either a JSON or CSV file. The following example imports the sakila.actor table from a CSV file.
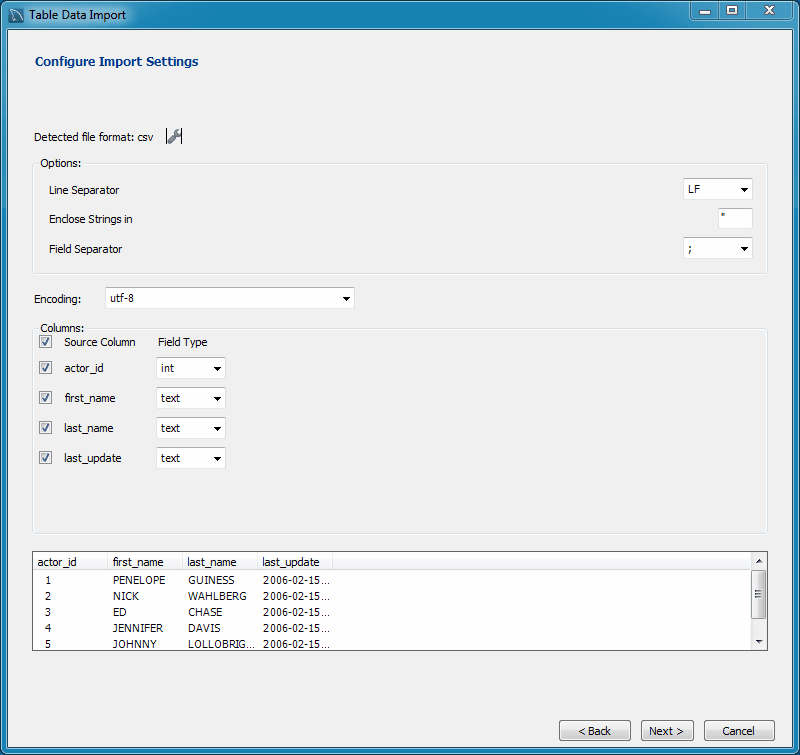
The Encoding field should correspond with your CSV file.
From the management navigator, you can export or import SQL generated from MySQL Workbench or the mysqldump command.
This wizard only exports/imports the MySQL SQL format. For an overview of the data export and import options in MySQL Workbench, see Section 6.5, “Data Export and Import”.
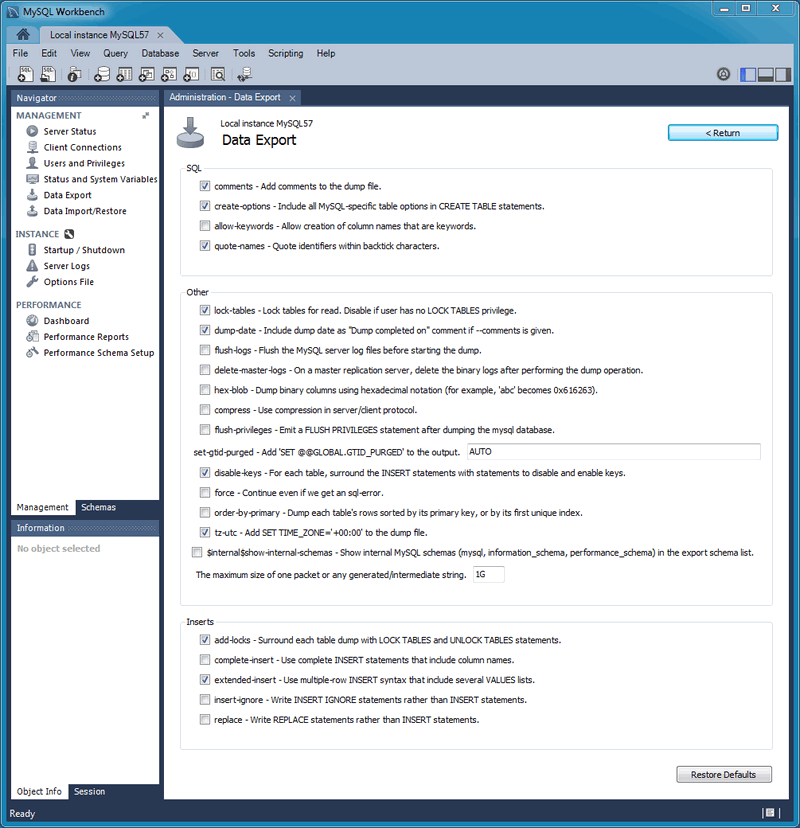
This tab allows you to export your MySQL data. Select each schema you want to export, optionally choose specific schema objects/tables from each schema, and generate the export. Configuration options include exporting to a project folder or self-contained SQL file, optionally dump stored routines and events, or skip table data.
Alternatively, use Export a Result Set to export a specific result set in the SQL editor to another format such as CSV, JSON, HTML, and XML.
Select the Database objects to export, and configure the related options.
Click to load the current objects.

Optionally open the tab that allows you to refine the export operation. For example, add table locks, use replace instead of insert statements, quote identifiers with backtick characters, and more.
Click to begin the export process:
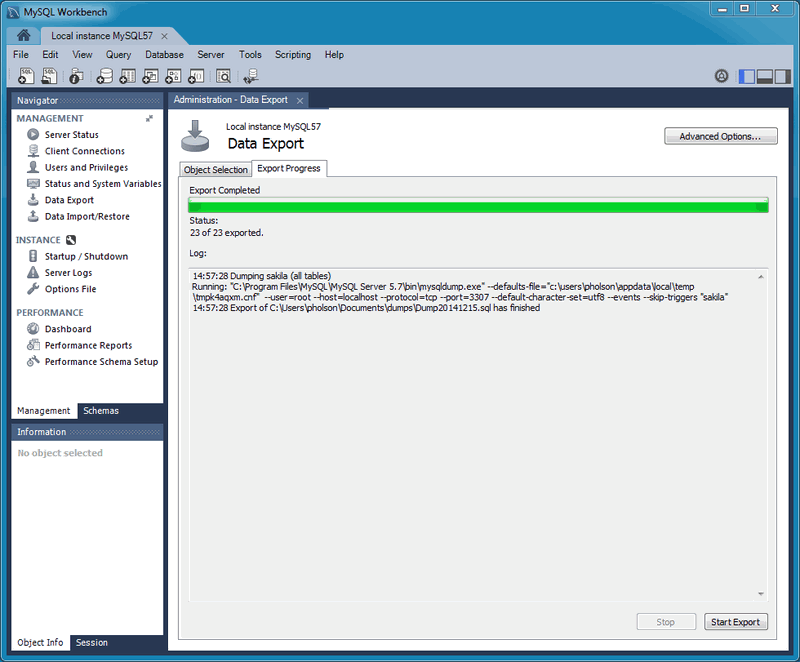
This functionality uses the mysqldump command.
Restore exported data from the Data Export operation, or from other exported data from the mysqldump command.
Choose the project folder or self-contained SQL file, choose the schema that the data will be imported to, or choose to define a new schema.
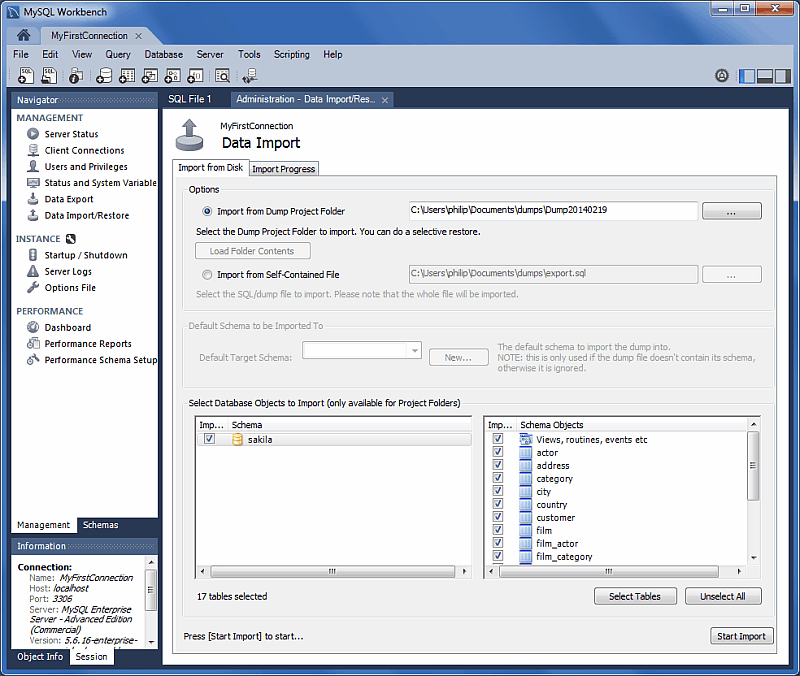
You may only select specific data objects (tables) to import if the data export operation used project folders instead of a self-contained SQL file.
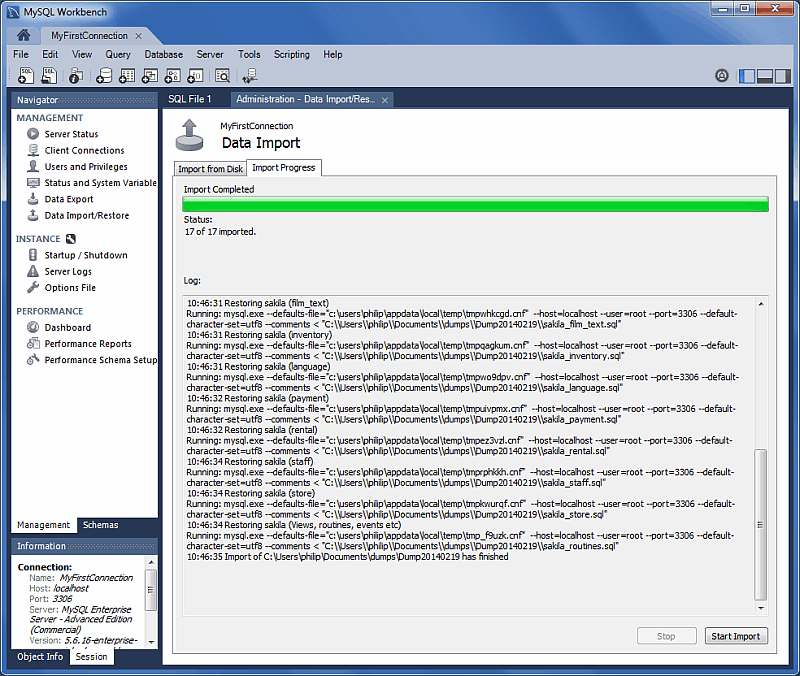
Click to begin the import process:
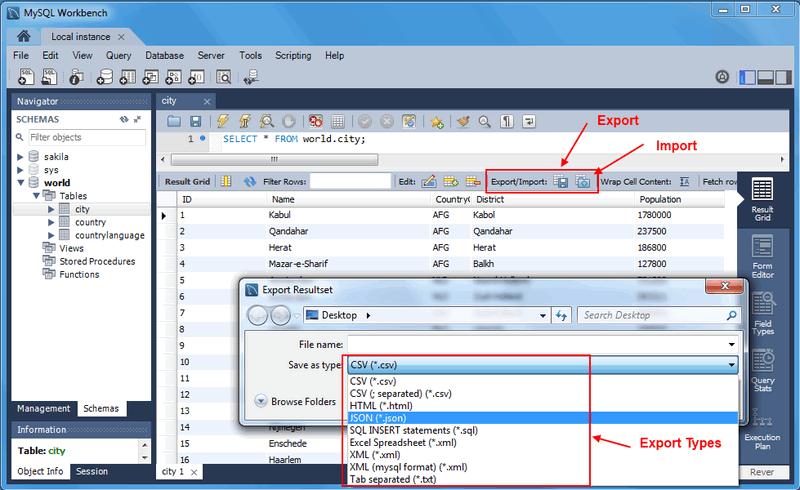
Export or Import data directly from or into the result set.
A result set in the visual SQL editor can be exported to common file formats including CSV, JSON, HTML, and XML.
This wizard only exports/imports data from a result set. For an overview of the data export and import options in MySQL Workbench, see Section 6.5, “Data Export and Import”.
Records from a CSV file can be imported into the result set of the visual SQL editor.
The result set must have a unique row identifier (such as a Primary Key or NOT NULL unique index) as otherwise values can not be imported because the result set will be read-only.
Alternatively, use Section 6.5, “Data Export and Import” to export larger sets of data, such as entire tables and databases.
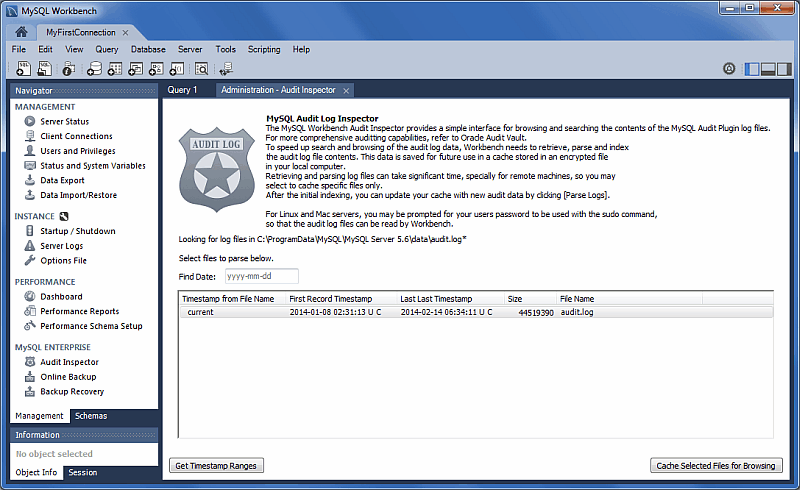
MySQL Workbench offers a GUI interface to the Audit Inspector.
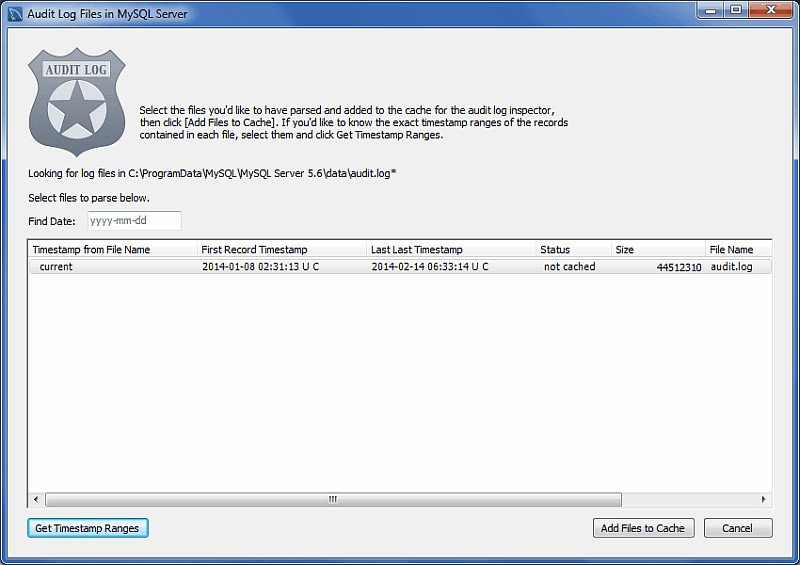
Initially, when you first load the Audit Inspector, you must use MySQL Workbench to cache the audit log for performance reasons. MySQL Workbench will then parse, index, and retrieve values from the encrypted cached file on your local computer.
MySQL Workbench will prompt for sudo access if the MySQL Workbench user is unable to read the audit log file.
At this stage, you also set a password for the encrypted file that will be used when viewing this file. The initial screen looks similar to:
Generating the cache file can take a long time. If you press during the caching process, MySQL Workbench will save the results that were cached at the point you pressed .
After caching an audit log, the Audit Inspector page will display the results:
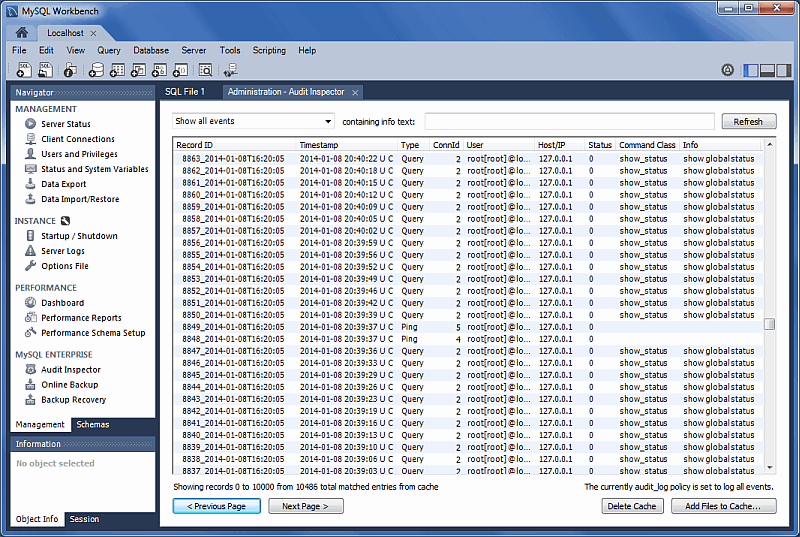
The search field offers criteria for narrowing the displayed events, including and , and defaults to . Custom filters are also available.
You can from the main Audit Inspector page:
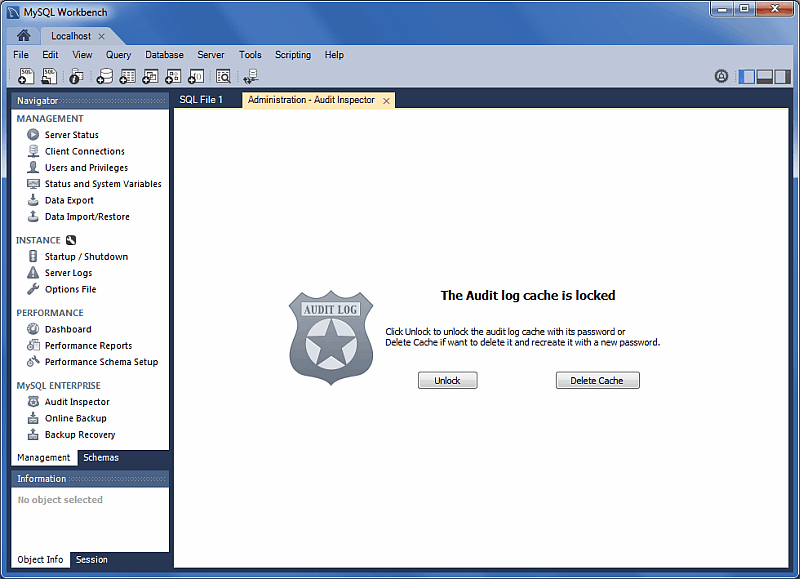
Future uses of the will require the password that you set during the initial step. The login page:
MySQL Workbench include a MySQL Enterprise Backup GUI interface that is listed in the Management Navigator tab for a MySQL connection. There are two MySQL Enterprise Backup related sections in the Navigator:
Online Backup: Sets a backup profile that defines
whatshould be backed up,wherethe backup should be stored, andwhen(the frequency) MySQL should be backed up.Restore: Restores the MySQL server to a specific point in time, typically by restoring a backup that was created by the Online Backup feature in MySQL Workbench.
For information comparing the different methods to import/export data using MySQL Workbench, see Section 6.5, “Data Export and Import”.
The MySQL Enterprise Backup configuration is located on the MySQL server, and not locally. This information includes the MySQL Enterprise Backup configuration backup profiles, job scheduling, backup operations, and data. This also means that the backup operations are executed with (or without) MySQL Workbench running.
MySQL Enterprise Backup is a MySQL Enterprise Feature that is separate from MySQL Workbench. For more information about its functionality, see the MySQL Enterprise Backup documentation at http://dev.mysql.com/doc/mysql-enterprise-backup/en. MySQL Workbench provides an interface to MySQL Enterprise Backup, as described in the following documentation. In addition to having MySQL Enterprise Backup installed on your host, the following general requirements also apply:
A recent version of MySQL Enterprise Backup. The MySQL Enterprise Backup support policy is to support the current GA version of MySQL Enterprise Backup, and the major version before that. This dictates the minimum MySQL Enterprise Backup version required by MySQL Workbench, which is the major version before the current GA release.
Managing both local and remote MySQL instances is available on Linux and OS X, and managing local MySQL instances is available on Microsoft Windows. Remote management is configured using SSH Remote Management.
A MySQL connection with a root user.
The MySQL server configuration file path must be set and correct for the MySQL connection.
The user running MySQL Workbench must be a sudoer (Linux / OS X) that is able to execute the MySQL Enterprise Backup binary.
Additionally, the sudo user must keep the
HOMEenvironment variable when executing system commands, which means adding the following to/etc/sudoers:env_keep +="HOME"
And the Prerequisites set in the tab are:
A path to the MySQL Enterprise Backup executable. MySQL Enterprise Backup is available via eDelivery or My Oracle Support (MOS). MySQL Workbench attempts to locate the MySQL Enterprise Backup executable, so check the path and adjust it accordingly.
The path to the Backup Home Directory, where backup profiles and data is stored. This can be created from within Workbench from the Settings tab.
The MySQL account for the Backup Process. The available actions depends on the current state of this set up, with options including:
: Available if a backup user does not already exist.
: Available if a backup user does exist.
: Available if the user's privileges are invalid, which alters the user by adding the
RELOAD,SUPER, andREPLICATION CLIENT ON *.*privileges.
Uninstallation notes
The MySQL Workbench uninstallation process does not remove the associated MySQL Enterprise Backup backup tasks. To stop the scheduled backups, edit the related "Task Scheduler" entries on Windows, or remove the associated cron jobs on Linux and OS X.
The MySQL Workbench uninstallation process does not remove the MySQL Enterprise Backup master related configuration file, the configuration files generated for each defined profile, nor the MySQL backups.
The tab:
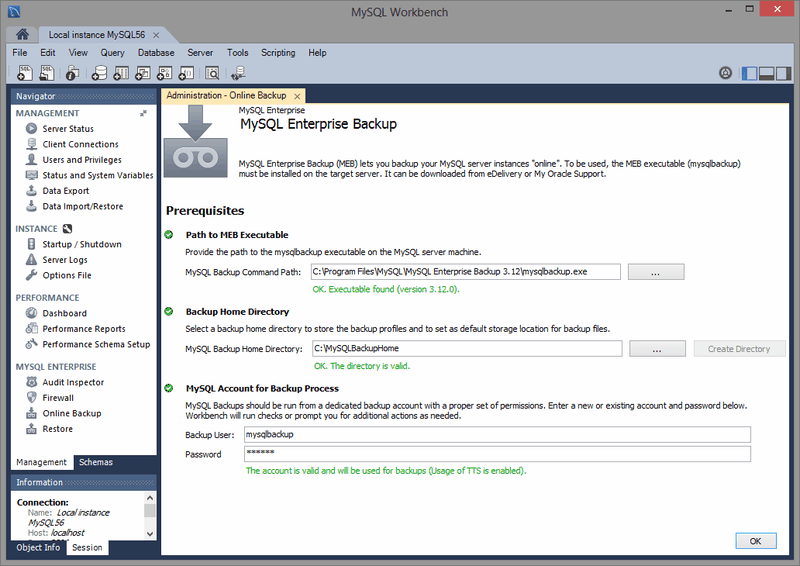
If any of the requirements are not met, then an error will be generated when attempting to use MySQL Enterprise Backup features.
Sets a backup profile that defines what should
be backed up, where the backup should be
stored, and when (the frequency) it should be
backed up. The main page:
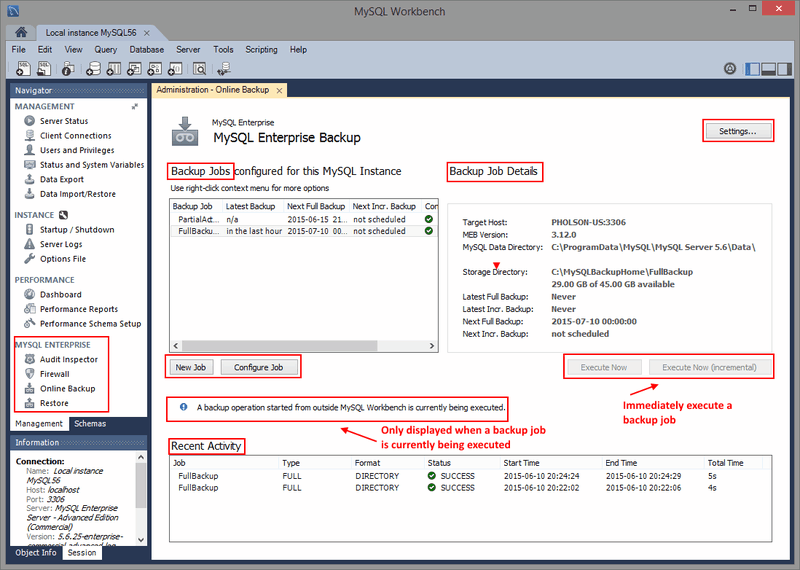
The Online Backup page is separated into three sections:
Backup Jobs: Used for managing backup jobs for the MySQL server. A backup job (profile) is a configuration file used to store information about what is backed up, where the backup is stored, and optionally when backups will be performed.
Right-clicking on a Backup Job is an alternative way to access the available actions, such as
Configure Job,Delete Job, andExecute Backup. Right-clicking also offers two additional options:: Saves the backup to a single file, and prompts for the file name.
: Generates a command for executing the backup, and copies it to your clipboard. You might execute this command in the shell or terminal, which looks similar to:
/bin/mysqlbackup
              --defaults-file="/var/lib/meb/foo.cnf"
              --show-progress=stdout backup --with-timestamp
.
Backup Job Details: Displays information about the state of a specific (selected) backup job. It includes information from the page, and information specific to the selected backup.
Recent Activity: Historical information about the backup operations performed on the server. View the backup log by right-clicking an entry and choosing
View Backup Log
A progress dialog is generated for the backup operation.
Backup Jobs
The following information applies to the operation, and is used to modify existing jobs.
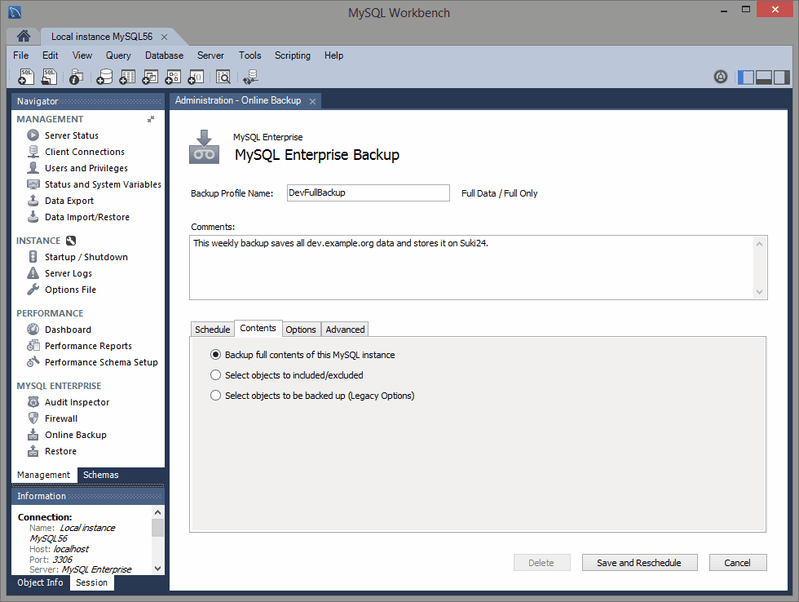
The Backup Profile Name and its associated Comments field are used to identify the backup job's profile, and this name is listed on the main page.
The scheduling page separates the configuration information into four tabs. The Contents tab defines the schemas and tables to back up, and whether the job is a full or partial backup.
Full backup: All schemas and tables are backed up.Partial: Select the schemas and tables (objects) that you want to back up. Choose Select objects to included/excluded to open the table inclusion (and exclusion) options. For additional information about the include, exclude, and Transportable Tablespace options, see the MySQL Enterprise Backup documentation titled Partial Backup and Restore Options.

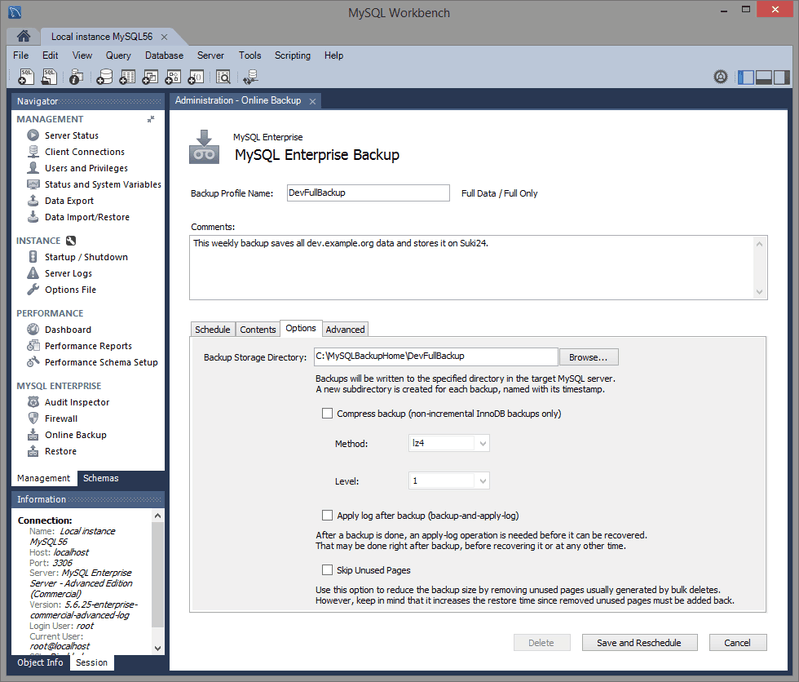
The Options tab includes settings to modify the default behavior of the backup process.
By default, the Backup Storage Directory is
stored under a sub-folder using the name of the Backup
Profile Name in the MySQL Backup Home
Directory setting. Additional options include
compression and apply-log, and the option to
Skip Unused Pages.
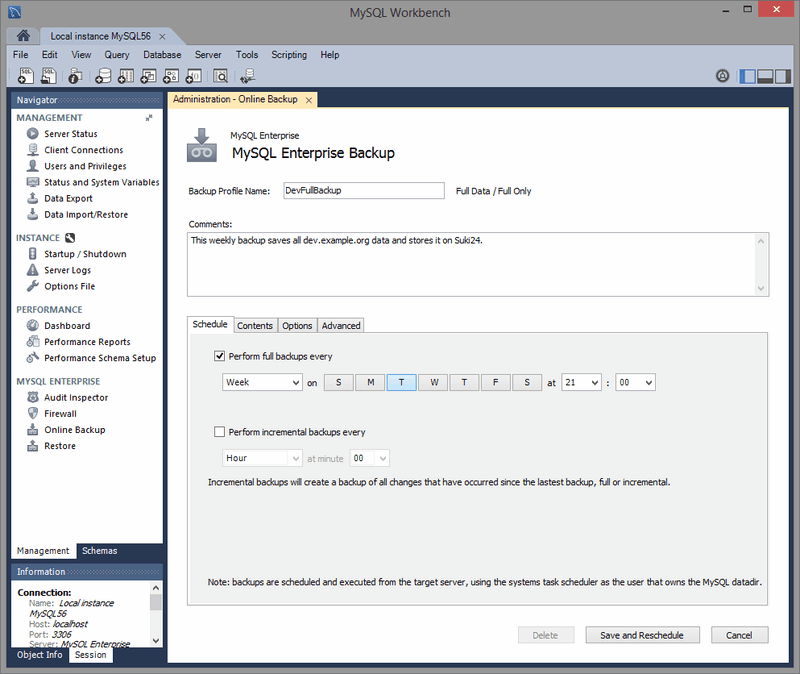
The Schedule tab optionally sets a backup schedule for both full and incremental backups. The schedule uses the Windows Tasks Scheduler on Microsoft Windows, and a cron job on Linux and OS X. It is scheduled using the operating system user that is scheduling the backup, which is typically the MySQL user.
A full backup is slower than the incremental backup that merges with a full backup. A common scenario is to set a full backup as weekly, and an incremental backup as daily. For additional information about backup performance, see Optimizing Backup Performance.
The Advanced tab allows you to pass in additional MySQL Enterprise Backup options.
These additional options are not validated.
To recover backups, see Section 6.7.3, “Backup Recovery”.
The Backup Recovery wizard is used to recover MySQL Enterprise Backup backups. For more information about creating MySQL Enterprise Backup backups using MySQL Workbench, see Section 6.7.2, “Online Backup”
The Backup Recovery wizard allows you to restore backups from folders, image files, and backup profiles created by Section 6.7.2, “Online Backup”. Click Restore from the Navigator, then choose the appropriate option:
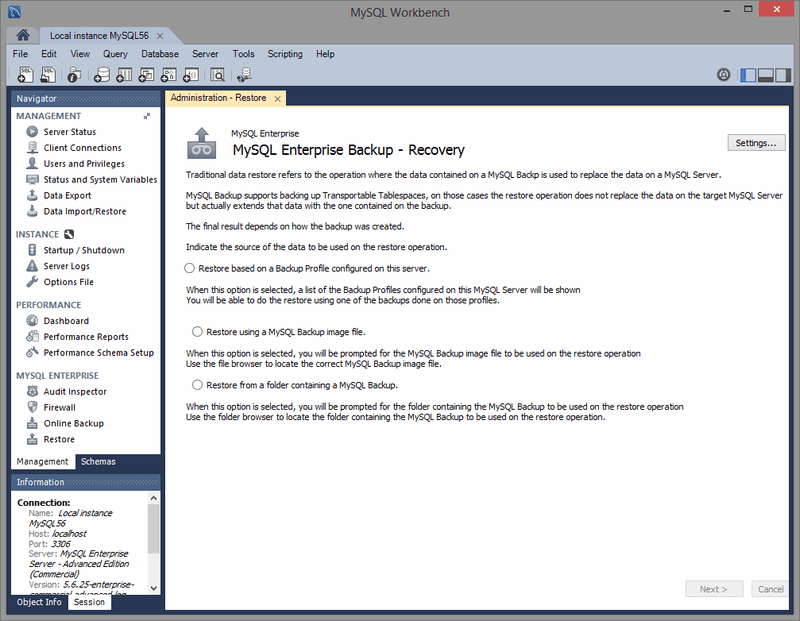
Backup Profile: Choose from the available MySQL Enterprise Backup profiles on your system.
Backup Image File: Opens the system's file browser; choose a backup image file to restore.
Backup Folder: Opens the system's file browser; choose a backup folder to restore.
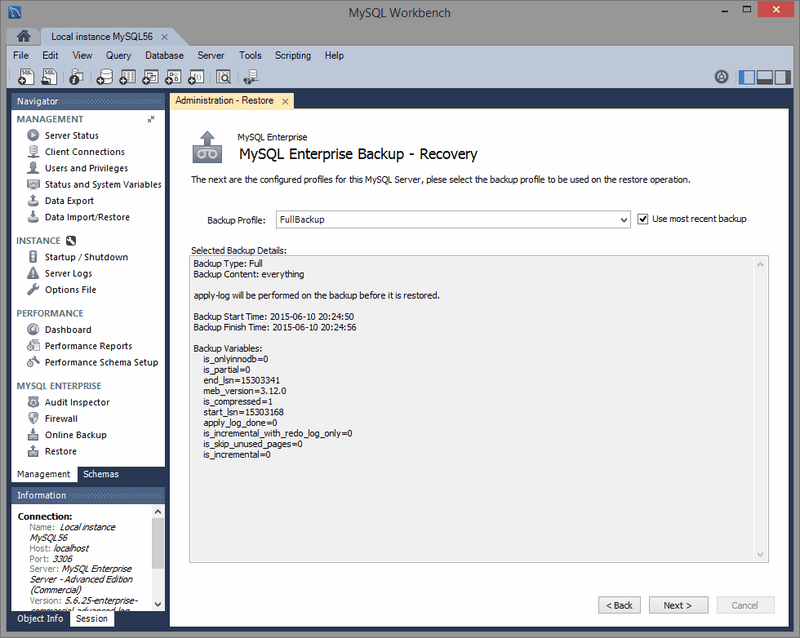
In our example, we will restore a full backup profile that was created by MySQL Workbench Online Backup. After choosing the "FullBackup" profile that we created earlier, use the next page to review its upcoming restoration:
Optionally, click to view the backup contents for the restoration:
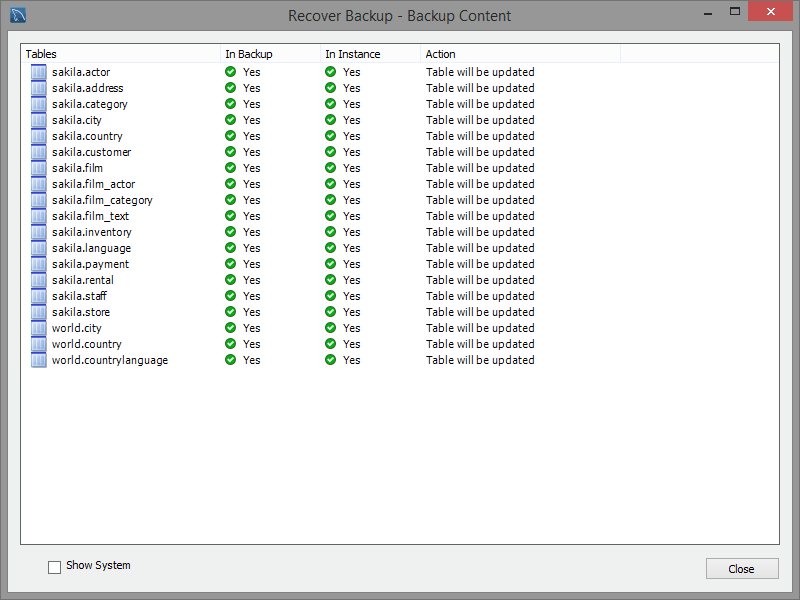
The Show System checkbox toggles internal schemas from view, schemas such as the internal performance_schema and mysql tables.
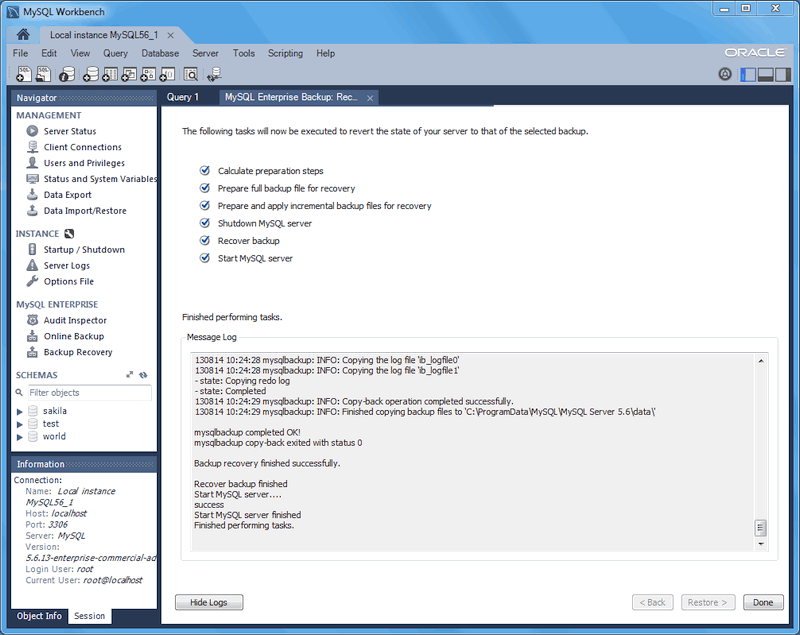
Clicking will open the Restore wizard. We then clicked to execute the restoration process, and toggled the message logs in our example below:
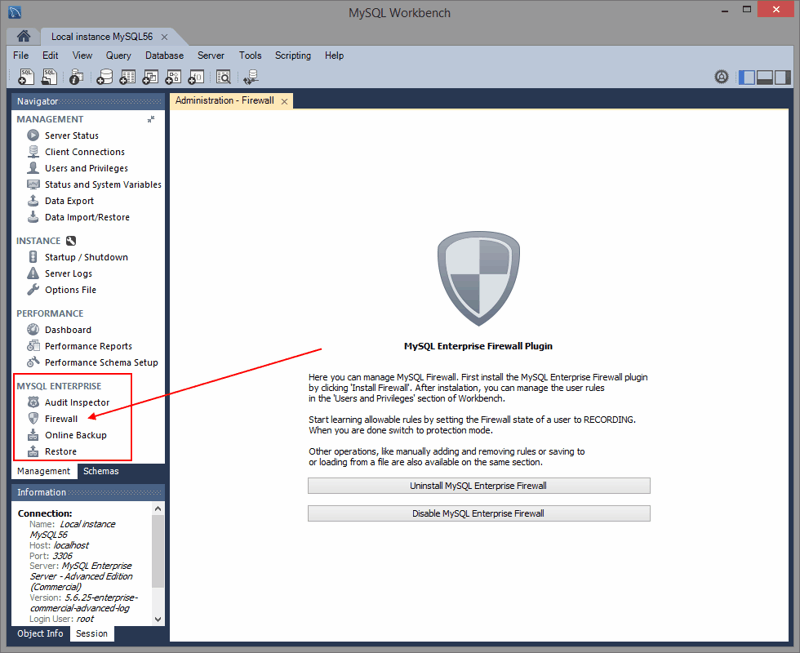
MySQL Workbench offers a GUI interface to MySQL Enterprise Firewall.
The MySQL Enterprise Firewall interface was added in MySQL Workbench 6.3.4.
For additional information about MySQL Enterprise Firewall, see https://dev.mysql.com/doc/en/firewall.html.
MySQL Workbench can manage the MySQL Enterprise Firewall installation and configuration by installing (or uninstalling) and enabling (or disabling) the plugin.
Alternatively, you can manually install and enable MySQL Enterprise Firewall. For additional information, see Installing or Uninstalling MySQL Enterprise Firewall.
Enable: Executes SET GLOBAL mysql_firewall_mode = ON; against the connected MySQL server. Disable sets it to OFF instead of ON.
This is a runtime operation. Configure the MySQL server configuration file to enable MySQL Enterprise Firewall at startup.
Install: Executes queries to install the new MySQL Enterprise Firewall tables and stored procedure needed to switch the state. Uninstall reverses these effects, which also removes the recorded rules.
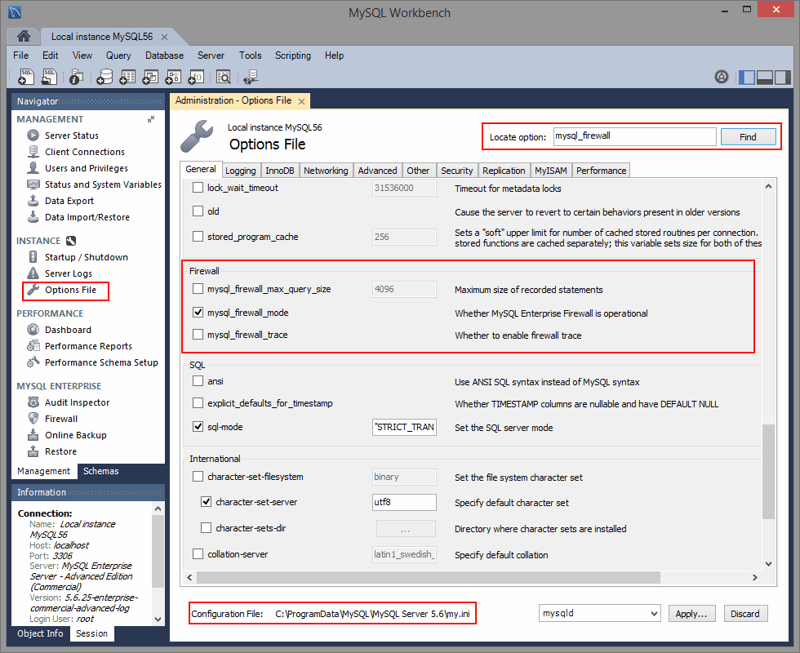
Because clicking from
MySQL Workbench is a runtime operation, enabling the
mysql_firewall_mode option in the configuration
option will enable it after a restart. Manually edit the MySQL
configuration file, or use MySQL Workbench to edit it.
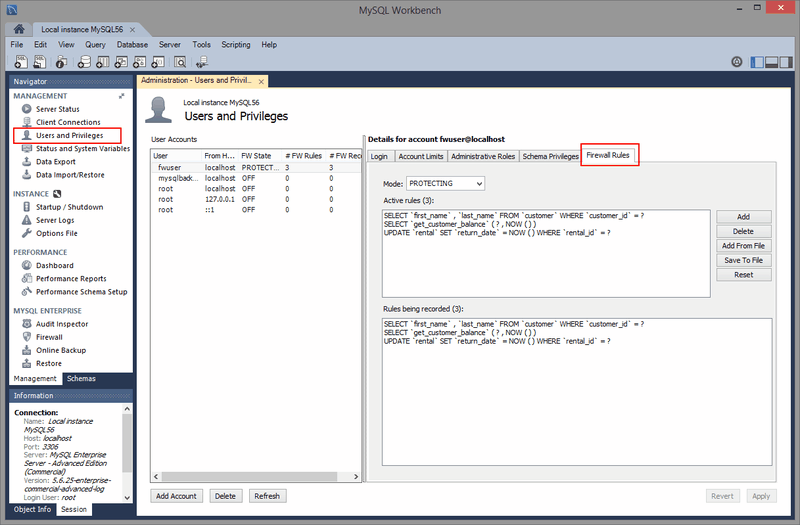
The Firewall Rules tab lists the active and recorded rules for a given user, the state of each rule, and includes options to add, delete, and save rules.
State (mode): Options include OFF (disables the firewall), PROTECTING (enables the whitelist), RECORDING (training mode), and RESET (removes the rules). For additional information about the meaning of these states, see MySQL Enterprise Firewall Procedures and Functions.
Administrative actions include and for individual rules, and to clear (remove) all rules. prompts for a firewall rules text file (defaults to the
.fwrextension) that contains one rule per line, and saves the current rules.Active rules are used in PROTECTIVE mode, and Rules being recorded are entries still being RECORDED. Switching from RECORDING to PROTECTING mode copies the recorded rules into the active rule subset.
MySQL Workbench executes queries, gets variables, and performs a lot of checks. For this reason, MySQL Workbench is more useful as an administration tool for MySQL Enterprise Firewall than a tool to record rules. For example, RECORDING rules in MySQL Workbench will record the behind-the-scenes operations performed by MySQL Workbench for the MySQL user. Also, using MySQL Workbench by a MySQL user in PROTECTING mode will attempt to execute operations that a typical firewalled MySQL user might not have access to.
wbcopytables is a command line utility included in MySQL Workbench that allows you to copy table data from a supported source database server to MySQL. It is used by the Workbench Migration wizard to copy data after the schema is migrated and created in the target MySQL server.
wbcopytables can connect to the source database using either ODBC, the Python DBAPI, or the native MySQL client library.
The copy executes a SELECT statement on the
source database, and then INSERT's the retrieved
rows into the target MySQL server.
Table 6.2 File Location (Default)
| Operating System | Location |
|---|---|
| Linux | /usr/bin/wbcopytables |
| OS X | /Applications/MySQLWorkbench.app/Contents/MacOS/wbcopytables |
| Windows | C:\Program Files (x86)\MySQL\MySQL Workbench
6.3\wbcopytables.exe |
Options for the source connection are:
--odbc-source=ODBC_connection_string:
The syntax of the ODBC connection string uses standard ODBC
syntax. You can also use a ODBC data source name (DSN).
--mysql-source=MySQL_connection_string:
Use for MySQL sources (when doing a MySQL to MySQL
migration/copy). It uses the same syntax as the MySQL Utilities:
For TCP/IP connections:
username[:password]@host:portFor local socket connections:
username[:password]@::socket_path
You can pass the connection password by using the
--source-password option.
For the target connection, the option is:
--target=MySQL_connection_string.
You can use the --passwords-from-stdin option to
pass a passwords through STDIN. Source and target passwords must
be separated by a tab character.
You can use ODBC specific data source options from the source
RDBMS to specify the number of rows to fetch at a time for the
source SELECT statement.
One or more tables can be specified in the command line for the copy operation. There are two copy types:
Full table copy:
--tableRange copy:
--table-range
Both table copy types require a set of common arguments:
Source schema: The schema/catalog the table belongs to. If quoting is required, it must be done using the syntax from the source RDBMS. For example, SQL Server uses [square_brackets].
Source table: The table to copy. If the source RDBMS uses a schema name in addition to a catalog, both schema and table must be specified here and separated by a dot. For example, [dbo].[mytable].
Target schema: The name of the MySQL schema. If quoting is needed, it must use the MySQL backtick syntax. For example,
`sakila`.Target table: The name of the MySQL table.
Select expression: The list of fields to
SELECT. This will be inserted verbatim into the sourceSELECTstatement.CautionUse caution as this expression is copied directly into the source
SELECTstatement.
For the select expression, if both the source and target tables
have the same fields in the same order, and use compatible types,
you can simply pass * here, which will build a
query like "SELECT * FROM [dbo].[mytable]".
If not, you can specify the fields as you would in the
SELECT statement, which are comma (,) separated
and with proper escaping/quoting specific to the source RDBMS. You
can also specify typecasts and/or data conversions that the source
RDBMS supports. For example:
[client_id], [name], [address], AsText([location])
Because each option must be interpreted as a single option by the wbcopytables command, you must perform OS shell specific quoting whenever necessary. Usually, quoting your parameter values with 'single' or "double" quotes is enough. This is in addition to any database specific quoting you use.
Full Table Copy
This performs a full SELECT on the source
table, fetches records, and then inserts them into the target
table.
There are no additional arguments required.
The --table syntax is as follows:
--table Source_Schema Source_Table Target_Schema Target_Table Select_Expression
Range Copy
This performs a SELECT copy on the source table
for the specified range. The table must have a numeric
UNIQUE NOT NULL or PRIMARY
KEY that is used to create a WHERE
expression for the range.
The --table-range syntax is as follows:
--table-range Source_Schema Source_Table Target_Schema Target_Table Select_Expression Source_Key Range_Start Range_End
The generated expression is:
key_column >= range_start AND key_column <= range_end
If you specify -1 for Range_End, then the expression will be:
key_column >= range_start
--thread-count=Number: If you are copying more than one table, you can use this option to divide the tables across several threads. There is no support for dividing a single table across many threads.--count-only: Only perform aCOUNT(*)of theSELECTwhich would be generated by the--tableoption that was used. The target schema and table can be omitted in this case.--truncate-target: Execute a TRUNCATE TABLE command on each target table that is copied.
Because there is no way to temporarily disable triggers in MySQL
and they can affect the copy process, MySQL Workbench will backup and
drop all triggers from the target MySQL database before the copy
process starts, and then these triggers are restored after the
copy finishes. The triggers are backed up in the target schema
under a table named wb_tmp_triggers.
--disable-triggers-on=Schema_Name: Performs the backup and DROP process for all triggers in the specified schema.--reenable-triggers-on=Schema_Name: Restores triggers previously backed up to thewb_tmp_triggerstable.--dont-disable-triggers: Bypass the trigger disabling step.