Contents

Contributed by Brian Leonard, maintained by Gail Chappell
December 2007 [Revision number: V6.0-2]
This tutorial describes how to build relationships (one-to-one and one-to-many) between models in a NetBeans Ruby on Rails project.
This tutorial requires the following technologies and resources:
mysqladmin -u root -p create rubyweblog_developmentNote: If the root user does not have a required password, omit the -p argument.
Open the rubyweblog project in the IDE.
Note: The first time that you open or create a Ruby project in the IDE, the IDE checks if you have any other Ruby installations in addition to the bundled JRuby software. If you do, the IDE displays a dialog box asking you to select which software to use. Choose JRuby if you want to use the bundled JRuby interpreter, or choose your Ruby installation if you prefer to use it instead. For more information, see Configuring the IDE to Use Your Own Ruby Installation in the Installing and Configuring Ruby tutorial.If your database requires a password, edit the database.yml file and provide the password under
the development configuration. Save the file.
database.yml file, press Alt+Shift+O (Ctrl+Shift+O on the Mac), type database.yml in the File Name text field, and press Enter.Right-click the rubyweblog node and choose Migrate Database > To Current Version.
This action updates the database to include the posts table and then adds a body field. The Output window indicates when the migration is complete.In the Projects window, expand the rubyweblog node if it is not already expanded, right-click the Models node, and choose Generate.
Type Comment
in the Arguments field and click OK.
The Rails Generator creates a model named Comment. This model includes the following files:
001_create_posts.rb and 002_add_body.rb, which create and modify the posts table. In the Output window, click the link for the 003_create_comments.rb file.
Add the following code (shown in bold) to create_table in the
self.up method:
Code Sample 1: self.up method |
class CreateComments < ActiveRecord::Migration
  def self.up
    create_table :comments do |t|
      t.column 'post_id', :integer
      t.column 'created_at', :datetime
      t.column 'comment', :text
    end
  end

  def self.down
    drop_table :comments
  end
end |
id, which contains an integer, post_id, which contains an integer; created_at, which stores the date and time; and comment, which contains a text description.Right-click the rubyweblog node and choose Migrate Database > To Current Version.
This action updates the the database to include the comments table. The Output window indicates when the migration is complete.post.rb.Add the following has_many association to post.rb:
Code Sample 2: has_many association in post.rb |
class Post < ActiveRecord::Base has_many :comments end |
has_many method indicates that the post can have
zero, one, or more comment records associated with it.
Open Models > comment.rb and add the belongs_to association:
Code Sample 3: belongs_to association in comment.rb |
class Comment < ActiveRecord::Base belongs_to :post end |
belongs_to method indicates that a comment can be associated with only one post.
By default, ActiveRecord uses the post_id to associate a comment with the post that has a matching post.id.blog_controller.rb, which generates the scaffolding, or the basic interface for creating, reading, updating, and deleting entries in the blog post. Expand Controllers node and open blog_controller.rb.
index, list, show, new, create, edit, update, and destroy.Modify the show action as shown in the following code sample to save the post_id to the flash:
Code Sample 4: show action |
  def show
    @post = Post.find(params[:id])
    flash[:post_id] = @post.id
  end
|
id parameter passed in with the request. It then stores the id in the flash for later use. The flash is similar to an HTTP session, but across a single request. When you put something in the flash, it is available for the next request, and then is gone (hence the name flash).Scroll to the end of the blog_controller.rb file and add the following post_comment action before the final end statement:
Code Sample 5: post_comment action |
def post_comment
    @comment = Comment.new(
      "post_id" => flash[:post_id],
      "created_at" => Time.now,
      "comment" => params[:comment]['comment']
      )
      if @comment.save
        flash[:notice] = 'Comment was successfully added.'
        redirect_to :action => 'show', :id => flash[:post_id]
      end
  end
|
The post_comment action is called when the user clicks the Post button to submit a comment. The first block of code gets the post_id from the flash (which is something like 1, 2, or so on) and uses it to find the blog post associated with that id. The code then creates a new Comment object to be associated with that post_id, also consisting of the time created and the actual comment. The Rails framework passes the submitted parameters from the page as a hash (params[:comment]), from which the code pulls out the comment parameter (params[:comment]['comment']).
Comment is an ActiveRecord class, so calling its save method saves the comment record to the database.
The message is then put in the flash. The code calls the show action, which loads the show.rhtml page. This page reloads the post and all of its comments, including the new one.
show.rhtml file, which displays an individual blog entry.show.rhtml.
Add the following code at the end of show.rhtml:
Code Sample 6: Code for show.rhtml |
<hr> <h4>Comments</h4> <% form_tag :action => 'post_comment' do %> <p><label for="comment_comment">Comment</label><br/> <%= text_area 'comment', 'comment' %></p> <%= submit_tag "Post" %> <%end %> |
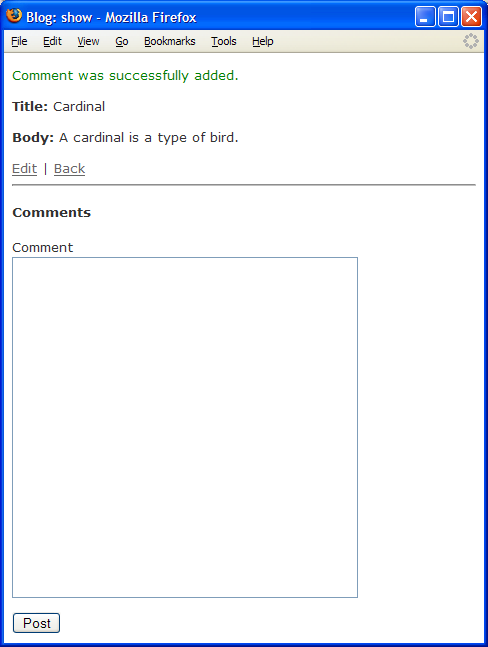
post_comment action is called when the form is submitted. Click a Permalink to view the details of a blog entry. Try adding a comment in the text area, but note that the blog does not yet display comments when you click the Post button.
If your posting is successful, you see a message at the top of the view, as shown in the following figure. In the next steps you add code to collect and display the comments.
Figure 1: View of Comment Model, Without Comments
In blog_controller.rb, find the show action and insert the following post_comments instance variable to collect the comments:
Code Sample 7: Code for blog_controller.rb |
def show
    @post = Post.find(params[:id])
    @post_comments = @post.comments.collect
    flash[:post_id] = @post.id
end
|
Modify show.rhtml by
copying and pasting the contents of the following <ul> tag to just after the <h4>Comments</h4> line:
Code Sample 8: Code for show.rhtml |
<ul>
<% for comment in @post_comments %>
<li><%= comment.comment %><br>
  <div style="color: #999; font-size: 8pt">
      Posted on <%= comment.created_at.strftime("%B %d, %Y at %I:%M %p") %>
  </div>
</li>
<% end %>
</ul>
|
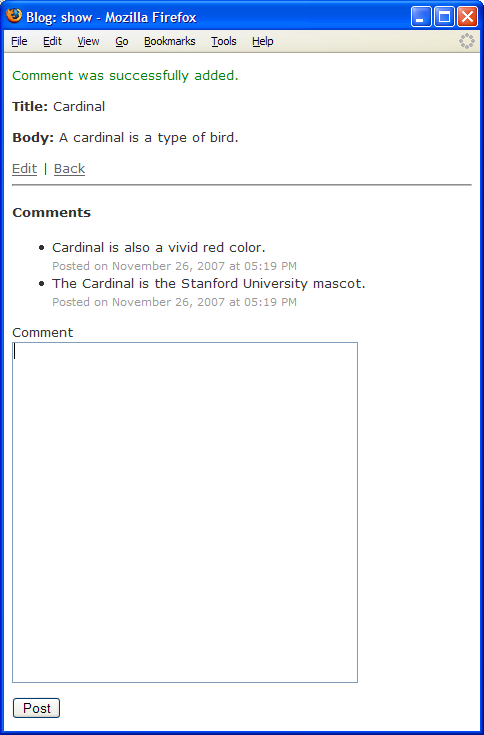
Choose File > Save All, then refresh your browser.
The comments now appear in the blog in a bulleted list, as shown in the following figure.
Figure 2: View of Comment Model, With Comments
To continue with the Ruby web log tutorial and learn more about NetBeans Ruby on Rails, go to Using Ajax With Ruby on Rails.
To obtain support and stay informed of the latest changes to the NetBeans Ruby development features, join the [email protected] and [email protected] mailing lists.