Contents
Tutorial Requirements
Before you proceed, make sure you review the requirements in this section.
Prerequisites
This tutorial assumes that you have some basic knowledge of, or programming experience with, the Java language and platform and the NetBeans IDE.
System Requirements
This tutorial assumes that your system meets the requirements specified in the System Requirements topic of the NetBeans IDE 6.0 Release Notes.
Software Needed for the Tutorial
Before you begin, you need to install the following software on your computer: NetBeans IDE 6.0 with SOA and the GlassFish application server.
Configuring and Starting the GlassFish Application Server
When you install full NetBeans 6.0 download, it includes the GlassFish application server. The NetBeans IDE will automatically start the application server when needed.
To start the GlassFish application server:
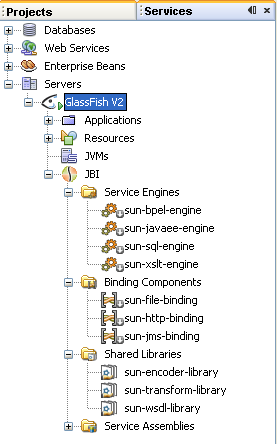
- If the Services window is not visible, choose Window > Services.
- In the Services window, expand the Servers node.
The Servers node should contain the GlassFish application server subnode. If the GlassFish application server node does not appear, go to To configure the GlassFish Application Server.
- Right-click the GlassFish application server node and select Start.
The Output window displays logging information about the application startup. If the Output window is not visible, choose Window > Output > Output.
When the message Application server startup complete appears in the Output window, the application server is running.
Note: If a green arrow badge appears on the GlassFish application server node, the server is running.
Note: Deploying an application to the GlassFish application server will automatically start the server. Thus, you do not have to manually start the application server.
Note: The following procedure shows how to configure the IDE to use an alternate version of the GlassFish V2 application server.
To configure the GlassFish V2 application server:
You might want to use a different version of the application server than the one provided with NetBeans 6.0. For example, you might want to download and install a more current version of the GlassFish V2 application server from the GlassFish Community site.
The following procedure shows how to configure the NetBeans 6.0 IDE to use an alternate version of the GlassFish V2 application server. It assumes that you have downloaded and installed the alternate version of the application server.
- In the Services window, right-click the Servers node and choose Add Server from the pop-up menu.
The Add Server Instance dialog box opens. - In the Choose Server page, select GlassFish V2 from the list.
- Click Next.
The Platform Folder Location page opens. - In the Platform Location field, use the Browse button to navigate to and select the installation location of the application server.
If you installed the GlassFish application server in the default location, use Table 1 as a guide for locating the installation. Otherwise, navigate to the location where you installed the GlassFish V2 application server.
Table 1: Default Application Server Installation Directory
Platform Installing As... SOA Installation Tools Bundle Installation Solaris OS
Linuxroot /opt/glassfish-v2 /opt/SUNWappserver Solaris OS
Linuxuser ~/glassfish-v2 ~/SUNWappserver Mac OS X N/A /Applications/NetBeans/glassfish-v2b58g /Applications/NetBeans/NetBeans 6.0 Windows N/A C:\Program Files\glassfish-v2-b58g C:\Sun\AppServer - Select the Register Local Default Domain radio button and click Next.
- Enter the user name and password for the domain's administrator.
If you accepted the default values during the installation, the user name is admin and the password is adminadmin. - Click Finish.
Opening the AsynchronousSample Project
- From the IDE's main menu, choose File >New Project.
The New Project wizard opens. - In the Categories list, select Samples>SOA.
- In the Projects list, select Asynchronous BPEL Process.
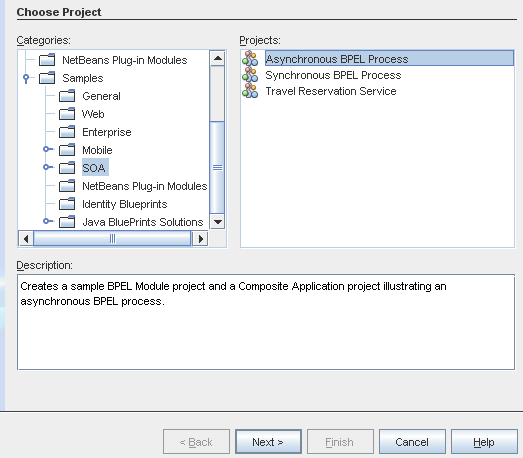
- Click Next.
- In the Project Name field, type AsynchronousSample.
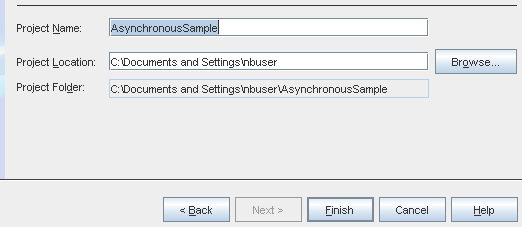
- (Optional) In the Project Location field, use the Browse button to navigate to and select a different folder where the IDE will store the project files.
- Click Finish.
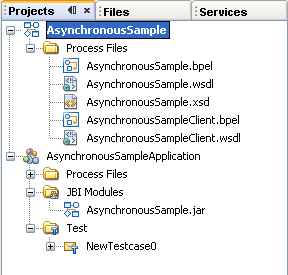
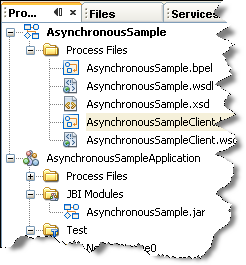
The Projects window now contains two project nodes: one for a BPEL project called AsynchronousSample, and one for a Composite application project called AsynchronousSampleApplication.
Exploring the BPEL and JBI Project in the Projects Window
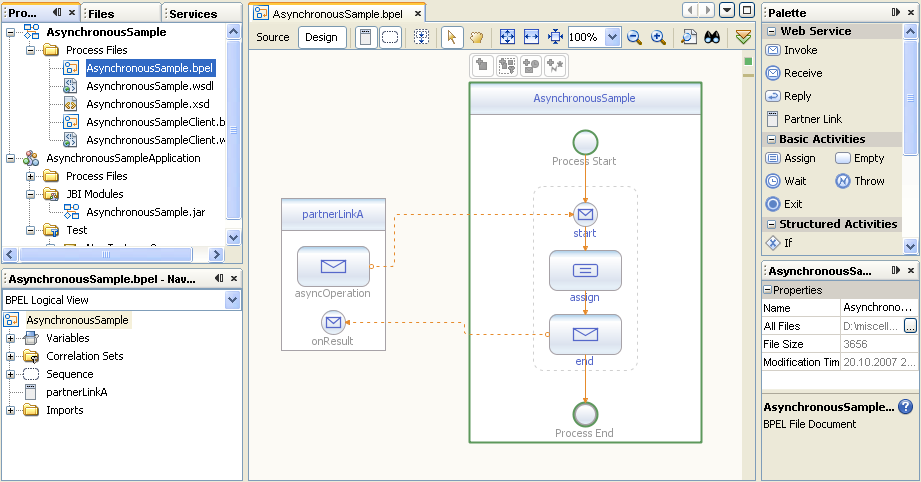
- In the Projects window, expand the AsynchronousSample node, then expand the Process Files node.
The Process Files node contains these items:- AsynchronousSample.bpel, the BPEL process
- AsynchronousSample.wsdl, the process web service interface
- AsynchronousSample.xsd, the schema file.
- AsynchronousSampleClient.bpel, the test client process.
- AsynchronousSampleClient.wsdl, the wsdl for the client process
- In the Projects window, expand the AsynchronousSampleApplication node. The JBI deployment project contains:
- Process Files
- JBI Modules
- Test
- Double-click the AsynchronousSample.bpel node.
Notice the following:- The Source Editor contains a tab for AsynchronousSample.bpel.
- The AsynchronousSample diagram is shown in the Design view.
The Design view is the business processes visual designer. In this view, you can visually model a business process. The BPEL Design tool automatically generates BPEL code that corresponds to the visual design. - The Palette of BPEL elements opens to the right of the Source Editor.
- The Navigator window shows the BPEL logical view of the BPEL process.
Exploring the AsynchronousSampleClient in the Projects Window
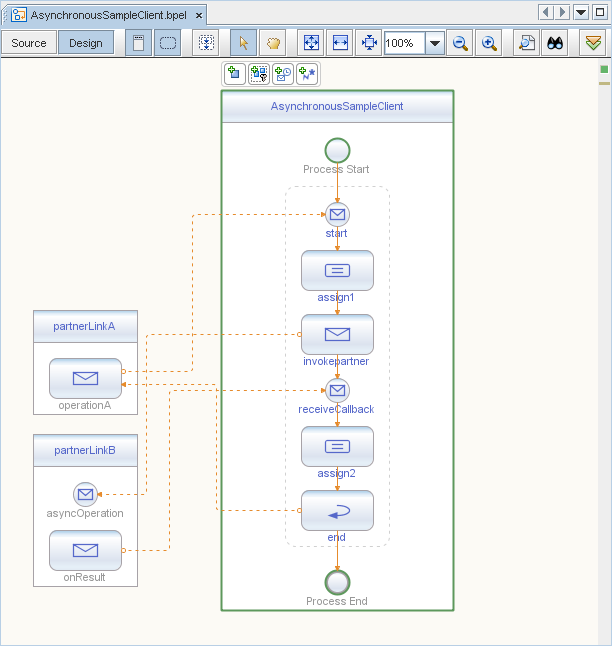
The AsynchronousSample project is an asynchronous BPEL process. Testing an asynchronous process requires a client that is capable of receiving an asynchronous callback. Therefore, the project also contains an AsynchronousSampleClient BPEL process. The sole purpose of the AsynchronousSampleClient process is to facilitate the unit testing of the AsynchronousSample.
- Double-click the AsynchronousSampleClient.bpel node.
The IDE displays the AsynchronousSampleClient diagram in the Design view.
Notice that AsynchronousSample ( partnerLinkB ) does an invocation back on AsynchronousSampleClient to return the response.
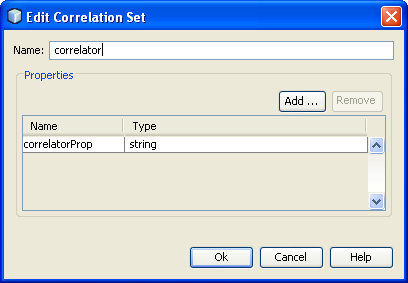
- Double-click the receiveCallback receive activity in the AsynchronousSampleClient process.
The Property Editor for receiveCallback opens. - Click the Correlations tab, select correlator row and click Edit.
The Edit Correlation Set Editor appears.
Notice how correlation is used to correlate this response to the correct instance of AsynchronousSampleClient.
Deploying the project to the Application Server
Notice that a BPEL project is not directly deployable. It must be added as a JBI module to a Composite Application project. Then you can deploy the Composite Application project. Deploying the project makes the service assembly available to the application server, thus allowing its service units to be run.
- Expand AsynchronousSampleApplication > JBI Modules.
Ensure that AsynchronousSample.jar node is added.
- Right-click the AsynchronousSampleApplication project node, and choose Deploy.
- In the Warning dialog box, make sure GlassFish V2 is selected and click OK.
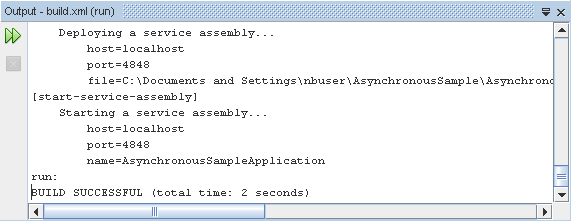
- Deployment has succeeded if you see the following message in the Output window:
- If the Output window is not visible, choose Window > Output.
Testing the AsynchronousSampleApplication
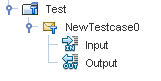
- In the Projects window, expand the AsynchronousSampleApplication > Test > NewTestcase0. The NewTestcase0 node contains two XML files:
- Input.xml for input
- Output.xml for output
- Right-click the AsynchronousSampleApplication project node, and choose Test from the pop-up menu.
The following message appears in the Output window:
