Contents
| December, 2007 [Revision number: V6.0] |
In this tutorial you learn about JSF Converters and Validators. Converters are used to convert string input into data Java data types for various purposes such as calculation. Validators are used to verify that user input falls within specified ranges. You use the Visual Web JSF framework to create an application that converts temperatures from Celsius to Fahrenheit. The application uses a converter to convert user input from a string value to a numerical Java data type on which the application can perform calculations. The application uses a validator to check that the data falls within a specified range and reports validation errors via a message component. You then build a web applicatation that calculates currency values and displays a formatted date value. You also learn how to add your own validation handler to an application and how to override the built-in error messages provided by the IDE for when a standard validation fails. |
This tutorial works with the following technologies and resources
| JavaServer Faces Components/ Java EE Platform |
||||
| Travel Database |
|
|||
* In order to take advantage of NetBeans IDE 6.0's Java EE 5 capabilities, use an application server that is fully compliant with the Java EE 5 specification such as the Sun Java Application Server 9/GlassFish.
This tutorial has been tailored for use with the GlassFish v2 Application Server. If you are using a different server, consult the Release Notes and FAQs for known problems and workarounds. For detailed information about the supported servers and Java EE platform, see the Release Notes.
In this section, you create the application and add the necessary components to it.
Create a new web application project and name it ValidatorConverter. Enable the Visual Web JavaServer Faces framework.
Figure 1 shows the page you will create in the following steps.From the Basic section of the Components Palette, drag a Text Field component and drop it on the page. Set the label property to Celsius and set the text property to 0.0.
label and text properties are under the Appearance section of the Properties window. The text value is the default value displayed at runtime.Set the Text Field component's required property to True by selecting the checkbox in the Properties window.
required property is under the Data section of the Properties window. A value of True requires that the user enter a value for the input field. If the user does not enter a value and tries to submit the page, a standard validation error message is returned. A red asterisk appears next to the Celsius label to indicate that the required property is set.Fahrenheit.32.0 to represent the freezing point of water in the Fahrenheit scale. Hold down the Ctrl+Shift keys and drag a line from the Message component to the Text Field component.
The text of the Message component changes to Message summary for textField1, as shown in the following figure:
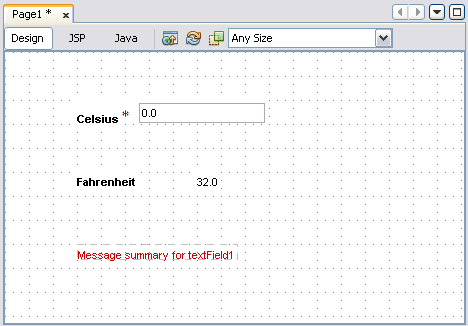 Figure 1 : Message Summary |
In the next section you add a validator to ensure that the user's entry falls within a specified range.
If your application collects information from users, for example a login and a password, then it is important that you verify the user data. The IDE provides a set of components for validating user input; you access them from the Validators section of the Components Palette. The simplest validation ensures that an input field has some sort of value.
The Double Range validator tests whether the value of a numerical input is within a specified range. The data type must be floating point or convertible to floating point. Other validators include the Length Validator and the Long Range Validator.
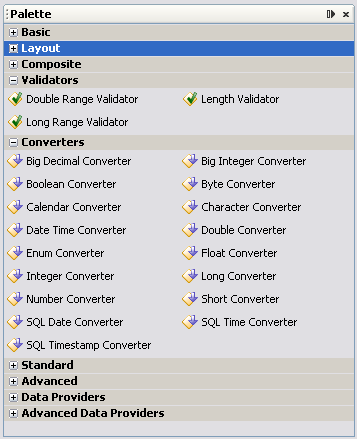 Figure 2 : Validators and Converters in the Palette |
When you use a validator (or a converter, described below in Using Converters), you may also want to use a message component to indicate when validation fails. The web application performs all the validations before it calls any value change or action listeners, such as the button action methods. If one or more validation errors occur, the value change listeners and action listeners are not called, and the web application rerenders the page so that the user can correct the problems.
For this application, you want to check that the Text Field component contains at least one character before the page is submitted. You also need a message component to indicate when the validation fails.The Message component you added in the previous section will indicate to the user if the validation fails.
Expand the Validators section of the Palette. Drag the Double Range Validator from the Palette and drop it on the Text Field component.
The double range validator is a non-visual component. The default value doubleRangeValidator1 appears in the Navigator window and in the validator property in the Properties window, as shown in the figure below.
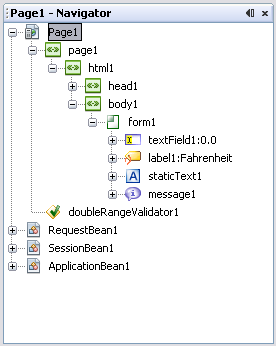
 Figure 3 : Outline Window and Properties Window |
Set the range for the validator in the Properties window:
maximum property to 1000.0 (a very hot temperature).minimum property to -273.15 (i.e. Absolute Zero on the Celsius scale).
In this section you enabled the application to validate a user-entered value using a Double Range Validator. In the next section you use a converter to enable the application to calculate the Fahrenheit value of a numerical string input of a Celsius temperature.
The IDE also provides a set of converters that you can use to convert component data. A converter converts data types between java.lang.String values in your component properties and a Java data type. The standard converters can be accessed from the Converters section of the Components Palette. When you bind a component, the IDE normally identifies the data type for you and sets the appropriate converter when you establish a binding to the value property. However, you can also add converters manually in the IDE by setting the component's converter property.
Note: Conversions are performed before the validation process starts. If a user provides a value that the application cannot convert to the specified data type, the web application rejects the input and sends an error message. This error message appears in the Message Group component and the associated Message component if they exist on the page. The Number Converter is a useful converter because you can use it to specify patterns that the input must match.
Other converter components include (but are not limited to) the following:
In the previous steps you set up a validator to verify that an input Celsius temperature fell between absolute zero and 1000°. In the following steps you use a Double Converter to convert the user's input to a double so that you can use the double to calculate the Fahrenheit value of a Celsius input.
Expand the Converters section of the Palette. Drag the Double Converter from the Palette onto the Text Field component.
This converter specifies that the Text Field component returns a Double object rather than a String. The default valuedoubleConverter1 appears in the Properties window and in the Navigator window.Double-click the Text Field component to open its source code in the Java Editor.
Add the following code (shown in bold) to the textField1_processValueChange action method.
| Code Sample 1: Value Change Event Handler Method |
public void textField1_processValueChange(ValueChangeEvent event) {
   double celsiusTemp = ((Double) textField1.getText()).doubleValue();
   double fahrenheitTemp = 9.0 * celsiusTemp / 5.0 + 32.0;
   staticText1.setText(new Double(fahrenheitTemp));
} |
This code sets two variables: celsiusTemp, the value entered into textField1, and fahrenheitTemp, the value into which celsiusTemp is converted by applying the specified calculation. The last line sets the new value of fahrenheitTemp in the Static Text field.
In this section, you run the application with various inputs that demonstrate possible validation and conversion errors.
Delete 0.0 from the text field and press Enter without entering a value. Verify that an error is displayed for the text field, as shown in the figure below.
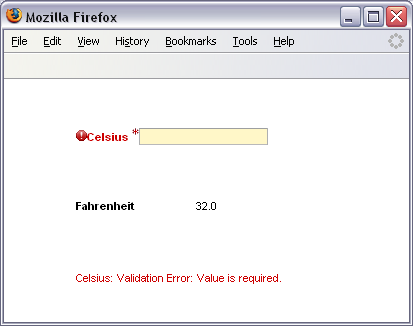 Figure 4 : Validation Error When Input is Required |
This error actually occurs because the we set the required property of the text field to true. When a page visitor submits a page, the web application performs the input verifications in the following order:
Enter various numbers to test the application. The figure below shows the results when you enter 100.
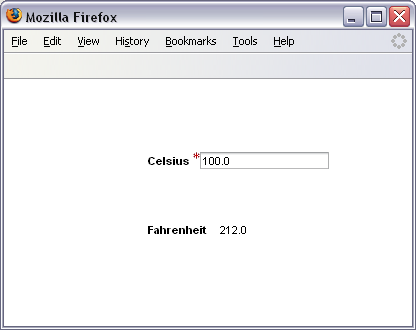 Figure 5: Successful Validation |
Verify that the validation error displays when you enter a value outside the range and the conversion error displays when you enter a non-numeric string value.
The figure below shows the result when you enter -1000. Note that when a validation or conversion error occurs, the value change listener method is not called and the value in the Static Text component does not change.
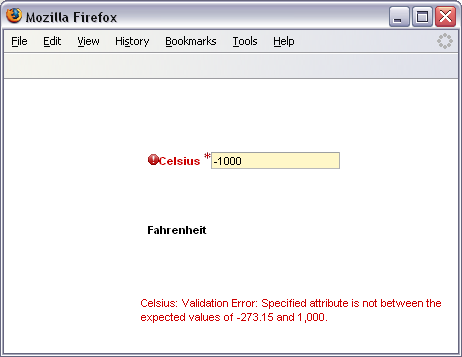 Figure 6 : Validation Error When Value is Outside Range |
Enter an alphanumeric string, such as 20x. Because the application is configured only to convert number formats, it returns a conversion error as shown in the figure below.
 Figure 7: Conversion Error When Entered Value In Incorrect Format |
Two of the standard converters, the Number converter and the Date Time converter, have their own properties that enable you to specify the format and type of the data. This mini tutorial shows how to use these two converters.
The following figure shows the page you will create in this section:
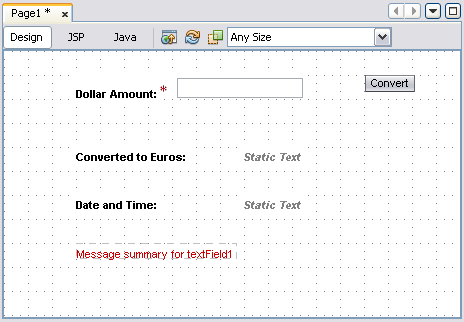 Figure 8 :Currency Converter Application |
Drag two Label components from the Basic section of the Palette onto the page.
Set the text of the first label to Converted to Euros: and the text of the second label to Date and Time:.From the Basic section of the Palette, drag a Message component and drop it below the Date and Time label.
Hold down the Ctrl+Shift keys and drag a line from the Message component to the Text Field component.From the Converters section of the Palette, drag the Number Converter and drop it on the Text Field component.
The number converter specifies that the Text Field component returns a Number object rather than a String.In the Number Format dialog box, choose Currency from the Type drop-down list. Set the Fractional Digits Max property to 2 and the Locale to English (United States), as shown in the figure below, and click OK.
Note how the Currency Code defaults to USD United States of America, Dollars, the currency abbreviation, country, and curreny name associated with the Locale. Choose different Locales to display their various currencies.
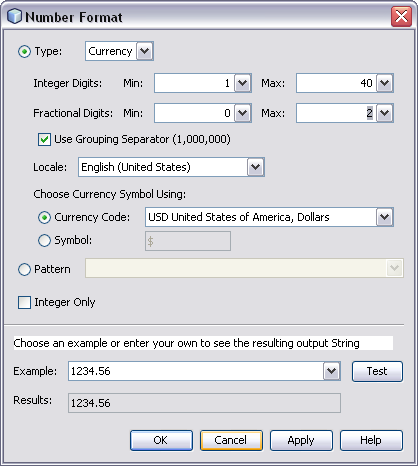 Figure 9 : Number Format Dialog Box |
The Number Converter appears in the converter property of the Properties window and in the Outline window.
In the Number Format dialog box, choose Currency from the Type drop-down list and German (Germany) from the Locale drop-down list. Set the Fractional Digits Max property to 2 and click OK.
This time the Currency Code defaults to EUR, Euro Member Countries, Euro. (If, for example, you select German (Switzerland), the Currency Code defaults to CHF, Switzerland, Francs because Switzerland is not in the Euro zone.) for the pattern property.
Type EEE, d MMM yyyy HH:mm:ss zzzz in the Pattern field, and click OK. As you add elements to the pattern, the current value appears in the pattern property of the Properties window.
Note how the value changes as you enter the elements. For example, if you type EEEE at the beginning instead of EEE, the pattern includes the full day of the week instead of its abbreviation. If you enter only one z at the end, the time zone is abbreviated.
Refer to the Customizing Formats lesson of the Java Tutorials for more information on formatting dates and times (external link displays in separate page).Add the following two lines immediately above the button1_action method. 0.74 approximates the exchange rate of euros to dollars.
| Code Sample 2: Constant Value for Dollars to Euros Exchange |
// constant value for dollars to euros exchange private static final double us2euros = 0.74; |
Add the following code (in bold) to the button1_action method. The comments in the code indicate what each line achieves.
| Code Sample 3: Constant Value for Dollars to Euros Exchange |
public String button1_action( ) {
	// get the amount of dollars the user entered
	Number dollars = (Number) textField1.getValue();
	// exchange the dollars for euros
	double euros = dollars.doubleValue() * us2euros;
	// display the amount of euros
	staticText1.setText(new Double(euros));
	// figure out the date and time
	Date date = new Date();
	staticText2.setText(date);
	return null;
} |
The figure below shows the result when you enter $100.00.
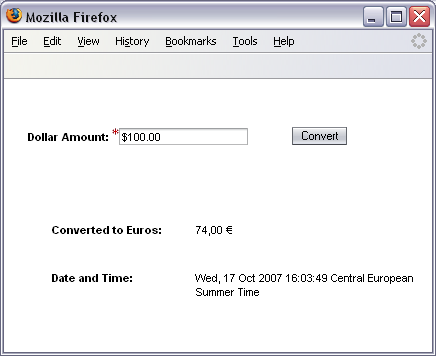 Figure 10: Page Showing Conversion Results |
The following figure shows the result when you enter 100 without the $. The converted value from the previous figure remains, but the conversion error displays.
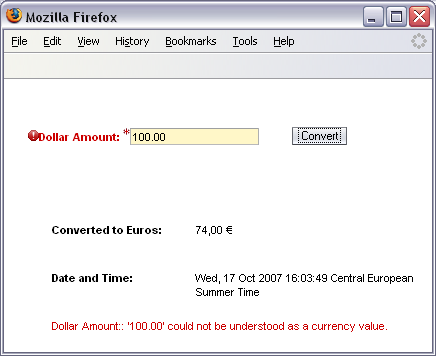 Figure 11: Page Showing Conversion Error |
For more information on number formatting, see the Java tutorial Customizing Formats (external link displays in separate page).
If the standard validators do not perform the validation checking you need, you can easily add your own validation handler. This section uses the NetBeans Visual Web JSF Application functionality to create a validation handler that checks the user's input and constrains it to a three-digit number. You can add these steps to the page Currency.jsp you created in the previous section.
Place a Message component under the Text Field component. Hold down the Ctrl+Shift keys and drag a line from the Message component to the Text Field component.
The text of the Message component changes to Message summary for textField2.Right-click the Text Field component and choose Edit Event Handler > validate.
This opens the Java Editor. The IDE automatically adds import statements for the ValidatorException, FacesContext, and FacesMessage classes to the code. The insertion point is in the validate event for the text field. The third parameter, value, is the String that you will validate.Enter the following code (in bold).
| Code Sample 4: Custom Validator Code |
public void textField2_validate(FacesContext context, UIComponent component, Object value) {
	String s = String.valueOf(value);
	if (!s.matches("\\d\\d\\d")){
		throw new ValidatorException(new FacesMessage
		("Not a three-digit number."));
	}
} |
The matches method on String s uses a regular expression to specify the legal values that the String may accept. The \d matches a digit (0-9).
The character "\" in a String literal has special meaning to the Java parser. You specify an extra "\" to escape the second "\", ensuring that it is passed unchanged through the parser to the pattern interpreter. So the expression \d\d\d matches any three-digit number from 000 to 999.
If the String does not match the regular expression, a message is passed to the ValidatorException constructor. The message is queued onto the FacesMessage and is displayed on the page during the render response phase.
Run the Application. Enter number and character strings of varying lengths to test the application. Also verify that the standard validation error is displayed when no value is entered in the text field.
The figure below shows the result when you enter a four-digit number.
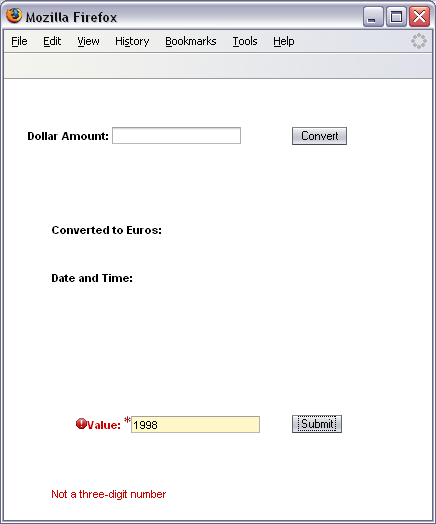 Figure 12: Custom Validator Example With Results |
You can override the built-in error messages that NetBeans IDE provides when a standard validation fails. You create a resource bundle for the project in which you want to provide a custom message. Note that this is a global override, not a component level override. This means that all required components return the same value.
This section shows how to customize messages for the Length, Double Range, and Long Range validators in JSF 1.1 / J2EE 1.4. As you can see, this is a slightly longer process than adding customized messages in JSF 1.2. You use the IDE to customize the default error message for required input. First you create a resource bundle which maps keys used by the program to the strings displayed to the user, then you edit the faces-config.xml to point to the MyResources.properties resource bundle.
Note: The steps in this section depend on the project being named ValidatorConverter. If you chose a different name, please adjust all uses of the project name to reflect the name of your project.
Enter MyResources in the File Name field, and type src\java\validatorconverter in the Folder field, and click Finish.
The IDE creates the resource bundle and opens the MyResources.properties file in the IDE. The MyResources.properties file provides the replacement text for the messages that are used by the components.In the Files window, expand ValidatorConverter > src> java > validatorconverter, right-click MyResources.properties, and select Open to open the Key-Values Properties Editor.
In the Key-Values Properties Editor you can add key-value pairs to the resource bundle.In the New Property dialog, type javax.faces.component.UIInput.REQUIRED in the Key field. In the Value field, type Please enter a value and then press Enter.
Important: Make sure that there are no spaces at the end of the key. Spaces prevent the application from working at run time.
For a list of all the keys for the standard messages, see Standard Message Keys below.Click OK. The values are displayed in the Properties Editor, as shown in the figure below.
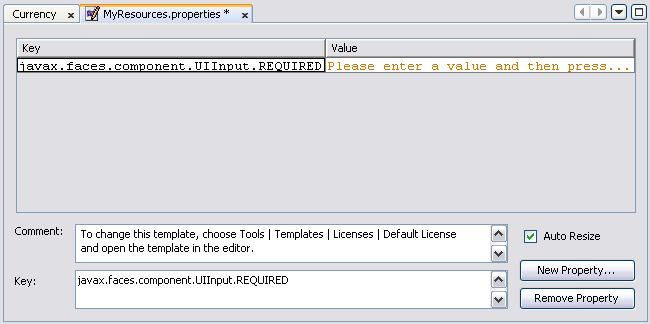 Figure 13: Properties Editor for MyResources.properties |
In the the faces.config file, enter the following code. Note that this code contains the name of the project. If your project is not named ValidatorConverter, change the text in the code as appropriate. Note that you should change upper-case characters in your project name to lower-case characters in the message-bundle element.
<application>
    <message-bundle>webapplication6.MyResources</message-bundle>
</application>
The message-bundle element represents a set of localized messages. This element contains the fully-qualified path to the resource bundle containing the localized messages, in this case, validatorconverter.MyResources.
Delete any text in the text field and Press Enter.
Your customized message appears in the message field as shown in the figure below.
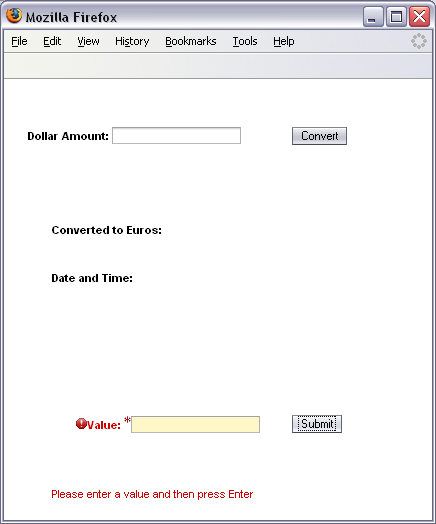 Figure 14: Custom Validator Message |
In the NetBeans IDE, you can use a resource bundle to handle informational messages that occur as a result of conversion, validation, or other application actions during the request processing lifecycle. The keys for the standard messages are listed in the following table.
| Key | Description |
|---|---|
javax.faces.component.UIInput.CONVERSION |
Conversion error occurred |
javax.faces.component.UIInput.REQUIRED |
Value is required |
javax.faces.component.UISelectOne.INVALID |
Value is not a valid option |
javax.faces.component.UISelectMany.INVALID |
Value is not a valid option |
javax.faces.validator.NOT_IN_RANGE |
Specified attribute is not between the expected values of {0}and {1} |
javax.faces.validator.DoubleRangeValidator.MAXIMUM |
Value is greater than allowable maximum of {0} |
javax.faces.validator.DoubleRangeValidator.MINIMUM |
Value is less than allowable minimum of {0} |
javax.faces.validator.DoubleRangeValidator.TYPE |
Value is not of the correct type |
javax.faces.validator.LengthValidator.MAXIMUM |
Value is greater than allowable maximum of {0} |
javax.faces.validator.LengthValidator.MINIMUM |
Value is less than allowable minimum of {0} |
javax.faces.validator.LongRangeValidator.MAXIMUM |
Value is greater than allowable maximum of {0} |
javax.faces.validator.LongRangeValidator.MINIMUM |
Value is less than allowable minimum of {0} |
javax.faces.validator.LongRangeValidator.TYPE |
Value is not of the correct type |
In this tutorial you learned how to:
See Also: