Getting Started with JAX-WS Web Service Clients
In this tutorial, you use the web service facilities provided by
NetBeans IDE 6.0 to analyze a Spell Checker web service, after which
you build a web client that interacts with it.
Contents
|
|
 |
Software Needed for the Tutorial
Before you begin, you need to download or install the following software on your computer:
- NetBeans IDE 6.0 Web & Java EE.
- Java Standard Development Kit (JDK) version 5.0 or version 6.0.
- Glassfish V2 or Tomcat Web Server, both of which you can select from the installer
that you use to install NetBeans IDE 6.0.
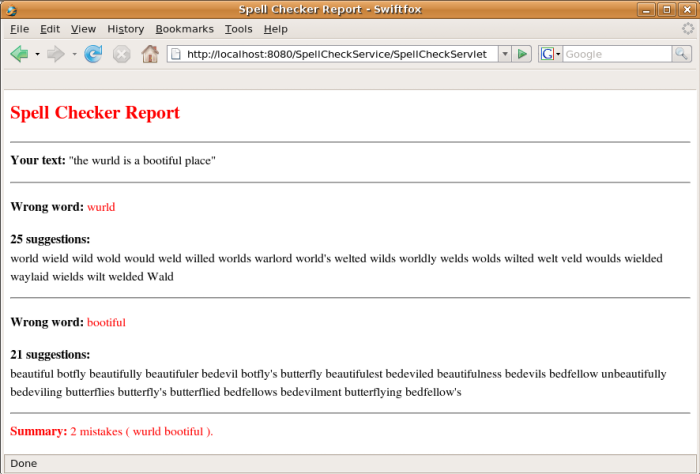
This is what your client will
look like, with all data received from the web service:
By the end of this tutorial, you discover that your only contribution to the application consists of
providing the text to be checked, invoking an operation on the web service, and rendering the result.
The IDE generates all the code needed
for contacting the web service and sending the text. The spell checker web service takes care of the
rest, it identifies the misspelled words and provides a list of suggested alternatives.
Note: The spell checker web service used in this tutorial is provided by
the CDYNE Corporation. CDYNE develops, markets and supports
a comprehensive suite of data enhancement, data quality and data analysis web services and business intelligence
integration. The spell checker web service is one of the web services provided by CDYNE. Note that
the strength of an application based on one or more web services depends on the availability and reliability of the web services. However,
CDYNE's FAQ points out that it has a "100% availability
objective" and that in the event of "natural disaster, act of terror, or other catastrophe, web service traffic
is transferred to our secondary data center". NetBeans thanks CDYNE for enabling this tutorial to be written
and for supporting its development.
Consuming the Spell Checker Web Service
To consume a web service, you need to create a web service client.
For the creation of web service clients, NetBeans IDE 6.0 provides a client creation facility—the Web Service Client
wizard that generates code for looking up a web service. It also provides facilities for developing the created web service client
—a work area consisting of nodes in the Projects window.
These facilities are part of the standard NetBeans IDE installation, they're available straight out of the box and no plug-ins
are needed.
Creating the Client
In this section, we use a wizard to generate Java objects from the web service's
WSDL file.
- Choose File > New Project (Ctrl-Shift-N). Under Categories, choose Web. Under Projects,
choose Web Application. Click Next. Name the project SpellCheckService and make sure
that you specify an appropriate server as your target server. (Refer
to the "Getting Started" section for details.) Click Finish.
- In the Projects window, right-click the SpellCheckService project
node and
choose New > Other. In the New File wizard choose Web
Services > Web Service Client. In the
Web Service Client wizard, specify the URL to the web service:
http://ws.cdyne.com/SpellChecker/check.asmx
If you are behind a firewall, you might need
to specify a proxy server—otherwise the WSDL file cannot be downloaded. If so, click Proxy Settings in the Web Service Client wizard and set
your proxy host and port number.
- Enter org.netbeans.end2end.check.client as the package
name. The package name specifies the package to which the client objects
will be generated.
You should now see this:
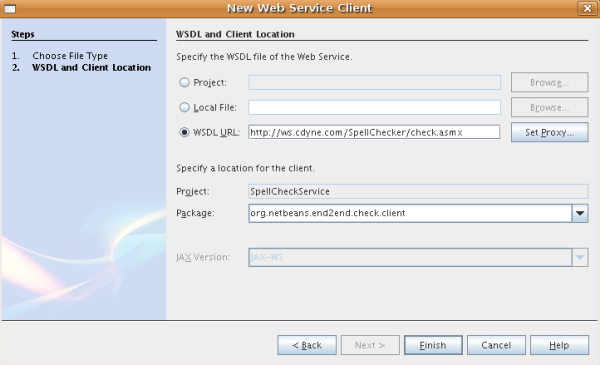
- Click Finish.
In the Projects window, within the Web Service References node, you should see the following:
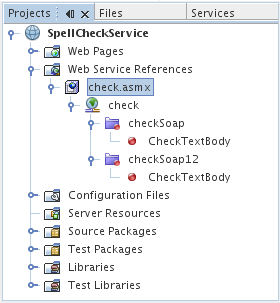
The Projects window shows that a web service called 'check' has made the operation 'CheckTextBody'
available to your application. The 'CheckTextBody' operation checks a string for spelling errors and returns data
to be processed by the client. You will use this operation throughout this tutorial.
In the Files window, within the build node, you should see the following:
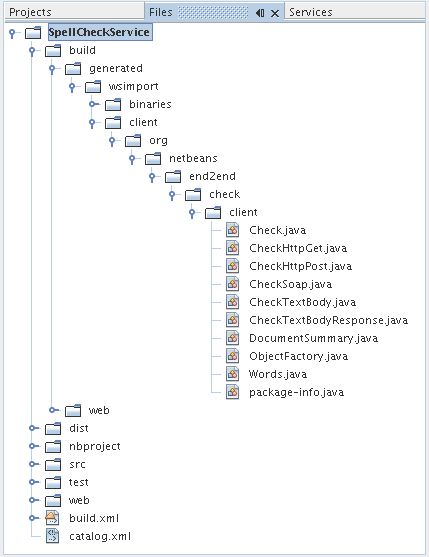
The Files window shows the client stubs that were generated by the JAX-WS Web Service Client wizard.
Developing the Client
There are many ways to implement a web service client. The web service's WSDL file restricts the type of
information that you can send to the web service, and it restricts the type of information you should expect to receive in return.
However, the WSDL file lays no restrictions on how you pass the information it needs, nor on what the
user interface consists of. The client implementation you build below consists of a JSP page which allows the user to enter text
to be checked and a servlet which passes the text to the web service and then produces a report containing the result.
Coding the JSP Page
Our JSP page will simply consist of a text area, where the user will enter some text,
and a button for sending the text to the web service.
- In the Projects window, expand the Web Pages node and double-click index.jsp
so that it opens in the Source Editor.
- Copy the following code and paste it over the <body> tags in index.jsp:
<body>
  <form name="Test" method="post" action="SpellCheckServlet">
     <p>Enter the text you want to check:</p>
     <p>
     <p><textarea rows="7" name="TextArea1" cols="40" ID="Textarea1"></textarea></p>
     <p>
     <input type="submit" value="Spell Check" name="spellcheckbutton">
  </form>
</body>
The above code specifies that when the submit button is clicked, the content of the textarea is posted
to a servlet called SpellCheckServlet.
Creating and Coding the Servlet
In this section we create a servlet that will interact with the web service. However,
as we will see, the code that performs the interaction will be provided by the IDE. As
a result, you only need to deal with the business logic, that is, the preparation of
the text to be sent and the processing of the result.
- Right-click the project node in the Projects window,
choose New > Other and then choose Web > Servlet. Click
Next. Name the servlet SpellCheckServlet and type org.netbeans.end2end.check.client in the Package drop-down.
Click Next. Note that the URL mapping for this servlet is /SpellCheckServlet, as shown below:
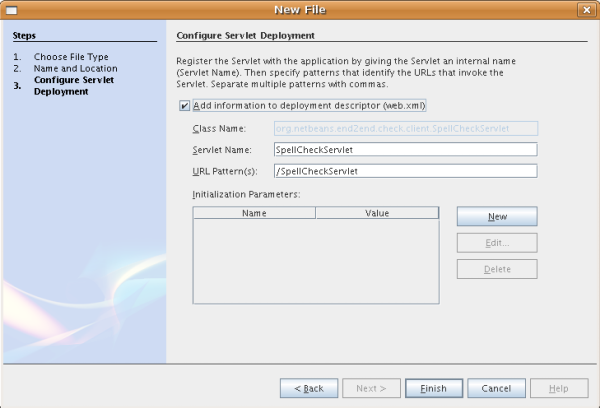
Click Finish. The servlet opens in the Source Editor.
- Put your cursor inside the Source Editor, inside the
processRequest method, add some new lines right
at the top of the method.
- Right-click in the space that you created in the
previous step, and choose Web Service
Client Resources > Call Web Service Operation. Click the CheckTextBody
operation in the "Select Operation to Invoke" dialog box,as shown below:
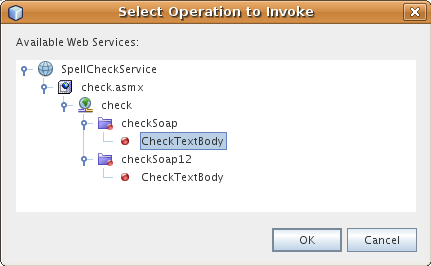
Click OK.
Note: You can also drag and drop the operation node
directly from the Projects window into the editor, instead
of calling up the dialog shown above.
At the top of
the processRequest method you see a snippet of code that
invokes the web service, as shown below:
try { // Call Web Service Operation
    org.netbeans.end2end.check.client.CheckSoap port = service.getCheckSoap();
    // TODO initialize WS operation arguments here
    java.lang.String bodyText = "";
    java.lang.String licenseKey = "";
    // TODO process result here
    org.netbeans.end2end.check.client.DocumentSummary result = port.checkTextBody(bodyText, licenseKey);
    out.println("Result = "+result);
} catch (Exception ex) {
    // TODO handle custom exceptions here
}
This method is all you need to work with to invoke
the operation on the web service. In addition, the
following lines of code are declared at the top
of the class:
@WebServiceRef(wsdlLocation = "http://ws.cdyne.com/SpellChecker/check.asmx?WSDL")
private Check service;
- Replace the entire processRequest method with
the code that follows. The in-line comments throughout the code below explain the purpose of
each line.
protected void processRequest(HttpServletRequest request, HttpServletResponse response) throws ServletException, IOException {
    response.setContentType("text/html;charset=UTF-8");
    PrintWriter out = response.getWriter();

    try {

        // Call Web Service Operation
        String TextArea1 = request.getParameter("TextArea1");

        org.netbeans.end2end.check.client.CheckSoap port = service.getCheckSoap();

        // TODO initialize WS operation arguments here
        java.lang.String bodyText = TextArea1;
        java.lang.String licenseKey = "0";

        // TODO process result here
        org.netbeans.end2end.check.client.DocumentSummary doc = port.checkTextBody(bodyText, licenseKey);
        String allcontent = doc.getBody();

        //From the retrieved document summary,
        //identify the number of wrongly spelled words:
        int no_of_mistakes = doc.getMisspelledWordCount();

        //From the retrieved document summary,
        //identify the array of wrongly spelled words:
        List allwrongwords = doc.getMisspelledWord();

        out.println("<html>");
        out.println("<head>");

        //Display the report's name as a title in the browser's titlebar:
        out.println("<title>Spell Checker Report</title>");
        out.println("</head>");
        out.println("<body>");

        //Display the report's name as a header within the body of the report:
        out.println("<h2><font color='red'>Spell Checker Report</font></h2>");

        //Display all the content (correct as well as incorrectly spelled) between quotation marks:
        out.println("<hr><b>Your text:</b> \"" + allcontent + "\"" + "<p>");

        //For every array of wrong words (one array per wrong word),
        //identify the wrong word, the number of suggestions, and
        //the array of suggestions. Then display the wrong word and the number of suggestions and
        //then, for the array of suggestions belonging to the current wrong word, display each
        //suggestion:
        for (int i = 0; i < allwrongwords.size(); i++) {
            String onewrongword = ((Words) allwrongwords.get(i)).getWord();
            int onewordsuggestioncount = ((Words) allwrongwords.get(i)).getSuggestionCount();
            List allsuggestions = ((Words) allwrongwords.get(i)).getSuggestions();
            out.println("<hr><p><b>Wrong word:</b><font color='red'> " + onewrongword + "</font>");
            out.println("<p><b>" + onewordsuggestioncount + " suggestions:</b><br>");
            for (int k = 0; k < allsuggestions.size(); k++) {
                String onesuggestion = (String) allsuggestions.get(k);
                out.println(onesuggestion);
            }
        }

        //Display a line after each array of wrong words:
        out.println("<hr>");

        //Summarize by providing the number of errors and display them:
        out.println("<font color='red'><b>Summary:</b> " + no_of_mistakes + " mistakes (");
        for (int i = 0; i < allwrongwords.size(); i++) {
            String onewrongword = ((Words) allwrongwords.get(i)).getWord();
            out.println(onewrongword);
        }

        out.println(").");
        out.println("</font>");
        out.println("</body>");
        out.println("</html>");
        out.close();

    } catch (Exception ex) {
        System.out.println("exception" + ex);
        out.println("exception" + ex);
    }

    out.println("</body>");
    out.println("</html>");
    out.close();
}
Note that error handling has not been dealt with in the code above.
See Applying What You Have Learned
for details.
Deploying the Client
The IDE uses an Ant build script to build and run your application. The IDE generates the
build script based on the options you entered when creating the project. You can finetune these options in the
project's Project Properties dialog box (right-click the project node in the Projects window and choose Properties).
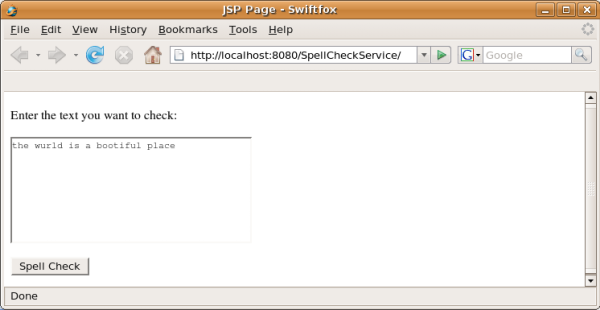
- Right-click the project node and choose Run Project.
After a while, the application should deploy
and display the JSP page that you coded in the previous section. Enter some text, making sure that
some of it is incorrectly spelled:
- Click Spell Check and see the result:
Applying What You Have Learned
Now that you have completed your first web service client in the IDE, it is time
to stretch your skills and extend the application to be all that it was destined to be.
Below are two suggested tasks to get you started.
- Add error handling code to the servlet.
- Rewrite the client so that the user can interact with the data returned from the web service.
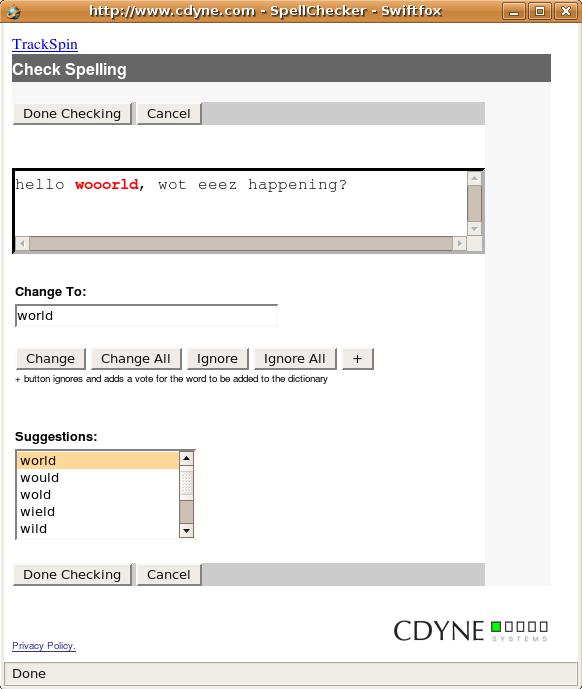
For inspiration, see the client implementation on the CDYNE site.
It looks like this:
Next Steps
For more information about using NetBeans IDE 6.0 to develop Java EE applications, see the following resources:
To send comments and suggestions, get support, and keep informed on the latest
developments on the NetBeans IDE Java EE development features, join
the [email protected] mailing list.