Getting Started with JAX-WS Web Services
Java API for XML Web Services (JAX-WS) 2.0, JSR 224, is an important part
of the Java EE 5 platform. A follow-on release of Java API for
XML-based RPC 1.1(JAX-RPC), JAX-WS simplifies the task of
developing web services using Java technology. It addresses some
of the issues in JAX-RPC 1.1 by providing support for multiple
protocols such as SOAP 1.1, SOAP 1.2, XML, and by providing
a facility for supporting additional protocols along with HTTP.
JAX-WS uses JAXB 2.0 for data binding and supports
customizations to control generated service endpoint interfaces.
With its support for annotations, JAX-WS simplifies web service
development and reduces the size of runtime JAR files.
This document takes you through the basics of using the IDE to develop a JAX-WS web service
and to consume it in three different clients—either a Java class in a Java SE application, or
a servlet or JSP page
in a web application. The three clients that you create in this document are separate applications, all
consuming the same web service.
Contents
|
|
 |
Software Needed for the Tutorial
Before you begin, you need to install the following software on your computer:
- NetBeans IDE 6.0 Web & Java EE.
- Java Standard Development Kit (JDK) version 5.0 or version 6.0.
- Glassfish V2 or Tomcat Web Server, both of which you can select from the installer
that you use to install NetBeans IDE 6.0.
Creating a Web Service
The goal of this exercise is to create a project appropriate to the deployment container that you decide to use. Once
you have a project, you will create a web service in it.
Choosing a Container
You can either deploy your web service in a web container or in an EJB container. This depends on implementation choices.
For example, if you plan to deploy to the Tomcat Web Server, which only has a web container, you should choose to create a web application,
and not an EJB module.
- Choose File > New Project (Ctrl-Shift-N). Select Web Application from
the Web category or EJB Module from the Enterprise category.
- Name the project CalculatorWSApplication.
- Depending on the deployment server that you want to use, do the following:
- For GlassFish, set the Java EE Version to Java EE 5.
- For the Tomcat Web Server, unselect the Set Source Level to 1.4 checkbox.
- Click Finish.
Creating a Web Service from a Java Class
- Right-click the CalculatorWSApplication node and
choose New > Web Service.
- Name the web service CalculatorWS, type org.me.calculator in
Package,
and click Finish.
The Projects window displays the structure of
the new web service and the visual designer is shown in the editor area. For
example, for web
applications you should now see the following:

Designing the Web Service
The goal of this exercise is to do something meaningful with the files and code
that the IDE has generated for you. You will add an operation that will add two numbers
received from a client.
Adding Business Logic to the Web Service
- Click Add Operation in the visual designer.
A dialog box appears, where you can define the new operation.
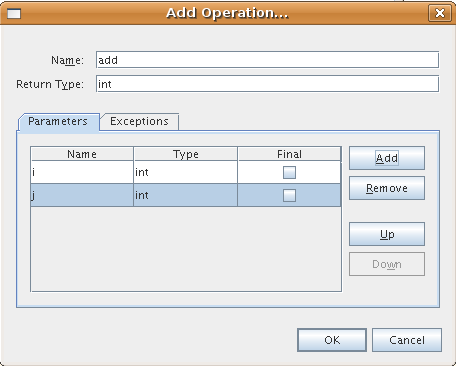
- In the upper part of the Add Operation dialog box, type add in Name and type int in
the Return Type drop-down list. In the lower part of the Add Operation dialog box, click Add and create a parameter of type int named i.
Then click Add again and create a parameter of type int called j.
You should now see the following:
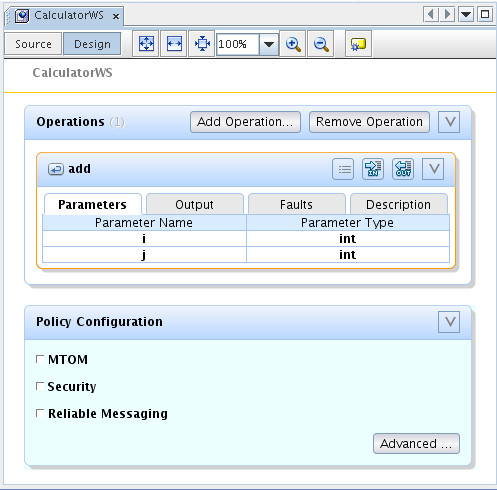
- Click OK at the bottom of the Add Operation dialog box.
The visual designer now displays the following:
- Click Source and notice that the source code that has been
generated in the previous steps is as follows:
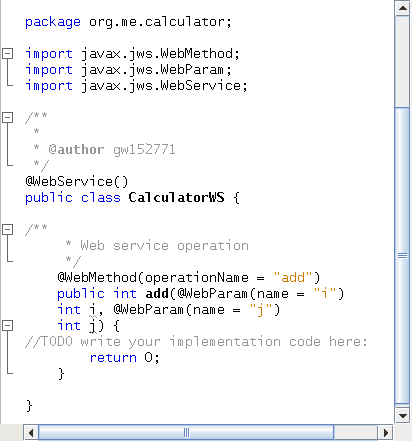
- In the editor, extend the skeleton add operation to the following (changes are in bold):
    @WebMethod
    public int add(@WebParam(name = "i") int i, @WebParam(name = "j") int j) {
        int k = i + j;
        return k;
    }
As you can see from the code above, the web service simply receives
two numbers and then returns their sum. In the next section, we use the IDE
to test our web service.
Deploying and Testing the Web Service
When you deploy a web service to a web container, the IDE lets you test the
web service to see if it functions as you expect. The Tester application, provided
by the Sun Java System Application Server, is integrated into the IDE for this purpose. For the
Tomcat Web Server, there is a similar tool. However, while the Sun Java System Application Server's
Tester page lets you enter values and test them, the Tomcat Web Server does not. In the
latter case, you can only see that the web service is deployed, you cannot test the values. No
facility for testing whether an EJB module is deployed successfully is currently available.
To test successful deployment to a web container:
- Expand the Web Services node,
right-click the node that represents
your web service, and choose Test Web Service.
The IDE starts the
application server, builds the application, and opens the tester page
in your browser, if you
deployed a web application to the Sun Java System Application Server.
For the Tomcat Web Server
and deployment of EJB modules, the situation is different:
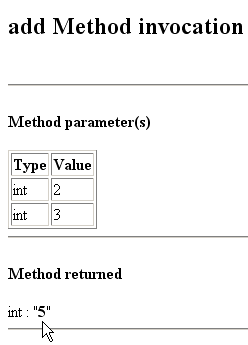
- If you deployed to the Sun Java System Application Server, type two numbers
in the tester page, as shown below:
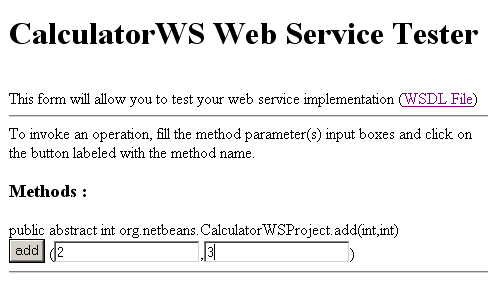
The sum of the two numbers is displayed:
- If you deployed to the Tomcat Web Server, you
will see the following instead, which indicates that you have successfully deployed your
web service:

- Right-click the project node, choose Properties, and click Run. Depending on the deployment
server that you want to use, do the following:
- For the Sun Java System Application Server, type /CalculatorWSService?Tester in the Relative URL field.
- For the Tomcat Web Server, type /CalculatorWS?Tester in the Relative URL field.
Note: Since the result of a deployed EJB module is not displayed in a browser, you cannot
take the step above if you are working with an EJB module.
Consuming the Web Service
Now that we have deployed our web service,
we need to create a client to make use of the web service's add method. Here,
we create three clients— a Java class in a Java SE application,
a servlet, and a JSP page
in a web application.
Note: A more
advanced tutorial focusing on clients is
Getting Started with JAX-WS Web Service Clients.
Client 1: Java Class in Java SE Application
In this section, we create a standard Java application. The wizard
that we use to create the application will also create a Java class.
We will then use the IDE's tools to consume the web service that we
created at the start of this tutorial.
- Choose File > New Project (Ctrl-Shift-N). Select Java Application from
the General category. Name the project CalculatorWS_Client_Application. Click Finish.
- Right-click the CalculatorWS_Client_Application node and
choose New > Web Service Client.
- In Project, click Browse. Browse to the web service that you want to consume.
When you have selected the web service, click OK.
- Type org.me.calculator.client in
Package,
and click Finish.
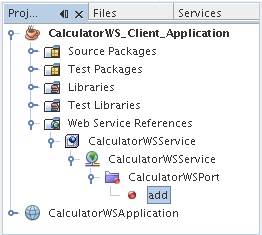
The Projects window displays the new web service client, with a node
for the add method that you created:
- Double-click Main.java so that it opens in the
Source Editor. Delete the TODO comment and then drag
the add node above into the empty line.
You should now see the following:
public static void main(String[] args) {

    try { // Call Web Service Operation
        org.me.calculator.client.CalculatorWSService service = new org.me.calculator.client.CalculatorWSService();
        org.me.calculator.client.CalculatorWS port = service.getCalculatorWSPort();
        // TODO initialize WS operation arguments here
        int i = 0;
        int j = 0;
        // TODO process result here
        int result = port.add(i, j);
        System.out.println("Result = "+result);
    } catch (Exception ex) {
        // TODO handle custom exceptions here
    }

}
Note: Alternatively, instead of dragging
the add node, you can right-click in the editor
and then choose Web Service Client Resources > Call Web Service Operation.
- Initialize the two ints, using meaningful numbers, such as 3 and 4. Just change the
values of the two ints above from 0 to some other number.
- Right-click the project node and choose Run Project.
The Output window should now show the sum:
    compile:
    run:
    Result = 7
    BUILD SUCCESSFUL (total time: 1 second)
Client 2: Servlet in Web Application
In this section, we create a new web application, after which
we create a servlet. We then use the servlet to consume the
web service that we created at the start of this tutorial.
- Choose File > New Project (Ctrl-Shift-N). Select Web Application from
the Web category. Name the project CalculatorWSServletClient.
Click Finish.
- Right-click the CalculatorWSServletClient node and
choose New > Web Service Client.
The New Web Service Client wizard appears.
- In Project, click Browse. Browse to the web service that you want to consume.
When you have selected the web service, click OK.
- In Package, type org.me.calculator.client.
You should now see the following:
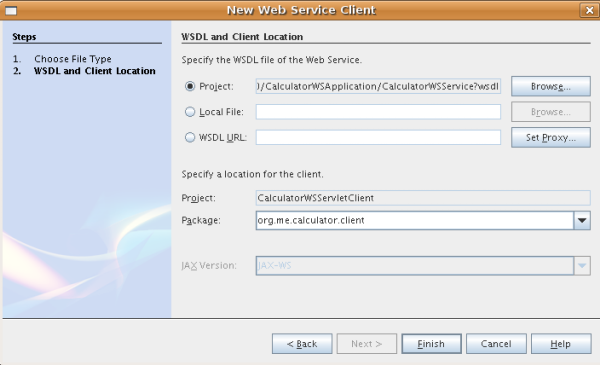
Click Finish.
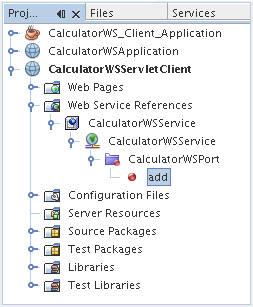
The Web Service References node in the Projects window displays
the structure of your newly created client, including
the add operation that you created earlier
in this tutorial:
- Right-click the CalculatorWSServletClient project node and choose New > Servlet. Name
the servlet ClientServlet and place it in a package called org.me.calculator.client.
Click Finish.
- To make the servlet the entry point to your application,
right-click the project node, choose Properties, click Run, and
type /ClientServlet in Relative URL. Click OK.
- In the Source Editor, remove the line that comments out the
body of the processRequest method.
This is the line:
/* TODO output your page here
Next, delete the line that ends the section of commented out code:
*/
Add some empty lines after this line:
out.println("<h1>Servlet ClientServlet at " + request.getContextPath () + "</h1>");
Now, drag the node that represents
the add operation into the space that you created.
The processRequest method now looks as
follows (the added code is in bold below):
    protected void processRequest(HttpServletRequest request, HttpServletResponse response)
    throws ServletException, IOException {
        response.setContentType("text/html;charset=UTF-8");
        PrintWriter out = response.getWriter();
        out.println("<html>");
        out.println("<head>");
        out.println("<title>Servlet ClientServlet</title>");
        out.println("</head>");
        out.println("<body>");
        out.println("<h1>Servlet ClientServlet at " + request.getContextPath () + "</h1>");

        try { // Call Web Service Operation
            org.me.calculator.client.CalculatorWS port = service.getCalculatorWSPort();
            // TODO initialize WS operation arguments here
            int i = 0;
            int j = 0;
            // TODO process result here
            int result = port.add(i, j);
            out.println("Result = "+result);
        } catch (Exception ex) {
            // TODO handle custom exceptions here
        }

        out.println("</body>");
        out.println("</html>");
        out.close();
     }
Change the value for i
and j to more meaningful numbers,
such as 3 and 4.
- Right-click the project node and choose Run Project.
The server starts, if
it wasn't running already; the application is built and deployed, and the browser
opens, displaying the calculation result, as shown below:

Client 3: JSP Page in Web Application
In this section, we create a new web application and
then consume our web service in the default JSP page
that the Web Application wizard creates.
- Choose File > New Project (Ctrl-Shift-N). Select Web Application from
the Web category. Name the project CalculatorWSJSPClient. Click Finish.
- Right-click the CalculatorWSJSPClient node and
choose New > Web Service Client.
- In Project, click Browse. Browse to the web service that you want to consume.
When you have selected the web service, click OK.
- In Package, type org.me.calculator.client.
You should now see the following:
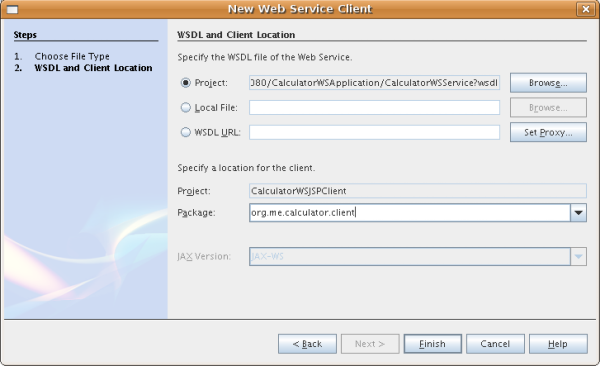
Click Finish.
The Projects window displays the new web service client,
as shown below:
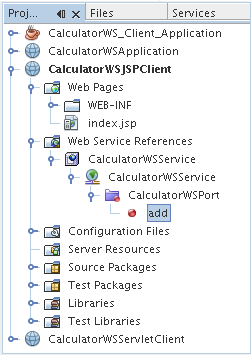
- In the Web Service References node, expand
the node that represents the web service. The add operation, which you want to
invoke from the client, is now exposed.
- Drag the add operation to the client's index.jsp page,
and drop it below the H1 tags. The code for invoking the service's operation
is now generated in the index.jsp page,
as you can see here:
<%
try {
    org.me.calculator.client.CalculatorWSService service =
        new org.me.calculator.client.CalculatorWSService();
    org.me.calculator.client.CalculatorWS port =
        service.getCalculatorWSPort();
     // TODO initialize WS operation arguments here
    int i = 0;
    int j = 0;
    // TODO process result here
    int result = port.add(i, j);
    out.println("Result = "+result);
} catch (Exception ex) {
    // TODO handle custom exceptions here
}
%>
Change the value for i
and j from 0 to more meaningful numbers,
such as 3 and 4.
- Right-click the project node and choose Run Project.
The server starts, if
it wasn't running already; the application is built and deployed, and the browser
opens, displaying the calculation result:

Next Steps
For more information about using NetBeans IDE 6.0 to develop Java EE applications, see the following resources:
To send comments and suggestions, get support, and keep informed on the latest
developments on the NetBeans IDE Java EE development features, join
the [email protected] mailing list.


