Table of Contents
Nuxeo EP is an ECM platform. That is to say that you can create, modify and share documents on the platform.
The documents available on Nuxeo EP are:
the note: a text typed in a rich editor integrated to Nuxeo EP;
the file: an attached file;
the folder: a repertory that contains several documents;
the forum: a discussion space.
The evolution of a document as contributors modify it constitutes its life cycle. This life cycle is composed of the following states:
project: the document has been created and it can be modified;
valid: the document has been approved. Modifying it makes it back to project life cycle state;
obsolete: the document is not accurate anymore and, for instance, has been replaced by a new version;
deleted: the document is not moved into the "Trash" tab of the workspace or folder.
To change the life cycle state of a document, you need to submit it to an approbation workflow.
Only users with writing or management rights can create documents.
Documents can be created in workspaces or templates only. There are two ways to create a document:
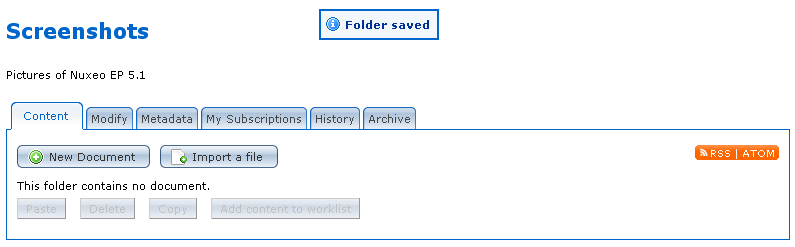
by using the buttons displayed in the “Content” tab of the workspace,

by dragging a file from your computer and dropping it into the workspace, using the Drag&Drop function. The document is then automatically created in the workspace and its title is the name of the original file.
To create documents using Drag & Drop, you need to install the extension corresponding to your browser. Extensions are available on the authentication page.
A folder is a repertory in which you can group several documents, either by creating them directly in the folder or by pasting them in it.
You can only create sub-folders and documents in a folder.
To create a folder:
In the Content tab of the workspace, click on the button.
On the page Available document types, click onFolder.
Fill in the creation form.
| Field | Description |
|---|---|
| Title | Type the name of the folder. |
| Description | Type a text explaining the purpose of the folder. |
Click on the button.
The Content tab of the folder is displayed.
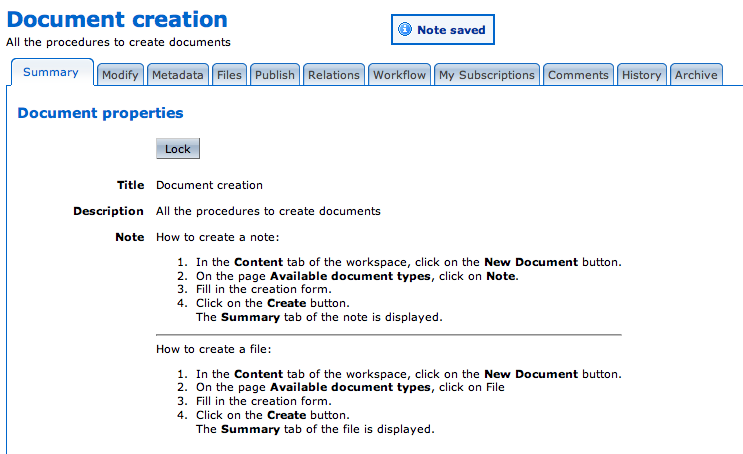
The note is a document that consists in a text displayed in the Summary tab of the document. The note is usually created using the integrated rich editor, displayed in the note creation form. This editor enables layout modifications on the text.
To create a note:
In the Content tab of the workspace, click on the button.
On the page Available document types, click on Note.
Fill in the creation form.
| Field | Description |
|---|---|
| Title | Type the note's name. |
| Description | Type a text that explains what the note is about. |
| Content | Type the text of the note in the editor displayed. |
Click on the button.
The Summary tab of the note is displayed.
You can also create a note by dragging and dropping a .txt file into the Content tab of the workspace.
A file document is composed of an attached file that you upload on the application. You can upload files of any format.
You can create a file document:
by using the button,
by using the button.
To create a file using the button:
In the Content tab of the workspace, click on the button.
On the page Available document types, click on File.
Fill in the creation form.
| Field | Description |
|---|---|
| Title | Type the document's name. |
| Description | Type a text that explains what the document is about. |
| Content | Click on the button to select the file to be uploaded. |
Click on the button.
The Summary tab of the document is displayed.
To create a file using the button:
In the Content tab of the workspace, click on the button.
Click on the button to select the file to be uploaded.
Click on the button.
The Summary tab of the document is displayed. The document automatically takes the name of the uploaded file as its title. The Description field of the document is empty. You need to modify the document to fill in this field.
You can also drag and drop a file into the Content tab of the workspace. The file is automatically uploaded on the application.
You must have at least restricted reading rights in a space to read the documents.
You can access documents directly in the workspace or section or from your dashboard.
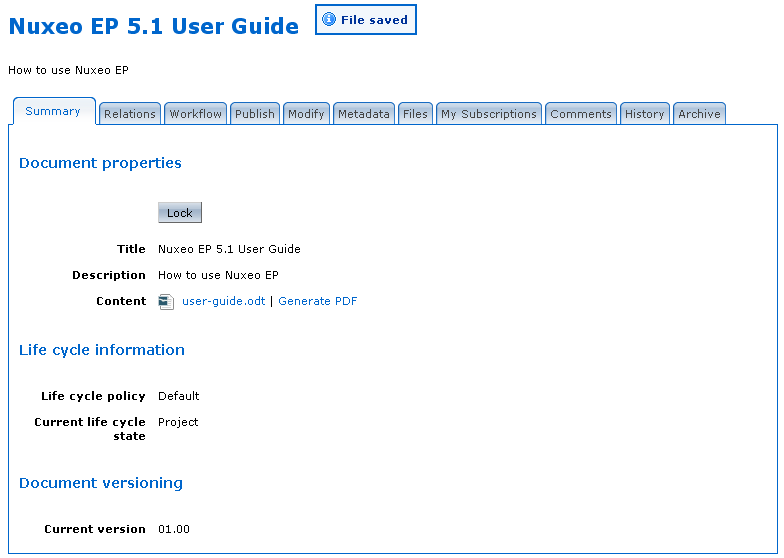
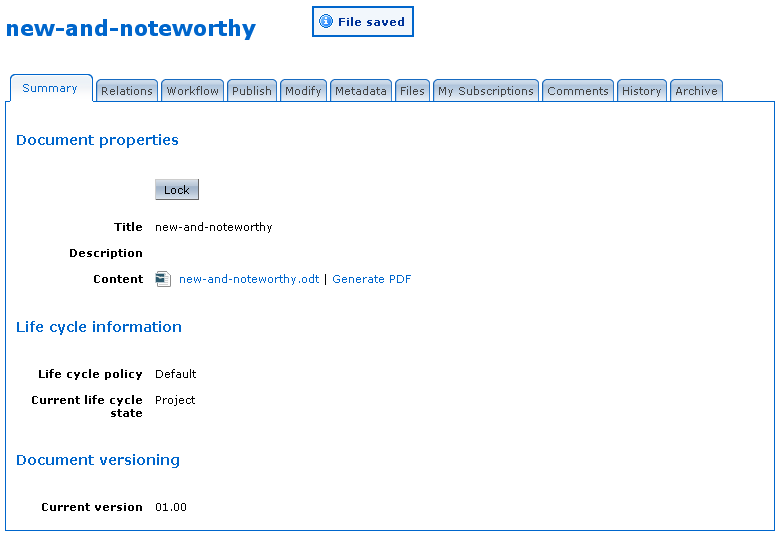
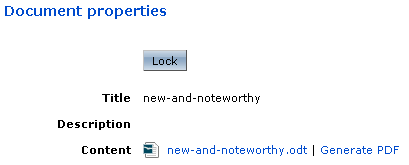
To read a document, click on its title. The document's Summary tab is displayed.
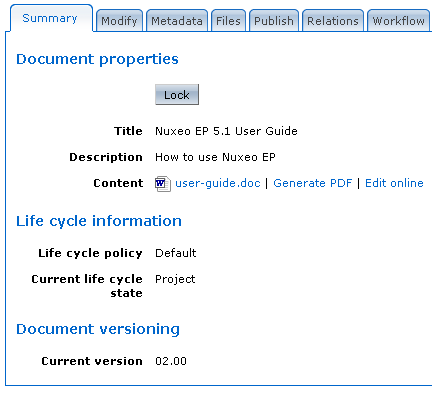
You can preview the file documents. This enables you to consult the attached file directly from the application. Thus, you do not need to save the file on your computer to read it. Previewing the file automatically creates a PDF copy of the file, that is open in your browser.
To preview the attached file of a document, click on the Generate PDF link located in the document's Summary tab.
Only users with writing or management rights can modify documents.
Documents can be modified in workspaces only. There are several ways to modify a document. You can edit:
the document's content,
the document's metadata,
several documents simultaneously.
Document modification means modifying or changing the attached file of a file document, modifying the text of a note, or simply editing the title or the description of the document.
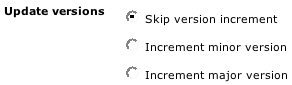
Every time you modify a document, you have to determine how the version number is updated. Indeed, each document has a version number, which is a piece of information about the evolution of the document. A version number (VV.vv) is composed of a major version number (VV) and a minor version number (vv). When a document is created, its version number is 01.00. Major version increment is reserved to significant modifications. Minor version increment is used for secondary changes.
To modify a document:
Click on the Modify tab of the document.
In the modification form displayed, type your modifications.
The fields of the modification form are the same as in the creation form.Indicate if you want to update the document's version.
Click on the button.
The document's Summary tab is displayed.
You can edit the attached file of a document directly from the application. Indeed, Nuxeo LiveEdit is a component that enables you to modify the file and save the modifications without saving the file on your computer and uploading it again on the application.
To modify a file online, you need to install Nuxeo LiveEdit on your computer. You can download Nuxeo LiveEdit from the identification page of the application.
To edit a file online:
In the Summary tab of the file document, click on the Edit online link displayed next to the file's name.
A browser window pops up.
In the pop-up window, select Open and select the Nuxeo LiveEdit program to open the file.
The file opens in the appropriate editing application, for instance MS Word for a .doc file.
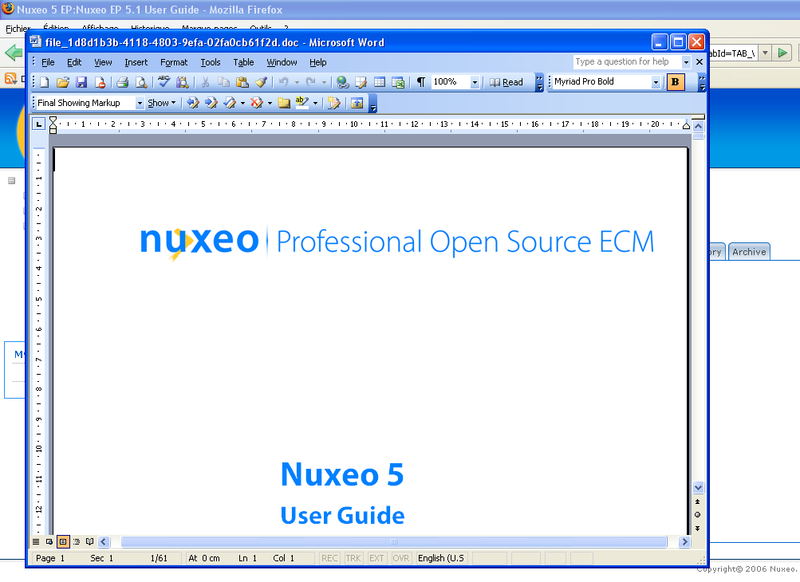
Modify the file.
When done, close the editing application.
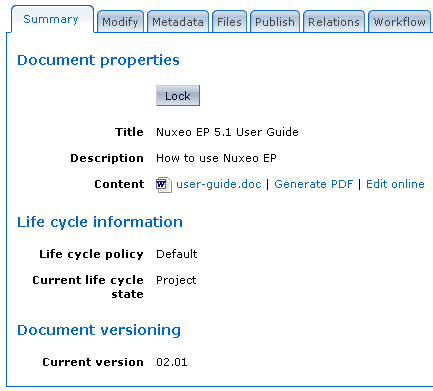
A window pops up.
Indicate if you want to save the modifications and update the document's version.
The modified file is automatically uploaded on the Nuxeo EP application. A pop-up window indicates that the modifications were saved.
The document version is incremented as you indicated.
Metadata are informations describing certain properties of the document, so that it is more accurately referenced. Some metadata are automatically filled in by the system, but most of them need to filled in by users. When you create a document, its metadata are empty.
Modifying the document's metadata does not update the version number.
To edit the metadata of a document:
Click on the Metadata tab of the document.
Edit the metadata modification form.
| Field | Description |
|---|---|
| Subjects | Topic of the document. TipHold down CTRL key and click to select several subjects. |
| Rights | Informations about the reproduction rights of the document. Rights informations often encompass Intellectual Property Rights and Copyright. |
| Source | The references of the resource from which the document content is derived (totally or partially). |
| Coverage | Informations about the scope of the content of the document. It can either be a spatial location, a temporal period or a jurisdiction. |
| Created at | Date automatically filled in by the system when the document is created. |
| Last modified at | Date automatically filled in by the system when the document is modified. |
| Format | Format of the file attached. |
| Language | Language used in the document. |
| Expire on | Date at which the document stops being valid.
Click on the button |
| Owner | User who created the document. This field is automatically filled in by the system. |
| Contributors | Users who modify the document. This field is automatically filled in by the system. |
Click on the button.
The document's Summary tab is displayed.
If you need to modify several documents, you can use the worklist to modify them in one single manipulation, instead of modifying them one after the other. Bulk modification is available when the selected documents are of the same type.
To modify several documents at the same time:
Check the boxes corresponding to the documents you want to modify.
Click on the button.
The documents are displayed in your worklist.
In your worklist, click on the Edit documents link.
In the modification form, select the fields you want to modify by checking the corresponding boxes.
For each selected field, select the content to modify and type the new content of the field.

| Label | Description |
|---|---|
| Empty | Only the document whose field is empty will get the modification. |
| All | All the documents will get the modification. |
Click on the button.
The Edit common fields for documents page summarizes the documents and fields that will be modified.

Uncheck Unselect saved documents box if you want the selected documents to remain selected in the workspace or folder.
Click on the button.
The documents are modified and the message Documents updated is displayed for a few seconds.
You can attach files to any document type. Theses attached files are intended to bring complementary informations about the document.
Only users with writing or management rights can attach files to a document.
Click on the Files tab.
Click on the Add new attached file link.
Click on the button and select the file to be uploaded.
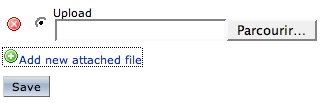
Click on the button.
The Summary tab is displayed.
You must have at least restricted reading rights to consult the attached files of a document.
To consult the attached files of a document:
Click on the Files tab.
The attached files are displayed as links.
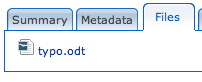
Click on the file you want to consult.
A window pops up.
Select if you want to open the file or save it on your computer.
Only users with writing or management rights can modify the attached files of a document.
To modify an attached file, you need to save it on your computer. When you have modified it, you can replace the file by your modified version.
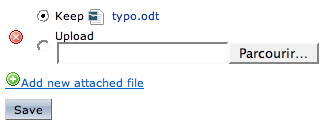
To replace a file by another one:
Click on the Files tab.
Check the button.
Click on the button and select the file to be uploaded.
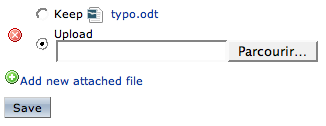
Click on the button.
The new file is uploaded on the application and the Summary tab is displayed.
Only users with writing or management rights can remove the attached files of a document.
When you remove an attached file from the application, it is erased. You cannot cancel the file removing.
To delete an attached file:
Click on the Files tab.
Click on the  icon corresponding to the file you
want to remove.
icon corresponding to the file you
want to remove.
The file is removed.
Only users with writing or management rights can copy documents.
When you copy a document, it is placed in the clipboard.
The pasted document has the same life cycle state as the original document. However, it has its own version number and history.
You can copy a document from a domain and paste in another one.
To copy a document:
In the Content tab of the workspace, check the box in front of the document's name.
Click on the button.
The document's name appears in the clipboard on the left column of the page and the button in the Content tab of the workspace is now active.
Go to the workspace where you want to paste the document.
You can only paste a document in a workspace in which you have writing or management rights.
There are two ways to paste the document:
Click on the button located in the destination workspace.
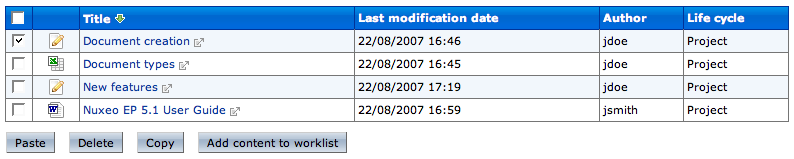
The document is displayed in the content list of the workspace.
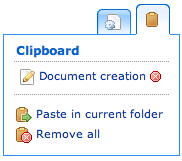
Click on the clipboard's Paste in current folder link.
The document is displayed in the content list of the workspace.
When you paste the document, it is not removed from clipboard.
All users have a clipboard and a worklist.
The clipboard and the worklist are two functionalities that enable you to see documents that you have selected and reserved to paste in another workspace or to modify.
The clipboard is just meant to store copied documents to be pasted in another workspace. If you copy a first document and then copy a new document before you have pasted the first one, the second copied document replaces the first one in the clipboard.
The clipboard can store several documents if you copy them at the same time.
The worklist enables you to reserve several documents from different workspaces, to export them or modify them all at the same time.
To add content to clipboard, you need to copy a document.
When the copied document has been pasted, you can remove it from the clipboard. To remove a document from the clipboard, click on the Remove all link in the clipboard.
If you have copied several documents, you can remove one document
independently from the others by clicking on the
icon located in front of the document's
name in the clipboard.
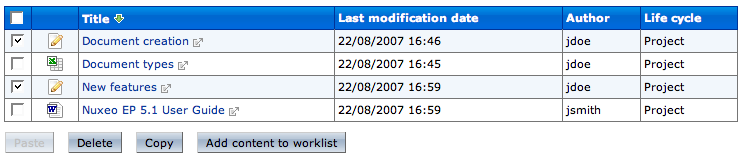
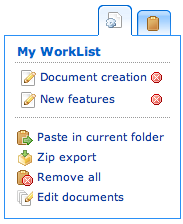
The worklist enables you to select and reserve several documents. You can then:
paste the documents in a workspace or a folder,
export the documents on your computer in a single ZIP folder,
modify all the reserved documents at the same time.
To add a document to your worklist:
Check the box in front of the document's name.
You can select several documents to add several documents at the same time.
Click on the button.
The document's name appears in the worklist on the left column of the page.
To paste the worklist content, click on the Paste in current folder link in the worklist. The documents are pasted in the current workspace.
You can export your worklist as a ZIP folder to work on the documents on your computer.
To export your worklist, click on the Zip export link in the worklist.
You can remove all the documents from your worklist in a single click, or you can remove only some documents from it.
To remove all the documents, click on the Remove all link in your worklist.
To remove one document from your worklist, click on the
icon displayed before the document's
name.
You must have at least restricted reading or reading rights to consult the history of documents.
All the actions that are done on the document are registered in the document's history, with several informations, such as the date and time, the user, the comment, etc.

To consult the document's history, click on the History tab.
All users can consult the previous versions of a document.
Every time you modify a document, the previous version is automatically archived by the system. Thus, the modifications do not erase the original version of the document.
The archived versions are listed below the Event log in the History tab.
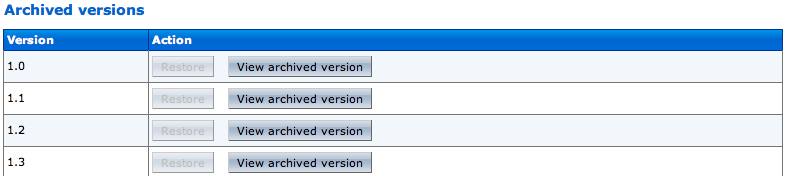
To consult a previous version of a document, click on the button corresponding to the chosen version. The archived version opens.
Archived versions have few actions available: you can only create relations from it to another document and subscribe to notifications.
Only users with writing or management rights can restore the previous version of a document.
Restoring an archived version means making it the current version of the document. The modifications done since that version are thus not taken into account anymore.
To restore an archived version, click on the button corresponding to the chosen version. The document is displayed as it was for the chosen version.

Only users with writing or management rights can delete documents from a space.
When you delete a document, it is moved into the space's or folder's Trash tab. Thus, deletion is not permanent and the space's manager can restore documents if they shouldn't have been deleted.
The trash tab is displayed to users with management rights.
Deleting a document occurs in two times:
A user moves a document to trash.
The manager of the space deletes the document permanently.
There are two ways to move a document into the Trash tab:
Deleting it from the workspace content table,
submitting the document to an approbation workflow, with the destination lifecycle state deleted.
If you are sure that the document is to be deleted, you can delete it from the workspace's content table. However, if you want the deletion to be approved before, you need to submit it to an approbation workflow and specify that the destination life cycle is deleted. When the workflow is ended and the deletion approved, the document is automatically moved into the Trash tab of the document.
To delete a document from the Content tab of the workspace:
In the Content tab of the workspace, check the box in front of the document's name.
Click on the button.
On the window that pops up, click on the button.
The document is moved to the Trash tab of the workspace and does not appear in the workspace's content list.
The trash tab is displayed to users with management rights.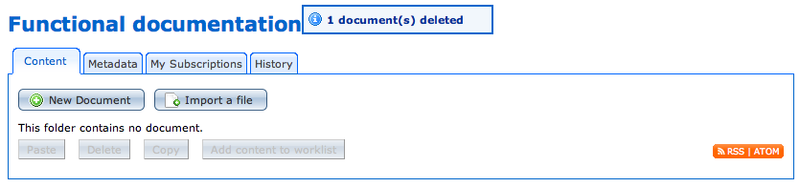
Only the users with management rights can delete a document permanently.
When they are deleted by users with writing rights, documents are moved into the Trash tab of workspaces or folders. They are not erased from the application and can still be restored.
To delete a document permanently, you need to delete it from the Trash tab:
Go on the Trash tab of the workspace.
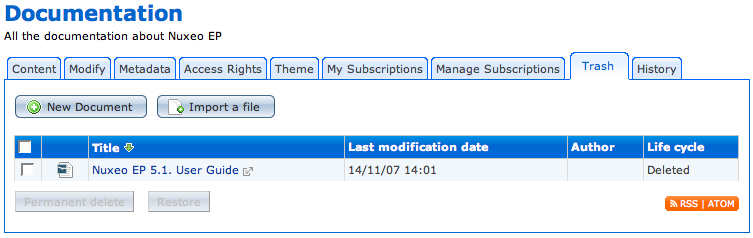
Check the box in front of the document's name.
Click on the button.
On the window that pops up, click on the button.
The document is permanently erased from the application. It cannot be restored.
The relations toward the deleted document are updated and are displayed as a URI relation
Only the users with management rights can delete a document permanently.
When they are deleted by users with writing rights, documents are moved into the Trash tab of workspaces or folders. They are not erased from the application and can still be restored, that is to say moved back into the Content tab of the workspace.
To restore a document:
Go on the Trash tab of the workspace.
Check the box in front of the document's name.
Click on the button.
On the window that pops up, click on the button.
The document is move back into the Content tab of the workspace. It goes back to the project life cycle state, enven if its life cycle state before deletion was approved or obsolete.
Relations are informations that connect the application's documents with other documents or external resources. Documents are thus part of a coherent and organized structure.
Available relations are:
reference relation (references, is referenced by),
basis relation (is based on, is base for),
replacement relation (replaces, is replaced by),
requirement relation (requires, is required by),
compliance relation (conforms to, has conform).
You can create relations between documents from different workspaces or domains.
Only users with writing or management rights can add relations on a document.
You can create a relation from a document to:
another document on the application,
an external document,
a text.
To create a relation:
Click on the Relations tab of the document.
Click on the Add a new relation link.
The relation creation form is displayed under the link.
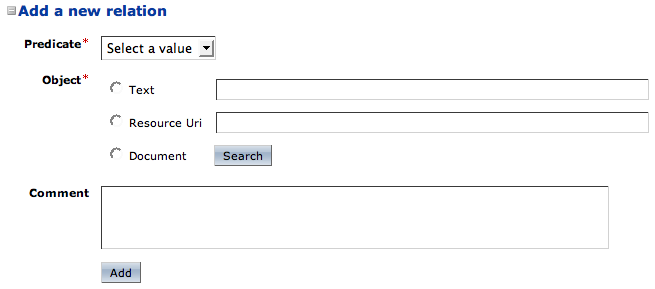
Fill in the creation form.
| Field | Description |
|---|---|
| Predicate | Select the type of relation. |
| Object | Select the target of the relation:
|
| Comment | Type a comment to add details on the relation. |
Click on the button.
The relation is displayed as an outgoing relation, under the relation creation form.

An incoming relation is automatically created in the target document's Relations tab, that directs to the source document of the relation.

All users that can read the document can consult its relations.
When you consult the relations of a document, relations are sorted into outgoing and incoming relations. Outgoing relations are relations that were created from the current document. Incoming relations are relations which were created from another document and whose object is the current document.
To consult the relations of a document, click on the Relations tab of the document. The outgoing and incoming relations are displayed under the Add a new relation link.
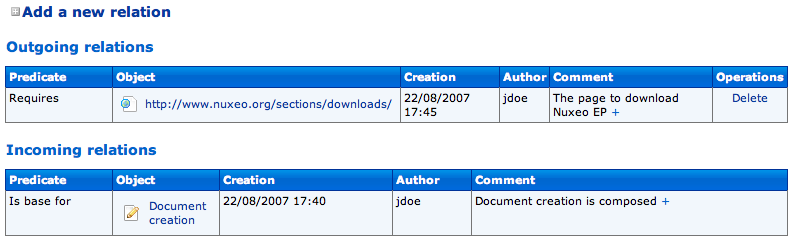
The objects of the relation are hyperlinks. Click on the object's name to consult it.
Only users with writing or management rights can delete the relations of a document.
You can delete outgoing relations only.
To delete a relation:
Click on the Relations tab of the document.
click on the Delete link corresponding to the relation.
The relation is deleted and does not appear in the table anymore. It is also removed from the incoming relations of the target document.
All the documents evolve according to a determined life cycle. This life cycle is composed of the following states: project, valid, obsolete and deleted. To change the document's life cycle state, you have to submit it to an approbation workflow.
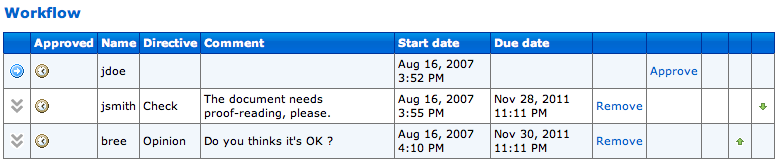
A workflow is a process to approve a document. It determines a chain of users who review and approve or reject the document.
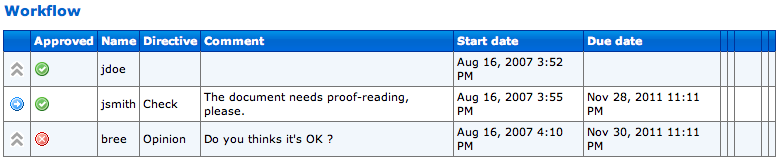
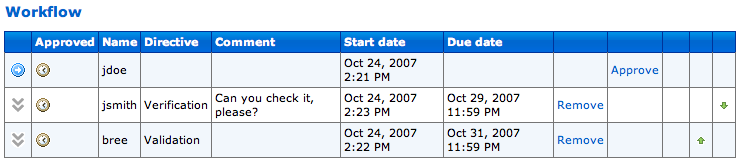
When a document is submitted to a workflow, the users that participate to the workflow have an indication of what they need to do on the document. This is the directive. To end the workflow, all the workflow participants must approve the document. Then, the workflow is automatically ended and the document gets into the specified life cycle state.
There are three types of workflow:
serial workflow,
parallel workflow,
approbation workflow.
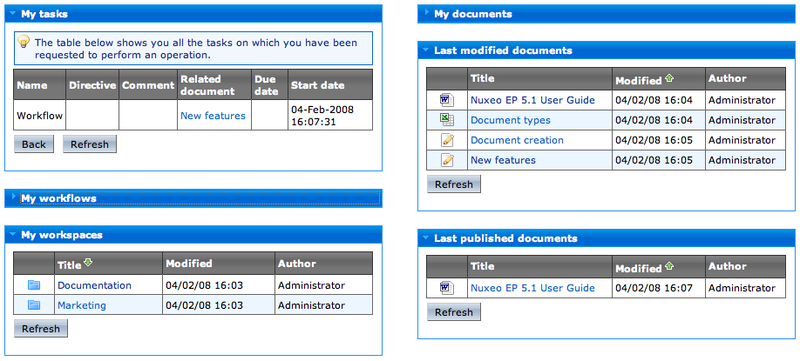
To see the workflows they participate to, users use a dashboard that shows them all the documents they have to review.
Every user on the application has a dashboard that displays the documents he or she has to review. It also displays the list of the documents that he or she has created and the list of the last modified documents of the domain.
You can access your dashboard from any page of the application. To consult your dashboard, click on the Dashboard link in the top right corner of the page.
In your dashboard, click on a document's name to open and read it.
Click on the frames name to fold or unfold them.
A serial workflow is an ordered workflow that does not make the document's life cycle state change. The workflow participants must approve or reject the document one after the other.
Only users with writing or management rights can start a serial workflow.
When you start a workflow, you define several parameters such as the modification possibilities.
To start a serial workflow:
Click on the Workflow tab of the document.
Fill in the form.
| Field | Description |
|---|---|
| Workflow type | Select Serial workflow. |
| Modification | Select if you want to allow modifications on the document during the workflow or not. |
Click on the button.
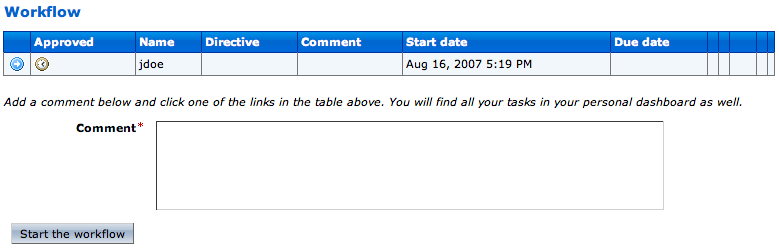
You are automatically declared as the first participant.
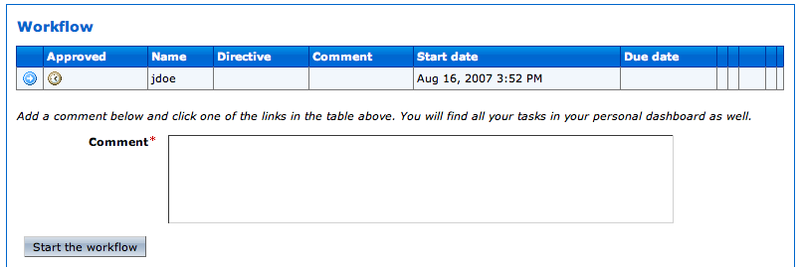
Add users on the workflow.
Click on the button to be able to approve the document and let the other participants consult it.
The link Approve is displayed so you can pass the document to the next participant.
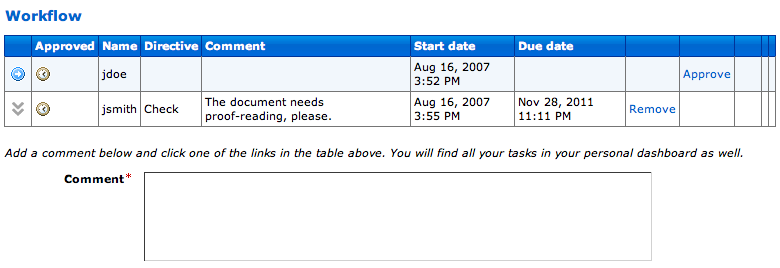
When the workflow is created, there is only one participant: the workflow initiator. He or she needs to add users to participate to the workflow. Indeed, a workflow must have at least two participants.
Only the workflow initiator and the current participant can add participants on a workflow.
Participants can add new users on the workflow as long as they are the current participant. They can only add users right under the current participant. They can afterwards modify the order of participants.
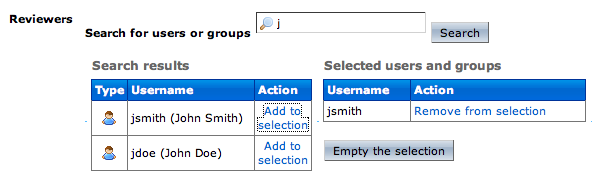
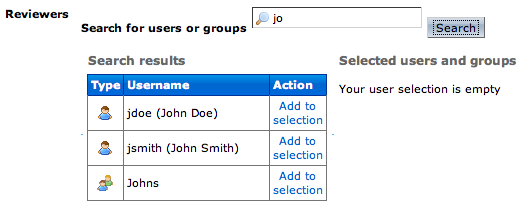
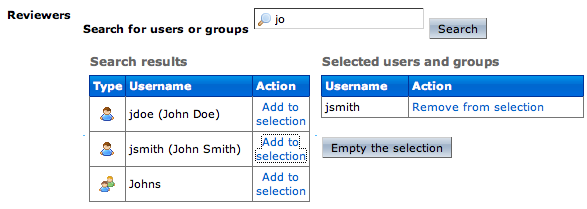
To add a user on the workflow:
Click on the Workflow tab of the document.
The workflow is displayed, with a form to add participants.
In the Select reviewers form, type the name of a user or a group and click on the button.
The usernames corresponding to the search criteria are displayed.
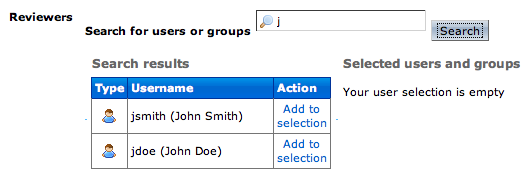
Select the level at which the new participant must be inserted in the workflow.

Click on the Add to selection link corresponding to the user you want to add on the workflow.
The selected users are displayed in the Selected users and groups column.
Fill in the other fields of the form.
| Field | Description |
|---|---|
| Directive | Select a directive in the list. |
| Due Date | Click on the  button to choose the
date at which the participant must have approved or
rejected the document. button to choose the
date at which the participant must have approved or
rejected the document. |
| Comment | Type a comment explaining to the participant what he or she has to do on the document. |
Click on the button.
The new participant appears at right below the current participant.
Only the current participant and the workflow initiator can delete users from the workflow.
To remove users from the workflow participants, click on the Remove link corresponding to the participant to remove in the workflow table. The removed user is not a workflow participant anymore and can only read the document.
The documents in a workflow to which you participate are displayed in you dashboard. They are listed in the My tasks table only when you are the current participant of the workflow.
To approve a document:
Click on the Workflow tab of the document.
In the Workflow section of the page, type a comment in the Comment field.
Click on the Approve link in the workflow table.
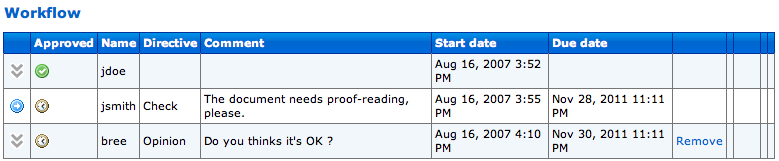
If you are not the current participant, there is no link displayed.The icon ![]() indicates that you approved the document.
You cannot add or remove participants, unless you are the workflow
initiator.
indicates that you approved the document.
You cannot add or remove participants, unless you are the workflow
initiator.
The icon ![]() indicates that the next
participant becomes the current participant.
indicates that the next
participant becomes the current participant.
To reject a document:
Click on the Workflow tab of the document.
In the Workflow section of the page, type a comment in the Comment field.
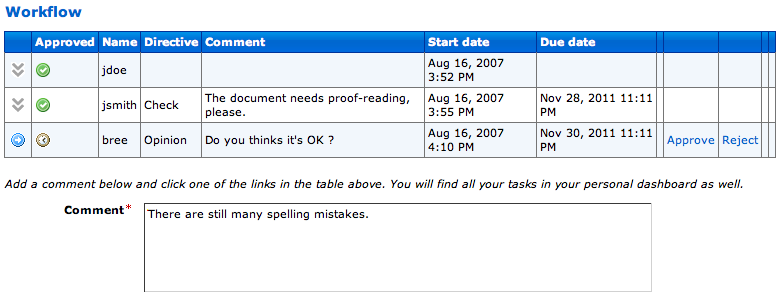
Click on the Reject link in the workflow table.
The icon ![]() is displayed in front of your name to
indicate that you have rejected the document.
is displayed in front of your name to
indicate that you have rejected the document.
The previous participant becomes the current participant. He or she needs to modify the document and approve it again so that you can review it again and approve it.
A parallel workflow is an unordered workflow that does not make the document's life cycle state change. Workflow participants can approve or reject the document as soon as they are declared on the workflow.
Only users with writing or management rights can start a parallel workflow.
When you start a workflow, you define several parameters such the modification possibilities.
To start a parallel workflow:
Click on the Workflow tab of the document.
Fill in the form Start a workflow.
| Field | Description |
|---|---|
| Workflow type | Select Parallel workflow. |
| Modification | Select if you want to allow modifications on the document during the workflow or not. |
Click on the button.
You are not automatically declared as a participant of the workflow. If you want to participate to the workflow, you need to add yourself as a participant.
Add users on the workflow.
Click on the button to let participants approve or reject the document.
When you create a parallel workflow, there is no participant on the workflow.
The workflow initiator and all the participants can add users on the workflow.
Participants can add new users as soon as the workflow is started and as long as they have not approved the document. As soon as they approve it, they cannot manage the workflow participants anymore.
To add a participant:
Click on the Workflow tab of the document.
The workflow is displayed, with a form to add participants.
In the Select reviewers form, type the name of a user or a group and click on the Search button.
The usernames corresponding to the search criteria are displayed.
Click on the Add to selection link corresponding to the user you want add on the workflow.

Fill in the other fields of the form.
| Field | Description |
|---|---|
| Directive | Select a directive in the list. |
| Due Date | Click on the button to choose the
date at which the participant must have approved or
rejected the document. |
| Comment | Type a comment explaining to the participant what he or she has to do on the document. |
Click on the button.
The new participant is added below the current participant.

The workflow initiator and all the participants can delete participants.
You can delete participants as long as you have not approved the document. As soon as you approve it, you cannot manage the workflow participants anymore. The workflow initiator does not need to participate to the workflow or to be the current participant to remove users from the workflow.
To delete a participant:
Click on the Workflow tab of the document.
In the Workflow section of the page, type a comment in the Comment field.
Click on the Remove link corresponding the participant you want to delete in the workflow table.
The participant is deleted. He or she cannot participate to the workflow anymore and can only read the document.
The participants of a parallel workflow can approve the document at any time.
To approve a document under workflow:
Click on the Workflow tab of the document.
In the Workflow section of the page, type a comment in the Comment field.
Click on the Approve link in the workflow table.
The icon ![]() is displayed in front of your name to
indicate that you approved the document. You cannot manage the
workflow participants anymore.
is displayed in front of your name to
indicate that you approved the document. You cannot manage the
workflow participants anymore.

The participants of a parallel workflow can reject the document at any time.
To reject a document:
Click on the Workflow tab of the document.
In the Workflow section of the page, type a comment in the Comment field.
Comment is mandatory to reject a document.Click on the Reject link in the workflow table.
The icon ![]() is displayed in front of your name to
indicate that you have rejected the document. You must then modify
the document or have it modified until you are satisfied with it
and approve it.
is displayed in front of your name to
indicate that you have rejected the document. You must then modify
the document or have it modified until you are satisfied with it
and approve it.

An approbation workflow is an ordered workflow that makes the document's life cycle state change. Workflow participants must approve or reject the document one after the other.
When the document is modified during an approbation workflow, it automatically goes back to the workflow initiator so that he or she approves the modifications.
Only users with writing or management rights can start an approbation workflow.
When you start an approbation workflow, you define several parameters such as the outgoing life cycle state or the modification possibilities.
To start an approbation workflow:
Click on the Workflow tab of the document.
Fill in the form Start a workflow.
| Field | Description |
|---|---|
| Workflow type | Select Approbation workflow. |
| Destination life cycle state after workflow | Select the output life cycle state of the document. |
| Modification | Select if you want to allow modifications on the document during the workflow or not. |
Click on the button.
You are automatically declared as the workflow's first participant.
Add users on the workflow.
Click on the button to approve the document ans let the other participants consult it.
The link Approve is displayed so you can pass the document to the next participant.

When the workflow is started, there is only one participant: the workflow initiator. He or she needs to add users to participate to the workflow. Indeed, a workflow must have at least two participants.
The workflow initiator can manage participants all along the workflow process.
Only the workflow initiator and the current participant can add participants on a workflow.
Participants can add new users on the workflow as long as they are the current participant.
To add a participant:
Click on the Workflow tab of the document.
The workflow is displayed, with a form to add participants.
In the Select reviewers form, type the name of a user or a group and click on the button.
The usernames corresponding to the search criteria are displayed.
Click on the Add to selection link corresponding to the user you want to participate to the workflow.
Fill in the other fields of the form.
| Field | Description |
|---|---|
| Insertion level | Select at which level the new participant must be inserted:
|
| Directive | Select a directive in the list. |
| Due Date | Click on the button to choose the
date at which the participant must have approved or
rejected the document. |
| Comment | Type a comment explaining to the participant what he or she has to do on the document. |
Click on the button.
The new participant is added below the current participant.
Only the workflow initiator and the current participant can remove users from the workflow.
To remove users from the workflow, click on the Remove link corresponding to the participant to remove in the workflow table. The removed user is not a workflow participant anymore and can only read the document.
When you consult your dashboard, you see the documents you have to review. You see the documents and can approve them only when you are the current participant.
To approve a document:
Click on the Workflow tab of the document.
In the Workflow section of the page, type a comment in the Comment field.
Click on the Approve link in the workflow table.
The icon ![]() indicates that you have approved the
document. You cannot add or remove participants, unless you are
the workflow initiator.
indicates that you have approved the
document. You cannot add or remove participants, unless you are
the workflow initiator.
The icon ![]() indicates that the next
participant becomes the current participant.
indicates that the next
participant becomes the current participant.

You can only reject the document when you the current participant.
To reject a document:
Click on the Workflow tab of the document.
In the Workflow section of the page, type a comment in the Comment field.
Comment is mandatory to reject the document.Click on the Reject link in the workflow table.
The icon ![]() is displayed in front of your name to
indicate that you have rejected the document.
is displayed in front of your name to
indicate that you have rejected the document.
The previous participant becomes the current participant. He or she needs to modify the document and approve it again so that you can review it again and approve it.

The workflow initiator is the only user who can abandon a workflow.
Abandoning a workflow means canceling it. When you abandon a workflow, the life cycle state of the document does not change. The modifications made on the document during the workflow are not deleted.
The abandon process is the same for the three different workflows.
To abandon a workflow:
Click on the Workflow tab of the document.
In the Abandon workflow section of the page, type a comment in the Comment field.
Comment is mandatory to abandon a workflow.Click on the button.
The workflow is canceled. The life cycle state of the document does not change and the modifications done during the workflow are saved.
When you are susceptible to submit different documents to the same users in a workflow, you can save the reviewers list into a participants list. Then, when you want to submit a document to these users, you just have to load the participants list in the workflow and don't need to add the participants one by one.
Only the workflow initiator can save the reviewers list into a participants list.
When you save a participants list, it is saved with its due dates, directives and comments. Then, when you reuse it, it is loaded with all these properties.
To save a participants list:
Add users on the workflow.
In the Participants management frame, type a name for the new list.
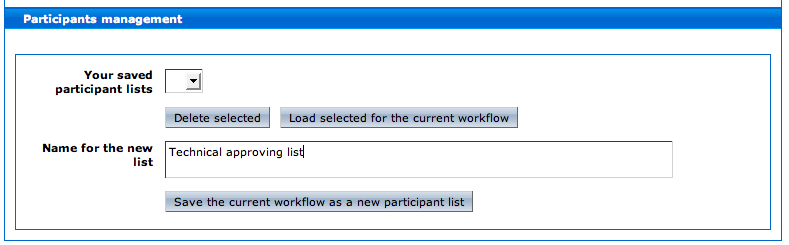
Click on the button.
The list is available in your saved participant lists.
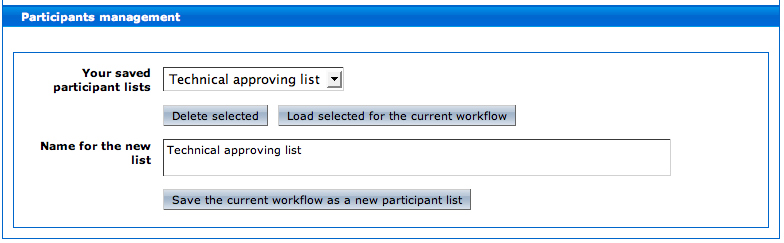
The participant lists are only available for the user who saved them. Only the workflow initiator can use a participant list on the workflow.
You can use your participant lists on the same workflow type as the original reviewer list. That is to say that if you save a list from a parallel workflow, you will only be able to use it on parallel workflows. Only the lists corresponding to the current workflow type are available in the saved participant lists drop down list.
To use a participant list:
Select the list you want to load on the current workflow.
Click on the button.
The participant list is displayed in the Workflow section of the page. It has the directives, due dates and comments defined on the original workflow of the list.
Only the user who saved the participant list can delete it.
When you delete a participant list from your saved lists, it is permanently erased. You cannot reuse it on later workflows.
To delete a saved participant list :
Select the list you want to delete in the saved lists drop down list.
Click on the button.
The list is permanently erased.