Pre-requisitos
Before starting, make sure you have the following:
- An IoT Box
- A 2A Power adapter with pi 3 b+ 2.5 A
Una computadora o tableta con un navegador web actualizado a la fecha
- A running SaaS or Odoo instance with the Point of Sale and IoT apps installed
- A local network setup with DHCP (this is the default setting)
- An Epson USB TM-T20 Printer or another ESC/POS compatible printer (officially supported printers are listed at the POS Hardware page)
Un Escáner de código de barras USB Honeywell Eclipse u otro escáner compatible
Un cajón de dinero Epson compatible
- An RJ45 Ethernet Cable (optional, WiFi is built in)
Configurar
To connect hardware to the PoS, the first step is to connect an IoT Box to your database. For this, follow this documentation.
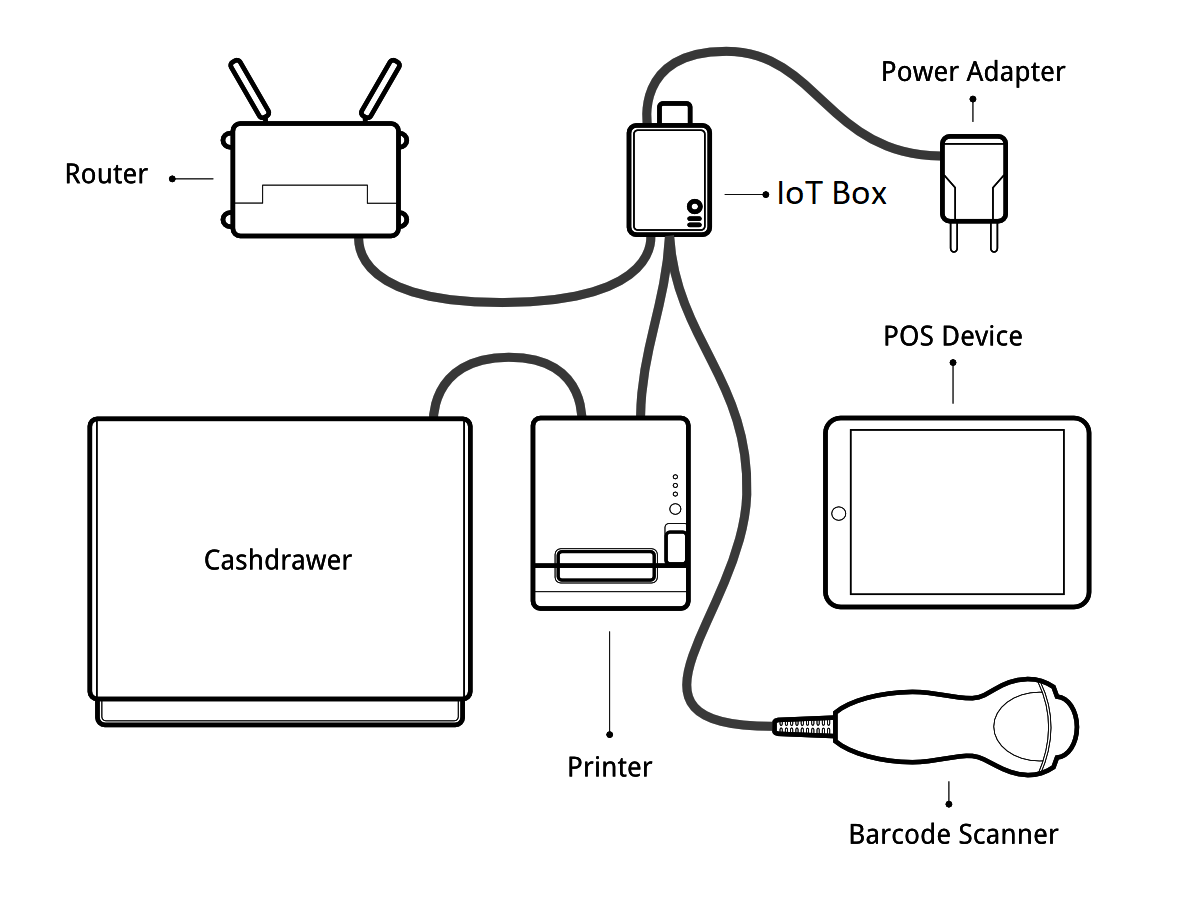
Then, you have to connect the peripheral devices to your IoT Box.
Officially supported hardware is listed on the POS Hardware page, but other hardware might work as well.
Impresora: Conectar una impresora ESC/POS a un puerto USB y encenderla.
Cajón de dinero: El cajón de dinero debe conectarse a la impresora con un cable RJ25.
Escáner de código de barras: Conecte el escáner de código de barras. Para que se escáner sea compatible, debe comportarse como un teclado y debe ser configurado en US QWERTY. También debe poner fin a los códigos de barras con una tecla ENTER (código clave 28). Esto es más probable en la configuración por defecto de su escáner.
Escala: Conecte su escala y enciéndala.
- Ethernet: If you do not wish to use Wi-Fi, plug in the Ethernet cable. Make sure this will connect the IoT Box to the same network as your POS device.
- Wi-Fi: The current version of the IoT Box has Wi-Fi built in. Make sure not to plug in an Ethernet cable when booting, because all Wi-Fi functionality will be bypassed when a wired network connection is available on boot.
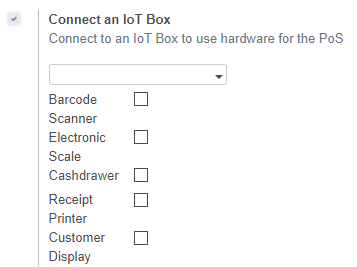
Once it's done, you can connect the IoT Box to your PoS. For this, go in Point of Sale > Configuration > PoS, tick the box "IoT Box" and select the IoT Box you want to connect with. Save the changes.
Set up is done, you can launch a new PoS Session.
Solución de problemas
The PoS cannot connect to the IoT Box
- The easiest way to make sure the IoT Box is properly set-up is to turn it on with the printer plugged in as it will print a receipt indicating any error if encountered or the IoT Box's IP address in case of success. If no receipt is printed, check the following steps:
- Make sure the IoT Box is powered on, indicated by a brightly lit red status LED.
- Make sure the IoT Box is ready, this is indicated by a brightly lit green status LED just next to the red power status LED. The IoT Box should be ready ~2 minutes after it is started.
- Make sure the IoT Box is connected to the same network as your POS device. Both the device and the IoT Box should be visible in the list of connected devices on your network router.
- If you specified the IoT Box's IP address in the configuration, make sure it corresponds to the ip address printed on the IoT Box's status receipt.
Asegúrese que el PdV no está cargado sobre HTTPS.
- A bug in Firefox's HTTP implementation might prevent the autodiscovery from working reliably. You could also manually set up the IoT Box's IP address in the POS configuration.
El escáner de código de barra no está funcionando
El escáner de código de barras se debe configurar en los Estados Unidos QWERTY y emite un Enter después de cada código de barras. Esta es la configuración por defecto de la mayoría de los lectores de códigos de barras. Consulte la documentación del lector de código de barras para obtener más información.
- The IoT Box needs a 2A power supply to work with some barcode scanners. If you are not using the provided power supply, make sure the one you use has enough power.
Algunos escáneres de códigos de barras necesitarán más de 2A y no funcionarán, o funcionan poco fiable, incluso con la fuente de alimentación proporcionada. En estos casos usted puede conectar el escáner de código de barras en un concentrador USB con alimentación propia.
- Some poorly built barcode scanners do not advertise themselves as barcode scanners but as a usb keyboard instead, and will not be recognized by the IoT Box.
El escáner de código de barra no está funcionando de manera segura
- Make sure that no more than one device with 'Scan via Proxy'/'Barcode Scanner' enabled are connected to the IoT Box at the same time.
Impresión del recibo tarda demasiado tiempo
- A small delay before the first print is expected, as the IoT Box will do some preprocessing to speed up the next printings. If you suffer delays afterwards it is most likely due to poor network connection between the POS and the IoT Box.
Algunos caracteres no se imprimen correctamente en el recibo
- The IoT Box does not support all languages and characters. It currently supports Latin and Cyrillic based scripts, with basic Japanese support.
La impresora está fuera de línea
Asegúrese de que la impresora esté conectada, funcionando, debe de tener suficiente papel y tener su tapa cerrada, y que no informe error. Si el error persiste, póngase en contacto con soporte.
El cajón de dinero no abre
El cajón de dinero debe estar conectado a la impresora y se debe activar en la configuración de la terminal.