Передумови
Before starting, make sure you have the following:
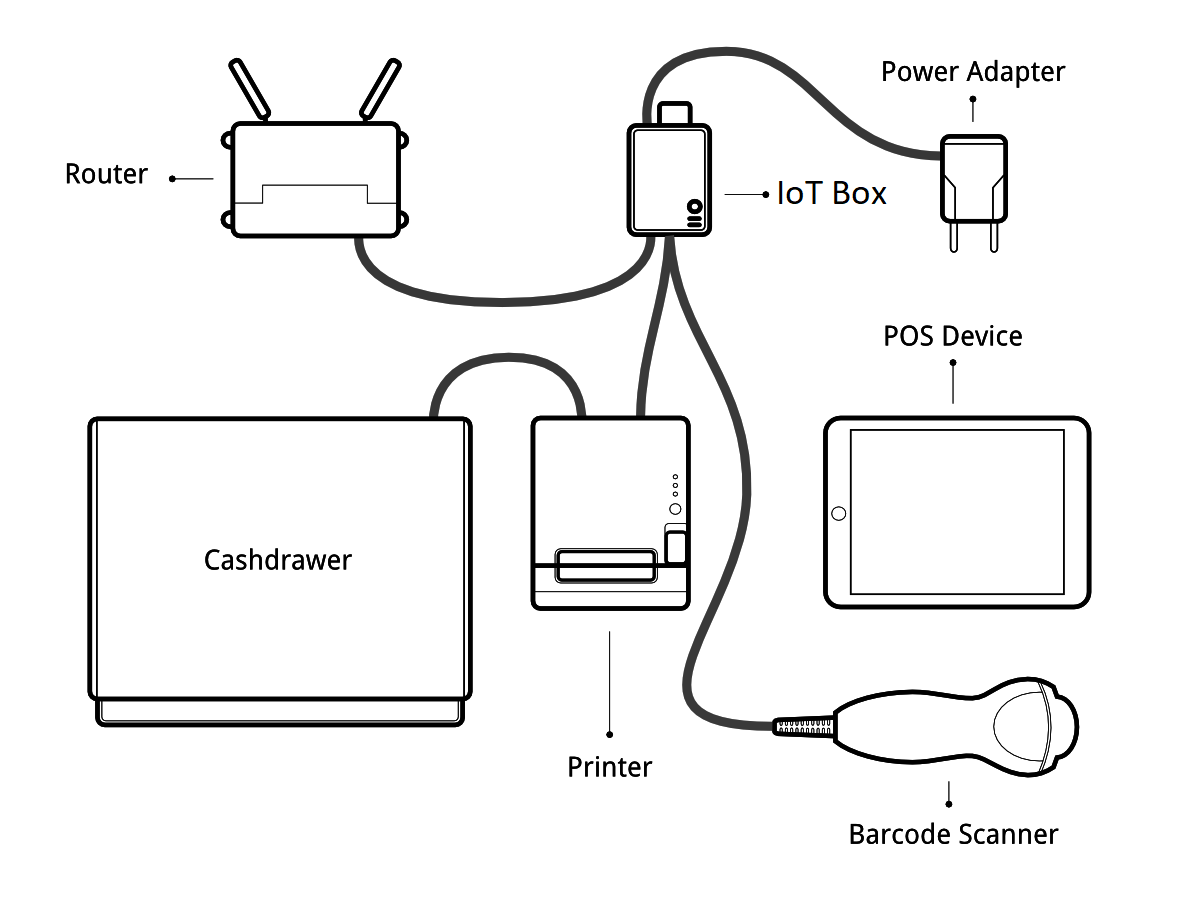
- An IoT Box
- A 2A Power adapter with pi 3 b+ 2.5 A
Комп'ютер або планшет із сучасним веб-браузером
- A running SaaS or Odoo instance with the Point of Sale and IoT apps installed
- A local network setup with DHCP (this is the default setting)
- An Epson USB TM-T20 Printer or another ESC/POS compatible printer (officially supported printers are listed at the POS Hardware page)
Сканер штрих-коду Honeywell Eclipse USB або інший сумісний сканер
Epson-сумісний ящик для готівки
- An RJ45 Ethernet Cable (optional, WiFi is built in)
Встановіть
To connect hardware to the PoS, the first step is to connect an IoT Box to your database. For this, follow this documentation.
Then, you have to connect the peripheral devices to your IoT Box.
Officially supported hardware is listed on the POS Hardware page, but other hardware might work as well.
Принтер: підключіть ESC/POS-принтер до USB-порту та увімкніть його.
Ящик для готівки: грошовий ящик повинен бути підключений до принтера за допомогою кабелю RJ25.
Сканер штрих-коду: підключіть сканер штрих-коду. Для того, щоби ваш сканер штрих-коду був сумісний, він повинен вести себе як клавіатура, і його потрібно налаштувати в US QWERTY. Він також повинен закінчувати штрих-коди з символом Enter (кодовий ключ 28). Це, швидше за все, є стандартною конфігурацією вашого сканера штрих-коду.
Ваги: підключіть ваги і включіть їх.
- Ethernet: If you do not wish to use Wi-Fi, plug in the Ethernet cable. Make sure this will connect the IoT Box to the same network as your POS device.
- Wi-Fi: The current version of the IoT Box has Wi-Fi built in. Make sure not to plug in an Ethernet cable when booting, because all Wi-Fi functionality will be bypassed when a wired network connection is available on boot.
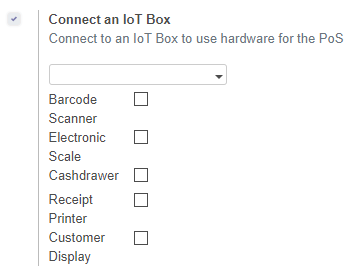
Once it's done, you can connect the IoT Box to your PoS. For this, go in Point of Sale > Configuration > PoS, tick the box "IoT Box" and select the IoT Box you want to connect with. Save the changes.
Set up is done, you can launch a new PoS Session.
Усунення несправностей
The PoS cannot connect to the IoT Box
- The easiest way to make sure the IoT Box is properly set-up is to turn it on with the printer plugged in as it will print a receipt indicating any error if encountered or the IoT Box's IP address in case of success. If no receipt is printed, check the following steps:
- Make sure the IoT Box is powered on, indicated by a brightly lit red status LED.
- Make sure the IoT Box is ready, this is indicated by a brightly lit green status LED just next to the red power status LED. The IoT Box should be ready ~2 minutes after it is started.
- Make sure the IoT Box is connected to the same network as your POS device. Both the device and the IoT Box should be visible in the list of connected devices on your network router.
- If you specified the IoT Box's IP address in the configuration, make sure it corresponds to the ip address printed on the IoT Box's status receipt.
Переконайтеся, що POS не завантажено через HTTPS.
- A bug in Firefox's HTTP implementation might prevent the autodiscovery from working reliably. You could also manually set up the IoT Box's IP address in the POS configuration.
Сканер штрих-коду не працює
Сканер штрих-коду повинен бути налаштований в US QWERTY і видати Enter після кожного штрих-коду. Це налаштовано за замовчуванням більшості сканерів штрих-кодів. Для отримання додаткової інформації зверніться до документації для сканування штрих-кодів.
- The IoT Box needs a 2A power supply to work with some barcode scanners. If you are not using the provided power supply, make sure the one you use has enough power.
Деякі сканери штрих-кодів потребують більше 2A, і вони не працюватимуть або працюватимуть неналежним чином, навіть за умови наявності джерела живлення. У такому випадку ви можете підключити сканер штрих-коду до автономного USB-концентратора.
- Some poorly built barcode scanners do not advertise themselves as barcode scanners but as a usb keyboard instead, and will not be recognized by the IoT Box.
Сканер штрих-коду не працює надійно
- Make sure that no more than one device with 'Scan via Proxy'/'Barcode Scanner' enabled are connected to the IoT Box at the same time.
Друк квитанції займає надто багато часу
- A small delay before the first print is expected, as the IoT Box will do some preprocessing to speed up the next printings. If you suffer delays afterwards it is most likely due to poor network connection between the POS and the IoT Box.
Деякі символи не надруковані на квитанції
- The IoT Box does not support all languages and characters. It currently supports Latin and Cyrillic based scripts, with basic Japanese support.
Принтер офлайн
Переконайтесь, що принтер підключений, живиться, має достатню кількість паперу, кришка закрита та не повідомляється про помилку. Якщо помилка не зникає, зверніться до служби підтримки.
Готівковий рахунок не відкривається
Каса повинна бути підключена до принтера і повинна активуватися в налаштуваннях точки продажу.