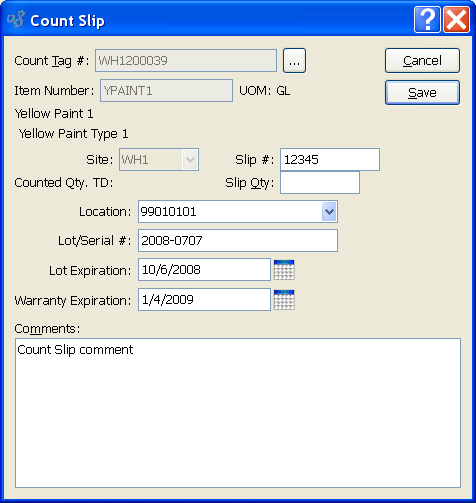
Count Slips are used for contributing Inventory count totals to unposted Count Tags. Unlike Count Tags, however, Count Slips do not have to be created before they can be entered. To enter a Count Slip, select the "Enter Count Slip" option. The following screen will appear:

When entering a Count Slip, you are presented with the following options:
Tip
Restrictions may be imposed on the creation of Count Slips. To learn more, see Section 10.13.2, “Configure Inventory”.
- Count Tag #
Enter the Count Tag Number of the Count Tag you want to enter a Count Slip toward.
- Item Number
Displays Item Number automatically when Count Tag Number is entered into "Count Tag #" field.
- UOM
Inventory Unit of Measure.
- Site
Specify Site where count is being conducted.
- Counted Qty. TD
Displays total for specified Count Tag to date.
- Slip #
Enter a Count Slip Number to identify the Count Slip. Some restrictions may apply. To learn more about Count Slip numbering restrictions, see the Section 10.13.2, “Configure Inventory”.
- Slip Qty
Enter the Physical Count total.
- Location
Specify the Location you want the Count Slip created for. The list will show all valid Site Locations for the specified Item.
- Lot/Serial #
Displays related Lot/Serial Number information, if applicable.
- Lot Expiration
If a Lot-controlled Item Site is also perishable, you will have the option to enter a perishability expiration date for the counted quantity.
- Warranty Expiration
If a Lot/Serial Item is marked to require a warranty when purchased, then you will have the option to enter a warranty expiration date for the counted quantity.
- Comments
This is a scrolling text field with word-wrapping for entering Comments related to the Count Slip.
To the far right of the screen, the following buttons are available:
- CANCEL
Closes the screen without creating a Count Slip, returning you to the application desktop.
- SAVE
Creates Count Slip and adds Count Slip quantity to the total of the specified Count Tag.