Planner Codes are used to identify Items that fall under the jurisdiction of planners—that is, employees responsible for planning, scheduling, or procurement. To access the master list of Planner Codes, select the "Planner Codes" option. The following screen will appear:
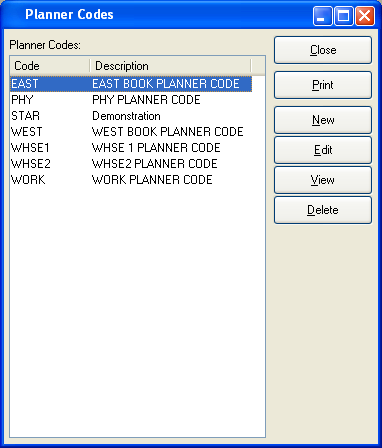
Planner Codes Master List
The "Planner Codes" screen displays information on all existing Planner Codes, including Planner Code and Planner Code description.
To the far right of the screen, the following buttons are available:
- CLOSE
Closes the screen, returning you to the application desktop.
Runs the report associated with this screen.
- NEW
Opens screen for creating a new Planner Code.
- EDIT
Enables you to edit highlighted Planner Codes. The edit screen is the same as that for creating a new Planner Code—except that when editing, the fields will contain Planner Code information. Double-clicking on a Planner Code will also bring you to the editing screen.
- VIEW
Highlight a Planner Code and then select this button to reach a read-only view of the "Edit" screen.
- DELETE
Highlight a Planner Code and then select this button to remove it from the list.
To create a new Planner Code, select the NEW button. The following screen will appear:
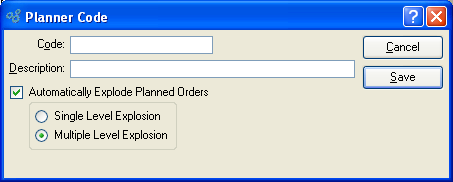
Tip
Create your Planner Codes using a logical, hierarchical structure. This will make it easier to retrieve Planner Code information in the future.
When creating a new Planner Code, you are presented with the following options:
- Code
Enter a code to identify the Planner Code.
- Description
Enter a brief description of the Planner Code.
Note
If you want requirements to be created for Planned Work Orders, the option "Automatically Explode Planned Orders" must be selected. If not selected, Planned Work Orders will not be exploded. This means that Planned Orders for lower level material requirements will not be generated when MRP is run.
- Automatically Explode Planned Orders
-
Select one of the following if you want Planned Work Orders to be exploded automatically:
- Single Level Explosion
This option specifies that when Planned Work Orders are exploded, requirements should be created for the parent Planned Work Order only.
- Multiple Level Explosion
This option specifies that requirements should be created for both parent and child Planned Work Orders.
Note
If you"re running MRP by Planner Code, the explosion level setting may not make a difference—depending on how your Planner Codes are assigned. For example, if all your Items fall within the same Planner Code, Planned Orders will be generated for all levels of requirements—regardless of whether single or multiple level explosion is set. The same does not hold true when running MRP by Item.
To the far right of the screen, the following buttons are available:
- CANCEL
Closes the screen without creating a Planner Code, returning you to the previous screen.
- SAVE
Creates the Planner Code and adds it to the master list of Planner Codes.