Invoice section.
An uninvoiced shipment is a shipment having one or more uninvoiced Sales Order Line Items. To invoice a Sales Order Line Item, select the Order for billing and specify an Invoice amount for the Item. Once the Invoice is printed and then posted, the selected Line Item will be considered invoiced. To view a list of Uninvoiced Shipments, select the "Uninvoiced Shipments" option. The following screen will appear:
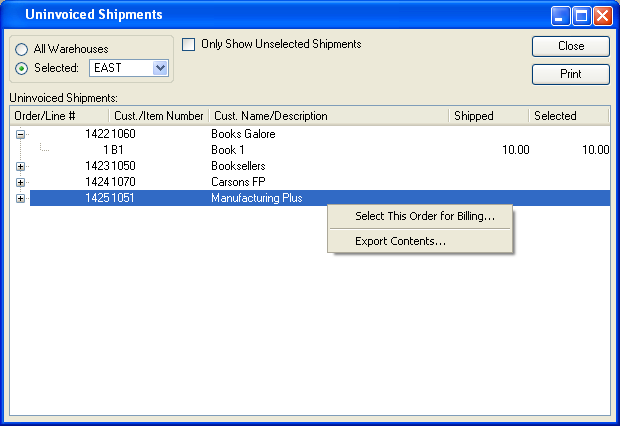
When displaying Uninvoiced Shipments, you are presented with the following options:
- All Sites
Select to display Uninvoiced Shipments for all Sites.
- Selected
Specify Site whose Uninvoiced Shipments you want to display.
- Uninvoiced Shipments
Display lists Uninvoiced Shipments.
To the far right of the screen, the following buttons are available:
- CLOSE
Closes the screen, returning you to the application desktop.
Runs the report associated with this screen.
Right-clicking on an Order in the Uninvoiced Shipments list enables you to select from the following menu options:
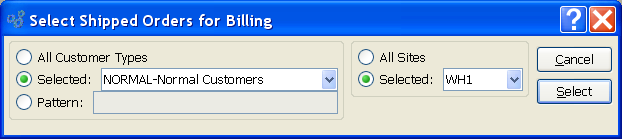
This utility enables you to select groups of shipped Orders for billing in one operation. When used, the full Order quantity of shipped Orders will be selected for billing. You may later change the billing details for individual Line Items using the right-click menu on the Billing Edit List. All selected Orders will appear on the Billing Edit List after the Select All Shipped Orders for Billing utility is run. This approach differs from the approach used by the Select Order for Billing utility, which requires you to manually enter billing details for individual Orders. To select multiple shipped Orders for billing, select the "Select All Shipped Orders for Billing" option. The following screen will appear:
Note
When you select an Order for billing, you are indicating that you wish to create an Invoice for the Order.
When selecting multiple shipped Orders for billing, you are presented with the following options:
- All Customer Types
Choose to select all Customer Types for billing.
- Selected
Specify the Customer Type you want to select for billing.
- Pattern
Enter a Customer Type pattern to select a range of Customer Types. Refine your search using Regular Expressions.
- All Sites
Choose to select all Shipped Orders for billing for all Sites.
- Selected
Specify Site whose Shipped Orders you want to select for billing.
To the far right of the screen, the following buttons are available:
- CANCEL
Closes the screen without selecting Shipped Orders for billing, returning you to the application desktop.
- SELECT
Selects all shipped Orders for billing.
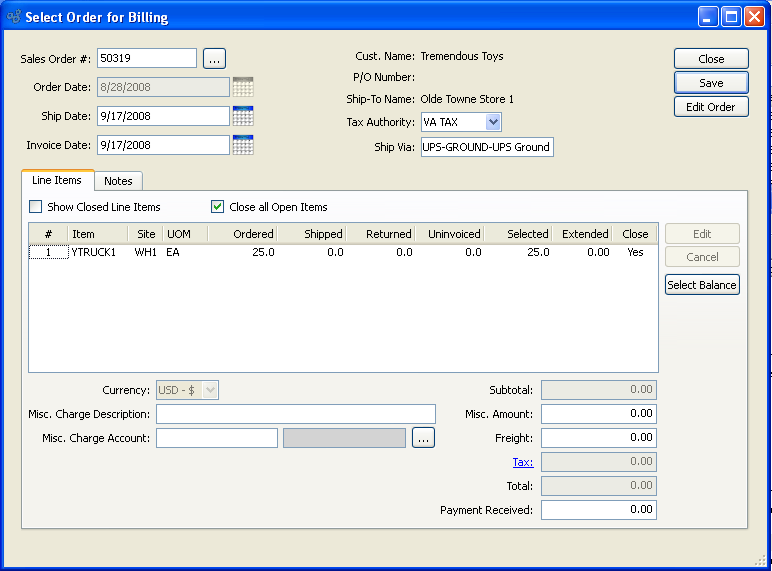
This utility enables you to manually enter billing details for individual Sales Order Line Items. Both shipped Orders and unshipped Line Items may be selected for billing in this manner. This individualized approach differs from the approach taken by the Select All Shipped Orders for Billing utility, which by default selects for billing the full Line Item quantities for all shipped Orders. To select an individual shipped Order for billing, select the "Select Order for Billing" option. The following screen will appear:
Note
When you select an Order for billing, you are indicating that you wish to create an Invoice for the Order. Invoice Numbers are assigned when an Invoice is printed.
When selecting an Order for billing, you are presented with the following options:
- Sales Order #
Enter the Sales Order Number of the Sales Order you want to select for billing.
- Order Date
Displays the original Sales Order date.
- Ship Date
By default, the most-recent ship date will appear in the field. You may override the default value by entering ship date information manually.
- Invoice Date
By default, the current (today"s) date will appear in the field. You may override the default value by entering Invoice date information manually.
- Cust. Name
Name: Displays Customer's name.
- P/O Number
Displays purchase for the specified Sales Order. Indicates the Customer Purchase Order Number assigned to the specified Sales Order.
- Ship-To Name
Displays Ship-To name.
- Tax Authority
Specify the Tax Authority associated with the Sales Order. The Tax Authority for the specified Ship-To Address will be entered here by default. Otherwise, the primary Tax Authority for the Customer will be entered. Ultimately, Tax is applied at the Line Item level—so the Tax Authority associated with an Item's Tax Type will be used.
- Ship Via
-
By default, the preferred Ship Via method for specified Customer will appear in the field. You may enter a free-form Ship Via simply by typing the name of the Ship Via into the field. Default Ship Vias may be defined at the system level.
Tip
The system supports up-to-date shipment tracking with links to the websites of many leading shipping companies (i.e., "Ship Vias").
- Show Closed Line Items
Select to show closed Line Items in the "Line Items" display.
- Close all Open Items
Select to close all open Sales Order Line Items.
Note
In the Line Items display, the Uninvoiced column refers to quantity that has been shipped but not yet invoiced. Quantity must have been shipped to appear in the Uninvoiced column. If no quantity has been shipped, then no quantity will appear as uninvoiced.
- Subtotal
Displays the subtotal for the Sales Order Line Items.
- Sales Tax
Displays the amount of Tax that will be added to the Sales Order, as defined by the specified Tax Code. To get a detailed view of the Tax calculation, click on the Tax link using your mouse.
- Misc. Charge Amount
Enter the amount of the miscellaneous charge. Before entering a miscellaneous charge amount, you must first assign the charge to a Sales Account and also enter a description of the charge.
- Misc. Charge Description
Enter a description to identify the miscellaneous charge.
- Misc. Charge Sales Account
Enter a Sales Account to assign the miscellaneous charge to.
- Freight
Enter the amount of freight charge to be added to the specified Order. The freight charge may be entered during the creation or modification of a Sales Order—or at the time of shipment.
Note
The Payment Received field is an optional field which may be used to provide visibility into prepaid amounts. Because the field exists for visual purposes only, entering an amount in this field will not affect the amount due. The only way an Invoice may be offset is through the application of a Cash Receipt or a Credit Memo.
- Total
Displays the total amount of all uninvoiced Sales Orders.
- Payment Received
Enter the amount of payment received against the specified Sales Order, if any. This amount will appear on any resulting Invoice, but will not be posted as a credit against the Invoice.
To the far right of the screen, the following buttons are available:
- CLOSE
Closes the screen without selecting the Order for billing, returning you to the previous screen.
- SAVE
Saves the information you specified in the screen and selects the Order for billing, creating an Invoice in the process.
- EDIT ORDER
Brings you to the Sales Order screen, where you may edit the specified Sales Order. The Sales Order screen is described at length in Section 8.2.1, “New Sales Order”.
- EDIT
Enables you to specify or edit the billing quantity for the highlighted Line Item. Double-clicking on a Line Item will also bring you to the billing quantity edit screen.
- CANCEL
Removes previously entered billing quantity from a selected Line Item.
- SELECT BALANCE
Highlight a Line Item, then select this button to transfer the full balance to Billing.
When the Notes tab is clicked, the screen will appear as follows:
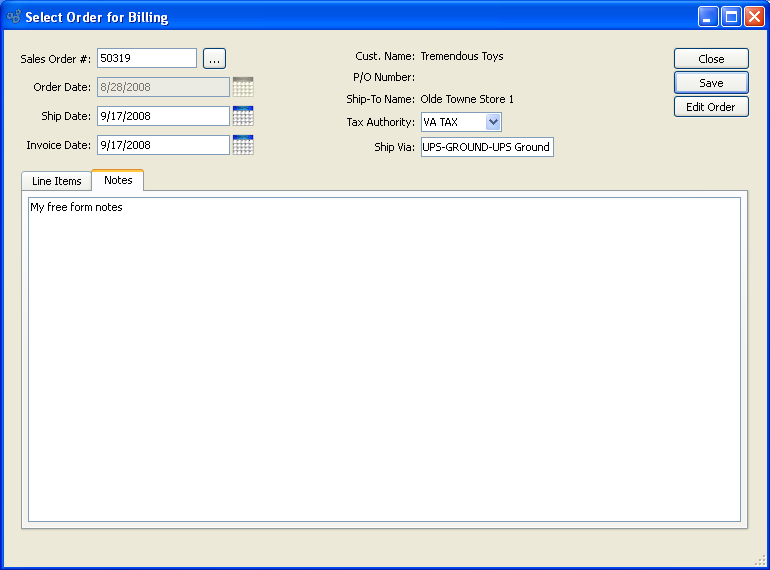
- Notes
This is a scrolling text field with word-wrapping for entering Notes related to the Sales Order selected for billing. Notes entered on this screen will follow the Order through the billing process. For example, you may view notes associated with a posted Invoice within the Invoice Information report.
To specify billing quantities for Line Items in the "Select Order for Billing" screen, double-click on a Line Item in the "Line Items" display—or highlight the Line Item and select the EDIT SELECTION button. The following screen will appear:
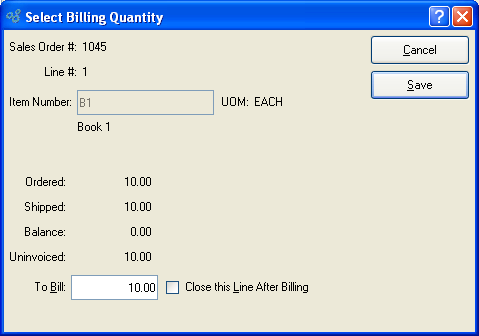
When selecting the billing quantity for a Line Item, you are presented with the following options:
- Sales Order #
Displays Sales Order Number.
- Line #
Displays Sales Order Line Item Number.
- Item Number
Displays Item Number of Line Item.
- UOM
Inventory Unit of Measure.
- Ordered
Displays quantity ordered.
- Shipped
Displays quantity shipped.
- Balance
Displays remaining quantity to be shipped.
- Uninvoiced
Displays uninvoiced quantity.
- To Bill
Enter the quantity you want to select for billing.
- Close this Line After Billing
Select to close the specified Line Item after billing.
Tip
If you are shipping a partial quantity to a Customer, be sure to leave the "Close this Line After Billing" option unchecked. This will ensure the Sales Order Item remains open until the full quantity has been shipped.
To the far right of the screen, the following buttons are available:
- CANCEL
Closes the screen without selecting a billing quantity, returning you to the previous screen.
- SAVE
Selects the specified quantity for billing, returning you to the previous screen.
To edit an Order selected for billing, or to view detailed information about selected Orders, choose the "Billing Edit List" option. The following screen will appear:

Tip
In cases where a large number of Orders have been selected for billing, data may be slow to display on the Billing Edit List—given the quantity of detail provided. For a faster-loading view of the same Orders, use the Billing Selections list, which provides only higher level details and so loads more quickly.
The Billing Edit List displays details on all Orders selected for billing. The display is a nested list, with a plus ("+") sign located to the far left of the screen next to each line that may be expanded to lower levels. By clicking your mouse on a plus sign, you reveal lower levels of information related to the Order.
Tip
If a Billing record displays in red type, this means an Account Assignment is missing for the Customer Type in question. To correct the problem, check your Sales Account and Accounts Receivable Assignments. Once the Assignments are in place, the record will display in black type.
To the far right of the screen, the following buttons are available:
- CLOSE
Closes the screen, returning you to the application desktop.
Runs the report associated with this screen.
Right-clicking on an Order in the Billing list enables you to select from the following menu options:
To edit Orders selected for billing and to create Invoices for these Orders, select the "Billing Selections" option. The following screen will appear:
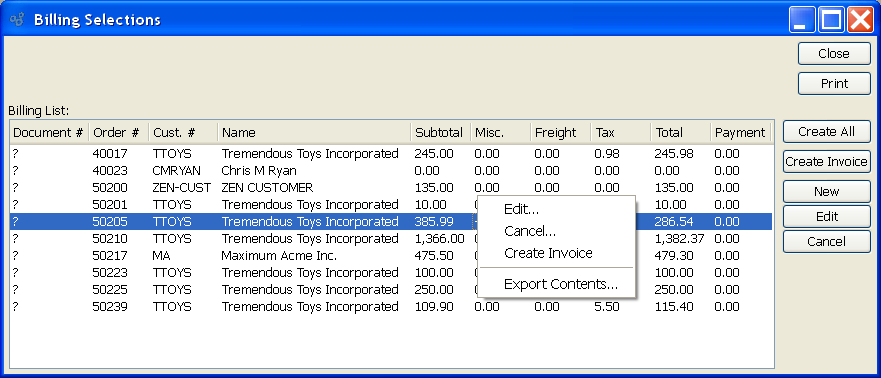
Tip
Because less detailed information is shown, the Billing Selections list will load more quickly than the Billing Edit List. The amount of detail is the only difference between the two lists. Both show the same Orders selected for billing.
The Billing Selections list displays Orders selected for billing.
To the far right of the screen, the following buttons are available:
- CLOSE
Closes the screen, returning you to the application desktop.
Runs the report associated with this screen.
- CREATE ALL
Select to create Invoices for all Orders on the list.
Note
When you convert an Order selected for billing to an Invoice, you create an unposted Invoice. Unposted Invoices must in turn be posted to generate associated General Ledger (G/L) transaction records. You can reverse the process of Invoice creation by deleting the unposted Invoice.
Note
Users may be restricted from editing billing selections if they are granted the privilege "RestrictSelectOrderEditing."
Right-clicking on an Order in the Billing list enables you to select from the following menu options:
- Edit
Enables you to edit highlighted billing selections. The edit screen is the same as that for selecting a new Order for billing—except that when editing, the fields will contain billing information. Double-clicking on a billing selection will also bring you to the editing screen.
- Cancel
Highlight an Order and then select this button to cancel the billing for the selected Order. Canceled billing selections may be recalled to Shipping—and then returned to Inventory from there.
To create an Invoice, an Order selected for billing must first be posted. Once the Order selected for billing is posted, an Invoice for that selected Order is created. To post Orders selected for billing in batch mode, select the "Post Billing Selections" option. The following screen will appear:
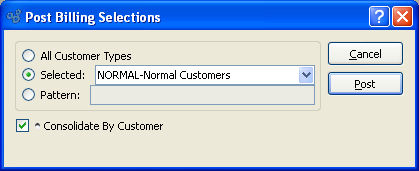
When posting billing selections, you are presented with the following options:
- All Customer Types
Select to post billing selections for all Customer Types.
- Selected
Specify Customer Type whose billing selections you want to post.
- Pattern
Enter a Customer Type pattern to select a range of Customer Types. Refine your search using Regular Expressions.
- Consolidate by Customer
Select to cause all Sales Orders selected for billing for each Customer to be consolidated on one Invoice. To be consolidated, the Orders must have matching criteria (e.g., Terms, Tax Authority, Billing information). If these criteria do not match, then non-conforming Orders will not be consolidated. If only a single Order exists, at all or in a group, then it will be posted as a single Invoice. Consolidated Orders are given a combined header, and the Line Items are attached to the Invoice in no particular order. Line Items themselves are never consolidated (i.e., you can have two lines for the same Item). In addition, Invoice Line Items have a reference back to their original Sales Order Item.
To the far right of the screen, the following buttons are available:
- CANCEL
Closes the screen without posting billing selections, returning you to the application desktop.
- POST
-
Select this button to post all Orders selected for billing.
When Orders selected for billing are posted, Invoices are created for the billing selections.
To edit or post Orders selected for billing, select the "Unposted Invoices" option. The following screen will appear:
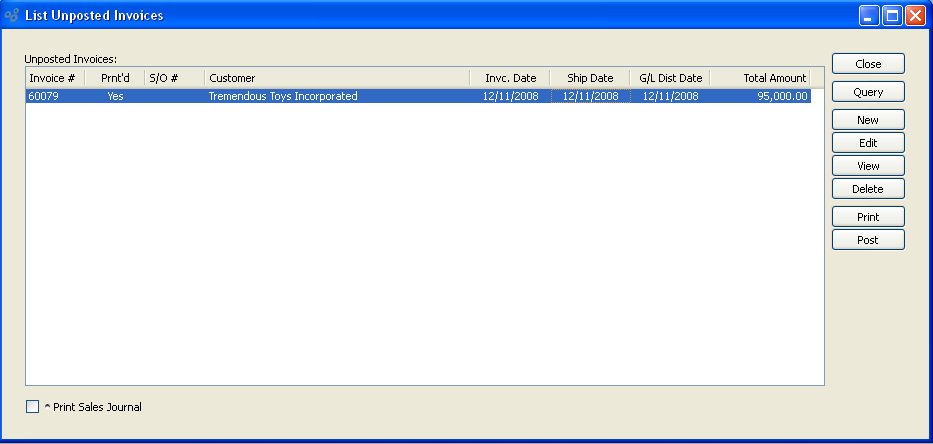
Tip
You may select multiple Invoices for printing or posting by highlighting them using your mouse—or a combination of your mouse and either the SHIFT or CTRL keys.
The Unposted Invoices list displays information on all Invoices available for posting. Users with the appropriate privilege will also see the G/L distribution date column.
To the far right of the screen, the following buttons are available:
- CLOSE
Closes the screen, returning you to the application desktop.
- QUERY
Refreshes the screen with latest Invoices.
- NEW
Opens screen for creating a new Invoice.
- EDIT
Enables you to edit highlighted Invoices. The edit screen is the same as that for selecting a new Invoice—except that when editing, the fields will contain Invoice information. Double-clicking on an Invoice will also bring you to the editing screen.
Tip
Deleting an Invoice effectively reverses the transaction which created it. In other words, when you delete an Invoice the source Sales Order will be returned to the Billing Selections list. From there, you have the ability to either A) cancel the Billing Selection or B) re-create the Invoice.
Note
If the Customer specified on the Invoice has an EDI Profile defined, you may encounter an EDI processing interface when printing Invoices.
- POST
Highlight one—or multiple—Invoices, then select this button to post the selected Invoice(s). By default, Invoices post to the General Ledger (G/L) on the Invoice date. However, users with the appropriate privilege may change the default G/L distribution date to an alternate date during the Invoice posting process. If used, Invoices will post on the alternate date. The ability privileged users have to change the distribution date applies to the posting of both individual and also batches of Invoices from this screen.
- Print Sales Journal
Select to print the Sales Journal when selected Invoices are posted.
Right-clicking on an Invoice in the Unposted Invoices list enables you to select from the following menu options:
- Edit
Enables you to edit highlighted Invoices. The edit screen is the same as that for selecting a new Invoice—except that when editing, the fields will contain Invoice information. Double-clicking on an Invoice will also bring you to the editing screen.
- View
Highlight an Invoice and then select this button to reach a read-only view of the "Edit" screen.
- Delete
Highlight an Invoice and then select this button to remove the Invoice from the list. Deleting an Invoice causes the source Sales Order to be returned to the Billing Selections list.
- Post
Highlight one—or multiple—Invoices, then select this button to post the selected Invoice(s). By default, Invoices post to the General Ledger (G/L) on the Invoice date. However, users with the appropriate privilege may change the default G/L distribution date to an alternate date during the Invoice posting process. If used, Invoices will post on the alternate date. The ability privileged users have to change the distribution date applies to the posting of both individual and also batches of Invoices from this screen.
To post Invoices in batch mode, select the "Post Invoices" option. The following screen will appear:
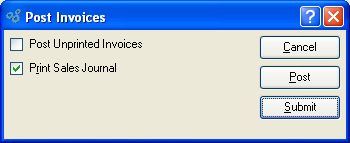
When posting Invoices, you are presented with the following options:
- Post Unprinted Invoices
Select to include unprinted Invoices in the list of Invoices to be posted. If not selected—and if there are unprinted Invoices waiting to be posted—you will be prompted to print the unprinted Invoices before posting may occur.
- Print Sales Journal
Select to print the Sales Journal in addition to posting the Invoices. Sales Journals are assigned a unique identification number, which corresponds to the Invoice batch and the date the batch was posted.
Note
A Sales Journal will also be created for Invoices that are posted individually—that is, not in batch mode, but one at a time. As with batch postings, the Sales Journals for individually-posted Invoices are assigned a unique identification number.
To the far right of the screen, the following buttons are available:
- CANCEL
Closes the screen without posting any Invoices, returning you to the application desktop.
- POST
Posts the Invoices, using the specified parameters.
- SUBMIT
Select to submit the requested action to the Batch Manager.