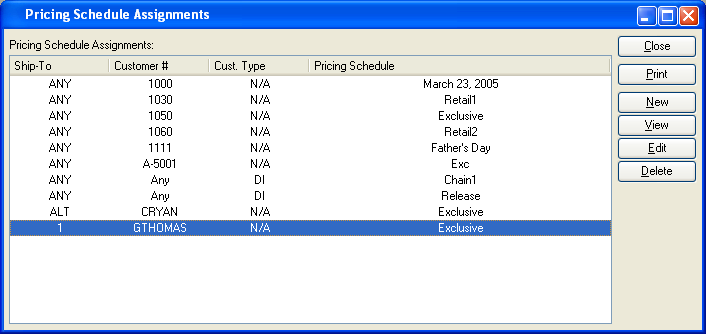
In order for Pricing Schedules to take effect at Sales Order entry, the Pricing Schedules must be linked—or assigned—to specific Customers or Customer Types. To assign Pricing Schedules to Customers, select the "Pricing Schedule Assignments" option. The following screen will appear:
When assigning Pricing Schedules to Customers, you are presented with the following options:
- Pricing Schedule Assignments
Display lists any and all Pricing Schedule Assignments.
To the far right of the screen, the following buttons are available:
- CLOSE
Closes the screen, returning you to the application desktop.
Runs the report associated with this screen.
- NEW
Opens screen for creating a new Pricing Schedule assignment.
- EDIT
Enables you to edit highlighted Pricing Schedule assignment. The edit screen is the same as that for creating a new Pricing Schedule assignment—except that when editing, the fields will contain Pricing Schedule assignment information. Double-clicking on a Pricing Schedule assignment will also bring you to the editing screen.
- DELETE
Highlight a Pricing Schedule assignment and then select this button to remove the Pricing Schedule assignment from the list of Pricing Schedule assignments.
To create a Pricing Schedule assignment, select the NEW button. The following screen will appear:
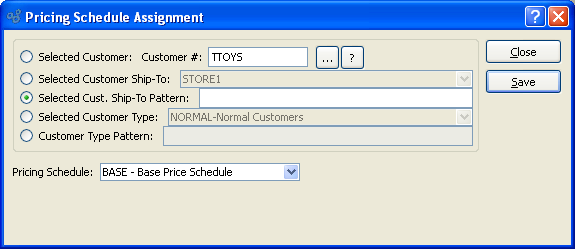
When creating a new Pricing Schedule assignment, you are presented with the following options:
- Selected Customer
-
Select to assign a Pricing Schedule to an individual Customer.
- Customer #
Specify the Customer Number of the Customer you want to assign a Pricing Schedule to. The browse button located to the right of the field leads to a searchable Customers list. You may also access this list using the keyboard shortcut "CTRL + L". Once a Customer Number is entered, the Customer name and billing address will display. Select the "?" or "$" symbol next to the browse button to view Customer information for the specified Customer. If a Customer's credit is "In Good Standing," the button will feature a black question mark ("?") icon. If the icon turns to an orange dollar sign ("$"), the Customer's credit Status is "On Credit Warning." A red dollar sign ("$") indicates the Customer's credit Status is "On Credit Hold."
- Selected Customer Ship-To
Specify the Customer Ship-To Address you want to assign a Pricing Schedule to. This is an optional setting which may be used in conjunction with the "Selected Customer" setting. The Ship-To option gives you the added flexibility of being able to assign multiple Pricing Schedules to a single Customer based on separate Ship-To Addresses.
Tip
When entering Credit Memos, make sure the Ship-To Address on the Credit Memo matches the Ship-To Address on the Customer's Pricing Schedule. If they don"t match, you won"t be able to issue credit for exclusively sold Items.
- Selected Cust. Ship-To Pattern
Enter a Ship-To Address pattern to select a range of Ship-To Addresses for the selected Customer.
- Selected Customer Type
Specify the Customer Type you want to assign a Pricing Schedule to.
- Customer Type Pattern
Enter a Customer Type pattern to select a range of Customer Types. Refine your search using Regular Expressions.
- Pricing Schedule
Specify the Pricing Schedule to be used when entering Sales Orders for the specified Customers.