A/P Reports section.
To view uninvoiced Receipts and Returns, select the "Uninvoiced Receipts and Returns" option. The following screen will appear:
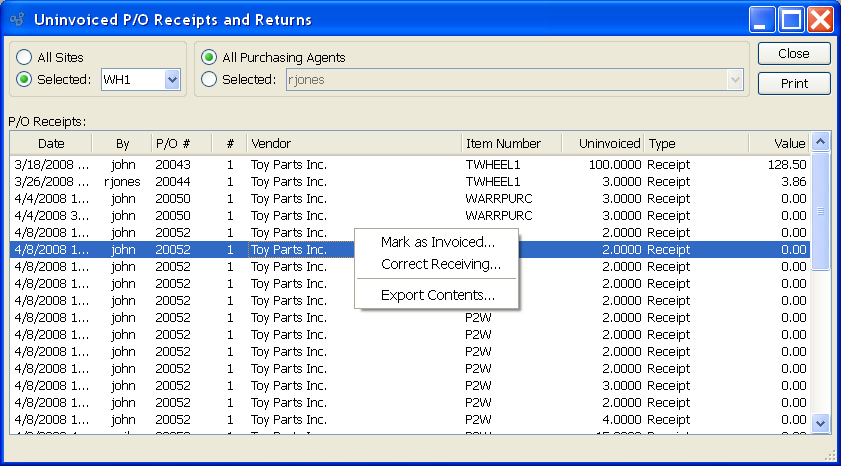
When displaying uninvoiced Receipts and Returns, you are presented with the following options:
- All Sites
Select to display uninvoiced Receipts and Returns for all Sites.
- Selected
Specify Site whose uninvoiced Receipts and Returns you want to display.
- All Purchasing Agents
Select to display uninvoiced Receipts and Returns for all Purchasing Agents.
- Selected
Specify Purchasing Agent whose uninvoiced Receipts and Returns you want to display. Users may be designated as Purchasing Agents at the system level.
- P/O Receipts
Display lists uninvoiced Receipts and Returns, using the specified parameters.
Tip
The primary path for marking Purchase Order Line Items as invoiced is on the Voucher Item screen. If received (or returned) quantity is tagged as "Yes" on the Voucher Item screen—and the Voucher is then posted—the quantity will no longer appear on the "Uninvoiced Receipts and Returns" screen.
To the far right of the screen, the following buttons are available:
- CLOSE
Closes the screen, returning you to the application desktop.
Runs the report associated with this screen.
Right-clicking on a Receipt in the P/O Receipts list enables you to select from the following menu options:
If you right-click on a Return, the following option will be available:
To mark a Line Item Receipt as invoiced, highlight the Receipt and then select the "Mark as Invoiced" option from the right-click menu. The following screen will appear:
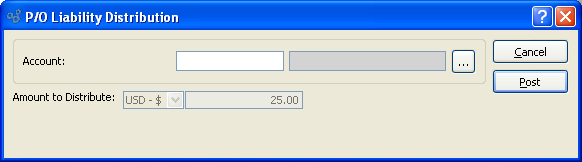
When marking a Line Item Receipt as invoiced, you are presented with the following options:
- Account
Select the Account you want to use opposite the P/O Liability Clearing Account. When this transaction is posted, the P/O Liability Clearing Account will be debited with the distribution amount—and the Account you specify will be credited. In this way, you will be sure to clear P/O Liability when marking Receipts as invoiced outside of the typical vouchering process flow.
- Amount to Distribute
Displays the Line Item Receipt amount to be distributed to the General Ledger when the transaction is posted.
To the far right of the screen, the following buttons are available:
- CANCEL
Closes the screen without marking the Receipt as invoiced, returning you to the application desktop.
- CORRECT
Select to post the distribution, using the specified Account.
To make corrections to a Purchase Order Receipt, select the "Correct Receiving" option from the right-click menu. The following screen will appear:
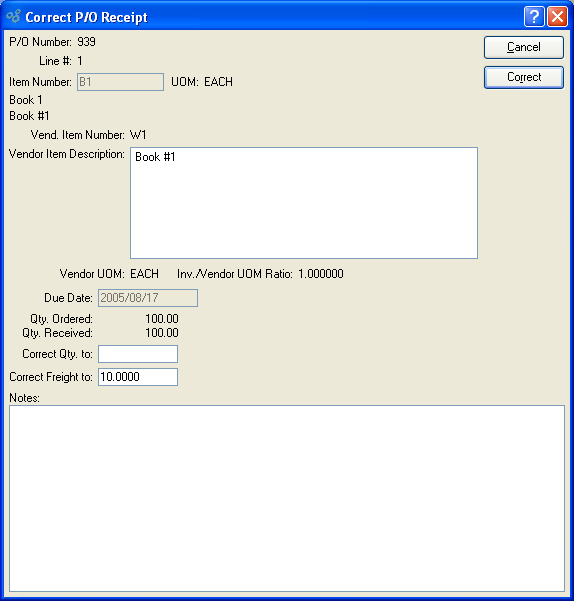
When correcting a Purchase Order Receipt, you are presented with the following options:
- P/O Number
Displays the selected Purchase Order Number.
- Line #
Displays the selected Line Item Number from the specified Purchase Order.
- Item Number
Displays Item Number associated with the specified Line Item Number.
- UOM
Inventory Unit of Measure.
- Vend. Item Number
Displays the Item Number the Vendor uses.
- Vendor Item Description
Displays the description for the Vendor Item Number.
- Vendor UOM
Displays the Unit of Measure the Vendor uses for the specified Item.
- Inventory/Vendor UOM Ratio
/Vendor UOM Ratio: Displays the ratio between Inventory and Vendor Units of Measure.
Note
The Inv./Vendor UOM Ratio specifies the ratio between Inventory and Vendor Units of Measure (UOM). For example, if you store an Item in single units, but a Vendor sells you the Item in cases of 12, then the ratio would be 12—or 12:1. When an Inv./Vend. ratio is specified, the system allows you to purchase Items using the Vendor's UOM; however, when the Items are received, the system will automatically convert the Inventory to your Inventory UOM.
- Due Date
Displays the date when the Line Item is due.
- Qty. Ordered
Displays the original Line Item quantity ordered.
- Qty. Received
Displays the total Line Item quantity received to date.
- Correct Qty. to
Enter the quantity you want to correct the received quantity to. This correction will create adjusting General Ledger entries when the CORRECT button is selected.
- Correct Freight to
Enter the amount you want to correct the Line Item freight to. This correction will create adjusting General Ledger entries when the CORRECT button is selected.
- Notes
This is a scrolling text field with word-wrapping for entering Notes related to the correction.
To the far right of the screen, the following buttons are available:
- CANCEL
Closes the screen without entering a correction, returning you to the application desktop.
- CORRECT
Select to post the correction. This action will result in adjusting General Ledger transactions.
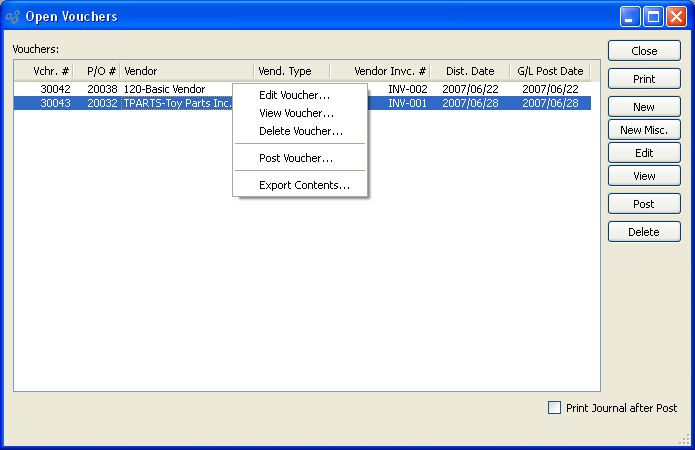
Vouchers may be posted individually or in groups using the Unposted Vouchers screen. After they are posted, open Vouchers may later be voided using the right-click menu on the Vendor History screen. To display unposted Vouchers, select the "List Unposted Vouchers" option. The following screen will appear:
Note
Actual Costs for purchased Items will be automatically updated when Vouchers are posted if there are differences between current Actual Costs and the vouchered Costs for the Items in question. Please keep in mind that Actual Costs only will be updated at posting. For new Costs to be recognized as Standard Costs, Actual Costs must be posted to Standard.
The "Vouchers" screen displays information on all unposted Vouchers, including Voucher Number, Purchase Order Number, Vendor Number/Vendor name, Vendor Invoice Number, and distribution date. Users with the appropriate privilege will also see the G/L distribution date column.
Tip
You may select multiple Vouchers for posting by highlighting them using your mouse—or a combination of your mouse and either the SHIFT or CTRL keys.
To the far right of the screen, the following buttons are available:
- CLOSE
Closes the screen, returning you to the application desktop.
Runs the report associated with this screen.
- NEW
Opens screen for creating a new Voucher.
- NEW MISC.
Opens screen for creating a new Miscellaneous Voucher.
Tip
If you have a Purchase Order Voucher that was corrupted by, for example, a sudden power outage, you can clear the record by running the Post Vouchers screen. In most cases, this action will remove the corrupted record and allow you to voucher the Purchase Order with a fresh Voucher.
- POST
Highlight one—or multiple—Vouchers, then select this button to post the selected Voucher(s). By default, Vouchers post to the General Ledger (G/L) on their distribution date. However, users with the appropriate privilege may change the G/L distribution date to an alternate date during the Voucher posting process. If used, Vouchers will post on the alternate date. The ability privileged users have to change the distribution date applies to the posting of both individual and also batches of Vouchers from this screen.
- Print Journal after Post
Select if you want to print a copy of the Payables Journal after the selected Vouchers are posted.
Right-clicking on an unposted Voucher in the list of unposted Vouchers enables you to select from the following menu options:
- Edit Voucher
Enables you to edit highlighted Vouchers. The edit screen is the same as that for creating a new Voucher—except that when editing, the fields will contain Voucher information. Double-clicking on a Voucher will also bring you to the editing screen.
- View Voucher
Highlight a Voucher and then select this button to reach a read-only view of the "Edit" screen.
- Post Voucher
Highlight one—or multiple—Vouchers, then select this button to post the selected Voucher(s). By default, Vouchers post to the General Ledger (G/L) on their distribution date. However, users with the appropriate privilege may change the G/L distribution date to an alternate date during the Voucher posting process. If used, Vouchers will post on the alternate date. The ability privileged users have to change the distribution date applies to the posting of both individual and also batches of Vouchers from this screen.
To view open A/P open items by Vendor, select the "Open Items by Vendor" option. The following screen will appear:

When displaying A/P open items by Vendor, you are presented with the following options:
- Vendor #
Enter the Vendor number of the Vendor whose A/P open items you want to display.
- Start Date
A/P open items for the specified Vendor entered on and after this date will be displayed.
- End Date
A/P open items for the specified Vendor entered on and before this date will be displayed.
- As of Date
-
Specify the date you want the A/P open items to be relative to. The report will include any A/P items which were open—that is, not yet paid—as of the specified date. This feature provides "point-in-time" open balance functionality.
Note
The payment date used as a reference for the "As of Date" field is the G/L distribution date, not the posting date.
- A/P Open Items
Display lists A/P open items by Vendor, using the specified parameters.
To the far right of the screen, the following buttons are available:
- CLOSE
Closes the screen, returning you to the application desktop.
- QUERY
Select to generate the display, using the specified parameters.
Runs the report associated with this screen.
Right-clicking on an Item in the A/P open items list enables you to select from the following menu options:
The A/P Aging report gives you the ability to view A/P open items in a bucketed, time-phased perspective. And this perspective is portable, allowing you to view point-in-time snapshots of open balances.
An open Item is recognized by the A/P Aging report "as of" the item's document or distribution date. In the case of Vouchers, the distribution date is the date the Voucher is distributed to the General Ledger (G/L). (A/P Debit/Credit Memos are distributed to the G/L on their document date.) For example, if you post a Voucher on January 1, but the G/L distribution date is February 15, then the "as of" distribution date for that open item will be February 15 while the doc date will be January 1. This means, if you run the A/P Aging report with an "as of" distribution date in January, the open item distributed to the G/L on February 15 will not appear in the report. In fact, it will not appear in the report until an "as of" date of February 15 or later is specified.
Tip
You can view the document date for an open item by right-clicking on a line in the A/P Aging display. You can also find open item details on other screens—for example, Vendor History, Open Items by Vendor, etc.
The grouping of open items into time-phased buckets is driven by a document's due date. In other words, if a due date falls within 0-30 days of the "as of" date specified when the report is run, then the open item will appear in the first bucket. If the due date falls 31-60 days past the specified "as of" date, then the open item will appear in the second bucket. And so on.
To view Accounts Payable (A/P) open items from an aging perspective, select the "A/P Aging" option. The following screen will appear:
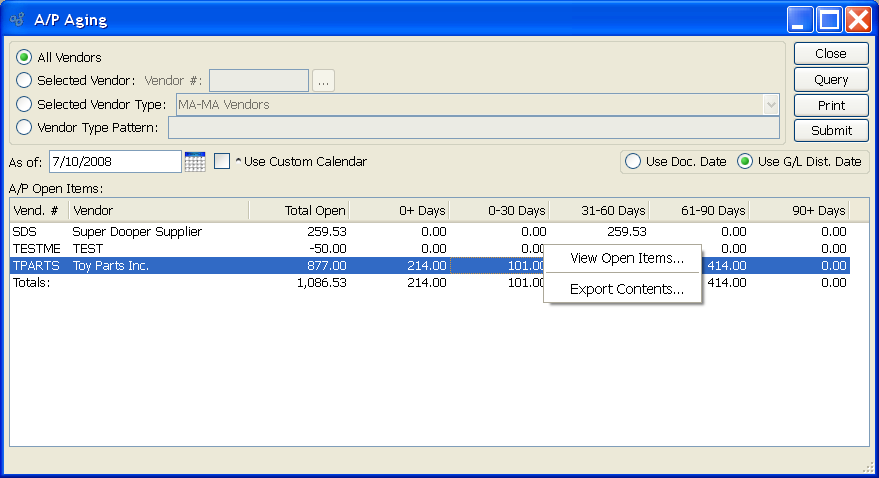
When displaying aging A/P open items, you are presented with the following options:
- All Vendors
Select to display A/P open items for all Vendors.
- Selected Vendor
Select to display A/P open items for a selected Vendor.
- Selected Vendor Type
Specify Vendor Type whose A/P open items you want to display.
- Vendor Type Pattern
Enter a Vendor Type pattern to select a range of Vendor Types. Refine your search using Regular Expressions.
- As of Date
Specify the date you want the A/P open items to be relative to. The report will include any A/P items which were open—that is, not yet paid—as of the specified date. This feature provides "point-in-time" open balance functionality. But again, keep in mind that the document date for an A/P open item (e.g., Voucher distribution date) must be on or before the specified "as of" date for the item to be recognized by the report.
- Use Custom Calendar
Select if you want to display A/P open items using a custom Calendar of your choosing. If selected, the screen will present a series of different options, including the option to select a Calendar and associated periods.
- Use Doc. Date
Select if you want to display A/P open items relative to the Document sate.
- Use G/L Dist. Date
Select if you want to display A/P open items relative to the G/L distribution date.
- A/P Open Items
Display lists aging A/P open items, using the specified parameters.
To view A/P open items using a custom Calendar, select the "Use Custom Calendar" option above. The following screen will appear:
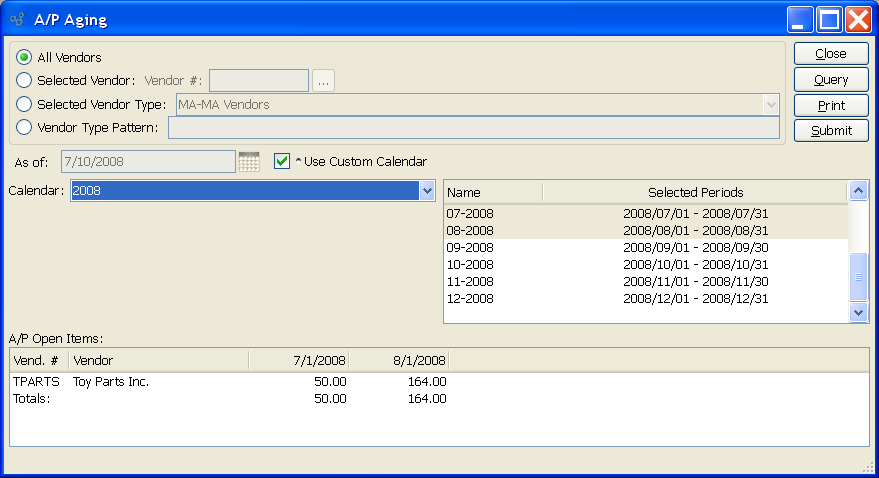
When displaying A/P open items using a custom Calendar, you are presented with the following options:
- Calendar
Select the Calendar you want to use for the report. Associated Calendar periods will be displayed.
- Name/Selected Periods
Select as many periods as you want to display. Selected periods correspond to Calendar specified in the "Calendar" field. Select individual periods or groups of periods together. To select an individual period, highlight the period using your mouse button. The period is now selected. To select a sequence of periods, highlight the first in the sequence using your mouse button. Then, holding down the SHIFT key on your keyboard, highlight the last period in the sequence. The entire sequence is now selected. To select periods that are out of sequence (e.g., January, April, July, October), highlight the first period in the group. Then, holding down the CTRL key on your keyboard, highlight the next period you want to select. Continue highlighting periods with the CTRL key depressed until all desired periods are selected. The entire group is now selected.
- A/P Open Items
Display lists time-phased A/P open items, using the specified parameters.
To the far right of the screen, the following buttons are available:
- CLOSE
Closes the screen, returning you to the application desktop.
- QUERY
Select to generate the display, using the specified parameters.
Runs the report associated with this screen.
- SUBMIT
Select to submit report to the Batch Manager.
Right-clicking on a Vendor in the A/P open items list enables you to select from the following menu options:
To view Check Registers by Bank Account, select the "Check Register" option. The following screen will appear:
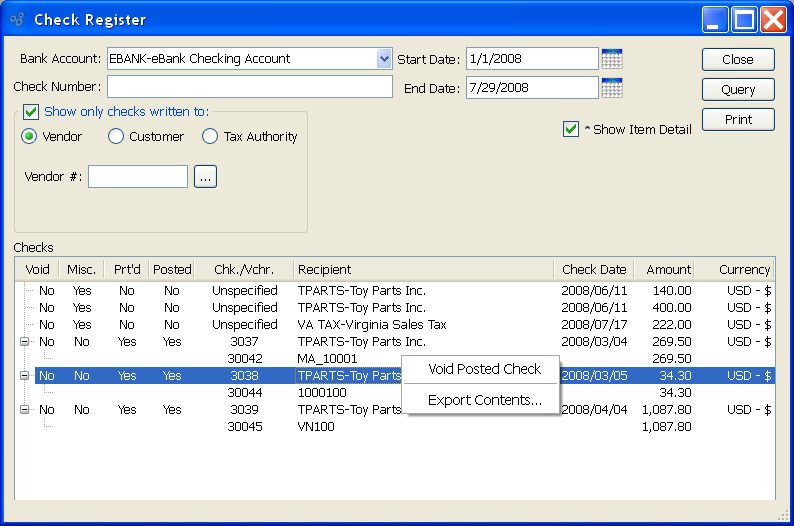
Tip
You can void posted Checks using the right-click option on the Check Register display. When voiding a Check, you will be given the option to specify the void date. Apply-to records will also be reversed on the void date you specify.
When displaying Check Register information, you are presented with the following options:
- Bank Account
Specify the Bank Account whose Check Register information you want to display.
- Check Number
Enter a Check Number or Regular Expression. The display will show Check(s) matching the specified Check Number(s).
- Show only checks written to:
-
Select if you want to limit the results to any of the following Check recipient types:
- Vendor
Select to include only Checks written to Vendors in the report.
- Customer
Select to include only Checks written to Customers in the report.
- Tax Authority
Select to include only Checks written to Tax Authorities in the report.
- Start Date
Checks posted on and after this date will be displayed.
- End Date
Checks posted on and before this date will be displayed.
- Show Item Detail
Select to include Check detail information in the display. If selected, the Vouchers and/or Debit Memos associated with Checks will be displayed in a nested list. Be sure to use the QUERY button after selecting this option to ensure detail is included in the display.
- Checks
Display lists Checks by Bank Account, using the specified parameters. This display is a nested list, with a plus ("+") sign located to the far left of the display next to each date. By clicking your mouse on a plus sign, you reveal lower levels of information related to transactions on that date. The total amount of all Checks will also be displayed.
To the far right of the screen, the following buttons are available:
- CLOSE
Closes the screen, returning you to the application desktop.
- QUERY
Select to generate the display, using the specified parameters.
Runs the report associated with this screen.
Right-clicking on a posted Check in the Register enables you to select from the following menu options:
To view the register of Voucher transactions, select the "Voucher Register" option. The following screen will appear:
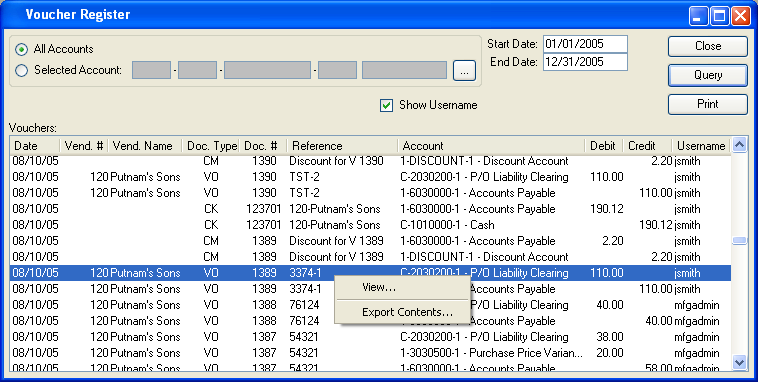
Tip
You have the ability to void posted Vouchers using the right-click menu in the Vendor History report.
When displaying the Voucher Register, you are presented with the following options:
- All Accounts
Select to display Voucher transactions for all G/L Accounts.
- Selected Account
Specify G/L Account whose Voucher transactions you want to display.
- Start Date
Vouchers posted on and after this date will be displayed. This is a required field.
- End Date
Vouchers posted on and before this date will be displayed. This is a required field.
- Vouchers
Display lists Voucher transactions based on the specified parameters. The totals for the included transactions will appear at the bottom of the screen.
- Show Username
Select to display the username of users associated with transactions.
To the far right of the screen, the following buttons are available:
- CLOSE
Closes the screen, returning you to the application desktop.
- QUERY
Select to generate the display, using the specified parameters. Start date and end date must be entered for request to proceed. Results will be displayed in the "Vouchers" list.
Runs the report associated with this screen.
Right-clicking on a Voucher in the list you to select from the following menu options:
To view details concerning the application of Checks and Credit Memos to A/P open items, select the "A/P Applications" option. The following screen will appear:
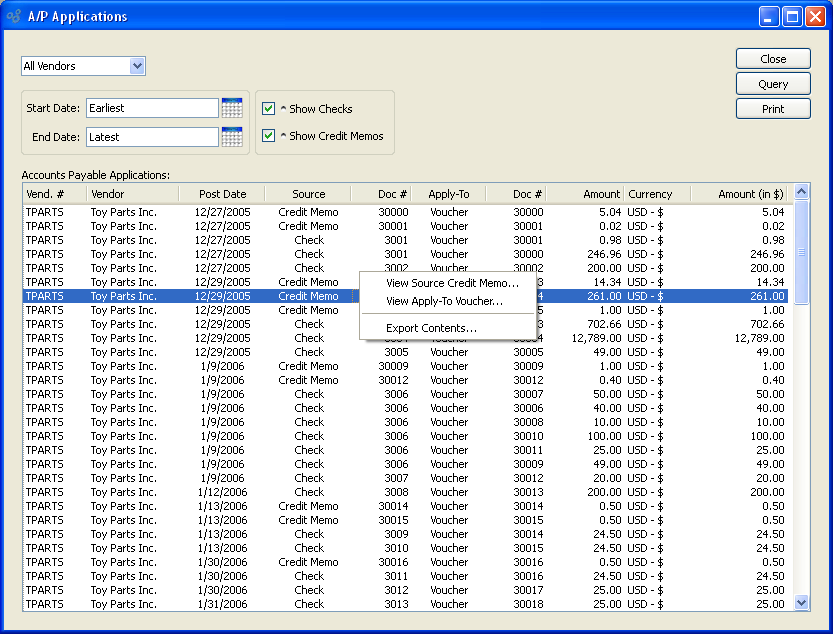
When viewing A/P application details, you are presented with the following options:
- Vendor
Select all or specific Vendors whose A/P Applications you would like to view.
- Start Date
A/P applications made on and after this date will be displayed.
- End Date
A/P applications made on and before this date will be displayed.
- Show Checks
Select to display only Check application details.
- Show Credit Memos
Select to display only Credit Memo application details.
- Accounts Payable Applications
Display lists A/P application details, using the specified parameters. The amount of each A/P Application is displayed in the document's Currency. The total amount of all applications during the period will display, normalized to the Base Currency using the Currency Exchange Rate effective on the document's Posting Date, at the bottom of the screen.
To the far right of the screen, the following buttons are available:
- CLOSE
Closes the screen, returning you to the application desktop.
- QUERY
Select to generate the display, using the specified parameters.
Runs the report associated with this screen.
Right-clicking on a Document in the A/P Applications list enables you to select from the following menu options:
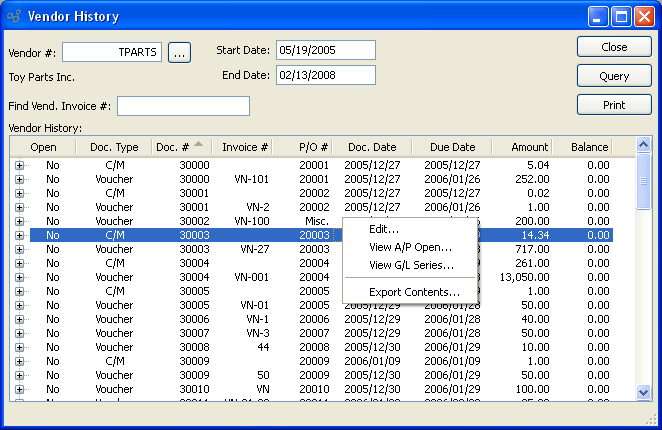
To view Vendor history, select the "Vendor History" option. The following screen will appear:
Tip
You can void posted Vouchers using the right-click menu on the Vendor History screen.
When displaying Vendor history, you are presented with the following options:
- Vendor #
Enter the Vendor number of the Vendor whose history you want to display.
- Find Vend. Invoice#
To search for an Invoice in the Vendor History display, begin typing an Invoice Number into this field. As you type, the list will automatically scroll toward the Invoice Number you are typing. You can also search for Invoices manually by scrolling through the list.
- Start Date
Vendor activity entered on and after this date will be displayed.
- End Date
Vendor activity entered on and before this date will be displayed.
- Vendor History
-
Display lists Vendor history, using the specified parameters.
This display is a nested list, with a plus ("+") sign located to the far left of the display next to each Document That may be expanded to lower levels. By clicking your mouse on a plus sign, you reveal lower levels of information related to the Document.
To the far right of the screen, the following buttons are available:
- CLOSE
Closes the screen, returning you to the application desktop.
- QUERY
Select to generate the display, using the specified parameters.
Runs the report associated with this screen.
Right-clicking on an Item in the Vendor History list enables you to select from the following menu options:
If the selected document is a Voucher, the following additional option will be available:
When posting Vouchers in batch mode, you are given the option to print a Payables Journal. To print a Payables Journal, select the "Payables Journal" option. The following screen will appear:
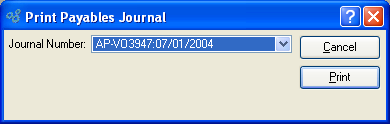
When printing a Payables Journal, you are presented with the following options:
- Journal Number
Specify the number of the Payables Journal you want to print. Payables Journals are created when Vouchers are posted. The Journal Number you select will include both the Payable Journal Number and also the date when the Vouchers were posted.
To the far right of the screen, the following buttons are available:
- CANCEL
Closes the screen without printing a Payables Journal, returning you to the application desktop.
Runs the report associated with this screen.
When posting A/P Checks in batch mode, you are given the option to print a Check Journal. To print a Check Journal, select the "Check Journal" option. The following screen will appear:
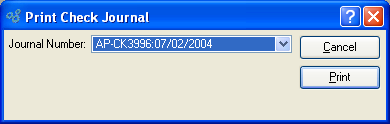
When printing or reprinting a Check Journal, you are presented with the following options:
- Journal Number
Specify the number of the Check Journal you want to print. Check Journals are created when A/P Checks are posted. The Journal Number you select will include both the Check Journal Number and also the date when the Checks were posted.
To the far right of the screen, the following buttons are available:
- CANCEL
Closes the screen without printing a Check Journal, returning you to the application desktop.
Runs the report associated with this screen.