Invoice section.
When you post a Sales Order that has been selected for billing, an Invoice is created for that Order. This is the standard flow for creating Invoices tied to Sales Orders. However, you also have the option of creating miscellaneous Invoices—that is, Invoices which are not tied to Sales Orders. For example, you might use a miscellaneous Invoice to bill for non-Inventory Items you have sold. To create a miscellaneous Invoice, select the "Create Invoice" option. The following screen will appear:
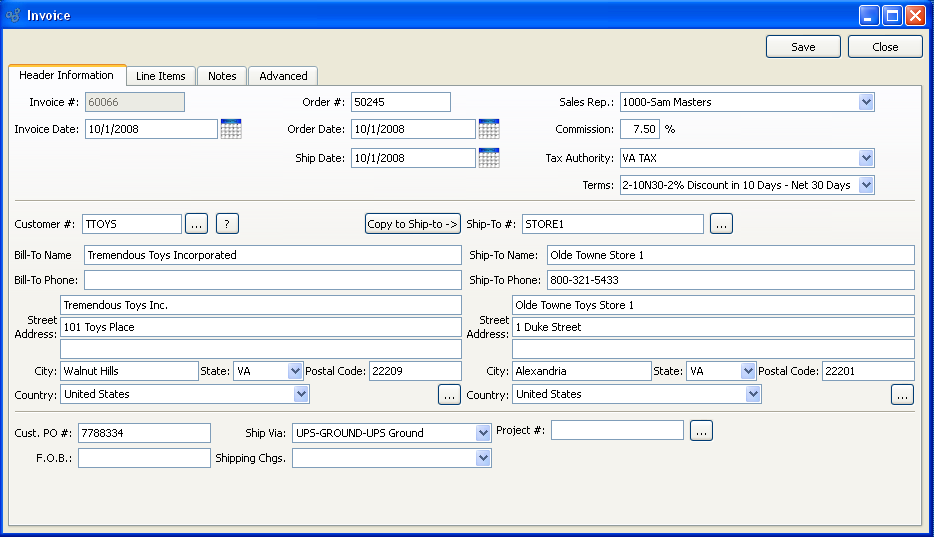
When creating an Invoice, you are presented with the following options:
- Invoice #
Next available Invoice Number will automatically display, unless your system requires you to enter Invoice Numbers manually. Default values and input parameters for Invoice Numbers are configurable at the system level.
- Order #
Will display the relevant Sales Order Number for Invoices generated from the Select for Billing process flow. If the Invoice is miscellaneous and was not generated by the Select for Billing process, then use this field for informational or reference purposes. Possible references might include Sales Order Number or Customer Purchase Order Number.
- Invoice Date
By default, the current day's date will be entered.
- Order Date
By default, the current day's date will be entered.
- Ship Date
By default, the current day's date will be entered.
- Customer #
Enter the Customer Number of the Customer to be billed. The browse button located to the right of the field leads to a searchable Customers list. You may also access this list using the keyboard shortcut "CTRL + L". Once a Customer Number is entered, the Customer name and billing address will display. Select the "?" or "$" symbol next to the browse button to view Customer information for the specified Customer. If a Customer's credit is "In Good Standing," the button will feature a black question mark ("?") icon. If the icon turns to an orange dollar sign ("$"), the Customer's credit Status is "On Credit Warning." A red dollar sign ("$") indicates the Customer's credit Status is "On Credit Hold."
Note
A valid Customer Number must be entered in the "Customer #" field before Line Items can be added to an Invoice. If no valid Customer Number is entered, you will not be able to add Line Items to the Invoice.
- Billing Address
Enter the Customer address where bills should be sent. By default, the billing address defined on the Customer master will be entered here.
- Copy to Ship-to
Select to copy contents of billing address into Ship-To address field. This option is enabled if the Customer master for the specified Customer indicates that free-form Ship-To's are allowed.
- Sales Rep.
Specify the Sales Representative for the Invoice. By default, the Customer's designated Sales Representative will appear in the field.
- Commission
By default, the commission percentage recorded on the Customer master will be automatically entered in this field. If for some reason you select a non-default Sales Representative at Order entry, the commission rate will not change. To adjust the commission rate, you must make the change manually.
- Tax Authority
Specify the Tax Authority for the Invoice. By default, the main Tax Authority for the Customer will appear in the field. The Ship-To Address Tax Authority will be shown if a Ship-To Address is being used.
- Terms
Specify the billing Terms for the Invoice. By default, the Customer's standard billing terms will appear in the field.
- Ship-To #
Enter the number of the preferred Ship-To Address. Customers may maintain multiple Ship-To Addresses. If the Customer master for the specified Customer indicates that free-form Ship-To's are allowed, then any address may be entered. If free-form Ship-To's are not allowed, then the Ship-To Address must be entered using the browse button located to the right of the field. The browse button leads to a searchable Ship-To Addresses list.
- Cust. PO #
PO #: Enter a Customer Purchase Order Number, as needed.
- F.O.B.
Enter free on board (FOB) terms for the Invoice.
- Ship Via
-
The preferred Ship Via method for the Customer will appear in the field. You may change the Ship Via using the list.
Tip
The Ship Via field supports free-form Ship Vias. If you want to enter a free-form Ship Via, simply type the name of the Ship Via into the field.
- Shipping Chgs.
Specify the Shipping charges associated with the Invoice. The preferred Shipping Charges Type for the associated Sales Order will appear in the field.
- Project #
-
Select a Project Number to associate with the Invoice. If the Invoice was created from a Sales Order—and the Sales Order had a Project Number associated with it—then the Project Number from the originating Sales Order will automatically be entered here. Once a Project Number is associated with a Sales Order, any Work Orders or Purchase Orders created by the Sales Order demand will automatically be linked to the same Project Number as the Sales Order. In this way, Sales Orders, Work Orders, and Purchase Orders may be linked to the same Project.
Tip
If your site is configured to create Projects automatically whenever new Sales Orders or Quotes are entered, the Projects generated in this way will assume the number of the Sales Order or Quote which caused their creation.
To the far right of the screen, the following buttons are available:
- SAVE
Creates the new Invoice.
- CLOSE
Closes the screen without creating a new Invoice, returning you to the application desktop.
To create or modify Invoice Line Items, select the "Line Items" tab at the top of the "Invoice" screen. The following screen will appear:
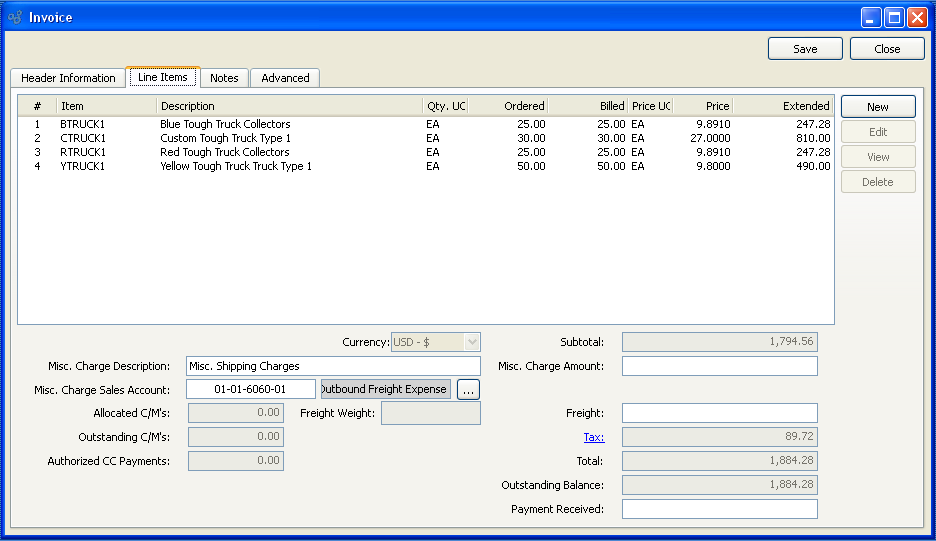
When creating or modifying Invoice Line Items, you are presented with the following options:
- Line Items
Display lists Line Items for this Invoice. A valid Customer Number must be entered in the "Customer #" field before Line Items can be added to the Order.
- Subtotal
Displays the subtotal for the Invoice Line Items.
- Tax
Tax is not calculated automatically when creating a miscellaneous Invoice—as it is when an Invoice is generated from a Sales Order. You must manually enter a Tax amount if you want to add Tax to a miscellaneous Invoice. To get a detailed view of the Tax calculation, click on the Tax link using your mouse.
- Misc. Charge Amount
Enter the amount of any miscellaneous charge. Examples of miscellaneous charges include palletization costs, co-op refund, etc. Before entering a miscellaneous charge amount, you must first assign the charge to a Sales Account and also enter a description of the charge.
- Misc. Charge Description
Enter a description to identify the miscellaneous charge.
- Misc. Charge Sales Account
Enter a Sales Account to assign the miscellaneous charge to.
- Total
Displays total amount of the Invoice.
- Payment Received
Enter the amount of payment received against the specified Sales Order, if any. This amount will appear on the Invoice, but will not be posted as a credit against the Invoice.
Note
The Payment Received field is an optional field which may be used to provide visibility into prepaid amounts. Because the field exists for visual purposes only, entering an amount in this field will not affect the amount due. The only way an Invoice may be offset is through the application of a Cash Receipt or a Credit Memo.
To the far right of the screen, the following buttons are available:
- SAVE
Saves the Invoice Line Item information.
- CLOSE
Closes the screen without creating a new Invoice, returning you to the application desktop.
- NEW
Opens screen for creating a new Invoice Line Item. Mac users may use COMMAND + N to enter a new Line Item.
- EDIT
Enables you to edit highlighted Invoice Line Items. The edit screen is the same as that for creating a new Invoice Line Item—except that when editing, the fields will contain Invoice Line Item information. Double-clicking on an Invoice Line Item will also bring you to the editing screen. Mac users may use COMMAND + E to edit an existing Line Item.
- VIEW
Highlight an Invoice Line Item and then select this button to reach a read-only view of the "Edit" screen.
- DELETE
Highlight an Invoice Line Item and then select this button to remove the Invoice Line Item from the list.
To add Notes to an Invoice, select the "Notes" tab at the top of the "Invoice" screen. If the Invoice was created from a Sales Order, any Sales Order Notes will be transferred to the Invoice. The following screen will appear:
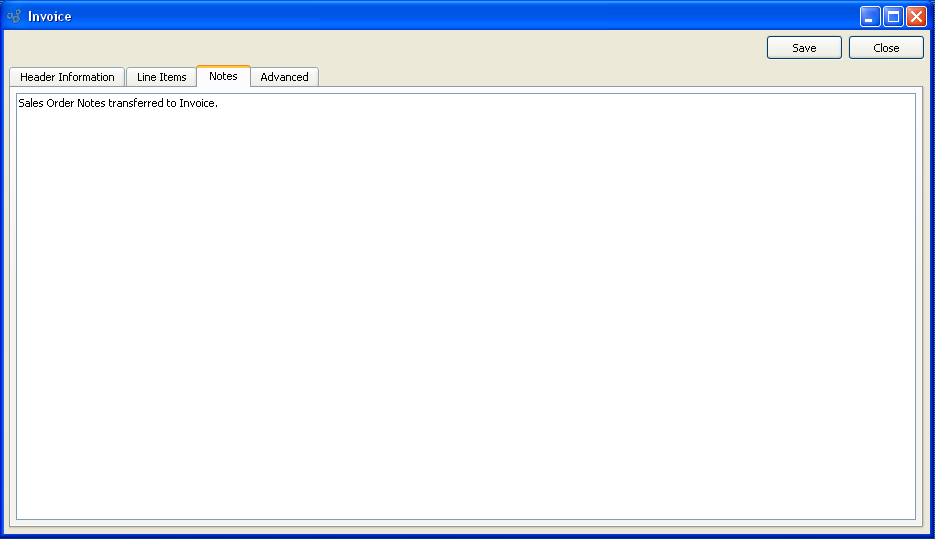
When adding Notes to an Invoice, you are presented with the following options:
- Notes
This is a scrolling text field with word-wrapping for entering Notes related to the Invoice. Notes entered on this screen will follow the Invoice through the billing process. For example, you may view notes associated with a posted Invoice within the Invoice Information report.
To the far right of the screen, the following buttons are available:
- SAVE
Saves the Invoice Notes.
- CLOSE
Closes the screen without creating a Note, returning you to the application desktop.
To specify advanced details related to the Invoice, select the "Advanced" tab. The following screen will appear:
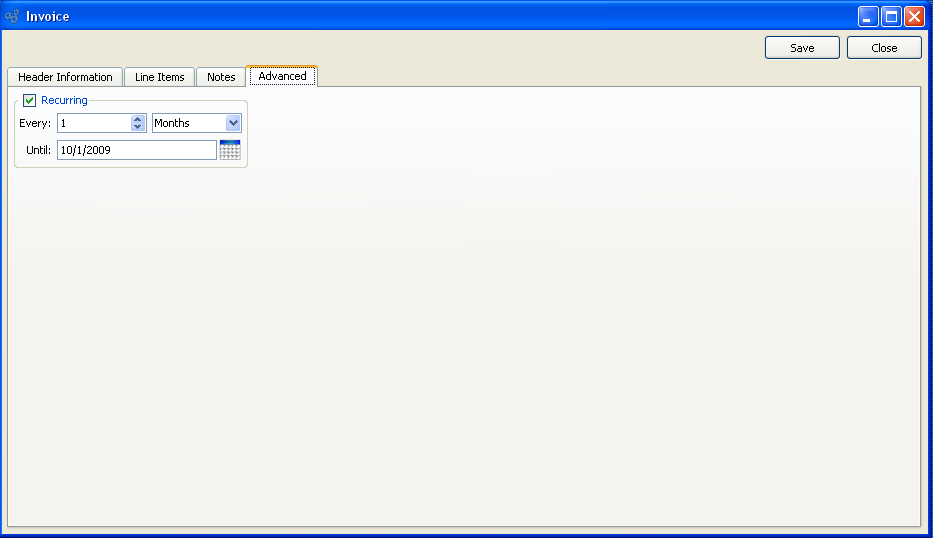
- Recurring
Select to indicate you want the Invoice to be a recurring Invoice, using the frequency settings you specify below. This feature enables you to automatically generate Invoices on a recurring basis (e.g., the same day of every month). Recurring Invoices are generated when you run the recurring Invoices utility, which is described in more detail here: Section 9.12.5, “ Create Recurring Invoices”. Newly-created recurring Invoices will appear on the list of unposted Invoices. Their distribution date will depend on the frequency specified and the Invoice date on the original Invoice. For example, if the original Invoice is dated January 1 and the frequency is once every month, then the next Invoices will be dated February 1, March 1, etc.
Tip
Once the recurring flag is set on the original Invoice, all subsequent, recurring Invoices will be marked in the database as children of the original parent Invoice. If you need to make changes to the frequency of a recurring Invoice (or to cancel the recurring Invoice), you must go back to the original parent Invoice and make the changes there.
- Every
Specify how frequently you want the Invoice to recur. For example, once (1) per month, six (6) times per year, etc.
- Until
Specify when the recurrence should stop. For example, on the last day of the year, at the end of six months, etc.
To the far right of the screen the following buttons are available:
- SAVE
Saves Advanced information.
- CLOSE
Closes the screen without creating Advanced information, returning you to the application desktop.
To add a new Invoice Line Item, select the NEW button. The following screen will appear:
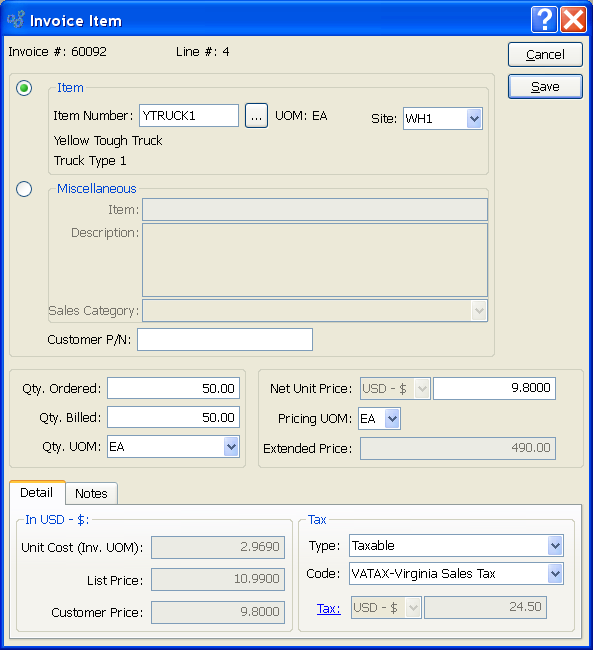
When creating a new Invoice Line Item, you are presented with the following options:
- Invoice #
Displays the Invoice Number specified in the "Invoice" screen.
- Line #
Displays the Line Item Number for the current Line Item.
- Item Type
-
Indicate the Item Type for the Invoice Line Item, by selecting one of the following options:
- Item
The browse button located to the right of the field leads to a searchable list of Inventory Items. The list will contain sold Items available for purchase by the specified Customer. The list of available Items may vary from Customer to Customer, depending on how Pricing Schedules are implemented at your site. Once an Item Number is entered, the Inventory Unit of Measure and Item description will automatically appear. Additionally, you may also specify the Item's supplying Site. Items may be supplied from multiple Sites. Sites designated as "Sold from" Sites in the Item Site master for an Item are considered "Supplying Sites" on this screen. By default, the Item Site with the highest Ranking will be selected as the supplying Site. If more than one Item Site share a Ranking of "1", the default supplying Site will be selected in alphabetical order. Item Sites are ranked using the Ranking mechanism on the Item Site master.
- Miscellaneous
Enter a name and description for the miscellaneous, non-Inventory Item you are billing the Customer for. The name and description fields are free-form, meaning they accept unlimited alphanumeric characters. You must also select a Sales Category. Sales Categories are used to identify the General Ledger (G/L) Accounts to be used when non-Inventory Sales transactions take place.
- Customer P/N
If applicable, enter a Customer Part Number to further identify the Item you are billing the Customer for. In the case of Inventory Items, the Customer Part Number will display automatically if you enter an Item Alias in the Item Number field. To enter an Item Alias, place the cursor in the Item Number field and then use the keyboard shortcut "CTRL + A". After you have entered a valid Item Alias, hit the TAB key. A list of Items that use the specified Item Alias will be displayed. Select the desired Item from the list. The Item Alias will display as the Customer Part Number. Item Aliases are defined on the Item master.
- Qty. Ordered
Enter the quantity of the Item you are billing for. The quantity ordered for Inventory Items is measured in the Item's Inventory UOM.
Note
The Quantity Ordered for Inventory Items is based on the Inventory UOM. But the Price is based on the Price UOM. Whenever these two UOMs are not identical, the Extended Price for a Line Item will be based on the following formula:
(Qty. Ordered) x (Price/Inv. Ratio) x (Net Unit Price)
If for some reason the Prices don"t look correct, check the Item master for the Line Item in question. It may be that the Inventory and Price UOMs do not exist in a 1:1 relationship.
- Qty. Billed
Specify the quantity of ordered Items you are billing for.
- Qty. UOM
Specify the Unit of Measure to be used when selling the Line Item. Sold Items may be assigned multiple Selling UOMs. These alternate UOMs may be defined on the Item master. If a Line Item has no Selling UOM defined, then the Inventory UOM will be used here by default.
- Net Unit Price
For Inventory Items having assigned Pricing Schedules, the Net Unit Price will be automatically calculated. For miscellaneous Items, the Net Unit Price must be entered manually.
- Pricing UOM
The Price Unit of Measure is the same as the Selling UOM. If an Item has Selling UOMs defined, then the Item may be sold and priced in these alternate UOMs. If no Selling UOMs are defined, then the Inventory UOM will be used here by default.
- Extended Price
Displays the Extended Price. The Extended Price for a Line Item is based on the quantity ordered multiplied by the Net Unit Price.
To view Costing and Tax information related to the Invoice Item, select the "Detail" tab. You will be presented with the following options:
- Unit Cost (Inv. UOM)
Displays the Standard Cost per unit in the Item's Inventory Unit of Measure.
- List Price
Displays the Item's List Price per Inventory UOM.
- Customer Price
Displays the Price (per Inventory UOM) given to the specified Customer for the specified Item. Special Customer Prices can be set for individual Customers or Customer Groups by using a Pricing Schedule.
- Tax
-
The following Tax-related information is available:
- Type
Specify the Tax Type for the Invoice Item. By default, the Item's Tax Type corresponding to the Invoice's Tax Authority will be presented here. The link between Tax Types and Tax Authorities is made on the Item master. If the Item master does not have a Tax Type for the Invoice's Tax Authority, then no Tax will be charged.
- Code
-
Specify the Tax Code to be applied to the Invoice Item. By default, the Tax Code specified in the Tax Selection matrix will be displayed here. For a Tax Code to be used, the matrix must have an entry which matches both the Item's Tax Type definition and the Tax Authority specified on the Invoice header. If no Tax Selection match exists, then no Tax Code will be used—meaning no Tax will be charged.
Tip
The relationship between Tax Authorities, Tax Types, and Tax Codes is established in the Tax Selection matrix.
- Tax
Displays the amount of Tax to be charged for the Invoice Line Item quantity. Sales Tax is calculated at the Invoice Line Item level. To get a detailed view of the Tax calculation, click on the Tax link using your mouse.
To add Notes to an Invoice Line Item, select the "Notes" tab at the bottom of the screen. If the Invoice was created from a Sales Order, any Sales Order Line Item Notes will be transferred to the Invoice. The following screen will appear:
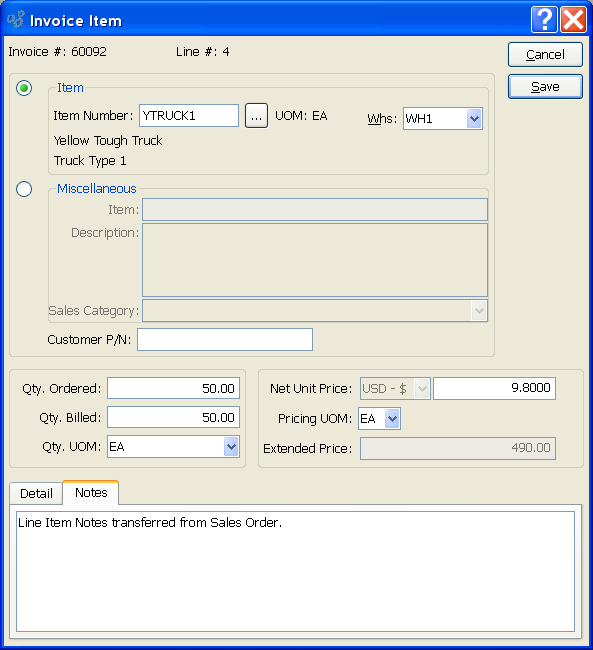
When entering Invoice Line Item Notes, you are presented with the following options:
- Notes
This is a scrolling text field with word-wrapping for entering general Notes related to the Invoice Item.
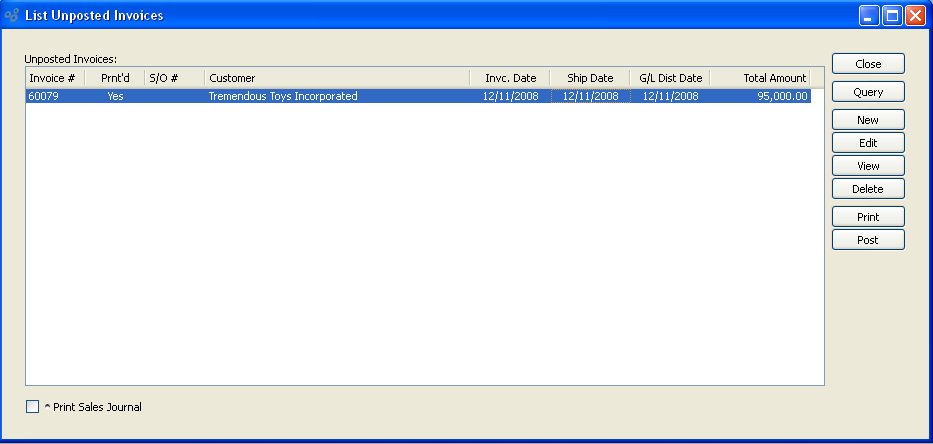
To edit or post Orders selected for billing, select the "Unposted Invoices" option. The following screen will appear:
Tip
You may select multiple Invoices for printing or posting by highlighting them using your mouse—or a combination of your mouse and either the SHIFT or CTRL keys.
The Unposted Invoices list displays information on all Invoices available for posting. Users with the appropriate privilege will also see the G/L distribution date column.
To the far right of the screen, the following buttons are available:
- CLOSE
Closes the screen, returning you to the application desktop.
- QUERY
Refreshes the screen with latest Invoices.
- NEW
Opens screen for creating a new Invoice.
- EDIT
Enables you to edit highlighted Invoices. The edit screen is the same as that for selecting a new Invoice—except that when editing, the fields will contain Invoice information. Double-clicking on an Invoice will also bring you to the editing screen.
Tip
Deleting an Invoice effectively reverses the transaction which created it. In other words, when you delete an Invoice the source Sales Order will be returned to the Billing Selections list. From there, you have the ability to either A) cancel the Billing Selection or B) re-create the Invoice.
Note
If the Customer specified on the Invoice has an EDI Profile defined, you may encounter an EDI processing interface when printing Invoices.
- POST
Highlight one—or multiple—Invoices, then select this button to post the selected Invoice(s). By default, Invoices post to the General Ledger (G/L) on the Invoice date. However, users with the appropriate privilege may change the default G/L distribution date to an alternate date during the Invoice posting process. If used, Invoices will post on the alternate date. The ability privileged users have to change the distribution date applies to the posting of both individual and also batches of Invoices from this screen.
- Print Sales Journal
Select to print the Sales Journal when selected Invoices are posted.
Right-clicking on an Invoice in the Unposted Invoices list enables you to select from the following menu options:
- Edit
Enables you to edit highlighted Invoices. The edit screen is the same as that for selecting a new Invoice—except that when editing, the fields will contain Invoice information. Double-clicking on an Invoice will also bring you to the editing screen.
- View
Highlight an Invoice and then select this button to reach a read-only view of the "Edit" screen.
- Delete
Highlight an Invoice and then select this button to remove the Invoice from the list. Deleting an Invoice causes the source Sales Order to be returned to the Billing Selections list.
- Post
Highlight one—or multiple—Invoices, then select this button to post the selected Invoice(s). By default, Invoices post to the General Ledger (G/L) on the Invoice date. However, users with the appropriate privilege may change the default G/L distribution date to an alternate date during the Invoice posting process. If used, Invoices will post on the alternate date. The ability privileged users have to change the distribution date applies to the posting of both individual and also batches of Invoices from this screen.
To post Invoices in batch mode, select the "Post Invoices" option. The following screen will appear:
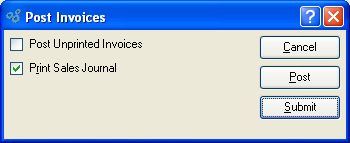
When posting Invoices, you are presented with the following options:
- Post Unprinted Invoices
Select to include unprinted Invoices in the list of Invoices to be posted. If not selected—and if there are unprinted Invoices waiting to be posted—you will be prompted to print the unprinted Invoices before posting may occur.
- Print Sales Journal
Select to print the Sales Journal in addition to posting the Invoices. Sales Journals are assigned a unique identification number, which corresponds to the Invoice batch and the date the batch was posted.
Note
A Sales Journal will also be created for Invoices that are posted individually—that is, not in batch mode, but one at a time. As with batch postings, the Sales Journals for individually-posted Invoices are assigned a unique identification number.
To the far right of the screen, the following buttons are available:
- CANCEL
Closes the screen without posting any Invoices, returning you to the application desktop.
- POST
Posts the Invoices, using the specified parameters.
- SUBMIT
Select to submit the requested action to the Batch Manager.