The Receivable Workbench is designed to consolidate on one screen the functions performed by Accounts Receivable personnel. To view the Receivables Workbench, select the "Workbench" option. The following screen will appear:
When viewing the Receivables Workbench, you are presented with the following options:
- Select
Specify the Customer(s) whose A/R information you would like to display.
- Customer #
Enter the Customer Number of the Customer whose A/R information you want to display.
Note
Once a Cash Receipt is posted, it will no longer appear in the Cash Receipts list.
- Total Open Items
Displays the total amount of A/R open items for the Customer. This total is the same amount as displayed in the A/R Display "Open Items by Customer."
- Cash Receipts
Displays the current list of unposted Cash Receipts for the specified Customer.
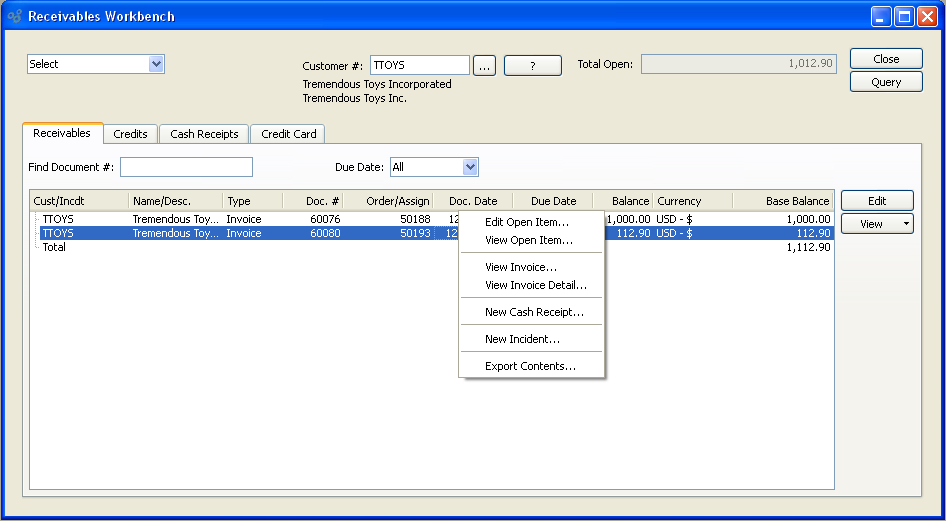
The Receivables tab provides the following options:
- Receivables
Displays the current list of receivable open items for the specified Customer, including invoices and misc. Debit Memos.
To the far right of the screen, the following buttons are available:
- EDIT
Enables you to edit highlighted receivables. Double-clicking on an item will also bring you to the editing screen.
- VIEW
Highlight an item and then select this button to reach a read-only view of the "Edit" screen.
Right-clicking on an Invoice in the Open Items list enables you to select from the following menu options:
The following additional options are available when right-clicking on other document types:
To add Credit Memos and Customer Deposits to Receivables Workbench select the "Credits" tab. The following screen will appear:
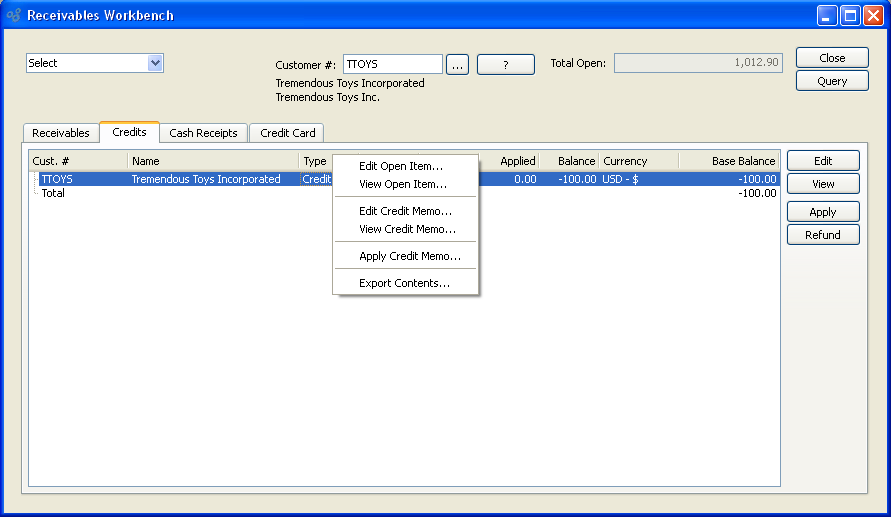
- Credits
Displays the current list of open Credit Memos and Customer Deposits for the specified Customer.
Tip
Once the full amount of a Credit Memo has been applied, the Credit Memo will be removed from the A/R Open Credit Memos list.
To the far right of the screen, the following buttons are available:
- APPLY
Highlight an unapplied Credit Memo or Cash Deposit and then select this button to apply an amount, as described in the ??? section.
- EDIT
Enables you to edit highlighted Credit Memos or Cash Deposit. The edit screen is the same as that for creating a new Credit Memo—except that when editing, the fields will contain pre-loaded Credit Memo information. Double-clicking on a Credit Memo will also bring you to the editing screen.
- VIEW
Highlight an unapplied Credit Memo or Cash Deposit and then select this button to reach a read-only view of the "Edit" screen.
- CREDIT CARD REFUND
Highlight an unapplied Credit Memo or Cash Deposit and then select this button to post a refund in the open amount to the Customer's Credit Card. This option will be visible if Credit Cards are enabled at your site.
Right-clicking on a Credit Memo in the A/R Open Credit Memos and Deposits list enables you to select from the following menu options:
- Edit Credit Memo
Enables you to edit highlighted Credit Memos or Cash Deposit. The edit screen is the same as that for creating a new Credit Memo—except that when editing, the fields will contain pre-loaded Credit Memo information. Double-clicking on a Credit Memo will also bring you to the editing screen.
- View Credit Memo
Highlight an unapplied Credit Memo or Cash Deposit and then select this button to reach a read-only view of the "Edit" screen.
- Apply Credit Memo
Highlight an unapplied Credit Memo or Cash Deposit and then select this button to apply an amount, as described in the ??? section.
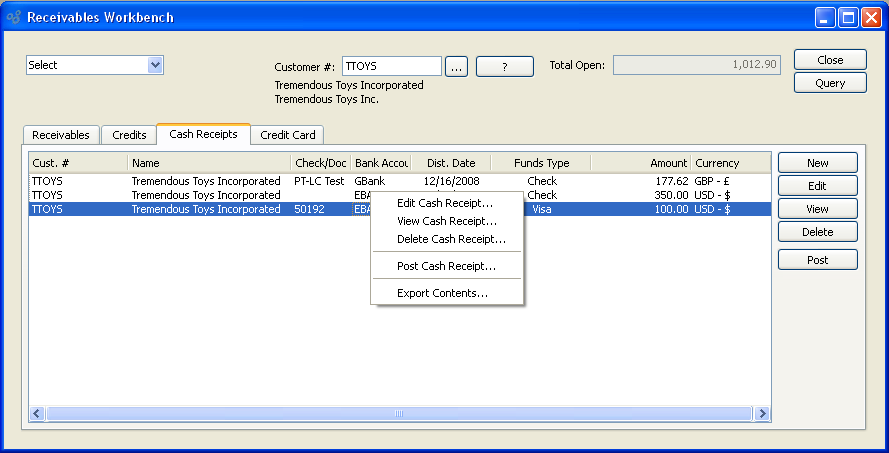
To add Cash Receipts to Receivables Workbench select the "Cash Receipts" tab. The following screen will appear:
To the far right of the screen, the following buttons are available:
- NEW
Opens screen for creating a new Cash Receipt. For more information on entering Cash Receipts, see the Section 9.2.3.1, “ New Cash Receipt” section.
- EDIT
Enables you to edit highlighted Cash Receipt. The edit screen is the same as that for creating a new Cash Receipt—except that when editing, the fields will contain pre-loaded Cash Receipt information. Double-clicking on a Cash Receipt will also bring you to the editing screen.
- VIEW
Highlight a Cash Receipt and then select this button to reach a read-only view of the "Edit" screen.
Right-clicking on a Cash Receipt in the Cash Receipts list enables you to select from the following menu options:
- Edit Cash Receipt
Enables you to edit highlighted Cash Receipt. The edit screen is the same as that for creating a new Cash Receipt—except that when editing, the fields will contain pre-loaded Cash Receipt information. Double-clicking on a Cash Receipt will also bring you to the editing screen.
- View Cash Receipt
Highlight a Cash Receipt and then select this button to reach a read-only view of the "Edit" screen.
To add Credit Cards to Receivables Workbench select the "Credit Card" tab. The following screen will appear:
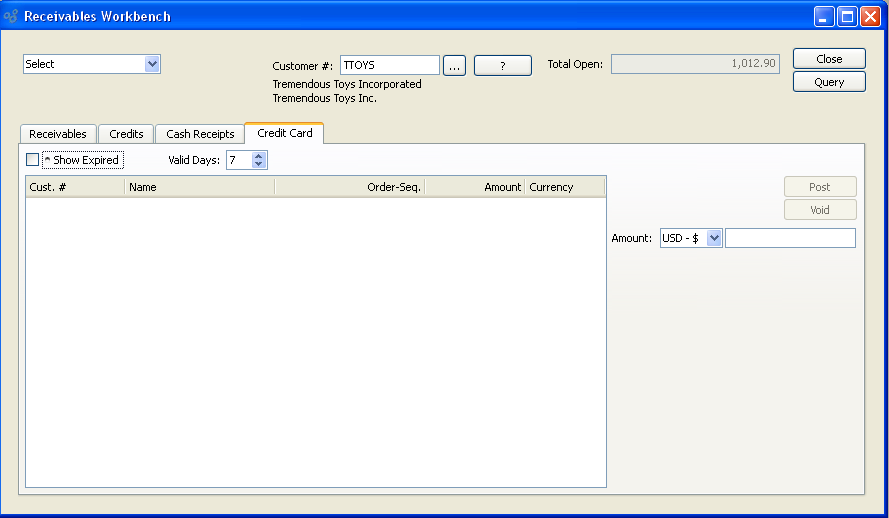
- Credit Card
Displays the current list of pre-authorized Credit Card charges for the specified Customer. Pre-authorizations are generated from the "Payments" tab of the Sales Order header.
- Show Expired
Lists all credit cards, including Expired cards.
- Valid Days
Displays credit cards which expire on after the number of days selected.
To the far right of the screen, the following options are available:
- POST
-
Highlight a pre-authorized Credit Card charge amount and then select this button to post-authorize the charge. When a pre-authorization is post-authorized, an unposted Cash Receipt is created in the specified post-authorization amount.
Tip
You only get one chance to post a Credit Card pre-authorization. Once a pre-authorization is post-authorized, it will no longer appear in the "Pre-authorized Credit Card Charges" list.
- VOID
Highlight a pre-authorized Credit Card charge amount and then select this button to void the pre-authorization.
- AMOUNT
Specify the amount of the post-authorization. By default, the pre-authorized amount will display here. However, you may override the default amount. After posting, a Cash Receipt for the Customer will be generated in the amount entered here (i.e., the post-authorization amount).