Throughout the application you have the ability to sort data and schedule activities according to specified time periods—or Calendars. Any users granted the "MaintainCalendars" privilege have the ability to define and maintain Calendars. To access the master list of Calendars, select the "Calendars" option. The following screen will appear:
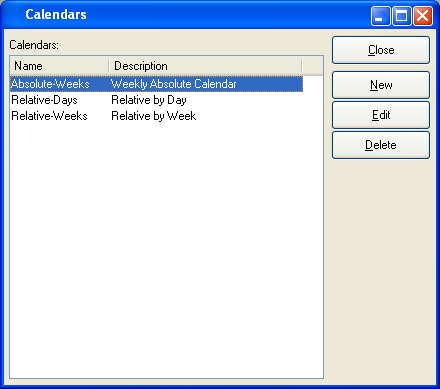
The "Calendar Master List" screen displays information on all existing Calendars, including Calendar name and Calendar description.
To the far right of the screen, the following buttons are available:
- CLOSE
Closes the screen, returning you to the application desktop.
- NEW
Opens screen for creating a new Calendar type.
- EDIT
Enables you to edit highlighted Calendar definitions. The edit screen is the same as that for creating a new Calendar definition—except that when editing, the fields will contain Calendar information. Double-clicking on a Calendar definition will also bring you to the editing screen.
- DELETE
Highlight a Calendar definition and then select this button to remove the Calendar from the list.
To create a new Calendar, select the NEW button. The following screen will appear:
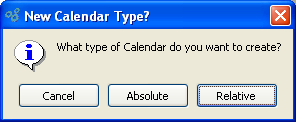
When determining the type of Calendar you want to create, you are presented with the following options:
- CANCEL
Closes the screen without creating a new Calendar, returning you to the previous screen.
- ABSOLUTE
Opens screen for creating a new absolute Calendar. Absolute Calendars consist of fixed time periods with specific dates defining the periods. The following example illustrates the kind of fixed time period to be found in an absolute Calendar: "01/01/2002 to 03/31/2002".
- RELATIVE
Opens screen for creating a new relative Calendar. Relative Calendars are more dynamic than absolute Calendars, allowing you to define time periods in relation to a point in time. Examples of points in time that relative Calendar periods might be defined in relation to include the following: "Current Day" or "Beginning of Current Month" or "Beginning of Next Quarter".
Regardless of which Calendar type you select, the following screen will appear:
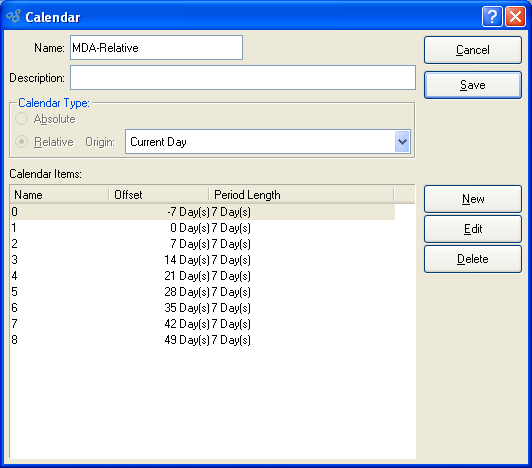
When creating a new Calendar, you are presented with the following options:
- Name
Enter a unique Calendar name.
- Description
Enter a brief description of the Calendar.
- Calendar Type
-
One of the following options will be selected:
- Absolute
Option will be selected if you specified absolute Calendar.
- Relative
Option will be selected if you specified relative Calendar.
- Origin
Specify the origin point for your relative Calendar.
- Calendar Items
Display lists Calendar Items for the specified Calendar. For relative Calendars, columns in the display include Calendar Item name, offset, and period length. For absolute Calendars, columns in the display include Calendar Item name, start date, and period.
To the far right of the screen, the following buttons are available:
- CANCEL
Closes the screen, returning you to the previous screen.
- SAVE
Creates the Calendar, returning you to the previous screen.
- NEW
Opens screen for creating a new Calendar Item.
- EDIT
Enables you to edit highlighted Calendar Items. The edit screen is the same as that for creating a new Calendar Item—except that when editing, the fields will contain Calendar Item information. Double-clicking on a Calendar Item will also bring you to the editing screen.
- DELETE
Highlight a Calendar Item and then select this button to remove the Calendar Item from the list.
To add a new Calendar Item to a Calendar, select the NEW button. The following screen will appear if the specified Calendar is an absolute Calendar:
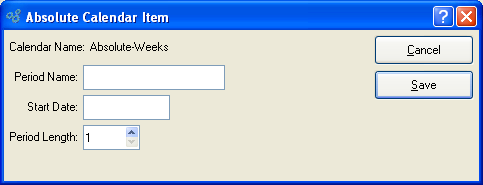
When creating a new Calendar Item for an absolute Calendar, you are presented with the following options:
- Calendar Name
Displays name of Calendar.
- Period Name
Enter a unique name to identify the absolute Calendar Item.
- Start Date
Date entered describes when Calendar Item period will begin.
- Period Length
Select a value between 1 and 999 using the arrow buttons located to the right of the field. Value entered dictates the length of the specified time period, measured in days.
To the far right of the screen, the following buttons are available:
- CANCEL
Closes the screen without creating a new absolute Calendar Item, returning you to the previous screen.
- SAVE
Creates the absolute Calendar Item and adds it to the list of Calendar Items.
The following screen will appear if the specified Calendar is a relative Calendar:
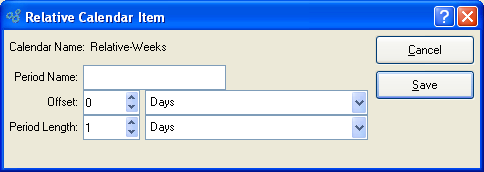
When creating a new Calendar Item for a relative Calendar, you are presented with the following options:
- Calendar Name
Displays name of Calendar.
- Period Name
Enter a unique name to identify the relative Calendar Item.
Note
Negative numbers may be used when defining an Offset period in a relative Calendar. This enables you to view data prior to the current period, for example.
- Offset
Select a value between -999 and 999 using the arrow buttons located to the right of the field. The offset is used to indicate the length of time a period is removed from a given starting point—for example, the current day, the current week, etc. Specify the type of interval to be used for the offset by selecting one from the list in the adjacent field. There are four different offset interval types to choose from: days, weeks, months, and years.
- Period Length
Select a value between 0 and 999 using the arrow buttons located to the right of the field. The period length dictates the length of the specified period. Specify the type of interval to be used for the period by selecting one from the list in the adjacent field. There are four different period interval types to choose from: days, weeks, months, and years.
To the far right of the screen, the following buttons are available:
- CANCEL
Closes the screen without creating a new relative Calendar Item, returning you to the previous screen.
- SAVE
Creates the relative Calendar Item and adds it to the list of Calendar Items.