Custom Screens are screens you can design, using QtDesigner, and then run within your xTuple ERP application. Essentially, a screen is a UI form which specifies widgets and layout information. Just like scripts, screens are stored in your xTuple database using the functionality described in this section. To take advantage of this functionality, you should have a basic understanding of how to program using ECMAScript and create UI screens using QtDesigner.
Tip
You can read more about creating custom screens and scripting in the Development Zone of our wiki at www.xtuple.org.
When creating a new screen, the first thing to do is give it a name. This name is then used to find matching scripts. Screens can be enabled or disabled—as well as have an order. You may have several screens with the same name; however, only the lowest enabled screen is used. In addition, you must export or import the UI file (i.e., you cannot edit the UI file directly on the database). And, creating a screen does not automatically make it available to users. You must first create a Section 10.15.2.1.1, “Custom Command” to makes sure the screen is added to the menu structure.
Note
Because screens are very limited in what they can be made to do without code or scripting, it will almost always be necessary to write one or more scripts for a screen.
To view the master list of available custom screens, select the "Screens" option. The following screen will appear:
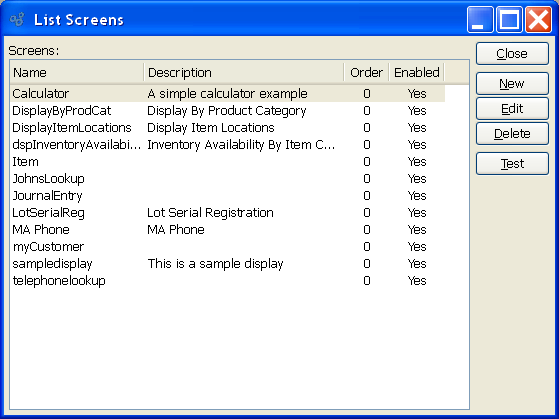
The screens master list displays information on all custom screens, including screen name, description, order, and enabled status.
To the far right of the screen, the following buttons are available:
- CLOSE
Closes the window, returning you to the application desktop.
- NEW
Opens window for adding a new custom screen to the screens master list.
- EDIT
Enables you to edit highlighted custom screens. The edit window is the same as that for creating a new custom screen—except that when editing, the fields will contain screen information.
- DELETE
Highlight a custom screen and then select this button to remove the custom screen from the master list.
- TEST
Highlight a custom screen and then select this button to launch the screen in the xTuple ERP application. If successful, the highlighted screen will appear within the xTuple framework (e.g., on the desktop). If the screen does not appear, then check your settings—and be sure you have imported your source UI file into the database.
To create a new custom screen, select the NEW button. The following window will appear:
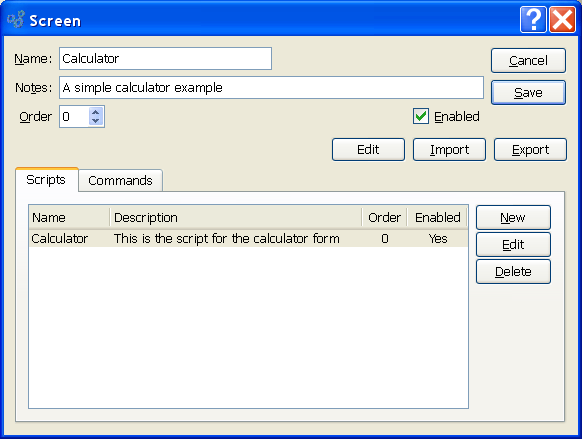
When creating a new custom screen, you are presented with the following options:
- Name
Enter a name to describe the screen.
- Notes
Enter some brief notes to describe the screen.
- Order
Specify the ranking of the screen. Having an order is useful when you have more than one screen with the same name—as when testing different versions of the same screen, for example. The version of the screen having the lowest number will be used (e.g., 0 will be executed before 1). To switch between screen versions, simply give the screen you want to run the lowest number.
- Enabled
Select to enable the screen. If not selected, the screen will be disabled.
- Scripts
Display lists any scripts associated with the screen. Scripts may be added/removed, enabled/disabled, and ordered according to need.
To the far right of the screen, the following buttons are available:
- CANCEL
Closes the screen without saving any changes.
- SAVE
Saves the screen definition, including any UI file which you may have imported. The screen definition and the UI file are both saved to the database.
- EDIT
Highlight a screen definition and then select this button to launch an embedded version of the Qt Designer tool. The embedded version of Qt Designer has been added to xTuple ERP to make screen editing more convenient. It is not a requirement that the embedded version of Qt Designer be used for building custom xTuple ERP screens. You may also use a standalone version of Qt Designer for this purpose.
- IMPORT
-
Select to import the UI file you want to use as the basis for your custom screen. UI files should be created using Qt Designer. When they are imported using this option, they are stored in the database and associated with the specified screen definition. If you ever want or need to edit the UI file and do not have a copy stored locally, you can simply export the UI file to your file system—and then re-import it when you are done editing. Whenever you import a UI file, it automatically replaces whatever UI file was in place before it.
Warning
Every time you import a UI file, the new UI file replaces whatever UI file was imported previously—regardless of the name of the file(s).
- EXPORT
Select to export the UI file associated with the screen. You would use this option if you need or want to edit the UI file and do not have a copy stored locally on your system. Once exported, the UI can be edited using Qt Designer—and then re-imported into the database using the import option. Whenever you import a UI file, it automatically replaces whatever UI file was in place before it.
- NEW
Opens screen for creating a new script. Read more about creating scripts in the Section 10.15.3, “Scripts” section.
- EDIT
Enables you to edit highlighted scripts. The edit screen is the same as that for creating a new script—except that when editing, the fields will contain script. Double-clicking on a script will also bring you to the editing screen.
- DELETE
Highlight a script and then select this button to remove the script from the list.
To specify commands for the screen, select the "Commands" tab. The following screen will appear:
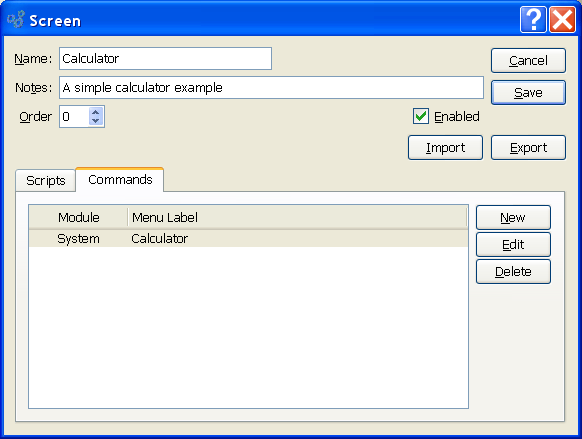
When specifying commands, you are presented with the following options:
- Commands
Displays the list of commands associated with the screen.
To the far right of the screen, the following buttons are available:
- NEW
Opens screen for creating a new command. The creation of custom commands is described in the Section 10.15.2.1.1, “Custom Command” section.
- EDIT
Enables you to edit highlighted commands. The edit screen is the same as that for creating a new command—except that when editing, the fields will contain command information. Double-clicking on a command will also bring you to the editing screen.
- DELETE
Highlight a command and then select this button to remove the command from the list.
Custom Commands enable you to insert ad hoc functionality into the xTuple ERP menu system. Examples of ad hoc features are custom report definitions, custom .ui screens, and more. All Custom Commands are launched from a special "Custom" menu, which gets created at the bottom of the menu tree for modules you are adding Custom Commands to. To create a new Custom Command, select the NEW button. The following screen will appear:
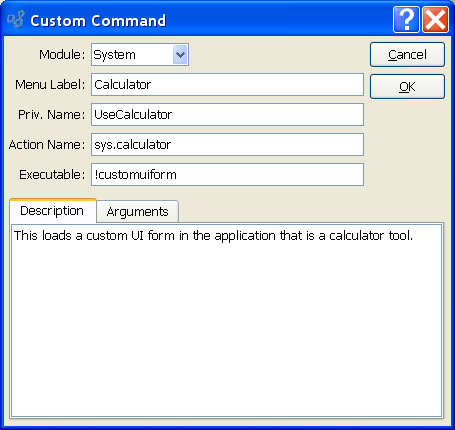
When creating a new Custom Command, you are presented with the following options:
- Module
Select the name of the module where you want the custom menu option to appear. You may create Custom Commands for any of the modules within the system. By default, a menu option named "Custom" will be added to the bottom of a module's menu tree when a Custom Command is created for that module.
- Menu Label
Enter a name to identify the Custom Command as it will appear on the menu tree for the specified module. Each menu label should be used to describe a separate Custom Command. There is no limit to the number of Custom Commands which may be added to a module.
- Priv. Name
Enter a name to describe the privilege associated with the Custom Command. By associating a privilege with a Custom Command, you gain the ability to grant or withhold access to the menu option on a user-by-user basis. Users who have been granted the privilege will have access to the Custom Command; all others will not.
- Action Name
Enter a programmatic-style name for the Custom Command, so the system will be able to locate and process the information easily. Having an action name also makes it possible to create a Hot Key for the Custom Command. Because of the Hot Key feature, you should consider using an action name which conforms to the already-existing naming convention for Hot Key actions. The Section 10.5.1, “Hot Key” section contains more information on Hot Keys.
- Executable
-
The information entered in this field will vary depending on the use case. If the Custom Command is designed to launch a custom screen, then the following text should be entered:
!customuiformIf, on the other hand, the Custom Command will launch an executable program (e.g., RPTRender), then you should enter the path to the location where the executable program is located. When users select the associated Custom Command menu option, the executable program will be launched. For example, if you want to run a custom report, specify the location for the standalone report renderer (RPTrender). The following examples illustrate how (on Windows) you can map to either local or network drives:
Local Drive:
C:\\Program Files\\xTuple\\RPTrender.exeNetwork URL:
\\\\drive_name\\dir_name\\xTuple\\RPTrender.exe
Note
You may encounter cross-platform conflicts when placing executables on network drives. To reduce these conflicts, it may be necessary to create separate custom menus to support executables designed for different operating systems.
Tip
Macintosh users should enter an executable path which points all the way to the executable file located within a package's Contents directory. For example, to launch the report renderer, enter the following path:
../rptrender.app/Contents/MacOS/rptrender
Under Mac, the RPTrender application will not open if the path does not continue past the rptrender.app file.
- Description
Enter text to describe the Custom Command.
If you want the system to pass parameters or other arguments to the specified executable when it is launched, select the "Arguments" tab. The following screen will appear:
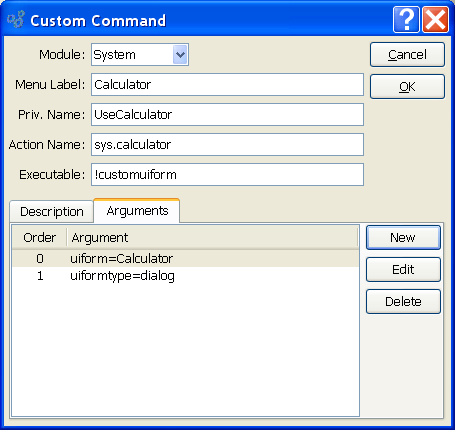
The arguments display lists all arguments defined for the specified executable. The following table shows the range of possible arguments if the executable is a custom screen (i.e., ui form):
Table 10.1. Arguments Used for Custom Screens
Syntax |
Description |
|---|---|
uiform= |
Use this argument followed by the name of the ui form (i.e., the screen) which the Custom Command will be executing. The screen name is the name entered on the main custom screen window. Example:
|
uiformtype= |
Use this argument to specify which type of screen it
is. There are two possible values: Example:
|
The next table shows the range of possible arguments you can pass to the report renderer (RPTRender) if you are running custom reports:
Table 10.2. Arguments Used for Custom Reports
Syntax |
Description |
|---|---|
-databaseURL |
Used to specify the location of the database server. This is followed by the server address, database name, and port number. If running a custom report, the program will automatically connect to the database specified when the report renderer (RPTrender) is launched Example:
|
-username |
Enter the username RPTrender should use to connect to the specified database. Example:
|
-passwd |
Enter the password for the specified user. Example:
|
-param |
Enter any parameters you want the system to pass to the report renderer. These pre-defined parameters will be used when RPTrender runs the specified report definition. Example:
|
|
This argument tells RPTrender to print the specified report definition using the indicated parameters—if any. Example:
|
|
-close |
Use this argument to close the RPTrender program when its work is done. Example:
|
-noAuth |
This argument tell RPTrender that not all login fields, if any, are required and it will attempt to login to the specified database without presenting the login screen. Example:
|
-loadfromdb= |
This argument specifies the name a report definition to load from the database that is being connected to. Example:
|
-printerName= |
This argument specified the printer to print to by it's name. Names vary from system to system and you must determine the correct name for this option. Example:
|
|
This argument specifies that you want the output to be in .pdf format. Example:
|
|
-outpdf= |
This argument specifies the name you want pdf output to be sent to. Example:
|
To the far right of the screen, the following buttons are available:
- CLOSE
Closes the screen, returning you to the application desktop.
- NEW
Opens screen for creating a new argument.
- EDIT
Enables you to edit highlighted argument definitions. The edit screen is the same as that for creating a new argument definition—except that when editing, the fields will contain argument information. Double-clicking on an argument definition will also bring you to the editing screen.
- DELETE
Highlight an argument definition and then select this button to remove the argument from the list.
To create a new argument for the system to pass to the specified executable program, select the NEW button. The following screen will appear:
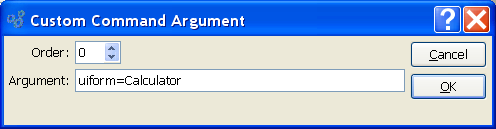
When creating a new argument, you are presented with the following options:
- Order
Specify the order in which the argument should be passed to the specified executable program.
Tip
You can change the position of an argument as it appears on the list by editing the argument and changing its order number.
- Argument
Enter the argument you want the system to pass to the specified executable program.
To the far right of the screen, the following buttons are available:
- CANCEL
Closes the screen, returning you to the application desktop.
- OK
Saves the argument information.