The Bank Reconciliation section is where Bank statements are reconciled against Deposits and Payments posted in the system.
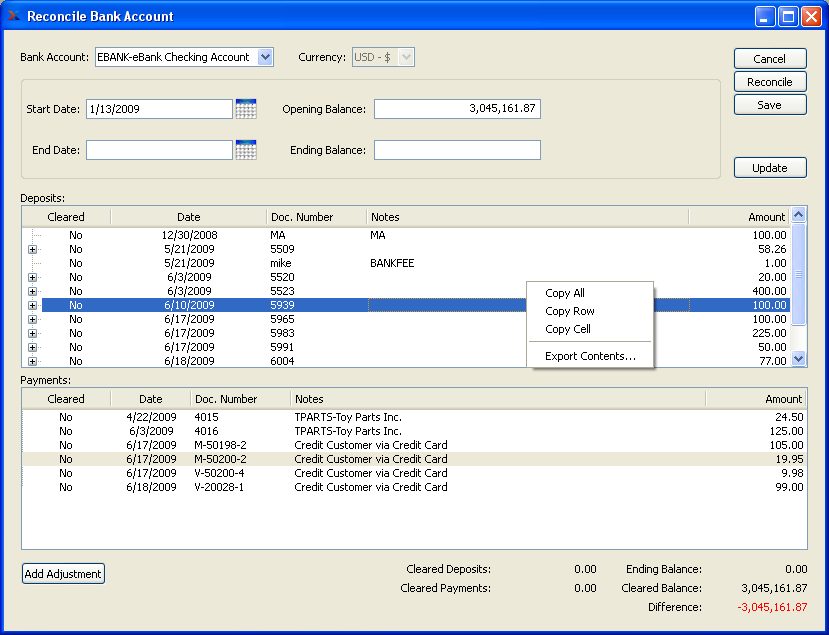
To reconcile a Bank Account, select the "Reconcile Bank Account" option. The following screen will appear:
Tip
To work on a Bank Reconciliation over several sessions, simply select the SAVE button. You work will be saved and ready when you return.
When reconciling a Bank Account, you are presented with the following options:
- Bank Account
Specify the Bank Account you want to reconcile.
- Start Date
By default the start date field will be pre-populated based on the end date of your most recent Bank Reconciliation—if it exists. The date used will be one day after the previous Bank Reconciliation end date. If you want to use a different start date, simply edit the date to your preferred date.
- End Date
Specify the ending date of the current Bank Reconciliation period. Bank Reconciliations are identified by their date ranges, for reporting purposes.
- Opening Balance
By default the opening balance field will be pre-populated with the ending balance of your most recent Bank Reconciliation—if it exists. If you want to use a different opening balance, simply edit the amount to your preferred amount.
- Ending Balance
Enter the current ending balance, as shown on your Bank statement.
Tip
Double-click on a Deposit or Payment line to mark the Document as "Cleared."
Note
Once a date range has been reconciled, it's not possible to re-reconcile the same range twice. You must select new date range.
- Deposits
Display lists posted Receipts and other Deposits which have not been previously reconciled. This display is a nested list, with a plus ("+") sign located to the far left of the display next to each Receipt or Deposit that may be expanded to lower levels. By clicking your mouse on a plus sign, you reveal lower levels of information related to the group.
Note
Cash Receipts posted in batch mode will appear grouped together in the nested list appearing under the appropriate Document Number.
- Payments
Display lists posted Checks and other Payments which have not been previously reconciled.
Tip
Double-click on a Deposit or Payment line to mark the Document as "Cleared."
- ADD ADJUSTMENT
Select to add a Bank Adjustment directly to either the Deposits or Payments list. Bank Adjustments marked as "Cleared" will automatically be posted to the General Ledger (G/L) when a Bank Account is reconciled. For more information on entering Bank Adjustments, see Section 4.2, “Bank Adjustment”.
- Cleared Deposits
Displays a running total amount of Deposits which have been marked as cleared. Double-click on a Document using your mouse to mark the Document as cleared. To unmark the Document, double-click on it again. The "Cleared" column value will alternate between "Yes" and "No" as you double-click on a Document line.
- Cleared Payments
Displays a running total amount of Payments which have been marked as cleared. Double-click on a Document using your mouse to mark the Document as cleared. To unmark the Document, double-click on it again. The "Cleared" column value will alternate between "Yes" and "No" as you double-click on a Document line.
- Ending Balance
Displays the ending balance entered in the "Ending Balance" field.
- Cleared Balance
Displays the cleared balance. The cleared balance is calculated based on the following formula:
(Opening Balance) + (Cleared Deposits) - (Cleared Payments)
Tip
A successful Bank Reconciliation will result in the cleared balance being equal to the ending balance.
- Difference
Displays the difference between the ending balance and the cleared balance.
Tip
A successful Bank Reconciliation will result in having "0.00" displayed as the amount of difference between the two balances.
To the far right of the screen, the following buttons are available:
- CANCEL
Closes the screen without reconciling a Bank Account, returning you to the application desktop. If you want to save any work you have done in the current or a prior session, you should select the SAVE button. Selecting CANCEL can cause your saved information to be cleared.
- RECONCILE
Select to reconcile the specified Bank Account and create a record of the Bank Reconciliation. Selecting this option posts the Bank Reconciliation. The posting may be viewed using the Bank Reconciliation History display. The start and end dates for the posting are used to identify it.
Note
Once a Bank Account is reconciled, any Deposits or Payments which were marked as "Cleared" will no longer be available for future Bank Reconciliations.
- SAVE
Select this option to save your work during the current Bank Reconciliation. The next time you open the Bank Reconciliation screen, the work you saved previously will be ready for you to start working on it again.
- UPDATE
Select to update the Bank Reconciliation screen with any new transaction information not already listed.
Bank Adjustments may be entered to record Deposits or Payments. Use the Bank Adjustment functionality to enter Bank Interest, Bank Fees, miscellaneous deposits, etc. To enter a Bank Adjustment, select the "Bank Adjustment" option. The following screen will appear:
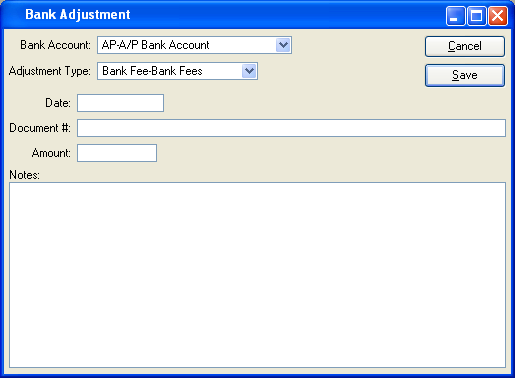
When entering a Bank Adjustment, you are presented with the following options:
- Bank Account
Specify the Bank Account you want to enter a Bank Adjustment for.
- Date
Specify the effective date of the Bank Adjustment.
- Document #
Creates a user-defined reference for the Bank Adjustment. The Document reference will be posted with the General Ledger (G/L) transaction record when the Bank Adjustment is generated. This field may be used for internal tracking and auditing purposes.
- Amount
Specify the monetary value of the Bank Adjustment.
To the far right of the screen, the following buttons are available:
- CANCEL
Closes the screen without entering a Bank Adjustment, returning you to the previous screen.
- SAVE
Creates the Bank Adjustment and makes it available for posting from the Adjustment Edit List.
Tip
Bank Adjustments, when marked as "Cleared," may also be posted when a Bank Account is reconciled.
To view the list of unposted Bank Adjustments, select the "Adjustment Edit List" option. The following screen will appear:
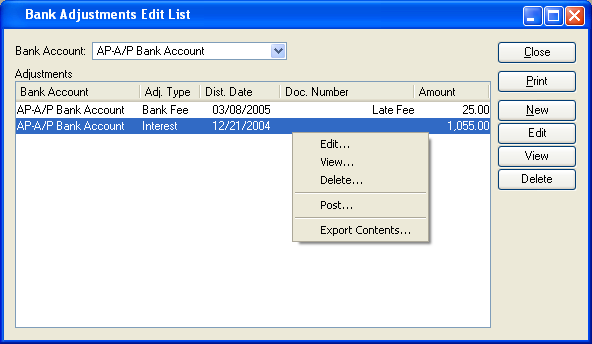
The "Adjustment Edit List" screen displays information on all unposted Bank Adjustments, including Bank Account, Adjustment Type, distribution date, Document Number, and amount.
To the far right of the list, the following buttons are available:
- CLOSE
Closes the screen, returning you to the application desktop.
Runs the report associated with this screen.
- NEW
Opens screen for creating a new Bank Adjustment.
- EDIT
Enables you to edit highlighted Bank Adjustment. The edit screen is the same as that for creating a new Bank Adjustment—except that when editing, the fields will contain Bank Adjustment information. Double-clicking on a Bank Adjustment will also bring you to the editing screen.
- VIEW
Highlight a Bank Adjustment and then select this button to reach a read-only view of the "Edit" screen.
- DELETE
Highlight a Bank Adjustment and then select this button to remove the Bank Adjustment from the list.
Bank Reconciliation reports section.
To view detailed information on past Bank Reconciliations, select the "Bank Reconciliation History" option. The following screen will appear:
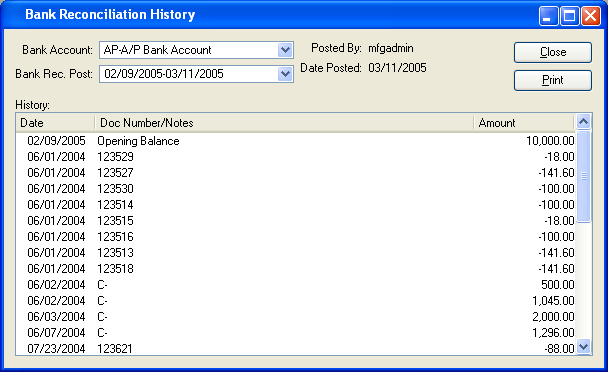
When displaying detailed information on past Bank Reconciliations, you are presented with the following options:
- Bank Account
Specify the Bank Account whose Bank Reconciliation History you want to view.
- Bank Rec. Post
Select the Bank Reconciliation whose detailed history you want to display.
Bank Reconciliations are identified by the date range they encompass. When a Bank Account is reconciled, the date range is determined by the specified start date and end date.
- Posted by
Displays the name of the user who posted the Bank Reconciliation.
- Date Posted
Displays the date when the Bank Reconciliation was posted.
- History
Display lists details for the specified Bank Reconciliation.
To the far right of the list, the following buttons are available:
- CLOSE
Closes the screen, returning you to the application desktop.
Prints a copy of the contents displayed on the screen.
To view summarized Bank Reconciliation history, select the "Summarized Bank Reconciliation History" option. The following screen will appear:
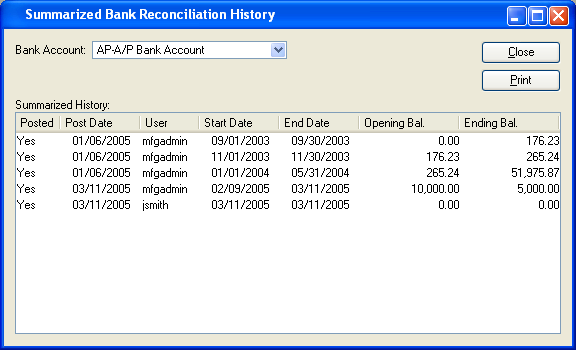
When displaying summarized Bank Reconciliation history, you are presented with the following options:
- Bank Account
Specify the Bank Account whose summarized Bank Reconciliation History you want to view.
- Summarized History
Display will summarize past Bank Reconciliations for the specified Bank Account.
To the far right of the list, the following buttons are available:
- CLOSE
Closes the screen, returning you to the application desktop.
Prints a copy of the contents displayed on the screen.