Financial Statements section.
The Financial Reporting Engine (FRE) enables you to design custom Financial Reports, which can then be previewed, printed, or exported in tab-delimited format. You are free to decide how much detail to include in these custom reports. For example, you can create highly-detailed Financial Reports or executive summaries.
To create a new Financial Report, select the "Create Financial Report" option. The following screen will appear:

When creating a new Financial Report, you are presented with the following options:
- Name
Enter a name to identify the Financial Report.
- Description
Enter a brief description of the Financial Report.
- Active
Select to indicate whether the Financial Report is active or not. Inactive Financial Reports will be hidden on the master list of Financial Reports by default.
- Report Type
Select one of the following standard statement formats to be the basis for your new Financial Report:
- Income Statement
Select to create an Income Statement. You might also consider building an Income Statement by making a copy of the system-defined Income Statement, using the system-defined report as a template. To make a copy of the system-defined Income Statement, simply use the COPY button on the master list of Financial Reports. Once copied, you can freely modify the report to suit your needs.
- Balance Sheet
Select to create a Balance Sheet. You might also consider building an Income Statement by making a copy of the system-defined Balance Sheet, using the system-defined report as a template. To make a copy of the system-defined Balance Sheet, simply use the COPY button on the master list of Financial Reports. Once copied, you can freely modify the report to suit your needs.
- Cash Flow
Select to create a Cash Flow statement. Because Cash Flow statements can vary so widely, there is no system-defined Cash Flow template.
- Ad Hoc
Select to create an Ad Hoc report. An Ad Hoc report is completely free-form and user-defined. This format gives you the flexibility to create reports which do not fit neatly within the three standard report types. Any Financial Report created in the system prior to version 2.1.0 will be classified as an Ad Hoc report.
The system ships with a basic Income Statement designed to generate Financial Reports using your Revenue and Expense Account data. In this section, we will examine this basic Income Statement.
Note
Because the basic Income Statement is a system-defined Financial Report, it may not be modified (except to make it active or inactive). However, you may copy the report and modify the copy. You can think of the basic Income Statement as a template for building other, similar Financial Reports.
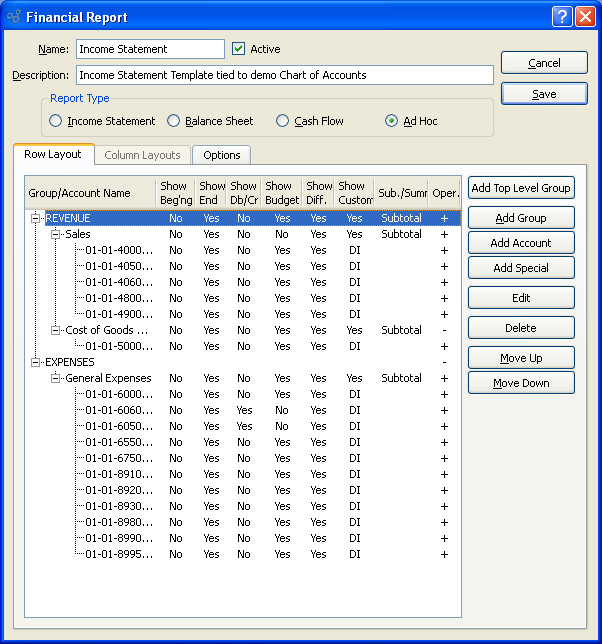
To view the basic Income Statement, select it for editing from the master list of Financial Reports. A message will alert you that this is a system-defined report which may only be viewed, not edited. Select the OK button to reach the following screen:

The "Row Layout" tab displays information on all the Account Groups and Account Numbers which make up the basic Income Statement. If this were a custom report you were creating, you would be able to add/remove Account Groups and Account Numbers to meet your specific needs.
Tip
To build row layouts for the three standard report types—Income Statement, Balance Sheet, and Cash Flow—use the same techniques as when building Ad Hoc report row layouts. The only difference is you won"t need to specify which balances to calculate (e.g., beginning, ending, etc.). The system determines which calculations will be done for the standard statement formats.
When viewing row layouts for the basic Income Statement, you are presented with the following columns:
Group/Account Name: Lists the Account Groups and Account Types used in the report. The two main groups are REVENUE and EXPENSES. All Accounts having Type=Revenue are included in the REVENUE group. And within the EXPENSES group all Accounts having Type=Expense are included.
Sub./Summ.: Indicates whether group information will be presented as a subtotal or summary line when the report is run. In the basic Income Statement, all Account Groups are subtotaled.
Oper.: Specifies whether a group will be added to ("+") or subtracted from ("-") the group total. In the basic Income Statement, REVENUE is added to and EXPENSES are subtracted from the INCOME group.
Note
Select the VIEW button to see the system-defined settings for each Account Group and Account Type used in the basic Income Statement. When creating your own reports, you may choose to either imitate or alter these default settings.
In addition to row layouts, you may also define column layouts for your Financial Reports. Column layouts are used to specify the time buckets financial information will be sorted into. You specify a column layout to use when viewing or printing Financial Reports. You may define any number of column layouts. Each layout will be linked to either a pre-defined report definition or a custom report definition you create yourself.
On the basic Income Statement, select the "Column Layouts" tab to view all the time buckets available for the report. If this were a custom report you were creating, you would be able to add/remove column layouts to meet your specific needs.
Tip
See Section 5.1.3, “ Cash Flow Report” for specific examples describing the various column layout options.

When viewing column layouts for the basic Income Statement, you are presented with the following column definitions—each of which defines a different time bucket available for viewing Income Statement information:
Month: Displays data for the current month (i.e., Accounting Period). The month used as the basis for the reporting is specified when the report is run. Uses the "FinancialReportMonth" report definition.
Month, Budget: Displays data for the current month, compared to Budget information for the current month. The month used as the basis for the reporting is specified when the report is run. Uses the "FinancialReportMonthBudget" report definition.
Month, Prior Month: Displays data for the current month, compared to the prior month. The month used as the basis for the reporting is specified when the report is run. Uses the "FinancialReportMonthPriorMonth" report definition.
Month, Prior Year Month: Displays data for the current month, compared to the same month in the prior Fiscal Year. The month used as the basis for the reporting is specified when the report is run. Uses the "FinancialReportMonthPriorMonth" report definition.
Month, QTD: Displays data for the current month, compared to the current Quarter to-date. The month used as the basis for the reporting is specified when the report is run. Uses the "FinancialReportMonthQuarter" report definition.
Month, YTD: Displays data for the current month, compared to the current Fiscal Year to-date. The month used as the basis for the reporting is specified when the report is run. Uses the "FinancialReportMonthYear" report definition.
QTD: Displays data for the current Quarter to-date. The month used as the basis for the reporting is specified when the report is run. Uses the "FinancialReportQuarter" report definition.
QTD, Budget: Displays data for the current Quarter to-date, compared to Budget information for the current Quarter. The month used as the basis for the reporting is specified when the report is run. Uses the "FinancialReportQuarterBudget" report definition.
QTD, Prior Quarter: Displays data for the current Quarter to-date, compared to the prior Quarter. The month used as the basis for the reporting is specified when the report is run. Uses the "FinancialReportQuarterPriorQuarter" report definition.
QTD, Prior Year Quarter: Displays data for the current Quarter to-date, compared to the same Quarter in the prior Fiscal Year. The month used as the basis for the reporting is specified when the report is run. Uses the "FinancialReportQuarterPriorQuarter" report definition.
YTD: Displays data for the current Fiscal Year to-date. The month used as the basis for the reporting is specified when the report is run. Uses the "FinancialReportYear" report definition.
YTD, Budget: Displays data for the current Fiscal Year to-date, compared to Budget information for the current Fiscal Year to-date. The month used as the basis for the reporting is specified when the report is run. Uses the "FinancialReportYearBudget" report definition.
YTD, Prior Full Year: Displays data for the current Fiscal Year to-date, compared to information for the entire prior Fiscal Year. The month used as the basis for the reporting is specified when the report is run. Uses the "FinancialReportYearPriorYear" report definition.
YTD, Prior Year YTD: Displays data for the current Fiscal Year to-date, compared to the prior Fiscal Year to-date. The month used as the basis for the reporting is specified when the report is run. Uses the "FinancialReportYearPriorYear" report definition.
Note
Select the VIEW button to see the system-defined settings for each Account Group and Account Type used in the basic Income Statement. When creating your own reports, you may choose to either imitate or alter these default settings.
Tip
When creating a column layout, you can choose from the following standard report templates:
FinancialReport (used by all Ad Hoc reports)
FinancialReportMonth
FinancialReportMonthBudget
FinancialReportMonthDbCr
FinancialReportMonthPriorMonth
FinancialReportMonthPriorQuarter
FinancialReportMonthPriorYear
FinancialReportMonthQuarter
FinancialReportMonthYear
FinancialReportQuarter
FinancialReportQuarterBudget
FinancialReportQuarterPriorQuarter
FinancialReportYear
FinancialReportYearBudget
FinancialReportYearPriorYear
FinancialTrend (used by non-Ad-Hoc trend reports)
If for some reason these templates don"t meet your needs, you can always use OpenRPT to a) modify them or b) create your own custom report templates.
To view additional configuration options for the layout of the basic Income Statement, select the "Options" tab. The following screen will appear:
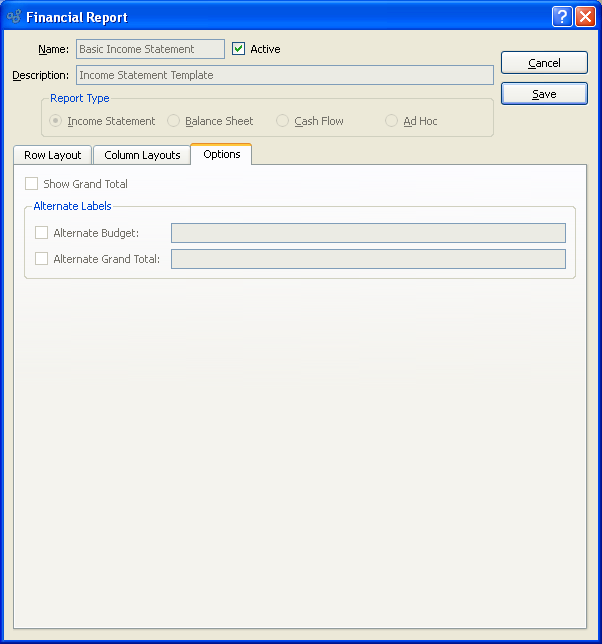
The layout for the basic Income Statement does not use any extra configuration options. However, if you were creating your own Income Statement layout, you could choose to a) include a Grand Total row and b) use alternate labels for Budget and Grand Total rows when viewing and/or printing the Financial Report.
The system ships with a basic Balance Sheet designed to generate Financial Reports using your Chart of Accounts data. In this section, we will examine this basic Balance Sheet.
Note
Because the basic Balance Sheet is a system-defined Financial Report, it may not be modified (except to make it active or inactive). However, you may copy the report and modify the copy. You can think of the basic Balance Sheet as a template for building other, similar Financial Reports.
To view the basic Balance Sheet, select it for editing from the master list of Financial Reports. A message will alert you that this is a system-defined report which may only be viewed, not edited. Select the OK button to reach the following screen:
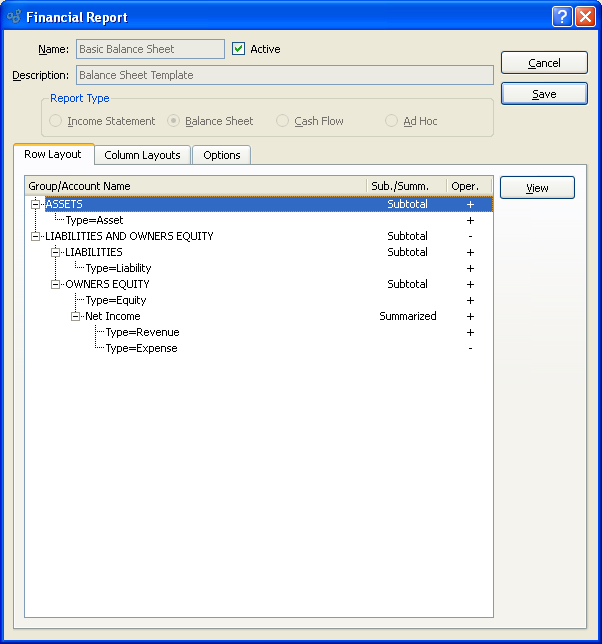
The "Row Layout" tab displays information on all the Account Groups and Account Numbers which make up the basic Balance Sheet. If this were a custom report you were creating, you would be able to add/remove Account Groups and Account Numbers to meet your specific needs.
Tip
To build row layouts for the three standard report types—Income Statement, Balance Sheet, and Cash Flow—use the same techniques as when building Ad Hoc report row layouts. The only difference is you won"t need to specify which balances to calculate (e.g., beginning, ending, etc.). The system determines which calculations will be done for the standard statement formats.
When viewing row layouts for the basic Balance Sheet, you are presented with the following columns:
Group/Account Name: Lists the Account Groups and Account Types used in the report. The two main groups are ASSETS and LIABILITIES AND OWNERS EQUITY. All Accounts having Type=Asset are included in the ASSETS group. And within the LIABILITIES AND OWNERS EQUITY group all Accounts having Type=Liability, Type=Equity, and also Net Income are included.
Sub./Summ.: Indicates whether group information will be presented as a subtotal or summary line when the report is run. In the basic Balance Sheet, all Account Groups are subtotaled—except for the Net Income group, which is summarized.
Oper.: Specifies whether a group will be added to ("+") or subtracted from ("-") the group total. In the basic Income Statement, LIABILITIES AND OWNERS EQUITY are subtracted from the ASSETS group.
Note
Select the VIEW button to see the system-defined settings for each Account Group and Account Type used in the basic Income Statement. When creating your own reports, you may choose to either imitate or alter these default settings.
In addition to row layouts, you may also define column layouts for your Financial Reports. Column layouts are used to specify the time buckets financial information will be sorted into. You specify a column layout to use when viewing or printing Financial Reports. You may define any number of column layouts. Each layout will be linked to either a pre-defined report definition or a custom report definition you create yourself.
On the basic Balance Sheet, select the "Column Layouts" tab to view all the time buckets available for the report. If this were a custom report you were creating, you would be able to add/remove column layouts to meet your specific needs.
Tip
See Section 5.1.3, “ Cash Flow Report” for specific examples describing the various column layout options.
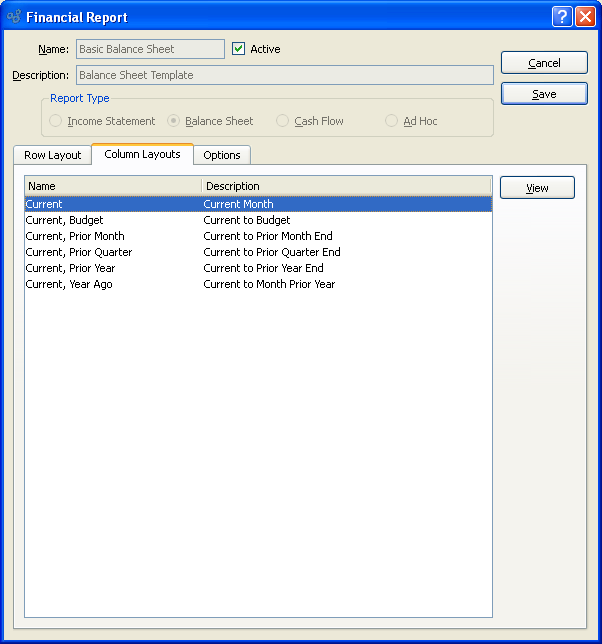
When viewing column layouts for the basic Balance Sheet, you are presented with the following column definitions—each of which defines a different time bucket available for viewing Balance Sheet information:
Current: Displays data for the current month (i.e., Accounting Period). The month used as the basis for the reporting is specified when the report is run. Uses the "FinancialReportMonth" report definition.
Current, Budget: Displays data for the current month, compared to Budget information for the current month. The month used as the basis for the reporting is specified when the report is run. Uses the "FinancialReportMonthBudget" report definition.
Current, Prior Month: Displays data for the current month, compared to the prior month end. The month used as the basis for the reporting is specified when the report is run. Uses the "FinancialReportMonthPriorMonth" report definition.
Current, Prior Quarter: Displays data for the current month, compared to the prior Quarter end. The month used as the basis for the reporting is specified when the report is run. Uses the "FinancialReportMonthPriorQuarter" report definition.
Current, Prior Year: Displays data for the current month, compared to the Prior Fiscal Year end. The month used as the basis for the reporting is specified when the report is run. Uses the "FinancialReportMonthPriorYear" report definition.
Current, Year Ago: Displays data for the current month, compared to the same month in the prior Fiscal Year. The month used as the basis for the reporting is specified when the report is run. Uses the "FinancialReportMonthPriorMonth" report definition.
Note
Select the VIEW button to see the system-defined settings for each Account Group and Account Type used in the basic Income Statement. When creating your own reports, you may choose to either imitate or alter these default settings.
Tip
When creating a column layout, you can choose from the following standard report templates:
FinancialReport (used by all Ad Hoc reports)
FinancialReportMonth
FinancialReportMonthBudget
FinancialReportMonthDbCr
FinancialReportMonthPriorMonth
FinancialReportMonthPriorQuarter
FinancialReportMonthPriorYear
FinancialReportMonthQuarter
FinancialReportMonthYear
FinancialReportQuarter
FinancialReportQuarterBudget
FinancialReportQuarterPriorQuarter
FinancialReportYear
FinancialReportYearBudget
FinancialReportYearPriorYear
FinancialTrend (used by non-Ad-Hoc trend reports)
If for some reason these templates don"t meet your needs, you can always use OpenRPT to a) modify them or b) create your own custom report templates.
To view additional configuration options for the layout of the basic Balance Sheet, select the "Options" tab. The following screen will appear:

The layout for the basic Balance Sheet does not use any extra configuration options. However, if you were creating your own Balance Sheet layout, you could choose to a) include a Grand Total row and b) use alternate labels for Budget and Grand Total rows when viewing and/or printing the Financial Report.
Because Cash Flow statements can vary so widely, there is no system-defined Cash Flow template. To create your own Cash Flow statement, select the "Cash Flow" report type. The following screen will appear:
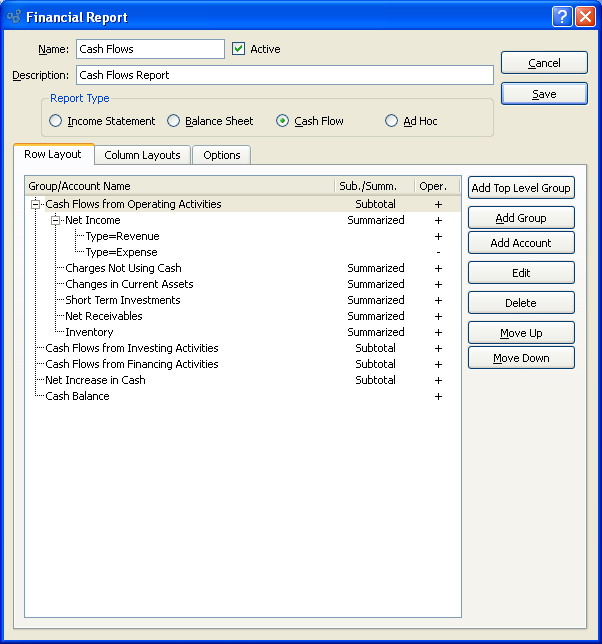
To create the row layouts for a Cash Flow report, you would follow the same basic steps as described in Section 5.1.4, “ Ad Hoc Report”. The only difference is you won"t need to specify which balances to calculate (e.g., beginning, ending, etc.). Because the Cash Flow report is one of three standard statement formats, the system determines which calculations will be done.
Tip
To build row layouts for the three standard report types—Income Statement, Balance Sheet, and Cash Flow—use the same techniques as when building Ad Hoc report row layouts. The only difference is you won"t need to specify which balances to calculate (e.g., beginning, ending, etc.). The system determines which calculations will be done for the standard statement formats.
In addition to row layouts, you may also define column layouts for your Cash Flow report. Column layouts are used to specify the time buckets financial information will be sorted into. You specify a column layout to use when viewing or printing Financial Reports. You may define any number of column layouts. Each layout will be linked to either a pre-defined report definition or a custom report definition you create yourself.
To create column layouts for a Cash Flow report, select the "Column Layouts" tab. The following screen will appear:

When creating column layouts for a Cash Flow report, you are presented with the following options:
- Column Layouts
Display lists column layouts defined for the Cash Flow report.
To the far right of the screen, the following buttons are available:
- CANCEL
Closes the screen without creating the report, returning you to the application desktop.
- SAVE
Creates the report and adds it to the master list of Financial Reports.
- ADD
Select to add a column layout.
- EDIT
Enables you to edit highlighted column layouts. The edit screen is the same as that for creating a new column layout—except that when editing, the fields will contain column layout information. Double-clicking on a column layout will also bring you to the editing screen.
- DELETE
Highlight a column layout and then select this button to remove the column layout from the list.
To create a new column layout, select the ADD button. The following screen will appear:
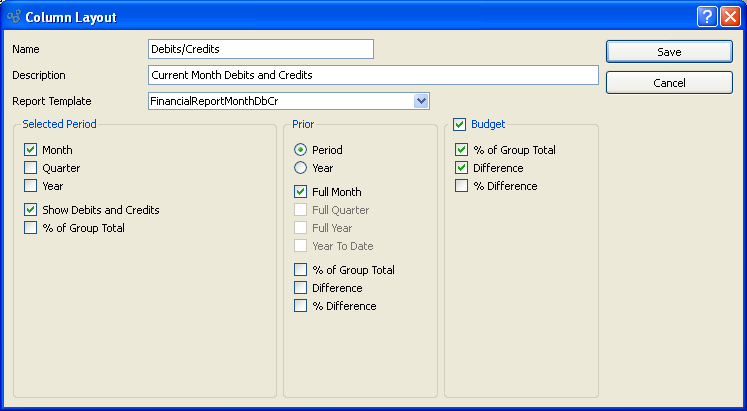
When adding a new column layout, you are presented with the following options:
- Name
Enter a name to identify the column layout.
- Description
Enter a brief description of the column layout.
- Report Template
Specify the report definition you want to associate with the column layout.
Tip
When creating a column layout, you can choose from the following standard report templates:
FinancialReport (used by all Ad Hoc reports)
FinancialReportMonth
FinancialReportMonthBudget
FinancialReportMonthDbCr
FinancialReportMonthPriorMonth
FinancialReportMonthPriorQuarter
FinancialReportMonthPriorYear
FinancialReportMonthQuarter
FinancialReportMonthYear
FinancialReportQuarter
FinancialReportQuarterBudget
FinancialReportQuarterPriorQuarter
FinancialReportYear
FinancialReportYearBudget
FinancialReportYearPriorYear
FinancialTrend (used by non-Ad-Hoc trend reports)
If for some reason these templates don"t meet your needs, you can always use OpenRPT to a) modify them or b) create your own custom report templates.
- Selected Period
Select the time period(s) you want to have included in the column layout:
- Month
Select to have the current month included as one of the columns in the layout. The month used as the basis for the reporting is specified when the report is run. If selected, you will also have the option to include the prior month in the layout.
- Quarter
Select to have the current Quarter included as one of the columns in the layout. The month used as the basis for the reporting is specified when the report is run. If selected, you will also have the option to include the prior Quarter in the layout.
- Year
Select to have the current Fiscal Year-to-Date included as one of the columns in the layout. The month used as the basis for the reporting is specified when the report is run. If selected, you will also have the option to include the prior Fiscal Year in the layout.
- Show Debits and Credits
Select to have Debits and Credits included as columns for each of the time periods (month, Quarter, Year) specified for the layout.
- % of Group Total
Select to have the percentage of group total included as a column for each of the time periods (month, Quarter, Year) specified for the layout. This information will only be shown for groups and Accounts whose row definition specifies "Show % of Group Total."
Note
There is no relationship between the selected time periods in a column layout and the Trend Report options available when viewing a Financial Report. Trend Reporting ignores column layouts.
- Prior
Select to include prior time period information in the column layout by selecting from the following options:
Period: Will include information for the Accounting Period immediately prior to the Period specified when the Financial Report is run. You must also select at least one of the time-period check boxes below ("Full Month" or "Full Quarter") for prior information to be included.
Year: Will include information for the Fiscal Year immediately prior to the current Year specified when the Financial Report is run. You must also select at least one of the time-period check boxes below ("Full Month," "Full Quarter," etc.) for prior information to be included.
Full Month: If selected, a full month's worth of information will be included when the report is run—depending on the prior time period specified above. If the "Period" option is specified, then the month immediately prior to the selected Accounting Period will be included. If the "Year" option is specified, then the selected month in the prior Fiscal Year will be included.
Full Quarter: If selected, a full Quarter's worth of information will be included when the report is run—depending on the prior time period specified above. If the "Period" option is specified, then the Quarter immediately prior to the selected Accounting Period's Quarter will be included. If the "Year" option is specified, then the selected Quarter in the prior Fiscal Year will be included.
Full Year: If selected, the full prior Fiscal Year's worth of information will be included when the report is run.
Tip
The "Full Year" and "Year To Date" check boxes are not affected by the "Period" or "Year" selections.
Year To Date: If selected, the current Fiscal Year to Date's worth of information will be included when the report is run.
% of Group Total: If selected, the percentage of the group total for the prior time period will be included when the report is run. This information will only be shown for groups and Accounts whose row definition specifies "Show % of Group Total."
Difference: If selected, the amount of difference between the selected Accounting Period and the prior time period will be included when the report is run.
% of Difference: If selected, the percentage difference between the selected Accounting Period and the prior time period will be included when the report is run.
- Budget
Select to include Budget information in the column layout. If selected, the following additional options will be available:
- % of Group Total
If selected, the Budget percentage of the group total will be included when the report is run. This information will only be shown for groups and Accounts whose row definition specifies "Show % of Group Total."
- Difference
If selected, the amount of difference between the selected Accounting Period and the Budget for the Period will be included when the report is run.
- % of Difference
If selected, the percentage difference between the selected Accounting Period and the Budget for the Period will be included when the report is run.
To the far right of the screen, the following buttons are available:
- SAVE
Creates the column layout and adds it to the list of column layouts.
- CANCEL
Closes the screen without creating the column layout, returning you to the previous screen.
To specify additional configuration options for the layout of your Cash Flow report, select the "Options" tab. The following screen will appear:
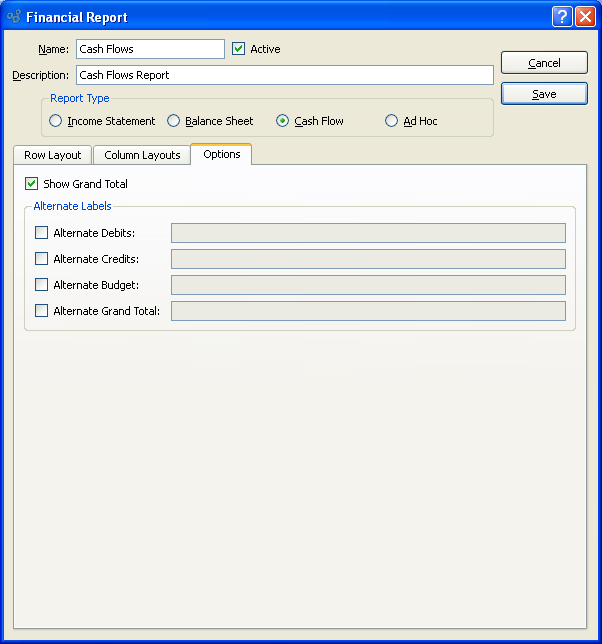
When specifying additional configuration options for the layout of your Cash Flow report, you are presented with the following options:
- Show Grand Total
Select if you want to include a grand total in the Financial Report.
- Alternate Labels
You have the option to substitute alternate text for the following column headers or row labels when viewing or printing your Financial Report:
- Alternate Debits
Specify an alternate label to use as the header text for the Debits column. If not specified, the default text will be used.
- Alternate Credits
Specify an alternate label to use as the header text for the Credits column. If not specified, the default text will be used.
- Alternate Budget
Specify an alternate label to use as the header text for the Budget column. If not specified, the default text will be used.
- Alternate Grand Total
Specify an alternate label to use as the text for the Grand Total row. If not specified, the default text will be used.
Ad Hoc reports are completely free-form and user-defined. They give you the flexibility to create Financial Reports which do not fit neatly within the three standard statement formats.
Note
Any Financial Reports created in the system prior to version 2.1.0 are considered to be Ad Hoc reports.
Tip
Exercise caution before converting an Ad Hoc report to another report type. The process removes Ad Hoc group definitions, replacing them with standard statement format settings.
To create an Ad Hoc Report, select the "Ad Hoc" report type. The following screen will appear:
When creating a new Ad Hoc report, you are presented with the following options:
- Row Layout
Display lists groups and Account Numbers for the specified Financial Report.
To the far right of the screen, the following buttons are available:
- CANCEL
Closes the screen without creating a report, returning you to the previous screen.
- SAVE
Creates the report and adds it to the master list of Financial Reports.
- ADD TOP LEVEL GROUP
Select to add a top level group to the report.
- ADD GROUP
Select to add a group to the report.
- ADD ACCOUNT
Select to add G/L Account(s) to a Financial Report Group.
- ADD SPECIAL
Select to add a Financial Report Special item.
- EDIT
Enables you to edit highlighted Group or Account. The edit screen is the same as that for creating a new Group or Account—except that when editing, the fields will contain Group or Account information. Double-clicking on a Group or Account will also bring you to the editing screen.
- DELETE
Highlight a Group or Account and then select this button to remove the Group or Account from the list.
- MOVE UP
Highlight a Group or Account and then select this button to move the Group or Account up the list.
- MOVE DOWN
Highlight a Group or Account and then select this button to move the Group or Account up the list.
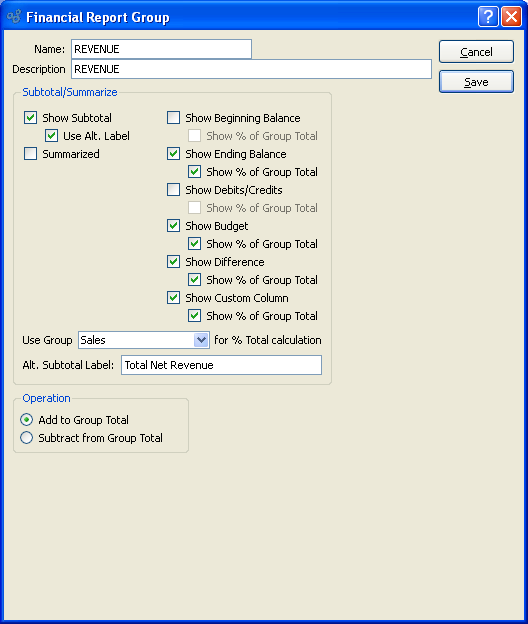
To add a new Financial Report Group, select either the ADD TOP LEVEL GROUP or ADD GROUP buttons. The following screen will appear:
Tip
To add a sub-group to a top level group, simply highlight a top level group using your mouse, then select the ADD GROUP button. The screen for adding a sub-group is the same as the one for adding a top level group.
When creating a new Financial Report Group, you are presented with the following options:
- Name
Enter a name to identify the Financial Report Group.
- Description
Enter a brief description of the Financial Report Group.
- Subtotal/Summarize
Specify whether you want to subtotal or summarize the Financial Report Group. If either is selected, specify which of the following display options you want to include subtotals or summaries for:
- Show Subtotal
Will show subtotals for all included Accounts when the Financial Report is generated.
- Use Alt. Label
Select if you want to replace the word "Subtotal" with an alternate label when the report is run. The text for the alternate label is entered below.
- Summarized
Will summarize the information for all included Accounts and roll that information up to the group's top level when the Financial Report is generated.
Tip
A Financial Report can show either a subtotal or a summary—but not both. If neither is specified, the additional options will be unavailable.
- Show Beginning Balance
Will show the subtotal or summary for all beginning balances included in the group when the Financial Report is generated. If selected, you also have the option to show the beginning balance as a percentage of the group total. Not selecting means the system will not calculate the beginning balance for the group.
- Show Ending Balance
Will show the subtotal or summary for all ending balances included in the group when the Financial Report is generated. If selected, you also have the option to show the ending balance as a percentage of the group total. Not selecting means the system will not calculate the ending balance for the group.
- Show Debits/Credits
Will show the subtotal or summary for all Debit/Credit balances included in the group when the Financial Report is generated. If selected, you also have the option to show Debits and Credits as a percentage of the group total. Not selecting means the system will not calculate the Debit/Credit balances for the group.
- Show Budget
Will show the subtotal or summary for all Budget balances included in the group when the Financial Report is generated. If selected, you also have the option to show Budgets as a percentage of the group total. Not selecting means the system will not calculate the Budget balance for the group.
- Show Difference
Will show the difference between Debits and Credits included in the group when the Financial Report is generated. If selected, you also have the option to show the difference as a percentage of the group total. Not selecting means the system will not calculate the difference between Debits and Credits for the group.
- Show Custom Column
Will show Custom column details included in the group when the Financial Report is generated. If selected, you also have the option to show Custom column details as a percentage of the group total. Not selecting means the system will not calculate the Custom column balance for the group.
- Use Group for % Total calculation
Indicate which group to use if percentage of group total calculations are specified. By default, the system will use the parent group for these calculations. The parent group is understood to be the group within which the group is immediately located. If you prefer to determine percentage of total calculations using a different group than the parent group, select that group from the list. All groups defined for the Financial Report will be available for selection.
- Alt. Subtotal Label
Enter the label text you want to replace the word "Subtotal" with when the report is run.
- Operation
Specify how the Financial Report Group should operate in relation to the group specified under the "Use Group" option:
- Add to Group Total
Select if you want the group to be added to the specified group's total. If selected, a "+" will appear next to the group as it appears in the Financial Report.
- Subtract from Group Total
Select if you want the group to be subtracted from the specified group's total. If selected, a "-" will appear next to the group as it appears in the Financial Report.
To the far right of the screen, the following buttons are available:
- CANCEL
Closes the screen without creating a Financial Report Group, returning you to the previous screen.
- SAVE
Creates the Financial Report Group and adds it to the Financial Report.
To add a G/L Account to a Financial Report Group, select the ADD ACCOUNT button. The following screen will appear:
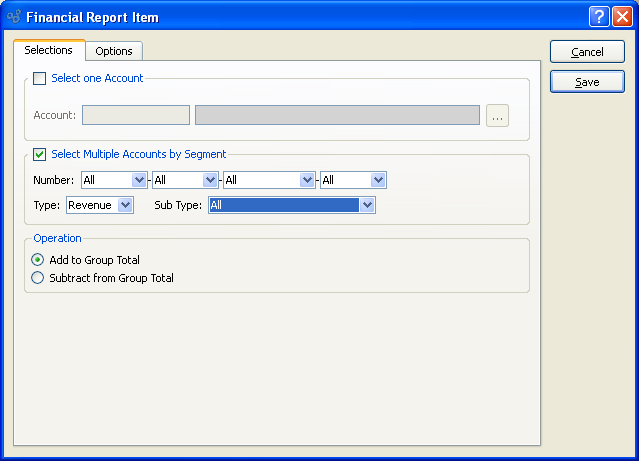
When adding an Account(s) to a Financial Report Group, you are presented with the following options:
- Select One Account
Select when you want to add a single Account to a Financial Report Group.
Account: Select the G/L Account you want to add to the Financial Report Group.
Tip
Adding Accounts by segment or type or sub type reduces the need for maintenance on your Financial Reports. Whenever new Accounts are added or removed, your Financial Reports will automatically use Accounts matching your selection criteria.
- Select Multiple Accounts by Segment
Select when you want to add groups of Accounts to a Financial Report Group.
- Number
Specify the Account Number segment(s) you want to add to the Financial Report Group. All Accounts matching the selected segment(s) will be added to the group.
- Type
Specify the Account Type you want to add to the Financial Report Group. All Accounts matching the selected Account Type will be added to the group.
- Sub Type
Specify the Subaccount Type you want to add to the Financial Report Group. All Accounts matching the selected Subaccount Type will be added to the group.
- Operation
Specify how the Account should operate in relation to the group specified under the "Use Group" option:
- Add to Group Total
Select if you want the Account to be added to the specified group's total. If selected, a "+" will appear next to the group as it appears in the Financial Report.
- Subtract from Group Total
Select if you want the Account to be subtracted from the specified group's total. If selected, a "-" will appear next to the group as it appears in the Financial Report.
To specify additional options for your Financial Report Item, select the "Options" tab. The following screen will appear:
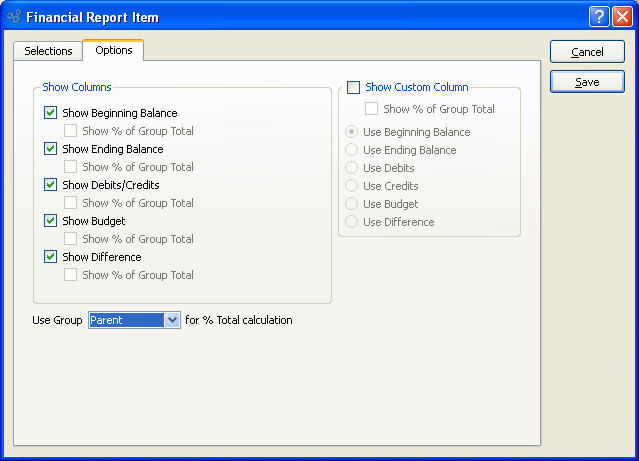
When specifying additional options for your Financial Report Item, you are presented with the following:
- Show Beginning Balance
Select to include the Account's beginning balance when the Financial Report is generated. If selected, you also have the option to show the beginning balance as a percentage of the group total. Not selecting means the Account's beginning balance will not be shown.
- Show Ending Balance
Select to include the Account's ending balance when the Financial Report is generated. If selected, you also have the option to show the ending balance as a percentage of the group total. Not selecting means the Account's ending balance will not be shown.
- Show Debits/Credits
Select to include the Account's Debit/Credit balance when the Financial Report is generated. If selected, you also have the option to show Debits and Credits as a percentage of the group total. Not selecting means the Account's Debit/Credit balance will not be shown.
- Show Budget
Select to include the Account's Budget balance when the Financial Report is generated. If selected, you also have the option to show Budgets as a percentage of the group total. Not selecting means the Account's Budget balance will not be shown.
- Show Difference
Select to include the difference between Debits and Credits for the Account when the Financial Report is generated. If selected, you also have the option to show the difference as a percentage of the group total. Not selecting means the Account's difference balance will not be shown.
- Use Group for % Total calculation
Indicate which group to use if percentage of group total calculations are specified. By default, the system will use the parent group for these calculations. The parent group is understood to be the group within which the Account is immediately located. If you prefer to determine percentage of total calculations using a different group than the parent group. All groups defined for the Financial Report will be available for selection.
- Show Custom Column
Select to enable Account information to be included in a Custom column when the Financial Report is generated.
- Show % of Group Total
Select to show the Custom column information as a percentage of the group total.
- Use Beginning Balance
Select to include the beginning balance for the Account in the Custom column.
- Use Ending Balance
Select to include the ending balance for the Account in the Custom column.
- Use Debits
Select to include the Debit balance for the Account in the Custom column.
- Use Credits
Select to include the Credit balance for the Account in the Custom column.
- Use Budget
Select to include the Budget balance for the Account in the Custom column.
- Use Difference
Select to include the difference between Debits and Credits for the Account in the Custom column.
To the far right of the screen, the following buttons are available:
- CANCEL
Closes the screen without adding an Account to the Financial Report Group, returning you to the previous screen.
- SAVE
Adds the Account to the Financial Report Group.
The Financial Reporting Engine (FRE) supports the addition of a limited number of Special items, which may be used to extend your reporting capabilities. A Special item can function as the child of a Top-Level or other Group. To add a new Special item to a Financial Report, select the ADD SPECIAL button. The following screen will appear:
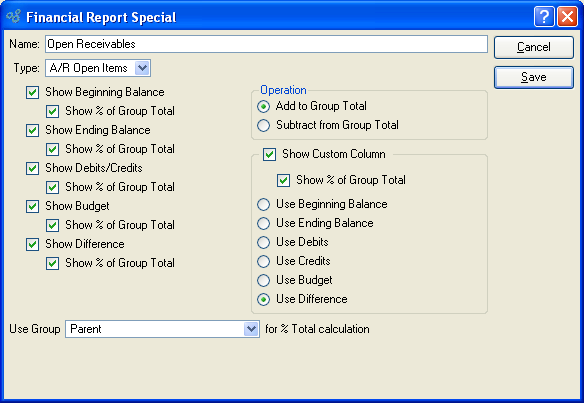
When adding a Special item to a Financial Report, you are presented with the following options:
- Name
Enter a name to identify the Special item.
- Type
Select one of the Special item types from the following options:
- A/R open items
Select to include the A/R open items balance for the specified Accounting Period(s) in the Financial Report.
- A/P open items
Select to include the A/P open items balance for the specified Accounting Period(s) in the Financial Report.
- Show Beginning Balance
Select to include the Special item's beginning balance when the Financial Report is generated. If selected, you also have the option to show the beginning balance as a percentage of the group total. Not selecting means the Special item's beginning balance will not be shown.
- Show Ending Balance
Select to include the Special item's ending balance when the Financial Report is generated. If selected, you also have the option to show the ending balance as a percentage of the group total. Not selecting means the Special item's ending balance will not be shown.
- Show Debit/Credit
Select to include the Special item's Debit/Credit balance when the Financial Report is generated. If selected, you also have the option to show Debits and Credits as a percentage of the group total. Not selecting means the Special item's Debit/Credit balance will not be shown.
- Show Budget
Select to include the Special item's Budget balance when the Financial Report is generated. If selected, you also have the option to show Budgets as a percentage of the group total. Not selecting means the Special item's Budget balance will not be shown.
- Show Difference
Select to include the difference between Debits and Credits for the Special item when the Financial Report is generated. If selected, you also have the option to show the difference as a percentage of the group total. Not selecting means the Account's difference balance will not be shown.
- Use Group for % Total calculation
Indicate which group to use if percentage of group total calculations are specified. By default, the system will use the parent group for these calculations. The parent group is understood to be the group within which the Special item is immediately located. If you prefer to determine percentage of total calculations using a different group than the parent group. All groups defined for the Financial Report will be available for selection.
- Operation
Specify how the Special item should operate in relation to the group specified under the "Use Group" option:
- Add to Group Total
Select if you want the Special item to be added to the specified group's total. If selected, a "+" will appear next to the group as it appears in the Financial Report.
- Subtract from Group Total
Select if you want the Special item to be subtracted from the specified group's total. If selected, a "-" will appear next to the group as it appears in the Financial Report.
- Show Custom Column
Select to enable Special item information to be included in a Custom column when the Financial Report is generated.
- Show % of Group Total
Select to show the Custom column information as a percentage of the group total.
- Use Beginning Balance
Select to include the beginning balance for the Special item in the Custom column.
- Use Ending Balance
Select to include the ending balance for the Special item in the Custom column.
- Use Debits
Select to include the Debit balance for the Special item in the Custom column.
- Use Credits
Select to include the Credit balance for the Special item in the Custom column.
- Use Budget
Select to include the Budget balance for the Special item in the Custom column.
- Use Difference
Select to include the difference between Debits and Credits for the Special item in the Custom column.
To the far right of the screen, the following buttons are available:
- CANCEL
Closes the screen without adding a Special item to the Financial Report Group, returning you to the previous screen.
- SAVE
Adds the Special item to the Financial Report Group.
Note
Because Ad Hoc reports are not required to conform to the three standard statement formats, the "Column Layouts" tab is not available for Ad Hoc reports. Column layouts may only be used by Financial Reports which conform to these standard formats.
To specify additional configuration options for the layout of your Ad Hoc report, select the "Options" tab. The following screen will appear:
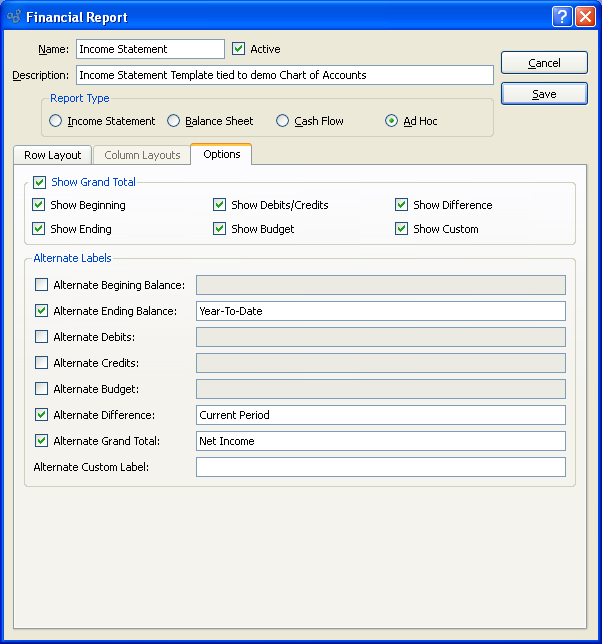
When specifying additional configuration options for the layout of your Ad Hoc report, you are presented with the following options:
- Show Grand Total
Select if you want to include grand totals in the Financial Report. If selected, specify which of the following display options you want to include grand totals for:
- Show Beginning
Will show the grand total for all included beginning balances when the Financial Report is generated.
- Show Ending
Will show the grand total for all included ending balances when the Financial Report is generated.
- Show Debits/Credits
Will show the grand total for all included Debit/Credit balances when the Financial Report is generated.
- Show Budget
Will show the grand total for all included Budget balances when the Financial Report is generated.
- Show Difference
Will show the grand total for all included difference balances when the Financial Report is generated.
- Show Custom
Will show the grand total for all included Custom balances when the Financial Report is generated.
- Alternate Labels
You have the option to substitute alternate text for the following column headers or row labels when viewing or printing your Financial Report:
- Alternate Beginning Balance
Specify an alternate label to use as the header text for the beginning balance column. If not specified, the default text will be used.
- Alternate Ending Balance
Specify an alternate label to use as the header text for the ending balance column. If not specified, the default text will be used.
- Alternate Debits
Specify an alternate label to use as the header text for the Debits column. If not specified, the default text will be used.
- Alternate Credits
Specify an alternate label to use as the header text for the Credits column. If not specified, the default text will be used.
- Alternate Budget
Specify an alternate label to use as the header text for the Budget column. If not specified, the default text will be used.
- Alternate Difference
Specify an alternate label to use as the header text for the difference column. If not specified, the default text will be used.
- Alternate Grand Total
Specify an alternate label to use as the text for the Grand Total row. If not specified, the default text will be used.
- Alternate Custom Label
Specify an alternate label to use as the header text for the custom column. If not specified, the default text will be used.
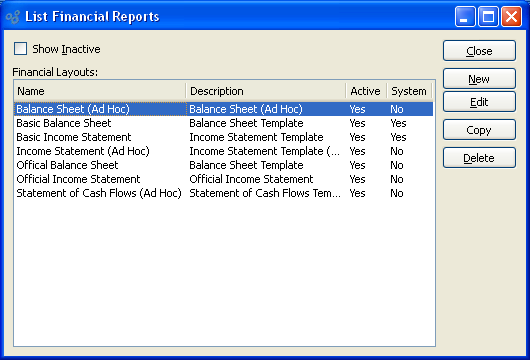
To access the master list of Financial Reports, select the "Financial Reports" option. The following screen will appear:
Note
The system ships with two system-defined Financial Report templates: a basic Income Statement and a basic Balance Sheet.
The "Financial Reports" screen displays information on all existing Financial Reports, including Financial Report name, description, status, and system-defined indicator.
To the far right of the screen, the following buttons are available:
- CLOSE
Closes the screen, returning you to the application desktop.
- NEW
Opens screen for creating a new Financial Report.
- EDIT
Enables you to edit highlighted Financial Report. The edit screen is the same as that for creating a new Financial Report—except that when editing, the fields will contain Financial Report information. Double-clicking on a Financial Report will also bring you to the editing screen.
- COPY
Highlight a Financial Report and then select this button to reach a screen for copying the Financial Report's definition.
- DELETE
Highlight a Financial Report and then select this button to remove the Financial Report from the list.
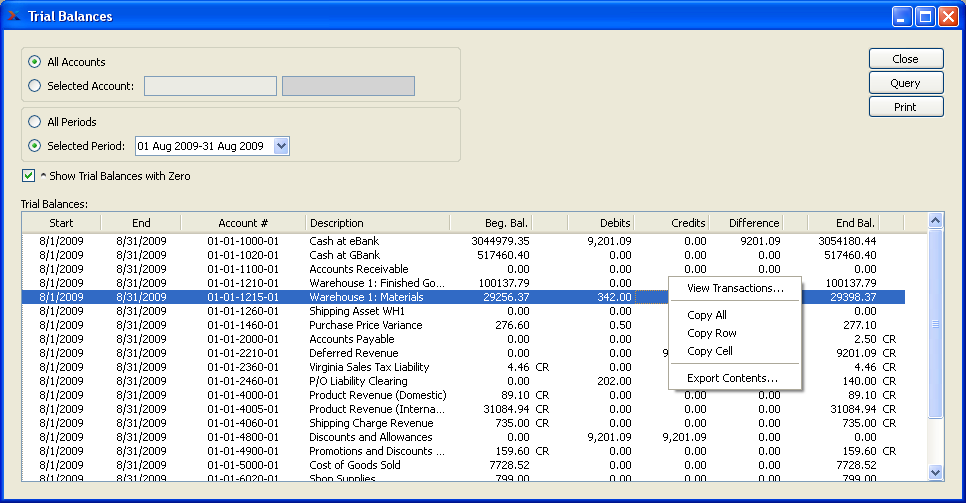
To view the Trial Balances for General Ledger Accounts, select the "View Trial Balances" option. The following screen will appear:
Tip
The system will automatically reset the beginning balances for Revenue and Expense Accounts to $0 at the start of a new Fiscal Year.
When viewing Trial Balances, you are presented with the following options:
- All Accounts
Select to display Trial Balances from all G/L Accounts.
- Selected Account
Specify G/L Account whose Trial Balance you want to display.
Note
When viewing Trial Balances for the Year-End Equity Account, the beginning balance for the first Period of the Fiscal Year will be equal to the ending balance for the previous year. In addition, the Credit and Debit columns will summarize the revenue and expense account activity for the previous year, and the ending balance will be the actual year-end equity value for the just-closed Fiscal Year.
- All Periods
Select to display Trial Balances for all Accounting Periods.
- Selected Period
Specify Accounting Period whose Trial Balances you want to display.
- Show Trial Balances with Zero
Select to display Trial Balances with a zero balance for the specified Period(s). If not selected, zero-balance Trial Balances will be hidden.
- Trial Balances
Display lists Trial Balances based on the specified parameters. A "CR" may display after the following columns: Beg. Bal., Difference, and End. Bal. The "CR" indicates the balance is a Credit balance. If no "CR" appears, then the balance is a Debit balance. Ending balances will display in orange type if either of the following conditions is true: 1) The ending balance has not been forward-updated, or 2) the ending balance has been forward-updated, but the account in question has no activity during the specified Period.
Note
Trial Balances will be automatically forward-updated unless your system is configured to manually forward-update Trial Balances. For more information see Section 12.8, “Configure Accounting”. Ending balances cannot be forward-updated into future Periods.
To the far right of the screen, the following buttons are available:
- CLOSE
Closes the screen, returning you to the application desktop.
- QUERY
Select to generate the display, using the specified parameters.
Runs the report associated with this screen.
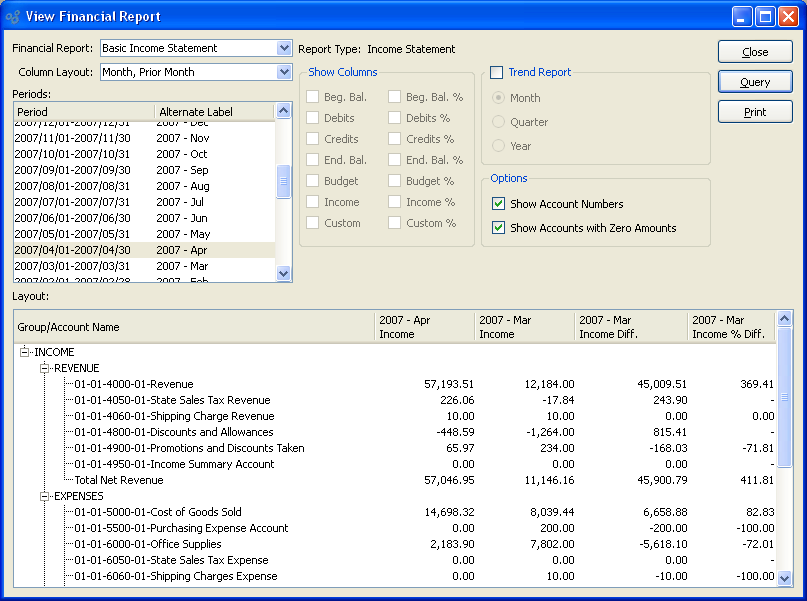
Once a Financial Report has been created using the Financial Reporting Engine, you may then generate it using time-phased information. To view a Financial Report, select the "View Financial Report" option. The following screen will appear:
When viewing a Financial Report, you are presented with the following options:
- Financial Report
Specify the Financial Report you want to generate.
The list will include both system-defined Financial Reports (e.g., basic Income Statement and basic Balance Sheet) and also any other reports you may have created.
- Report Type
Displays the report type for the Financial Report you select: Balance Sheet, Income Statement, Cash Flow, or Ad Hoc.
Note
The options available on the screen will vary, depending on the report type selected. For example, column layouts are not available for Ad Hoc reports.
- Column Layout
Select the column layout you want the Financial Report to use. This feature may not be used in conjunction with the "Trend Report" option.
When defining a Financial Report using one of the standard report types (i.e., Balance Sheet, Income Statement, or Cash Flow), you must define a column layout to specify the time buckets financial information will be sorted into. A standard Financial Report may have any number of column layouts defined for it. Each layout will be linked to either a pre-defined report definition or a custom report definition you create yourself. This option will be disabled for Ad Hoc reports, which do not use column layouts.
- Periods
Specify the Accounting Period(s) whose details you want to display.
For Financial Reports created using one of the standard report types (i.e., Balance Sheet, Income Statement, or Cash Flow), you can only select a single Accounting Period—unless you are running a Trend Report, in which case multiple Periods may be chosen. Ad Hoc reports may always use either single or multiple Periods. To select an individual Period, highlight the Period using your mouse button. The Period is now selected. To select a sequence of Periods, highlight the first in the sequence using your mouse button. Then, holding down the SHIFT key on your keyboard, highlight the last Period in the sequence. The entire sequence is now selected. To select Periods that are out of sequence (e.g., January, April, July, October), highlight the first Period in the group. Then, holding down the CTRL key on your keyboard, highlight the next Period you want to select. Continue highlighting Periods with the CTRL key depressed until all desired Periods are selected. The entire group is now selected.
Tip
You can export the generated financial data in tab-delimited format using the "Export Contents" option from the right-click menu.
- Show Columns
For Ad Hoc reports (which do not use column layouts), specify the columns of information you want to include in the Financial Report. To be successful, these selections must also match the Ad Hoc report layout. If a column is not selected, it will not be included in the report. This option will be disabled for non-Ad Hoc reports, whose column choices are defined by column layouts.
- Beg. Bal
Select to include a beginning balance column in the report. An alternate label may also be used to identify this field.
- Beg. Bal. %
Select to include a beginning balance percentage column in the report. An alternate label may also be used to identify this field.
- Debits
Select to include a Debits column in the report. An alternate label may also be used to identify this field.
- Debits %
Select to include a Debits percentage column in the report. An alternate label may also be used to identify this field.
- Credits
Select to include a Credits column in the report. An alternate label may also be used to identify this field.
- Credits %
Select to include a Credits percentage column in the report. An alternate label may also be used to identify this field.
- End. Bal.
Select to include an ending balance column in the report. An alternate label may also be used to identify this field.
- End. Bal. %
Select to include an ending balance percentage column in the report. An alternate label may also be used to identify this field.
- Budget
Select to include a Budget column in the report. An alternate label may also be used to identify this field.
- Budget %
Select to include a Budget percentage column in the report. An alternate label may also be used to identify this field.
- Difference
Select to include a column showing the difference between Debits and Credits in the report. An alternate label may also be used to identify this field.
- Difference %
Select to include a difference percentage column in the report. An alternate label may also be used to identify this field.
- Custom
Select to include a Custom column in the report. An alternate label may also be used to identify this field.
- Custom %
Select to include a Custom column percentage column in the report. An alternate label may also be used to identify this field.
- Trend Report
Select to generate a Financial Report which groups information across multiple time periods. This option may be used regardless of report type—and if used for one of the standard report types (i.e., Balance Sheet, Income Statement, or Cash Flow), the column layout option will be disabled. If selected, the following options will be available:
- Month
If selected, you may group together any number of Accounting Periods to include in your report. Use your mouse and a combination of the SHIFT and CTRL keys to select multiple Periods.
- Quarter
If selected, you may group together any number of Quarters to include in your report. Use your mouse and a combination of the SHIFT and CTRL keys to select multiple Quarters.
- Year
If selected, you may group together any number of Fiscal Years to include in your report. Use your mouse and a combination of the SHIFT and CTRL keys to select multiple Fiscal Years.
Tip
There is no relationship between the selected Periods in a column layout and the Trend Report options available when viewing a Financial Report. Trend Reporting ignores column layouts.
- Options
You may optionally select one or both of the following options:
- Show Account Numbers
Select to include Account Numbers for each row in the Group/Account Name column. If not selected, only Account descriptions will be shown.
- Show Accounts with Zero Amounts
Select to include Accounts with zero amounts for each row in the Group/Account Name column. If not selected, only Accounts with non-zero amounts will be shown.
- Layout
Display lists Financial Report details for the selected Financial Report, using the specified parameters. This display is a nested list, with a plus ("+") sign located to the far left of the display next to each Financial Report Group that may be expanded to lower levels. By clicking your mouse on a plus sign, you reveal lower levels of information related to the group.
To the far right of the screen, the following buttons are available: